CloudFormationカスタムリソースを使って、Auroraカスタムエンドポイントを作成する
AWS SAAの出題範囲の1つである、高性能なアーキテクチャの設計に関する内容です。
以下のページで、Auroraクラスターのリードレプリカとエンドポイントに関して取り上げました。
Auroraにはデフォルトのエンドポイントに加えて、カスタムエンドポイントを作成する機能があります。
Aurora クラスターのカスタムエンドポイントは、選択した DB インスタンスのセットを表します。カスタムエンドポイントに接続すると、Aurora は負荷分散を行い、グループ内のいずれかのインスタンスを選択して接続を処理します。ユーザーは、このエンドポイントで参照するインスタンスを定義し、エンドポイントの用途を決めます。
Amazon Aurora 接続管理
今回は2つのカスタムエンドポイントを作成します。
2つのエンドポイントは、特定の用途に応じたリードレプリカに接続するために使用することを意図しています。
カスタムエンドポイントの作成は、CloudFormationカスタムリソースを使用して実施します。
構築する環境
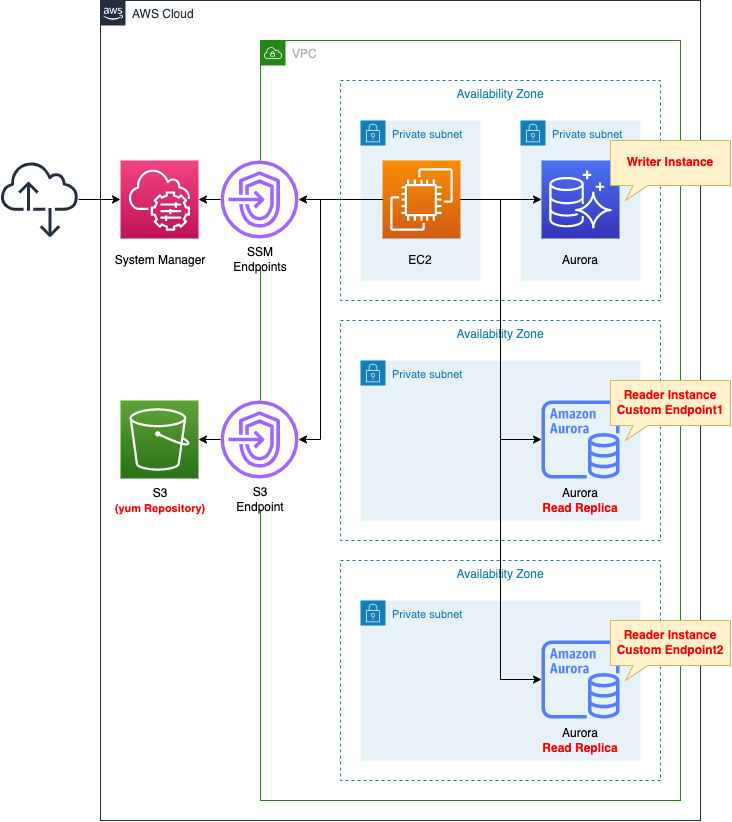
AuroraクラスターをAZが異なる3つのプライベートサブネットにまたがるように配置します。
クラスター内に3つのDBインスタンスを作成します。
1つはプライマリサーバ、残りの2つはリードレプリカとして動作します。
AuroraクラスターはMySQLタイプとします。
プライベートサブネットに、EC2インスタンスを配置します。
このEC2インスタンスはAuroraクラスターへアクセスするクライアントとして使用します。
EC2インスタンスは最新版のAmazon Linux2のAMIをベースとします。
S3用VPCエンドポイントを作成します。
Auroraクラスターに接続するためのクライアントを、EC2インスタンスにインストールするためです。
SSM用VPCエンドポイントを作成します。
EC2インスタンスにSSM Session Manager経由でアクセスするためです。
CloudFormationテンプレートファイル
上記の構成をCloudFormationで構築します。
以下のURLにCloudFormationテンプレートを配置しています。
https://github.com/awstut-an-r/awstut-saa/tree/main/02/008
テンプレートファイルのポイント解説
本ページでは、CloudFormationカスタムリソースを利用して、Auroraのカスタムエンドポイントを作成する方法を中心に取り上げます。
CloudFormationカスタムリソースに関する基本的な事項については、以下のページをご確認ください。
Aurora
Resources:
  DBCluster:
    Type: AWS::RDS::DBCluster
    Properties:
      DatabaseName: !Ref DBName
      DBClusterIdentifier: !Sub "${Prefix}-dbcluster"
      DBSubnetGroupName: !Ref DBSubnetGroup
      Engine: !Ref DBEngine
      EngineVersion: !Ref DBEngineVersion
      MasterUsername: !Ref DBUser # cannot use "-".
      MasterUserPassword: !Ref DBPassword # cannot use "/@'"
      StorageEncrypted: true
      VpcSecurityGroupIds:
        - !Ref DBSecurityGroup

  DBSubnetGroup:
    Type: AWS::RDS::DBSubnetGroup
    Properties:
      DBSubnetGroupName: !Sub "${Prefix}-dbsubnetgroup" # must be lowercase alphanumeric characters or hyphens.
      DBSubnetGroupDescription: Test DBSubnetGroup for Aurora.
      SubnetIds:
        - !Ref DBSubnet1
        - !Ref DBSubnet2
        - !Ref DBSubnet3

  DBInstance1:
    Type: AWS::RDS::DBInstance
    Properties:
      DBClusterIdentifier: !Ref DBCluster
      DBSubnetGroupName: !Ref DBSubnetGroup
      DBInstanceIdentifier: !Sub "${Prefix}-dbinstance1"
      DBInstanceClass: !Ref DBInstanceClass
      Engine: !Ref DBEngine
      AvailabilityZone: !Sub "${AWS::Region}${AvailabilityZone1}"
      PubliclyAccessible: false

  DBInstance2:
    Type: AWS::RDS::DBInstance
    Properties:
      DBClusterIdentifier: !Ref DBCluster
      DBSubnetGroupName: !Ref DBSubnetGroup
      DBInstanceIdentifier: !Sub "${Prefix}-dbinstance2"
      DBInstanceClass: !Ref DBInstanceClass
      Engine: !Ref DBEngine
      AvailabilityZone: !Sub "${AWS::Region}${AvailabilityZone2}"
      PubliclyAccessible: false

  DBInstance3:
    Type: AWS::RDS::DBInstance
    Properties:
      DBClusterIdentifier: !Ref DBCluster
      DBSubnetGroupName: !Ref DBSubnetGroup
      DBInstanceIdentifier: !Sub "${Prefix}-dbinstance3"
      DBInstanceClass: !Ref DBInstanceClass
      Engine: !Ref DBEngine
      AvailabilityZone: !Sub "${AWS::Region}${AvailabilityZone3}"
      PubliclyAccessible: false
Code language: YAML (yaml)
Auroraクラスターを作成します。
クラスター内に3つのDBインスタンスを作成します。
カスタムエンドポイントを作成する上では、特別な設定は不要です。
CloudFormationカスタムリソース
カスタムリソース
Resources:
  CustomResource:
    Type: Custom::CustomResource
    Properties:
      ServiceToken: !GetAtt Function.Arn
Code language: YAML (yaml)
ServiceTokenプロパティにバックエンドで動作するリソースのARNを設定します。
今回は後述のLambda関数が動作しますので、この関数のARNを設定します。
Lambda関数
Resources:
  Function:
    Type: AWS::Lambda::Function
    Properties:
      Code:
        ZipFile: |
          import boto3
          import cfnresponse
          import os

          db_cluster_identifier = os.environ['DB_CLUSTER_IDENTIFIER']
          db_cluster_custom_endpoint1 = os.environ['DB_CLUSTER_CUSTOM_ENDPOINT1']
          db_cluster_custom_endpoint2 = os.environ['DB_CLUSTER_CUSTOM_ENDPOINT2']
          custom_endpoints = [
            db_cluster_custom_endpoint1,
            db_cluster_custom_endpoint2
            ]

          client = boto3.client('rds')

          CREATE = 'Create'
          response_data = {}

          def lambda_handler(event, context):
            try:
              if event['RequestType'] == CREATE:
                response = client.describe_db_clusters(
                  DBClusterIdentifier=db_cluster_identifier
                  )
                read_replica_instances = [member for member in response['DBClusters'][0]['DBClusterMembers'] if member['IsClusterWriter'] == False]
                for (endpoint_name, read_replica_instance) in zip(custom_endpoints, read_replica_instances):
                  instance_name = read_replica_instance['DBInstanceIdentifier']
                  create_response = client.create_db_cluster_endpoint(
                    DBClusterIdentifier=db_cluster_identifier,
                    DBClusterEndpointIdentifier=endpoint_name,
                    EndpointType='READER',
                    StaticMembers=[instance_name])
                  print(create_response)
                  response_data[endpoint_name] = create_response['Endpoint']

              cfnresponse.send(event, context, cfnresponse.SUCCESS, response_data)

            except Exception as e:
              print(e)
              cfnresponse.send(event, context, cfnresponse.FAILED, response_data)
      Environment:
        Variables:
          DB_CLUSTER_CUSTOM_ENDPOINT1: !Ref DBClusterCustomEndpoint1
          DB_CLUSTER_CUSTOM_ENDPOINT2: !Ref DBClusterCustomEndpoint2
          DB_CLUSTER_IDENTIFIER: !Ref DBClusterIdentifier
      FunctionName: !Sub "${Prefix}-function"
      Handler: !Ref Handler
      Runtime: !Ref Runtime
      Role: !GetAtt FunctionRole.Arn
Code language: YAML (yaml)
関数そのものの設定に特別な項目はありません。
1つ挙げるとすると、環境変数がポイントです。
環境変数としてカスタムエンドポイント名やAuroraクラスター名を関数に渡します。
event[‘RequestType’]の値を参照して、スタック操作に応じた処理を実装します。
今回はこの値が「Create」の時、つまりスタック作成時に処理を実行します。
describe_db_clustersメソッドを実行し、Auroraクラスターの詳細を取得します。
取得した情報の中で、クラスターのメンバーであるDBインスタンスに関するデータを確認し、リードレプリカであるインスタンスのみを抽出します。
それらを対象としてカスタムエンドポイントを作成します。
具体的には、create_db_cluster_endpointメソッドを実行します。
cfnresponse.sendを使って、関数の実行完了メッセージをCloudFormationスタックに返す際に、作成したカスタムエンドポイントの名前をリスト型で渡します。
これでCloudFormationテンプレートから、この2アドレスにアクセスすることができるようになります。
IAMロール
Resources:
  FunctionRole:
    Type: AWS::IAM::Role
    Properties:
      AssumeRolePolicyDocument:
        Version: 2012-10-17
        Statement:
          - Effect: Allow
            Action: sts:AssumeRole
            Principal:
              Service:
                - lambda.amazonaws.com
      ManagedPolicyArns:
        - arn:aws:iam::aws:policy/service-role/AWSLambdaBasicExecutionRole
      Policies:
        - PolicyName: !Sub "${Prefix}-CreateAuroraCustomEndpointPolicy"
          PolicyDocument:
            Version: 2012-10-17
            Statement:
              - Effect: Allow
                Action:
                  - rds:CreateDBClusterEndpoint
                  - rds:DescribeDBClusters
                Resource:
                  - !Sub "arn:aws:rds:${AWS::Region}:${AWS::AccountId}:cluster:${DBClusterIdentifier}"
                  - !Sub "arn:aws:rds:${AWS::Region}:${AWS::AccountId}:cluster-endpoint:*"
Code language: YAML (yaml)
Lambda関数はAuroraクラスターの情報にアクセスし、カスタムエンドポイントを作成しますので、「rds:DescribeDBClusters」「rds:CreateDBClusterEndpoint」アクションを許可します。
Outputsセクション
Outputs:
  DBClusterCustomEndpoint1:
    Value: !GetAtt
      - CustomResource
      - !Ref DBClusterCustomEndpoint1

  DBClusterCustomEndpoint2:
    Value: !GetAtt
      - CustomResource
      - !Ref DBClusterCustomEndpoint2
Code language: YAML (yaml)
CloudFormationカスタムリソースによって作成されたカスタムエンドポイント情報を取得します。
組み込み関数Fn::GetAttおよびFn::Refを組み合わせて、カスタムリソースからカスタムエンドポイント情報を取得します。
環境構築
CloudFormationを使用して、本環境を構築し、実際の挙動を確認します。
CloudFormationスタックを作成し、スタック内のリソースを確認する
CloudFormationスタックを作成します。
スタックの作成および各スタックの確認方法については、以下のページをご確認ください。
各スタックのリソースを確認した結果、今回作成された主要リソースの情報は以下の通りです。
- Auroraクラスター:saa-02-008-dbcluster
- EC2インスタンス:i-014c001efcf83db1e
AWS Management Consoleからもリソースの作成状況を確認します。
Auroraクラスターを確認します。
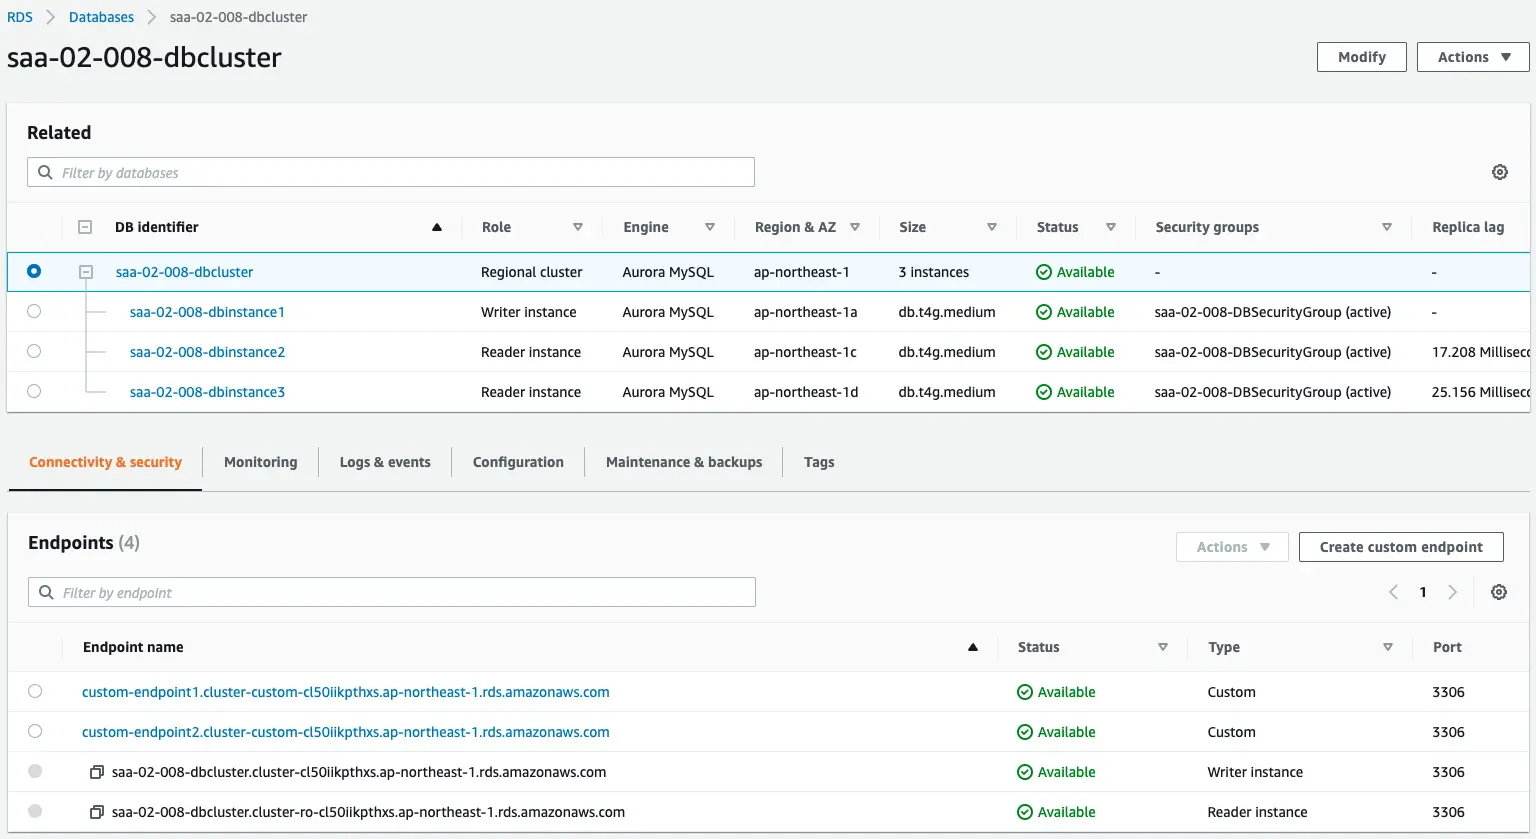
クラスターが作成され、内部に3つのDBインスタンスが存在していることがわかります。
Endpointsの項目を見ると、2つのカスタムエンドポイントが作成されていることがわかります。
それぞれの詳細を確認します。


確認した情報を以下にまとめます。
| Endpoint Name | DB Instance | Role |
| custom-endpoint1.cluster-custom-cl50iikpthxs.ap-northeast-1.rds.amazonaws.com | saa-02-008-dbinstance3 | Reader |
| custom-endpoint2.cluster-custom-cl50iikpthxs.ap-northeast-1.rds.amazonaws.com | saa-02-008-dbinstance2 | Reader |
CloudFormationカスタムリソースであるLambda関数の実行結果を確認します。
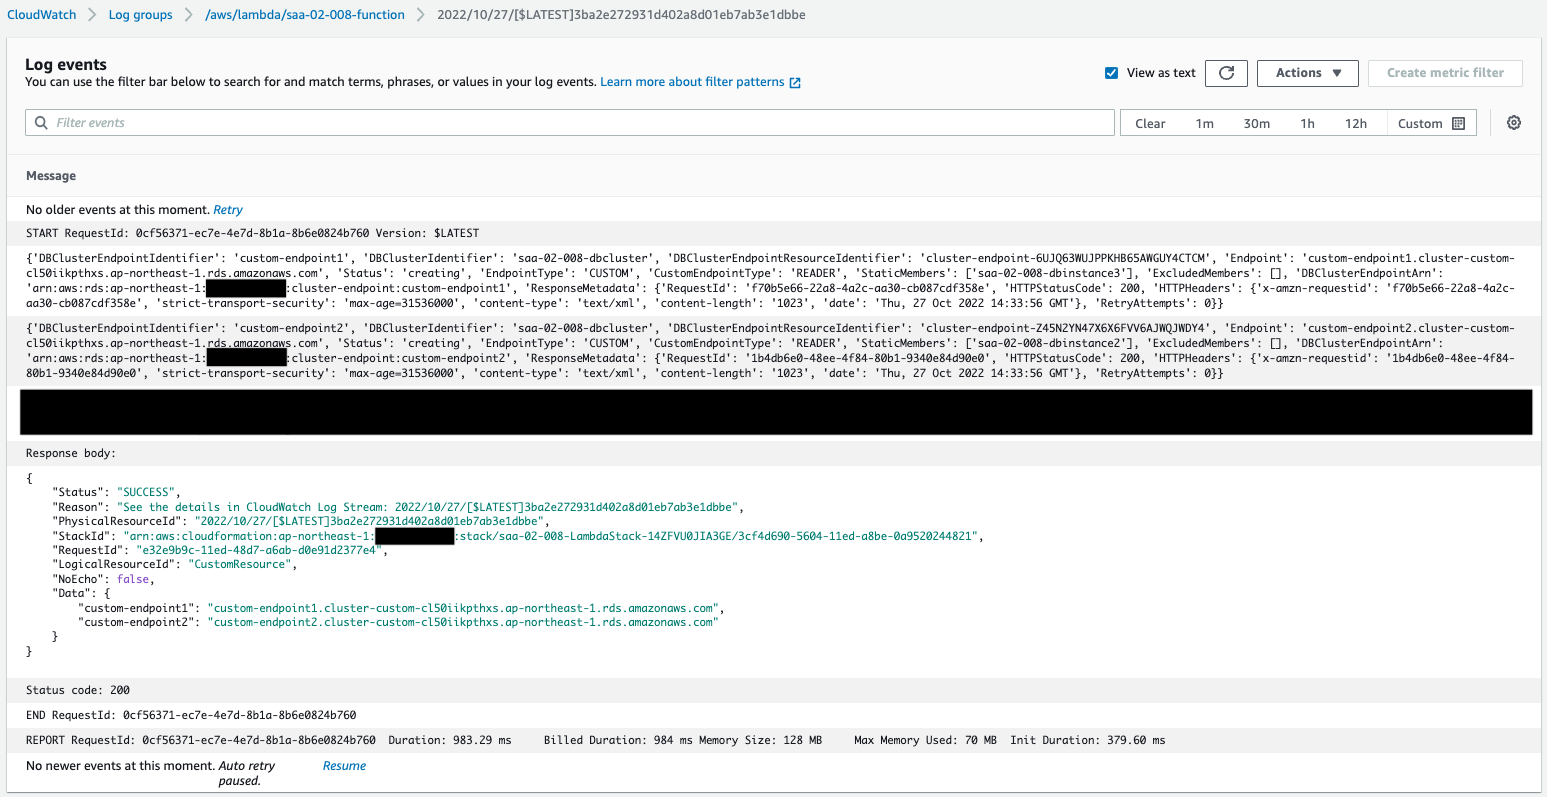
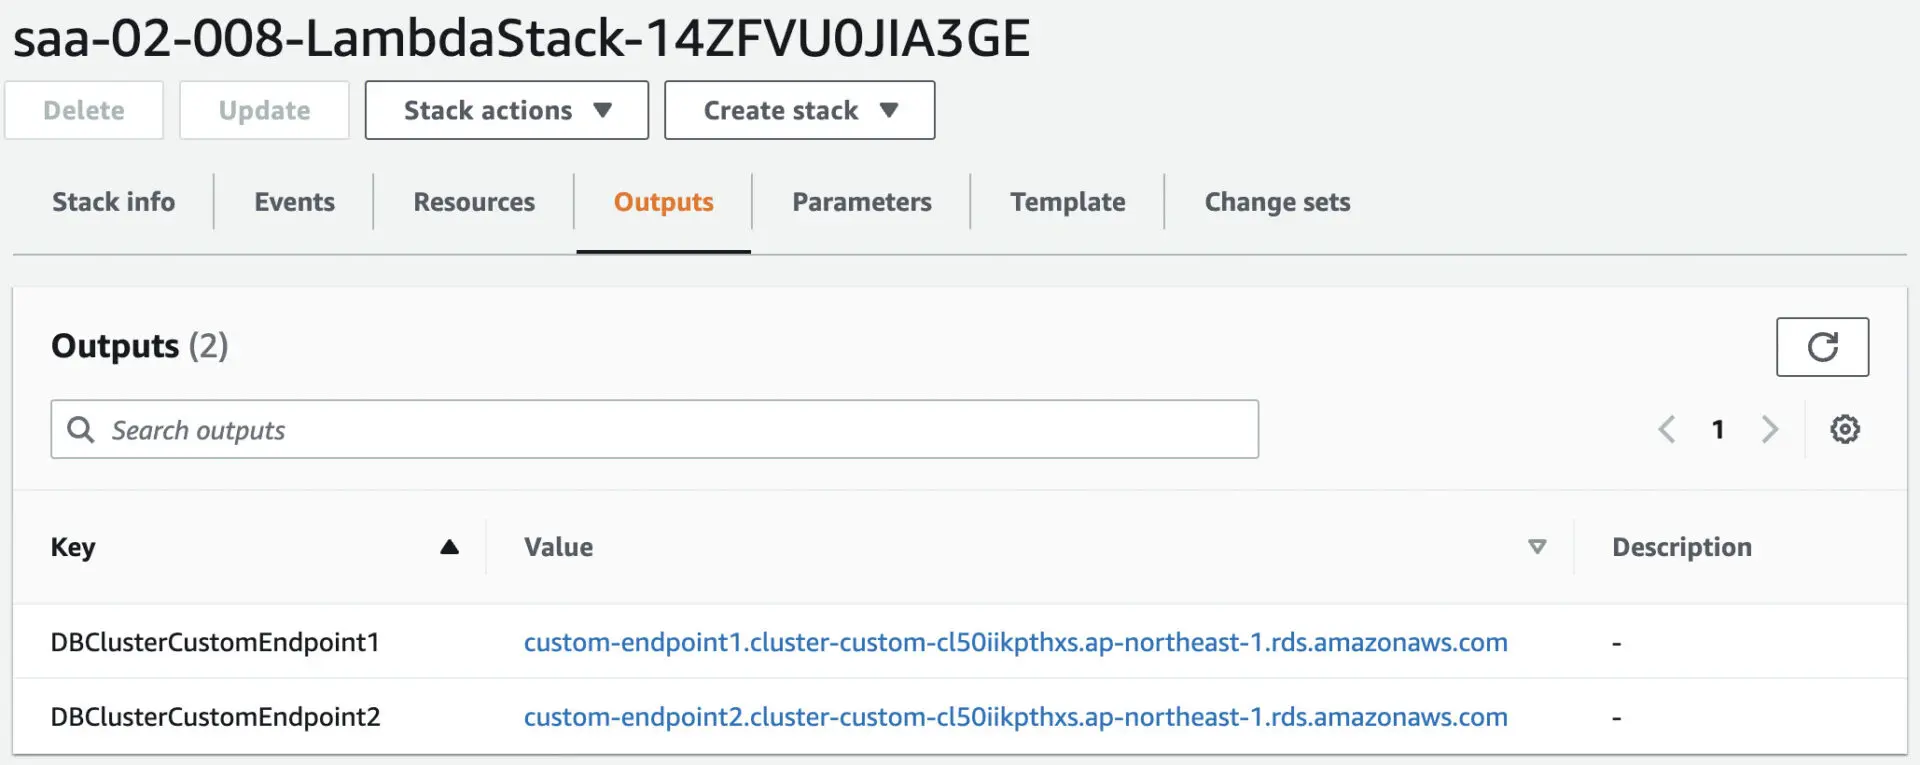
確かにLambda関数が自動的に実行され、先ほど確認したカスタムエンドポイントが作成されたことがわかります。
動作確認
準備が整いましたので、EC2インスタンスにアクセスします。
インスタンスへのアクセスはSSM Session Managerを使用します。
% aws ssm start-session --target i-014c001efcf83db1e
...
sh-4.2$
Code language: Bash (bash)
SSM Session Managerの詳細につきましては、以下のページをご確認ください。
Auroraにアクセスするためのクライアントパッケージ(MariaDB)がインストールされていることを確認します。
sh-4.2$ sudo yum list installed | grep maria
mariadb.aarch64                       1:5.5.68-1.amzn2               @amzn2-core
mariadb-libs.aarch64                  1:5.5.68-1.amzn2               installed

sh-4.2$ mysql -V
mysql  Ver 15.1 Distrib 5.5.68-MariaDB, for Linux (aarch64) using readline 5.1
Code language: Bash (bash)
確かにパッケージがインストールしました。
nslookupコマンドでカスタムエンドポイントの名前解決状況を確認します。
sh-4.2$ nslookup custom-endpoint1.cluster-custom-cl50iikpthxs.ap-northeast-1.rds.amazonaws.com
Server:		10.0.0.2
Address:	10.0.0.2#53

Non-authoritative answer:
custom-endpoint1.cluster-custom-cl50iikpthxs.ap-northeast-1.rds.amazonaws.com	canonical name = saa-02-008-dbinstance3.cl50iikpthxs.ap-northeast-1.rds.amazonaws.com.
Name:	saa-02-008-dbinstance3.cl50iikpthxs.ap-northeast-1.rds.amazonaws.com
Address: 10.0.4.161
Code language: Bash (bash)
sh-4.2$ nslookup custom-endpoint2.cluster-custom-cl50iikpthxs.ap-northeast-1.rds.amazonaws.com
Server: 10.0.0.2
Address: 10.0.0.2#53
Non-authoritative answer:
custom-endpoint2.cluster-custom-cl50iikpthxs.ap-northeast-1.rds.amazonaws.com canonical name = saa-02-008-dbinstance2.cl50iikpthxs.ap-northeast-1.rds.amazonaws.com.
Name: saa-02-008-dbinstance2.cl50iikpthxs.ap-northeast-1.rds.amazonaws.com
Address: 10.0.3.221
Code language: Bash (bash)AWS Management Consoleで確認した通り、各カスタムエンドポイントにDBインスタンスが紐づけられていることがわかります。
カスタムエンドポイントに接続を試みます。
sh-4.2$ mysql -h custom-endpoint1.cluster-custom-cl50iikpthxs.ap-northeast-1.rds.amazonaws.com -P 3306 -u testuser -p testdb
Enter password:
Welcome to the MariaDB monitor.  Commands end with ; or \g.
Your MySQL connection id is 20
Server version: 8.0.23 Source distribution

Copyright (c) 2000, 2018, Oracle, MariaDB Corporation Ab and others.

Type 'help;' or '\h' for help. Type '\c' to clear the current input statement.

MySQL [testdb]>

MySQL [testdb]> create table testtable (datetime datetime);
ERROR 1836 (HY000): Running in read-only modeCode language: JavaScript (javascript)
sh-4.2$ mysql -h custom-endpoint2.cluster-custom-cl50iikpthxs.ap-northeast-1.rds.amazonaws.com -P 3306 -u testuser -p testdb
Enter password:
Welcome to the MariaDB monitor. Commands end with ; or \g.
Your MySQL connection id is 20
Server version: 8.0.23 Source distribution
Copyright (c) 2000, 2018, Oracle, MariaDB Corporation Ab and others.
Type 'help;' or '\h' for help. Type '\c' to clear the current input statement.
MySQL [testdb]>
MySQL [testdb]> create table testtable (datetime datetime);
ERROR 1836 (HY000): Running in read-only mode
Code language: Bash (bash)両エンドポイントとも正常に接続することができました。
ロールがReaderですから、書き込みを実行しようとするとエラーが発生しました。
まとめ
CloudFormationカスタムリソースを使用して、Auroraカスタムエンドポイントを作成する方法を確認しました。