CloudFormationを使用して、EC2 Image Builder入門
本ページではEC2 Image Builderを取り上げます。
Image Builder は、シンプルなグラフィカルインターフェイス、組み込みの自動化、および AWS が提供するセキュリティ設定により、イメージを最新でセキュアなものにするための労力を大幅に軽減します。Image Builder を使えば、イメージをアップデートするためのステップを手動で実施したり、独自の自動化パイプラインを構築したりする必要はなくなります。
EC2 Image Builder
今回はImage Builder入門ということで、Apacheをインストール・有効化したAMIを作成します。
そしてこのAMIを使用して、自動的にEC2インスタンスを作成します。
構築する環境
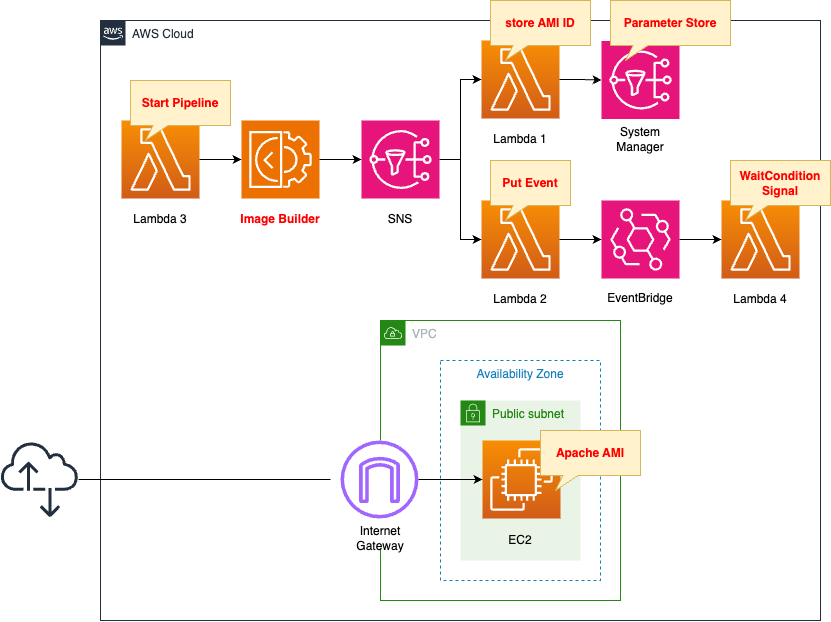
Image Builderを使用して、Linux用のAMIを作成します。
このAMIはApacheをインストール・有効化したものです。
このAMIを使用して、EC2インスタンスを作成します。
インスタンスのOSはAmazon Linux 2とします。
このインスタンスはパブリックサブネットに配置し、パブリックアドレスをアタッチします。
本ページでは、自動的にImage Builderパイプラインを実行し、それを受けて、自動的にEC2インスタンスを構築することを目指します。
そのために、いくつかLambda関数を使用します。
1つ目の関数の働きは、SSM Parameter Storeに作成されたAMIのIDを登録することです。
2つ目の関数の働きは、EventBridge用のカスタムイベントを作成することです。
この2つの関数は、Image Builderパイプラインが正常に完了した際に、SNSを通じて実行されます。
3つ目の関数の働きは、Image Builderパイプラインを開始することです。
この関数はCloudFormationカスタムリソースに関連づけて、CloudFormationスタック作成時に自動的に実行されます。
4つ目の関数の働きは、CloudFormation WaitConditionへ成功シグナルを発信することです。
この関数はEventBridgeルールに関連づけて、関数2によってイベントが作成されたことをトリガーとして実行されます。
なお全関数のランタイム環境はPython3.8です。
CloudFormationテンプレートファイル
上記の構成をCloudFormationで構築します。
以下のURLにCloudFormationテンプレートを配置しています。
https://github.com/awstut-an-r/awstut-fa/tree/main/145
テンプレートファイルのポイント解説
Image Builder
Image Builderを構築する上で、以下の5つのリソースを作成する必要があります。
- コンポーネント
- レシピ
- インフラストラクチャ設定およびIAMロール
- ディストリビューション設定
- パイプライン
コンポーネント
AWS公式では、コンポーネントを以下の通りに説明しています。
Image Builder uses the AWS Task Orchestrator and Executor (AWSTOE) component management application to orchestrate complex workflows. Build and test components that work with the AWSTOE application are based on YAML documents that define the scripts to customize or test your image.
Manage components with Image Builder
つまりコンポーネントとは、AMIビルド時にインストールするパッケージや、テスト内容を定義するものです。
Resources:
  Component:
    Type: AWS::ImageBuilder::Component
    Properties:
      Data: |
        schemaVersion: 1.0
        phases:
          - name: build
            steps:
              - name: InstallAndEnableApache
                action: ExecuteBash
                inputs:
                  commands:
                    - yum update -y
                    - yum install -y httpd
                    - systemctl start httpd
                    - systemctl enable httpd
                    - ec2-metadata -i > /var/www/html/index.html
      Name: !Sub "${Prefix}-Component"
      Platform: !Ref ImageBuilderPlatform
      SupportedOsVersions:
        - !Ref ImageBuilderSupportedOsVersion
      Version: !Ref ImageBuilderVersion
Code language: YAML (yaml)
コンポーネントに関する詳細は以下のページをご確認ください。
https://docs.aws.amazon.com/imagebuilder/latest/userguide/manage-components.html
本ページでは、ポイントのみ取り上げます。
Dataプロパティでコンポーネント用のYAMLドキュメントを設定できます。
今回はactionにExecuteBashを指定することで、Bashコマンドを実行するように指定します。
inputs内にApacheのインストール・有効化用のコマンドを指定します。
AMIビルド用のEC2インスタンスのIDをindex.htmlに書き込み、ルートディレクトリに配置します。
PlatformプロパティはコンポーネントのOSを設定します。
今回は「Linux」を指定します。
SupportedOsVersionsプロパティで、このコンポーネントがサポートするOSやバージョンを指定します。
今回は「Amazon Linux 2」を指定します。
Versionはこのコンポーネントのバージョンを指定します。
今回は「1.0.0」とします。
レシピ
AWS公式では、イメージレシピを以下の通りに説明しています。
An EC2 Image Builder recipe defines the base image to use as your starting point to create a new image, along with the set of components that you add to customize your image and verify that everything works as expected.
Manage recipes
つまりレシピとは、AMIのベースとなるイメージや適用するコンポーネントを指定するものです。
Resources:
  ImageRecipe:
    Type: AWS::ImageBuilder::ImageRecipe
    Properties:
      Components:
        - ComponentArn: !Ref Component
      Name: !Sub "${Prefix}-ImageRecipe"
      ParentImage: !Ref ImageBuilderParentImage
      Version: !Ref ImageBuilderVersion
Code language: YAML (yaml)
Componentsプロパティに、レシピに適用するコンポーネントを設定します。
こちらに先ほど確認したコンポーネントを指定します。
ParentImageプロパティで、ベースとなるAMIを設定します。
今回はARM版のAmazon Linux 2のAMI(arn:aws:imagebuilder:ap-northeast-1:aws:image/amazon-linux-2-arm64/x.x.x)を指定します。
Versionはこのレシピのバージョンを指定します。
今回は「1.0.0」とします。
インフラストラクチャ設定
AWS公式では、インフラストラクチャ設定を以下の通りに説明しています。
You can use infrastructure configurations to specify the Amazon EC2 infrastructure that Image Builder uses to build and test your EC2 Image Builder image.
Manage EC2 Image Builder infrastructure configuration
つまりインフラストラクチャ設定とは、AMIビルド用のEC2インスタンスに関して設定するものです。
Resources:
  InfrastructureConfiguration:
    Type: AWS::ImageBuilder::InfrastructureConfiguration
    Properties:
      InstanceProfileName: !Ref ImageBuilderRoleProfile
      InstanceTypes:
        - !Ref InstanceType
      Name: !Sub "${Prefix}-InfrastructureConfiguration"
      SnsTopicArn: !Ref Topic
Code language: YAML (yaml)
InstanceTypesプロパティで、AMIビルド用のEC2インスタンスのタイプを設定できます。
今回はARMタイプのt4g.nanoを指定します。
SnsTopicArnプロパティでSNSの通知先を指定できます。
When the image status reaches one of the following states, Image Builder publishes a message:
AVAILABLE
FAILED
Amazon SNS integration in Image Builder
今回は本プロパティにSNSトピックを指定することによって、Image Builderパイプラインが完了し、AMIが使用可能になった際に、後述するLambda関数を実行します。
InstanceProfileNameプロパティで、Image Builder用のSLRを指定します。
Resources:
  ImageBuilderRoleProfile:
    Type: AWS::IAM::InstanceProfile
    Properties:
      Path: /
      Roles:
        - !Ref ImageBuilderRole

  ImageBuilderRole:
    Type: AWS::IAM::Role
    DeletionPolicy: Delete
    Properties:
      AssumeRolePolicyDocument:
        Version: 2012-10-17
        Statement:
          - Effect: Allow
            Action: sts:AssumeRole
            Principal:
              Service:
                - ec2.amazonaws.com
      ManagedPolicyArns:
        - arn:aws:iam::aws:policy/AmazonSSMManagedInstanceCore
        - arn:aws:iam::aws:policy/EC2InstanceProfileForImageBuilder
Code language: YAML (yaml)
詳細につきましては、以下のページをご確認ください。
https://docs.aws.amazon.com/imagebuilder/latest/userguide/image-builder-setting-up.html
ディストリビューション設定
AWS公式では、ディストリビューション設定を以下の通りに説明しています。
Specify the name and description of your output AMI.
Authorize other AWS accounts, organizations, and OUs to launch the AMI from the owner’s account. The owner account is billed for charges that are associated with the AMI.
Manage EC2 Image Builder distribution settings
つまりディストリビューション設定とは、ビルドされたイメージの配信リージョン等を設定するものです。
Resources:
  DistributionConfiguration:
    Type: AWS::ImageBuilder::DistributionConfiguration
    Properties:
      Distributions:
        - Region: !Ref AWS::Region
          AmiDistributionConfiguration: {}
      Name: !Sub "${Prefix}-DistributionConfiguration"
Code language: YAML (yaml)
Distributionsプロパティで配信設定が行えます。
Regionプロパティに本スタックを作成するap-northeast-1リージョンを指定します。
なお今回はAmiDistributionConfigurationプロパティは何も設定しませんが、この項目を明示しなければ本リソース作成に失敗します。
ですから本プロパティに「{}」を指定します。
パイプライン
AWS公式では、パイプラインを以下の通りに説明しています。
Image Builder image pipelines provide an automation framework for creating and maintaining custom AMIs and container images.
Manage EC2 Image Builder pipelines using the console
つまりパイプラインは、AMIをビルドするために、パッケージインストールやテスト等の一連の流れを自動的に実行します。
Resources:
  ImagePipeline:
    Type: AWS::ImageBuilder::ImagePipeline
    Properties:
      DistributionConfigurationArn: !Ref DistributionConfiguration
      ImageRecipeArn: !Ref ImageRecipe
      InfrastructureConfigurationArn: !Ref InfrastructureConfiguration
      Name: !Sub "${Prefix}-ImagePipeline"
      Status: ENABLED
Code language: YAML (yaml)
今まで確認した各リソースを指定します。
具体的には、レシピ・インフラストラクチャ設定・ディストリビューション設定です。
(参考) SNS
Resources:
  Topic:
    Type: AWS::SNS::Topic
    Properties:
      Subscription:
        - Endpoint: !Ref FunctionArn1
          Protocol: lambda
        - Endpoint: !Ref FunctionArn2
          Protocol: lambda
      TopicName: !Ref Prefix

  SNSPermission1:
    Type: AWS::Lambda::Permission
    Properties:
      FunctionName: !Ref Function1
      Action: lambda:InvokeFunction
      Principal: sns.amazonaws.com
      SourceArn: !Ref Topic

  SNSPermission2:
    Type: AWS::Lambda::Permission
    Properties:
      FunctionName: !Ref Function2
      Action: lambda:InvokeFunction
      Principal: sns.amazonaws.com
      SourceArn: !Ref Topic
Code language: YAML (yaml)
Image Builderパイプライン完了後に、SNSを通じて、その旨を各リソースに通知することができます。
今回は2つのLambda関数を実行させます。
SNSを通じてLambda関数を実行する方法については、以下のページをご確認ください。
(参考) Lambda
関数1
Resources:
  ParameterAmi:
    Type: AWS::SSM::Parameter
    Properties:
      Name: !Sub "${Prefix}-Ami"
      Type: String
      Value: " "

  Function1:
    Type: AWS::Lambda::Function
    Properties:
      Architectures:
        - !Ref Architecture
      Environment:
        Variables:
          PARAMETER: !Ref ParameterAmi
      Code:
        ZipFile: |
          import boto3
          import json
          import os

          parameter = os.environ['PARAMETER']
          client = boto3.client('ssm')

          def lambda_handler(event, context):
            message = json.loads(event["Records"][0]["Sns"]["Message"])
            ami = message['outputResources']['amis'][0]['image']

            response = client.put_parameter(
              Name=parameter,
              Value=ami,
              Type='String',
              Overwrite=True
            )
            print(response)
      FunctionName: !Sub "${Prefix}-function-01"
      Handler: !Ref Handler
      Runtime: !Ref Runtime
      Role: !GetAtt FunctionRole1.Arn

  FunctionRole1:
    Type: AWS::IAM::Role
    DeletionPolicy: Delete
    Properties:
      AssumeRolePolicyDocument:
        Version: 2012-10-17
        Statement:
          - Effect: Allow
            Action: sts:AssumeRole
            Principal:
              Service:
                - lambda.amazonaws.com
      ManagedPolicyArns:
        - arn:aws:iam::aws:policy/service-role/AWSLambdaBasicExecutionRole
      Policies:
        - PolicyName: UpdateSSMParameter
          PolicyDocument:
            Version: 2012-10-17
            Statement:
              - Effect: Allow
                Action:
                  - ssm:PutParameter
                Resource:
                  - !Sub "arn:aws:ssm:${AWS::Region}:${AWS::AccountId}:parameter/${ParameterAmi}"
Code language: YAML (yaml)
SNSによって呼び出されるLambda関数の1つです。
この関数の目的は、ビルドされたAMIのIDをSSM Parameter Storeに保存することです。
関数2
Resources:
  Function2:
    Type: AWS::Lambda::Function
    Properties:
      Code:
        ZipFile: |
          import boto3
          import datetime
          import json
          import os

          event_bus_name = os.environ['EVENT_BUS_NAME']
          detail_type = os.environ['DETAIL_TYPE']
          source = os.environ['SOURCE']

          client = boto3.client('events')

          def lambda_handler(event, context):
            detail = json.dumps({})

            entry = {
              'Time': datetime.datetime.now(),
              'Source': source,
              'Resources': [],
              'DetailType': detail_type,
              'Detail': detail,
              'EventBusName': event_bus_name
            }
            print(entry)

            response = client.put_events(
              Entries=[entry,]
            )
            print(response)
      Environment:
        Variables:
          EVENT_BUS_NAME: !Ref EventBusName
          DETAIL_TYPE: image-builder-finish-event
          SOURCE: !Ref Prefix
      FunctionName: !Sub "${Prefix}-function-02"
      Handler: !Ref Handler
      Runtime: !Ref Runtime
      Role: !GetAtt FunctionRole2.Arn

  FunctionRole2:
    Type: AWS::IAM::Role
    DeletionPolicy: Delete
    Properties:
      AssumeRolePolicyDocument:
        Version: 2012-10-17
        Statement:
          - Effect: Allow
            Action: sts:AssumeRole
            Principal:
              Service:
                - lambda.amazonaws.com
      ManagedPolicyArns:
        - arn:aws:iam::aws:policy/service-role/AWSLambdaBasicExecutionRole
      Policies:
        - PolicyName: !Sub "${Prefix}-PutEventsPolicy"
          PolicyDocument:
            Version: 2012-10-17
            Statement:
              - Effect: Allow
                Action:
                  - events:PutEvents
                Resource: !Sub "arn:aws:events:${AWS::Region}:${AWS::AccountId}:event-bus/${EventBusName}"
Code language: YAML (yaml)
SNSによって呼び出されるLambda関数の1つです。
この関数の目的は、EventBridgeのカスタムイベントを生成することです。
詳細については、以下のページをご確認ください。

関数3
Resources:
  CustomResource:
    Type: Custom::CustomResource
    Properties:
      ServiceToken: !GetAtt Function3.Arn

  Function3:
    Type: AWS::Lambda::Function
    Properties:
      Architectures:
        - !Ref Architecture
      Environment:
        Variables:
          IMAGE_PIPELINE_ARN: !Ref ImagePipelineArn
      Code:
        ZipFile: |
          import boto3
          import cfnresponse
          import os

          image_pipeline_arn = os.environ['IMAGE_PIPELINE_ARN']
          client = boto3.client('imagebuilder')

          CREATE = 'Create'
          response_data = {}

          def lambda_handler(event, context):
            try:
              if event['RequestType'] == CREATE:
                response = client.start_image_pipeline_execution(
                  imagePipelineArn=image_pipeline_arn
                )
                print(response)

              cfnresponse.send(event, context, cfnresponse.SUCCESS, response_data)

            except Exception as e:
              print(e)
              cfnresponse.send(event, context, cfnresponse.FAILED, response_data)
      FunctionName: !Sub "${Prefix}-function-03"
      Handler: !Ref Handler
      Runtime: !Ref Runtime
      Role: !GetAtt FunctionRole3.Arn

  FunctionRole3:
    Type: AWS::IAM::Role
    DeletionPolicy: Delete
    Properties:
      AssumeRolePolicyDocument:
        Version: 2012-10-17
        Statement:
          - Effect: Allow
            Action: sts:AssumeRole
            Principal:
              Service:
                - lambda.amazonaws.com
      ManagedPolicyArns:
        - arn:aws:iam::aws:policy/service-role/AWSLambdaBasicExecutionRole
      Policies:
        - PolicyName: UpdateSSMParameter
          PolicyDocument:
            Version: 2012-10-17
            Statement:
              - Effect: Allow
                Action:
                  - imagebuilder:StartImagePipelineExecution
                Resource:
                  - !Ref ImagePipelineArn
Code language: YAML (yaml)
この関数は、CloudFormationカスタムリソースに関連づけます。
カスタムリソースに関する詳細は、以下のページをご確認ください。
この関数の目的は、CloudFormationスタック作成時に、Image Builderパイプラインを開始することです。
関数4
Resources:
  WaitConditionHandle:
    Type: AWS::CloudFormation::WaitConditionHandle

  WaitCondition:
    Type: AWS::CloudFormation::WaitCondition
    Properties:
      Handle: !Ref WaitConditionHandle
      Timeout: !Ref WaitConditionTimeout

  EventsRule:
    Type: AWS::Events::Rule
    Properties:
      EventBusName: !Ref EventBusName
      EventPattern:
        source:
          - !Ref Prefix
      Name: !Sub "${Prefix}-EventsRule"
      State: ENABLED
      Targets:
        - Arn: !GetAtt Function4.Arn
          Id: !Ref Function4

  EventsRulePermission:
    Type: AWS::Lambda::Permission
    Properties:
      FunctionName: !Ref Function4
      Action: lambda:InvokeFunction
      Principal: events.amazonaws.com
      SourceArn: !GetAtt EventsRule.Arn

  Function4:
    Type: AWS::Lambda::Function
    Properties:
      Architectures:
        - !Ref Architecture
      Environment:
        Variables:
          SIGNAL_URL: !Ref WaitConditionHandle
      Code:
        ZipFile: |
          import boto3
          import json
          import os
          import urllib3
          import uuid

          signal_url = os.environ['SIGNAL_URL']

          def lambda_handler(event, context):
            body = json.dumps({
                "Status": "SUCCESS",
                "Reason": "AMI Building Successed",
                "UniqueId": str(uuid.uuid4()),
                "Data": "Lambda Deploy Package Setup Successed"
            })
            http = urllib3.PoolManager()
            http.request('PUT', signal_url, body=body)
      FunctionName: !Sub "${Prefix}-function-04"
      Handler: !Ref Handler
      Runtime: !Ref Runtime
      Role: !GetAtt FunctionRole4.Arn

  FunctionRole4:
    Type: AWS::IAM::Role
    DeletionPolicy: Delete
    Properties:
      AssumeRolePolicyDocument:
        Version: 2012-10-17
        Statement:
          - Effect: Allow
            Action: sts:AssumeRole
            Principal:
              Service:
                - lambda.amazonaws.com
      ManagedPolicyArns:
        - arn:aws:iam::aws:policy/service-role/AWSLambdaBasicExecutionRole
Code language: YAML (yaml)
CloudFormationを使用して、Image BuilderでAMIを作成し、このAMIを使用してEC2インスタンスを作成する場合、ポイントは作成する順序です。
最初にImage Builderリソースを作成し、次にパイプラインを実行してAMIをビルドし、最後にEC2インスタンスを作成します。
そのためにCloudFormation WaitConditionを使用して、リソースの作成タイミングを制御します。
WaitConditionを使用して、EC2インスタンスの作成を待機させます。
先述の通り、CloudFormationカスタムリソースによって、Lambda関数3が実行されて、Image Builderパイプラインが開始されます。
SNSを通じて、Lambda関数2が実行されて、EventBridgeカスタムイベントが生成されます。
このイベントがEventBridgeルールを満たしているため、同ルールに関連づくLambda関数4が実行がトリガーされます。
この関数によって、WaitConditionに成功シグナルが通知されて、待機が解除されます。
このように、WaitConditionを使用することによって、EC2インスタンスが作成されるタイミングを、AMIが作成された後に制御できます。
詳細につきましては、以下のページをご確認ください。
上記のページでは、Lambda関数を作成する際に、関数本体と、デプロイパッケージを作成する順序を制御する方法を取り上げています。
Lambda関数用のデプロイパッケージとElastic Beanstalk用のソースバンドルとの違いはありますが、考え方は全く同じです。
EC2インスタンス
Resources:
  Instance:
    Type: AWS::EC2::Instance
    Properties:
      ImageId: !Sub "{{resolve:ssm:${ParameterAmi}}}"
      InstanceType: !Ref InstanceType
      NetworkInterfaces:
        - AssociatePublicIpAddress: true
          DeviceIndex: 0
          GroupSet:
            - !Ref InstanceSecurityGroup
          SubnetId: !Ref PublicSubnet1
Code language: YAML (yaml)
ImageIdプロパティでAMIを指定します。
今回は先述のSSM Parameter Storeに保存されているAMI IDを動的参照します。
https://docs.aws.amazon.com/ja_jp/AWSCloudFormation/latest/UserGuide/dynamic-references.html
先ほども確認した通り、EC2インスタンスを作成するタイミングは、CloudFormation WaitConditionで調整しています。
つまり必ずSSM Parameter StoreにAMI IDが保存されていることが保証されているということです。
環境構築
CloudFormationを使用して、本環境を構築し、実際の挙動を確認します。
CloudFormationスタックを作成し、スタック内のリソースを確認する
CloudFormationスタックを作成します。
スタックの作成および各スタックの確認方法については、以下のページをご確認ください。
各スタックのリソースを確認した結果、今回作成された主要リソースの情報は以下の通りです。
- コンポーネント:fa-145-Component
- レシピ:fa-145-ImageRecipe
- インフラストラクチャ設定:fa-145-InfrastructureConfiguration
- ディストリビューション設定:fa-145-DistributionConfiguration
- パイプライン:fa-145-ImagePipeline
- EC2インスタンス:i-0547b207bb21f2ee0
作成されたリソースをAWS Management Consoleから確認します。
コンポーネントを確認します。
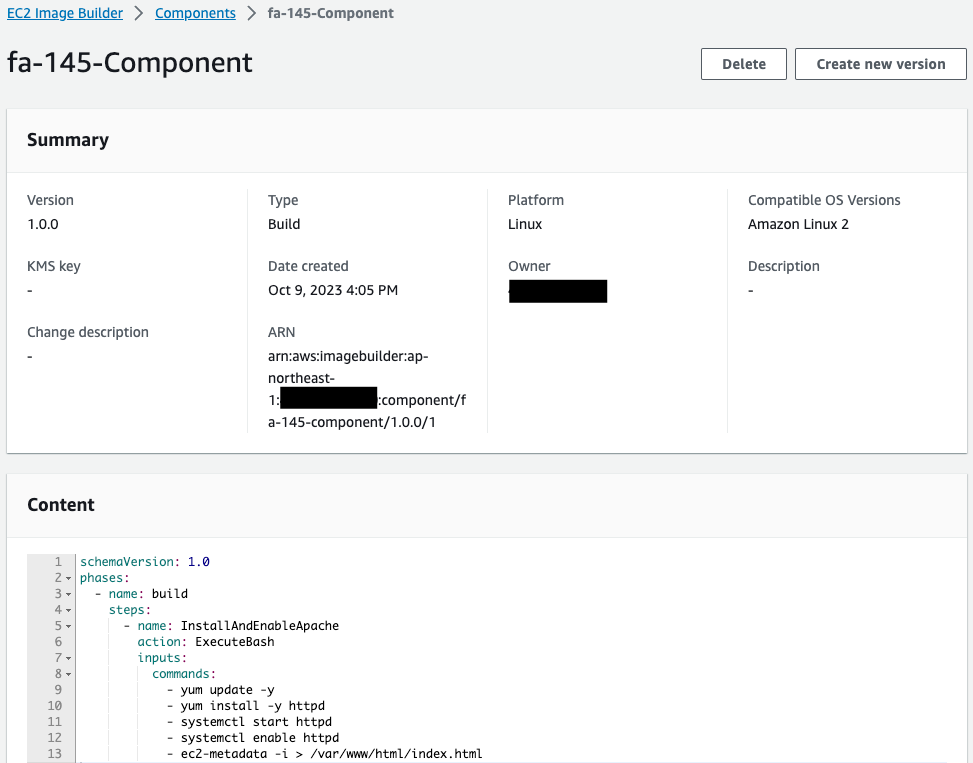
正常にコンポーネントが作成されています。
Contentを見ると、YAMLファイルの中身を確認することができます。
レシピを確認します。
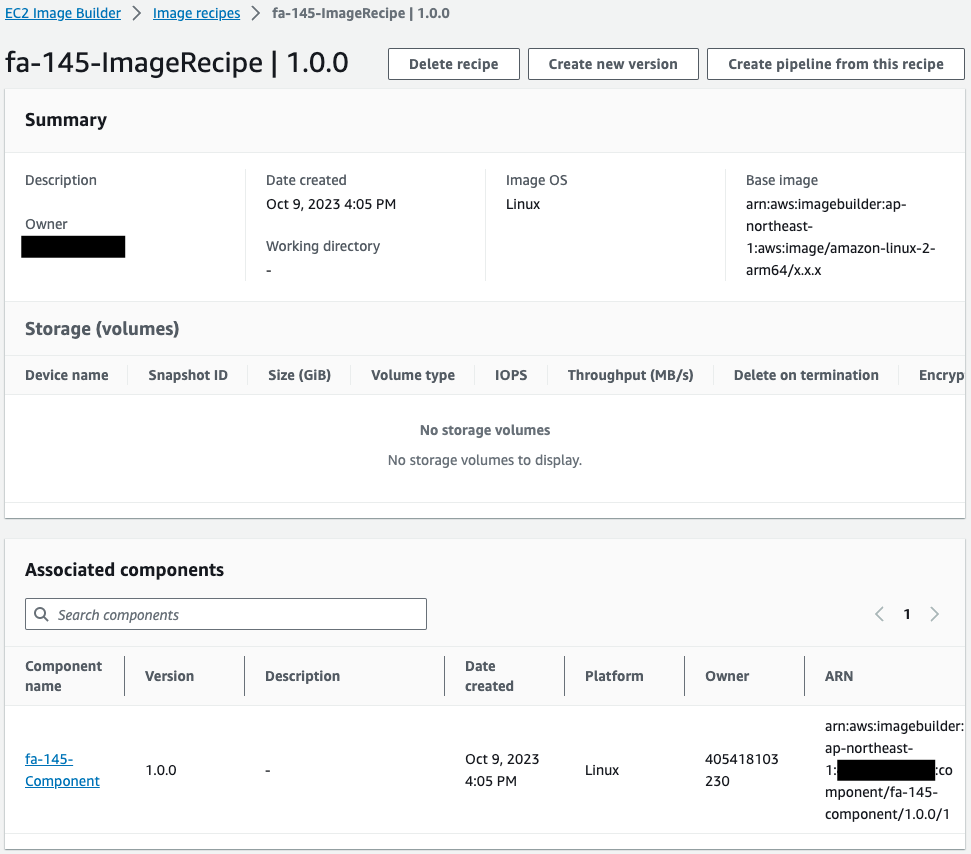
正常にレシピが作成されています。
先ほど確認したコンポーネントが指定されていることわかります。
インフラストラクチャ設定を確認します。
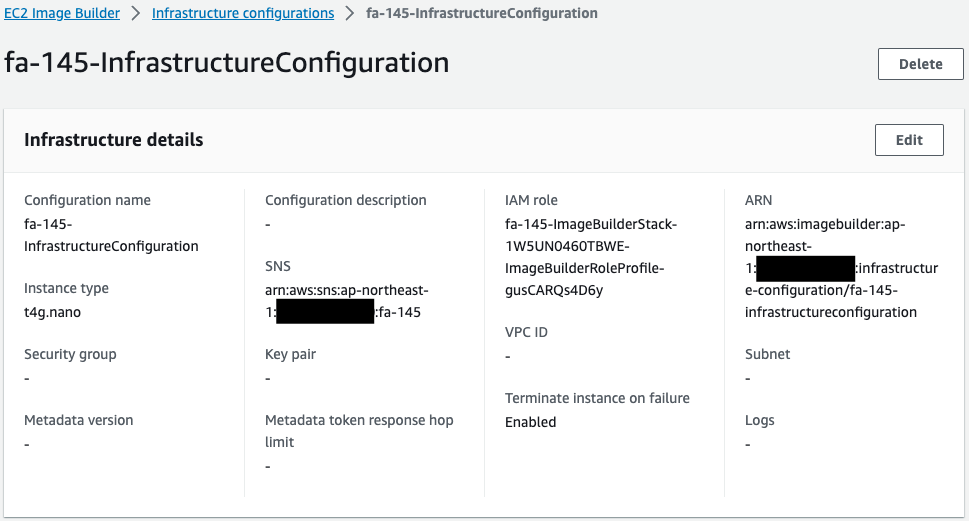
AMIビルド用のインスタンスタイプや、SNSトピックが指定されています。
このSNS通知を通じて、2つのLambda関数が実行されます。
ディストリビューション設定を確認します。
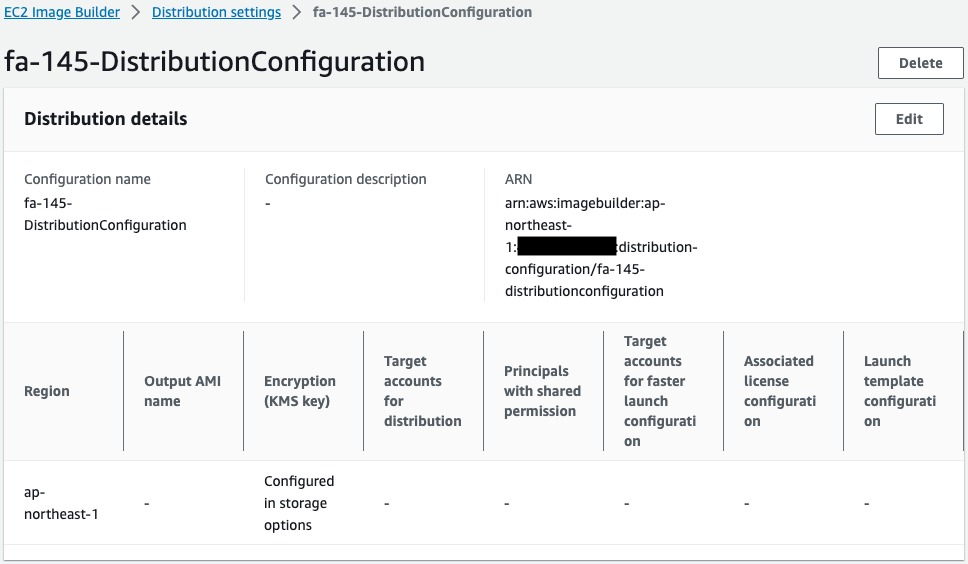
主にリージョンが設定されていることがわかります。
パイプラインを確認します。
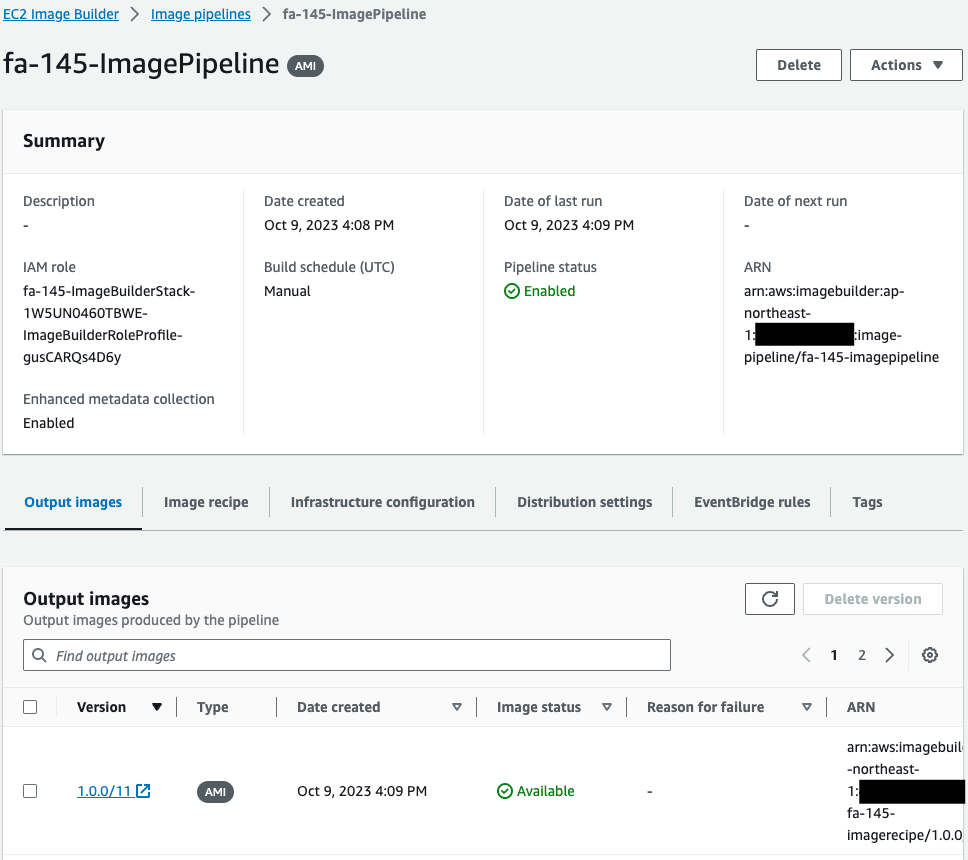
正常にパイプラインが作成されていることがわかります。
Output Imagesを見ると、このパイプラインは実行されて、AMIが作成されたことがわかります。
つまりCloudFormationカスタムリソースに関連づいているLambda関数3によって、本パイプラインが自動的に実行されたということです。
パイプラインの実行の詳細を確認します。

ワークフロー全体のステータスはCompletedです。
合計7つのステップがありましたが、全てSkipped・Completedというステータスです。
サンプルとして1番目のステップの詳細を確認します。
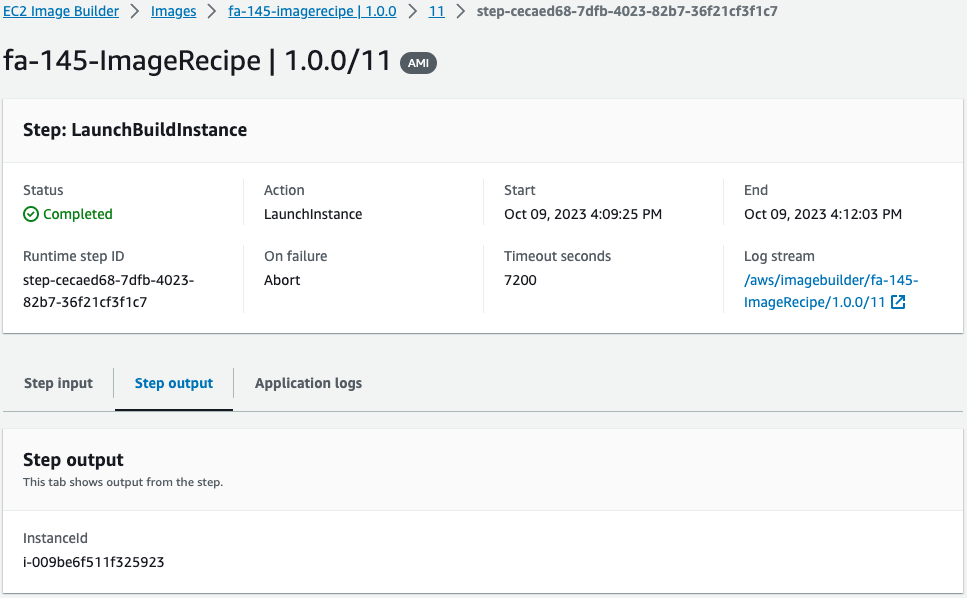
今回のAMIビルド用に一時的に生成されたEC2インスタンスのIDが確認できます。
このインスタンスのIDは「i-009be6f511f325923」でした。
ビルドされたAMIを確認します。
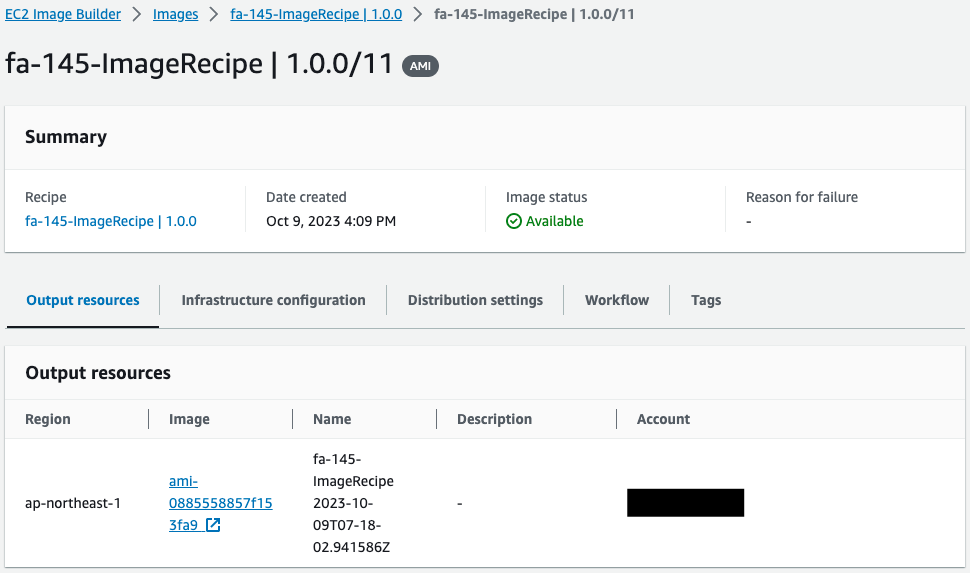
今回作成されたAMIのIDは「ami-0885558857f153fa9」です。
SSM Parameter Storeを確認します。
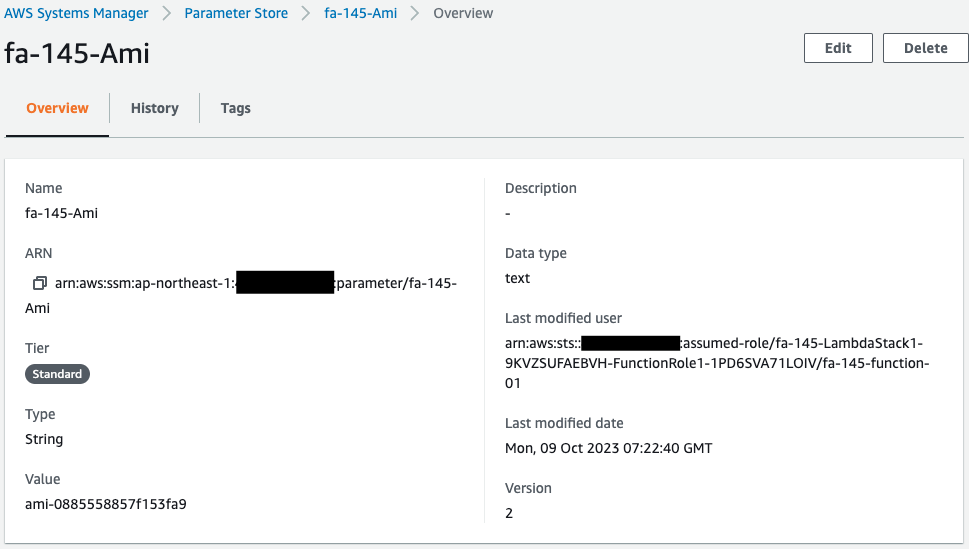
確かにParameter StoreにAMI IDが保存されています。
つまりSNS経由でLambda関数1が実行されたということです。
EC2インスタンスを確認します。
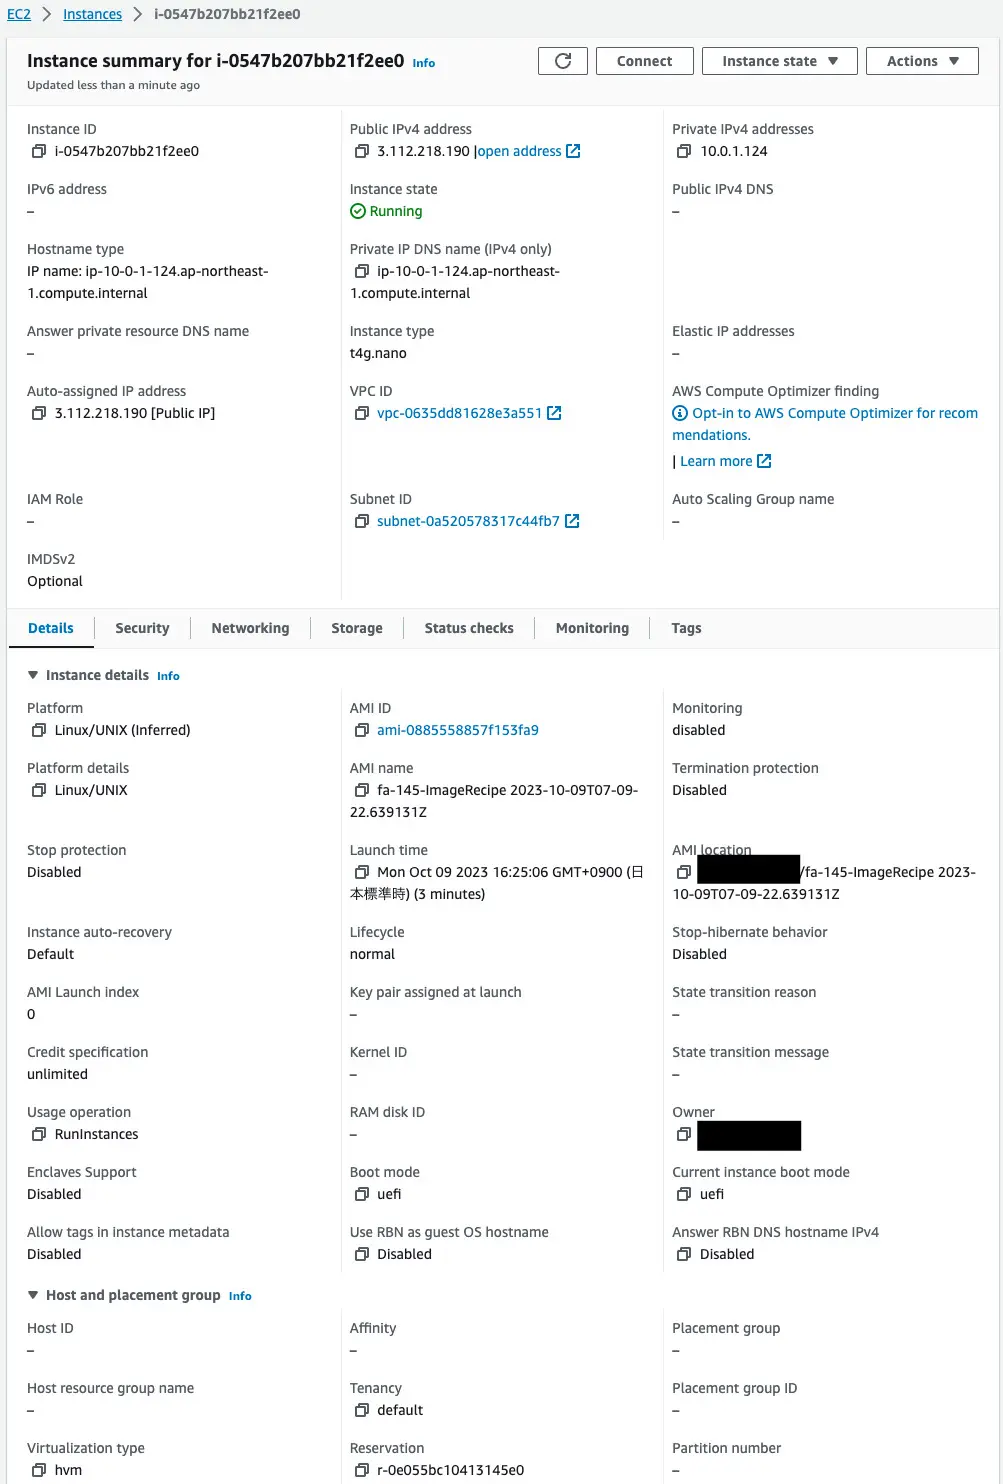
AMI IDの値を見ると、Image BuilderでビルドされたAMIです。
つまりLambda関数2および4によって、EC2インスタンス作成のタイミングを調整し、ビルドされたAMIを使用してインスタンスが作成されたということです。
動作確認
最後にこのインスタンスにアクセスします。
$ curl http://3.112.218.190
instance-id: i-009be6f511f325923
Code language: Bash (bash)
インスタンスから応答がありました。
このIDはAMIビルド用に使われたインスタンスのものです。
このことから確かにImage BuilderによってビルドされたAMIであることがわかります。
まとめ
Image Builderを使用して、AMIを作成しました。
そしてこのAMIを使用して、自動的にEC2インスタンスを作成しました。