CloudFormationカスタムリソースを使用して、AWS IoTクライアント証明書を作成する
AWS IoT Core入門ということで、以下のページでEC2インスタンスをIoTデバイスに見立て、AWS IoT CoreにMQTTメッセージを送信する方法を確認しました。
上記のページでは、AWS公式チュートリアルに概ね従って設定を進めました。
今回は目的は同じですが、以下の点を変更します。
- クライアント証明書や公開鍵・秘密鍵の作成をIoTデバイス(EC2インスタンス)において実施するのではなく、Lambda関数を使用して作成し、S3バケットに配置する。IoTデバイスはバケットからそれらをダウンロードする。
- MQTTメッセージのエンドポイント取得をIoTデバイスにおいて実施するのではなく、Lambda関数を使用する。
- モノに証明書をアタッチする処理を、IoTデバイスおいて実施するのではなく、CloudFormationを使用して該当リソースを作成して対応する。
- IoTポリシーに証明書をアタッチする処理を、IoTデバイスおいて実施するのではなく、CloudFormationを使用して該当リソースを作成して対応する。
構築する環境
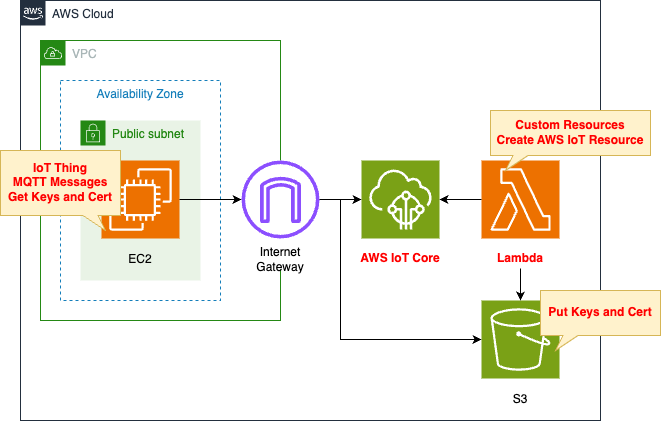
基本的な構成は上記ページと同様です。
冒頭でご紹介した変更点のために、Lambda関数およびS3バケットを用意します。
Lambda関数のランタイム環境はPython3.11とします。
CloudFormationテンプレートファイル
上記の構成をCloudFormationで構築します。
以下のURLにCloudFormationテンプレートを配置しています。
https://github.com/awstut-an-r/awstut-fa/tree/main/154
テンプレートファイルのポイント解説
冒頭でご紹介した変更点を中心に取り上げます。
(参考)S3バケット
Resources:
  Bucket:
    Type: AWS::S3::Bucket
    Properties:
      BucketName: !Ref Prefix
      AccessControl: Private
Code language: YAML (yaml)
このバケットはクライアント証明書や鍵を配置するために使用します。
後述するLambda関数が本バケットにオブジェクトをアップロードし、IoTデバイスとして動作するEC2インスタンスがオブジェクトをダウンロードします。
Lambda関数
Resources:
  CustomResource:
    Type: Custom::CustomResource
    Properties:
      ServiceToken: !GetAtt Function.Arn

  Function:
    Type: AWS::Lambda::Function
    Properties:
      Architectures:
        - !Ref Architecture
      Environment:
        Variables:
          BUCKET_NAME: !Ref BucketName
          CERTIFICATE_NAME: !Ref CertificateName
          PRIVATE_KEY_NAME: !Ref PrivateKeyName
          PUBLIC_KEY_NAME: !Ref PublicKeyName
          REGION: !Ref AWS::Region
          THING: !Ref Thing
      Code:
        ZipFile: |
          import boto3
          import cfnresponse
          import os

          bucket_name = os.environ['BUCKET_NAME']
          certificate_name = os.environ['CERTIFICATE_NAME']
          private_key_name = os.environ['PRIVATE_KEY_NAME']
          public_key_name = os.environ['PUBLIC_KEY_NAME']
          region = os.environ['REGION']
          thing = os.environ['THING']

          s3_key = '{folder}/{object}'

          CREATE = 'Create'
          response_data = {}

          iot_client = boto3.client('iot', region_name=region)
          s3_client = boto3.client('s3', region_name=region)

          def lambda_handler(event, context):
            try:
              if event['RequestType'] == 'Create':
                iot_response = iot_client.create_keys_and_certificate(
                  setAsActive=True
                )

                # certificate
                s3_client.put_object(
                  Body=iot_response['certificatePem'],
                  Bucket=bucket_name,
                  Key=s3_key.format(
                    folder=thing,
                    object=certificate_name
                  )
                )

                # public key
                s3_client.put_object(
                  Body=iot_response['keyPair']['PublicKey'],
                  Bucket=bucket_name,
                  Key=s3_key.format(
                    folder=thing,
                    object=public_key_name
                  )
                )

                # private key
                s3_client.put_object(
                  Body=iot_response['keyPair']['PrivateKey'],
                  Bucket=bucket_name,
                  Key=s3_key.format(
                    folder=thing,
                    object=private_key_name
                  )
                )

                response_data['CertificateArn'] = iot_response['certificateArn']
                certificate_id = iot_response['certificateId']

                iot_endpoint_response = iot_client.describe_endpoint(
                  endpointType='iot:Data-ATS'
                )
                response_data['IoTEndpoint'] = iot_endpoint_response['endpointAddress']

              elif event['RequestType'] == 'Delete':
                certificate_id = event['PhysicalResourceId']

                # delete objects in s3 bucket
                list_response = s3_client.list_objects_v2(
                  Bucket=bucket_name
                )

                if 'Contents' in list_response and len(list_response['Contents']):
                  for obj in list_response['Contents']:
                    delete_response = s3_client.delete_object(
                      Bucket=bucket_name,
                      Key=obj['Key']
                    )
                    print(delete_response)

                # inactive and delete iot cert
                iot_client.update_certificate(
                  certificateId=certificate_id,
                  newStatus='INACTIVE'
                )
                iot_client.delete_certificate(
                  certificateId=certificate_id,
                  forceDelete=True
                )

              cfnresponse.send(
                event=event,
                context=context,
                responseStatus=cfnresponse.SUCCESS,
                responseData=response_data,
                physicalResourceId=certificate_id
                )
            except Exception as e:
              print(e)

              certificate_id = event['PhysicalResourceId']

              cfnresponse.send(
                event=event,
                context=context,
                responseStatus=cfnresponse.FAILED,
                responseData=response_data,
                physicalResourceId=certificate_id
                )
      FunctionName: !Sub "${Prefix}-function"
      Handler: !Ref Handler
      Runtime: !Ref Runtime
      Role: !GetAtt FunctionRole.Arn

Outputs:
  CertificateArn:
    Value: !GetAtt CustomResource.CertificateArn

  IoTEndpoint:
    Value: !GetAtt CustomResource.IoTEndpoint
Code language: YAML (yaml)
Lambda関数で実行するコードをインライン表記で定義します。
詳細につきましては、以下のページをご確認ください。
cfnresponseモジュールを使用して、関数をLambda-backedカスタムリソースとして実装します。
詳細につきましては、以下のページをご確認ください。
実行するコードの内容ですが、CloudFormationスタック作成時と削除時では、実行内容が異なります。
スタック作成時は主に以下の処理を行います。
- IoT用クライアントオブジェクトのcreate_keys_and_certificateメソッドを実行して、クライアント証明書および秘密鍵・公開鍵を作成する。
- S3用クライアントオブジェクトのput_objectメソッドを実行して、証明書および鍵をS3バケットにアップロードする。
- IoT用クライアントオブジェクトのdescribe_endpointメソッドを実行して、MQTTメッセージ用エンドポイントを取得する。
また作成されたクライアント証明書のARNと取得したエンドポイントをカスタムリソースに渡します。
これはcfnresponse.send関数の実行時にこれらの値を引数として渡すことで実現しています。
それらの値をカスタムリソースに渡すことによって、CloudFormationスタック内で、それらの値を参照することができるようになります。
Outputsセクションを見ると、確かにこれらの値が参照できていることがわかります。
スタック削除時は主に以下の処理を行います。
- S3用クライアントオブジェクトのlist_objects_v2およびdelete_objectメソッドを実行して、S3バケット内の全オブジェクトを削除する。
- クライアント証明書を無効化後、削除する。
なお証明書のIDの扱いに関して、一工夫します。
スタック作成時にphysicalResourceIdに証明書のIDを指定します。
本パラメータにIDを指定することによって、スタック削除時に本パラメータを参照できるようになります。
以下が本関数用のIAMロールです。
Resources:
  FunctionRole:
    Type: AWS::IAM::Role
    DeletionPolicy: Delete
    Properties:
      AssumeRolePolicyDocument:
        Version: 2012-10-17
        Statement:
          - Effect: Allow
            Action: sts:AssumeRole
            Principal:
              Service:
                - lambda.amazonaws.com
      ManagedPolicyArns:
        - arn:aws:iam::aws:policy/service-role/AWSLambdaBasicExecutionRole
      Policies:
        - PolicyName: FunctionPolicy
          PolicyDocument:
            Version: 2012-10-17
            Statement:
              - Effect: Allow
                Action:
                  - iot:CreateKeysAndCertificate
                  - iot:DeleteCertificate
                  - iot:DescribeEndpoint
                  - iot:UpdateCertificate
                Resource:
                  - "*"
              - Effect: Allow
                Action:
                  - s3:PutObject
                Resource:
                  - !Sub "arn:aws:s3:::${BucketName}/${Thing}/*"
              - Effect: Allow
                Action:
                  - s3:DeleteObject
                  - s3:GetObject
                  - s3:ListBucket
                Resource:
                  - !Sub "arn:aws:s3:::${BucketName}"
                  - !Sub "arn:aws:s3:::${BucketName}/*"
Code language: YAML (yaml)
IoTおよびS3関係のアクションが実行できるように設定します。
証明書とIoTリソースのアタッチ
Resources:
  PolicyPrincipalAttachment:
    Type: AWS::IoT::PolicyPrincipalAttachment
    Properties:
      PolicyName: !Ref Policy
      Principal: !Ref CertificateArn

  ThingPrincipalAttachment:
    Type: AWS::IoT::ThingPrincipalAttachment
    Properties:
      Principal: !Ref CertificateArn
      ThingName: !Ref Thing
Code language: YAML (yaml)
2つのリソースを作成し、ポリシーとモノに証明書をアタッチします。
冒頭でご紹介したページでは、IoTデバイスであるEC2インスタンスにおいて、AWS CLIを使ってこれらのアタッチを行っていました。
今回はCloudFormationリソースという形で、証明書のアタッチを行います。
EC2インスタンス
Resources:
  Instance:
    Type: AWS::EC2::Instance
    Properties:
      IamInstanceProfile: !Ref InstanceProfile
      ImageId: !Ref ImageId
      InstanceType: !Ref InstanceType
      NetworkInterfaces:
        - AssociatePublicIpAddress: true
          DeviceIndex: 0
          GroupSet:
            - !Ref InstanceSecurityGroup
          SubnetId: !Ref PublicSubnet1
      UserData: !Base64
        Fn::Sub: |
          #!/bin/bash -xe
          dnf update -y
          dnf install python3.11-pip -y
          dnf install -y git

          mkdir ~/${CertificateDir}

          root_cert="Amazon-root-CA-1.pem"
          curl -o ~/${CertificateDir}/$root_cert \
            https://www.amazontrust.com/repository/AmazonRootCA1.pem

          aws s3 cp s3://${BucketName}/${Thing}/${CertificateName} ~/${CertificateDir}/
          aws s3 cp s3://${BucketName}/${Thing}/${PrivateKeyName} ~/${CertificateDir}/
          aws s3 cp s3://${BucketName}/${Thing}/${PublicKeyName} ~/${CertificateDir}/

          python3.11 -m pip install awsiotsdk
          cd ~ && git clone https://github.com/aws/aws-iot-device-sdk-python-v2.git

          cd ~/aws-iot-device-sdk-python-v2/samples && python3.11 pubsub.py \
            --endpoint "${IoTEndpoint}" \
            --ca_file ~/${CertificateDir}/$root_cert \
            --cert ~/${CertificateDir}/${CertificateName} \
            --key ~/${CertificateDir}/${PrivateKeyName} \
            --client_id "${Thing}" \
            --topic "${TopicName}" \
            --count 5
Code language: YAML (yaml)
ユーザデータを使用して、本インスタンスをIoTデバイスとして動作させるための処理を行います。
実行する内容の全体的な流れは冒頭のページと同様です。
変更点は証明書・鍵の扱いです。
前回は証明書や鍵の作成および証明書のアタッチ等の処理をインスタンス内で実行していました。
対して今回はこれらの処理はLambda関数とCloudFormationリソースで実施しています。
ですからこのユーザデータ内では、S3バケットから証明書および鍵をダウンロードします。
以下がEC2インスタンス用のIAMロールです。
Resources:
  InstanceRole:
    Type: AWS::IAM::Role
    DeletionPolicy: Delete
    Properties:
      AssumeRolePolicyDocument:
        Version: 2012-10-17
        Statement:
          - Effect: Allow
            Action: sts:AssumeRole
            Principal:
              Service:
                - ec2.amazonaws.com
      ManagedPolicyArns:
        - arn:aws:iam::aws:policy/AmazonSSMManagedInstanceCore
      Policies:
        - PolicyName: InstancePolicy
          PolicyDocument:
            Version: 2012-10-17
            Statement:
              - Effect: Allow
                Action:
                  - s3:GetObject
                Resource:
                  - !Sub "arn:aws:s3:::${BucketName}/${Thing}/*"
Code language: YAML (yaml)
S3バケットからオブジェクトを取得するための権限を与えます。
前回は証明書や鍵の作成や、証明書のアタッチ、エンドポイント取得のための権限を与えていましたが、それらは不要となりました。
環境構築
CloudFormationを使用して、本環境を構築し、実際の挙動を確認します。
CloudFormationスタックを作成し、スタック内のリソースを確認する
CloudFormationスタックを作成します。
スタックの作成および各スタックの確認方法については、以下のページをご確認ください。
AWS Management Consoleから各リソースを確認します。
S3バケットを確認します。
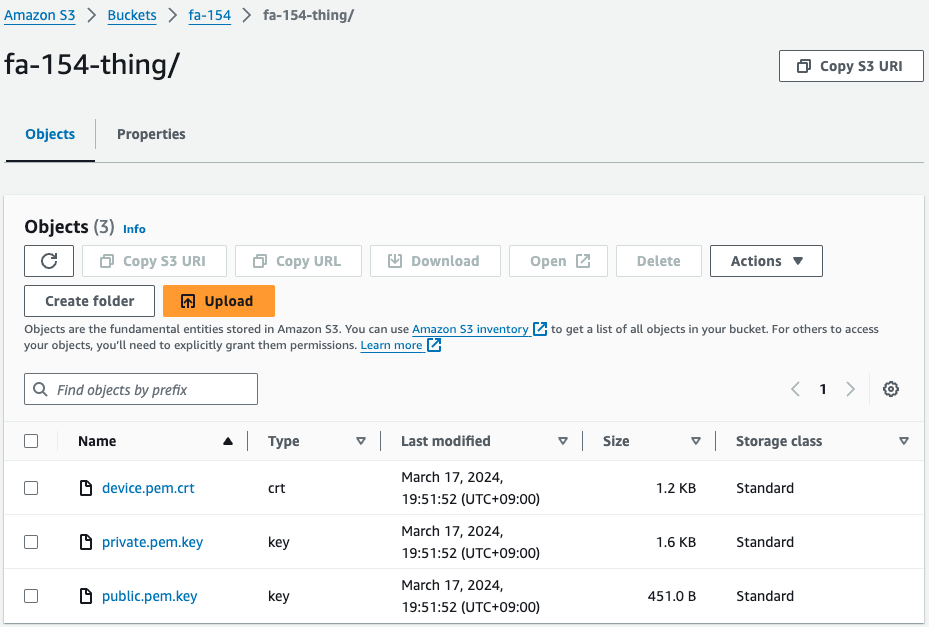
3つのファイルが配置されています。
クライアント証明書と公開鍵・秘密鍵です。
つまりCloudFormationスタック作成時に、CloudFormationカスタムリソースに紐づくLambda関数が正常に実行されて、これらのファイルが生成されて、本バケットにアップロードされたということです。
クライアント証明書を確認します。
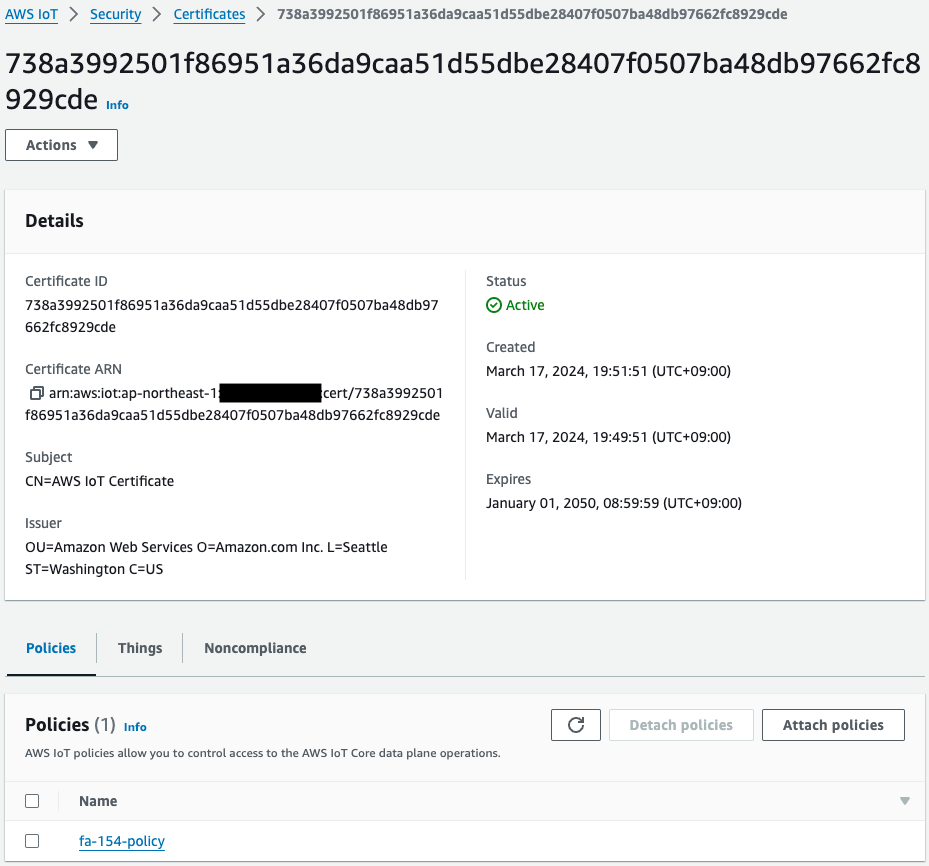
確かに証明書が作成されています。
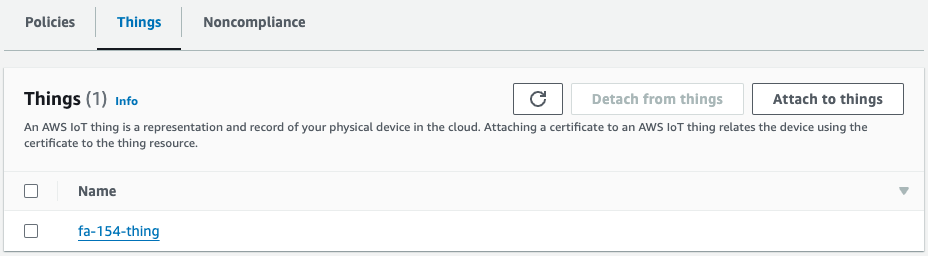
本証明書にアタッチされているものを見ると、ポリシーとモノがあることがわかります。
つまりCloudFormationリソース(PolicyPrincipalAttachmentおよびThingPrincipalAttachment)によって、証明書とのアタッチが正常に実施されたということです。
動作確認
準備が整いましたので、IoTデバイスであるEC2インスタンス(i-00c214deb83338595)にアクセスします。
インスタンスへのアクセスはSSM Session Managerを使用します。
% aws ssm start-session --target i-00c214deb83338595
...
sh-5.2$
Code language: Bash (bash)
SSM Session Managerに関しては以下のページをご確認ください。
/root/certsディレクトリの中身を確認します。
sh-5.2$ sudo ls /root/certs
Amazon-root-CA-1.pem  device.pem.crt  private.pem.key  public.pem.key
Code language: Bash (bash)
確かにS3バケットに配置されていた3ファイルが保存されています。
つまりEC2ユーザデータによるインスタンスの初期化処理の一環で、これらのファイルが正常にダウンロードされたということです。
このことはログを見ることでも確認することができます。
sh-5.2$ sudo journalctl --no-pager
...
Mar 17 10:56:34 ip-10-0-1-14.ap-northeast-1.compute.internal cloud-init[1671]: + aws s3 cp s3://fa-154/fa-154-thing/device.pem.crt /root/certs/
Mar 17 10:56:36 ip-10-0-1-14.ap-northeast-1.compute.internal cloud-init[1671]: [142B blob data]
Mar 17 10:56:36 ip-10-0-1-14.ap-northeast-1.compute.internal cloud-init[1671]: + aws s3 cp s3://fa-154/fa-154-thing/private.pem.key /root/certs/
Mar 17 10:56:37 ip-10-0-1-14.ap-northeast-1.compute.internal cloud-init[1671]: [144B blob data]
Mar 17 10:56:37 ip-10-0-1-14.ap-northeast-1.compute.internal cloud-init[1671]: + aws s3 cp s3://fa-154/fa-154-thing/public.pem.key /root/certs/
Mar 17 10:56:37 ip-10-0-1-14.ap-northeast-1.compute.internal cloud-init[1671]: [145B blob data]
Code language: Bash (bash)
確かにAWS CLIを使用して、S3バケットから3ファイルをダウンロードしていることがわかります。
最後にAWS IoT CoreへのMQTTメッセージの送信状況を確認します。
改めてログを確認します。
Mar 17 10:56:47 ip-10-0-1-14.ap-northeast-1.compute.internal cloud-init[1671]: Connecting to a2oxckhng7gmur-ats.iot.ap-northeast-1.amazonaws.com with client ID 'fa-154-thing'...
Mar 17 10:56:47 ip-10-0-1-14.ap-northeast-1.compute.internal cloud-init[1671]: Connected!
Mar 17 10:56:47 ip-10-0-1-14.ap-northeast-1.compute.internal cloud-init[1671]: Subscribing to topic 'test/topic'...
Mar 17 10:56:47 ip-10-0-1-14.ap-northeast-1.compute.internal cloud-init[1671]: Connection Successful with return code: 0 session present: False
Mar 17 10:56:47 ip-10-0-1-14.ap-northeast-1.compute.internal cloud-init[1671]: Subscribed with 1
Mar 17 10:56:47 ip-10-0-1-14.ap-northeast-1.compute.internal cloud-init[1671]: Sending 5 message(s)
Mar 17 10:56:47 ip-10-0-1-14.ap-northeast-1.compute.internal cloud-init[1671]: Publishing message to topic 'test/topic': Hello World!  [1]
Mar 17 10:56:47 ip-10-0-1-14.ap-northeast-1.compute.internal cloud-init[1671]: Received message from topic 'test/topic': b'"Hello World!  [1]"'
Mar 17 10:56:47 ip-10-0-1-14.ap-northeast-1.compute.internal cloud-init[1671]: Publishing message to topic 'test/topic': Hello World!  [2]
Mar 17 10:56:47 ip-10-0-1-14.ap-northeast-1.compute.internal cloud-init[1671]: Received message from topic 'test/topic': b'"Hello World!  [2]"'
Mar 17 10:56:47 ip-10-0-1-14.ap-northeast-1.compute.internal cloud-init[1671]: Publishing message to topic 'test/topic': Hello World!  [3]
Mar 17 10:56:47 ip-10-0-1-14.ap-northeast-1.compute.internal cloud-init[1671]: Received message from topic 'test/topic': b'"Hello World!  [3]"'
Mar 17 10:56:47 ip-10-0-1-14.ap-northeast-1.compute.internal cloud-init[1671]: Publishing message to topic 'test/topic': Hello World!  [4]
Mar 17 10:56:47 ip-10-0-1-14.ap-northeast-1.compute.internal cloud-init[1671]: Received message from topic 'test/topic': b'"Hello World!  [4]"'
Mar 17 10:56:47 ip-10-0-1-14.ap-northeast-1.compute.internal cloud-init[1671]: Publishing message to topic 'test/topic': Hello World!  [5]
Mar 17 10:56:47 ip-10-0-1-14.ap-northeast-1.compute.internal cloud-init[1671]: Received message from topic 'test/topic': b'"Hello World!  [5]"'
Mar 17 10:56:47 ip-10-0-1-14.ap-northeast-1.compute.internal cloud-init[1671]: 5 message(s) received.
Mar 17 10:56:47 ip-10-0-1-14.ap-northeast-1.compute.internal cloud-init[1671]: Disconnecting...
Mar 17 10:56:47 ip-10-0-1-14.ap-northeast-1.compute.internal cloud-init[1671]: Connection closed
Mar 17 10:56:47 ip-10-0-1-14.ap-northeast-1.compute.internal cloud-init[1671]: Disconnected!
Code language: Bash (bash)
確かにMQTTメッセージをエンドポイントに送信しています。
改めてマネージメントコンソールを確認します。
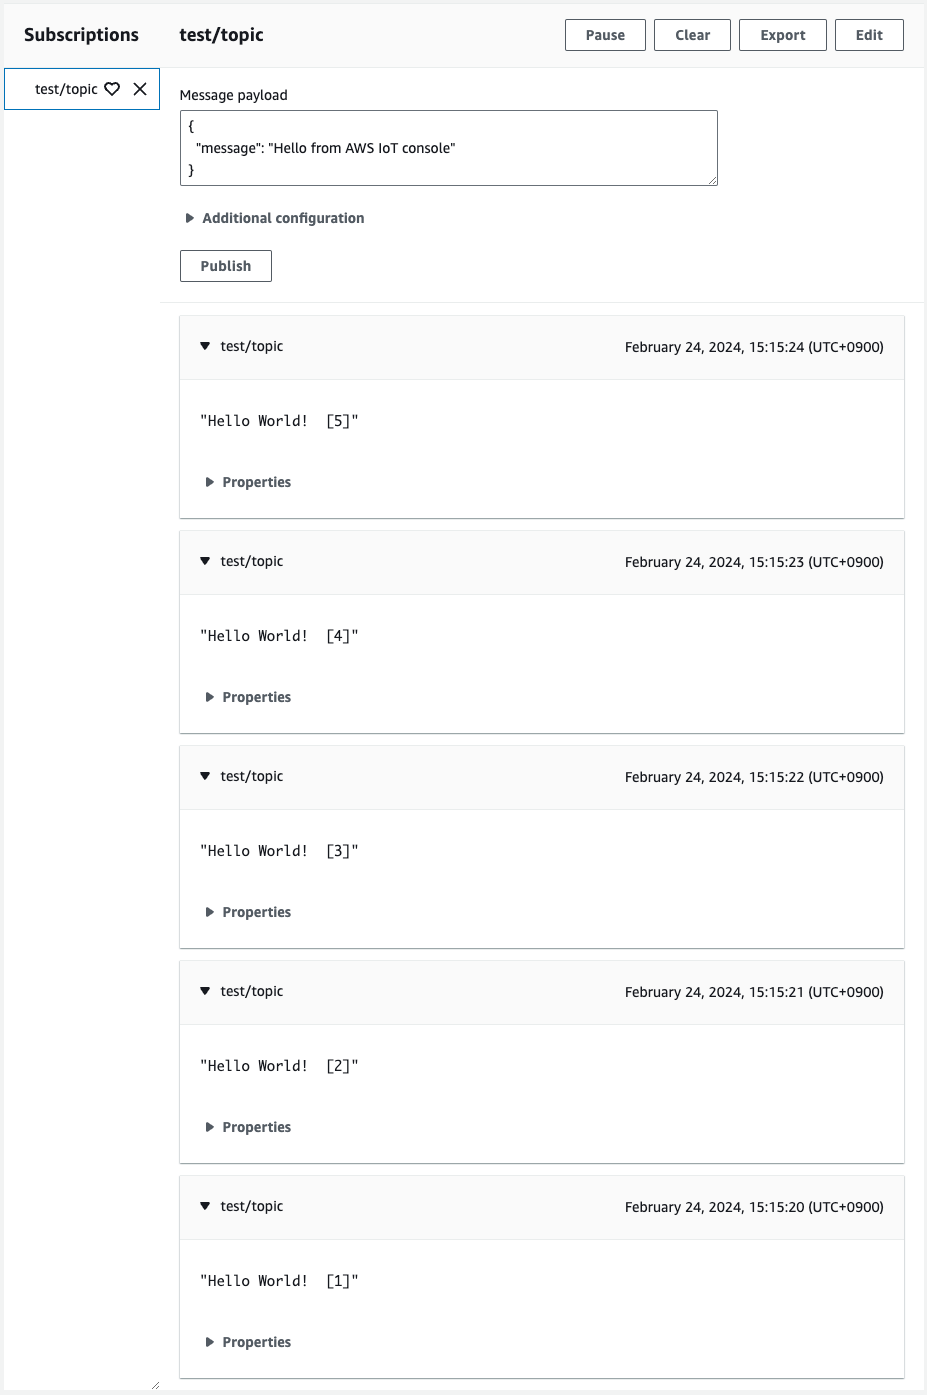
確かにインスタンスからメッセージが送信されてきました。
このようにCloudFormationカスタムリソースによって作成したクライアント証明書を使用して、AWS IoT CoreにMQTTメッセージを送信することができました。
まとめ
CloudFormationカスタムリソースを使用することによって、クライアント証明書を作成することができました。