Image Builderを使用して、WordPress用のAMIを作成する
以下のページで、Image Builderについて取り上げました。
本ページでは、Image Builderの具体的な使用例として、WordPress用のAMIを作成します。
構築する環境
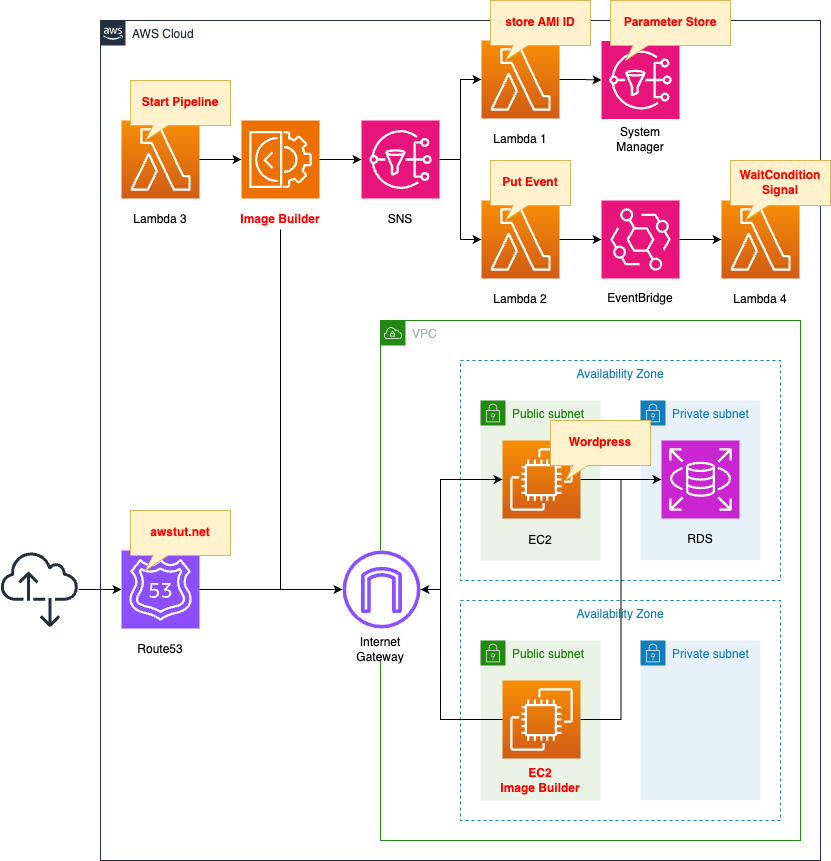
基本的な構成は、冒頭でご紹介したページと同様です。
変更点は3つです。
1点目はプライベート作成を作成し、そちらにRDSのDBインスタンスを配置します。
このDBインスタンスはMySQLタイプです。
このDBインスタンスは、WordPressのDBサーバとして動作します。
2点目はImage Builderで起動するEC2インスタンスの配置場所です。
このインスタンスの用途はAMI作成用でして、一時的に使用します。
冒頭ページでは、本インスタンスはデフォルトVPCに作成されました。
今回はAMIビルド時に先述のDBインスタンスにアクセスしますので、同インスタンスと同じVPC内に配置させます。
3点目はRoute53を使用する点です。
WordPressサイトへ独自ドメインでアクセスできるようにします。
今回はRoute53で取得したawstut.netというドメインを使用します。
Route53にAレコードを作成します。
このレコードは、同ドメインと、WordPressサーバのElastic IPを関連づけるものです。
CloudFormationテンプレートファイル
上記の構成をCloudFormationで構築します。
以下のURLにCloudFormationテンプレートを配置しています。
https://github.com/awstut-an-r/awstut-fa/tree/main/144
テンプレートファイルのポイント解説
本ページはImage Builderを使用して、WordPress用AMIを作成する方法を中心に取り上げます。
Image Builderに関する基本的な事項については、以下のページを確認ください。

Image Builder
Resources:
  Component:
    Type: AWS::ImageBuilder::Component
    Properties:
      Data: !Sub |
        schemaVersion: 1.0
        phases:
          - name: build
            steps:
              - name: InstallWordPress
                action: ExecuteBash
                inputs:
                  commands:
                    - yum update -y
                    - yum install -y httpd
                    - amazon-linux-extras enable -y php7.4

                    - yum install -y php php-gd php-mysqlnd php-xmlrpc -y
                    - yum install -y mariadb

                    - systemctl start httpd
                    - systemctl enable httpd

                    - cd /var/www/html

                    - curl -O https://raw.githubusercontent.com/wp-cli/builds/gh-pages/phar/wp-cli.phar
                    - chmod +x wp-cli.phar
                    - mv wp-cli.phar /usr/local/bin/wp
                    - wp core download --locale=ja
                    - wp core config --dbname="${DBName}" --dbuser="${DBMasterUsername}" --dbpass="${DBMasterUserPassword}" --dbhost="${DBInstanceEndpointAddress}"
                    - wp core install --url="http://${DomainName}" --title="${WordPressTitle}" --admin_user="${WordPressAdminUser}" --admin_password="${WordPressAdminPassword}" --admin_email="${WordPressAdminEmail}"
      Name: !Sub "${Prefix}-Component"
      Platform: !Ref ImageBuilderPlatform
      SupportedOsVersions:
        - !Ref ImageBuilderSupportedOsVersion
      Version: !Ref ImageBuilderVersion

  ImageRecipe:
    Type: AWS::ImageBuilder::ImageRecipe
    Properties:
      Components:
        - ComponentArn: !Ref Component
      Name: !Sub "${Prefix}-ImageRecipe"
      ParentImage: !Ref ImageBuilderParentImage
      Version: !Ref ImageBuilderVersion

  InfrastructureConfiguration:
    Type: AWS::ImageBuilder::InfrastructureConfiguration
    Properties:
      InstanceProfileName: !Ref ImageBuilderRoleProfile
      InstanceTypes:
        - !Ref InstanceType
      Name: !Sub "${Prefix}-InfrastructureConfiguration"
      SecurityGroupIds:
        - !Ref InstanceSecurityGroup
      SnsTopicArn: !Ref Topic
      SubnetId: !Ref PublicSubnet2

  DistributionConfiguration:
    Type: AWS::ImageBuilder::DistributionConfiguration
    Properties:
      Distributions:
        - Region: !Ref AWS::Region
          AmiDistributionConfiguration: {}
      Name: !Sub "${Prefix}-DistributionConfiguration"

  ImagePipeline:
    Type: AWS::ImageBuilder::ImagePipeline
    Properties:
      DistributionConfigurationArn: !Ref DistributionConfiguration
      ImageRecipeArn: !Ref ImageRecipe
      InfrastructureConfigurationArn: !Ref InfrastructureConfiguration
      Name: !Sub "${Prefix}-ImagePipeline"
      Status: ENABLED

  ImageBuilderRoleProfile:
    Type: AWS::IAM::InstanceProfile
    Properties:
      Path: /
      Roles:
        - !Ref ImageBuilderRole

  ImageBuilderRole:
    Type: AWS::IAM::Role
    DeletionPolicy: Delete
    Properties:
      AssumeRolePolicyDocument:
        Version: 2012-10-17
        Statement:
          - Effect: Allow
            Action: sts:AssumeRole
            Principal:
              Service:
                - ec2.amazonaws.com
      ManagedPolicyArns:
        - arn:aws:iam::aws:policy/AmazonSSMManagedInstanceCore
        - arn:aws:iam::aws:policy/EC2InstanceProfileForImageBuilder
Code language: YAML (yaml)
WordPress用AMIを作成する上で、ポイントとなるリソースは2つです。
1つ目はコンポーネントです。
このリソースでWordPressインストールおよび初期設定の手続きを定義します。
具体的には、まずWordPress動作用のパッケージ(Apache, MariaDB, PHP)のインストール・有効化を行います。
続いてWP-CLIを使用して、WordPressの設定を行います。
具体的には、以下を実施します。
- WP-CLIのインストール
- WordPress本体のダウンロード
- wp-config.phpのセットアップ
- WordPressインストール
2つ目はインフラストラクチャ設定です。
SubnetIdプロパティが重要です。
コンポーネントでは、AMIビルド時に、WordPressのインストールまで実施するように記載しています。
つまりDBサーバであるRDSインスタンスにアクセス可能である必要があります。
そのためDBインスタンスが起動しているVPC内のサブネットに、Image Builder用のEC2インスタンスを配置させる必要があります。
加えて、このEC2インスタンスはインターネットへのアクセスが必須となります。
このインスタンスはWP-CLIやWordPress本体のダウンロードを行いますし、Image Builderを正常に動作させるために、SSMやS3にアクセスも行います。
インスタンスがインターネット向けに通信するために、インスタンスをパブリックサブネット(PubllicSubnet2)に配置します。
このサブネットの詳細を確認します。
Resources:
  VPC:
    Type: AWS::EC2::VPC
    Properties:
      CidrBlock: !Ref VPCCidrBlock

  IGW:
    Type: AWS::EC2::InternetGateway

  IGWAttachment:
    Type: AWS::EC2::VPCGatewayAttachment
    Properties:
      VpcId: !Ref VPC
      InternetGatewayId: !Ref IGW

  PublicSubnet2:
    Type: AWS::EC2::Subnet
    Properties:
      AvailabilityZone: !Sub "${AWS::Region}${AvailabilityZone2}"
      CidrBlock: !Ref CidrIp2
      MapPublicIpOnLaunch: true
      VpcId: !Ref VPC

  PublicRouteTable:
    Type: AWS::EC2::RouteTable
    Properties:
      VpcId: !Ref VPC

  RouteToInternet:
    Type: AWS::EC2::Route
    Properties:
      RouteTableId: !Ref PublicRouteTable
      DestinationCidrBlock: 0.0.0.0/0
      GatewayId: !Ref IGW

  PublicSubnetRouteTableAssociation2:
    Type: AWS::EC2::SubnetRouteTableAssociation
    Properties:
      SubnetId: !Ref PublicSubnet2
      RouteTableId: !Ref PublicRouteTable
Code language: YAML (yaml)
このサブネットはインターネットゲートウェイへのデフォルトルートを持っています。
そしてMapPublicIpOnLaunchプロパティを有効化することによって、インスタンスの起動時に、パブリックアドレスを自動的に付与させます。
EC2インスタンス
Resources:
  Instance:
    Type: AWS::EC2::Instance
    Properties:
      ImageId: !Sub "{{resolve:ssm:${ParameterAmi}}}"
      InstanceType: !Ref InstanceType
      NetworkInterfaces:
        - AssociatePublicIpAddress: true
          DeviceIndex: 0
          GroupSet:
            - !Ref InstanceSecurityGroup
          SubnetId: !Ref PublicSubnet1

  EIP:
    Type: AWS::EC2::EIP
    Properties:
      Domain: vpc

  EIPAssociation:
    Type: AWS::EC2::EIPAssociation
    Properties:
      AllocationId: !GetAtt EIP.AllocationId
      InstanceId: !Ref Instance
Code language: YAML (yaml)
ポイントは2つです。
1つ目はImageIdプロパティです。
Image BuilderでビルドしたAMIのIDをSSM Parameter Storeに格納します。
この値をCloudFormationの動的参照を使用して、本プロパティに指定します。
詳細については、冒頭でご紹介したページをご確認ください。
2つ目はElastic IPです。
後述のRoute53を使用して、カスタムドメインで本インスタンスにアクセスできるようにします。
ですから本インスタンスに割り当てるグローバルアドレスは、Elastic IPを使用して固定します。
(参考)RDS
Resources:
  DBInstance:
    Type: AWS::RDS::DBInstance
    DeletionPolicy: Delete
    Properties:
      AllocatedStorage: !Ref DBAllocatedStorage
      DBInstanceClass: !Ref DBInstanceClass
      DBInstanceIdentifier: dbinstance
      DBName: !Ref DBName
      DBSubnetGroupName: !Ref DBSubnetGroup
      Engine: !Ref DBEngine
      EngineVersion: !Ref DBEngineVersion
      MasterUsername: !Ref DBMasterUsername
      MasterUserPassword: !Ref DBMasterUserPassword
      VPCSecurityGroups:
        - !Ref DBSecurityGroup

  DBSubnetGroup:
    Type: AWS::RDS::DBSubnetGroup
    Properties:
      DBSubnetGroupName: dbsubnetgroup
      DBSubnetGroupDescription: dbsubnetgroup.
      SubnetIds:
        - !Ref PrivateSubnet1
        - !Ref PrivateSubnet2
Code language: YAML (yaml)
RDSのDBインスタンスを1台作成します。
特設な設定は実施しません。
以下の通りに設定します。
- ユーザ名:testuser
- パスワード:Passw0rd
- DB名:wordpress
(参考)Route53
Resources:
  DnsRecord:
    Type: AWS::Route53::RecordSet
    Properties:
      HostedZoneId: !Ref HostedZoneId
      Name: !Ref DomainName
      ResourceRecords:
        - !Ref EIP
      TTL: !Ref TTL
      Type: A
Code language: YAML (yaml)
Route53のAレコードを作成します。
カスタムドメインとEC2インスタンスのEIPを関連づけます。
環境構築
CloudFormationを使用して、本環境を構築し、実際の挙動を確認します。
CloudFormationスタックを作成し、スタック内のリソースを確認する
CloudFormationスタックを作成します。
スタックの作成および各スタックの確認方法については、以下のページをご確認ください。
各スタックのリソースを確認した結果、今回作成された主要リソースの情報は以下の通りです。
- コンポーネント:fa-144-Component
- パイプライン:fa-144-ImagePipeline
- EC2インスタンス:i-01c377157641d532d
- RDSインスタンスのエンドポイント:dbinstance.cl50iikpthxs.ap-northeast-1.rds.amazonaws.com
作成されたリソースをAWS Management Consoleから確認します。
コンポーネントを確認します。
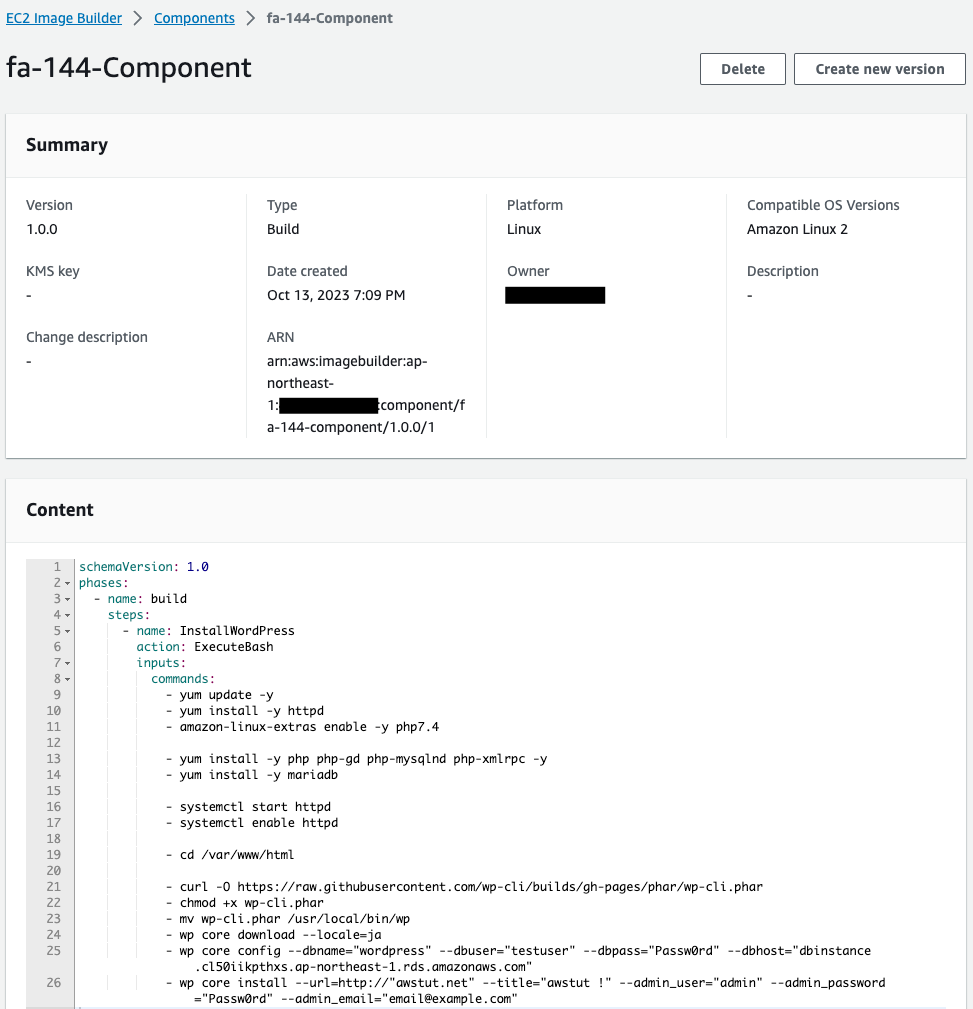
CloudFormationで指定した通りに、コンポーネントが作成されています。
WP CLIに各種パラメータが渡されています。
DBの各種情報(ユーザ名、パスワード等)や、サイトの情報(ドメイン名やタイトル等)が指定されています。
パイプラインを確認します。
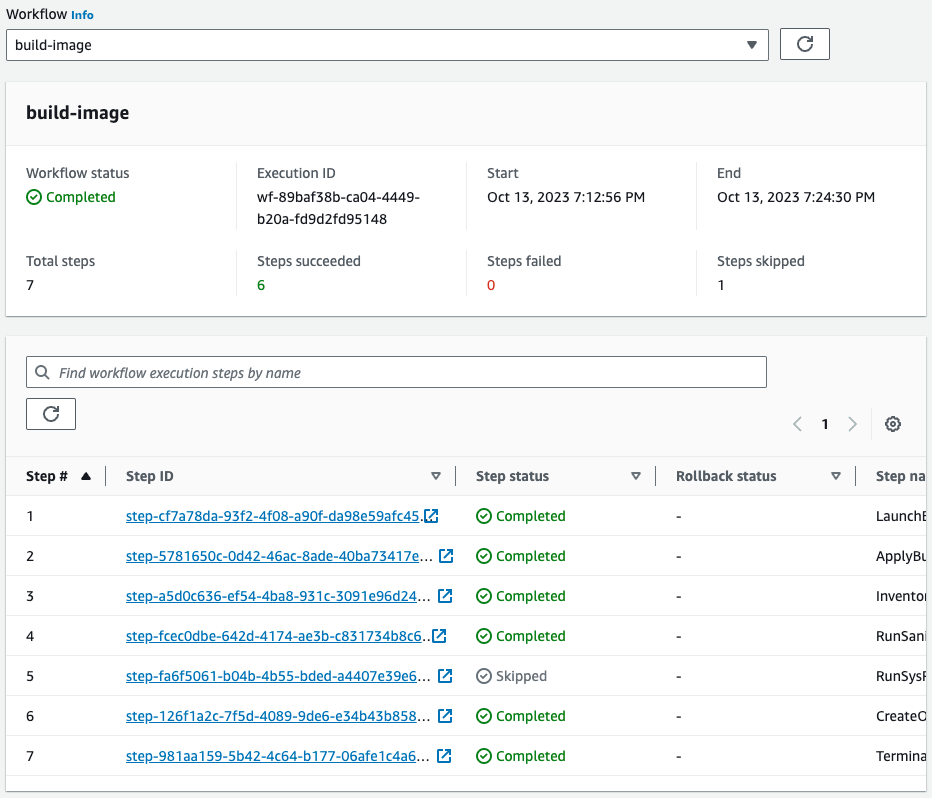
Workflowを見ると、パイプラインが実行されて、正常に完了しています。
CloudFormationカスタムリソースに紐づくLambda関数によって、このパイプラインが自動的に開始されたということです。

Outputを見ると、AMIが作成されています。
今回生成されたAMIのIDは「ami-0014da8524101ba45」でした。
EC2インスタンスを確認します。
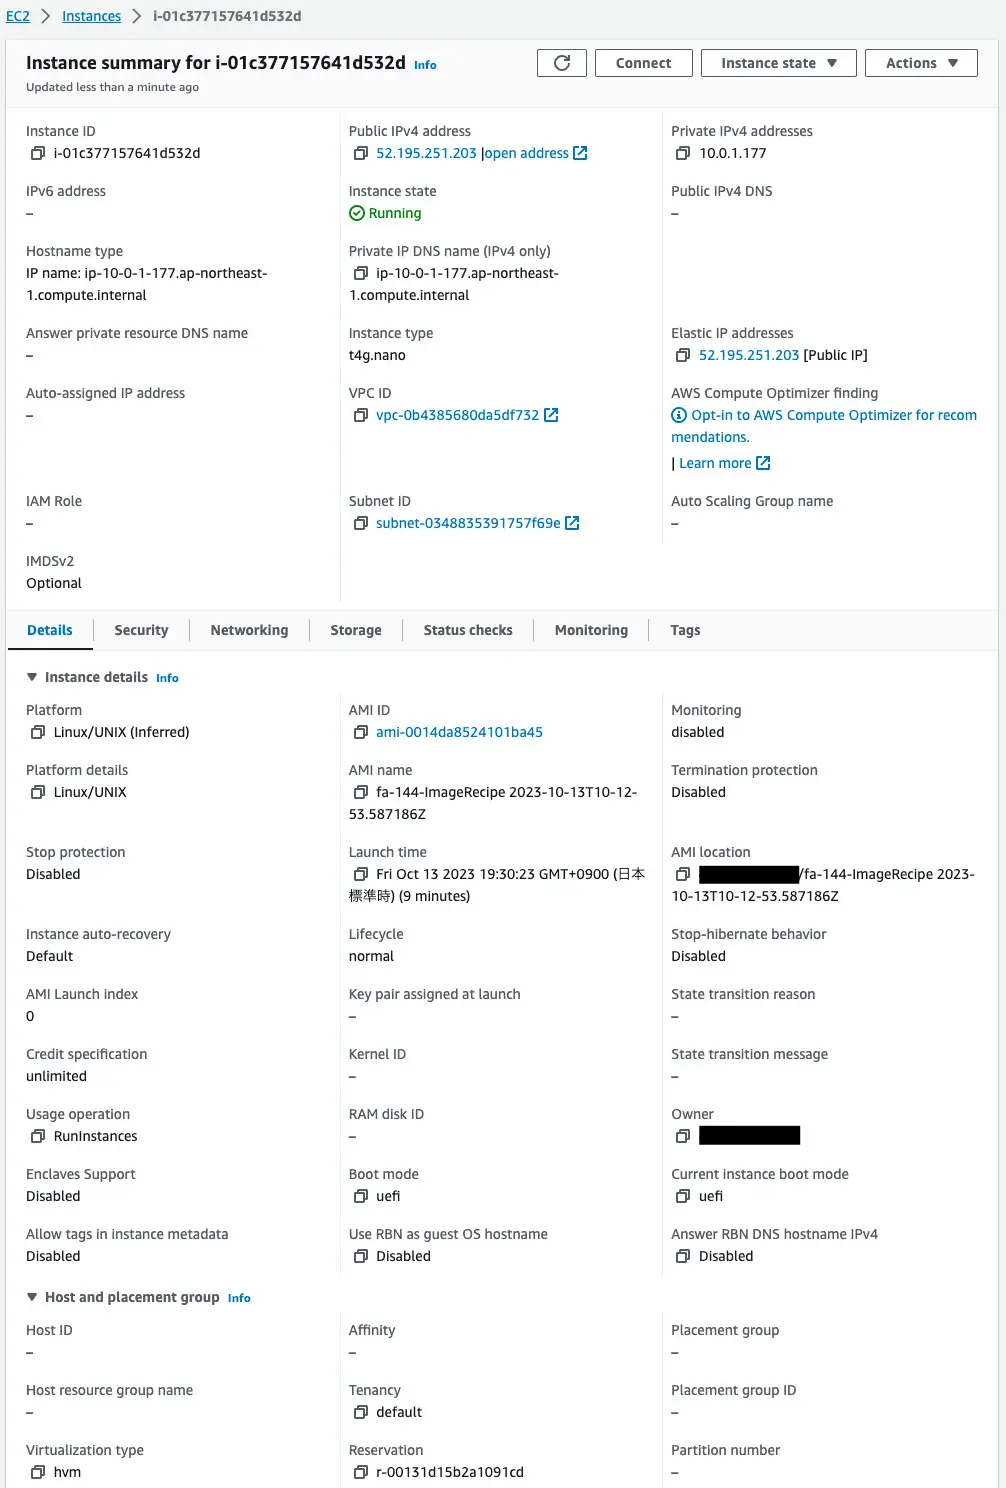
インスタンスが正常に作成されています。
AMIを見ると、「ami-0014da8524101ba45」とあります。
つまりImage BuilderによってビルドされたAMIが指定されています。
Elastic IP Addressを見ると、「52.195.251.203」が設定されています。
Route53を確認します。

awstut.netというドメインに先ほどのElastic IPが関連づいています。
動作確認
準備が整いましたので、WordPressサイトにアクセスします。
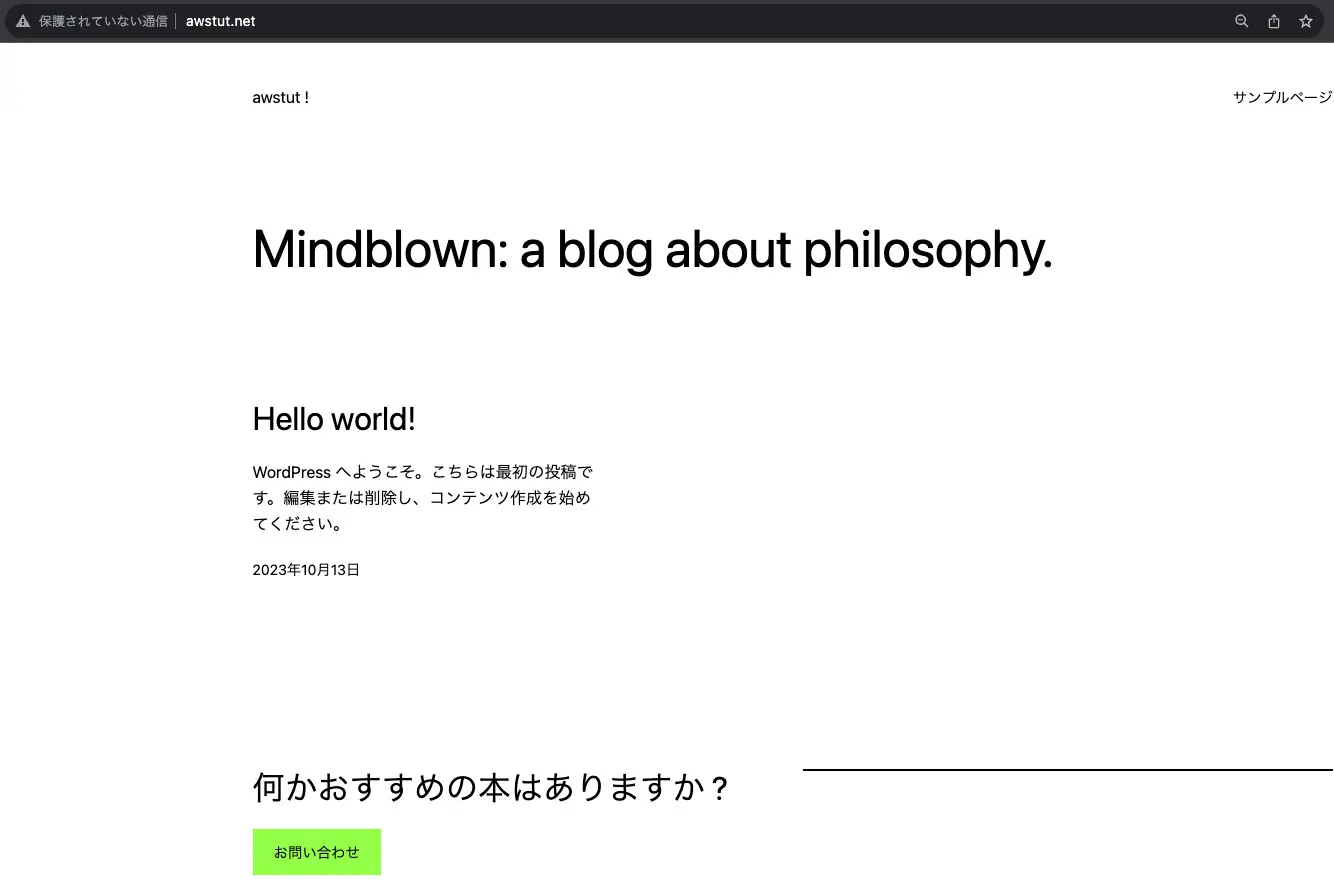
WordPressページが表示されました。
このことから、Image BuilderによってビルドされたAMIを使用して、EC2インスタンスが起動され、正常に動作していることがわかります。
管理ページにログインします。
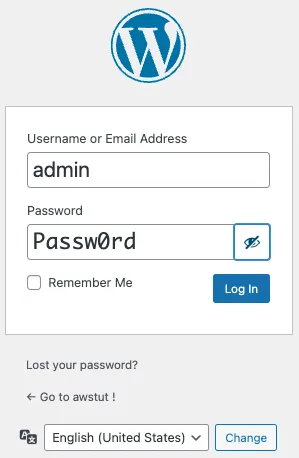
Image Builderで指定したユーザ名とパスワードを入力します。
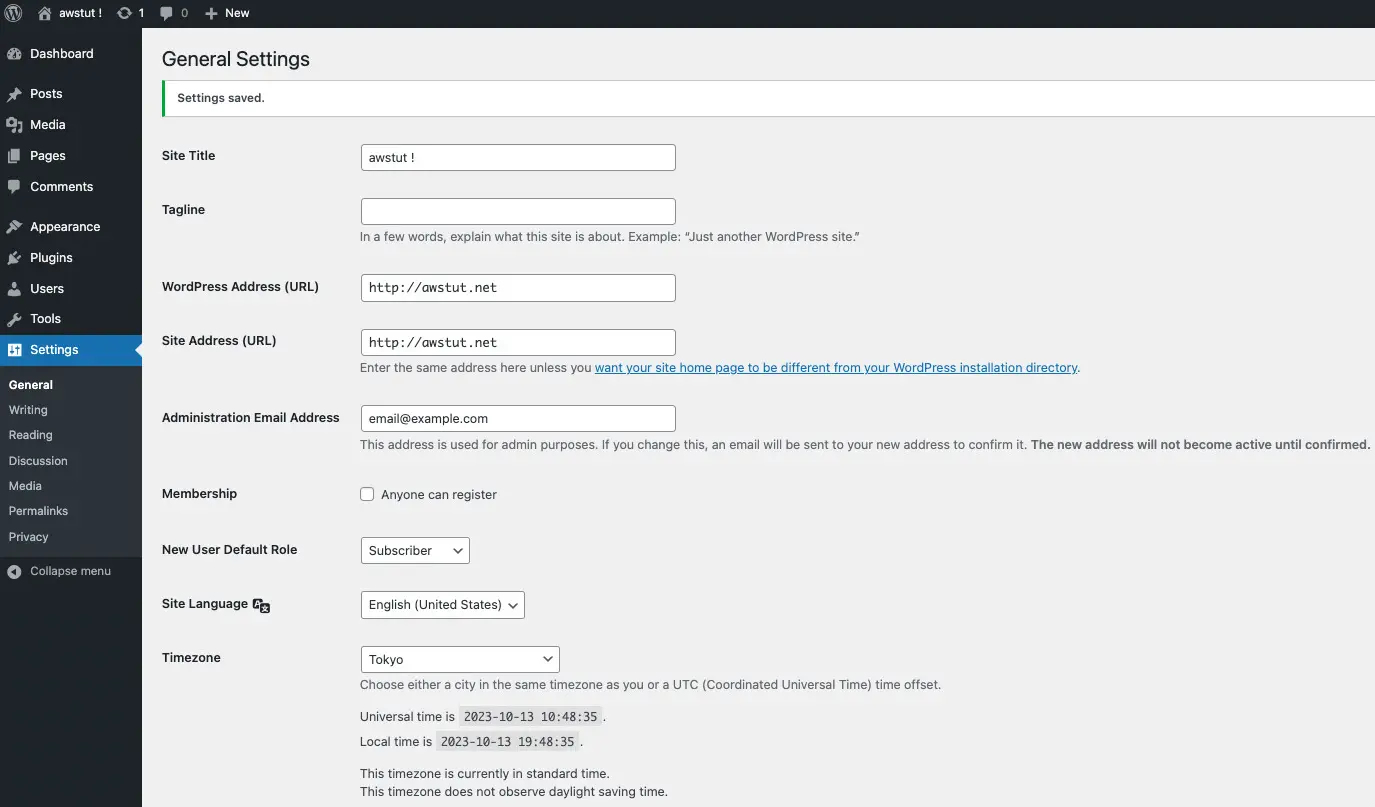
正常にログインできました。
設定ページを見ると、サイトのタイトルや、URL、メールアドレスが設定されていることがわかります。
これらもImage Builderで指定した値です。
まとめ
Image Builderの具体的な使用例として、WordPress用のAMIを作成しました。
このAMIからEC2インスタンスを起動し、WordPressサイトが動作することを確認しました。