Systems Managerに登録したRaspberry Piに、AWS IoT Device Clientをインストールする
本ページでは、AWS IoT Device Clientを取り上げます。
The AWS IoT Device Client is free, open-source, modular software written in C++ that you can compile and install on your Embedded Linux based IoT devices to access AWS IoT Core, AWS IoT Device Management, and AWS IoT Device Defender features by default. It serves as a reference implementation for your IoT devices to work with AWS IoT services, with operational best practices baked in – using it is the easiest way to create a proof-of-concept (PoC) for your IoT project.
aws-iot-device-client
今回はAWS公式チュートリアルに従い、Raspberry PiにAWS IoT Device Clientをインストールします。
なお使用するRaspberry PiはSystems Managerに登録します。
SSMを通じてコマンドを送って、AWS IoT Device Clientをインストールするためです。
構築する環境
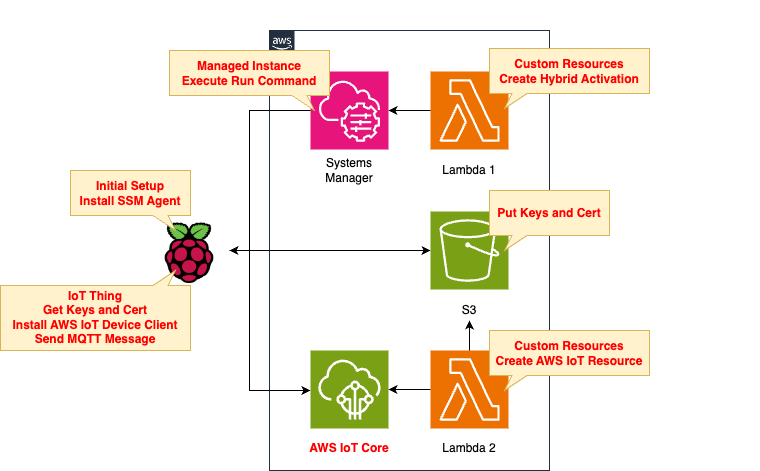
構成は大きく2つに分かれます。
1つ目はRaspberry PiをSystems Managerに登録するためのものです。
CloudFormationカスタムリソースに関連付けたLambda関数を実行して、登録用のハイブリッドアクティベーションを作成します。
2つ目はAWS IoTに関するものです。
IoTデバイスとしてRaspberry Piを登録するために必要なリソースを、Lambda関数を用いて作成します。
この関数もカスタムリソースに関連づいています。
生成されるリソースの中には、クライアント証明書や鍵が含まれますが、これらはS3バケットに配置します。
これはRaspberry Piがこれらのリソースをダウンロードできるようにするためです。
AWS側からRaspbbery Piにコマンドを送ってAWS IoT Device Clientのセットアップを行います。
具体的には、Raspberry Piに対してSSM関連付けを作成し、シェルスクリプトを実行する形をとります。
Lambda関数のランタイム環境はPython3.12とします。
CloudFormationテンプレートファイル
上記の構成において、AWS側の構成に関しては、CloudFormationを使用して構築します。
以下のURLにCloudFormationテンプレートを配置しています。
Raspberry PiをSSMに登録する
SSM用IAMロールの変更点
Rraspberry PiをSSMに登録します。
登録は2工程です。
- Systems Managerのハイブリッドアクティベーションを作成する
- アクティベーションコードを使用しつつ、Raspberry PiにSSMエージェントをインストールする
具体的な手順は以下のページをご確認ください。

上記のページと異なる点は、SSM用IAMロールです。
Resources:
  SSMServiceRole:
    Type: AWS::IAM::Role
    DeletionPolicy: Delete
    Properties:
      AssumeRolePolicyDocument:
        Version: 2012-10-17
        Statement:
          - Effect: Allow
            Action: sts:AssumeRole
            Principal:
              Service:
                - ssm.amazonaws.com
            Condition:
              StringEquals:
                aws:SourceAccount: !Ref AWS::AccountId
              ArnEquals:
                aws:SourceArn: !Sub "arn:aws:ssm:${AWS::Region}:${AWS::AccountId}:*"
      ManagedPolicyArns:
        - arn:aws:iam::aws:policy/AmazonSSMManagedInstanceCore
      Policies:
        - PolicyName: SSMServiceRolePolicy
          PolicyDocument:
            Version: 2012-10-17
            Statement:
              - Effect: Allow
                Action:
                  - s3:GetObject
                  - s3:PutObject
                Resource:
                  - !Sub "arn:aws:s3:::${BucketName}/*"
Code language: YAML (yaml)
このIAMロールはRaspberry Piが実行可能なAWSアクションを定めるものです。
今回はS3バケットへのアクセスを許可します。
このバケットは2つの用途があります。
1つ目はAWS IoT用証明書や鍵を設置するために使用します。
これらのオブジェクトはRaspberry Piがダウンロードして使用するので、s3:GetObjectを許可します。
2つ目はSSM関連付けの実行ログを設置するために使用します。
ログはRaspberry Piから配置することになりますので、s3:PutObjectを許可します。
CloudFormationスタック作成
AWS CLIを使用して、CloudFormationスタックを作成します。
上記のテンプレートファイルを任意のS3バケットに設置した上で、以下のコマンドを実行します。
$ aws cloudformation create-stack \
--stack-name fa-153-01 \
--template-url https://[bucket-name].s3.[region].amazonaws.com/fa-153/fa-153-01.yaml \
--capabilities CAPABILITY_IAM
Code language: Bash (bash)
スタック作成の詳細については、以下のページをご確認ください。

マネージメントコンソールのCloudFormationページにおいて該当スタックを確認します。
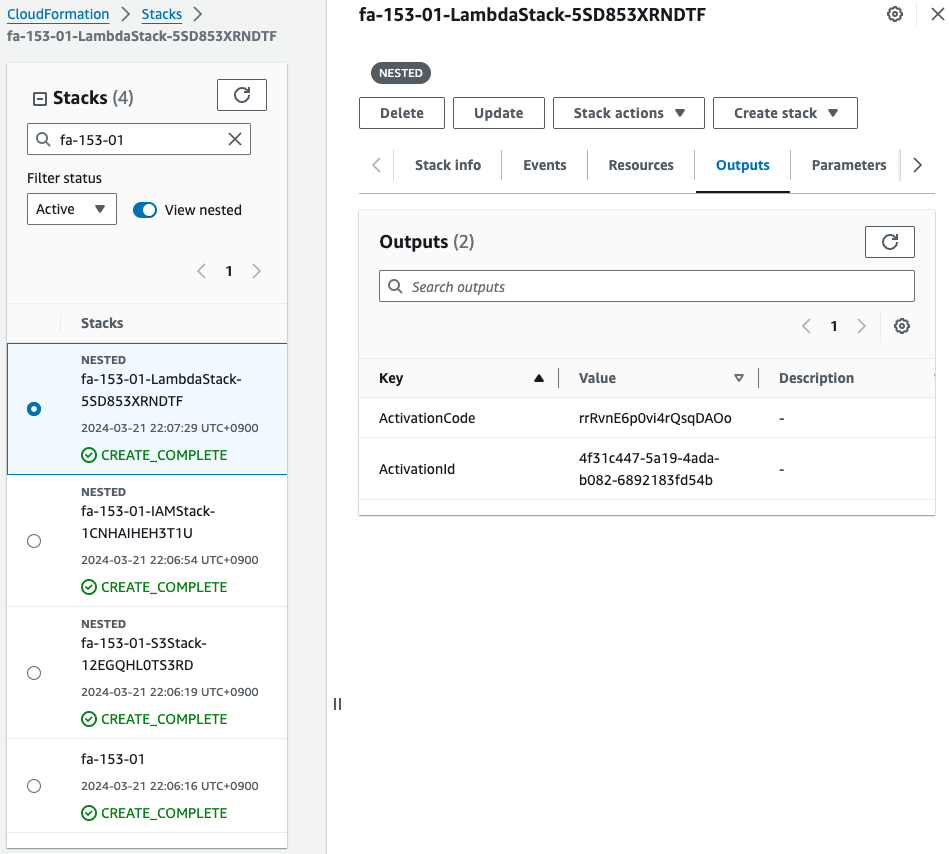
確かにハイブリッドアクティベーション用のコードとIDが取得できています。
Raspberry PiにSSM Agentをインストールする
Raspberry Piで以下のコマンドを実行してSSM Agentをインストールします。
sudo apt-get -y update
sudo apt-get -y upgrade
sudo apt-get -y install libc6:armhf
mkdir /tmp/ssm
curl https://amazon-ssm-ap-northeast-1.s3.ap-northeast-1.amazonaws.com/latest/debian_arm/ssm-setup-cli -o /tmp/ssm/ssm-setup-cli
sudo chmod +x /tmp/ssm/ssm-setup-cli
sudo /tmp/ssm/ssm-setup-cli -register -activation-code "[activation-code]" -activation-id "[activation-id]" -region "ap-northeast-1"
Code language: Bash (bash)
最後のコマンドに先ほど確認したアクティベーション用のIDとコードを埋め込みます。
SSM Agentのインストールが正常に完了すると、同エージェントが自動的に起動します。
awstut@raspberrypi:~ $ sudo systemctl status amazon-ssm-agent
● amazon-ssm-agent.service - amazon-ssm-agent
      Loaded: loaded (/lib/systemd/system/amazon-ssm-agent.service; enabled; preset: enabled)
      Active: active (running) since Thu 2024-03-21 22:10:02 JST; 2 days ago
    Main PID: 2978 (amazon-ssm-agen)
      Tasks: 24 (limit: 9253)
        CPU: 6min 11.989s
      CGroup: /system.slice/amazon-ssm-agent.service
              ├─2978 /usr/bin/amazon-ssm-agent
              └─2996 /usr/bin/ssm-agent-worker
Code language: Bash (bash)
SSM Fleet Managerを確認します。
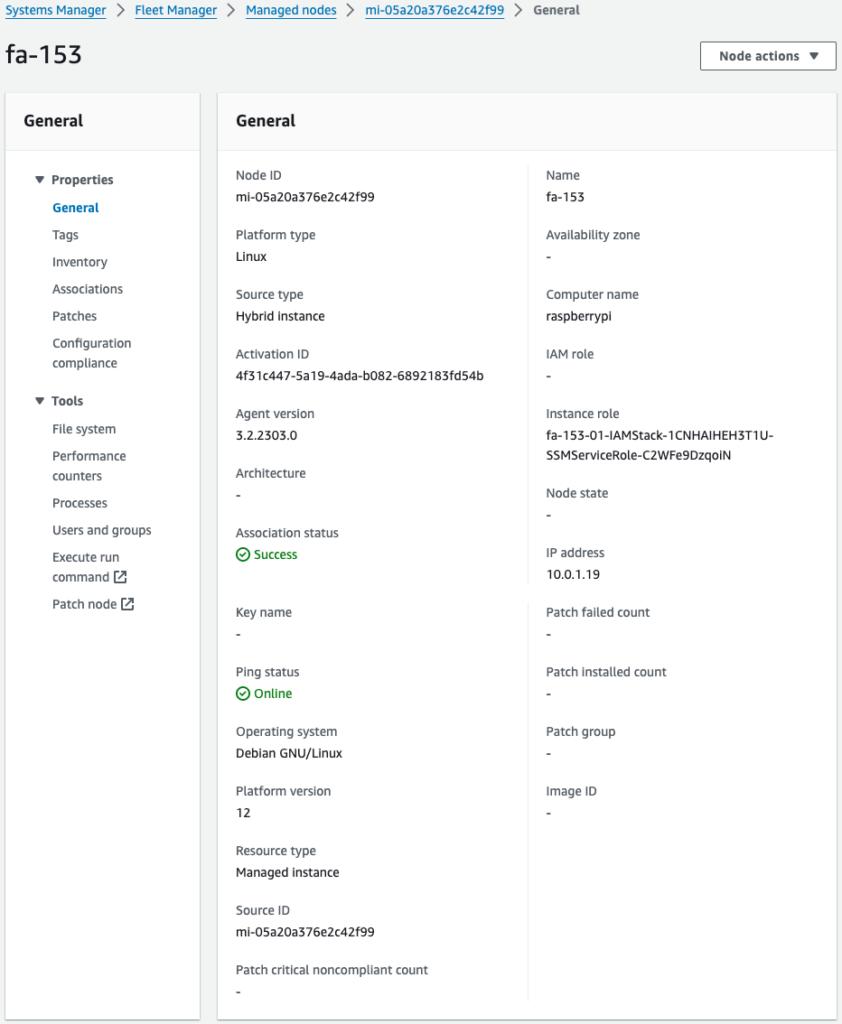
確かにRaspberry Piがマネージドノードとして登録されています。
Raspberry PiをAWS IoTに登録する
Raspberry Piに割り当てられたインスタンスIDを取得する
Raspberry PiをIoTデバイスとしてAWS IoTに登録する方法は、以下の2工程があります。
- AWS IoTリソースを作成する。
- S3バケットからAWS IoT用のクライアント証明書と鍵をアップロードする。
Raspberry PiをAWS IoTに登録するためには、以下のリソースを作成します。
- モノ(Thing)
- IoTポリシー
- クライアント証明書
- 秘密鍵と公開鍵
- モノと証明書のアタッチ
- IoTポリシーと証明書のアタッチ
具体的な手順は以下のページをご確認ください。
上記ページと異なる点は、クライアント証明書や鍵を作成するLambda関数です。
Resources:
  Function2:
    Type: AWS::Lambda::Function
    Properties:
      Architectures:
        - !Ref Architecture
      Environment:
        Variables:
          ACTIVATION_ID: !Ref ActivationId
          BUCKET_NAME: !Ref BucketName
          CERTIFICATE_NAME: !Ref CertificateName
          PRIVATE_KEY_NAME: !Ref PrivateKeyName
          PUBLIC_KEY_NAME: !Ref PublicKeyName
          REGION: !Ref AWS::Region
          THING: !Ref Thing
      Code:
        ZipFile: |
          import boto3
          import cfnresponse
          import os

          activation_id = os.environ['ACTIVATION_ID']
          bucket_name = os.environ['BUCKET_NAME']
          certificate_name = os.environ['CERTIFICATE_NAME']
          private_key_name = os.environ['PRIVATE_KEY_NAME']
          public_key_name = os.environ['PUBLIC_KEY_NAME']
          region = os.environ['REGION']
          thing = os.environ['THING']

          s3_key = '{folder}/{object}'

          CREATE = 'Create'
          response_data = {}

          iot_client = boto3.client('iot', region_name=region)
          s3_client = boto3.client('s3', region_name=region)
          ssm_client = boto3.client('ssm', region_name=region)

          def lambda_handler(event, context):
            try:
              if event['RequestType'] == 'Create':
                iot_response = iot_client.create_keys_and_certificate(
                  setAsActive=True
                )

                s3_client.put_object(
                  Body=iot_response['certificatePem'],
                  Bucket=bucket_name,
                  Key=s3_key.format(
                    folder=thing,
                    object=certificate_name
                  )
                )

                # public key
                s3_client.put_object(
                  Body=iot_response['keyPair']['PublicKey'],
                  Bucket=bucket_name,
                  Key=s3_key.format(
                    folder=thing,
                    object=public_key_name
                  )
                )

                # private key
                s3_client.put_object(
                  Body=iot_response['keyPair']['PrivateKey'],
                  Bucket=bucket_name,
                  Key=s3_key.format(
                    folder=thing,
                    object=private_key_name
                  )
                )

                response_data['CertificateArn'] = iot_response['certificateArn']
                certificate_id = iot_response['certificateId']

                iot_endpoint_response = iot_client.describe_endpoint(
                  endpointType='iot:Data-ATS'
                )
                response_data['IoTEndpoint'] = iot_endpoint_response['endpointAddress']

                describe_instance_response = ssm_client.describe_instance_information(
                  Filters=[
                    {
                      'Key': 'ActivationIds',
                      'Values': [
                        activation_id
                      ]
                    }
                  ]
                )
                response_data['InstanceId'] = describe_instance_response['InstanceInformationList'][0]['InstanceId']

              elif event['RequestType'] == 'Delete':
                certificate_id = event['PhysicalResourceId']

                # delete objects in s3 bucket
                list_response = s3_client.list_objects_v2(
                  Bucket=bucket_name
                )

                if 'Contents' in list_response and len(list_response['Contents']):
                  for obj in list_response['Contents']:
                    delete_response = s3_client.delete_object(
                      Bucket=bucket_name,
                      Key=obj['Key']
                    )
                    print(delete_response)

                # inactive and delete iot cert
                iot_client.update_certificate(
                  certificateId=certificate_id,
                  newStatus='INACTIVE'
                )
                iot_client.delete_certificate(
                  certificateId=certificate_id,
                  forceDelete=True
                )

              cfnresponse.send(
                event=event,
                context=context,
                responseStatus=cfnresponse.SUCCESS,
                responseData=response_data,
                physicalResourceId=certificate_id
                )
            except Exception as e:
              print(e)

              certificate_id = event['PhysicalResourceId']

              cfnresponse.send(
                event=event,
                context=context,
                responseStatus=cfnresponse.FAILED,
                responseData=response_data,
                physicalResourceId=certificate_id
                )
      FunctionName: !Sub "${Prefix}-function-02"
      Handler: !Ref Handler
      Runtime: !Ref Runtime
      Role: !GetAtt FunctionRole2.Arn
      Timeout: !Ref Timeout
Code language: YAML (yaml)
変更点はRaspberry Piに割り当てられたインスタンスIDを取得する部分です。
boto3のSSM用クライアントオブジェクトのdescribe_instance_informationメソッドを実行してIDを取得します。
ハイブリッドアクティベーションのIDに基づいて検索します。
取得したインスタンスIDは後述のSSM関連付けを作成するために使用します。
SSMを使用して、AWS IoT Device Clientのセットアップする
Raspberry PiにAWS IoT Device Clientをインストールする手順は、基本的に以下のAWS公式ページで紹介されている手順に従っています。
ただし今回は手作業でインストール手順をなぞるのではなく、AWS側からコマンドを送って自動的にセットアップを進めます。
具体的にはSSM関連付けを作成し、SSM Run Commandsを通じてコマンドを実行します。
Resources:
  RunShellScriptAssociation:
    Type: AWS::SSM::Association
    Properties:
      AssociationName: !Sub "${Prefix}-shellscript-association"
      Name: AWS-RunShellScript
      OutputLocation:
        S3Location:
          OutputS3BucketName: !Ref BucketName
          OutputS3KeyPrefix: shellscript-association-log
      Parameters:
        commands:
          - "apt-get -y install build-essential libssl-dev cmake unzip git python3-pip"
          - !Sub 'su - ${UserName} -c "export PATH=$PATH:~/.local/bin"'
          - !Sub 'su - ${UserName} -c "git clone https://github.com/aws/aws-cli.git"'
          - !Sub 'su - ${UserName} -c "cd aws-cli && git checkout v2 && sudo pip3 install --break-system-packages -r requirements.txt"'
          - !Sub 'su - ${UserName} -c "cd aws-cli && git checkout v2 && sudo pip3 install --break-system-packages ."'

          - !Sub 'su - ${UserName} -c "mkdir ~/certs"'
          - !Sub 'su - ${UserName} -c "curl -o ~/certs/AmazonRootCA1.pem https://www.amazontrust.com/repository/AmazonRootCA1.pem"'
          - !Sub 'su - ${UserName} -c "chmod 745 ~"'
          - !Sub 'su - ${UserName} -c "chmod 700 ~/certs"'
          - !Sub 'su - ${UserName} -c "chmod 644 ~/certs/AmazonRootCA1.pem"'

          - !Sub 'su - ${UserName} -c "git clone https://github.com/awslabs/aws-iot-device-client aws-iot-device-client"'
          - !Sub 'su - ${UserName} -c "mkdir ~/aws-iot-device-client/build"'
          - !Sub 'su - ${UserName} -c "cd ~/aws-iot-device-client/build && cmake ../"'
          - !Sub 'su - ${UserName} -c "cd ~/aws-iot-device-client/build && cmake --build . --target aws-iot-device-client"'

          - !Sub 'su - ${UserName} -c "mkdir ~/dc-configs"'
          - !Sub 'su - ${UserName} -c "mkdir ~/policies"'
          - !Sub 'su - ${UserName} -c "mkdir ~/messages"'
          - !Sub 'su - ${UserName} -c "mkdir ~/certs/testconn"'
          - !Sub 'su - ${UserName} -c "mkdir ~/certs/pubsub"'
          - !Sub 'su - ${UserName} -c "mkdir ~/certs/jobs"'
          - !Sub 'su - ${UserName} -c "chmod 745 ~"'
          - !Sub 'su - ${UserName} -c "chmod 700 ~/certs/testconn"'
          - !Sub 'su - ${UserName} -c "chmod 700 ~/certs/pubsub"'
          - !Sub 'su - ${UserName} -c "chmod 700 ~/certs/jobs"'

          - !Sub 'su - ${UserName} -c "sudo aws s3 cp s3://${BucketName}/${Thing}/${CertificateName} ~/certs/testconn/"'
          - !Sub 'su - ${UserName} -c "sudo aws s3 cp s3://${BucketName}/${Thing}/${PrivateKeyName} ~/certs/testconn/"'
          - !Sub 'su - ${UserName} -c "sudo aws s3 cp s3://${BucketName}/${Thing}/${PublicKeyName} ~/certs/testconn"'
          - !Sub 'su - ${UserName} -c "sudo chown ${UserName}:${UserName} ~/certs/testconn/*"'

          - !Sub 'su - ${UserName} -c "sudo chmod 644 ~/certs/testconn/*"'
          - !Sub 'su - ${UserName} -c "sudo chmod 600 ~/certs/testconn/${PrivateKeyName}"'

          - !Sub 'su - ${UserName} -c "chmod 745 ~/dc-configs"'
          - !Sub |
            cat << EOF > /home/${UserName}/dc-configs/dc-testconn-config.json
            {
              "endpoint": "${Endpoint}",
              "cert": "~/certs/testconn/${CertificateName}",
              "key": "~/certs/testconn/${PrivateKeyName}",
              "root-ca": "~/certs/AmazonRootCA1.pem",
              "thing-name": "${Thing}",
              "logging": {
                "enable-sdk-logging": true,
                "level": "DEBUG",
                "type": "STDOUT",
                "file": ""
              },
              "jobs": {
                "enabled": false,
                "handler-directory": ""
              },
              "tunneling": {
                "enabled": false
              },
              "device-defender": {
                "enabled": false,
                "interval": 300
              },
              "fleet-provisioning": {
                "enabled": false,
                "template-name": "",
                "template-parameters": "",
                "csr-file": "",
                "device-key": ""
              },
              "samples": {
                "pub-sub": {
                  "enabled": true,
                  "publish-topic": "${PublishTopicName}",
                  "publish-file": "",
                  "subscribe-topic": "${SubscribeTopicName}",
                  "subscribe-file": ""
                }
              },
              "config-shadow": {
                "enabled": false
              },
              "sample-shadow": {
                "enabled": false,
                "shadow-name": "",
                "shadow-input-file": "",
                "shadow-output-file": ""
              }
            }
            EOF
          - !Sub 'su - ${UserName} -c "sudo chown ${UserName}:${UserName} ~/dc-configs/dc-testconn-config.json"'
          - !Sub 'su - ${UserName} -c "chmod 644 ~/dc-configs/dc-testconn-config.json"'

          - !Sub 'su - ${UserName} -c "sudo mkdir /var/log/aws-iot-device-client"'
          - !Sub 'su - ${UserName} -c "sudo chmod 745 /var/log/aws-iot-device-client"'
          - !Sub 'su - ${UserName} -c "sudo chown ${UserName}:${UserName} /var/log/aws-iot-device-client"'
      Targets:
        - Key: InstanceIds
          Values:
            - !Ref InstanceId
      WaitForSuccessTimeoutSeconds: !Ref WaitForSuccessTimeoutSeconds
Code language: YAML (yaml)
SSM関連付けでは、SSMドキュメントAWS-RunShellScriptを実行します。
このドキュメントは指定したコマンドを対象インスタンスで実行することができるというものです。
今回実行するコマンドは上記のページで取り上げられているものです。
ただし以下の2点を変更しています。
1点目はsuコマンドを使用して、各コマンドを実行するユーザを指定します。
以下のページで詳しく取り上げられていますが、AWS-RunShellScriptで実行されるコマンドの実行ユーザはrootです。
今回はRaspberry Piに対してコマンドを実行することになりますが、今回Raspberry Pi OSインストール時に指定したユーザ(awstut)で実行します。
2点目はAWS IoTリソースの扱いについてです。
本章冒頭でご紹介したページでは、Raspberry Pi内でモノやIoTポリシーを作成する流れになっています。
しかし今回の構成では、それらはCloudFormationを使用して作成することになっていますので、これに関係するコマンドは実行しません。
また証明書と鍵については先述のLambda関数によって作成されており、S3バケットに配置されています。
ですからAWS CLIを使用して、同バケットからそれらをダウンロードします。
CloudFormationスタック作成
AWS CLIを使用して、CloudFormationスタックを作成します。
上記のテンプレートファイルを任意のS3バケットに設置した上で、以下のコマンドを実行します。
aws cloudformation create-stack \
--stack-name fa-153-02 \
--template-url https://[bucket-name].s3.[region].amazonaws.com/fa-153/fa-153-02.yaml \
--capabilities CAPABILITY_IAM
Code language: Bash (bash)
リソース確認
マネージメントコンソールにアクセスして、作成されてリソースを確認します。
AWS IoTに関係するリソースを確認します。
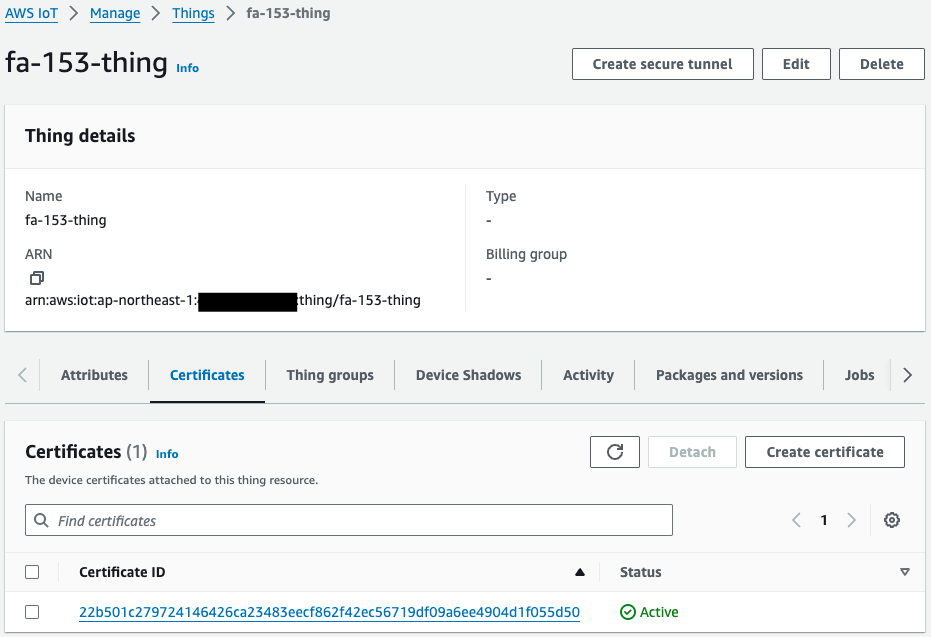
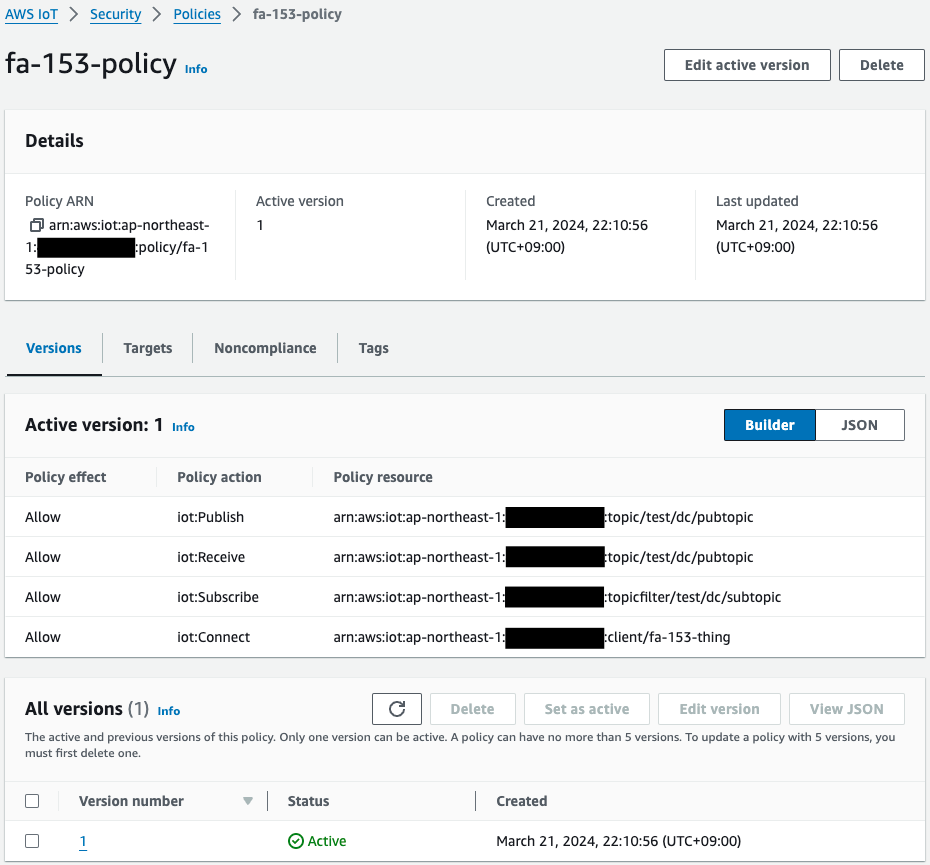
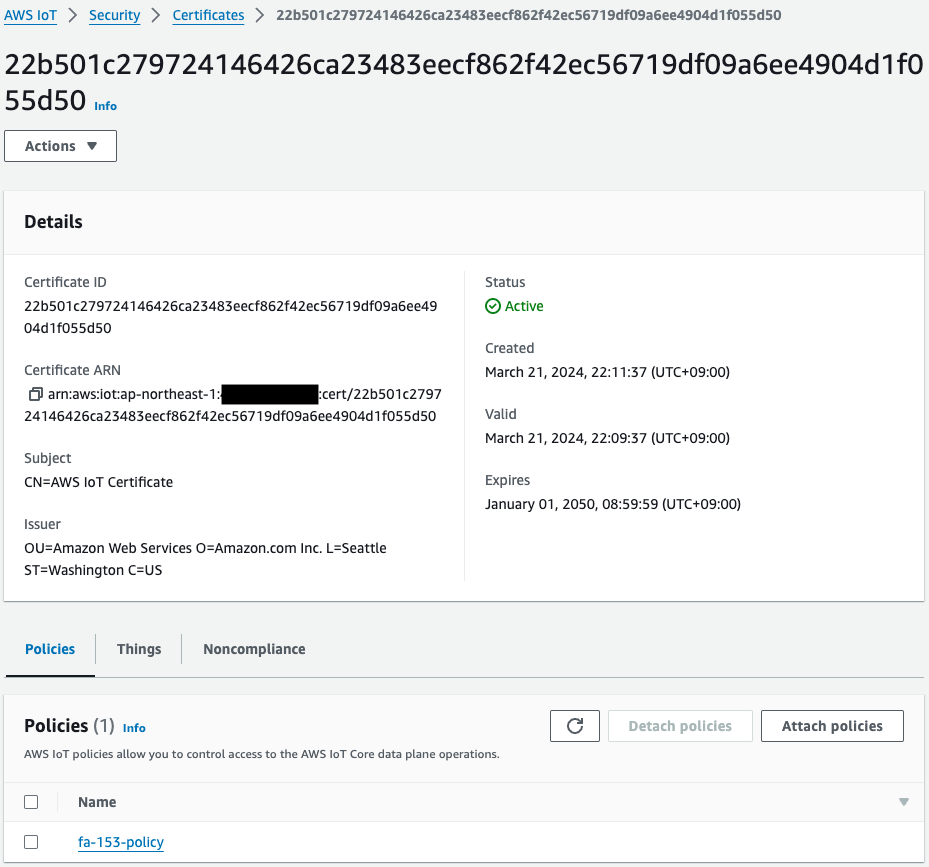
モノ、IoTポリシー、証明書が作成されています。
そして証明書がモノおよびポリシーにアタッチされていることも確認できます。
S3バケットを確認します。
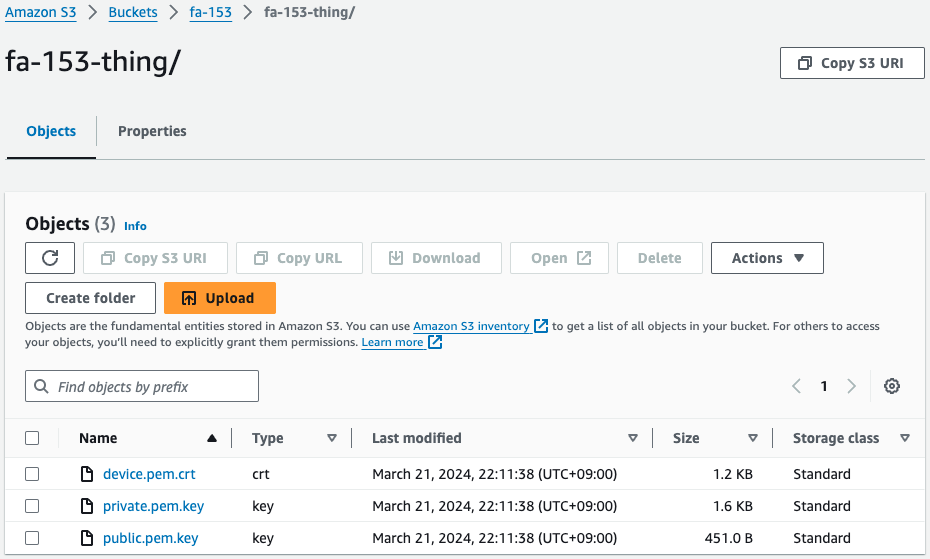
確かに証明書と鍵が設置されています。
つまりCloudFormationカスタムリソースに紐づくLambda関数が、スタック作成時に自動的に動作して、これらを作成後、本バケットにアップロードしたということです。
Systems Managerを確認します。
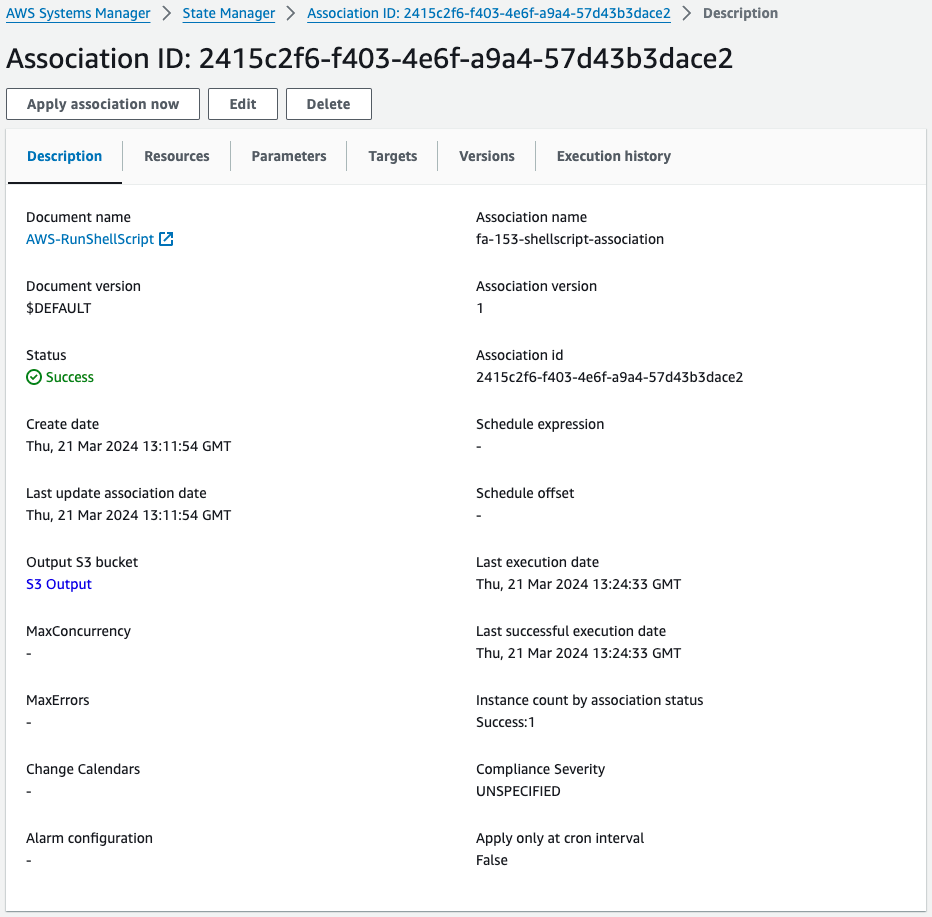
SSM State Managerを見ると、確かにSSM関連付けが作成されています。
次にSSM Run Commandを確認します。
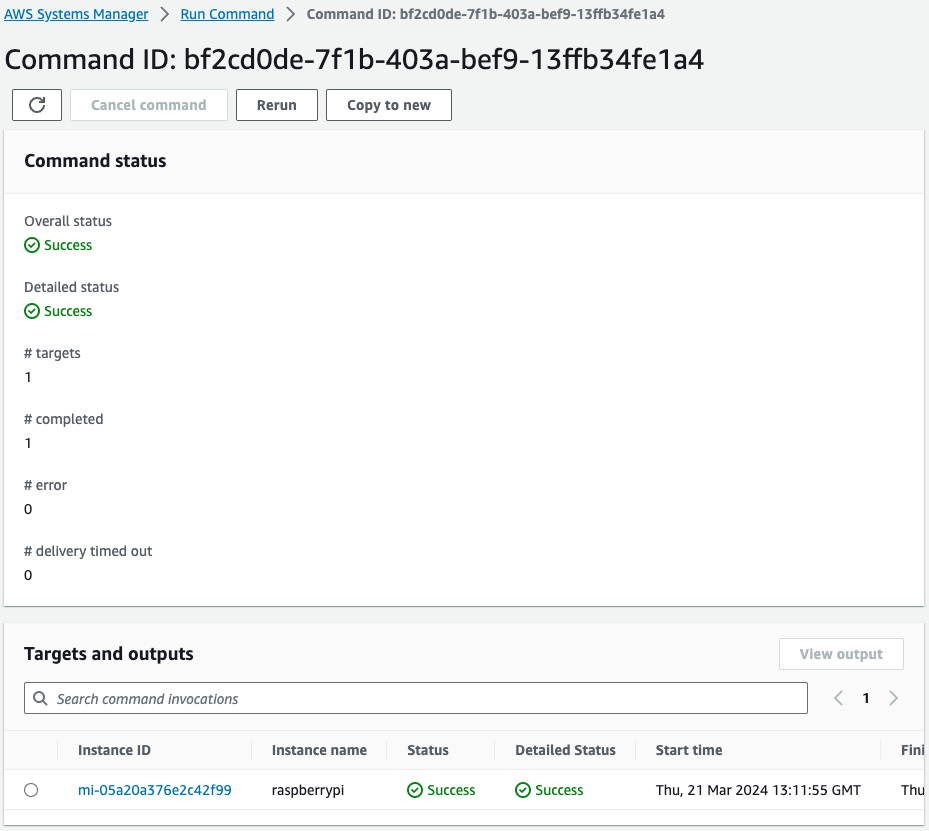
確かにRaspberry Piに対してコマンドが実行されたことがわかります。
以上から、SSMドキュメントAWS-RunShellScriptを使用して、Raspbbery Piに対して、AWS IoT Device Clientインストールに関するコマンドを送って、正常に完了したということです。
動作確認
準備が整いましたので、Raspberry Piにアクセスします。
アクセスはローカルマシンからSSHします。
証明書と鍵の有無を確認します。
awstut@raspberrypi:~ $ ls -l ~/certs/testconn
total 12
-rw-r--r-- 1 awstut awstut 1220 Mar 21 22:11 device.pem.crt
-rw------- 1 awstut awstut 1679 Mar 21 22:11 private.pem.key
-rw-r--r-- 1 awstut awstut  451 Mar 21 22:11 public.pem.key
Code language: Bash (bash)
確かにS3バケットから証明書および鍵がダウンロードされています。
AWS IoT Device Clientのインストール状況を確認します。
awstut@raspberrypi:~ $ cd ~/aws-iot-device-client/build/
awstut@raspberrypi:~/aws-iot-device-client/build $ ./aws-iot-device-client --version
v1.9.2-cf76107
Code language: Bash (bash)
確かにAWS IoT Device Clientがインストールされて、使用できる状態であることがわかります。
最後にAWS IoT Device Clientを使用して、AWS IoT CoreにMQTTメッセージを送信します。
メッセージの送信に関しては、以下のページ通りに進めます。
awstut@raspberrypi:~/aws-iot-device-client/build $ ./aws-iot-device-client --config-file ~/dc-configs/dc-testconn-config.json
2024-03-24T09:04:23.545Z [WARN]  {FileUtils.cpp}: Permissions to given file/dir path '/home/awstut/dc-configs/dc-testconn-config.json' is not set to recommended value... {Permissions: {desired: 640, actual: 644}}
2024-03-24T09:04:23.545Z [WARN]  {Config.cpp}: Key {publish-file} was provided in the JSON configuration file with an empty value
2024-03-24T09:04:23.545Z [WARN]  {Config.cpp}: Key {subscribe-file} was provided in the JSON configuration file with an empty value
2024-03-24T09:04:23.545Z [INFO]  {Config.cpp}: Successfully fetched JSON config file: {
  "endpoint": "a2oxckhng7gmur-ats.iot.ap-northeast-1.amazonaws.com",
  "cert": "~/certs/testconn/device.pem.crt",
  "key": "~/certs/testconn/private.pem.key",
  "root-ca": "~/certs/AmazonRootCA1.pem",
  "thing-name": "fa-153-thing",
  "logging": {
    "enable-sdk-logging": true,
    "level": "DEBUG",
    "type": "STDOUT",
    "file": ""
  },
  "jobs": {
    "enabled": false,
    "handler-directory": ""
  },
  "tunneling": {
    "enabled": false
  },
  "device-defender": {
    "enabled": false,
    "interval": 300
  },
  "fleet-provisioning": {
    "enabled": false,
    "template-name": "",
    "template-parameters": "",
    "csr-file": "",
    "device-key": ""
  },
  "samples": {
    "pub-sub": {
      "enabled": true,
      "publish-topic": "test/dc/pubtopic",
      "publish-file": "",
      "subscribe-topic": "test/dc/subtopic",
      "subscribe-file": ""
    }
  },
  "config-shadow": {
    "enabled": false
  },
  "sample-shadow": {
    "enabled": false,
    "shadow-name": "",
    "shadow-input-file": "",
    "shadow-output-file": ""
  }
}

2024-03-24T09:04:23.545Z [INFO]  {FileUtils.cpp}: Successfully create directory /home/awstut/.aws-iot-device-client/sample-shadow/ with required permissions 700
2024-03-24T09:04:23.545Z [INFO]  {Config.cpp}: ~/.aws-iot-device-client/sample-shadow/default-sample-shadow-document
2024-03-24T09:04:23.545Z [INFO]  {Config.cpp}: Succesfully create default file: /home/awstut/.aws-iot-device-client/sample-shadow/default-sample-shadow-document required for storage of shadow document
2024-03-24T09:04:23.545Z [DEBUG] {Config.cpp}: Did not find a runtime configuration file, assuming Fleet Provisioning has not run for this device
2024-03-24T09:04:23.545Z [DEBUG] {Config.cpp}: Did not find a http proxy config file /home/awstut/.aws-iot-device-client/http-proxy.conf, assuming HTTP proxy is disabled on this device
2024-03-24T09:04:23.545Z [DEBUG] {EnvUtils.cpp}: Updated PATH environment variable to: /usr/local/sbin:/usr/local/bin:/usr/sbin:/usr/bin:/sbin:/bin:/usr/local/games:/usr/games:/home/awstut/.aws-iot-device-client:/home/awstut/.aws-iot-device-client/jobs:/home/awstut/aws-iot-device-client/build:/home/awstut/aws-iot-device-client/build/jobs
2024-03-24T09:04:23.545Z [DEBUG] {LockFile.cpp}: creating lockfile
2024-03-24T09:04:23.545Z [INFO]  {Main.cpp}: Now running AWS IoT Device Client version v1.9.2-cf76107
2024-03-24T09:04:23.545Z [INFO]  {SharedCrtResourceManager.cpp}: SDK logging is enabled. Check /var/log/aws-iot-device-client/sdk.log for SDK logs.
2024-03-24T09:04:23.546Z [DEBUG] {Retry.cpp}: Retryable function starting, it will retry until success
2024-03-24T09:04:23.588Z [INFO]  {SharedCrtResourceManager.cpp}: Establishing MQTT connection with client id fa-153-thing...
2024-03-24T09:04:23.946Z [INFO]  {SharedCrtResourceManager.cpp}: MQTT connection established with return code: 0
2024-03-24T09:04:23.946Z [INFO]  {SharedCrtResourceManager.cpp}: Shared MQTT connection is ready!
2024-03-24T09:04:23.946Z [INFO]  {Main.cpp}: Provisioning with Secure Elements is disabled
2024-03-24T09:04:23.946Z [INFO]  {Main.cpp}: Config shadow is disabled
2024-03-24T09:04:23.946Z [INFO]  {Main.cpp}: Jobs is disabled
2024-03-24T09:04:23.946Z [INFO]  {Main.cpp}: Secure Tunneling is disabled
2024-03-24T09:04:23.946Z [INFO]  {Main.cpp}: Device Defender is disabled
2024-03-24T09:04:23.946Z [INFO]  {Main.cpp}: Sample shadow is disabled
2024-03-24T09:04:23.946Z [INFO]  {Main.cpp}: PubSub is enabled
2024-03-24T09:04:23.946Z [INFO]  {samples/PubSubFeature.cpp}: Creating Pub/Sub file: /home/awstut/.aws-iot-device-client/pubsub/publish-file.txt
2024-03-24T09:04:23.946Z [INFO]  {samples/PubSubFeature.cpp}: Creating Pub/Sub file: /home/awstut/.aws-iot-device-client/pubsub/subscribe-file.txt
2024-03-24T09:04:23.946Z [INFO]  {Main.cpp}: Sensor Publish is disabled
2024-03-24T09:04:23.946Z [INFO]  {SharedCrtResourceManager.cpp}: Starting Device Client features.
2024-03-24T09:04:23.946Z [DEBUG] {FeatureRegistry.cpp}: Attempting to start Pub Sub Sample
2024-03-24T09:04:23.946Z [INFO]  {samples/PubSubFeature.cpp}: Starting Pub Sub Sample
2024-03-24T09:04:23.947Z [INFO]  {Main.cpp}: Client base has been notified that Pub Sub Sample has started
2024-03-24T09:04:23.975Z [DEBUG] {samples/PubSubFeature.cpp}: PublishCompAck: PacketId:(Pub Sub Sample), ErrorCode:0
2024-03-24T09:04:23.997Z [DEBUG] {samples/PubSubFeature.cpp}: SubAck: PacketId:(Pub Sub Sample), ErrorCode:0
Code language: Bash (bash)
ログを見ると、正常にMQTTメッセージを送信できたことがわかります。
続いてマネージドコンソールのMQTT test clientページを確認します。
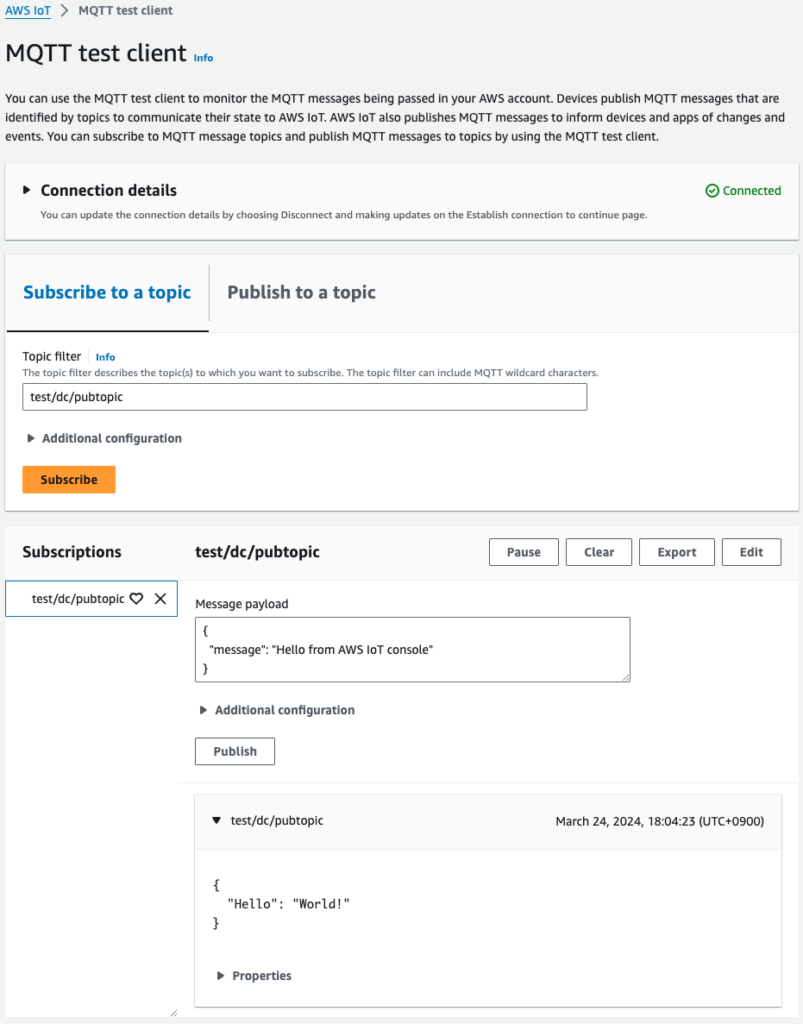
test/dc/pubtopicをサブスクライブした状態で待っていると、確かにメッセージが送信されてきました。
Raspberry PiのAWS IoT Device Clientによって送信されたものです。
チュートリアルに従い、AWS IoT Device Clientを使用して、確かにメッセージを送信することができました。
まとめ
Raspberry PiにAWS IoT Device Clientをインストールし、AWS IoT Coreに対してテストメッセージを送る方法を確認しました。
またRaspberry PiをSystems Managerに登録することで、SSMからコマンドを送ることで、AWS IoT Device Clientをセットアップすることができました。
