Raspberry PiとAWS IoT Device Clientを使用して、リモートアクション(ジョブ)をデモする
以下のページでRaspberry PiにAWS IoT Device Clientをインストールする方法をご紹介しました。
また以下のページでAWS IoT Device Clientを使用してMQTTメッセージを送受信する方法を取り上げました。
今回もその続きということで、以下の公式チュートリアルに従い、AWS IoT Device Clientを使用して、リモートアクション(ジョブ)を体験します。
構築する環境
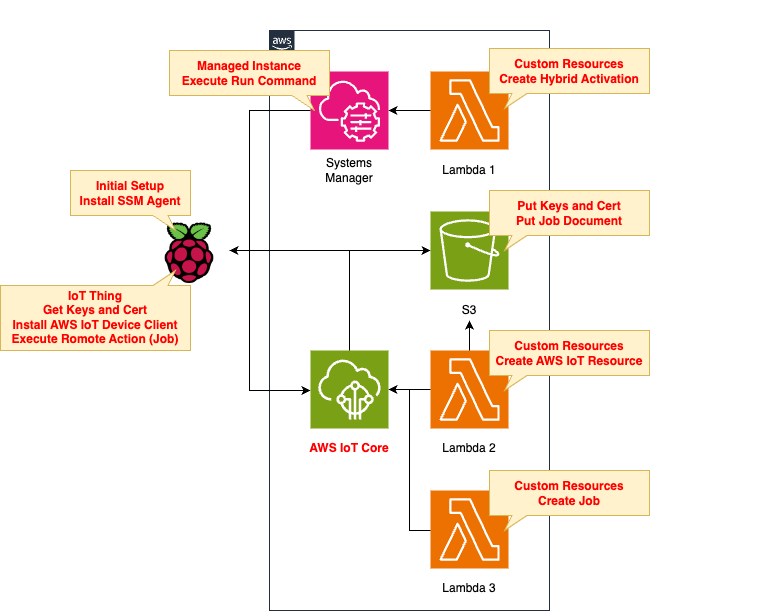
基本的な構成は冒頭でご紹介したページと同様です。
変更点は4つです。
1点目はIoTポリシーです。
これはRasbperry Piに対応するAWS IoT Thing(モノ)に適用されるポリシーです。
上記のチュートリアルの内容に従い修正を加えます。
2点目はS3バケットに保存するファイルです。
冒頭のページでは、証明書と鍵を配置していました。
今回はこれらに加えて、ジョブドキュメントも作成して配置します。
3点目はSSMドキュメントで実行するコマンドです。
SSMドキュメントはRaspberry Piに対して実行し、AWS IoT Device Clientインストール等のセットアップを行います。
こちらもチュートリアルに沿って修正して、ジョブが実行できるようにします。
4点目はジョブの作成です。
新たにLambda関数を作成し、ジョブを作成します。
そしてこの関数をCloudFormationカスタムリソースに紐付けて、CloudFormationスタック作成時に、自動的に実行されるように設定します。
なお今回作成するLambda関数のランタイム環境はPython3.12とします。
CloudFormationテンプレートファイル
上記の構成をCloudFormationで構築します。
以下のURLにCloudFormationテンプレートを配置しています。

テンプレートファイルのポイント解説
先述の通り、今回の構成は冒頭でご紹介した内容と大部分が同一ですから、変更点を中心に取り上げます。
IoTポリシー
Resources:
  Policy:
    Type: AWS::IoT::Policy
    Properties:
      PolicyDocument:
        Version: 2012-10-17
        Statement:
          - Effect: Allow
            Action:
              - iot:Connect
            Resource:
              - !Sub "arn:aws:iot:${AWS::Region}:${AWS::AccountId}:client/${Thing}"
          - Effect: Allow
            Action:
              - iot:Publish
            Resource:
              - !Sub "arn:aws:iot:${AWS::Region}:${AWS::AccountId}:topic/${PublishTopicName}"
              - !Sub "arn:aws:iot:${AWS::Region}:${AWS::AccountId}:topic/$aws/events/job/*"
              - !Sub "arn:aws:iot:${AWS::Region}:${AWS::AccountId}:topic/$aws/events/jobExecution/*"
              - !Sub "arn:aws:iot:${AWS::Region}:${AWS::AccountId}:topic/$aws/things/${Thing}/jobs/*"
          - Effect: Allow
            Action:
              - iot:Subscribe
            Resource:
              - !Sub "arn:aws:iot:${AWS::Region}:${AWS::AccountId}:topicfilter/${SubscribeTopicName}"
              - !Sub "arn:aws:iot:${AWS::Region}:${AWS::AccountId}:topic/$aws/events/jobExecution/*"
              - !Sub "arn:aws:iot:${AWS::Region}:${AWS::AccountId}:topicfilter/$aws/things/${Thing}/jobs/*"
          - Effect: Allow
            Action:
              - iot:Receive
            Resource:
              - !Sub "arn:aws:iot:${AWS::Region}:${AWS::AccountId}:topic/${SubscribeTopicName}"
              - !Sub "arn:aws:iot:${AWS::Region}:${AWS::AccountId}:topic/$aws/things/${Thing}/jobs/*"
          - Effect: Allow
            Action:
              - iot:DescribeJobExecution
              - iot:GetPendingJobExecutions
              - iot:StartNextPendingJobExecution
              - iot:UpdateJobExecution
            Resource:
              - !Sub "arn:aws:iot:${AWS::Region}:${AWS::AccountId}:topic/$aws/things/${Thing}"
      PolicyName: !Sub "${Prefix}-policy"
Code language: YAML (yaml)
IoTデバイスがジョブを実行するために必要なIoTポリシーを定義します。
以下のページを参考にしてポリシーを作成しました。
ジョブドキュメントを作成するLambda関数
Resources:
  Function2:
    Type: AWS::Lambda::Function
    Properties:
      Architectures:
        - !Ref Architecture
      Environment:
        Variables:
          ACTIVATION_ID: !Ref ActivationId
          BUCKET_NAME: !Ref BucketName
          CERTIFICATE_NAME: !Ref CertificateName
          JOB_DOCUMENT_NAME: !Ref JobDocumentName
          PRIVATE_KEY_NAME: !Ref PrivateKeyName
          PUBLIC_KEY_NAME: !Ref PublicKeyName
          REGION: !Ref AWS::Region
          THING: !Ref Thing
      Code:
        ZipFile: |
          import boto3
          import cfnresponse
          import os

          activation_id = os.environ['ACTIVATION_ID']
          bucket_name = os.environ['BUCKET_NAME']
          certificate_name = os.environ['CERTIFICATE_NAME']
          job_document_name = os.environ['JOB_DOCUMENT_NAME']
          private_key_name = os.environ['PRIVATE_KEY_NAME']
          public_key_name = os.environ['PUBLIC_KEY_NAME']
          region = os.environ['REGION']
          thing = os.environ['THING']

          s3_key = '{folder}/{object}'

          CREATE = 'Create'
          response_data = {}

          iot_client = boto3.client('iot', region_name=region)
          s3_client = boto3.client('s3', region_name=region)
          ssm_client = boto3.client('ssm', region_name=region)

          def lambda_handler(event, context):
            try:
              if event['RequestType'] == 'Create':
                iot_response = iot_client.create_keys_and_certificate(
                  setAsActive=True
                )
                print(iot_response)

                # certificate
                s3_client.put_object(
                  Body=iot_response['certificatePem'],
                  Bucket=bucket_name,
                  Key=s3_key.format(
                    folder=thing,
                    object=certificate_name
                  )
                )

                # public key
                s3_client.put_object(
                  Body=iot_response['keyPair']['PublicKey'],
                  Bucket=bucket_name,
                  Key=s3_key.format(
                    folder=thing,
                    object=public_key_name
                  )
                )

                # private key
                s3_client.put_object(
                  Body=iot_response['keyPair']['PrivateKey'],
                  Bucket=bucket_name,
                  Key=s3_key.format(
                    folder=thing,
                    object=private_key_name
                  )
                )

                # job document
                s3_client.put_object(
                  Body='{"operation": "echo","args": ["Hello world!"]}',
                  Bucket=bucket_name,
                  Key=s3_key.format(
                    folder='jobs',
                    object=job_document_name
                  )
                )
                response_data['CertificateArn'] = iot_response['certificateArn']
                certificate_id = iot_response['certificateId']

                iot_endpoint_response = iot_client.describe_endpoint(
                  endpointType='iot:Data-ATS'
                )
                print(iot_endpoint_response)

                response_data['IoTEndpoint'] = iot_endpoint_response['endpointAddress']

                describe_instance_response = ssm_client.describe_instance_information(
                  Filters=[
                    {
                      'Key': 'ActivationIds',
                      'Values': [
                        activation_id
                      ]
                    }
                  ]
                )
                print(describe_instance_response)

                response_data['InstanceId'] = describe_instance_response['InstanceInformationList'][0]['InstanceId']

              elif event['RequestType'] == 'Delete':
                certificate_id = event['PhysicalResourceId']

                # delete objects in s3 bucket
                list_response = s3_client.list_objects_v2(
                  Bucket=bucket_name
                )

                if 'Contents' in list_response and len(list_response['Contents']):
                  for obj in list_response['Contents']:
                    delete_response = s3_client.delete_object(
                      Bucket=bucket_name,
                      Key=obj['Key']
                    )
                    print(delete_response)

                # inactive and delete iot cert
                iot_client.update_certificate(
                  certificateId=certificate_id,
                  newStatus='INACTIVE'
                )
                iot_client.delete_certificate(
                  certificateId=certificate_id,
                  forceDelete=True
                )

              cfnresponse.send(
                event=event,
                context=context,
                responseStatus=cfnresponse.SUCCESS,
                responseData=response_data,
                physicalResourceId=certificate_id
                )
            except Exception as e:
              print(e)

              cfnresponse.send(
                event=event,
                context=context,
                responseStatus=cfnresponse.FAILED,
                responseData=response_data
                )
      FunctionName: !Sub "${Prefix}-function-02"
      Handler: !Ref Handler
      Runtime: !Ref Runtime
      Role: !GetAtt FunctionRole2.Arn
      Timeout: !Ref Timeout
Code language: YAML (yaml)
本来、この関数の主な役割は、クライアント証明書と鍵を作成し、S3バケットにアップロードすることでした。
これに加えて、今回はジョブドキュメントを作成し、S3バケットにアップロードします。
以下のページを参考にして、ジョブドキュメントを作成しました。
この関数をCloudFormationカスタムリソースに関連付けます。
これによって、CloudFormationスタック作成時に、自動的に本関数が実行されるようになります。
SSMドキュメント
Resources:
  RunShellScriptAssociation:
    Type: AWS::SSM::Association
    Properties:
      AssociationName: !Sub "${Prefix}-shellscript-association"
      Name: AWS-RunShellScript
      OutputLocation:
        S3Location:
          OutputS3BucketName: !Ref BucketName
          OutputS3KeyPrefix: shellscript-association-log
      Parameters:
        commands:
          - "apt-get -y install build-essential libssl-dev cmake unzip git python3-pip"
          - !Sub 'su - ${UserName} -c "export PATH=$PATH:~/.local/bin"'
          - !Sub 'su - ${UserName} -c "git clone https://github.com/aws/aws-cli.git"'
          - !Sub 'su - ${UserName} -c "cd aws-cli && git checkout v2 && sudo pip3 install --break-system-packages -r requirements.txt"'
          - !Sub 'su - ${UserName} -c "cd aws-cli && git checkout v2 && sudo pip3 install --break-system-packages ."'

          - !Sub 'su - ${UserName} -c "mkdir ~/certs"'
          - !Sub 'su - ${UserName} -c "curl -o ~/certs/AmazonRootCA1.pem https://www.amazontrust.com/repository/AmazonRootCA1.pem"'
          - !Sub 'su - ${UserName} -c "chmod 745 ~"'
          - !Sub 'su - ${UserName} -c "chmod 700 ~/certs"'
          - !Sub 'su - ${UserName} -c "chmod 644 ~/certs/AmazonRootCA1.pem"'

          - !Sub 'su - ${UserName} -c "git clone https://github.com/awslabs/aws-iot-device-client aws-iot-device-client"'
          - !Sub 'su - ${UserName} -c "mkdir ~/aws-iot-device-client/build"'
          - !Sub 'su - ${UserName} -c "cd ~/aws-iot-device-client/build && cmake ../"'
          - !Sub 'su - ${UserName} -c "cd ~/aws-iot-device-client/build && cmake --build . --target aws-iot-device-client"'

          - !Sub 'su - ${UserName} -c "mkdir ~/dc-configs"'
          - !Sub 'su - ${UserName} -c "mkdir ~/certs/jobs"'
          - !Sub 'su - ${UserName} -c "chmod 745 ~"'
          - !Sub 'su - ${UserName} -c "chmod 700 ~/certs/jobs"'

          - !Sub 'su - ${UserName} -c "sudo aws s3 cp s3://${BucketName}/${Thing}/${CertificateName} ~/certs/jobs/"'
          - !Sub 'su - ${UserName} -c "sudo aws s3 cp s3://${BucketName}/${Thing}/${PrivateKeyName} ~/certs/jobs/"'
          - !Sub 'su - ${UserName} -c "sudo aws s3 cp s3://${BucketName}/${Thing}/${PublicKeyName} ~/certs/jobs/"'
          - !Sub 'su - ${UserName} -c "sudo chown ${UserName}:${UserName} ~/certs/jobs/*"'
          - !Sub 'su - ${UserName} -c "sudo chmod 644 ~/certs/jobs/*"'
          - !Sub 'su - ${UserName} -c "sudo chmod 600 ~/certs/jobs/${PrivateKeyName}"'

          - !Sub 'su - ${UserName} -c "chmod 745 ~/dc-configs"'
          - !Sub |
            cat << EOF > /home/${UserName}/dc-configs/dc-jobs-config.json
            {
              "endpoint": "${Endpoint}",
              "cert": "~/certs/jobs/${CertificateName}",
              "key": "~/certs/jobs/${PrivateKeyName}",
              "root-ca": "~/certs/AmazonRootCA1.pem",
              "thing-name": "${Thing}",
              "logging": {
                "enable-sdk-logging": true,
                "level": "DEBUG",
                "type": "STDOUT",
                "file": ""
              },
              "jobs": {
                "enabled": true,
                "handler-directory": ""
              },
              "tunneling": {
                "enabled": false
              },
              "device-defender": {
                "enabled": false,
                "interval": 300
              },
              "fleet-provisioning": {
                "enabled": false,
                "template-name": "",
                "template-parameters": "",
                "csr-file": "",
                "device-key": ""
              },
              "samples": {
                "pub-sub": {
                  "enabled": false,
                  "publish-topic": "",
                  "publish-file": "",
                  "subscribe-topic": "",
                  "subscribe-file": ""
                }
              },
              "config-shadow": {
                "enabled": false
              },
              "sample-shadow": {
                "enabled": false,
                "shadow-name": "",
                "shadow-input-file": "",
                "shadow-output-file": ""
              }
            }
            EOF
          - !Sub 'su - ${UserName} -c "sudo chown ${UserName}:${UserName} ~/dc-configs/dc-jobs-config.json"'
          - !Sub 'su - ${UserName} -c "chmod 644 ~/dc-configs/dc-jobs-config.json"'

          - !Sub 'su - ${UserName} -c "sudo mkdir /var/log/aws-iot-device-client"'
          - !Sub 'su - ${UserName} -c "sudo chmod 745 /var/log/aws-iot-device-client"'
          - !Sub 'su - ${UserName} -c "sudo chown ${UserName}:${UserName} /var/log/aws-iot-device-client"'
      Targets:
        - Key: InstanceIds
          Values:
            - !Ref InstanceId
      WaitForSuccessTimeoutSeconds: !Ref WaitForSuccessTimeoutSeconds
Code language: YAML (yaml)
冒頭でご紹介したページからの主な変更点はdc-jobs-config.jsonの内容です。
以前はdc-pubsub-custom-config.jsonという名前で設定ファイルを作成していましたが、内容を一部変更します。
具体的には、jobsのenabledの値をtrueに変更します。
ジョブを作成するLambda関数
Resources:
  Function3:
    Type: AWS::Lambda::Function
    Properties:
      Architectures:
        - !Ref Architecture
      Environment:
        Variables:
          JOB_DOCUMENT_URL: !Sub "https://${BucketName}.s3.${AWS::Region}.amazonaws.com/jobs/${JobDocumentName}"
          REGION: !Ref AWS::Region
          THING_ARN: !Sub "arn:aws:iot:${AWS::Region}:${AWS::AccountId}:thing/${Thing}"
      Code:
        ZipFile: |
          import boto3
          import cfnresponse
          import os

          job_document_url = os.environ['JOB_DOCUMENT_URL']
          region = os.environ['REGION']
          thing_arn = os.environ['THING_ARN']

          CREATE = 'Create'
          response_data = {}

          iot_client = boto3.client('iot', region_name=region)

          def lambda_handler(event, context):
            try:
              if event['RequestType'] == 'Create':
                response = iot_client.create_job(
                  jobId='hello-world-job-1',
                  targets=[
                    thing_arn
                  ],
                  documentSource=job_document_url,
                  targetSelection='SNAPSHOT'
                )
                print(response)

                job_id = response['jobId']

              elif event['RequestType'] == 'Delete':
                job_id = event['PhysicalResourceId']

                response = iot_client.delete_job(
                  jobId=job_id,
                  force=True
                )
                print(response)

              cfnresponse.send(
                event=event,
                context=context,
                responseStatus=cfnresponse.SUCCESS,
                responseData=response_data,
                physicalResourceId=job_id
                )
            except Exception as e:
              print(e)

              job_id = event['PhysicalResourceId']

              cfnresponse.send(
                event=event,
                context=context,
                responseStatus=cfnresponse.FAILED,
                responseData=response_data,
                physicalResourceId=job_id
                )
      FunctionName: !Sub "${Prefix}-function-03"
      Handler: !Ref Handler
      Runtime: !Ref Runtime
      Role: !GetAtt FunctionRole3.Arn
Code language: YAML (yaml)
この関数の主な目的はジョブを作成することです。
Boto3のIoT用クライアントオブジェクトを作成後、create_jobメソッドを実行してジョブを作成します。
作成するジョブの名前は「hello-world-job-1」とします。
ジョブの対象には、Raspberry Piに関連付けているIoT Thing(モノ)を指定します。
作成するジョブの内容には、先述のS3バケットにアップロードしてジョブドキュメントを指定します。
この関数もCloudFormationカスタムリソースに関連付けて、スタック作成時に、本関数が自動的に実行されるようにします。
本関数用のIAMロールは以下です。
Resources:
  FunctionRole3:
    Type: AWS::IAM::Role
    DeletionPolicy: Delete
    Properties:
      AssumeRolePolicyDocument:
        Version: 2012-10-17
        Statement:
          - Effect: Allow
            Action: sts:AssumeRole
            Principal:
              Service:
                - lambda.amazonaws.com
      ManagedPolicyArns:
        - arn:aws:iam::aws:policy/service-role/AWSLambdaBasicExecutionRole
      Policies:
        - PolicyName: FunctionPolicy3
          PolicyDocument:
            Version: 2012-10-17
            Statement:
              - Effect: Allow
                Action:
                  - iot:CreateJob
                  - iot:DeleteJob
                Resource:
                  - "*"
              - Effect: Allow
                Action:
                  - s3:GetObject
                Resource:
                  - !Sub "arn:aws:s3:::${BucketName}/jobs/${JobDocumentName}"
Code language: YAML (yaml)
ジョブの作成・削除のための権限(iot:CreateJob, iot:DeleteJob)に加えて、S3バケットに配置されているジョブドキュメントを取得するための権限(s3:GetObject)が必要です。
環境構築
Raspberry PiをSSMに登録する
1つ目のCloudFormationスタックを作成します。
AWS CLIを使用して、CloudFormationスタックを作成します。
上記のテンプレートファイルを任意のS3バケットに設置した上で、以下のコマンドを実行します。
aws cloudformation create-stack \
--stack-name fa-156-01 \
--template-url https://[bucket-name].s3.[region].amazonaws.com/fa-156/fa-156-01.yaml \
--capabilities CAPABILITY_IAM
Code language: Bash (bash)
スタック作成の詳細については、以下のページをご確認ください。
このスタックによって、主に以下のリソースが作成されます。
- クライアント証明書や鍵を配置するS3バケット
- SSMハイブリッドアクティベーション
- アクティベーション用のIAMロール
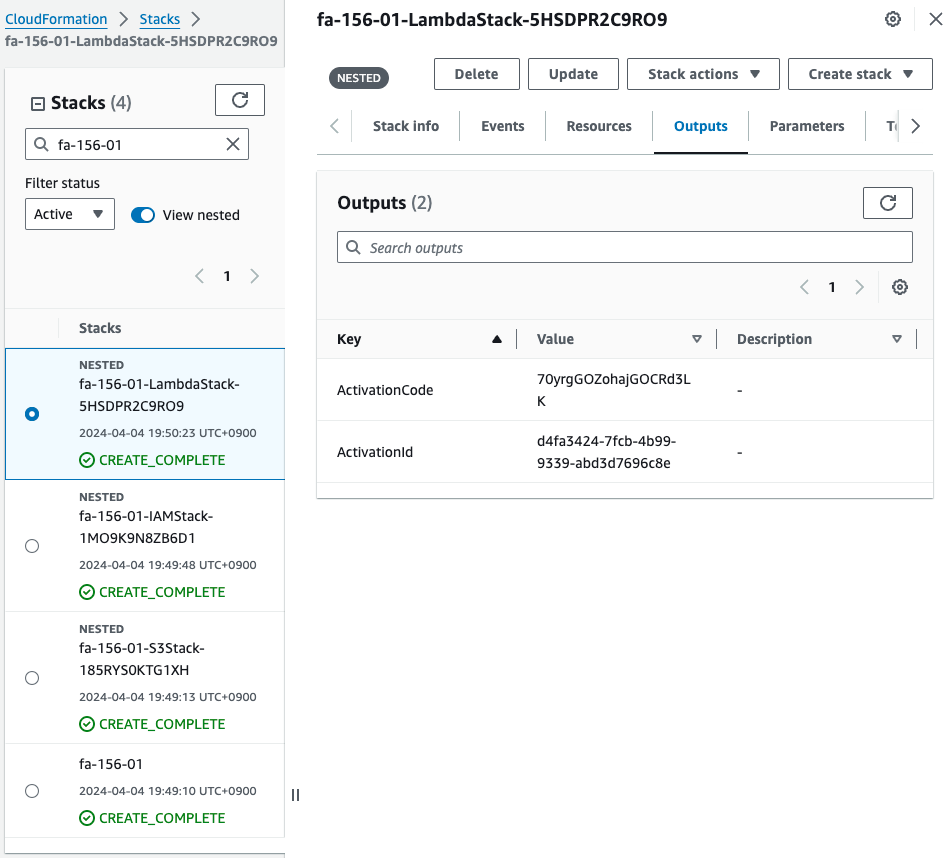
スタックの作成が完了すると、以下の通りハイブリッドアクティベーション用のコードとIDが取得できます。
Raspberry PiにSSM Agentをインストールする
Raspberry Piで以下のコマンドを実行してSSM Agentをインストールします。
sudo apt-get -y update
sudo apt-get -y upgrade
sudo apt-get -y install libc6:armhf
mkdir /tmp/ssm
curl https://amazon-ssm-ap-northeast-1.s3.ap-northeast-1.amazonaws.com/latest/debian_arm/ssm-setup-cli -o /tmp/ssm/ssm-setup-cli
sudo chmod +x /tmp/ssm/ssm-setup-cli
sudo /tmp/ssm/ssm-setup-cli -register -activation-code "[activation-code]" -activation-id "[activation-id]" -region "ap-northeast-1"
Code language: Bash (bash)
最後のコマンドに先ほど確認したアクティベーション用のIDとコードを埋め込みます。
手順の詳細については以下のページをご確認ください。
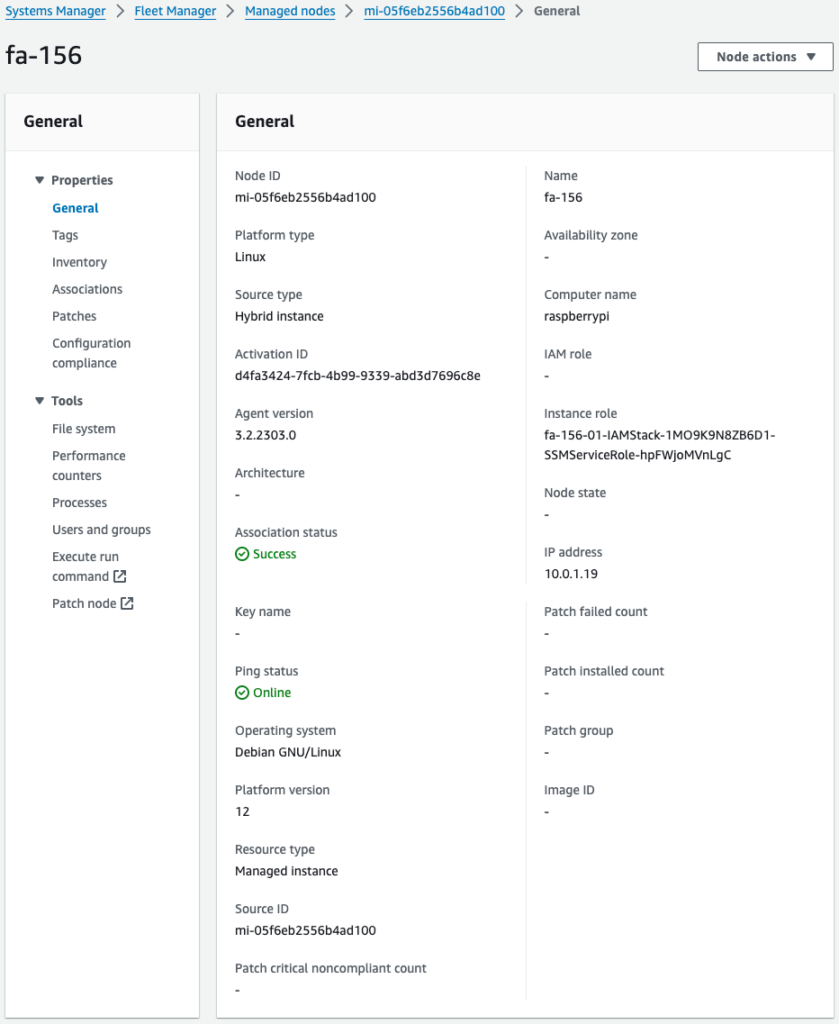
SSM Fleet Managerを確認すると、確かにRaspberry PiにSSMエージェントがインストールされて管理対象になっていることがわかります。
SSMドキュメントを使用して、Raspberry PiをAWS IoTに登録後、AWS IoT Device Clientをセットアップする
2つ目のCloudFormationスタックを作成します。
先ほどと同様にAWS CLIを使用してスタックを作成します。
$ aws cloudformation create-stack \
--stack-name fa-156-02 \
--template-url https://[bucket-name].s3.[region].amazonaws.com/fa-156/fa-156-02.yaml \
--capabilities CAPABILITY_IAM
Code language: Bash (bash)
このスタックによって、主に以下のリソースが作成されます。
- IoT Thing(モノ)
- IoTポリシー
- クライアント証明書と鍵
- クライアント証明書をモノおよびIoTポリシーにアタッチ
加えてSSMドキュメントによって、Raspberry Piにクライアント証明書や鍵がダウンロードされて、Raspberry Piをモノとして扱うことができるようになります。
そしてAWS IoT Device Clientを使用するために必要な手続きが実行されます。
SSMドキュメントの実行後、モノに対してジョブドキュメントに基づいたジョブが作成されます。
マネージメントコンソールから作成されたリソースを確認します。
S3バケットを確認します。
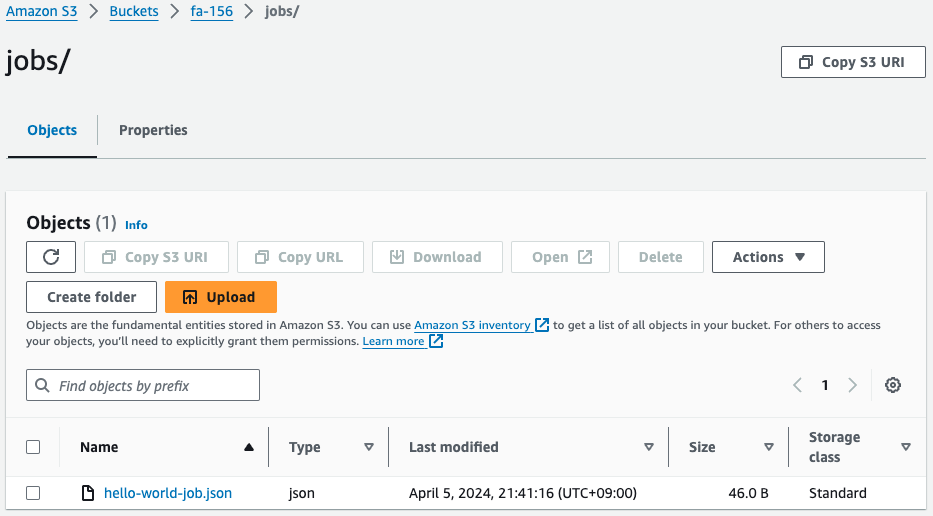
バケットにジョブドキュメントが保存されています。
これを使ってジョブが作成されることになります。
AWS IoTに関係するリソースを確認します。
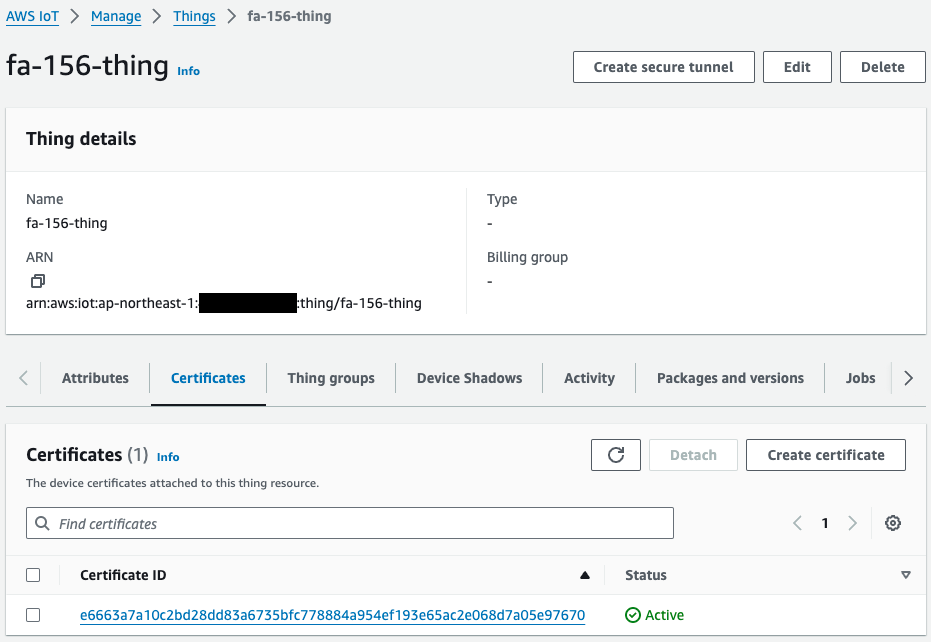
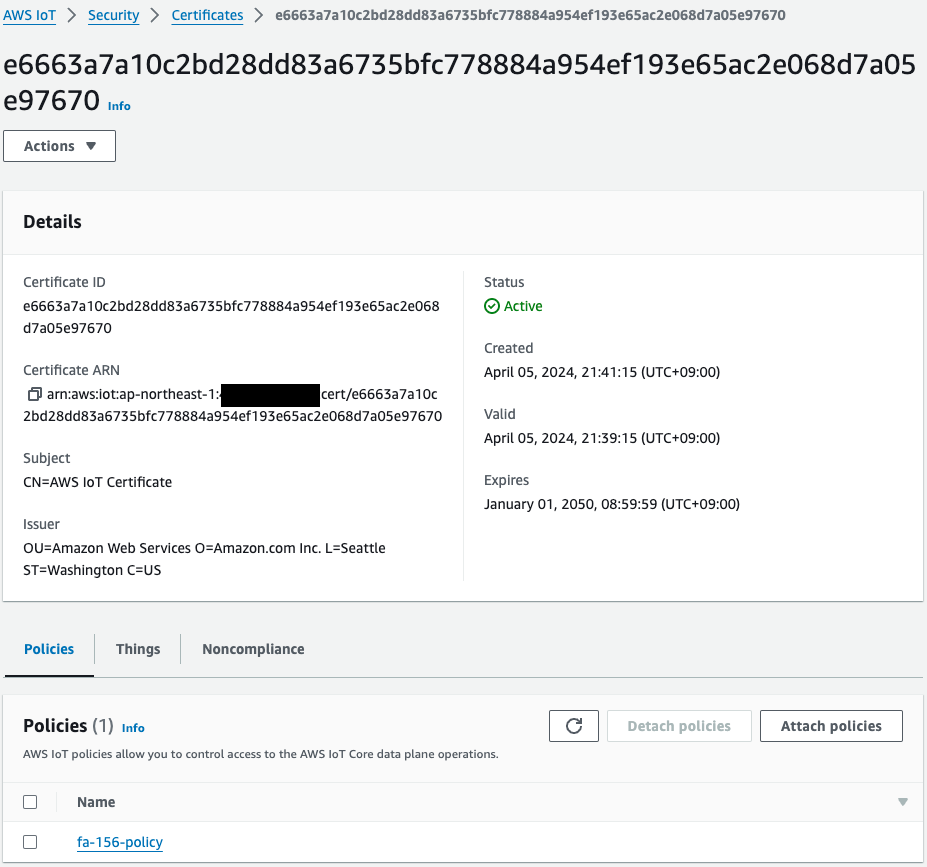
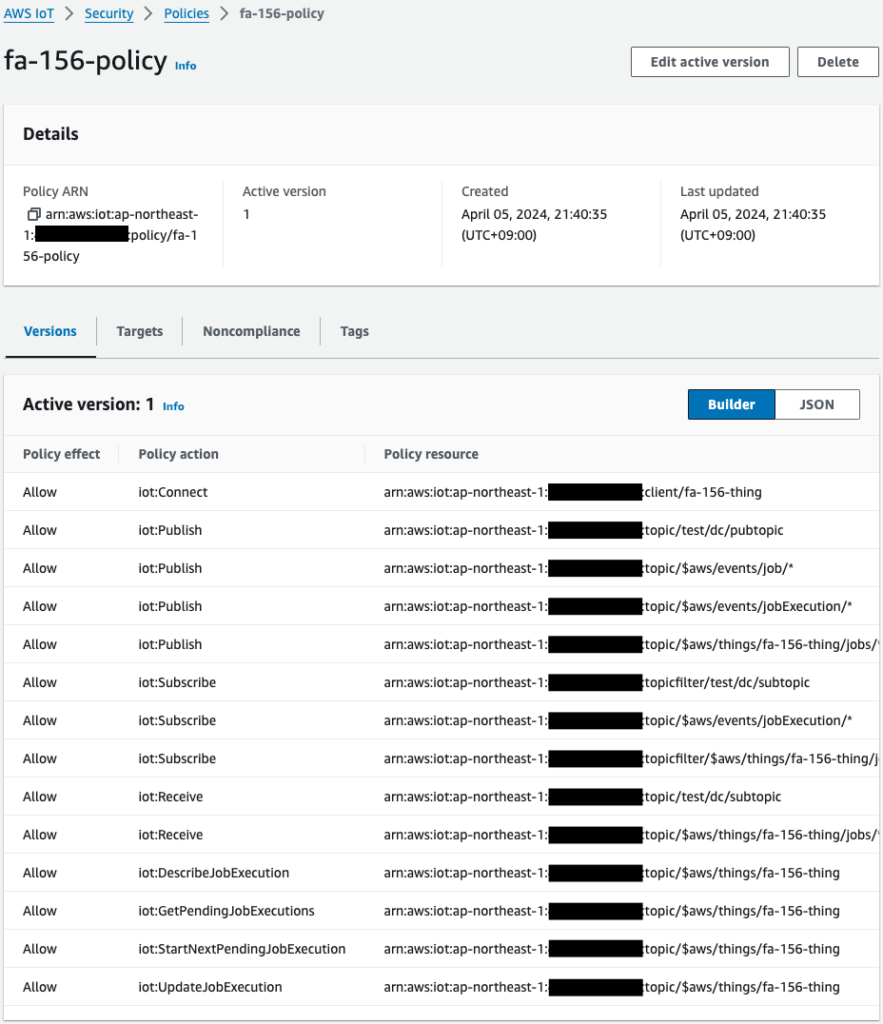
モノ、証明書、ポリシーが正常に作成されています。
モノに関連づいているジョブを確認します。
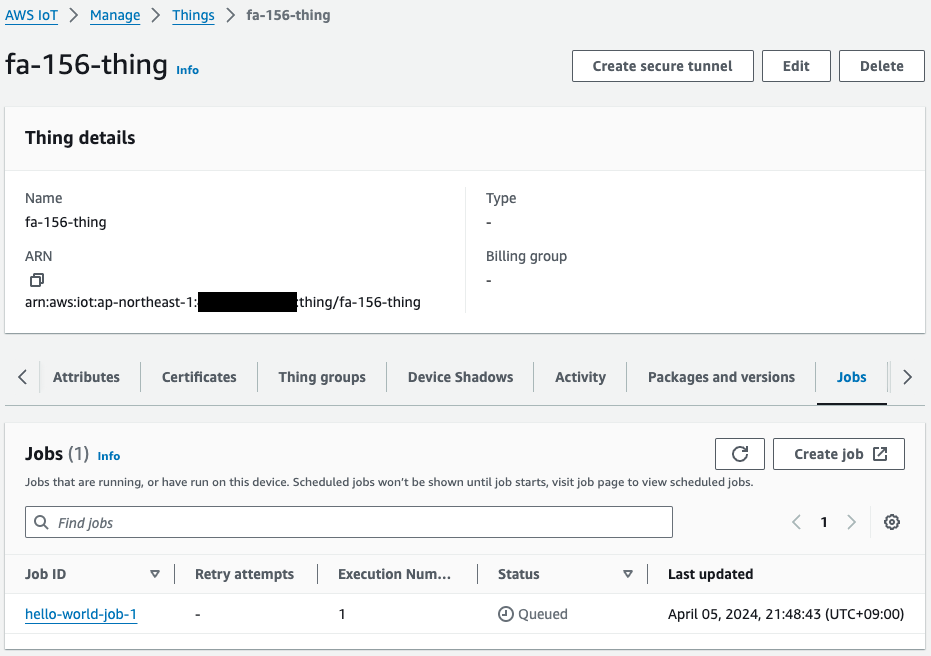
確かにジョブが作成されてモノに関連づいています。
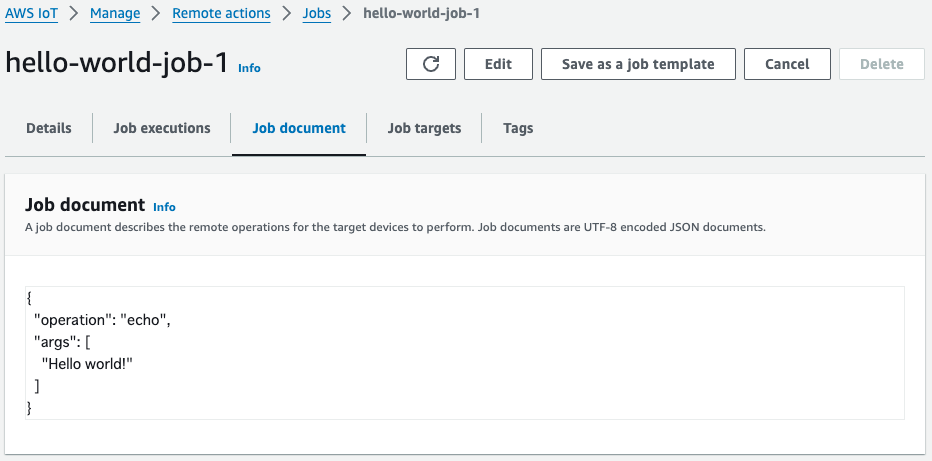
ジョブの内容を見ると、確かにジョブドキュメントで指定したものです。
動作確認
AWS IoT Device Clientのインストール状況確認
準備が整いましたので、Raspberry Piにアクセスします。
アクセスはローカルマシンからSSHします。
証明書と鍵の有無を確認します。
awstut@raspberrypi:~ $ ls -l ~/certs/jobs/
total 12
-rw-r--r-- 1 awstut awstut 1220 Apr  5 21:41 device.pem.crt
-rw------- 1 awstut awstut 1675 Apr  5 21:41 private.pem.key
-rw-r--r-- 1 awstut awstut  451 Apr  5 21:41 public.pem.key
Code language: Bash (bash)
確かにS3バケットから証明書および鍵がダウンロードされています。
つまりこのRaspberry PiはAWS IoTデバイスとして動作できます。
AWS IoT Device Clientのインストール状況を確認します。
awstut@raspberrypi:~ $ cd ~/aws-iot-device-client/build/
awstut@raspberrypi:~/aws-iot-device-client/build $ ./aws-iot-device-client --version
v1.9.2-cf76107
Code language: Bash (bash)
確かにAWS IoT Device Clientがインストールされて、使用できる状態であることがわかります。
AWS IoT Device Clientを使用してジョブ実行
以下のページに従い、Raspberry Piでジョブを実行します。
awstut@raspberrypi:~/aws-iot-device-client/build $ cd ~/aws-iot-device-client/build
awstut@raspberrypi:~/aws-iot-device-client/build $ ./aws-iot-device-client --config-file ~/dc-configs/dc-jobs-config.json
2024-04-05T22:23:54.453Z [WARN]  {FileUtils.cpp}: Permissions to given file/dir path '/home/awstut/dc-configs/dc-jobs-config.json' is not set to recommended value... {Permissions: {desired: 640, actual: 644}}
2024-04-05T22:23:54.453Z [INFO]  {Config.cpp}: Successfully fetched JSON config file: {
  "endpoint": "a2oxckhng7gmur-ats.iot.ap-northeast-1.amazonaws.com",
  "cert": "~/certs/jobs/device.pem.crt",
  "key": "~/certs/jobs/private.pem.key",
  "root-ca": "~/certs/AmazonRootCA1.pem",
  "thing-name": "fa-156-thing",
  "logging": {
    "enable-sdk-logging": true,
    "level": "DEBUG",
    "type": "STDOUT",
    "file": ""
  },
  "jobs": {
    "enabled": true,
    "handler-directory": ""
  },
  "tunneling": {
    "enabled": false
  },
  "device-defender": {
    "enabled": false,
    "interval": 300
  },
  "fleet-provisioning": {
    "enabled": false,
    "template-name": "",
    "template-parameters": "",
    "csr-file": "",
    "device-key": ""
  },
  "samples": {
    "pub-sub": {
      "enabled": false,
      "publish-topic": "",
      "publish-file": "",
      "subscribe-topic": "",
      "subscribe-file": ""
    }
  },
  "config-shadow": {
    "enabled": false
  },
  "sample-shadow": {
    "enabled": false,
    "shadow-name": "",
    "shadow-input-file": "",
    "shadow-output-file": ""
  }
}

2024-04-05T22:23:54.453Z [INFO]  {FileUtils.cpp}: Successfully create directory /home/awstut/.aws-iot-device-client/sample-shadow/ with required permissions 700
2024-04-05T22:23:54.453Z [INFO]  {Config.cpp}: ~/.aws-iot-device-client/sample-shadow/default-sample-shadow-document
2024-04-05T22:23:54.453Z [INFO]  {Config.cpp}: Succesfully create default file: /home/awstut/.aws-iot-device-client/sample-shadow/default-sample-shadow-document required for storage of shadow document
2024-04-05T22:23:54.453Z [DEBUG] {Config.cpp}: Did not find a runtime configuration file, assuming Fleet Provisioning has not run for this device
2024-04-05T22:23:54.453Z [DEBUG] {Config.cpp}: Did not find a http proxy config file /home/awstut/.aws-iot-device-client/http-proxy.conf, assuming HTTP proxy is disabled on this device
2024-04-05T22:23:54.454Z [DEBUG] {EnvUtils.cpp}: Updated PATH environment variable to: /usr/local/sbin:/usr/local/bin:/usr/sbin:/usr/bin:/sbin:/bin:/usr/local/games:/usr/games:/home/awstut/.aws-iot-device-client:/home/awstut/.aws-iot-device-client/jobs:/home/awstut/aws-iot-device-client/build:/home/awstut/aws-iot-device-client/build/jobs
2024-04-05T22:23:54.454Z [DEBUG] {LockFile.cpp}: creating lockfile
2024-04-05T22:23:54.454Z [INFO]  {Main.cpp}: Now running AWS IoT Device Client version v1.9.2-cf76107
2024-04-05T22:23:54.454Z [INFO]  {SharedCrtResourceManager.cpp}: SDK logging is enabled. Check /var/log/aws-iot-device-client/sdk.log for SDK logs.
2024-04-05T22:23:54.454Z [DEBUG] {Retry.cpp}: Retryable function starting, it will retry until success
2024-04-05T22:23:54.496Z [INFO]  {SharedCrtResourceManager.cpp}: Establishing MQTT connection with client id fa-156-thing...
2024-04-05T22:23:54.761Z [INFO]  {SharedCrtResourceManager.cpp}: MQTT connection established with return code: 0
2024-04-05T22:23:54.761Z [INFO]  {SharedCrtResourceManager.cpp}: Shared MQTT connection is ready!
2024-04-05T22:23:54.761Z [INFO]  {Main.cpp}: Provisioning with Secure Elements is disabled
2024-04-05T22:23:54.761Z [INFO]  {Main.cpp}: Config shadow is disabled
2024-04-05T22:23:54.761Z [INFO]  {Main.cpp}: Jobs is enabled
2024-04-05T22:23:54.761Z [INFO]  {Main.cpp}: Secure Tunneling is disabled
2024-04-05T22:23:54.761Z [INFO]  {Main.cpp}: Device Defender is disabled
2024-04-05T22:23:54.761Z [INFO]  {Main.cpp}: Sample shadow is disabled
2024-04-05T22:23:54.761Z [INFO]  {Main.cpp}: Pub Sub is disabled
2024-04-05T22:23:54.761Z [INFO]  {Main.cpp}: Sensor Publish is disabled
2024-04-05T22:23:54.761Z [INFO]  {SharedCrtResourceManager.cpp}: Starting Device Client features.
2024-04-05T22:23:54.761Z [DEBUG] {FeatureRegistry.cpp}: Attempting to start Jobs
2024-04-05T22:23:54.761Z [INFO]  {Main.cpp}: Client base has been notified that Jobs has started
2024-04-05T22:23:54.761Z [INFO]  {JobsFeature.cpp}: Running Jobs!
2024-04-05T22:23:54.761Z [DEBUG] {JobsFeature.cpp}: Attempting to subscribe to startNextPendingJobExecution accepted and rejected
2024-04-05T22:23:54.761Z [DEBUG] {JobsFeature.cpp}: Attempting to subscribe to nextJobChanged events
2024-04-05T22:23:54.761Z [DEBUG] {JobsFeature.cpp}: Attempting to subscribe to updateJobExecutionStatusAccepted for jobId +
2024-04-05T22:23:54.823Z [DEBUG] {JobsFeature.cpp}: Ack received for SubscribeToStartNextJobAccepted with code {0}
2024-04-05T22:23:54.823Z [DEBUG] {JobsFeature.cpp}: Ack received for SubscribeToUpdateJobExecutionAccepted with code {0}
2024-04-05T22:23:54.823Z [DEBUG] {JobsFeature.cpp}: Attempting to subscribe to updateJobExecutionStatusRejected for jobId +
2024-04-05T22:23:54.828Z [DEBUG] {JobsFeature.cpp}: Ack received for SubscribeToStartNextJobRejected with code {0}
2024-04-05T22:23:54.830Z [DEBUG] {JobsFeature.cpp}: Ack received for SubscribeToNextJobChanged with code {0}
2024-04-05T22:23:54.888Z [DEBUG] {JobsFeature.cpp}: Ack received for SubscribeToUpdateJobExecutionRejected with code {0}
2024-04-05T22:23:54.889Z [DEBUG] {JobsFeature.cpp}: Publishing startNextPendingJobExecutionRequest
2024-04-05T22:23:54.925Z [DEBUG] {JobsFeature.cpp}: Ack received for StartNextPendingJobPub with code {0}
2024-04-05T22:23:54.926Z [DEBUG] {JobsFeature.cpp}: We have not seen a job yet, this is not a duplicate job notification
2024-04-05T22:23:54.926Z [DEBUG] {JobsFeature.cpp}: Attempting to update job execution status!
2024-04-05T22:23:54.926Z [INFO]  {JobsFeature.cpp}: Executing job: hello-world-job-1
2024-04-05T22:23:54.926Z [DEBUG] {Retry.cpp}: Retryable function starting, it will retry until success
2024-04-05T22:23:54.927Z [DEBUG] {JobsFeature.cpp}: Created EphemeralPromise for ClientToken NETuKkPetx in the updateJobExecution promises map
2024-04-05T22:23:54.927Z [INFO]  {JobEngine.cpp}: About to execute step with name: echo
2024-04-05T22:23:54.927Z [DEBUG] {JobEngine.cpp}: Assuming executable is in PATH
2024-04-05T22:23:54.927Z [INFO]  {JobEngine.cpp}: About to execute: echo  Hello world!
2024-04-05T22:23:54.927Z [DEBUG] {JobEngine.cpp}: Child process now running
2024-04-05T22:23:54.927Z [DEBUG] {JobEngine.cpp}: Child process about to call execvp
2024-04-05T22:23:54.927Z [DEBUG] {JobEngine.cpp}: Parent process now running, child PID is 19340
2024-04-05T22:23:54.927Z [DEBUG] {19340}:  Hello world!
2024-04-05T22:23:54.927Z [DEBUG] {JobEngine.cpp}: JobEngine finished waiting for child process, returning 0
2024-04-05T22:23:54.927Z [INFO]  {JobsFeature.cpp}: Job exited with status: 0
2024-04-05T22:23:54.927Z [INFO]  {JobsFeature.cpp}: Job executed successfully!
2024-04-05T22:23:54.927Z [DEBUG] {JobsFeature.cpp}: Attempting to update job execution status!
2024-04-05T22:23:54.927Z [DEBUG] {Retry.cpp}: Retryable function starting, it will retry until success
2024-04-05T22:23:54.927Z [DEBUG] {JobsFeature.cpp}: Created EphemeralPromise for ClientToken ucviLUeZRe in the updateJobExecution promises map
2024-04-05T22:23:54.954Z [DEBUG] {JobsFeature.cpp}: Ack received for PublishUpdateJobExecutionStatus with code {0}
2024-04-05T22:23:54.954Z [DEBUG] {JobsFeature.cpp}: Removing ClientToken NETuKkPetx from the updateJobExecution promises map
2024-04-05T22:23:54.954Z [DEBUG] {JobsFeature.cpp}: Success response after UpdateJobExecution for job hello-world-job-1
2024-04-05T22:23:54.979Z [DEBUG] {JobsFeature.cpp}: Ack received for PublishUpdateJobExecutionStatus with code {0}
2024-04-05T22:23:54.979Z [DEBUG] {JobsFeature.cpp}: Removing ClientToken ucviLUeZRe from the updateJobExecution promises map
2024-04-05T22:23:54.979Z [DEBUG] {JobsFeature.cpp}: Success response after UpdateJobExecution for job hello-world-job-1
2024-04-05T22:23:55.230Z [INFO]  {JobsFeature.cpp}: No pending jobs are scheduled, waiting for the next incoming job
Code language: Bash (bash)
ログを見ると、確かにジョブが実行されたことがわかります。
改めてマネージメントコンソールにアクセスして、ジョブのステータスを確認します。
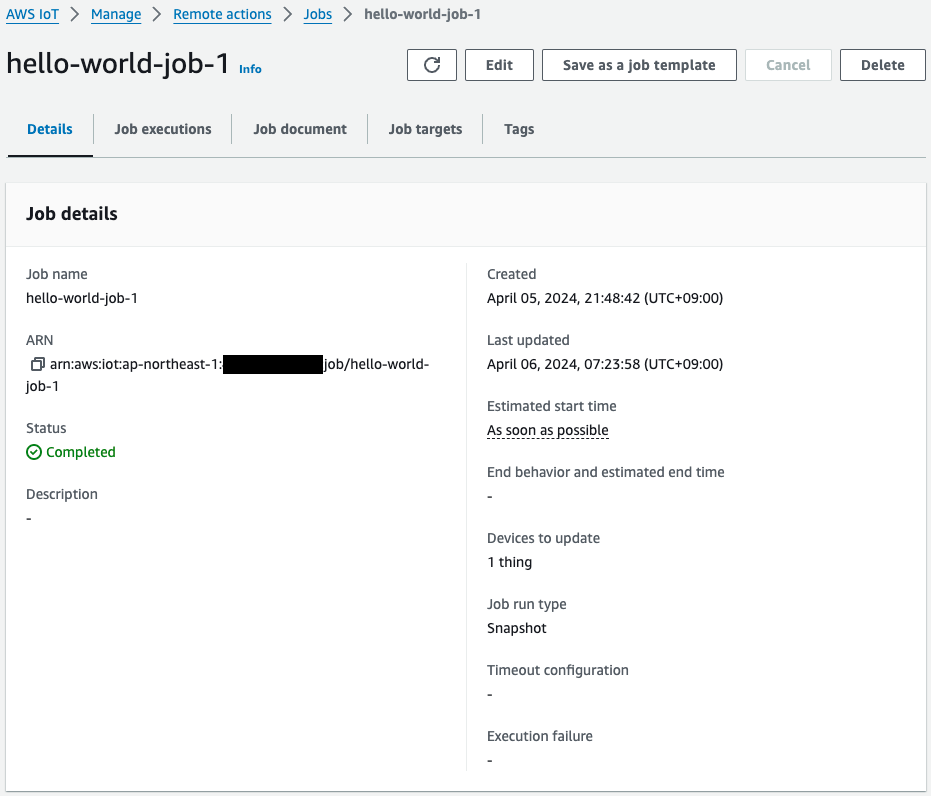
こちらでも「Completed」に変化しました。
このようにAWS IoT Device Clientを使用して、リモートアクション(ジョブ)を実行することができました。
まとめ
Raspberry Piにおいて、AWS IoT Device Clientを使用して、リモートアクション(ジョブ)を実行する方法を確認しました。