AWS IoT Device SDKを使用して、Raspberry PiをAWS IoT Coreに接続する
以下のページで、AWSIoT Device SDKを使用して、AWS IoT Coreに接続するデモが紹介されています。
今回はRaspberry Pi 5を使用して、実際にこのデモを体験します。
構築する環境
基本的な構成は以下のページと同様です。
変更点はRaspberry Piに対して実行するSSMドキュメントの内容です。
具体的には、以下の2つの処理を実行するように修正します。
- AWS IoT Device SDKインストール
- 同SDKのデモ用プログラムの準備
なお今回はPythonバージョンのSDKを使用します。
CloudFormationテンプレートファイル
上記の構成をCloudFormationで構築します。
以下のURLにCloudFormationテンプレートを配置しています。

テンプレートファイルのポイント解説
本構成は先述のページと概ね同様ですから、変更点を中心に取り上げます。
IoTポリシー
Resources:
  Policy:
    Type: AWS::IoT::Policy
    Properties:
      PolicyDocument:
        Version: 2012-10-17
        Statement:
          - Effect: Allow
            Action:
              - iot:Publish
              - iot:Receive
              - iot:Subscribe
              - iot:Connect
            Resource: "*"
      PolicyName: !Sub "${Prefix}-policy"
Code language: YAML (yaml)
以下のページで指定されている通りに設定します。
SSMドキュメント
Resources:
  RunShellScriptAssociation:
    Type: AWS::SSM::Association
    Properties:
      AssociationName: !Sub "${Prefix}-shellscript-association"
      Name: AWS-RunShellScript
      OutputLocation:
        S3Location:
          OutputS3BucketName: !Ref BucketName
          OutputS3KeyPrefix: shellscript-association-log
      Parameters:
        commands:
          - "sudo apt-get -y install cmake libssl-dev"

          - !Sub 'su - ${UserName} -c "git clone https://github.com/aws/aws-cli.git"'
          - !Sub 'su - ${UserName} -c "cd aws-cli && git checkout v2 && sudo pip3 install --break-system-packages -r requirements.txt"'
          - !Sub 'su - ${UserName} -c "cd aws-cli && git checkout v2 && sudo pip3 install --break-system-packages ."'

          - !Sub 'su - ${UserName} -c "cd ~ && python3 -m pip install awsiotsdk --break-system-packages"'
          - !Sub 'su - ${UserName} -c "git clone https://github.com/aws/aws-iot-device-sdk-python-v2.git"'

          - !Sub 'su - ${UserName} -c "mkdir ~/certs"'
          - !Sub 'su - ${UserName} -c "curl -o ~/certs/AmazonRootCA1.pem https://www.amazontrust.com/repository/AmazonRootCA1.pem"'
          - !Sub 'su - ${UserName} -c "sudo aws s3 cp s3://${BucketName}/${Thing}/${CertificateName} ~/certs/"'
          - !Sub 'su - ${UserName} -c "sudo aws s3 cp s3://${BucketName}/${Thing}/${PrivateKeyName} ~/certs/"'
          - !Sub 'su - ${UserName} -c "sudo aws s3 cp s3://${BucketName}/${Thing}/${PublicKeyName} ~/certs/"'

          - !Sub "row=`sed -n '/print(\"Received message/=' /home/${UserName}/aws-iot-device-sdk-python-v2/samples/pubsub.py`"
          - !Sub |
            cat << EOF | sed ''$row'r /dev/stdin' /home/${UserName}/aws-iot-device-sdk-python-v2/samples/pubsub.py > /home/${UserName}/aws-iot-device-sdk-python-v2/samples/pubsub2.py
                # insert start
                topic_parsed = False
                if "/" in topic:
                    parsed_topic = topic.split("/")
                    if len(parsed_topic) == 3:
                        # this topic has the correct format
                        if (parsed_topic[0] == 'device') and (parsed_topic[2] == 'details'):
                            # this is a topic we care about, so check the 2nd element
                            if (parsed_topic[1] == 'temp'):
                                print("Received temperature request: {}".format(payload))
                                topic_parsed = True
                            if (parsed_topic[1] == 'light'):
                                print("Received light request: {}".format(payload))
                                topic_parsed = True
                if not topic_parsed:
                    print("Unrecognized message topic.")
                # insert end
            EOF
          - !Sub 'su - ${UserName} -c "sudo chown ${UserName}:${UserName} ~/aws-iot-device-sdk-python-v2/samples/pubsub2.py"'

          - !Sub 'su - ${UserName} -c "cp ~/aws-iot-device-sdk-python-v2/samples/pubsub.py ~/aws-iot-device-sdk-python-v2/samples/pubsub3.py"'
          - !Sub |
            su - ${UserName} -c "sed -i 's/message = \"{} \[{}\]\".format(message_string, publish_count)/message = \"{}\".format(message_string)/' ~/aws-iot-device-sdk-python-v2/samples/pubsub3.py"
          - !Sub |
            su - ${UserName} -c "sed -i 's/message_json = json.dumps(message)/message_json = json.dumps(json.loads(message))/' ~/aws-iot-device-sdk-python-v2/samples/pubsub3.py"
      Targets:
        - Key: InstanceIds
          Values:
            - !Ref InstanceId
      WaitForSuccessTimeoutSeconds: !Ref WaitForSuccessTimeoutSeconds
Code language: YAML (yaml)
SSMドキュメントAWS-RunShellScriptを実行して、Raspberry Piにてコマンドを実行します。
以下の2点がポイントです。
1点目はAWS IoT Device SDKのインストールです。
インストール手順は以下のページを参考にしました。
なおPythonやGitは、Raspberry Piにデフォルトでインストールされているものを使用します。
2点目はSDKのデモ用プログラムの準備です。
SDKをインストールすると、pubsub.pyというサンプルプログラムが使用できます。
デモを進める過程で、このファイルをコピーし、一部修正したファイル(pubsub2.py, pubsub3.py)を使用します。
本来、この処理は手作業で実施することになっていますが、自動的に同処理を実行するようにSSMドキュメントを設定します。
なお本処理を実装する上で、以下のページを参考にしました。

環境構築
Raspberry PiをSSMに登録する
1つ目のCloudFormationスタックを作成します。
AWS CLIを使用して、CloudFormationスタックを作成します。
上記のテンプレートファイルを任意のS3バケットに設置した上で、以下のコマンドを実行します。
$ aws cloudformation create-stack \
--stack-name fa-157-01 \
--template-url https://[bucket-name].s3.[region].amazonaws.com/fa-157/fa-157-01.yaml \
--capabilities CAPABILITY_IAM
Code language: Bash (bash)
スタック作成の詳細については、以下のページをご確認ください。
このスタックによって、主に以下のリソースが作成されます。
- クライアント証明書や鍵を配置するS3バケット
- SSMハイブリッドアクティベーション
- アクティベーション用のIAMロール
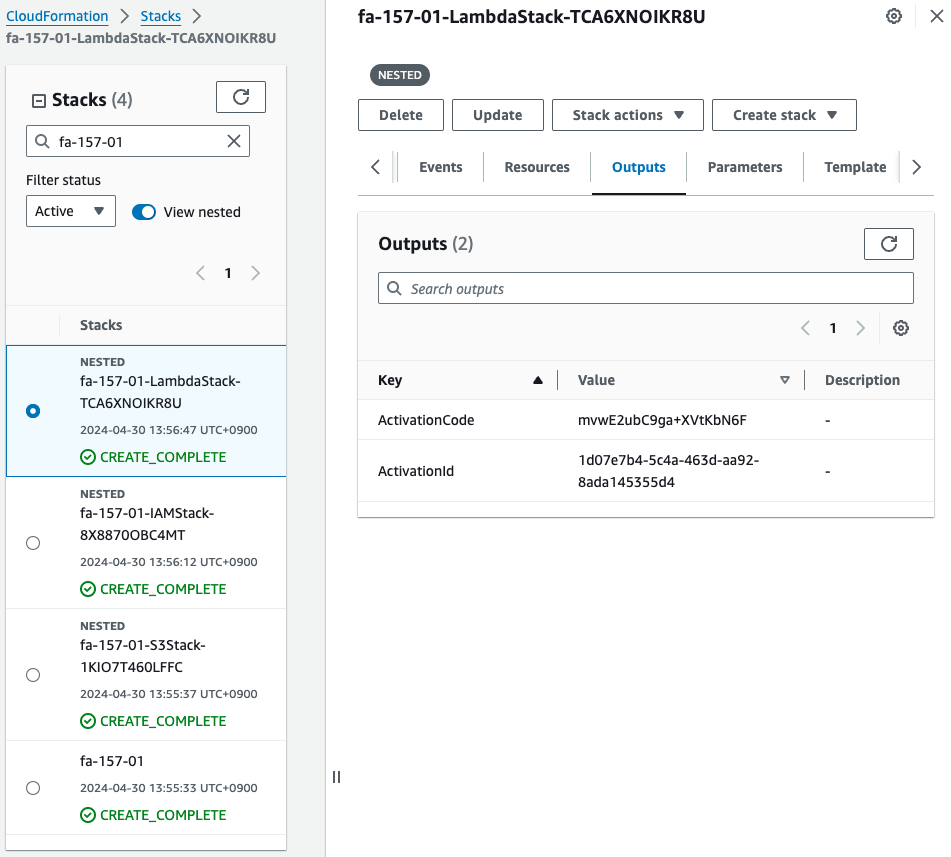
スタックの作成が完了すると、以下の通りハイブリッドアクティベーション用のコードとIDが取得できます。
Raspberry PiにSSM Agentをインストールする
Raspberry Piで以下のコマンドを実行して、SSM Agentをインストールします。
sudo apt-get -y update
sudo apt-get -y upgrade
sudo apt-get -y install libc6:armhf
mkdir /tmp/ssm
curl https://amazon-ssm-ap-northeast-1.s3.ap-northeast-1.amazonaws.com/latest/debian_arm/ssm-setup-cli -o /tmp/ssm/ssm-setup-cli
sudo chmod +x /tmp/ssm/ssm-setup-cli
sudo /tmp/ssm/ssm-setup-cli -register -activation-code "[activation-code]" -activation-id "[activation-id]" -region "ap-northeast-1"
Code language: Bash (bash)
最後のコマンドに、先ほど確認したアクティベーション用のIDとコードを埋め込みます。
手順の詳細については以下のページをご確認ください。
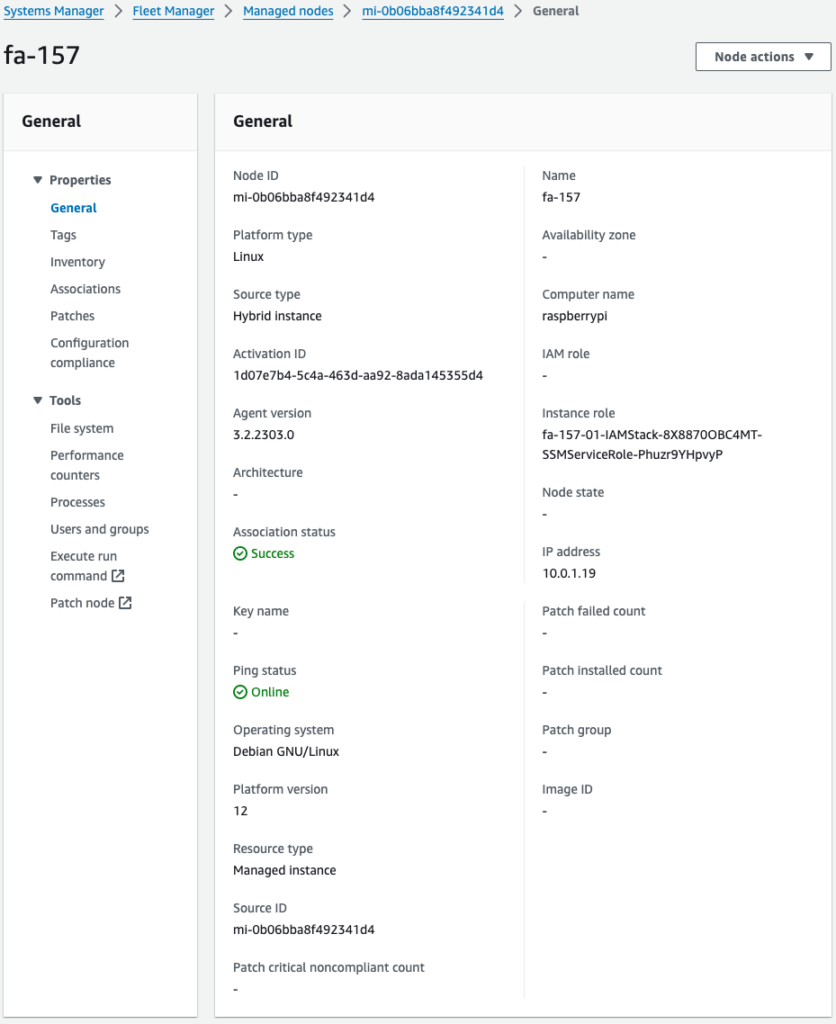
SSM Fleet Managerを確認すると、確かにRaspberry PiにSSMエージェントがインストールされて、管理対象であることがわかります。
SSMドキュメントを使用して、Raspberry PiをAWS IoTに登録後、AWS IoT Device SDKをセットアップする
2つ目のCloudFormationスタックを作成します。
先ほどと同様に、AWS CLIを使用してスタックを作成します。
$ aws cloudformation create-stack \
--stack-name fa-157-02 \
--template-url https://[bucket-name].s3.[region].amazonaws.com/fa-157/fa-157-02.yaml \
--capabilities CAPABILITY_IAM
Code language: Bash (bash)
このスタックによって、主に以下のリソースが作成されます。
- IoT Thing(モノ)
- IoTポリシー
- クライアント証明書と鍵
- クライアント証明書をモノおよびIoTポリシーにアタッチ
加えてSSMドキュメントによって、Raspberry Piにクライアント証明書や鍵がダウンロードされて、Raspberry Piをモノとして扱うことができるようになります。
そしてAWS IoT Device SDKを使用するために必要な手続きが実行されます。
マネージメントコンソールからAWS IoTに関係するリソースを確認します。
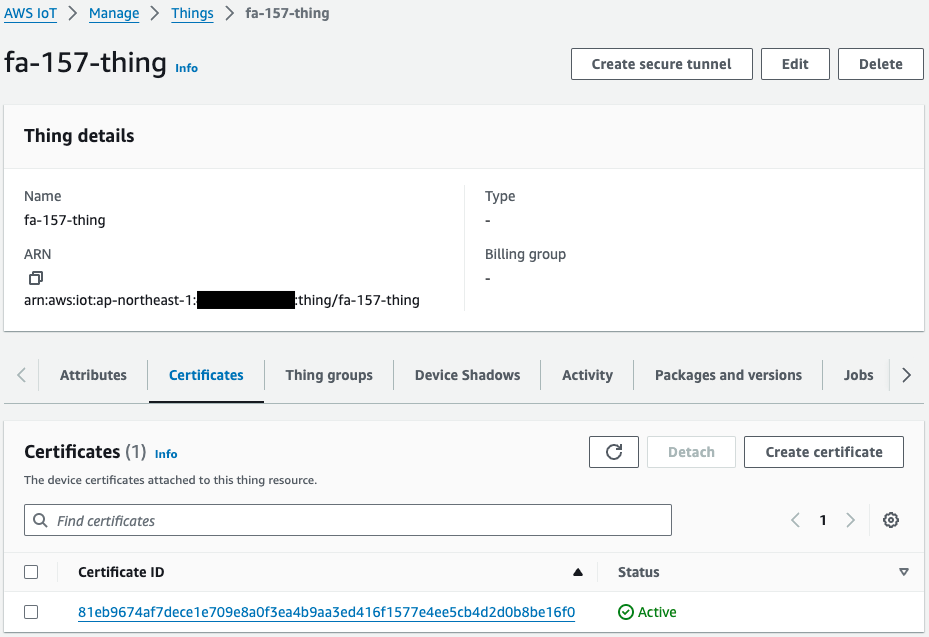
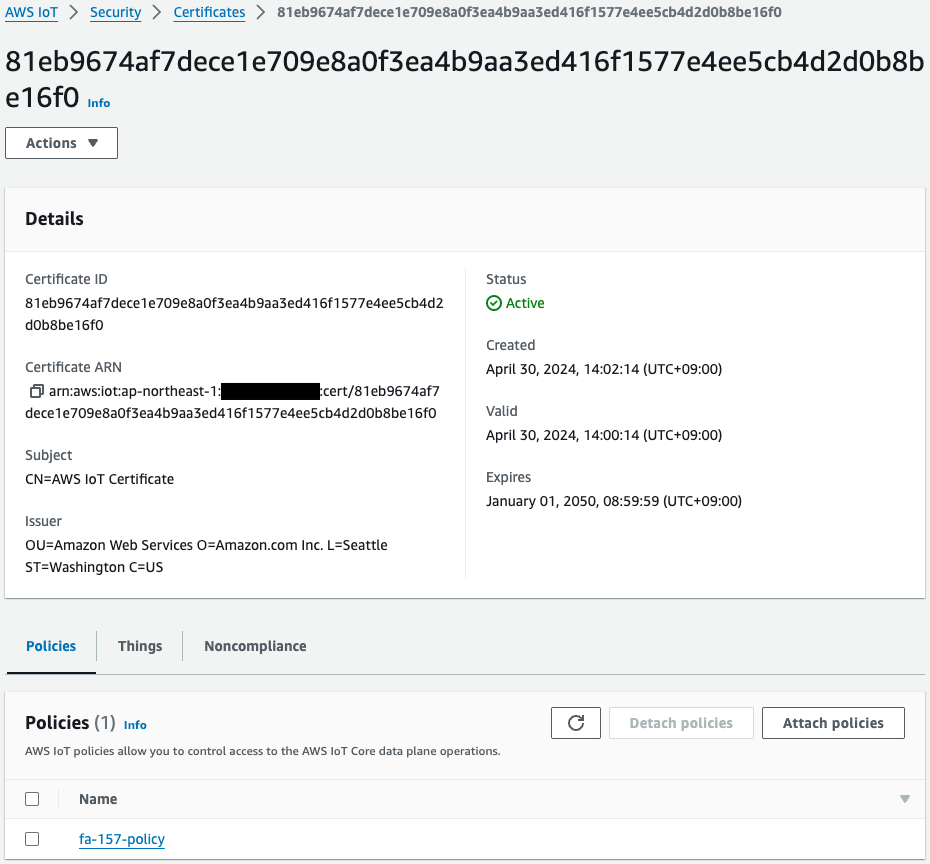
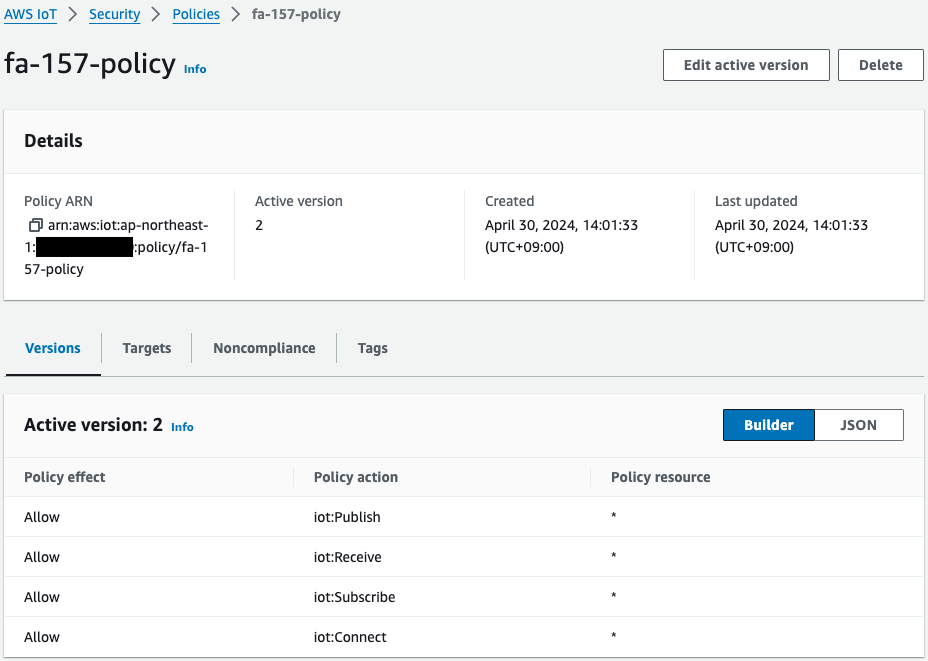
モノ、証明書、ポリシーが正常に作成されています。
特にポリシーは先ほど確認したCloudFormationテンプレート通りであることがわかります。
動作確認
AWS IoT Device SDKのインストール状況確認
準備が整いましたので、Raspberry Piにアクセスします。
アクセスはローカルマシンからSSHします。
まず証明書と鍵の有無を確認します。
awstut@raspberrypi:~ $ ls -l ~/certs
total 16
-rw-r--r-- 1 awstut awstut 1188 Apr 30 14:09 AmazonRootCA1.pem
-rw-r--r-- 1 root   root    root   1220 Apr 30 14:02 device.pem.crt
-rw-r--r-- 1 root   root    root   1679 Apr 30 14:02 private.pem.key
-rw-r--r-- 1 root    root    451 Apr 30 14:02 public.pem.key
Code language: Bash (bash)
ルート証明書に加えて、S3バケットから証明書および鍵がダウンロードされています。
つまりこのRaspberry PiはAWS IoTデバイスとして動作できます。
AWS IoT Device SDKのインストール状況を確認します。
awstut@raspberrypi:~ $ ls -ld ~/aws*
drwxr-xr-x 18 awstut awstut 4096 Apr 30 14:04 /home/awstut/aws-cli
drwxr-xr-x 14 awstut awstut 4096 Apr 30 14:09 /home/awstut/aws-iot-device-sdk-python-v2
Code language: Bash (bash)
AWS CLIに加えて、AWS IoT Device SDKがインストールされています。
サンプルプログラムの状況を確認します。
awstut@raspberrypi:~ $ ls -l ~/aws-iot-device-sdk-python-v2/samples/pubsub*
-rw-r--r-- 1 awstut awstut 7244 Apr 30 14:10 /home/awstut/aws-iot-device-sdk-python-v2/samples/pubsub2.py
-rw-r--r-- 1 awstut awstut 6479 Apr 30 14:10 /home/awstut/aws-iot-device-sdk-python-v2/samples/pubsub3.py
-rw-r--r-- 1 awstut awstut 3204 Apr 30 14:09 /home/awstut/aws-iot-device-sdk-python-v2/samples/pubsub.md
-rw-r--r-- 1 awstut awstut 6487 Apr 30 14:09 /home/awstut/aws-iot-device-sdk-python-v2/samples/pubsub.py
Code language: Bash (bash)
ベースとなるpubsub.pyをベースとして、pubsub2.pyおよびpubsub3.pyが作成されています。
これらのファイルの作成は、SSMドキュメントで定義しています。
AWS IoT Device SDKのデモ
以下のページに従いデモを行います。
デモ1:ワイルドカードトピックフィルターを使用してサブスクライブする
このデモの目的は、ワイルドカードトピックフィルターを使用してメッセージをサブスクライブすることです。
まずRaspberry Pi側でpubsub.pyを実行します。
awstut@raspberrypi:~ $ python3 ~/aws-iot-device-sdk-python-v2/samples/pubsub.py \
--message "" \
--count 2 \
--topic device/+/details \
--ca_file ~/certs/AmazonRootCA1.pem \
--cert ~/certs/device.pem.crt \
--key ~/certs/private.pem.key \
--endpoint [endpoint-name]
Connecting to a2oxckhng7gmur-ats.iot.ap-northeast-1.amazonaws.com with client ID 'test-cd3f51c3-7a0a-43ad-b5af-98f62ee53dfa'...
Connection Successful with return code: 0 session present: False
Connected!
Subscribing to topic 'device/+/details'...
Subscribed with 1
Waiting for all messages to be received...
Code language: Bash (bash)
endpoint引数に渡す値はAWSアカウントごとにユニークです。
適切なエンドポイント名をしてください。
プログラムが実行されて、待機状態となりました。
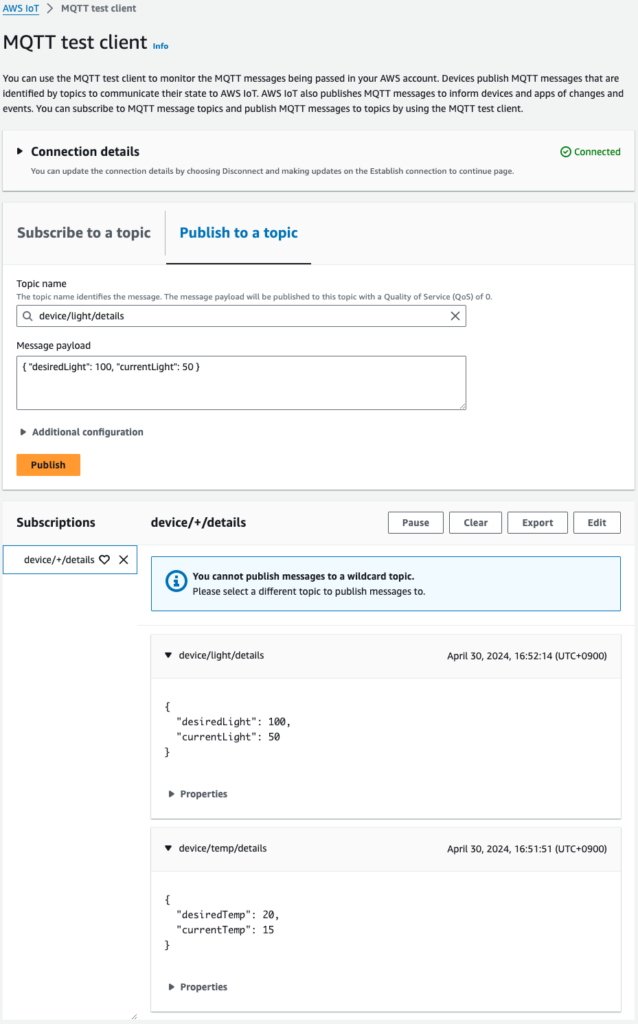
続いてマネージドコンソールのMQTT test clientページで、トピックフィルターに「device/+/details」を指定して登録します。
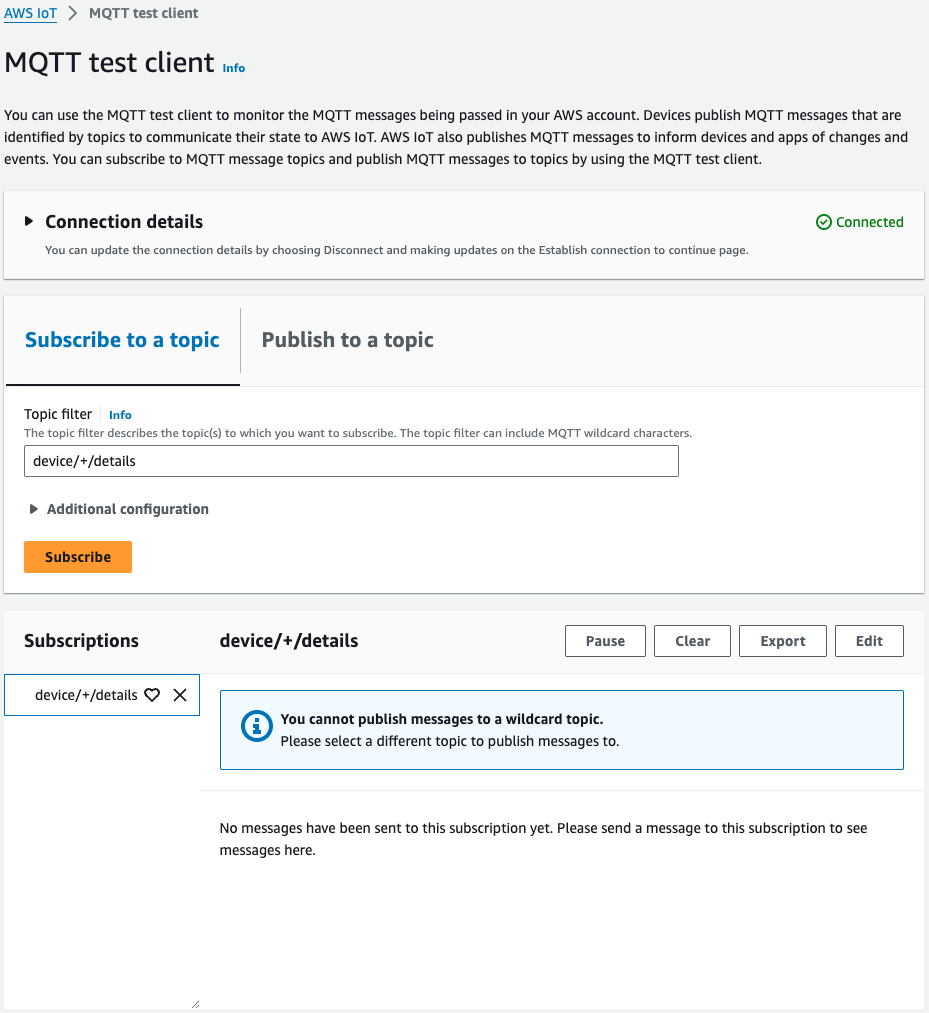
そして2つのトピックに対して、メッセージを発行します。
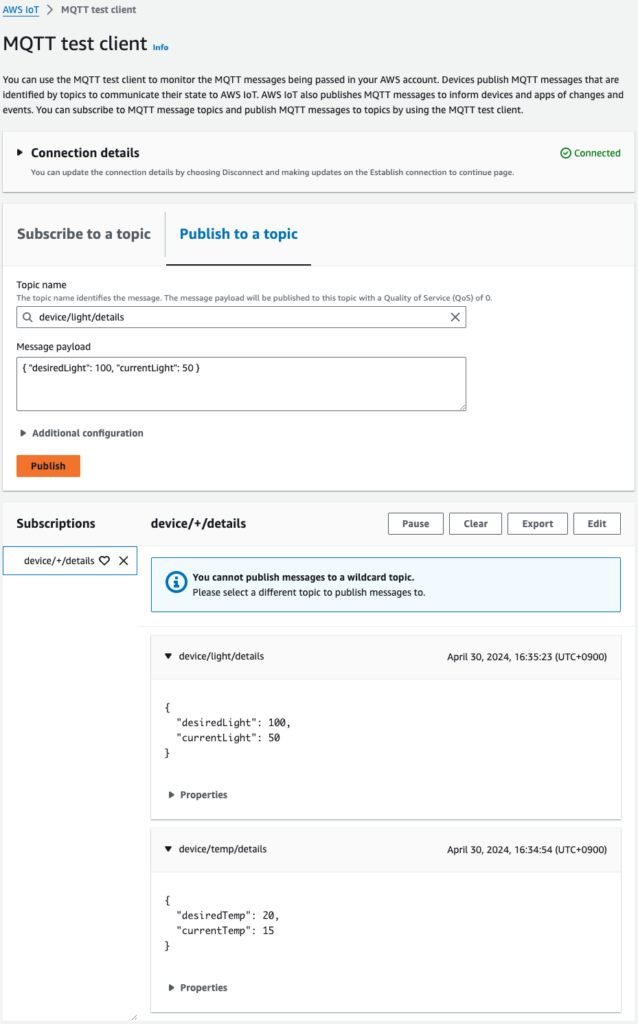
正常にメッセージを発行できました。
改めてRaspberry Piを確認します。
Waiting for all messages to be received...
Received message from topic 'device/temp/details': b'{ "desiredTemp": 20, "currentTemp": 15 }'
Received message from topic 'device/light/details': b'{ "desiredLight": 100, "currentLight": 50 }'
2 message(s) received.
Disconnecting...
Connection closed
Disconnected!
Code language: Bash (bash)
確かに2つのメッセージを受け取ることができました。
このようにAWS IoT Device SDKを使用して、メッセージを受信することができます。
デモ2:コールバック関数のカスタマイズ
このデモの目的は、メッセージ受信時に実行するコールバック関数をカスタマイズし、トピックに応じて実行する処理を分けることです。
以下がカスタマイズしたコールバック関数です。
# Callback when the subscribed topic receives a message
def on_message_received(topic, payload, dup, qos, retain, **kwargs):
    print("Received message from topic '{}': {}".format(topic, payload))
    # insert start
    topic_parsed = False
    if "/" in topic:
        parsed_topic = topic.split("/")
        if len(parsed_topic) == 3:
            # this topic has the correct format
            if (parsed_topic[0] == 'device') and (parsed_topic[2] == 'details'):
                # this is a topic we care about, so check the 2nd element
                if (parsed_topic[1] == 'temp'):
                    print("Received temperature request: {}".format(payload))
                    topic_parsed = True
                if (parsed_topic[1] == 'light'):
                    print("Received light request: {}".format(payload))
                    topic_parsed = True
    if not topic_parsed:
        print("Unrecognized message topic.")
    # insert end
    global received_count
    received_count += 1
    if received_count == cmdData.input_count:
        received_all_event.set()
Code language: Python (python)
トピック名をスラッシュで分割し、中央の文字列に応じて、実行するアクションを変化させます。
今までは統一的に文字列を返していましたが、返す文字列の一部を変化させます。
まずRaspberry Pi側でpubsub2.pyを実行します。
awstut@raspberrypi:~ $ python3 ~/aws-iot-device-sdk-python-v2/samples/pubsub2.py \
--message "" \
--count 2 \
--topic device/+/details \
--ca_file ~/certs/AmazonRootCA1.pem \
--cert ~/certs/device.pem.crt \
--key ~/certs/private.pem.key \
--endpoint [endpoint-name]
Connecting to a2oxckhng7gmur-ats.iot.ap-northeast-1.amazonaws.com with client ID 'test-21b600e1-018d-42eb-81c8-d156e55dd729'...
Connection Successful with return code: 0 session present: False
Connected!
Subscribing to topic 'device/+/details'...
Subscribed with 1
Waiting for all messages to be received...
Code language: Bash (bash)
プログラムが実行されて、待機状態となりました。
続いてマネージドコンソールのMQTT test clientページで、2つのメッセージを発行します。
正常にメッセージを発行できました。
改めてRaspberry Piを確認します。
Waiting for all messages to be received...
Received message from topic 'device/temp/details': b'{ "desiredTemp": 20, "currentTemp": 15 }'
Received temperature request: b'{ "desiredTemp": 20, "currentTemp": 15 }'
Received message from topic 'device/light/details': b'{ "desiredLight": 100, "currentLight": 50 }'
Received light request: b'{ "desiredLight": 100, "currentLight": 50 }'
2 message(s) received.
Disconnecting...
Connection closed
Disconnected!
Code language: Bash (bash)
先ほどと同様に、2つのメッセージを受け取ることができました。
受信した際のメッセージに注目すると、トピック名に応じて、出力される文字列が変化していることがわかります。
このようにAWS IoT Device SDKでは、コールバック変数をカスタマイズすることで、サブスクリプションごとにアクションを定義することができます。
デモ3:メッセージ発行
このデモの目的は、AWS IoT Device SDKを使用して、メッセージを発行することです。
デモの前に、このデモのために用意したpubsub3.pyを確認します。
pubsub.pyとの違いは以下の通りです。
awstut@raspberrypi:~ $ diff -c ~/aws-iot-device-sdk-python-v2/samples/pubsub.py ~/aws-iot-device-sdk-python-v2/samples/pubsub3.py
*** /home/awstut/aws-iot-device-sdk-python-v2/samples/pubsub.py	2024-04-30 14:09:43.040952447 +0900
--- /home/awstut/aws-iot-device-sdk-python-v2/samples/pubsub3.py	2024-04-30 14:10:05.797367406 +0900
***************
*** 132,140 ****

          publish_count = 1
          while (publish_count <= message_count) or (message_count == 0):
!              message = "{} [{}]".format(message_string, publish_count)
              print("Publishing message to topic '{}': {}".format(message_topic, message))
!              message_json = json.dumps(message)
              mqtt_connection.publish(
                  topic=message_topic,
                  payload=message_json,
--- 132,140 ----

          publish_count = 1
          while (publish_count <= message_count) or (message_count == 0):
!              message = "{}".format(message_string)
              print("Publishing message to topic '{}': {}".format(message_topic, message))
!              message_json = json.dumps(json.loads(message))
              mqtt_connection.publish(
                  topic=message_topic,
                  payload=message_json,
Code language: Bash (bash)
見ての通り、2箇所を修正しています。
1箇所目はメッセージ数に関する修正です。
デフォルトでは、発行したメッセージ数を、メッセージと併記していましたが、これを削除します。
2箇所目はメッセージのフォーマットの変更です。
デフォルトでは、文字列のままjson.dumpsを実行していましたが、その前にjson.loads関数を実行します。
準備が整いました。
まずマネージドコンソールのMQTT test clientページで、サブスクリプション設定を行います。
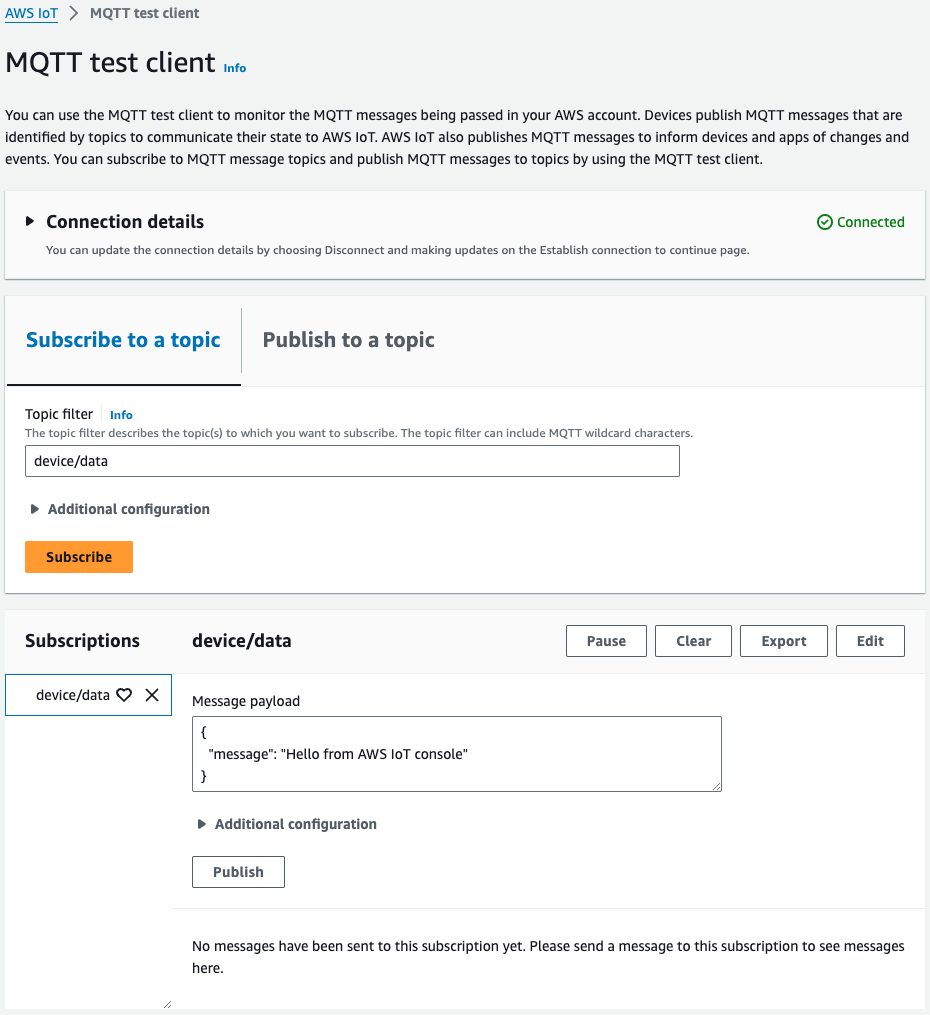
「device/data」をサブスクライブします。
続いてRaspberry Pi側でpubsub3.pyを実行します。
awstut@raspberrypi:~ $ python3 ~/aws-iot-device-sdk-python-v2/samples/pubsub3.py \
--message '{"timestamp":1601048303,"sensorId":28,"sensorData":[{"sensorName":"Wind speed","sensorValue":34.2211224}]}' \
--count 2 \
--topic device/data \
--ca_file ~/certs/AmazonRootCA1.pem \
--cert ~/certs/device.pem.crt \
--key ~/certs/private.pem.key \
--endpoint [endpoint-name]
Connecting to a2oxckhng7gmur-ats.iot.ap-northeast-1.amazonaws.com with client ID 'test-4522c1a4-f306-4910-9331-e87728ccd222'...
Connection Successful with return code: 0 session present: False
Connected!
Subscribing to topic 'device/data'...
Subscribed with 1
Sending 2 message(s)
Publishing message to topic 'device/data': {"timestamp":1601048303,"sensorId":28,"sensorData":[{"sensorName":"Wind speed","sensorValue":34.2211224}]}
Received message from topic 'device/data': b'{"timestamp": 1601048303, "sensorId": 28, "sensorData": [{"sensorName": "Wind speed", "sensorValue": 34.2211224}]}'
2 message(s) received.
Disconnecting...
Connection closed
Disconnected!
Code language: Bash (bash)
2つメッセージを発行後、プログラムが終了しました。
最後にMQTT test clientページをもう一度確認します。
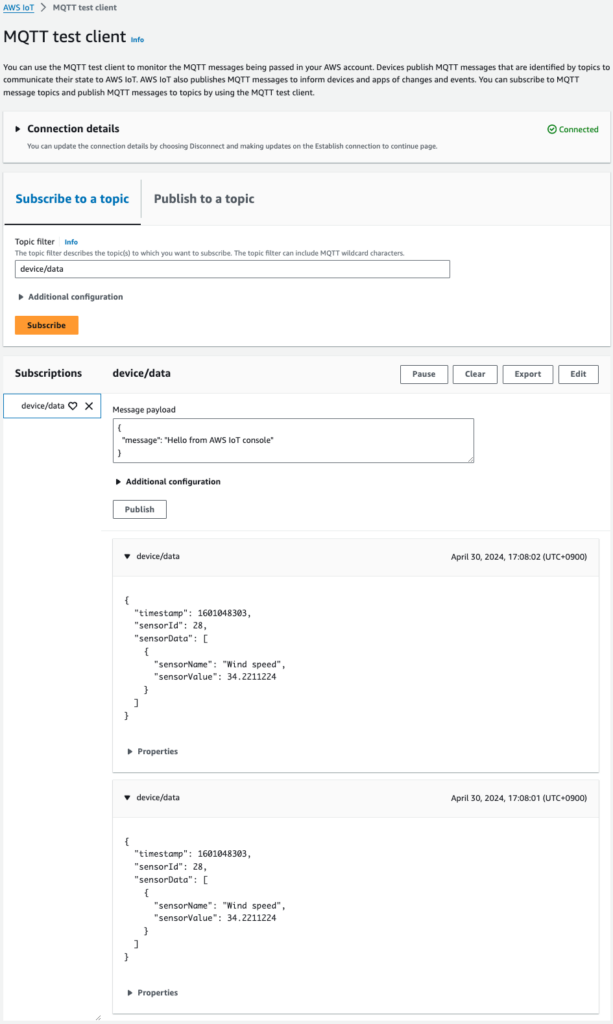
確かに発行したメッセージが表示されました。
メッセージのペイロードがJSON形式である点も注目です。
比較のためにpubsub.pyでメッセージを発行します。
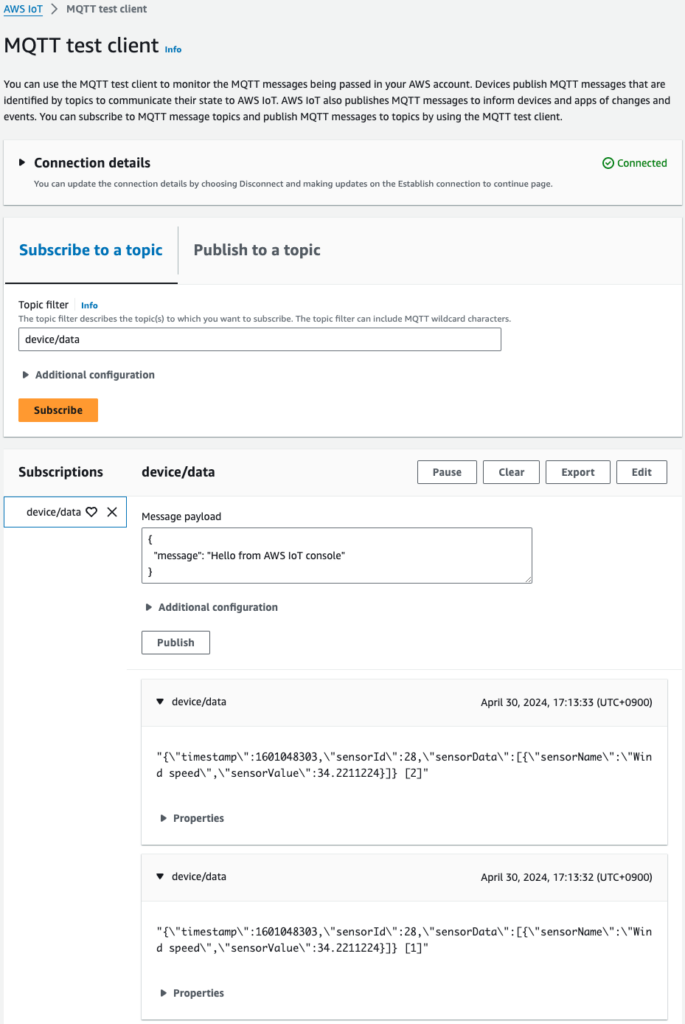
JSONフォーマットではなく、文字列としてメッセージが送信されました。
このようにAWS IoT Device SDKを使用すれば、メッセージを発行することが可能です。
またメッセージ発行ロジックを適切に実装することによって、JSONフォーマットでメッセージを発行することもできます。
まとめ
Raspberry Pi 5を使用して、AWS IoT Device SDKのデモを体験しました。