Configuration using CloudFront cache to reduce number of requests to origin server
This is one of the topics covered in AWS SAA, which is about designing a high-performance architecture.
CloudFront is placed in front of the origin server to cache content and improve the performance of the origin server.
Environment
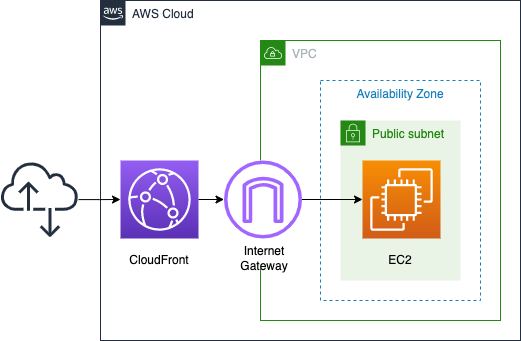
Set up an EC2 instance (Amazon Linux 2) on a public subnet. Install Apache on the instance and run it as a web server.
Deploy CloudFront in front of it to cache the instance’s contents.
CloudFormation template files
The above configuration is built with CloudFormation.
The CloudFormation template file is located at the following URL
https://github.com/awstut-an-r/awstut-saa/tree/main/02/005
Explanation of key points in the template files
Enable DNS functionality for VPC
Configure the EC2 instance to be accessible by host name.
Resources:
  VPC:
    Type: AWS::EC2::VPC
    Properties:
      CidrBlock: !Ref VPCCidrBlock
      EnableDnsHostnames: true
      EnableDnsSupport: true
Code language: YAML (yaml)
VPC offers a variety of features, one of which is DNS.
The following VPC attributes determine the DNS support provided for your VPC. If both attributes are enabled, an instance launched into the VPC receives a public DNS hostname if it is assigned a public IPv4 address or an Elastic IP address at creation.
DNS attributes in your VPC
The reason for setting up the DNS function is that we need the public DNS hostname of the EC2 instance.
This public DNS host name is used in specifying the origin server for CloudFront, described below.
To enable DNS functionality in a VPC, it is said that both of the following two parameters must be set to enable.
enableDnsHostnames
Determines whether the VPC supports assigning public DNS hostnames to instances with public IP addresses.enableDnsSupport
DNS attributes in your VPC
Determines whether the VPC supports DNS resolution through the Amazon provided DNS server.
Set the EnableDnsHostnames and EnableDnsSupport properties to true according to the above.
Granting EIP to EC2 instance
Check the EC2 instance. The point is to grant a fixed address.
Resources:
  EIP:
    Type: AWS::EC2::EIP
    Properties:
      Domain: vpc

  EIPAssociation:
    Type: AWS::EC2::EIPAssociation
    Properties:
      AllocationId: !GetAtt EIP.AllocationId
      InstanceId: !Ref Instance

  Instance:
    Type: AWS::EC2::Instance
    Properties:
      ImageId: !Ref ImageId
      InstanceType: !Ref InstanceType
      NetworkInterfaces:
        - DeviceIndex: 0
          SubnetId: !Ref PublicSubnet
          GroupSet:
            - !Ref InstanceSecurityGroup
      UserData: !Base64 |
        #!/bin/bash -xe
        yum update -y
        yum install -y httpd
        systemctl start httpd
        systemctl enable httpd
        ec2-metadata -i > /var/www/html/index.html


Outputs:
  InstancePublicDnsName:
    Value: !GetAtt Instance.PublicDnsName
Code language: YAML (yaml)
Assign a static IP address to the instance.
The public DNS hostname described above is created based on the public address. Therefore, if the public address is changed dynamically, the public DNS hostname may be changed accordingly.
To assign a fixed public address, use Elastic IP. After an Elastic IP is defined, it is associated with an EC2 instance.
Setting up = EC2 instance as CloudFront origin
First, check how to specify the origin server for CloudFront.
Resources:
  Distribution:
    Type: AWS::CloudFront::Distribution
    Properties:
      DistributionConfig:
        Origins:
          - CustomOriginConfig:
              OriginProtocolPolicy: http-only
            DomainName: !Ref InstancePublicDnsName
            Id: !Ref InstancePublicDnsName
Code language: YAML (yaml)
The origin server is specified with the Origins property.
Specify the domain name of the origin server in the DomainName property. In this case, specify the public DNS host name of the EC2 instance.
The CustomOriginConfig property allows you to change the behavior when CloudFront accesses the origin server. In this case, the EC2 instance, which is the origin server, listens for HTTP requests instead of HTTPS. Therefore, set the OriginProtocolPolicy property to “http-only”.
Specify the ID to be assigned to the origin server in the Id property. In this case, specify the public DNS host name of the instance. This value will be used in the cache configuration described below.
CloudFront cache settings
Finally, configure the cache settings.
Resources:
  Distribution:
    Type: AWS::CloudFront::Distribution
    Properties:
      DistributionConfig:
        DefaultCacheBehavior:
          AllowedMethods:
            - GET
            - HEAD
          CachedMethods:
            - GET
            - HEAD
          Compress: true
          ForwardedValues:
            Cookies:
              Forward: none
            QueryString: false
          TargetOriginId: !Ref InstancePublicDnsName
          ViewerProtocolPolicy: allow-all
          DefaultTTL: !Ref CacheTTL
          MaxTTL: !Ref CacheTTL
          MinTTL: !Ref CacheTTL
Code language: YAML (yaml)
This time, only the EC2 instance is the origin server. Therefore, by setting the DefaultCacheBehavior property, the default cache settings for this CloudFront distribution are configured.
Specify the HTTP methods allowed in this distribution with the AlloedMethods property. The value to be set for this property is defined by the accepted method patterns.
A complex type that controls which HTTP methods CloudFront processes and forwards to your Amazon S3 bucket or your custom origin. There are three choices:
・CloudFront forwards only GET and HEAD requests.
AWS::CloudFront::Distribution DefaultCacheBehavior
・CloudFront forwards only GET, HEAD, and OPTIONS requests.
・CloudFront forwards GET, HEAD, OPTIONS, PUT, PATCH, POST, and DELETE requests.
In this case, only GETs will be accepted. Therefore, specify GET and HEAD.
The same goes for the CachedMethods property. The value to be set for this property depends on the method corresponding to the cache.
A complex type that controls whether CloudFront caches the response to requests using the specified HTTP methods. There are two choices:
・CloudFront caches responses to GET and HEAD requests.
AWS::CloudFront::Distribution DefaultCacheBehavior
・CloudFront caches responses to GET, HEAD, and OPTIONS requests.
GET and HEAD are also specified here.
In the TargetOriginId property, specify the origin server corresponding to this cache setting. In this case, the EC2 instance is used as the origin server, so the value specified for the Id property in the Origins property described above is also specified here.
In the ViewerProtocolPolicy property, you can specify the HTTP protocol accepted by the user when accessing the TargetOriginId property. In this case, HTTP and HTTPS are accepted. In this case, specifying “allow-all” will allow both protocols to be accepted.
Note that this property is a setting for the HTTP protocol between the user and CloudFront; the setting for the protocol between CloudFront and the origin server is set in the Origins property, as described above. In this case, CloudFront will communicate with the origin server using HTTP even if the user communicates with CloudFront using either HTTP or HTTPS protocol.
Finally, we set the TTL of the cache; three properties (DefaultTTL, MaxTTL, MinTTL) allow us to set the cache lifetime. In this case, we set them all to “60 (seconds)”.
Architecting
Using CloudFormation, we will build this environment and check its actual behavior.
Create CloudFormation stack and check resources in stack
Create a CloudFormation stack.
For information on how to create stacks and check each stack, please refer to the following page

After reviewing the resources in each stack, the following is the information on the main resources created in this case.
- Instance ID: i-08665eb4768e384ec
- Public DNS hostname for the instance: ec2-35-74-46-156.ap-northeast-1.compute.amazonaws.com
- Domain name of CloudFront distribution: https://d3julxofsz7qa5.cloudfront.net
The AWS Management Console also checks the status of resource creation.
First, check the status of the EC2 instance.
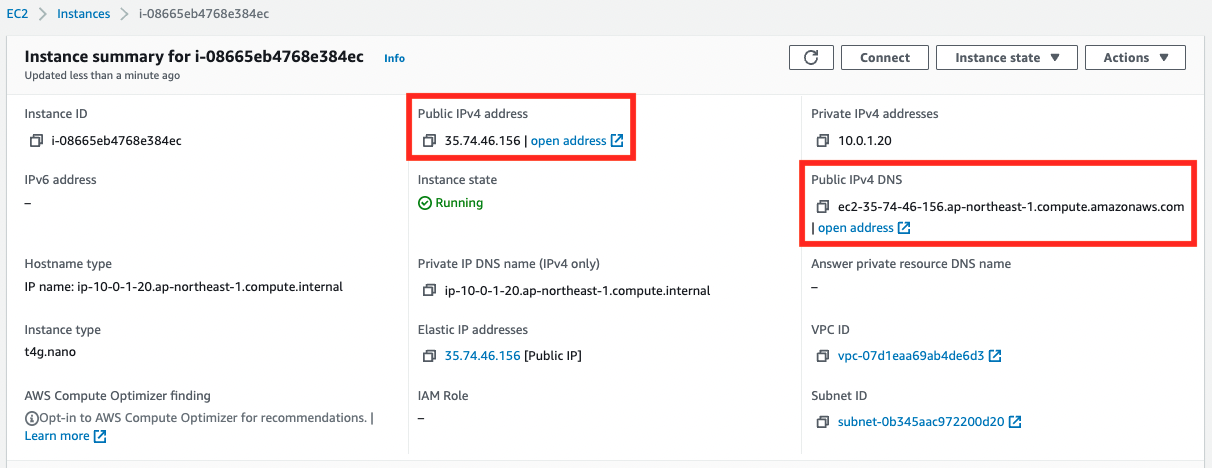
You can see that the EIP has been assigned and that the public DNS hostname has been activated.
Next, check CloudFront.

You can see the domain name assigned to CloudFront.

An EC2 instance is set as the distribution origin.

An EC2 instance is specified as the default path pattern.
Behavior check 1: Direct access to the EC2 instance
We are ready to go.
First, access the EC2 instance directly.

A response is returned from the instance.
Check the behavior at the time of the HTTP request.
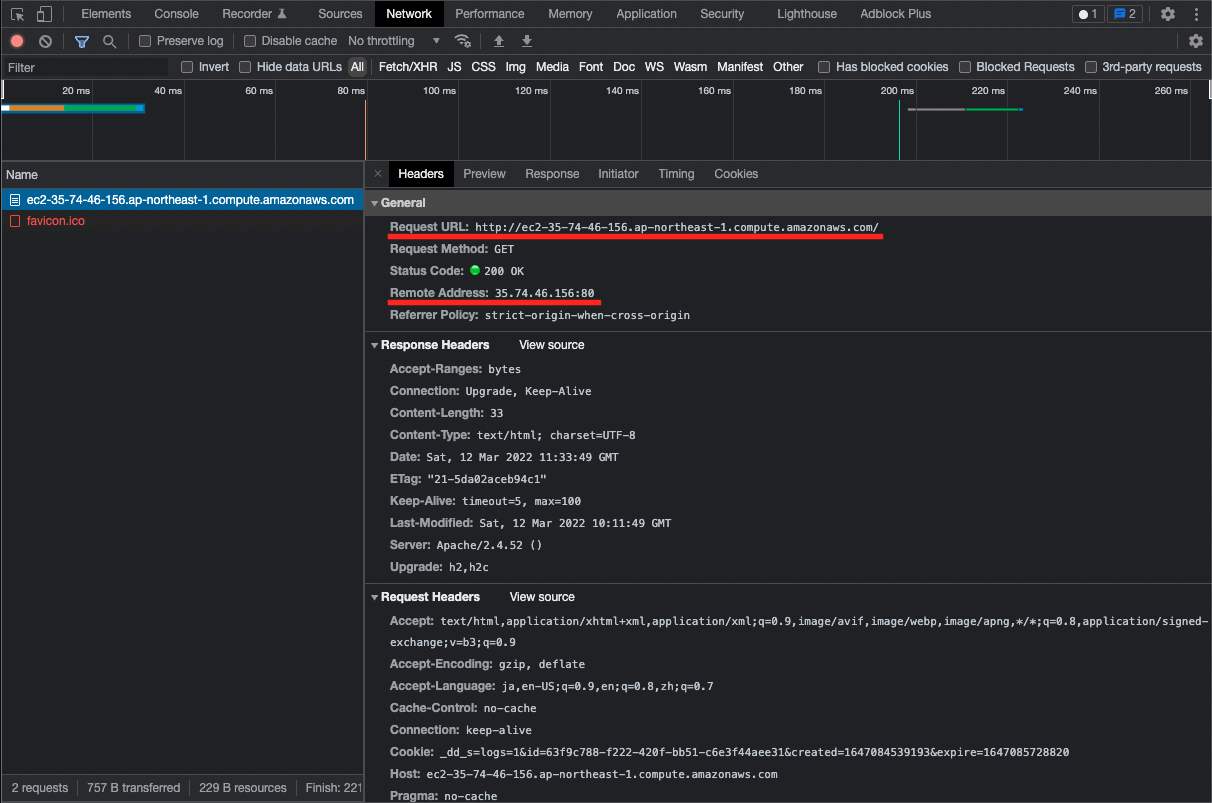
If you access the public DNS hostname of the instance, you will see that traffic is flowing toward the instance’s EIP.
Behavior check 2: Accessing an EC2 instance via CloudFront
Finally, access CloudFront.

Here, too, a response is returned from the instance.
We will also check the behavior of HTTP requests.
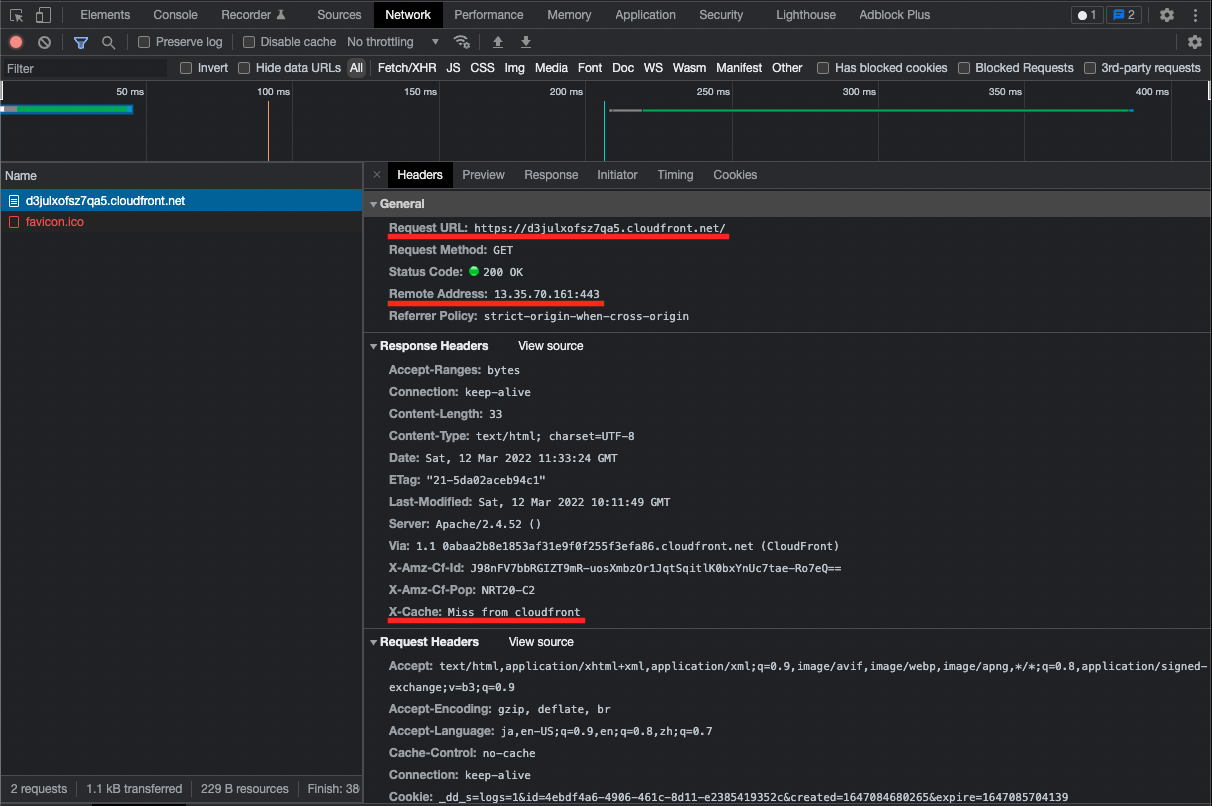
When accessing CloudFront, we see that it is accessed via an edge location.
Looking at the cache item, we see “Miss front cloudfront”. This means that the content was not cached because it was accessed for the first time.
Access via CloudFront again.
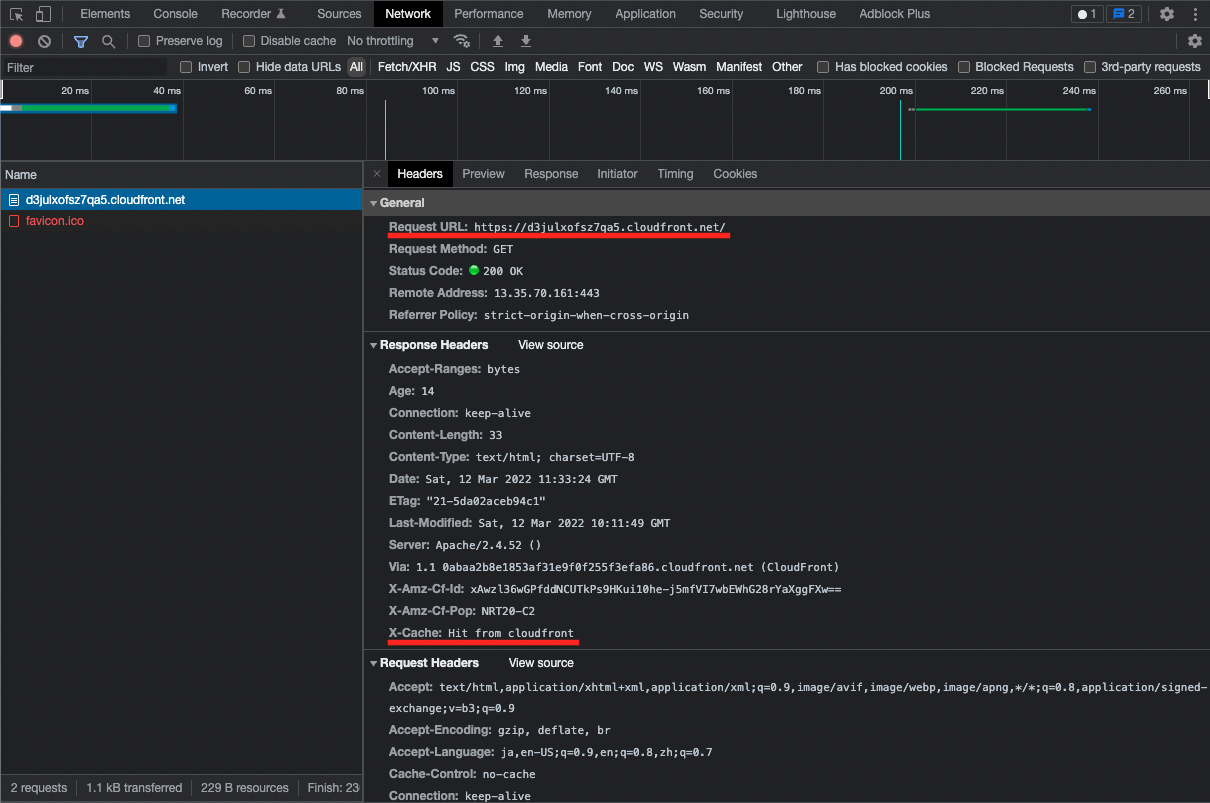
After the second access, you will see “Hit front cloudfront”.
This means that the content cached in CloudFront is returned in response to the HTTP request.
In other words, the EC2 instance, which is the origin server, will not receive the request, which can be expected to improve server performance.
Summary
We have confirmed a configuration in which CloudFront is placed in front of the EC2 instance.