Configure Windows instances to be accessed via SSM Session Manager
We will check a configuration that accesses a Windows instance via SSM Session Manager.
Session Manager is a fully managed AWS Systems Manager capability that lets you manage your Amazon EC2 instances through an interactive one-click browser-based shell or through the AWS CLI. You can use Session Manager to start a session with an instance in your account. After the session is started, you can run bash commands as you would through any other connection type.
Connect to your Linux instance using Session Manager
Accessing an instance using SSM Session Manager has various advantages over the common SSH access. One of the most notable points is that it eliminates the need to open ports for remote access, and it also eliminates the need for a stepping stone server.
Leaving inbound SSH ports and remote PowerShell ports open on your managed nodes greatly increases the risk of entities running unauthorized or malicious commands on the managed nodes. Session Manager helps you improve your security posture by letting you close these inbound ports, freeing you from managing SSH keys and certificates, bastion hosts, and jump boxes.
AWS Systems Manager Session Manager
In this article, we will compare the access to a typical remote desktop (RDP) connection.
This page is intended for Windows instances.
Environment

Create one subnet in the VPC.
A public subnet with access to the Internet.
Three Windows instances will be placed on each of these subnets.
The instance we are creating is Windows Server 2022.
Each of them will be configured with a public address.
These instances correspond to (1) or (2) in the Linux version.
The reason we only provide these two patterns is that this page focuses on checking the RDP connection and SSM Session Manager behavior on Windows.
CloudFormation template files
We will build the above configuration using CloudFormation.
Place the CloudFormation template at the following URL.
https://github.com/awstut-an-r/awstut-fa/tree/main/007
Scenario
The following three patterns are identified with respect to how to access Windows instances.
- RDP Connection
- SSM Session Manager connection (PowerShell)
- SSM Session Manager connection (RDP with port forwarding)
Template file points
This page focuses on how to access Windows instances using SSM Session Manager.
For basic information on SSM Session Manager, please refer to the following pages.
Security Group
One major difference between RDP and SSM Session Manager is the security group.
In the case of RDP, the port for the service (generally 3389/tcp) must be open.
In the case of SSM Session Manager, on the other hand, no such action is required.
The following table summarizes the inbound communications allowed by each instance in the security group.
| Instance | Method | Security Group |
| Instance 1 | RDP | Allow 3389/tcp |
| Instance 2 | SSM Session Manager | – |
| Instance 3 | SSM Session Manager | – |
Instance 1: Security Group to allow RDP
Resources:
  InstanceSecurityGroup1:
    Type: AWS::EC2::SecurityGroup
    Properties:
      GroupName: !Sub "${Prefix}-InstanceSecurityGroup1"
      GroupDescription: Allow SSH.
      VpcId: !Ref VPC
      SecurityGroupIngress:
        - IpProtocol: tcp
          FromPort: !Ref RDPPort
          ToPort: !Ref RDPPort
          CidrIp: 0.0.0.0/0
Code language: YAML (yaml)
There are two key points to consider for security groups.
The first is the port number. In this case, RDP (3389/tcp) will be used to access instance 1 to which this security group will be applied, so the same port is specified.
The second is the sender. This time, “0.0.0.0/0” is specified as the CIDR. By setting it this way, it means that access from all source addresses is allowed.
In summary, the above allows RDP connections from all addresses via the Internet.
Instances 2 and 3: No inbound communication occurs in SSM Session Manager
Resources:
  InstanceSecurityGroup2:
    Type: AWS::EC2::SecurityGroup
    Properties:
      GroupName: !Sub "${Prefix}-InstanceSecurityGroup2"
      GroupDescription: Deny All.
      VpcId: !Ref VPC
Code language: YAML (yaml)
Security group to be applied to instances 2 and 3.
As you can clearly see by comparing with instance 1, it does not allow any inbound communication.
This means that all inbound communication is not allowed.
Without going into details, there is no inbound communication that should be allowed in order to run SSM Session Manager.
So create a security group that does not allow all inbound communication.
EC2
There are four key points in setting up an EC2 instance.
The first is the security group.
This was checked in the previous section and is omitted.
The second is an IAM role.
To use SSM Session Manager, we need to allow multiple SSM actions on the instance by associating an IAM role.
The required actions are summarized in the form of an AWS management policy (AmazonSSMMManagedInstanceCore), which you attach to the IAM role you create.
The third is the key pair.
If you use RDP, you need to set the key pair.
A key pair, consisting of a public key and a private key, is a set of security credentials that you use to prove your identity when connecting to an Amazon EC2 instance.
Amazon EC2 key pairs and Linux instances
Instance 1 will be accessed directly using RDP, and instance 3 will use SSM Session Manager’s port forwarding feature for RDP connections, so key pair settings are required for both instances.
Below is a table summarizing the settings for each instance.
| Instance | Method | Policies to attach to IAM roles | Key Pair |
| Instance 1 | RDP | – | Required |
| Instance 2 | SSM Session Manager(PowerShell) | AWS Management Policy for SSM | – |
| Instance 3 | SSM Session Manager(Port Fowarding) | AWS Management Policy for SSM | Required |
Instance 1: Allow RDP with Key Pair and Security Group
Resources:
  Instance1:
    Type: AWS::EC2::Instance
    Properties:
      ImageId: !Ref ImageId
      InstanceType: !Ref InstanceType
      KeyName: !Ref KeyName
      NetworkInterfaces:
        - AssociatePublicIpAddress: true
          DeviceIndex: 0
          SubnetId: !Ref PublicSubnet
          GroupSet:
            - !Ref InstanceSecurityGroup1
Code language: YAML (yaml)
Set the key pair.
In this case, we are assuming that you are creating a key pair named “MyKeyPair”.
Please see the following page for more information on creating key pairs.
https://docs.aws.amazon.com/cli/latest/userguide/cli-services-ec2-keypairs.html
Use the security group for instance 1.
This allows RDP (3389/tcp) from the Internet.
Instance 2: Allow SSM Session Manager in IAM role
Resources:
  Instance2:
    Type: AWS::EC2::Instance
    Properties:
      IamInstanceProfile: !Ref InstanceProfile
      ImageId: !Ref ImageId
      InstanceType: !Ref InstanceType
      NetworkInterfaces:
        - AssociatePublicIpAddress: true
          DeviceIndex: 0
          SubnetId: !Ref PublicSubnet
          GroupSet:
            - !Ref InstanceSecurityGroup2
Code language: YAML (yaml)
The security group for instance 2 does not allow all inbound communication.
Associate an instance profile (IAM role) with the IamInstanceProfile property.
The IAM role to be associated this time is attached to the AWS management policy AmazonSSMManagedInstanceCore.
Attaching this will allow the actions required to run SSM Session Manager.
Another requirement for running SSM Session Manager is that the SSM agent must be installed on the instance.
However, Windows Server 2022 has the agent installed by default, so no special action is required.
AWS Systems Manager Agent (SSM Agent) is preinstalled, by default, on the Amazon Machine Images (AMIs) for Windows Server that are provided by AWS. Support is provided for the following operating system (OS) versions.
Windows Server 2008-2012 R2 AMIs published in November 2016 or later
Windows Server 2016, 2019, and 2022
Working with SSM Agent on EC2 instances for Windows Server
Instance 3: Key pair configuration is required for RDP using Port Forwarding in SSM Session Manager
Resources:
  Instance3:
    Type: AWS::EC2::Instance
    Properties:
      IamInstanceProfile: !Ref InstanceProfile
      ImageId: !Ref ImageId
      InstanceType: !Ref InstanceType
      KeyName: !Ref KeyName
      NetworkInterfaces:
        - AssociatePublicIpAddress: true
          DeviceIndex: 0
          SubnetId: !Ref PublicSubnet
          GroupSet:
            - !Ref InstanceSecurityGroup2
Code language: YAML (yaml)
Instance 3 also uses SSM Session Manager, so set up an instance profile and security group as for instance 2.
In addition, instance 3 will use SSM Session Manager port forwarding for RDP connections, so we will also set up the key pair.
Architecting
Using CloudFormation, we will build this environment and check its actual behavior.
This time, we will proceed with the following conditions.
- Bucket name and folder name: awstut-bucket/fa-007
- CloudFormation stack name: fa-007
Create a CloudFormation stack and check the resources in the stack
Create a CloudFormation stack.
For more information on how to create stacks and check each stack, please refer to the following page.

Check each resource from the AWS Management Console.
Instance 1
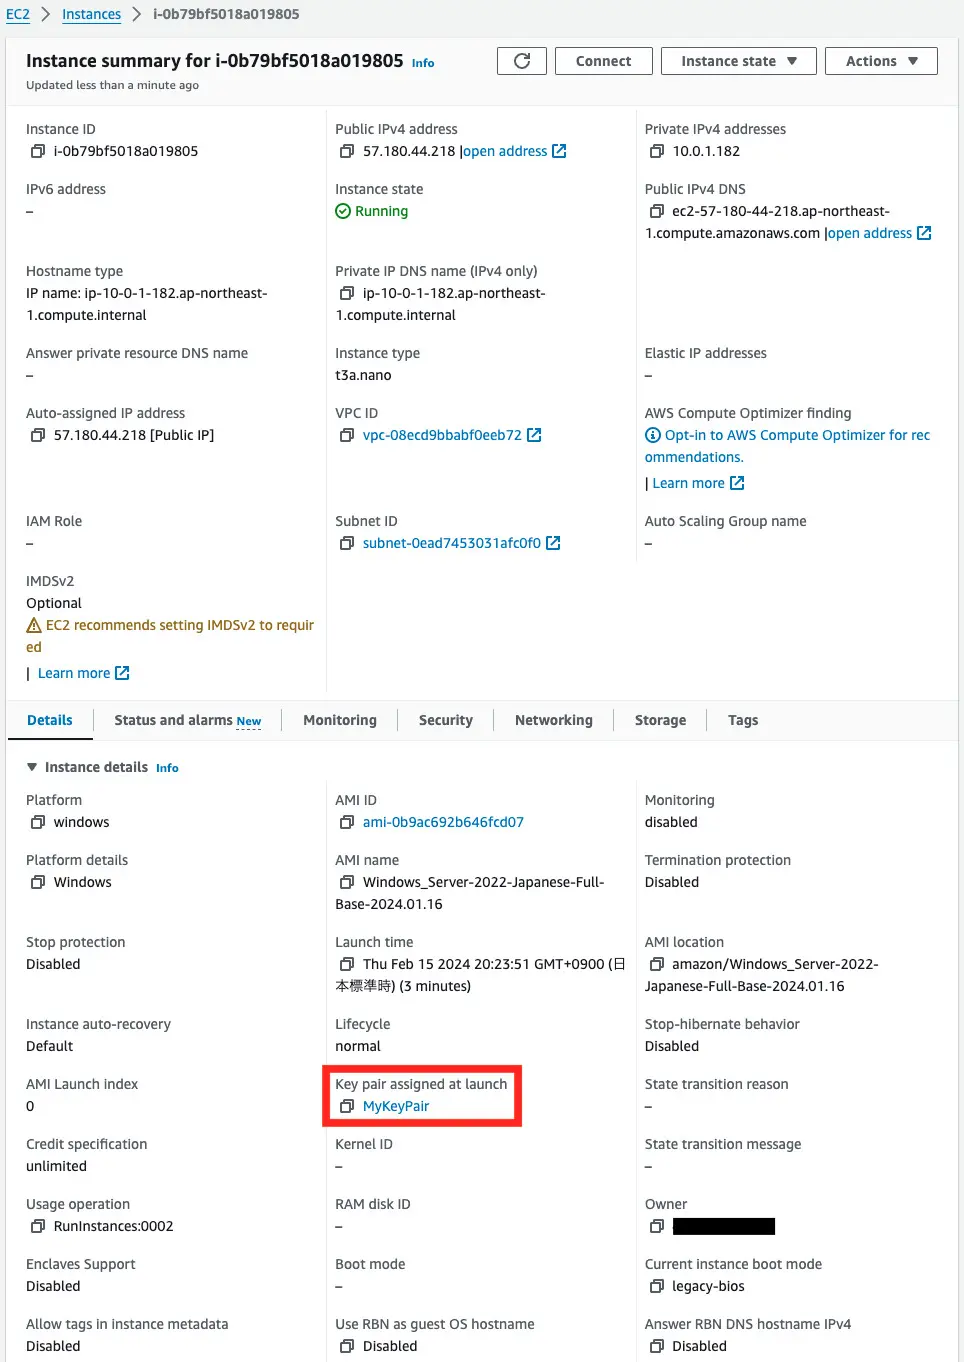
Indeed, a key pair is set.
Check the security groups applied to this instance.
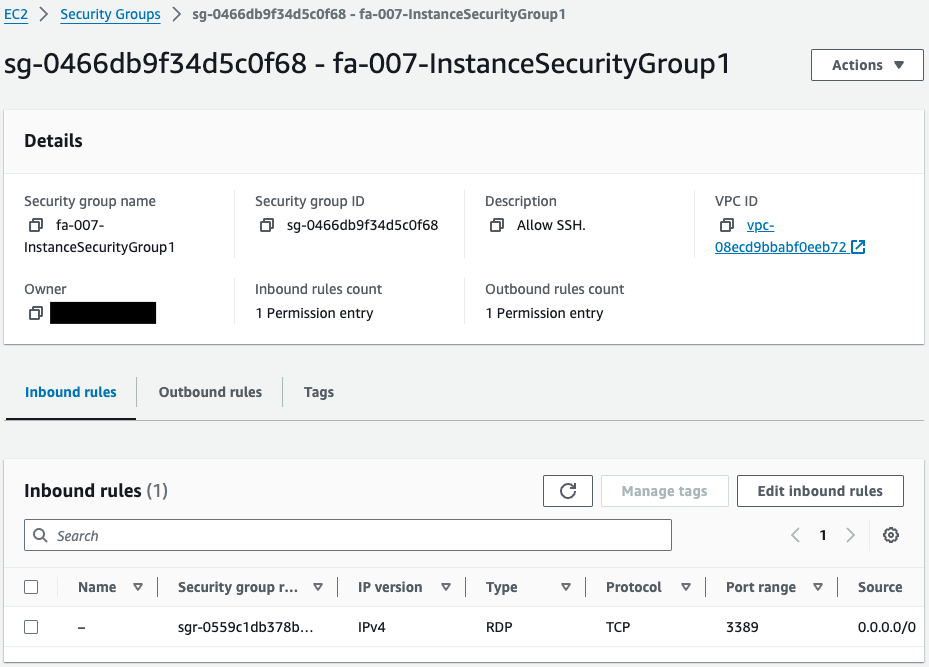
We can confirm that this is indeed what the RDP allows.
Instance 2
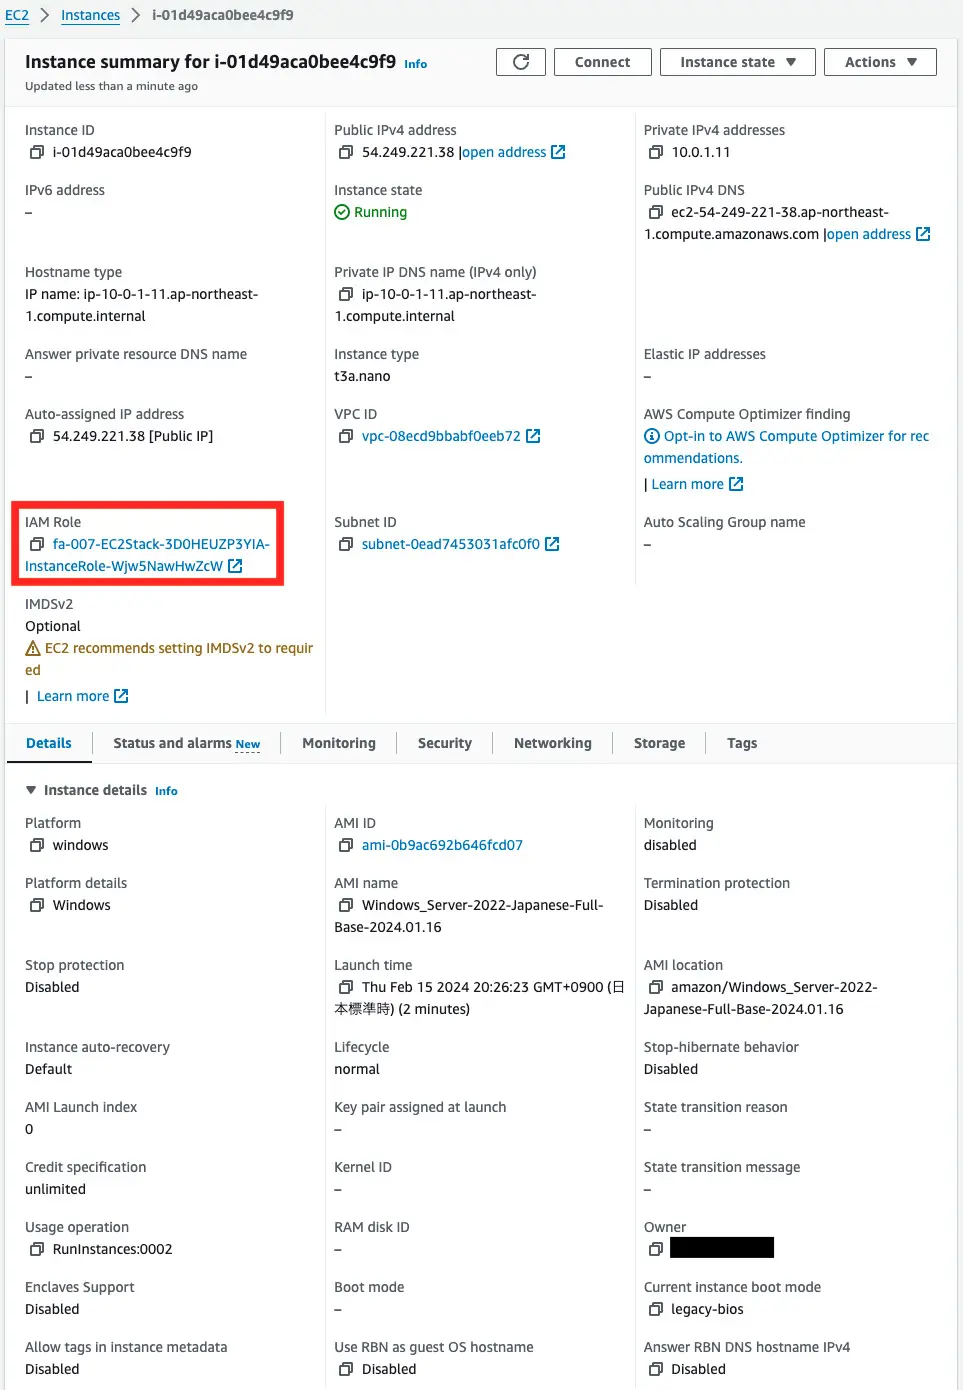
You can see that the IAM role is set.
Check this IAM role.
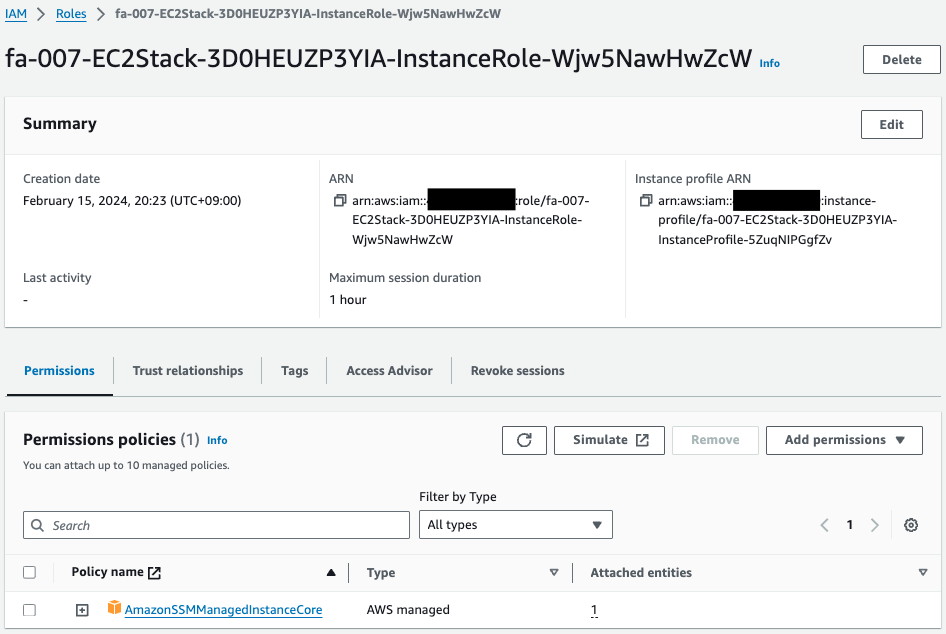
Indeed, the AWS management policy AmazonSSMManagedInstanceCore is attached to this IAM role.
Instance 3
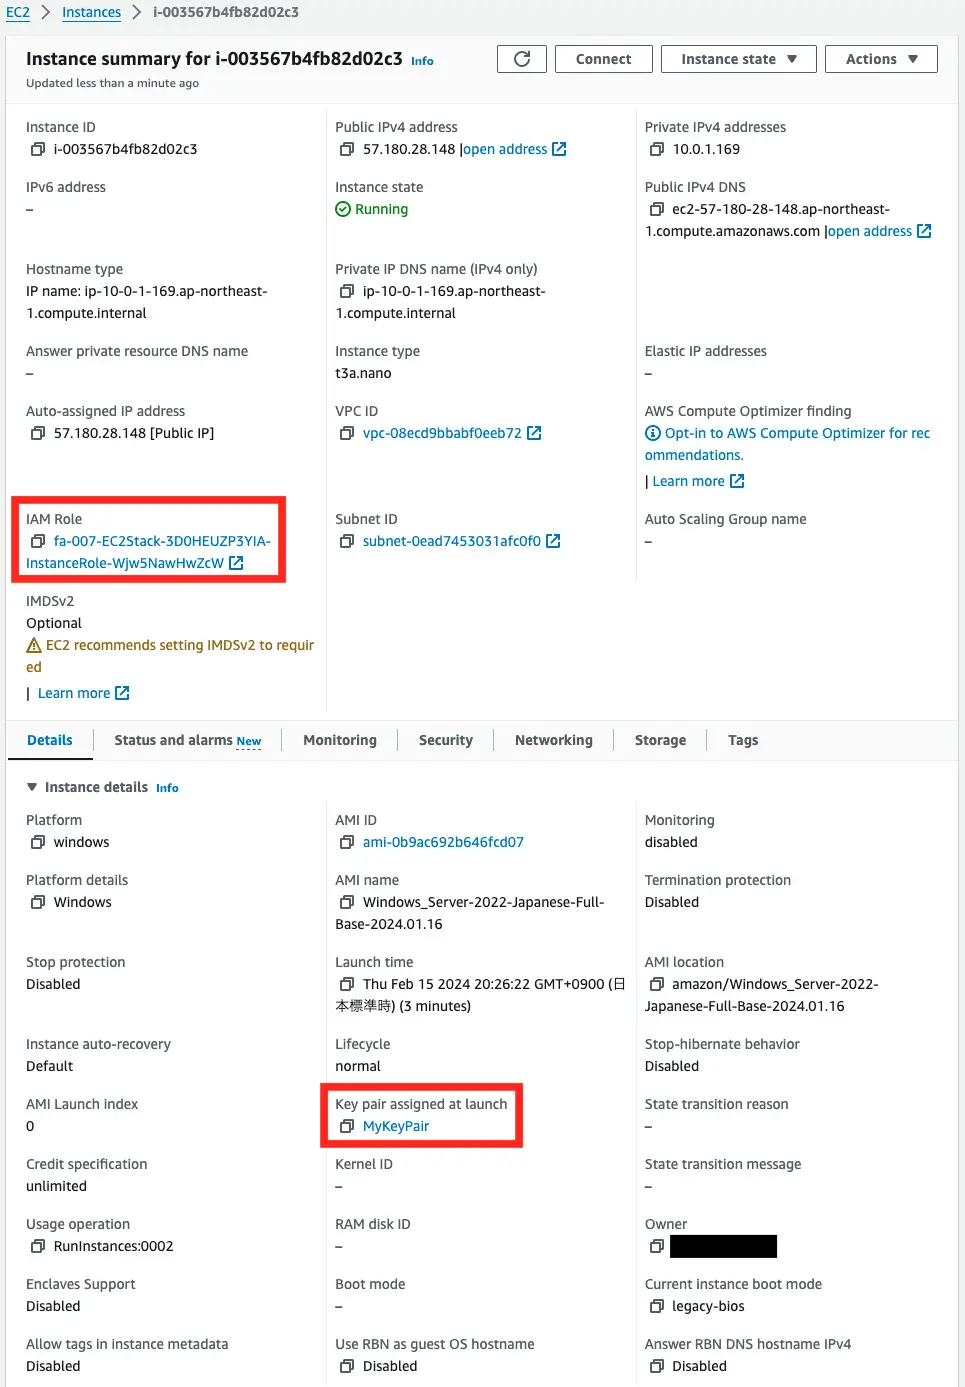
You can see that IAM roles and key pairs have been set up.
Operation Check
Instance 1: RDP connection
Access to instance 1 is via RDP.
Verify the password of the administrator account for RDP connections – AWS Management Console Edition
When making a remote desktop connection, the initial password set for the administrator account must be verified.
The administrator’s account name depends on the language, but is usually Administrator.
The default username for the Administrator account depends on the language of the operating system (OS) contained in the AMI. To ascertain the correct username, identify the language of your AMI’s OS, and then choose the corresponding username. For example, for an English OS, the username is Administrator, for a French OS it’s Administrateur, and for a Portuguese OS it’s Administrador.
Connect to your Windows instance
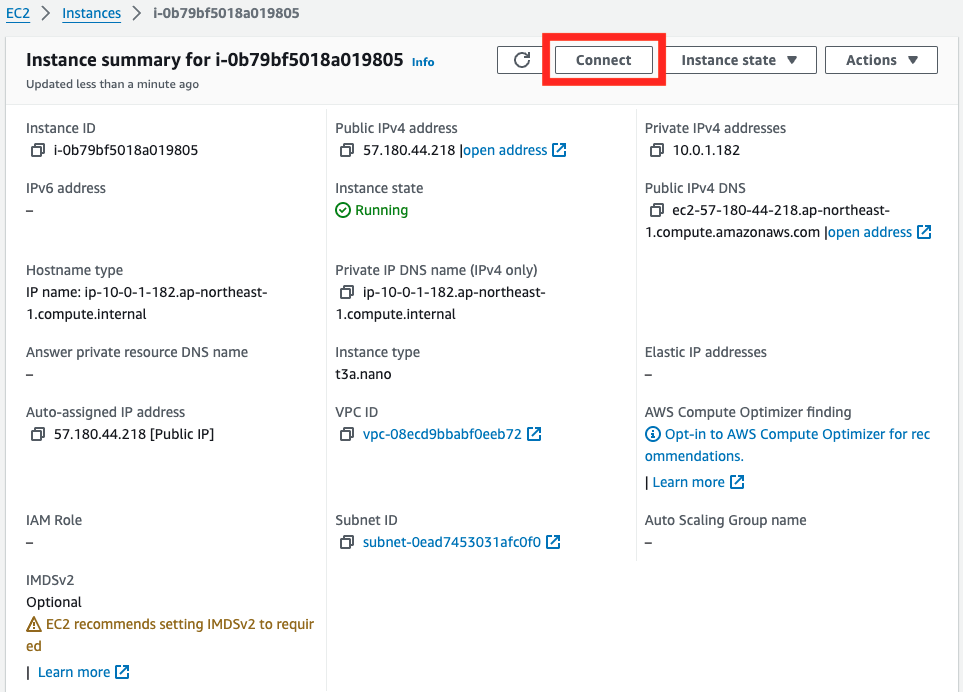
There are two ways to check the Administrator password. First, we will cover the method using the AWSManagement Console.
After logging in to the AWS Management Console, access the page for the target EC2 instance and click “Connect” at the top.
Select the “RDP client” tab and click “Get password”.
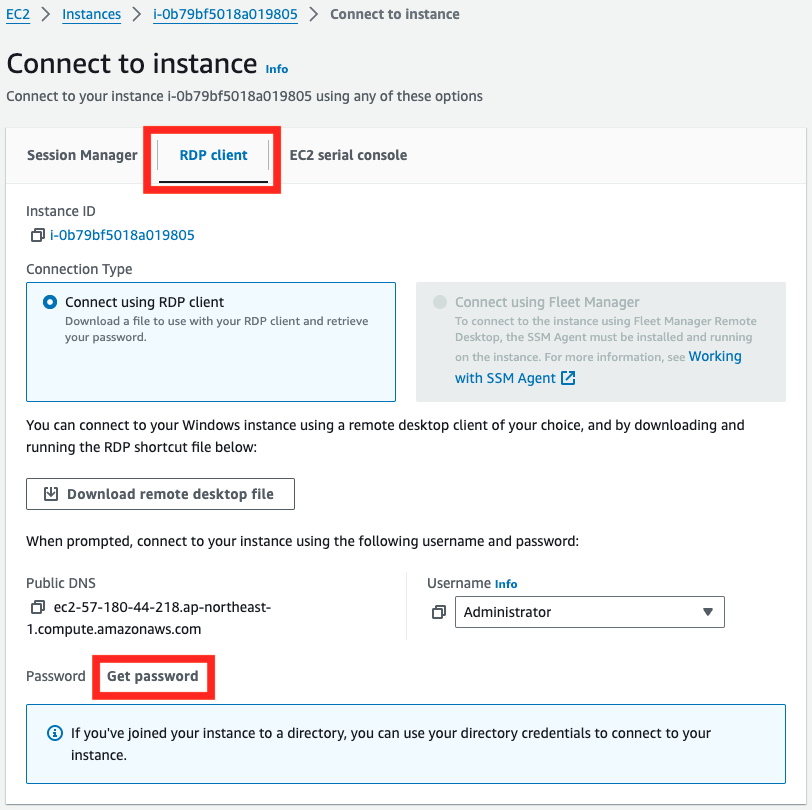
Paste the private key of the key pair associated with the instance into the text area and press “Decrypt Password”.
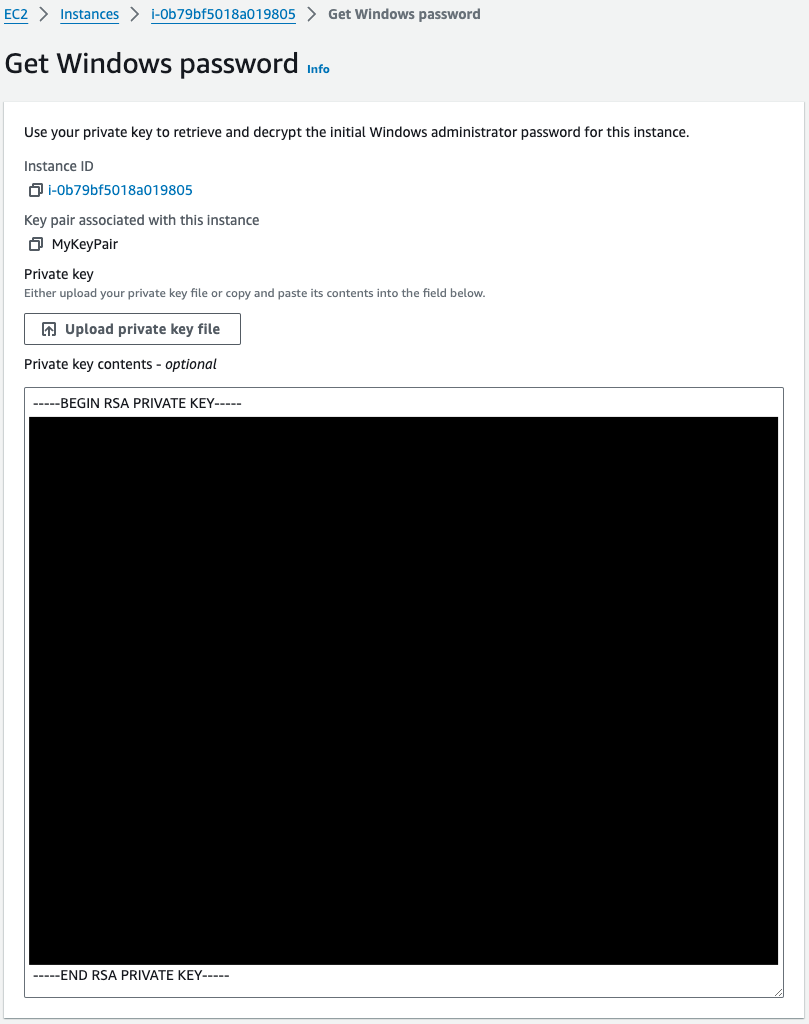
The string in the “Password” field is the Administrator’s password.
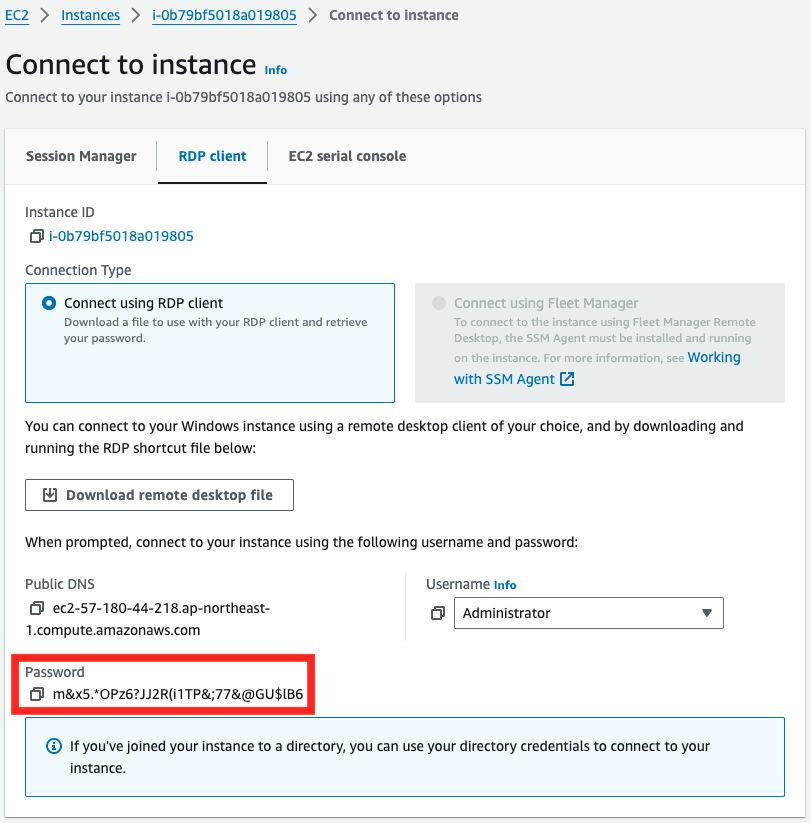
RDP connection to a Windows instance
Start the remote desktop client and initiate access.
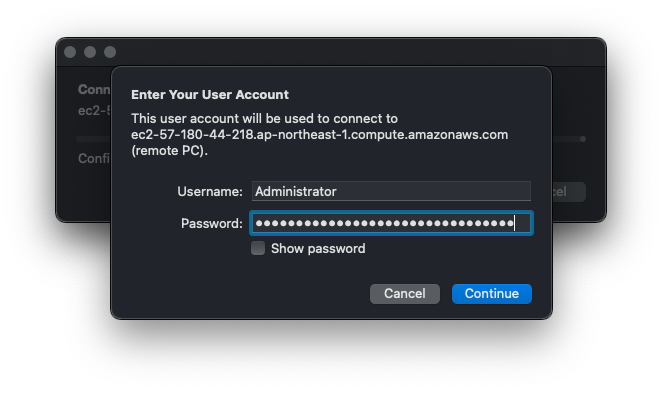
Specify the public IPv4 DNS name of instance 1 as the access destination. Specify Administrator as the user name and the password you have just confirmed as the password.
After a short wait, the desktop screen appears.

Thus, we were able to make an RDP connection to the Windows instance.
Instance 2: SSM Session Manager – PowerShell version
SSM Session Manager is used to access instance 2.
Access the instance using the AWS CLI.
$ aws ssm start-session \
--target i-01d49aca0bee4c9f9

Starting session with SessionId: i-0548ccea730f12250-052fb1dfae9c09d3c
Windows PowerShell
Copyright (C) Microsoft Corporation. All rights reserved.

新機能と改善のために最新の PowerShell をインストールしてください!https://aka.ms/PSWindows

PS C:\Windows\system32>
Code language: PowerShell (powershell)
Thus, by using SSM Session Manager, we were able to access the instance through a PowerShell connection.
Instance 3: SSM Session Manager – Port Forwarding Edition
Finally, we will review another access method for SSM Session Manager, using port forwarding to connect to RDP.
Verify password for admin account for RDP connection – AWS CLI version
Prior confirmation of the password is also required for RDP connections using port forwarding.
Learn how to check your password using the AWS CLI.
$ aws ec2 get-password-data \
--instance-id i-003567b4fb82d02c3 \
--priv-launch-key MyKeyPair.pem
{
    "InstanceId": "i-003567b4fb82d02c3",
    "PasswordData": "W!M5-$@.TfA@-DCZx9A.AeS!-vusQUkI",
    "Timestamp": "2024-02-15T11:33:30+00:00"
}
Code language: Bash (bash)
The value of PasswordData is the password.
RDP connection to a Windows instance using port forwarding
First, port forwarding is performed on the client side.
% aws ssm start-session \
--target i-003567b4fb82d02c3 \
--document-name AWS-StartPortForwardingSession \
--parameters "portNumber=3389, localPortNumber=13389"

Starting session with SessionId: root-030641470dec64987
Port 13389 opened for sessionId root-030641470dec64987.
Waiting for connections...
Code language: Bash (bash)
The command is to listen on port 13389 of the client terminal and forward to port 3389 of SSM Session Manager.
Start the remote desktop client and initiate access.
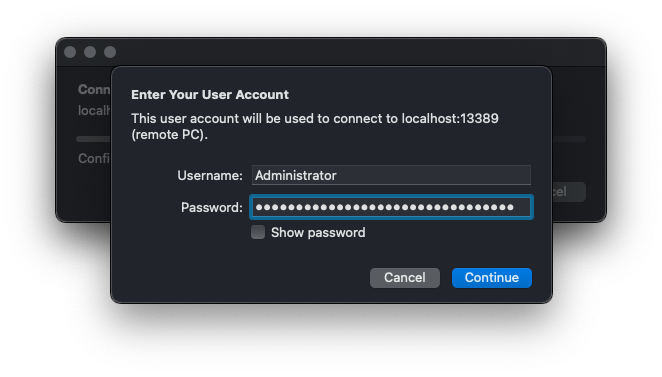
The flow is the same as before, but the “PC name” value should be “localhost:13389”.
After entering the instance’s user name and password, wait a moment and the instance’s desktop screen will appear.
By configuring port forwarding in this way, we were able to access the instance even with an RDP connection using SSM Session Manager.
Summary
We have identified a way to access Windows-type EC2 instances.
In addition to a typical RDP connection, you can also use SSM Session Manager for access.
When using SSM Session Manager, you can choose between the PowerShell version and RDP connections using port forwarding.
Compared to RDP connections, using SSM Session Manager has the advantage of eliminating the need to open ports for remote access or to prepare a stepping stone server, etc. By using SSM Session Manager, the risk of unauthorized access to instances can be reduced, and it will also reduce the man-hours required to manage instances. SSM Session Manager can reduce the risk of unauthorized access to your instances, and it can also reduce the man-hours required to manage your instances.