How to build an environment with a nested CloudFormation stack
Examine nested stacks in CloudFormation.
CloudFormation allows you to nest stacks.
Nested stacks are stacks created as part of other stacks. You create a nested stack within another stack by using the AWS::CloudFormation::Stack resource.
Working with nested stacks
In this article, we will try to build a simple environment using a nested stack and see how it works.
Environment
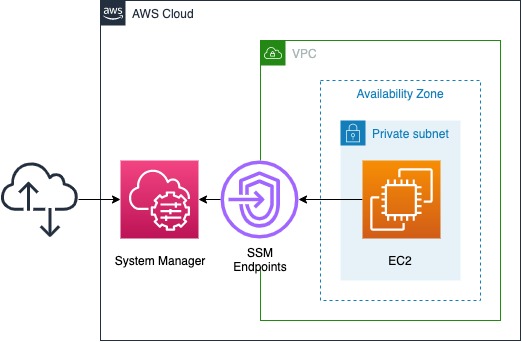
We will build the above configuration by dividing it into the following four stacks.
- Root stack: A stack that creates the three stacks underneath it.
- VPC stack: A stack created by the root stack that generates VPC-related resources.
- Endpoint stack: A stack created by the root stack that creates SSM endpoints.
- EC2 stack: A stack created by the root stack that creates EC2 instances.
In this case, we are going to access the instance in the private subnet via the SSM endpoint.
However, since the purpose of this page is to check the nested stack, we will not check the details of the configuration itself. For details of this configuration, please refer to the following page.
CloudFormation template files
We will build the above configuration using CloudFormation.
Place the CloudFormation template at the following URL.
https://github.com/awstut-an-r/awstut-fa/tree/main/013
Template file points
We will cover the key points of each template file to configure this environment.
Define the stack to be nested
fa-013.yaml is the template file for the root stack.
Resources:
  VPCStack:
    Type: AWS::CloudFormation::Stack
    Properties:
      TemplateURL: !Sub "https://${TemplateBucketName}.s3.${AWS::Region}.amazonaws.com/${Prefix}/${Prefix}-vpc.yaml"
      Parameters:
        AvailabilityZone: a
        CidrIp: 10.0.1.0/24
        HTTPSPort: 443
        Prefix: !Ref Prefix
        VPCCidrBlock: 10.0.0.0/16
Code language: YAML (yaml)
Above is the code to generate a VPC stack.
In order to define a nested stack, specify “AWS::CloudFormation::Stack” in the Type property.
In the TemplateURL property, specify the location of the template file for the stack to be created. The template file must be placed in an S3 bucket and its URL must be specified.
TemplateURL
AWS::CloudFormation::Stack
Location of file containing the template body. The URL must point to a template (max size: 460,800 bytes) that’s located in an Amazon S3 bucket.
The Parameters property can be used to specify the parameters to be passed to the stack to be generated.
Receive parameters from the root stack on the nested stack
fa-013-vpc.yaml is the template file for the nested stack that generates VPC-related resources.
Check how to receive the parameters you have just checked.
Parameters:
  AvailabilityZone:
    Type: String

  CidrIp:
    Type: String

  HTTPSPort:
    Type: Number

  Prefix:
    Type: String

  VPCCidrBlock:
    Type: String
Code language: YAML (yaml)
Describe the parameters to be received in the Parameters section.
The description itself is the same as in a normal template file, but now you can receive the parameters passed from the root stack.
Referencing the output value of a nested stack from another stack
Next, we will see how to reference the values output by the nested stack in another stack.
Check the Outputs section of fa-013-vpc.yaml, which is the template for the nested stack side.
Outputs:
  VPC:
    Value: !Ref VPC

  PrivateSubnet:
    Value: !Ref PrivateSubnet

  InstanceSecurityGroup:
    Value: !Ref InstanceSecurityGroup

  EndpointSecurityGroup:
    Value: !Ref EndpointSecurityGroup
Code language: YAML (yaml)
The description itself is the same as in a normal template file.
Define the logical ID and the value in the Value property.
Next, let’s check fa-013.yaml, the root stack side.
Resources:
  EndpointStack:
    Type: AWS::CloudFormation::Stack
    DependsOn:
      - VPCStack
    Properties:
      TemplateURL: !Sub "https://${TemplateBucketName}.s3.${AWS::Region}.amazonaws.com/${Prefix}/${Prefix}-endpoint.yaml"
      Parameters:
        EndpointSecurityGroup: !GetAtt VPCStack.Outputs.EndpointSecurityGroup
        Prefix: !Ref Prefix
        PrivateSubnet: !GetAtt VPCStack.Outputs.PrivateSubnet
        VPC: !GetAtt VPCStack.Outputs.VPC
Code language: YAML (yaml)
The following is the code for generating the endpoint stack.
Within the Parameters property, the built-in function Fn::GetAtt can be used to reference variables in the VPC stack. In this case, we will refer to three values (EndpointSecurityGroup, PrivateSubnet and VPC).
Architecting
We will build this environment and check the actual behavior.
Creating a CloudFormation stack using the AWS CLI
To build a nested stack, follow the steps below.
- Place the template file in the S3 bucket
- Create the root stack
First, place the template file in an S3 bucket. This time, we will set the bucket where the file will be placed as “awstut-bucket” and place it in the folder name “fa-013” in the same bucket.
To install the four files using the AWS CLI, execute the following command.
$ aws s3 cp . s3://awstut-bucket/fa-013/ \
--recursive
upload: ./fa-013-ec2.yaml to s3://awstut-bucket/fa-013/fa-013-ec2.yaml
upload: ./fa-013-vpc.yaml to s3://awstut-bucket/fa-013/fa-013-vpc.yaml
upload: ./fa-013-endpoint.yaml to s3://awstut-bucket/fa-013/fa-013-endpoint.yaml
upload: ./fa-013.yaml to s3://awstut-bucket/fa-013/fa-013.yaml
Code language: Bash (bash)
Use the recursive option to recursively copy the files in the current directory to the S3 bucket.
Next, we will create the root stack. The creation of the root stack is also performed using the AWS CLI.
$ aws cloudformation create-stack \
--stack-name fa-013 \
--template-url https://awstut-bucket.s3.ap-northeast-1.amazonaws.com/fa-013/fa-013.yaml \
--capabilities CAPABILITY_IAM
Code language: Bash (bash)
Specify the location of the root stack in template-url. Specify the URL of the S3 bucket where you uploaded the file earlier.
Check the resources of the created stack
Let’s check the resources in the created CloudFormation stack.
First, let’s check the resources created from the root stack.
$ aws cloudformation list-stack-resources \
--stack-name fa-013
{
    "StackResourceSummaries": [
        {
            "LogicalResourceId": "EC2Stack",
            "PhysicalResourceId": "arn:aws:cloudformation:ap-northeast-1:[account-id]:stack/fa-013-EC2Stack-1SYPX7XNEXH5F/29310a50-6fbb-11ec-80e3-0e9006c2c991",
            "ResourceType": "AWS::CloudFormation::Stack"
        },
        {
            "LogicalResourceId": "EndpointStack",
            "PhysicalResourceId": "arn:aws:cloudformation:ap-northeast-1:[account-id]:stack/fa-013-EndpointStack-HOAJG8XBN9R2/b9ce2da0-6fba-11ec-bdd0-0a8ae6b81257",
            "ResourceType": "AWS::CloudFormation::Stack"
        },
        {
            "LogicalResourceId": "VPCStack",
            "PhysicalResourceId": "arn:aws:cloudformation:ap-northeast-1:[account-id]:stack/fa-013-VPCStack-1B2QC016MS825/9b9b01f0-6fba-11ec-8073-062bdbc94911",
            "ResourceType": "AWS::CloudFormation::Stack"            }
        }
    ]
}
Code language: Bash (bash)
In the AWS Management Console, you can also check the status of the stack creation.
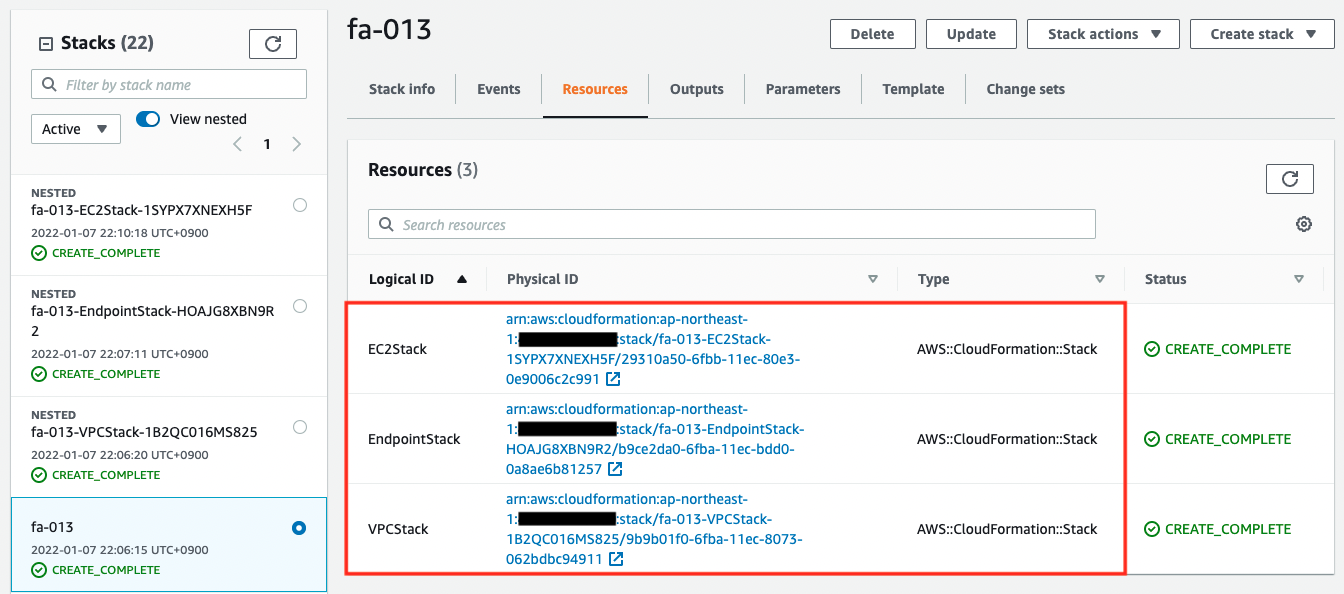
We can see that the three resources were successfully created, and from the ResourceType, we know that they are all nested stacks.
For resources created in nested stacks, we need to check each stack individually. The name of each stack refers to the PhysicalResourceId.
$ aws cloudformation list-stack-resources \
--stack-name fa-013-VPCStack-1B2QC016MS825

$ aws cloudformation list-stack-resources \
--stack-name fa-013-EndpointStack-HOAJG8XBN9R2

$ aws cloudformation list-stack-resources \
--stack-name fa-013-EC2Stack-1SYPX7XNEXH5F
Code language: Bash (bash)
Check the creation status of the EC2 stack in the AWS Management Console as well.
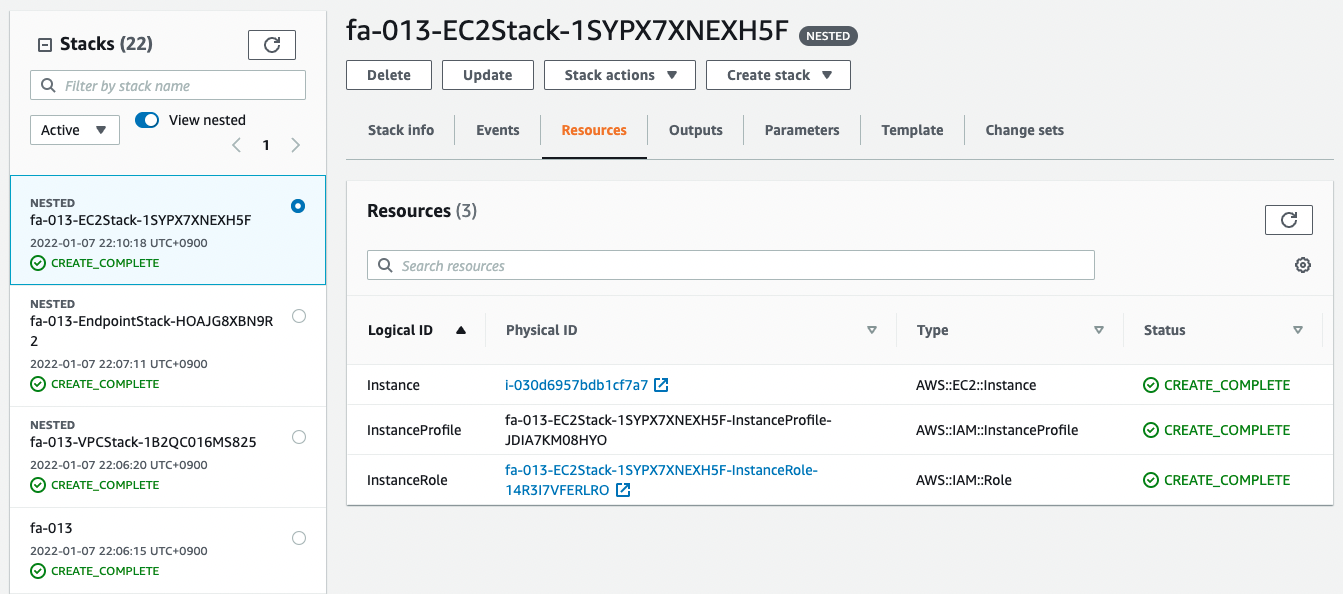
You can see that the resource has indeed been created in the nested stack.
After checking the resources for each stack, the following information is available for the main resources created this time.
- instance ID: i-030d6957bdb1cf7a7
Operation check
Finally, access the environment built on the nested stack.
$ aws ssm start-session \
--target i-030d6957bdb1cf7a7

Starting session with SessionId: root-09c10692724f80cab
sh-4.2$
Code language: Bash (bash)
Through the SSM endpoint, we are able to access the instances located in the private subnet.
Even with nested stacks, we are able to build the environment just as if it is described in a single template or created from the GUI in the AWSManagement Console.
Summary
In CloudFormation, we have seen how to build an environment using a nested stack.