Accessing original yum repository on S3 from Amazon Linux 2 in a private subnet
For Amazon Linux (2), yum can be run from a private subnet by referencing an Amazon Linux repositories built on an S3 bucket.
Amazon Linux repositories are hosted in Amazon Simple Storage Service (Amazon S3) buckets. To update and install packages on your instance without an internet connection, create an S3 Amazon Virtual Private Cloud (Amazon VPC) gateway endpoint.
How can I update yum or install packages without internet access on my EC2 instances running Amazon Linux 1 or Amazon Linux 2?
However, not all packages can be installed from the Amazon Linux repositories.
For example, to connect to Oracle or Microsoft SQL Server versions of RDS, a dedicated client is required, but these cannot be installed on EC2 without installing a NAT gateway or similar.
So this time, we will build our own yum repository on S3.
Client packages for the two database engines (Oracle and Microsoft SQL Server) are stored in that repository and installed on instances in the private subnet.
Environment
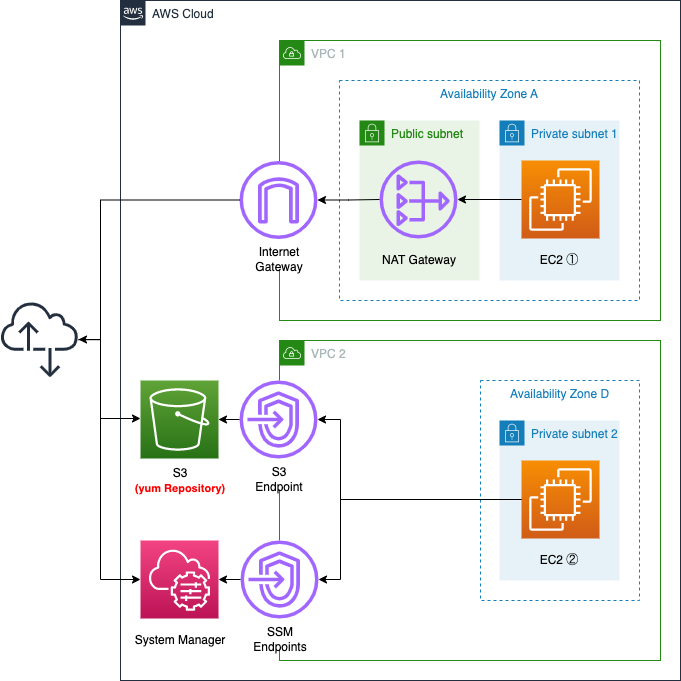
Create two VPCs.
One VPC is for yum repository creation. Deploy the latest Amazon Linux 2 instance, create a repository for the clients, and upload it to the S3 bucket.
On the other VPC, we will deploy a verification instance for our home-grown repository. No Internet Gateway or NAT gateway will be placed in this VPC, and the S3 bucket will be accessed via the VPC endpoint for S3.
CloudFormation template files
The above configuration is built with CloudFormation.
The CloudFormation template is located at the following URL.
https://github.com/awstut-an-r/awstut-fa/tree/main/031
Explanation of key points in the template files
Enable static website hosting functionality and make S3 bucket yum repository
Check the S3 bucket.
The key point is the settings related to static website hosting.
Resources:
  Bucket:
    Type: AWS::S3::Bucket
    Properties:
      BucketName: !Ref Prefix
      AccessControl: Private
      WebsiteConfiguration:
        IndexDocument: index.html
Code language: YAML (yaml)
The WebsiteConfiguration property sets the static website hosting functionality. By enabling this function, HTTP communication from yum clients can be accepted.
The point to note is the IndexDocument property. Set “index.html” to this property. This is because the hosting function cannot be activated without setting this property. Therefore, although the index file is not actually set up, it is set as a formality.
Restricting access with bucket policy
Restrict access to the buckets you have created using bucket policies.
The key point is the conditions under which access is allowed. In this case, we will use the following policy to restrict access.
- allow access if the source IP address is an Elastic IP address assigned to the NAT gateway * for instances in VPC1
- If the source VPC is VPC2, allow access * For instances in VPC2
Resources:
  BucketPolicy:
    Type: AWS::S3::BucketPolicy
    Properties:
      Bucket: !Ref Bucket
      PolicyDocument:
        Version: 2012-10-17
        Statement:
          - Action:
              - s3:*
            Effect: Allow
            Resource:
              - !Sub "arn:aws:s3:::${Bucket}/*"
            Condition:
              IpAddress:
                "aws:SourceIp":
                  - !Ref EIP
            Principal: "*"
          - Action:
              - s3:*
            Effect: Allow
            Resource:
              - !Sub "arn:aws:s3:::${Bucket}/*"
            Condition:
              StringEquals:
                "aws:SourceVpc":
                  - !Ref VPC
            Principal: "*"
Code language: YAML (yaml)
Two policies are defined.
The first policy is to allow access from instance 1; the key is the Condition property; by setting the IpAddress property to “aws:SourceIp” and the Elastic IP address given to the NAT gateway, the policy will allow access from instance 2. The policy allows communication from the same address. When instance 1 accesses an S3 bucket, it goes through the NAT gateway and the source address is replaced with the Elastic IP address.
The second policy is to allow access from instance 2. The second policy is to allow access from instance 2, again by setting the Condition property to “aws:SourceVpc” and the ID of VPC2 in the StringEquals property.
Create repository with createrepo command and upload it to S3 bucket
To create a yum repository, check the contents to be executed on instance 1.
Resources:
  RunShellScriptAssociation1:
    Type: AWS::SSM::Association
    Properties:
      AssociationName: !Sub "${Prefix}-runshellscript-association1"
      Name: AWS-RunShellScript
      Parameters:
        commands:
          - "sudo yum update -y"

          - !Sub "mkdir ${Repository}"

           # download oracle client
          - !Sub "curl  https://download.oracle.com/otn_software/linux/instantclient/1914000/{oracle-instantclient19.14-basic-19.14.0.0.0-1.x86_64.rpm} --output ./${Repository}/#1"
          - !Sub "curl  https://download.oracle.com/otn_software/linux/instantclient/1914000/{oracle-instantclient19.14-sqlplus-19.14.0.0.0-1.x86_64.rpm} --output ./${Repository}/#1"

          # download mssql-tools
          - "curl -OL https://packages.microsoft.com/config/rhel/7/prod.repo"
          - "sudo mv ./prod.repo /etc/yum.repos.d/msprod.repo"
          - !Sub "sudo yum install -y --downloadonly --downloaddir=./${Repository} mssql-tools"

          # create repository
          - "sudo yum -y install createrepo"
          - !Sub "createrepo ./${Repository}"

          - !Sub "aws s3 cp ./${Repository} s3://${Bucket}/ --recursive"
      Targets:
        - Key: InstanceIds
          Values:
            - !Ref Instance1
      WaitForSuccessTimeoutSeconds: !Ref WaitForSuccessTimeoutSeconds
Code language: YAML (yaml)
This time, as part of the instance initialization process, the SSM document AWS-RunShellScript is executed to create a repository. For more information on the initialization process using this document, please refer to the following page.
The commands property defines the actual commands to be executed. The commands are as follows
- Preparation (updating packages, creating directories for storing packages)
- Download the client (sqlplus) package for Oracle
- Download the client (sqlcmd) package for Microsoft SQL Server
- Install and execute the createrepo command to make the above directory a yum repository.
- Upload repository data to S3 bucket using AWS CLI.
For the installation procedure of each client, we referred to the following official website.
https://docs.oracle.com/cd/F39414_01/lacli/install-instant-client-using-rpm.html
https://docs.microsoft.com/en-us/sql/linux/sql-server-linux-setup-tools?view=sql-server-ver15
VPC Endpoint for S3
Check VPC2.
This VPC does not create a point of contact with the Internet and accesses the S3 bucket through the VPC endpoint.
Resources:
  S3Endpoint:
    Type: AWS::EC2::VPCEndpoint
    Properties:
      RouteTableIds:
        - !Ref PrivateRouteTable
      ServiceName: !Sub "com.amazonaws.${AWS::Region}.s3"
      VpcId: !Ref VPC
Code language: YAML (yaml)
No special configuration is required.
Set S3 to the ServiceName property.
The VPC endpoint for S3 is a gateway type, so set the VPC2 ID and the route table associated with the subnet in the VPC.
Register original repository in yum
Check the contents to be performed on instance 2.
The key point is how to refer to the yum repository you have created.
Resources:
  RunShellScriptAssociation2:
    Type: AWS::SSM::Association
    Properties:
      AssociationName: !Sub "${Prefix}-runshellscript-association2"
      Name: AWS-RunShellScript
      Parameters:
        commands:
          - !Sub |
              sudo cat << EOF > /etc/yum.repos.d/${Repository}.repo
              [${Repository}]
              name=${Repository}
              baseurl=${BucketWebsiteURL}/
              gpgcheck=0
              enabled=1
              EOF
          - "sudo yum clean all"
      Targets:
        - Key: InstanceIds
          Values:
            - !Ref Instance2
      WaitForSuccessTimeoutSeconds: !Ref WaitForSuccessTimeoutSeconds
Code language: YAML (yaml)
This one also executes the SSM document AWS-RunShellScript to perform the process for referencing your own repositories.
Generally, repositories to be referenced when yum is executed are defined in a configuration file under the /etc/yum.repos.d directory. In the same directory, create and set up a configuration file for your own repository.
This time, register the repository under the name “myrepo”.
Architecting
Use CloudFormation to build this environment and check actual behavior.
Create CloudFormation stacks and check resources in stacks
Create a CloudFormation stack.
For information on how to create stacks and check each stack, please refer to the following page

After checking the resources in each stack, information on the main resources created in this case is as follows
- S3 bucket: fa-031
- Instance 1: i-04533bae0ba1dd468
- Instance 2: i-054ec8995ebc83925
The resource creation status is also checked from the AWS Management Console.
First is the instance creation status.
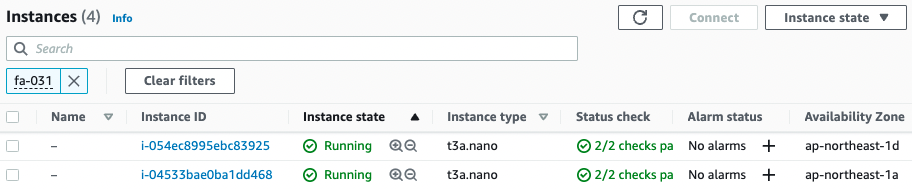
Indeed, two instances have been created.
Next, we check the execution result of the SSM document on instance 1.
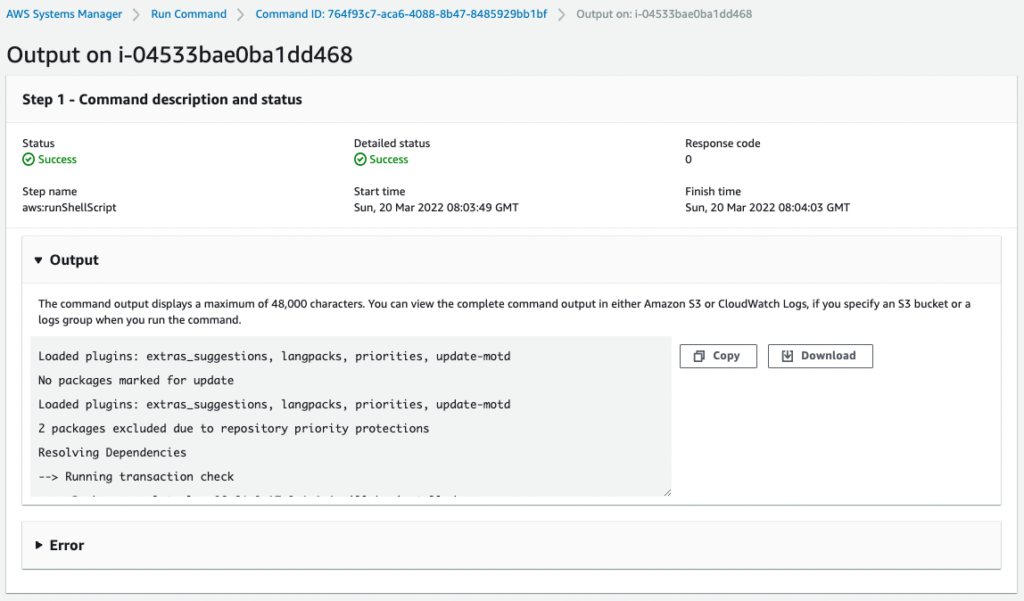
You can check the execution result from Output.
Check the S3 bucket.
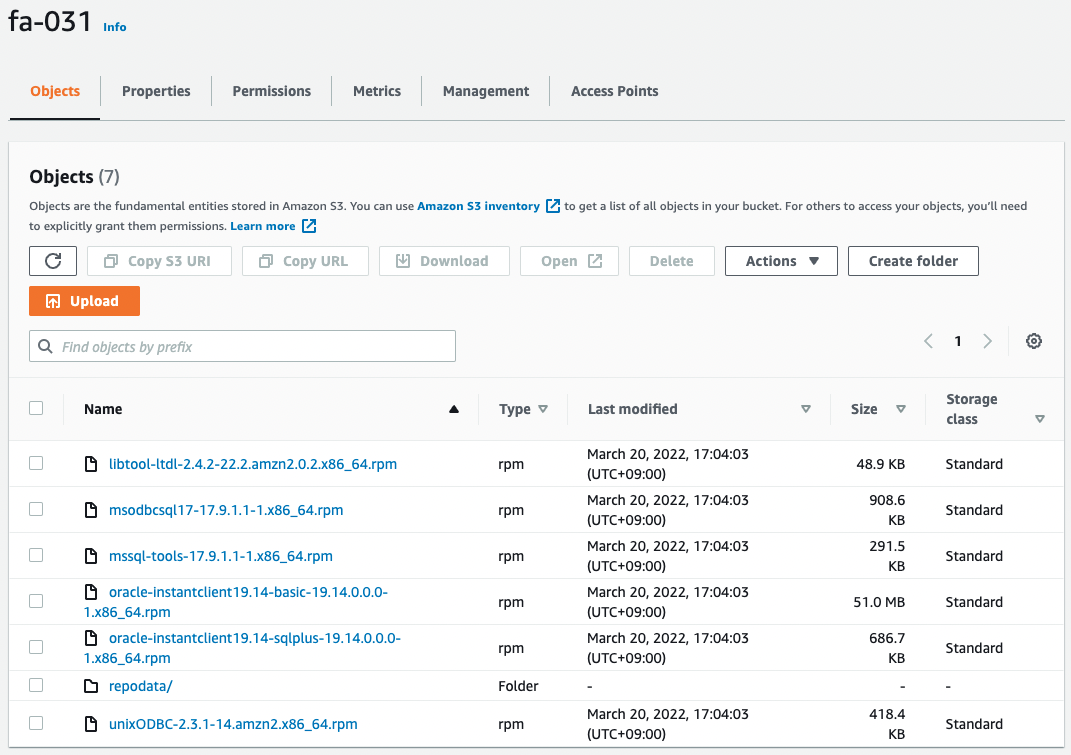
You can see that packages, etc. for both clients have been uploaded to the bucket.
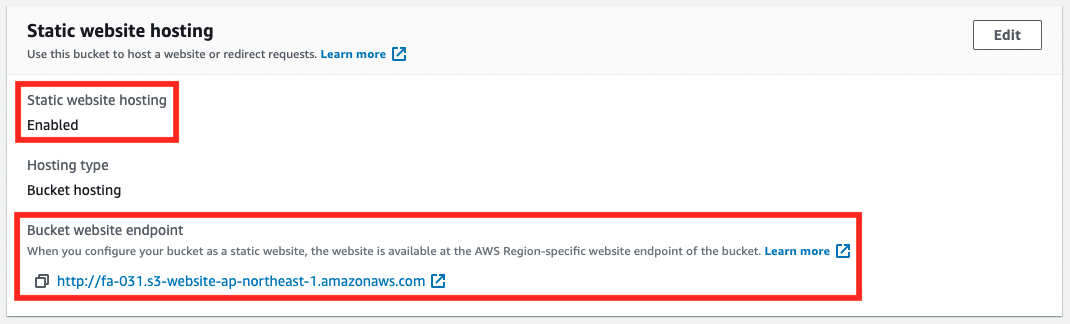
You can also confirm that the static website hosting function is enabled and ready to accept HTTP requests.
Check registration status of original repository
Now that everything is ready, access instance 2.
To access the instance, use SSM Session Manager.
Please refer to the following page for details.
% aws ssm start-session \
--target i-054ec8995ebc83925

Starting session with SessionId: root-0ec77415ecf2fb260

sh-4.2$Code language: JavaScript (javascript)
Check the file for registering the original repository.
sh-4.2$ ls -l /etc/yum.repos.d/
total 12
-rw-r--r-- 1 root root 1003 Oct 26 17:55 amzn2-core.repo
-rw-r--r-- 1 root root 1105 Mar 16 01:52 amzn2-extras.repo
-rw-r--r-- 1 root root  105 Mar 19 02:02 myrepo.repo
Code language: Bash (bash)
The file (myrepo.repo) has indeed been created.
Check the contents.
sh-4.2$ cat /etc/yum.repos.d/myrepo.repo
[myrepo]
name=myrepo
baseurl=http://fa-031.s3-website-ap-northeast-1.amazonaws.com/
gpgcheck=0
enabled=1
Code language: Bash (bash)
Note the value of baseurl, which is the URL of the S3 website endpoint. This means that when referencing myrepo, the S3 bucket will be accessed.
Check the list of repositories recognized by yum.
sh-4.2$ yum repolist
Loaded plugins: extras_suggestions, langpacks, priorities, update-motd
2 packages excluded due to repository priority protections
repo id                                                                repo name                                                                  status
amzn2-core/2/x86_64                                                    Amazon Linux 2 core repository                                             27418
amzn2extra-docker/2/x86_64                                             Amazon Extras repo for docker                                                 56
myrepo                                                                 myrepo                                                                       4+2
repolist: 27478
Code language: Bash (bash)
You can see that myrepo is recognized in addition to the default Amazon Linux repositories.
Check the packages that can be installed from myrepo.
sh-4.2$ yum list all | grep myrepo
msodbcsql17.x86_64                     17.9.1.1-1                     myrepo
mssql-tools.x86_64                     17.9.1.1-1                     myrepo
oracle-instantclient19.14-basic.x86_64 19.14.0.0.0-1                  myrepo
                                       19.14.0.0.0-1                  myrepo
sh-4.2$
Code language: Bash (bash)
You can see that it is hosted in myrepo.
Client installation for Oracle
First, install the client for Oracle.
sh-4.2$ sudo yum install -y oracle-instantclient19.14-basic.x86_64
...
Installed:
  oracle-instantclient19.14-basic.x86_64 0:19.14.0.0.0-1

Complete!


sh-4.2$ sudo yum install -y oracle-instantclient19.14-sqlplus.x86_64
...
Installed:
  oracle-instantclient19.14-sqlplus.x86_64 0:19.14.0.0.0-1

Complete!
Code language: Bash (bash)
The installation was successful.
Check the installed packages.
sh-4.2$ yum list installed | grep oracle
oracle-instantclient19.14-basic.x86_64
oracle-instantclient19.14-sqlplus.x86_64
Code language: Bash (bash)
The Oracle client was indeed installed from myrepo.
Check the version.
sh-4.2$ sqlplus -V

SQL*Plus: Release 19.0.0.0.0 - Production
Version 19.14.0.0.0
Code language: Bash (bash)
The version was successfully displayed.
Client installation for Microsoft SQL Server
First, install the client for SQL Server.
sh-4.2$ sudo yum install -y mssql-tools
...
Installed:
  mssql-tools.x86_64 0:17.9.1.1-1

Dependency Installed:
  libtool-ltdl.x86_64 0:2.4.2-22.2.amzn2.0.2               msodbcsql17.x86_64 0:17.9.1.1-1               unixODBC.x86_64 0:2.3.1-14.amzn2

Complete!

Code language: Bash (bash)
The installation was successful.
Check the installed packages.
sh-4.2$ yum list installed | grep mssql-tools
mssql-tools.x86_64                    17.9.1.1-1                     @myrepo
Code language: Bash (bash)
Sure enough, the SQL Server client was installed from myrepo.
Check the version.
sh-4.2$ /opt/mssql-tools/bin/sqlcmd -?
Microsoft (R) SQL Server Command Line Tool
Version 17.9.0001.1 Linux
Copyright (C) 2017 Microsoft Corporation. All rights reserved.
...
Code language: Bash (bash)
The version was successfully displayed.
Summary
We have seen how to build our own yum repository on S3.
By referencing the original repository, we were able to install packages that do not exist in the Amazon Linux repositories on instances in our private subnet.