Configure Linux instances to be accessed via SSM Session Manager
We will check a configuration in which an EC2 instance is accessed via SSM Session Manager.
Session Manager is a fully managed AWS Systems Manager capability that lets you manage your Amazon EC2 instances through an interactive one-click browser-based shell or through the AWS CLI. You can use Session Manager to start a session with an instance in your account. After the session is started, you can run bash commands as you would through any other connection type.
Connect to your Linux instance using Session Manager
Accessing an instance using SSM Session Manager has various advantages over the common SSH access. One of the most notable points is that it eliminates the need to open ports for remote access, and it also eliminates the need for a stepping stone server.
Leaving inbound SSH ports and remote PowerShell ports open on your managed nodes greatly increases the risk of entities running unauthorized or malicious commands on the managed nodes. Session Manager helps you improve your security posture by letting you close these inbound ports, freeing you from managing SSH keys and certificates, bastion hosts, and jump boxes.
AWS Systems Manager Session Manager
In this article, we will introduce three patterns for accessing EC2 instances using SSM Session Manager.
- Access via the Internet using SSM Session Manager
- Access via NAT gateway using SSM Session Manager
- Access via VPC endpoints using SSM Session Manager
As a comparison to connections using SSM Session Manager, connections using SSH are also presented.
This page is for Linux instances; for information on how to access Windows instances via Session Manager, please refer to the following page.
Environment
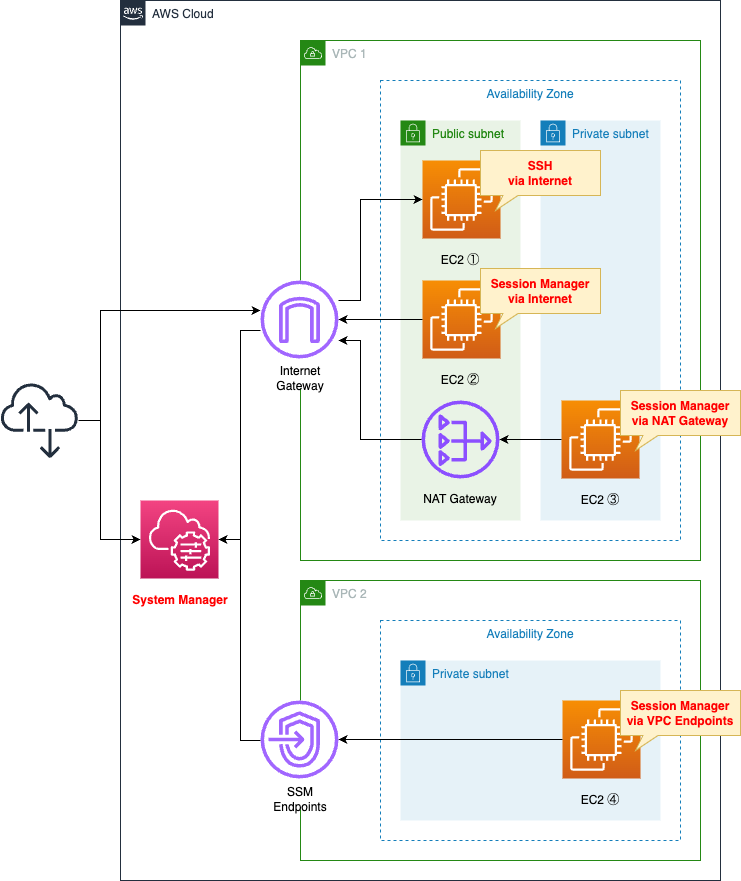
Create two VPCs.
Create two subnets in the first VPC.
One will be a public subnet with access to the Internet and the other will be a private subnet without.
Create an Internet gateway and a NAT gateway on the public subnet.
Create one private subnet in the second VPC.
Configure a VPC endpoint for SSM in this VPC.
We will create three EC2 instances in the first VPC and one EC2 instance in the second VPC.
The instance we will create will be the latest Amazon Linux 2023.
Scenario
We will attempt to access 4 instances.
The following organizes how to access the four instances and the resources to create for them.
The key point is the route and method of access.
| Instance | Route | Method |
| Instance 1 | Internet Gateway | SSH |
| Instance 2 | Internet Gateway | SSM Session Manager |
| Instance 3 | NAT Gateway | SSM Session Manager |
| Instance 4 | VPC Endpoints | SSM Session Manager |
CloudFormation template files
We will build the above configuration using CloudFormation.
The CloudFormation template is placed at the following URL
https://github.com/awstut-an-r/awstut-fa/tree/main/003
Template file points
Security Group
One major difference between SSH and SSM Session Manager is the security group.
In the case of SSH, it is necessary to open a port for the service (generally tcp/22).
In the case of SSM Session Manager, on the other hand, no such action is required.
The following table summarizes the inbound communications allowed by each instance in the security group.
| Instance | Method | Security Group |
| Instance 1 | SSH | 22/tcp allowed |
| Instance 2 | SSM Session Manager | – |
| Instance 3 | SSM Session Manager | – |
| Instance 4 | SSM Session Manager | – |
Instance 1: Security group to allow SSH
Resources:
  InstanceSecurityGroup1:
    Type: AWS::EC2::SecurityGroup
    Properties:
      GroupName: !Sub "${Prefix}-InstanceSecurityGroup1"
      GroupDescription: Allow SSH.
      VpcId: !Ref VPC1
      SecurityGroupIngress:
        - IpProtocol: tcp
          FromPort: !Ref SSHPort
          ToPort: !Ref SSHPort
          CidrIp: 0.0.0.0/0
Code language: YAML (yaml)
There are two key points to consider for security groups.
The first is the port number.
In this case, we will use SSH (22/tcp) to access instance 1 to which this security group applies, so we specify the same port.
The second is the sender.
This time we specify “0.0.0.0/0” as the CIDR.
By setting it this way, it means that access from all source addresses is allowed.
In summary, SSH from all addresses via the Internet is allowed.
Instances 2 and 3: No inbound communication occurs in SSM Session Manager
Resources:
  InstanceSecurityGroup2:
    Type: AWS::EC2::SecurityGroup
    Properties:
      GroupName: !Sub "${Prefix}-InstanceSecurityGroup2"
      GroupDescription: Deny All.
      VpcId: !Ref VPC1
Code language: YAML (yaml)
Security group to be applied to instances 2 and 3.
As you can clearly see by comparing with instance 1, it does not allow any inbound communication.
This means that all inbound communication is not allowed.
In fact, the workings of SSM, such as SSM Session Manager, are performed by the SSM agent in the instance.
The SSM agent communicates with SSM periodically, with the SSM agent as the source and SSM as the destination.
This means that there is no inbound communication to allow in order to run SSM Session Manager.
So create a security group that does not allow all inbound communication.
Instance 4: In the security group for VPC endpoints, allow HTTPS from the instance
Resources:
  InstanceSecurityGroup3:
    Type: AWS::EC2::SecurityGroup
    Properties:
      GroupName: !Sub "${Prefix}-InstanceSecurityGroup3"
      GroupDescription: Deny All.
      VpcId: !Ref VPC2

  EndpointSecurityGroup:
    Type: AWS::EC2::SecurityGroup
    Properties:
      GroupName: !Sub "${Prefix}-EndpointSecurityGroup"
      GroupDescription: Allow HTTPS from InstanceSecurityGroup3.
      VpcId: !Ref VPC2
      SecurityGroupIngress:
        - IpProtocol: tcp
          FromPort: !Ref HTTPSPort
          ToPort: !Ref HTTPSPort
          SourceSecurityGroupId: !Ref InstanceSecurityGroup3
Code language: YAML (yaml)
The former is the security group applied to instance 4.
This instance also uses SSM Session Manager, so all inbound communication is not allowed.
It is the latter security group that is worth noting.
This is for VPC endpoints.
Allow HTTPS communication (443/tcp) from instance 4.
This is one of the requirements for creating VPC endpoints, discussed below.
The security group attached to the VPC endpoint must allow incoming connections on port 443 from the private subnet of the managed instance. If incoming connections aren’t allowed, then the managed instance can’t connect to the SSM and EC2 endpoints.
VPC endpoint restrictions and limitations
Routing
The key point to consider for routing is whether to go through an Internet gateway or not.
If you are going through an Internet Gateway, you will need to configure routing for that gateway.
If using a one-way interface type VPC Endpoint, no routing configuration is required.
The following is a table summarizing the routing settings related to each instance.
| Instance | Method | First Hop | Subnet | Routing |
| Instance 1 | SSH | Internet Gateway | Public Subnet | for the Internet |
| Instance 2 | SSM Session Manager | Internet Gateway | Public Subnet | for the Internet |
| Instance 3 | SSM Session Manager | NAT Gateway | Private Subnet 1 | for NAT Gateway |
| Instance 4 | SSM Session Manager | VPC Endpoints | Private Subnet 2 | – |
Instances 1 and 2: Routing configuration for Internet Gateway
Instances 1 and 2 communicate toward the Internet.
Each will be accessed using SSH and SSM Session Manager, but both must be configured to communicate toward the Internet.
Define the following resources for instance 1 and instance 2
Resources:
  IGW:
    Type: AWS::EC2::InternetGateway

  IGWAttachment:
    Type: AWS::EC2::VPCGatewayAttachment
    Properties:
      VpcId: !Ref VPC1
      InternetGatewayId: !Ref IGW

  PublicSubnet:
    Type: AWS::EC2::Subnet
    Properties:
      CidrBlock: !Ref CidrIp1
      VpcId: !Ref VPC1
      AvailabilityZone: !Sub "${AWS::Region}${AvailabilityZone1}"

  PublicRouteTable:
    Type: AWS::EC2::RouteTable
    Properties:
      VpcId: !Ref VPC1

  RouteToInternet:
    Type: AWS::EC2::Route
    Properties:
      RouteTableId: !Ref PublicRouteTable
      DestinationCidrBlock: 0.0.0.0/0
      GatewayId: !Ref IGW

  PublicSubnetRouteTableAssociation:
    Type: AWS::EC2::SubnetRouteTableAssociation
    Properties:
      SubnetId: !Ref PublicSubnet
      RouteTableId: !Ref PublicRouteTable
Code language: YAML (yaml)
First, define the public subnet and Internet gateway.
Then prepare a route table for the public subnet and create a default route for the gateway.
The default route can be created by specifying “0.0.0.0/0” for the DestinationCidrBlock property.
Creating these resources will allow instances 1 and 2 to communicate for the Internet.
Instance 3: Routing configuration for NAT gateway
Routing considerations should also be made when going through a NAT gateway.
In general, NAT gateways are used to allow instances located in private subnets to access the Internet.
This means that the configuration is exactly like instance 3.
For instance 3, define the following resources
Resources:
  EIP:
    Type: AWS::EC2::EIP
    Properties:
      Domain: vpc

  NATGateway:
    Type: AWS::EC2::NatGateway
    Properties:
      AllocationId: !GetAtt EIP.AllocationId
      SubnetId: !Ref PublicSubnet

  PrivateSubnet1:
    Type: AWS::EC2::Subnet
    Properties:
      CidrBlock: !Ref CidrIp2
      VpcId: !Ref VPC1
      AvailabilityZone: !Sub "${AWS::Region}${AvailabilityZone1}"

  PrivateSubnet1RouteTable:
    Type: AWS::EC2::RouteTable
    Properties:
      VpcId: !Ref VPC1

  RouteToNATGateway:
    Type: AWS::EC2::Route
    Properties:
      RouteTableId: !Ref PrivateSubnet1RouteTable
      DestinationCidrBlock: 0.0.0.0/0
      NatGatewayId: !Ref NATGateway

  PrivateRoute1TableAssociation:
    Type: AWS::EC2::SubnetRouteTableAssociation
    Properties:
      SubnetId: !Ref PrivateSubnet1
      RouteTableId: !Ref PrivateSubnet1RouteTable
Code language: YAML (yaml)
There are two points.
The first point is to place the NAT gateway on a public subnet.
The NAT gateway is configured with an Elastic IP to fix the public address for Internet access.
The second point is to create a route table for private subnet 1 and configure routes for the NAT gateway in this table.
By creating the resource in this way, SSM communications from instance 3 in private subnet 1 will be routed to the NAT gateway.
And as we saw in the previous section, the public subnet is configured with routing for the Internet gateway.
So the SSM communication can exit to the Internet and eventually reach SSM.
Instance 4: To use SSM Session Manager, create 3 VPC endpoints
In the previous section, we reviewed how to use a NAT gateway for SSM communication by instances in a private subnet.
One other method is to use a VPC endpoint.
In this case, SSM communication is possible without going through the Internet.
Define private subnet 2 for instance 4.
Resources:
  PrivateSubnet2:
    Type: AWS::EC2::Subnet
    Properties:
      CidrBlock: !Ref CidrIp3
      VpcId: !Ref VPC2
      AvailabilityZone: !Sub "${AWS::Region}${AvailabilityZone2}"
Code language: YAML (yaml)
No routing-related settings are made.
Instance 4 accesses SSM via the following VPC endpoints, so it does not use Internet Gateway, etc.
The following are the VPC endpoints
Resources:
  SSMEndpoint:
    Type: AWS::EC2::VPCEndpoint
    Properties:
      PrivateDnsEnabled: true
      SecurityGroupIds:
        - !Ref EndpointSecurityGroup
      ServiceName: !Sub "com.amazonaws.${AWS::Region}.ssm"
      SubnetIds:
        - !Ref PrivateSubnet
      VpcEndpointType: Interface
      VpcId: !Ref VPC2

  EC2MessagesEndpoint:
    Type: AWS::EC2::VPCEndpoint
    Properties:
      PrivateDnsEnabled: true
      SecurityGroupIds:
        - !Ref EndpointSecurityGroup
      ServiceName: !Sub "com.amazonaws.${AWS::Region}.ec2messages"
      SubnetIds:
        - !Ref PrivateSubnet
      VpcEndpointType: Interface
      VpcId: !Ref VPC2

  SSMMessagesEndpoint:
    Type: AWS::EC2::VPCEndpoint
    Properties:
      PrivateDnsEnabled: true
      SecurityGroupIds:
        - !Ref EndpointSecurityGroup
      ServiceName: !Sub "com.amazonaws.${AWS::Region}.ssmmessages"
      SubnetIds:
        - !Ref PrivateSubnet
      VpcEndpointType: Interface
      VpcId: !Ref VPC2
Code language: YAML (yaml)
There are four points.
The first point is that to use SSM Session Manager, three different VPC endpoints must be created.
The following three services are required to access an EC2 instance using SSM Session Manager.
com.amazonaws.[region].ssm
How do I create VPC endpoints so that I can use Systems Manager to manage private EC2 instances without internet access?
com.amazonaws.[region].ec2messages
com.amazonaws.[region].ssmmessages
Specify the name of each service in the ServiceName property.
The second point is the VPC endpoint type.
Select the interface type by specifying “Interface” for the VpcEndpointType property.
Interface – Create an interface endpoint to send TCP traffic to an endpoint service. Traffic destined for the endpoint service is resolved using DNS.
AWS PrivateLink concepts
Gateway types also exist for VPC endpoints, but they are limited to targeted services.
There is another type of VPC endpoint, Gateway, which creates a gateway endpoint to send traffic to Amazon S3 or DynamoDB.
AWS PrivateLink concepts
The third point is the security group.
Specify the aforementioned security group for the VPC endpoint in the SecurityGroupIds property.
This will allow HTTPS communication (443/tcp) from instance 4 to be accepted.
The fourth point is private DNS.
Enable private DNS by specifying “true” for the PrivateDnsEnabled property.
In addition, the private DNS feature must be enabled on the VPC side.
Configure the VPC as follows
Resources:
  VPC2:
    Type: AWS::EC2::VPC
    Properties:
      CidrBlock: !Ref VPCCidrBlock
      EnableDnsHostnames: true
      EnableDnsSupport: true
Code language: YAML (yaml)
When setting up a VPC endpoint, two parameters must be configured in the VPC.
Set “true” to 2 properties according to the above.
EC2
There are four key points in setting up an EC2 instance.
The first is the security group.
This was checked in the previous section and is omitted.
The second is the address.
If an instance is placed on a public subnet in order to communicate to the Internet, a public address must be set for the instance.
On the contrary, if the instance is placed on a private subnet, no public address is required.
The third is an IAM role.
To use SSM Session Manager, we need to allow multiple SSM actions on the instance by associating an IAM role.
The required actions are summarized in the form of an AWS management policy (AmazonSSMMManagedInstanceCore), which you attach to the IAM role you create.
The fourth is the key pair.
If you use SSH, you need to set the key pair.
A key pair, consisting of a public key and a private key, is a set of security credentials that you use to prove your identity when connecting to an Amazon EC2 instance.
Amazon EC2 key pairs and Linux instances
Below is a table summarizing the settings for each instance.
| Instance | Method | Subnet | Address | Policies to attach to IAM role | Key Pair |
| Instance 1 | SSH | Public Subnet | Public Address | – | Setup |
| Instance 2 | SSM Session Manager | Public Subnet | Public Address | AWS Management Policy for SSM | – |
| Instance 3 | SSM Session Manager | Private Subnet 1 | Private Address | AWS Management Policy for SSM | – |
| Instance 4 | SSM Session Manager | Private Subnet 2 | Private Address | AWS Management Policy for SSM | – |
Instance 1: Set public address and allow SSH with key pair and security group
Resources:
  Instance1:
    Type: AWS::EC2::Instance
    Properties:
      ImageId: !Ref ImageId
      InstanceType: !Ref InstanceType
      KeyName: !Ref KeyName
      NetworkInterfaces:
        - AssociatePublicIpAddress: true
          DeviceIndex: 0
          SubnetId: !Ref PublicSubnet
          GroupSet:
            - !Ref InstanceSecurityGroup1
Code language: YAML (yaml)
Instance 1 is placed on a public subnet and communicates for the Internet.
So a public address is required, and this address is set by specifying “true” for the AssociatePublicIpAddress property.
Use the security group for instance 1.
This allows SSH (22/tcp) from the Internet.
Set the key pair.
In this case, we are assuming that you are creating a key pair named “MyKeyPair”.
Please see the following page for more information on creating key pairs.
https://docs.aws.amazon.com/cli/latest/userguide/cli-services-ec2-keypairs.html
Instance 2: Set public address and allow Session Manager in IAM role
Resources:
  Instance2:
    Type: AWS::EC2::Instance
    Properties:
      IamInstanceProfile: !Ref InstanceProfile
      ImageId: !Ref ImageId
      InstanceType: !Ref InstanceType
      NetworkInterfaces:
        - AssociatePublicIpAddress: true
          DeviceIndex: 0
          SubnetId: !Ref PublicSubnet
          GroupSet:
            - !Ref InstanceSecurityGroup2

  InstanceProfile:
    Type: AWS::IAM::InstanceProfile
    Properties:
      Path: /
      Roles:
        - !Ref InstanceRole

  InstanceRole:
    Type: AWS::IAM::Role
    Properties:
      AssumeRolePolicyDocument:
        Version: 2012-10-17
        Statement:
          - Effect: Allow
            Action: sts:AssumeRole
            Principal:
              Service:
                - ec2.amazonaws.com
      ManagedPolicyArns:
        - arn:aws:iam::aws:policy/AmazonSSMManagedInstanceCore
Code language: YAML (yaml)
Instance 2 is also placed on a public subnet to communicate for the Internet.
The security group for instance 2 does not allow all inbound communication.
Associate the IAM role with the IamInstanceProfile property.
In this case, the IAM role to be associated is attached to the AWS management policy AmazonSSMMManagedInstanceCore.
Attaching this will allow the actions required to run SSM Session Manager.
Another requirement for running SSM Session Manager is that the SSM agent must be installed on the instance.
However, Amazon Linux-based instances, such as the Amazon Linux 2023 used in this project, have the agent installed by default, so no additional action is required.
https://docs.aws.amazon.com/systems-manager/latest/userguide/sysman-manual-agent-install.html
Instances 3 and 4: No public address required
Resources:
  Instance3:
    Type: AWS::EC2::Instance
    Properties:
      IamInstanceProfile: !Ref InstanceProfile
      ImageId: !Ref ImageId
      InstanceType: !Ref InstanceType
      NetworkInterfaces:
        - DeviceIndex: 0
          SubnetId: !Ref PrivateSubnet1
          GroupSet:
            - !Ref InstanceSecurityGroup2

  Instance4:
    Type: AWS::EC2::Instance
    Properties:
      IamInstanceProfile: !Ref InstanceProfile
      ImageId: !Ref ImageId
      InstanceType: !Ref InstanceType
      NetworkInterfaces:
        - DeviceIndex: 0
          SubnetId: !Ref PrivateSubnet2
          GroupSet:
            - !Ref InstanceSecurityGroup3
Code language: YAML (yaml)
The two instances are generally the same.
Both will associate the aforementioned IAM role, and both will be placed on a private subnet, so no public address will be set.
The difference is the private subnet where it is installed.
Instance 3 will be placed on private subnet 1, so it will communicate with SSM from the Internet plane via a NAT gateway.
Instance 4, in contrast, will be placed on private subnet 2, so it will communicate with SSM via the VPC endpoint.
In other words, the process of communicating with SSM is very different from whether or not it relays over the Internet.
Architecting
Use CloudFormation to build this environment and check its actual behavior.
Create CloudFormation stacks and check the resources in the stacks
Create CloudFormation stacks.
For information on how to create stacks and check each stack, please see the following page.

Check each resource from the AWS Management Console.
Security Group
Instance 1
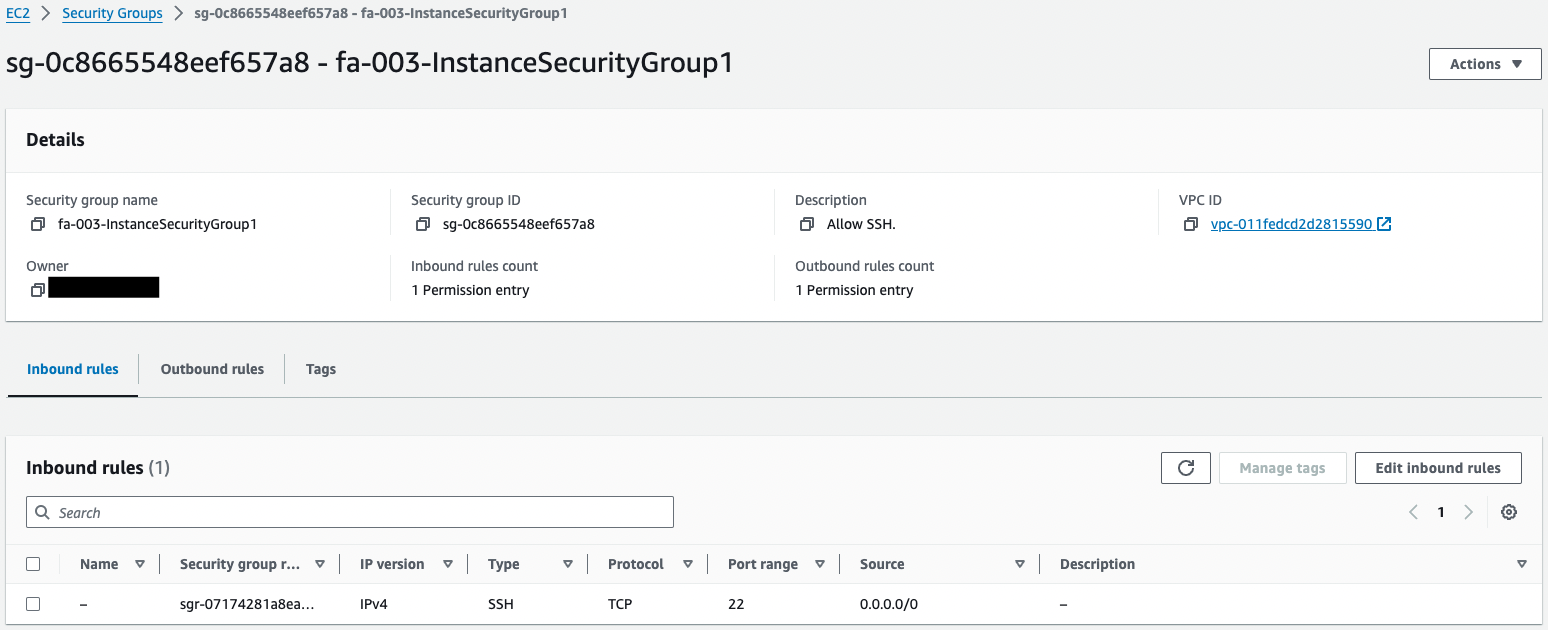
This setting allows SSH from all addresses.
Instances 2 and 3
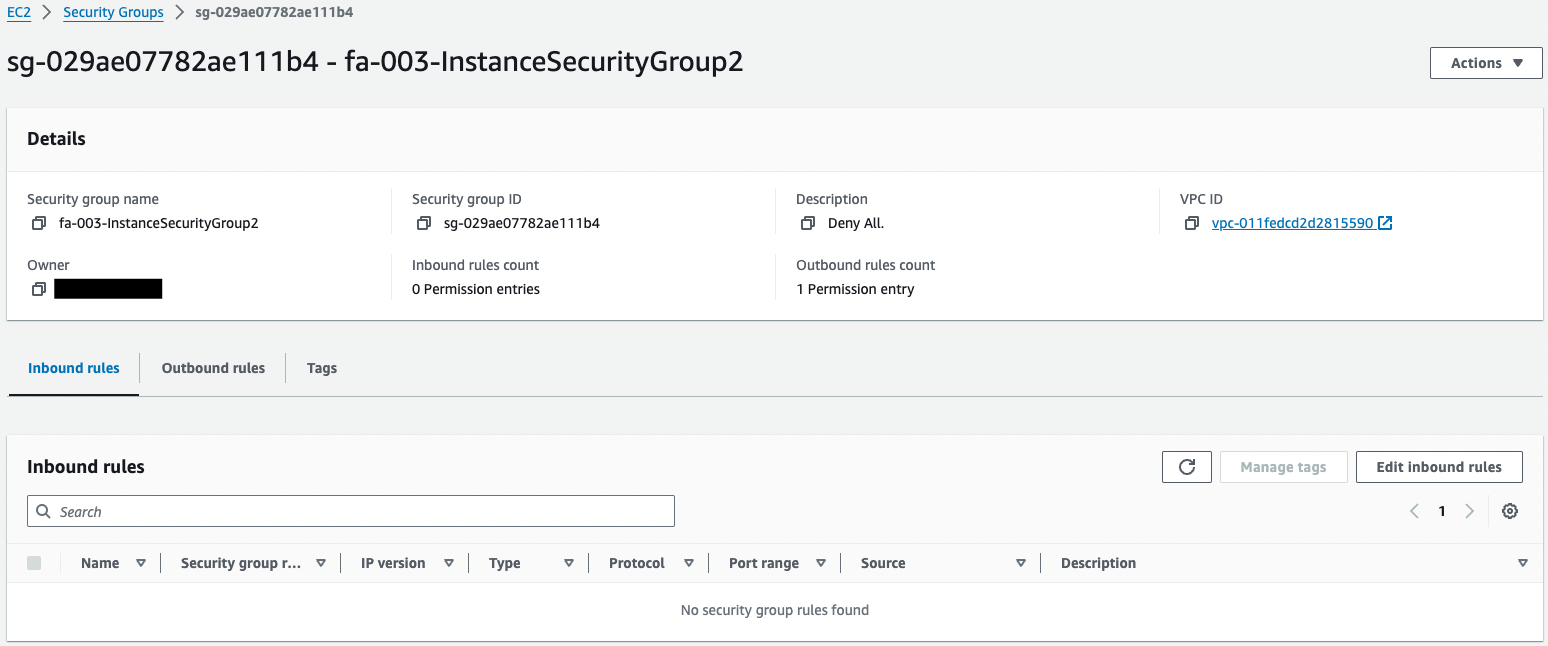
Inbound communication is not allowed.
This is because inbound communication does not occur when using SSM Session Manager.
Instance 4 and VPC endpoints
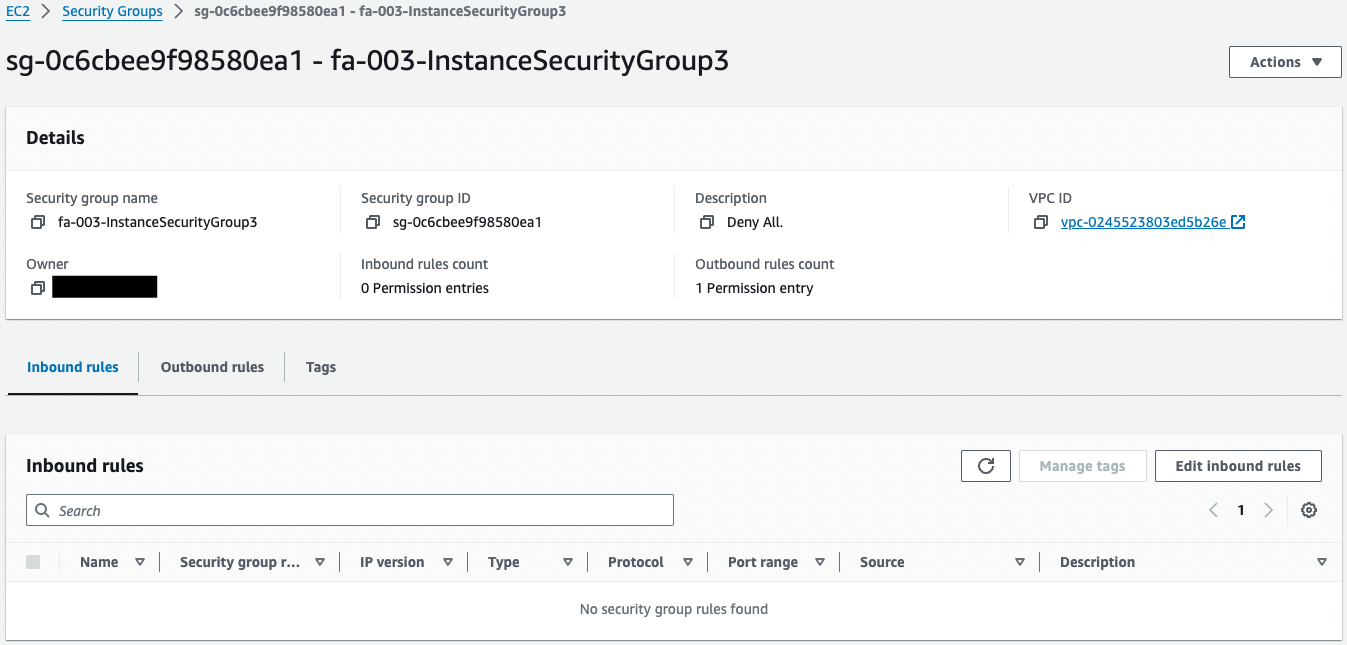
Looking at the security group for instance 4, inbound communication is still not allowed.
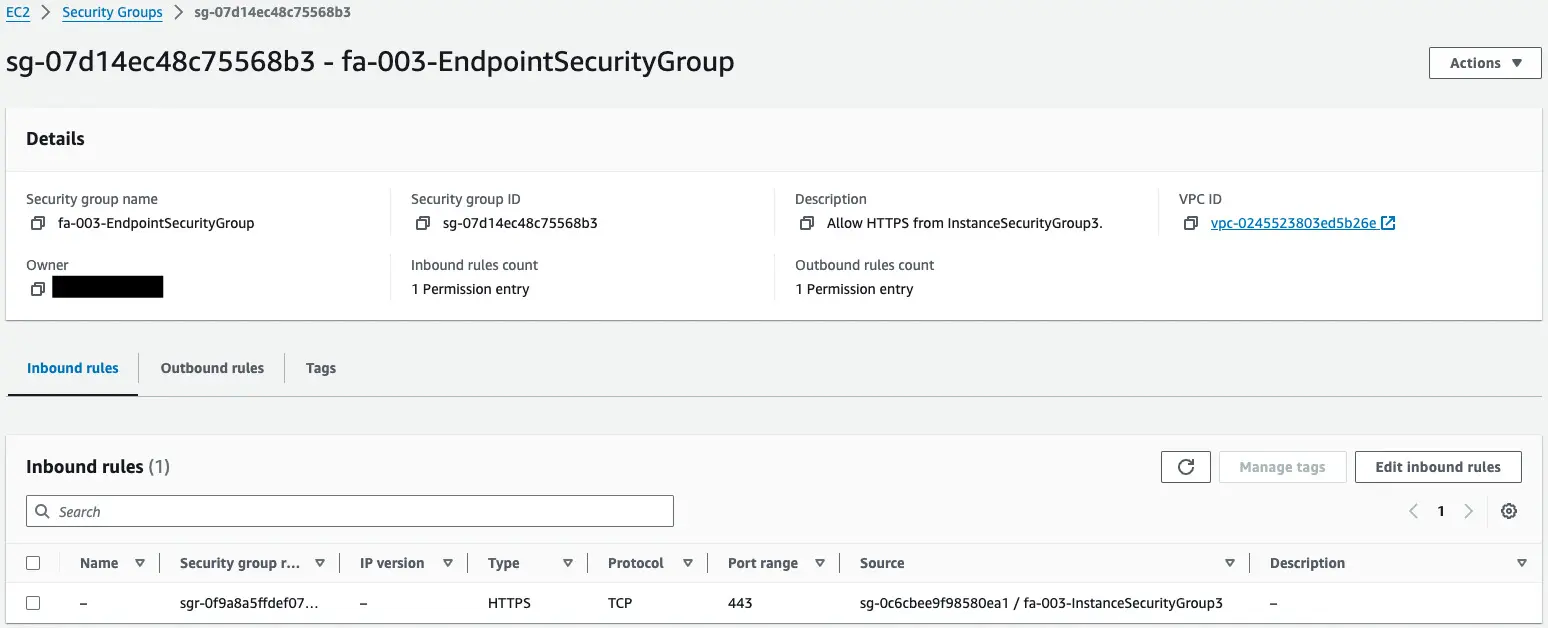
Looking at the security group for the VPC endpoint, HTTPS (443/tcp) is allowed with the source as the aforementioned security group.
Routing
Public Subnet

Looking at the route table associated with the public subnet, we see that a default route is set for the Internet Gateway.
This means that communications to address bands other than the CIDR (10.0.0.0/16) used by the VPC will be routed to the Internet.
This means that instances 1 and 2 located in the public subnet and the NAT gateway can communicate to the Internet.
Private Subnet 1
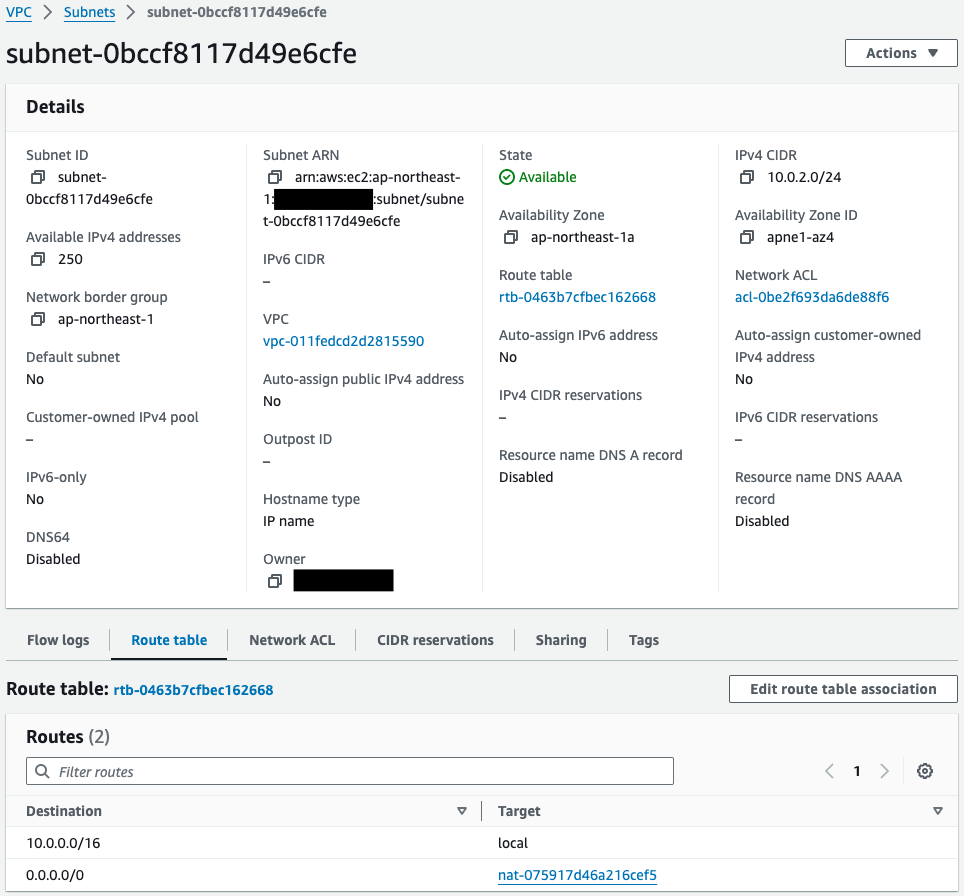
Similarly, looking at the route table for private subnet 1, we see that the default route is set for the NAT gateway.
That is, communication to addresses outside the VPC is routed to the NAT gateway.
In combination with the public subnet routing settings from earlier, instance 3 can communicate to the Internet.
Private Subnet 2
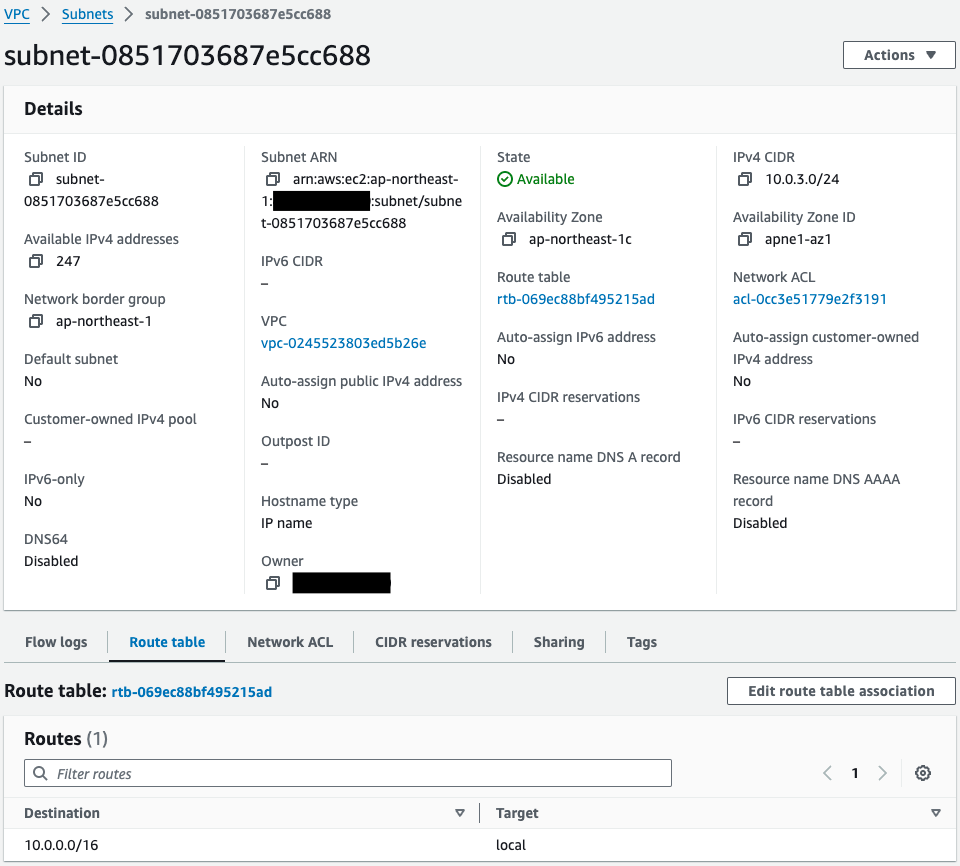
And if you look at the route table for private subnet 2, you will see that no default route is set.
This is because EC2 instance 4 in this subnet accesses SSM via a VPC endpoint, so no routing configuration is required.
VPC Endpoints
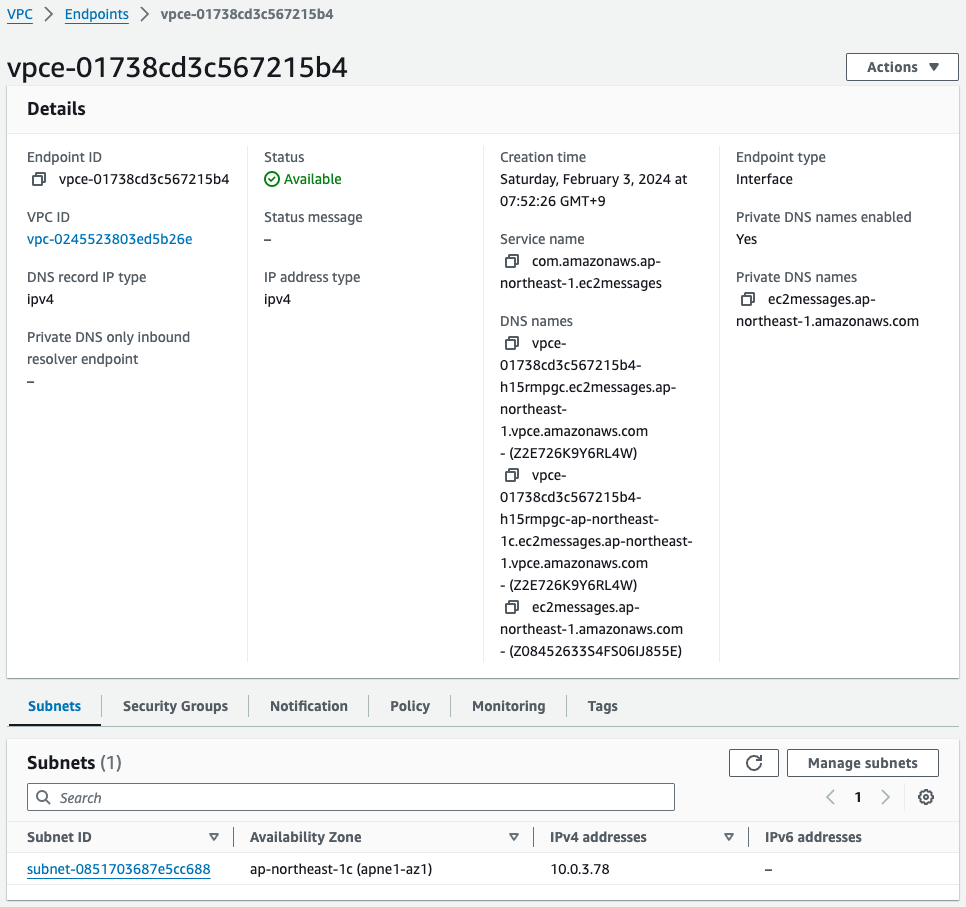
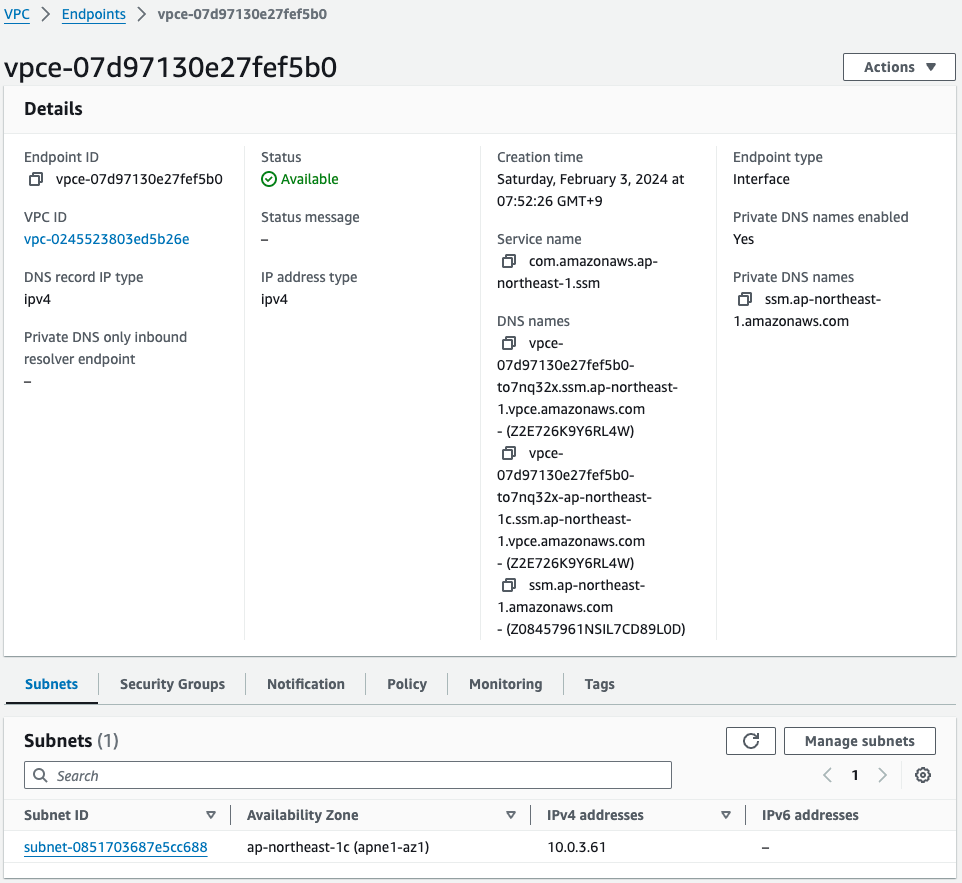
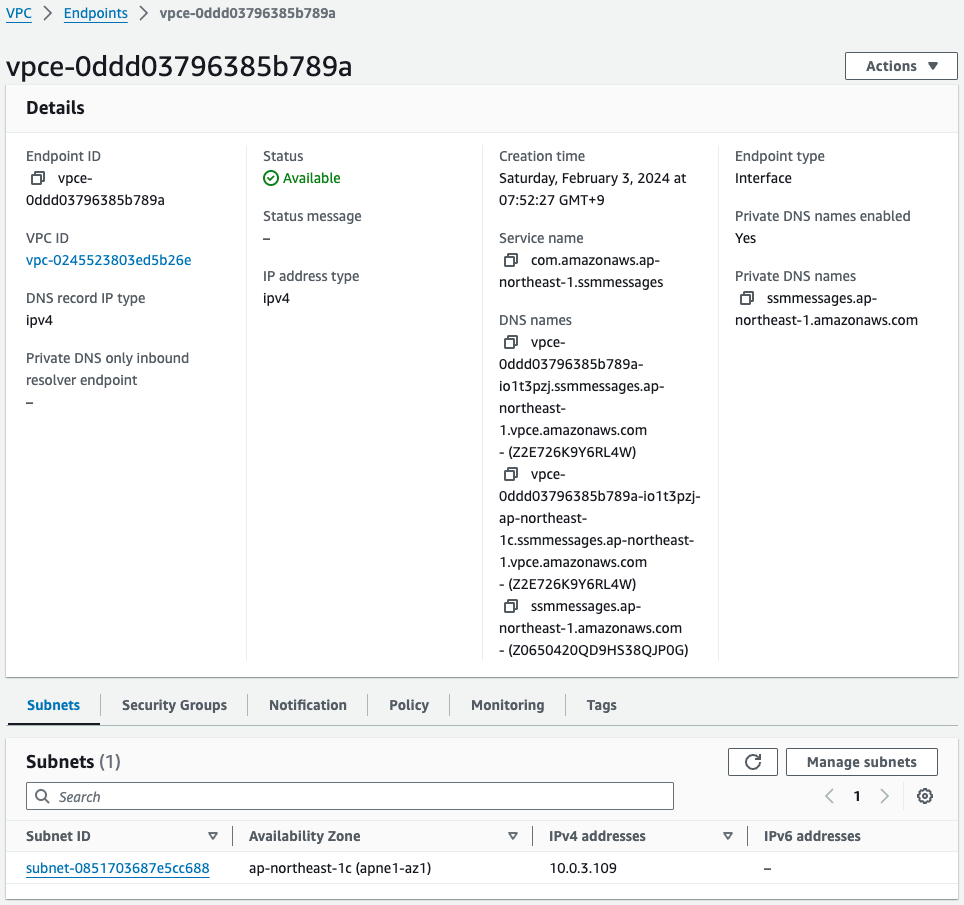
Three different VPC endpoints have been created.
The subnet information shows that the address of private subnet 2 is assigned.
So EC2 instance 4 in VPC2 will be able to access SSM via these endpoints.
EC2 Instance
Instance 1
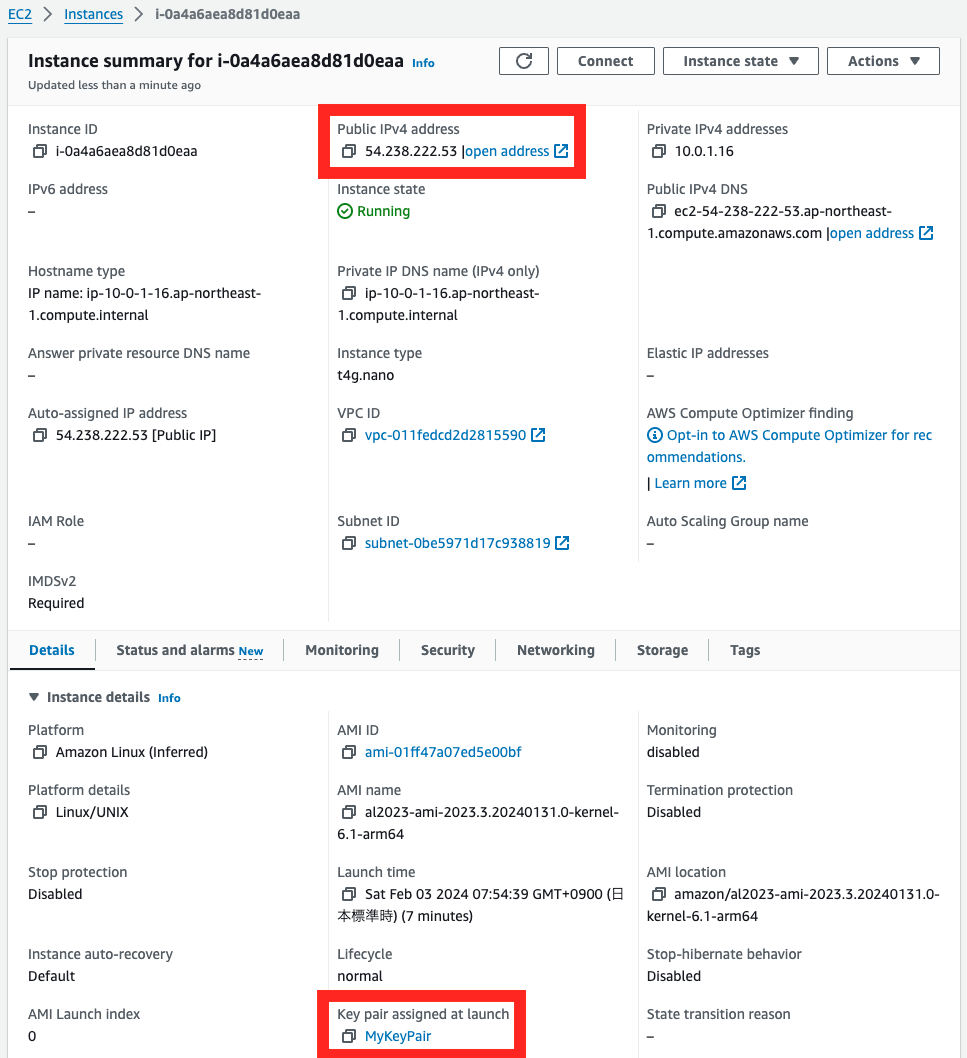
The public address and key pair are set.
These settings are for SSH access over the Internet to instance 1.
Instance 2
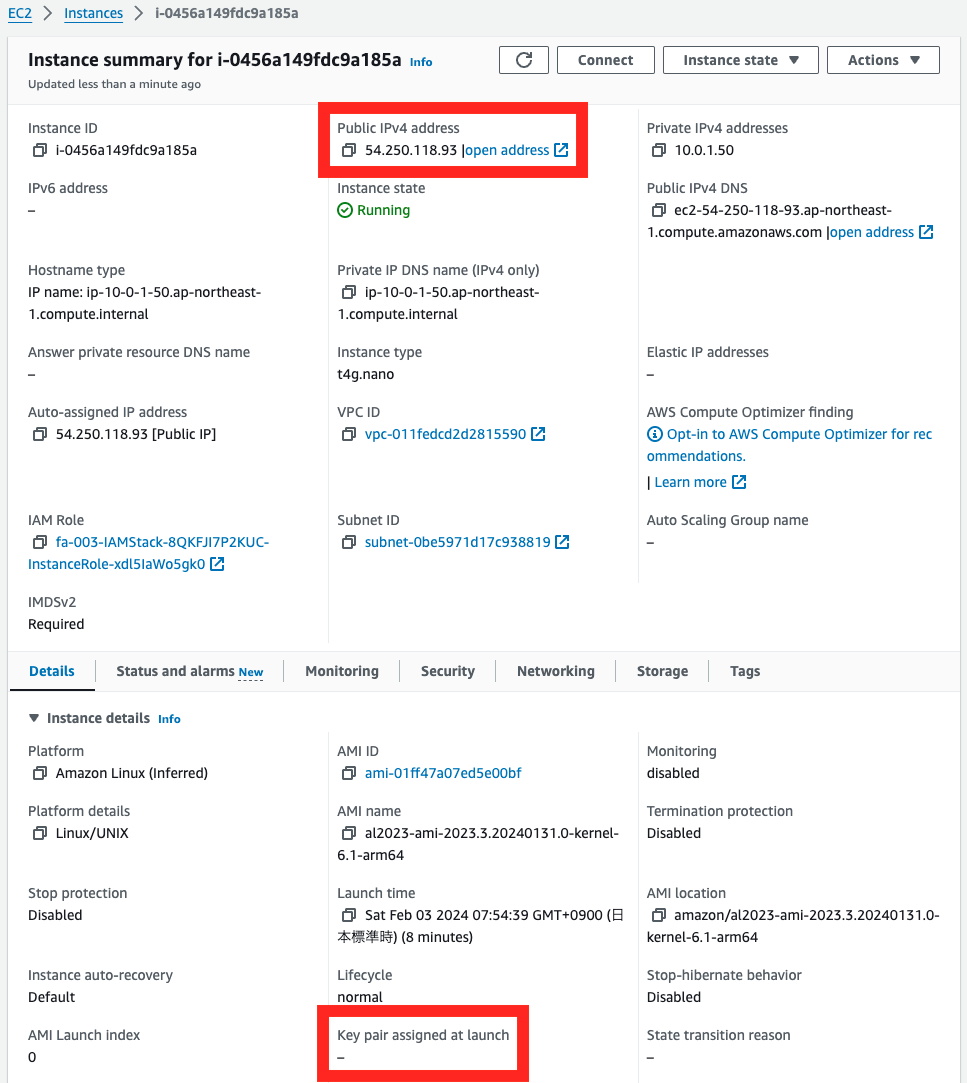
The public address is set, whereas the key pair is not.
These are for SSM Session Manager access over the Internet to Instance 2.
Instance 3
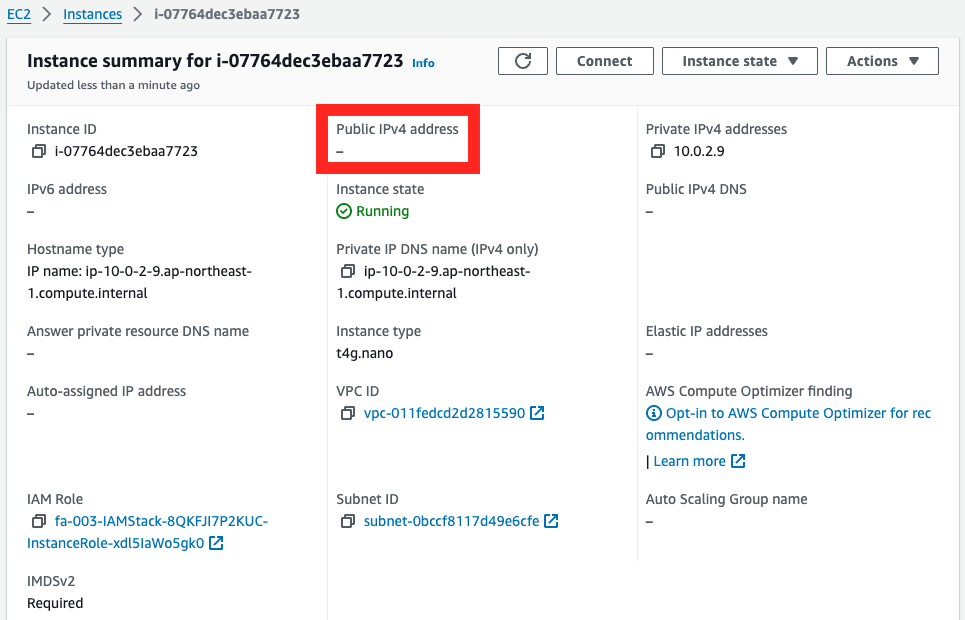
No public address is configured.
Instance 3 is located on private subnet 1 and accesses SSM through a NAT gateway, so a public address is not needed.
Instance 4
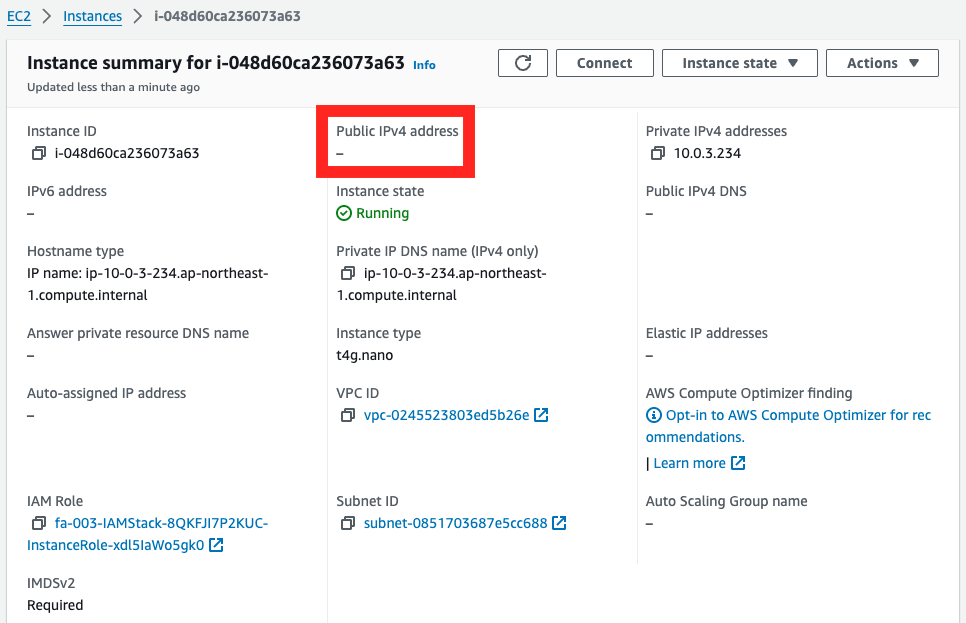
No public address is set here either.
Instance 4 is located on private subnet 2 and accesses SSM via a VPC endpoint, so no public address is needed.
Action Check
Instance 1
SSH is used to access instance 1.
$ ssh -i MyKeyPair.pem ec2-54-238-222-53.ap-northeast-1.compute.amazonaws.com
...
   ,     #_
   ~\_  ####_        Amazon Linux 2023
  ~~  \_#####\
  ~~     \###|
  ~~       \#/ ___   https://aws.amazon.com/linux/amazon-linux-2023
   ~~       V~' '->
    ~~~         /
      ~~._.   _/
         _/ _/
       _/m/'
[ec2-user@ip-10-0-1-16 ~]$
Code language: Bash (bash)
By specifying the key pair, we were able to access instance 1.
After confirming the public address as a trial, the communication is made for the Internet.
[ec2-user@ip-10-0-1-16 ~]$ ec2-metadata --public-ipv4
public-ipv4: 54.238.222.53

[ec2-user@ip-10-0-1-16 ~]$ ping 8.8.8.8
PING 8.8.8.8 (8.8.8.8) 56(84) bytes of data.
64 bytes from 8.8.8.8: icmp_seq=1 ttl=112 time=1.24 ms
64 bytes from 8.8.8.8: icmp_seq=2 ttl=112 time=1.22 ms
64 bytes from 8.8.8.8: icmp_seq=3 ttl=112 time=1.21 ms
64 bytes from 8.8.8.8: icmp_seq=4 ttl=112 time=1.19 ms
^C
--- 8.8.8.8 ping statistics ---
4 packets transmitted, 4 received, 0% packet loss, time 3004ms
rtt min/avg/max/mdev = 1.194/1.214/1.239/0.016 ms
Code language: Bash (bash)
A public address has been granted and access to the Internet has been verified.
To use SSH in this way, you need to allow SSH in the security group, grant a public address and configure routing settings, plus configure and manage key pairs.
Instance 2
SSM Session Manager is used to access instance 2.
$ aws ssm start-session --target i-0456a149fdc9a185a
...
sh-5.2$
Code language: Bash (bash)
We were indeed able to access instance 2.
After confirming the public address as a trial, the communication is made for the Internet.
sh-5.2$ ec2-metadata --public-ipv4
public-ipv4: 54.250.118.93

sh-5.2$ ping 8.8.8.8
PING 8.8.8.8 (8.8.8.8) 56(84) bytes of data.
64 bytes from 8.8.8.8: icmp_seq=1 ttl=117 time=2.02 ms
64 bytes from 8.8.8.8: icmp_seq=2 ttl=117 time=2.04 ms
64 bytes from 8.8.8.8: icmp_seq=3 ttl=117 time=2.04 ms
64 bytes from 8.8.8.8: icmp_seq=4 ttl=117 time=2.05 ms
^C
--- 8.8.8.8 ping statistics ---
4 packets transmitted, 4 received, 0% packet loss, time 3003ms
rtt min/avg/max/mdev = 2.022/2.038/2.049/0.010 ms
Code language: Bash (bash)
A public address was given and access to the Internet was confirmed.
For instances that are located on a public subnet, such as instance 2, it is not necessary to allow specific inbound communications in the security group to use SSM Session Manager It is not necessary to do so, but it is necessary to grant a public address and configure routing settings.
Instance 3
SSM Session Manager is used to access instance 3.
$ aws ssm start-session --target i-07764dec3ebaa7723
...
sh-5.2$
Code language: Bash (bash)
We were indeed able to access instance 3.
After confirming the public address as a trial, the communication is made for the Internet.
sh-5.2$ ec2-metadata --public-ipv4
public-ipv4: not available

sh-5.2$ ping 8.8.8.8
PING 8.8.8.8 (8.8.8.8) 56(84) bytes of data.
64 bytes from 8.8.8.8: icmp_seq=1 ttl=113 time=2.70 ms
64 bytes from 8.8.8.8: icmp_seq=2 ttl=113 time=2.18 ms
64 bytes from 8.8.8.8: icmp_seq=3 ttl=113 time=2.17 ms
64 bytes from 8.8.8.8: icmp_seq=4 ttl=113 time=2.16 ms
^C
--- 8.8.8.8 ping statistics ---
4 packets transmitted, 4 received, 0% packet loss, time 3004ms
rtt min/avg/max/mdev = 2.161/2.302/2.702/0.231 ms
Code language: Bash (bash)
No public address was given, but access to the Internet was also confirmed.
This is because we are accessing the Internet via a NAT gateway.
For instances that are located on a private subnet, such as instance 3, in order to use SSM Session Manager, we need to place the NAT gateway on a public subnet and properly By configuring the routing settings appropriately, it is not necessary to allow specific inbound communications by security groups or to assign a public address.
Instance 4
SSM Session Manager is used to access instance 4.
$ aws ssm start-session --target i-048d60ca236073a63
...
sh-5.2$
Code language: Bash (bash)
We were indeed able to access instance 4.
After confirming the public address as a trial, the communication is made for the Internet.
sh-5.2$ ec2-metadata --public-ipv4
public-ipv4: not available

sh-5.2$ ping 8.8.8.8
PING 8.8.8.8 (8.8.8.8) 56(84) bytes of data.
^C
--- 8.8.8.8 ping statistics ---
8 packets transmitted, 0 received, 100% packet loss, time 7280ms
Code language: Bash (bash)
No public address was assigned and no access to the Internet was available.
This is because instance 4 is accessing SSM via a VPC endpoint and has no path to access the Internet.
For instances that are located on a private subnet, like instance 4, by configuring the VPC endpoint to use SSM Session Manager, It is not necessary to allow specific inbound communications by security groups or to grant public addresses.
Summary
We have introduced three patterns for accessing EC2 instances using SSM Session Manager.
- Access via the Internet using SSM Session Manager
- Access via NAT gateway using SSM Session Manager
- Access via VPC endpoints using SSM Session Manager
Comparing SSM Session Manager to SSH, it eliminates the need for port release and key pair configuration.
Using SSM Session Manager will reduce the risk of unauthorized access to the instance and will also reduce the man-hours required to manage the instance.