Configuring Route53 Failover Routing Policy to Display Error Page
This topic is related to high elasticity, which is also one of the questions in the AWS SAA: You can increase the elasticity of your system by choosing a Route 53 failover routing policy and displaying an error page in the event of a failure.
Route53 allows you to choose from a variety of routing policies, one of which is the failover routing policy.
Failover routing lets you route traffic to a resource when the resource is healthy or to a different resource when the first resource is unhealthy.
Failover routing
In this case, we will build a system with an EC2 instance under the ALB distribution to build the primary website. If an abnormality occurs on the primary side, we will configure the system to display an error page placed in the S3 bucket.
Incidentally, Route 53 provides many routing policies.
For latency-based routing, please see the following page.
For location-based routing, please see the following page
Environment
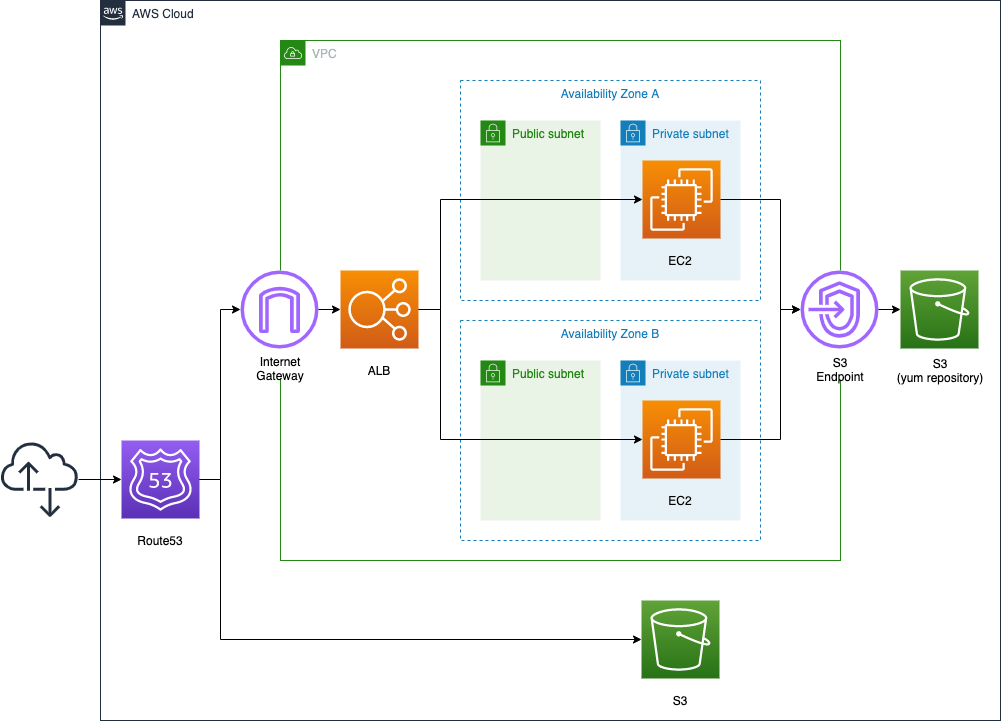
Configuration of the primary web site side
We will place one EC2 instance on each of the two private subnets. The instances will be based on the latest Amazon Linux 2023.
To install Apache, we will create a VPC endpoint for S3.
Place the ELB in front of the EC2 instance, and use the ALB type.
Configuration of the error page side
Next, we will prepare the error page in an S3 bucket.
Enable the static website hosting feature of the bucket, and place the HTML file for the error page in the bucket.
Use CloudFormation custom resources to invoke Lambda functions to automatically create HTML file.
Configuration of Route53
Finally, Route53, as mentioned earlier, we will configure an active-passive type failover routing policy. Specify ALB as the primary resource and S3 bucket as the secondary resource.
To check the failover behavior, follow the steps below.
- Check the behavior of the primary resource when it is normal.
- Stop the two EC2 instances, and reproduce the situation in which the primary resource has failed.
- Fail over to the secondary resource, and confirm that the error page is displayed.
- Launch the two EC2 instances, and reproduce the situation in which the primary resource has recovered from the failure.
- Verify that traffic is routed to the primary resource again.
CloudFormation template files
We will build the above configuration using CloudFormation.
Place the CloudFormation template at the following URL.
https://github.com/awstut-an-r/awstut-saa/tree/main/01/001
The domain used in this configuration is assumed to be a domain obtained from Route53, so no settings for the domain’s HostedZone are required. If you wish to use a domain obtained from a source other than AWS, please add the definition of the HostedZone resource to the above template.
Template file points
We will cover the key points of each template file to configure this environment.
Attaching instances in private subnets to ALB
First, the primary resource is built with an ALB and two EC2 instances.
There are two points.
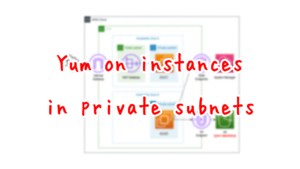
Run yum/dnf in private subnets
The first point is the subnets where the instances are located.
Resources:
  Instance1:
    Type: AWS::EC2::Instance
    Properties:
      ImageId: !Ref ImageId
      InstanceType: !Ref InstanceType
      NetworkInterfaces:
        - DeviceIndex: 0
          SubnetId: !Ref PrivateSubnet1
          GroupSet:
            - !Ref InstanceSecurityGroup
      UserData: !Base64 |
        #!/bin/bash -xe
        dnf update -y
        dnf install -y httpd
        systemctl start httpd
        systemctl enable httpd
        ec2-metadata -i > /var/www/html/index.html
Code language: YAML (yaml)
Two instances will be created in this configuration, but one is listed as a representative.
In this configuration, instances are placed on private subnets.
Normally, running yum/dnf requires a pathway out to the Internet. In the case of Amazon Linux, however, it is possible to execute yum/dnf by accessing the yum/dnf repository hosted on the S3 bucket. Even in a private subnet with no route to the Internet, it is possible to securely access S3 buckets by installing an endpoint for S3.
This time, we will create a VPC endpoint for S3 as follows
Resources:
  S3Endpoint:
    Type: AWS::EC2::VPCEndpoint
    Properties:
      RouteTableIds:
        - !Ref PrivateRouteTable
      ServiceName: !Sub "com.amazonaws.${AWS::Region}.s3"
      VpcId: !Ref VPC
Code language: YAML (yaml)
For details, please refer to the following page.
This time we will use user data, install and startup configuration of Apache by dnf, and write the instance ID in index.html to create it.
Associate public subnets with ALB
The second point is the subnets to which the ALB is attached.
Resources:
  ALB:
    Type: AWS::ElasticLoadBalancingV2::LoadBalancer
    Properties:
      Name: !Sub "${Prefix}-ALB"
      Scheme: internet-facing
      SecurityGroups:
        - !Ref ALBSecurityGroup
      Subnets:
        - !Ref PublicSubnet1
        - !Ref PublicSubnet2
      Type: application

  ALBTargetGroup:
    Type: AWS::ElasticLoadBalancingV2::TargetGroup
    Properties:
      VpcId: !Ref VPC
      Name: !Sub "${Prefix}-ALBTargetGroup"
      Protocol: HTTP
      Port: !Ref HTTPPort
      HealthCheckProtocol: HTTP
      HealthCheckPath: /
      HealthCheckPort: traffic-port
      HealthyThresholdCount: !Ref HealthyThresholdCount
      UnhealthyThresholdCount: !Ref UnhealthyThresholdCount
      HealthCheckTimeoutSeconds: !Ref HealthCheckTimeoutSeconds
      HealthCheckIntervalSeconds: !Ref HealthCheckIntervalSeconds
      Matcher:
        HttpCode: !Ref HttpCode
      Targets:
        - Id: !Ref Instance1
        - Id: !Ref Instance2

  ALBListener:
    Type: AWS::ElasticLoadBalancingV2::Listener
    Properties:
      DefaultActions:
        - TargetGroupArn: !Ref ALBTargetGroup
          Type: forward
      LoadBalancerArn: !Ref ALB
      Port: !Ref HTTPPort
      Protocol: HTTP
Code language: YAML (yaml)
In order to attach an instance in private subnets to an ALB, the ALB must be associated with public subnets. A public subnet is required for each AZ where the instance is located. In this case, we have one instance in each of the two AZs, so we will have one public subnet in each of the two AZs as well.
For more information, please see the following page.
The S3 bucket name where error page is placed should match domain name
Set up an error page in the S3 bucket and configure it to be published.
Resources:
  S3Bucket:
    Type: AWS::S3::Bucket
    Properties:
      BucketName: !Ref DomainName
      PublicAccessBlockConfiguration:
        BlockPublicAcls: false
        BlockPublicPolicy: false
        IgnorePublicAcls: false
        RestrictPublicBuckets: false
      WebsiteConfiguration:
        IndexDocument: !Ref IndexDocument

  BucketPolicy:
    Type: AWS::S3::BucketPolicy
    DependsOn:
      - S3Bucket
    Properties:
      Bucket: !Ref S3Bucket
      PolicyDocument:
        Statement:
          Action:
            - s3:GetObject
          Effect: Allow
          Resource: !Sub "arn:aws:s3:::${DomainName}/*"
          Principal: "*"
Code language: YAML (yaml)
Use the static website hosting feature of S3 to display error pages. For more information about this feature, please refer to the following page.
The key point in displaying the error page using the static web hosting feature is the name of the bucket.
The bucket must have the same name as your domain or subdomain. For example, if you want to use the subdomain acme.example.com, the name of the bucket must be acme.example.com.
Routing traffic to a website that is hosted in an Amazon S3 bucket
The bucket name is specified in the BucketName property, and it is necessary to specify the same string as the domain name used in the primary website in this property. In this case, we will use the built-in function Fn::Ref to refer to the domain name.
Automatically create error page using CloudFormation custom resources
This time, an HTML file for the error page is automatically prepared.
Resources:
  CustomResource:
    Type: Custom::CustomResource
    DependsOn:
      - S3Bucket
    Properties:
      ServiceToken: !GetAtt Function.Arn

  Function:
    Type: AWS::Lambda::Function
    Properties:
      Code:
        ZipFile: |
          import boto3
          import cfnresponse
          import os

          bucket_name = os.environ['BUCKET_NAME']
          index_document = os.environ['INDEX_DOCUMENT']
          prefix = os.environ['PREFIX']

          object_body = """<html>
            <head>{prefix}</head>
            <body>
              <h1>index.html</h1>
              <p>{bucket_name}</p>
            </body>
          </html>""".format(bucket_name=bucket_name, prefix=prefix)
          content_type = 'text/html'
          char_code= 'utf-8'

          s3_client = boto3.client('s3')

          CREATE = 'Create'
          DELETE = 'Delete'
          response_data = {}

          def lambda_handler(event, context):
            try:
              if event['RequestType'] == CREATE:
                put_response = s3_client.put_object(
                  Bucket=bucket_name,
                  Key=index_document,
                  Body=object_body.encode(char_code),
                  ContentEncoding=char_code,
                  ContentType=content_type)
                print(put_response)

              elif event['RequestType'] == DELETE:
                list_response = s3_client.list_objects_v2(
                  Bucket=bucket_name)
                for obj in list_response['Contents']:
                  delete_response = s3_client.delete_object(
                    Bucket=bucket_name,
                    Key=obj['Key'])
                  print(delete_response)

              cfnresponse.send(event, context, cfnresponse.SUCCESS, response_data)

            except Exception as e:
              print(e)
              cfnresponse.send(event, context, cfnresponse.FAILED, response_data)
      Environment:
        Variables:
          BUCKET_NAME: !Ref DomainName
          INDEX_DOCUMENT: !Ref IndexDocument
          PREFIX: !Ref Prefix
      FunctionName: !Sub "${Prefix}-function"
      Handler: !Ref Handler
      Runtime: !Ref Runtime
      Role: !GetAtt FunctionRole.Arn

  FunctionRole:
    Type: AWS::IAM::Role
    DeletionPolicy: Delete
    Properties:
      AssumeRolePolicyDocument:
        Version: 2012-10-17
        Statement:
          - Effect: Allow
            Action: sts:AssumeRole
            Principal:
              Service:
                - lambda.amazonaws.com
      ManagedPolicyArns:
        - arn:aws:iam::aws:policy/service-role/AWSLambdaBasicExecutionRole
      Policies:
        - PolicyName: FunctionPolicy
          PolicyDocument:
            Version: 2012-10-17
            Statement:
              - Effect: Allow
                Action:
                  - s3:ListBucket
                  - s3:GetObject
                  - s3:PutObject
                  - s3:DeleteObject
                Resource:
                  - !Sub "arn:aws:s3:::${DomainName}"
                  - !Sub "arn:aws:s3:::${DomainName}/*"Code language: YAML (yaml)
Use CloudFormation custom resources to automatically invoke Lambda functions when creating/deleting CloudFormation stacks. Depending on the stack action, the Lambda function works as follows
- When creating stack: Place HTML files in the S3 bucket.
- When deleting stack: Delete all objects in the S3 bucket.
For more information, please refer to the following page.
Use health checks to check if primary resource has failed
First, configure Route53 to be able to check the failure status of the primary resource.
Resources:
  DnsHealthCheck:
    Type: AWS::Route53::HealthCheck
    Properties:
      HealthCheckConfig:
        Port: !Ref HTTPPort
        Type: HTTP
        ResourcePath: /
        FullyQualifiedDomainName: !Ref ALBDnsName
        RequestInterval: !Ref RequestInterval
        FailureThreshold: !Ref FailureThreshold
Code language: YAML (yaml)
The HealthCheckConfig property specifies the target and method of health check, and the conditions under which a failure is considered to have occurred.
- FullyQualifiedDomainName property: Specify the target of the health check as the root page of the ALB.
- Port and Type properties: The health check is performed using HTTP (80/tcp).
- RequestInterval property: Health check is performed once every 30 seconds.
- FailureThreshold property: If the HTTP status code is not “200” for three consecutive times as a result of the health check, a failure is considered to have occurred.
Route53 active and passive type failover configuration
Finally, define the record information for Route53.
Resources:
  AwstutNetDnsRecordGroup:
    Type: AWS::Route53::RecordSetGroup
    Properties:
      HostedZoneName: !Sub "${DomainName}."
      RecordSets:
        # ALB
        - Name: !Ref DomainName
          Failover: PRIMARY
          HealthCheckId: !Ref DnsHealthCheck
          SetIdentifier: primary
          Type: A
          AliasTarget:
            DNSName: !Ref ALBDnsName
            EvaluateTargetHealth: true
            HostedZoneId: !Ref ALBHostedZoneId
        # S3
        - Name: !Ref DomainName
          Failover: SECONDARY
          SetIdentifier: secondary
          Type: A
          AliasTarget:
            DNSName: !Ref S3DnsName
            HostedZoneId: !Ref S3HostedZoneId
Code language: YAML (yaml)
In the HostedZoneName property, specify the domain name to register with Route53. Specify the same domain name as the S3 bucket name mentioned above.
In the RecordSets property, specify the resources associated with the domain name specified in the HostedZoneName property, where the first element is the ALB and the second is the S3 bucket. The first element is the ALB, and the second is the S3 bucket. There are three settings that are particularly important when configuring failover.
- For the Failover property, specify “PRIMARY” since ALB is the primary resource, and “SECONDARY” since S3 is the secondary resource.
- Specify the aforementioned health check resource in the HealthCheckId property on the ALB side.
- Specify “true” for the EvaluateTargetHealth property in the AliasTarget property on the ALB side.
By configuring the above settings, if a failure occurs in the ALB, it will automatically fail over and the traffic will be routed to the S3 side.
As for the HostedZoneId property in the RecordSetGroup, there are certain values that should be set.
First, for the ALB side, refer to Elastic Load Balancing endpoints and quotas, and you will see that you need to specify “Z14GRHDCWA56QT” for the ap-northeast-1 region.
Next, for the value on the S3 bucket side, according to Amazon Simple Storage Service endpoints and quotas, we need to specify “Z2M4EHUR26P7ZW” in the ap-northeast-1 region.
Architecting
Using CloudFormation, we will build this environment and check its actual behavior.
Create CloudFormation stacks and check resources in stacks
Create a CloudFormation stacks.
For more information on how to create stacks and check each stack, please refer to the following page.

After checking the resources for each stack, the following information is available for the main resources created this time.
- Domain name: awstut.net
- Instance ID of EC2 instance: i-032febbe1b5fd6a9e, i-00520c950f3fbcd97
- ALB Name: saa-01-001-ALB
- S3 Bucket Name: awstut.net
- Route53 Health Check ID: d0d474a5-aaba-4cf3-b5c4-dc3075f56b49
First, check the configuration status of Route53.
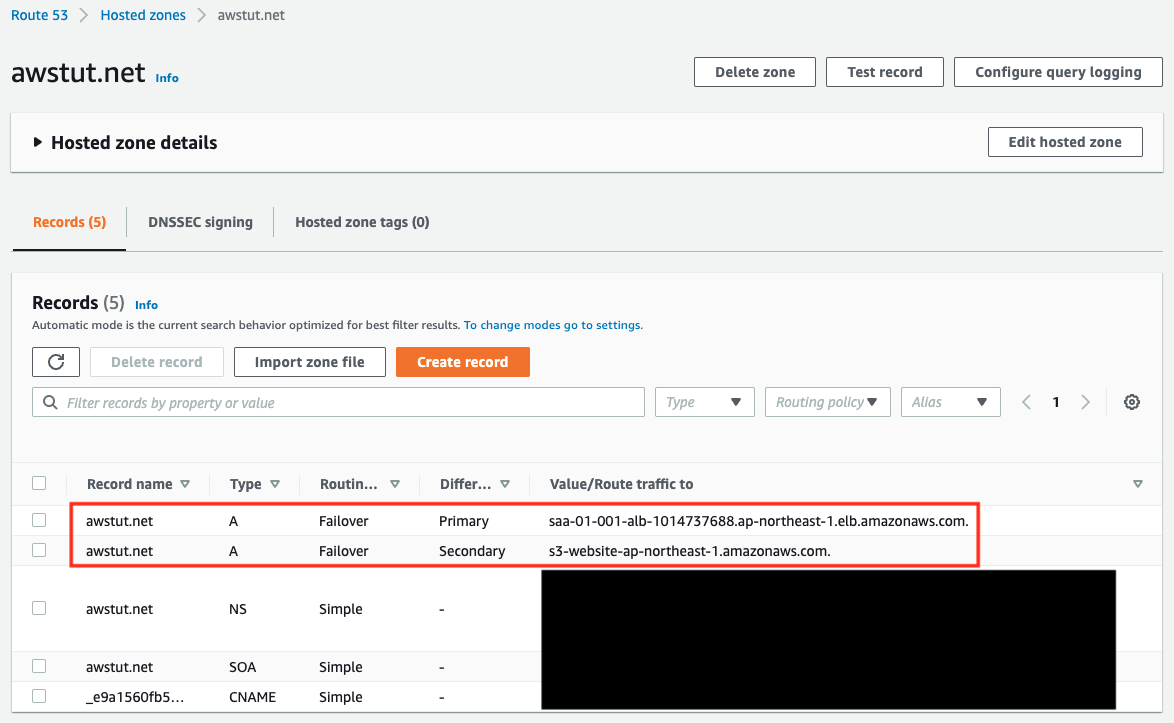
You can see that ALB is registered as the primary and S3 bucket as the secondary as specified in the template file.
Check the S3 bucket.

Indeed, you can see that the HTML file for the error page is in place, which means that the CloudFormation custom resource was activated when the CloudFormation stack was created and the HTML file was automatically created.
If ALB fails, it will fail over and this HTML file will be displayed.
Behavior check: normal
Now that we are ready, we will access the web app we have built and check its behavior.
$ curl http://awstut.net
instance-id: i-00520c950f3fbcd97

$ curl http://awstut.net
instance-id: i-032febbe1b5fd6a9e
Code language: Bash (bash)
The IDs of the two EC2 instances were returned alternately. This is because the ALB is routing traffic to the two instances in a round-robin fashion.
This indicates that the ALB and the EC2 instances under it have passed the health check and are operating normally as the primary resource.
Route53 health check status check: normal
In the meantime, we will also check the status of the health check under normal conditions.
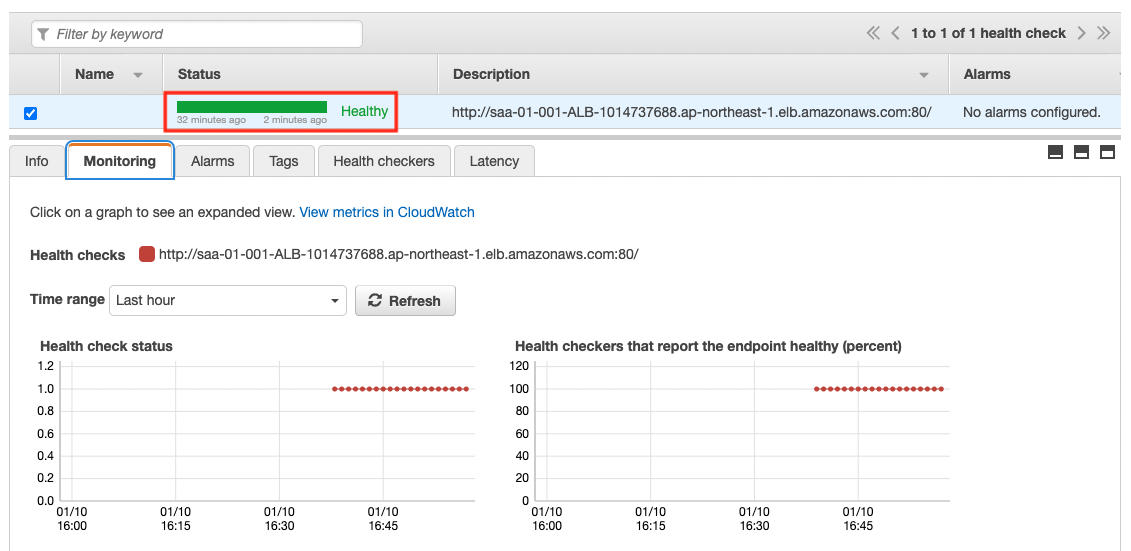
The Status is “Healthy”. This shows that the health check has been successful.
Recreate failure by stopping EC2 instance
We have seen that the primary resource is running normally.
Now we will stop the two instances to create a situation where a failure has occurred intentionally.
$ aws ec2 stop-instances \
--instance-ids i-032febbe1b5fd6a9e i-00520c950f3fbcd97
Code language: Bash (bash)
The value of Instance state for both instances is “Stopped”, so they have been stopped.
Route53 health check status check: when failure occurs
After the instance is stopped, check the status of the health check again.
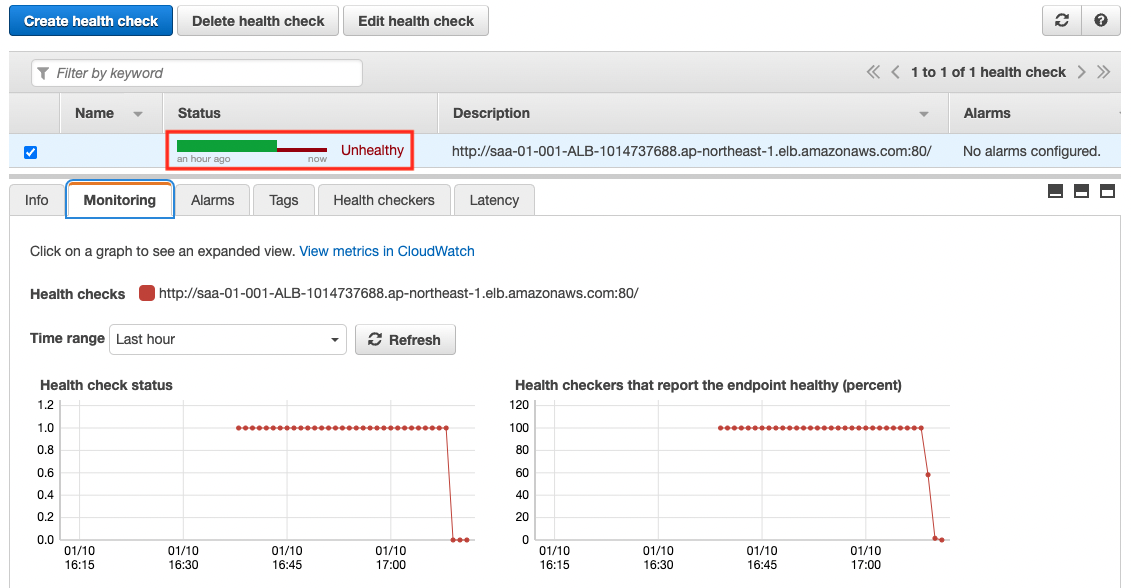
The Status value is now “Unthealthy”. This means that the health check has failed.
This is because there are no more normal targets registered in the ALB due to stopping the instance.
Behavior check: when failure occurs
Now that we have confirmed that the health check has failed, we will access the web app again.
$ curl http://awstut.net
<html>
  <head>saa-01-001</head>
  <body>
    <h1>index.html</h1>
    <p>awstut.net</p>
  </body>
</html>
Code language: Bash (bash)
The HTML file placed in the S3 bucket has been returned.
This shows that Route53 failed over the traffic routing from ALB, the primary resource, to S3, the secondary resource, due to the failed health check to ALB.
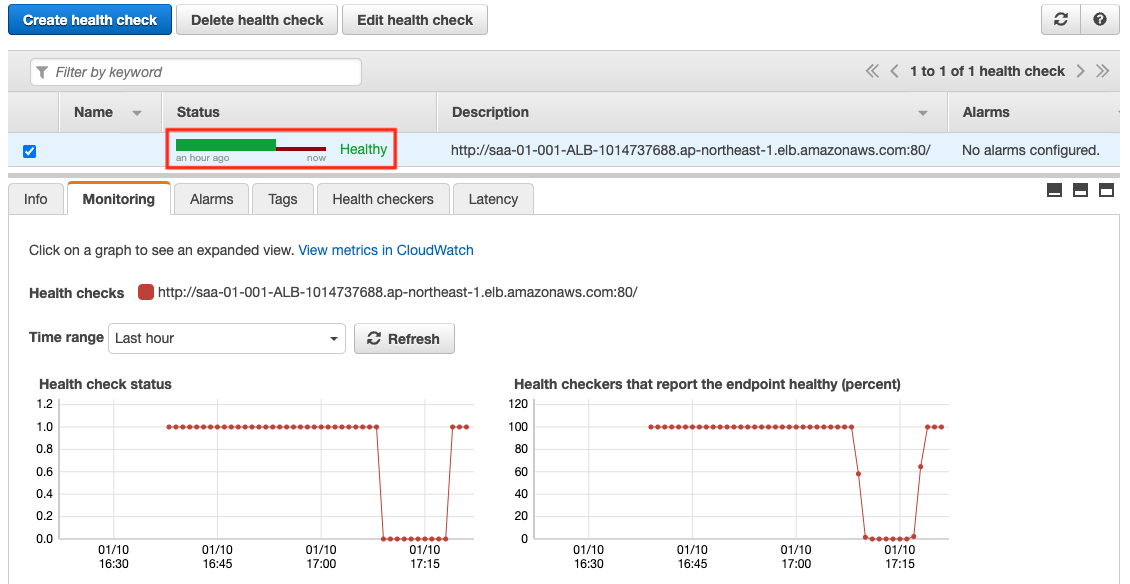
Start instance and reproduce disaster recovery
We now know that the system automatically fails over when a failure occurs. Next, let’s check the behavior at the time of failure recovery.
In order to reproduce the failure recovery, we will re-launch the instance that was stopped earlier.
$ aws ec2 start-instances \
--instance-ids i-032febbe1b5fd6a9e i-00520c950f3fbcd97
Code language: Bash (bash)
The Instance Status value is now “Running”. This means that the instance is currently running.
Behavior check: during failure recovery
Once the instance is back, access the web app again to check the behavior.
$ curl http://awstut.net
instance-id: i-032febbe1b5fd6a9e

$ curl http://awstut.net
instance-id: i-00520c950f3fbcd97
Code language: Bash (bash)
We can see that the traffic is routed to the ALB side again. This is because the instance was re-recognized as the target of the ALB when it was launched, and Route53 successfully performed a health check on the ALB.
As you can see, in Route53’s active-passive failover routing policy, when the primary resource recovers from a failure, the failover state will be automatically removed and traffic will be routed to the primary side again.
Summary
This time, through hands-on experience with Route53 active-passive type failover, we confirmed the behavior of routing during failure and disaster recovery.
Route 53’s failover routing policy can be used to display an error page in the event of a failure, increasing system resiliency.