Configure the hosted UI of the Cognito user pool to create a sign-in page
Create a sign-in page using Cognito.
Cognito is an authentication system service provided by AWS.
Amazon Cognito provides authentication, authorization, and user management for your web and mobile apps. Your users can sign in directly with a user name and password, or through a third party such as Facebook, Amazon, Google or Apple.
What is Amazon Cognito?
This time, we will use the hosted UI of the Cognito user pool to create a sign-in page.
The Amazon Cognito Hosted UI provides you an OAuth 2.0 compliant authorization server. It includes default implementation of end user flows such as registration and authentication.
Using the Amazon Cognito hosted UI for sign-up and sign-in
In this article, we will build an environment that follows the contents of the AWS official website Setting up the hosted UI with the Amazon Cognito console.
Environment
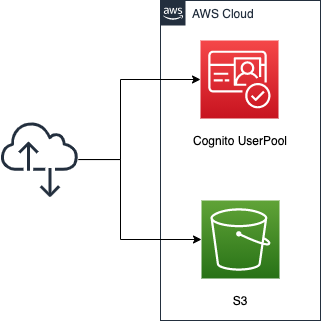
Create a Cognito user pool. Use the user pool to create a sign-in/sign-up function and a page for this function.
Configure the user pool to register the following information when signing up
- Email address
- Password
- Name * not username
Sign-in will be performed using the email address and password.
Create an S3 bucket, enable the static website hosting feature, and install the following three HTML files.
- index.html: for the top page
- signin.html: For the page to be displayed after signing in
- signout.html: For the page to be displayed after signing out
CloudFormation template files
We will build the above configuration using CloudFormation.
Place the CloudFormation template at the following URL.
https://github.com/awstut-an-r/awstut-fa/tree/main/010
This time, we will build this environment with a nested stack. For more information about nested stacks, please refer to the following page.

Template file points
We will cover the key points of each template file to configure this environment.
Create user pool
In fa-010-cognito.yaml, we will define the Cognito-related resources.
First, let’s check the user pool itself.
Resources:
  UserPool:
    Type: AWS::Cognito::UserPool
    Properties:
      AutoVerifiedAttributes:
        - email
      UsernameAttributes:
        - email
      UserPoolName: !Sub ${Prefix}-UserPool
      Schema:
        - AttributeDataType: String
          Mutable: true
          Name: name
          Required: true
Code language: YAML (yaml)
The AutoVerifiedAttributes property allows you to set automatic verification for the specified attributes.
Amazon Cognito can automatically verify email addresses or mobile phone numbers by sending a verification code—or, for email, a verification link. For email addresses, the code or link is sent in an email message. For phone numbers, the code is sent in an SMS text message.
Configuring email or phone verification
You can specify “email” or “phone_number” for this property. In this case, we will specify the former so that a verification code will be automatically sent to the registered email address upon signup.
The UsernameAttributes property is a parameter to specify the attributes to be used in place of the user name (username).
UsernameAttributes
AWS::Cognito::UserPool UsernameAttributes
Determines whether email addresses or phone numbers can be specified as user names when a user signs up. Possible values: phone_number or email.
As mentioned above, you can specify “email” or “phone_number” for this property, but we will specify the former. In this case, we will specify the former. This setting will allow users to sign in using their email address instead of their user name.
One thing to note about this property is that username is considered a required attribute in Cognito.
The username value is a separate attribute and not the same as the name attribute. A username is always required to register a user, and it can’t be changed after a user is created.
User pool attributes
However, if a username is not required, such as in the case of the application we are creating this time, an email address/phone number can be used instead of a username. In this case, the user name will be set to a randomly generated ID.
If your application does not require a username, you do not need to ask users to provide one. Your app can create a unique username for users in the background. This is useful if, for example, you want users to register and sign in with an email address and password.
User pool attributes
The Schema property allows you to specify the attributes to be registered when signing up. In this case, we will add one of the standard attributes, name (not username).
Note that email address and password are not required to be specified in this property, as they are set to “email” in the UsernameAttributes property.
Create user pool app client
Next, check the user pool app client.
Resources:
  UserPoolClient:
    Type: AWS::Cognito::UserPoolClient
    Properties:
      AccessTokenValidity: 60 # (minutes) default value.
      AllowedOAuthFlowsUserPoolClient: true
      AllowedOAuthFlows:
        - code
        - implicit
      AllowedOAuthScopes:
        - aws.cognito.signin.user.admin
        - email
        - openid
        - phone
        - profile
      CallbackURLs:
        - !Sub "${BucketWesSiteEndpointUrl}/${SigninHtml}"
      ClientName: !Sub ${Prefix}-UserPoolClient
      EnableTokenRevocation: true # default value.
      ExplicitAuthFlows:
        - ALLOW_CUSTOM_AUTH
        - ALLOW_REFRESH_TOKEN_AUTH
        - ALLOW_USER_SRP_AUTH
      IdTokenValidity: 60 # (minutes) default value.
      LogoutURLs:
        - !Sub "${BucketWesSiteEndpointUrl}/${SignoutHtml}"
      PreventUserExistenceErrors: ENABLED # default value.
      RefreshTokenValidity: 30 # (days) default value.
      SupportedIdentityProviders:
        - COGNITO
      TokenValidityUnits:
        AccessToken: minutes
        IdToken: minutes
        RefreshToken: days
      UserPoolId: !Ref UserPool
Code language: YAML (yaml)
By creating an app client, you will be able to perform API operations such as signup.
An app is an entity within a user pool that has permission to call unauthenticated API operations.
Configuring a user pool app client
We will configure the app client settings in a manner similar to the AWS official page Using the Amazon Cognito hosted UI for sign-up and sign-in.
The parameters that are important this time are the CallbackURLs and LogoutURLs properties. Specify the URLs to be redirected to after sign-in and sign-out, respectively.
Enter Callback URL(s). A callback URL indicates where the user will be redirected after a successful sign-in.
Enter Sign out URL(s). A sign-out URL indicates where your user will be redirected after signing out.
Using the Amazon Cognito hosted UI for sign-up and sign-in
In this case, we will specify the URL of the HTML file to be placed in the S3 bucket as described below.
Set up domain
Then, check the domain.
Resources:
  UserPoolDomain:
    Type: AWS::Cognito::UserPoolDomain
    Properties:
      Domain: !Ref Prefix
      UserPoolId: !Ref UserPool
Code language: YAML (yaml)
You need to create a domain for the sign-in/sign-up page with hosted UI.
After setting up an app client, you can configure the address of your sign-up and sign-in webpages. You can use an Amazon Cognito hosted domain and choose an available domain prefix, or you can use your own web address as a custom domain.
Configuring a user pool domain
This time, we will use the domain prefix to set the domain, passing the prefix string to the Domain property. For the Tokyo region (ap-northeast-1), the domain containing the prefix will be as follows
- [prefix].auth.ap-northeast-1.amazoncognito.com
The URL for the sign-in/sign-out page with the hosted UI is as follows
- URL for sign-in page
- https://[prefix].auth.ap-northeast-1.amazoncognito.com/login?response_type=code&client_id=[app-client-id]&redirect_uri=[callback-url]
- URL for sign-out page
- https://[prefix].auth.ap-northeast-1.amazoncognito.com/logout?response_type=code&client_id=[app-client-id]&logout_uri=[sign-out-url]
Please note that there are restrictions on the URLs that can be specified as sign-in/sign-out destinations, and they must start with “https”.
Prepare sign-in/sign-out destination content with S3 static website hosting
Define S3-related resources in fa-010-s3.yaml.
Resources:
  S3Bucket:
    Type: AWS::S3::Bucket
    Properties:
      BucketName: !Sub
        - "${Prefix}-${StackUUId}"
        - StackUUId: !Select
            - 2
            - !Split
                - "/"
                - !Ref AWS::StackId
      PublicAccessBlockConfiguration:
        BlockPublicAcls: false
        BlockPublicPolicy: false
        IgnorePublicAcls: false
        RestrictPublicBuckets: false
      WebsiteConfiguration:
        IndexDocument: !Ref IndexHtml

  BucketPolicy:
    Type: AWS::S3::BucketPolicy
    Properties:
      Bucket: !Ref S3Bucket
      PolicyDocument:
        Statement:
          Action:
            - s3:GetObject
          Effect: Allow
          Resource: !Sub "arn:aws:s3:::${S3Bucket}/*"
          Principal: "*"
Code language: YAML (yaml)
We will prepare the content to be displayed after sign-in and sign-out. We will use the static website hosting feature provided by S3.
You can use Amazon S3 to host a static website. On a static website, individual webpages include static content. They might also contain client-side scripts.
Hosting a static website using Amazon S3
For more information, please see the following page.
The content published using this function can be accessed via two types of endpoints (website endpoint and RESTAPI endpoint), but we will use the REST API endpoint. This has to do with the URL to be specified as the sign-in/sign-out destination as described earlier. This is because REST API endpoints are the endpoints that can be used for HTTPS communication, which is a condition of the URLs that can be specified. In the case of the Tokyo region (ap-northeast-1), the URL to access the content using this endpoint is as follows
https://s3-ap-northeast-1.amazonaws.com/[バケット名]/[オブジェクト名]
Architecting
We will use CloudFormation to build this environment and check its actual behavior.
Create CloudFormation stacks and check resources in stacks
Create a CloudFormation stacks.
For more information on how to create stacks and check each stack, please refer to the following page.
After checking the resources for each stack, the information for the main resource created this time is as follows
- Name of the S3 bucket: fa-010-9fb3fa90-e567-11f0-9b93-0e788aadd4c5
- ID of Cognito user pool: ap-northeast-1_Ajzqt7Te7
- Cognito user pool app client ID: 5vb5gkv9rjeunvendcc1pj4089
- Cognito user pool domain prefix: fa-010
From the above, the URL for the sign-in/sign-out page with the hosted UI mentioned above is determined as follows
- URL for sign-in page
- https://fa-010.auth.ap-northeast-1.amazoncognito.com/login?response_type=code&client_id=5vb5gkv9rjeunvendcc1pj4089&redirect_uri=https://s3-ap-northeast-1.amazonaws.com/fa-010/signin.html
- URL for sign-out page
- https://fa-010.auth.ap-northeast-1.amazoncognito.com/logout?response_type=code&client_id=5vb5gkv9rjeunvendcc1pj4089&logout_uri=https://s3-ap-northeast-1.amazonaws.com/fa-010/signout.html
Place the HTML in the S3 bucket
Place HTML files in an S3 bucket to prepare the website content.
In this example, we will prepare the following three files:
- index.html
- signin.html
- signout.html
index.html
<html>
  <head></head>
  <body>
    <h1>index.html</h1>
    <ul>
      <li>
        <p><a href="https://fa-010.auth.ap-northeast-1.amazoncognito.com/login?response_type=code&client_id=5vb5gkv9rjeunvendcc1pj4089&redirect_uri=https://s3-ap-northeast-1.amazonaws.com/fa-010-9fb3fa90-e567-11f0-9b93-0e788aadd4c5/signin.html">Sign In</a></p>
      </li>
      <li>
        <p><a href="https://fa-010.auth.ap-northeast-1.amazoncognito.com/logout?response_type=code&client_id=5vb5gkv9rjeunvendcc1pj4089&logout_uri=https://s3-ap-northeast-1.amazonaws.com/fa-010-9fb3fa90-e567-11f0-9b93-0e788aadd4c5/signout.html">Sign Out</a></p>
      </li>
    </ul>
  </body>
</html>
Code language: HTML, XML (xml)
signin.html
<html>
  <head></head>
  <body>
    <h1>signin.html</h1>
  </body>
</html>
Code language: HTML, XML (xml)
signout.html
<html>
  <head></head>
  <body>
    <h1>signout.html</h1>
  </body>
</html>
Code language: HTML, XML (xml)
Using CodeBuild, these files will be created and uploaded to the S3 bucket.
A CloudFormation custom resource will be created to automatically start the CodeBuild project.
For more details, please refer to the page below.

Accessing the hosted UI: Sign up
Now that we are ready, let’s actually access the hosted UI.
First, access the following URL
https://s3-ap-northeast-1.amazonaws.com/fa-010-9fb3fa90-e567-11f0-9b93-0e788aadd4c5/index.html
The root page, index.html, will be displayed.
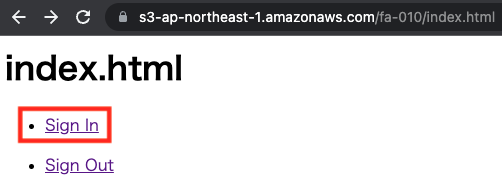
Click on “Sign In”. This is the link to the sign-in URL.
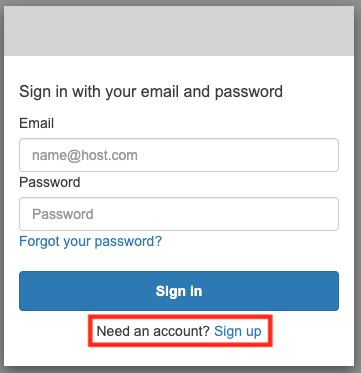
At this time, we have not created a user for sign-in. Therefore, click on “Sign up” to create a user.
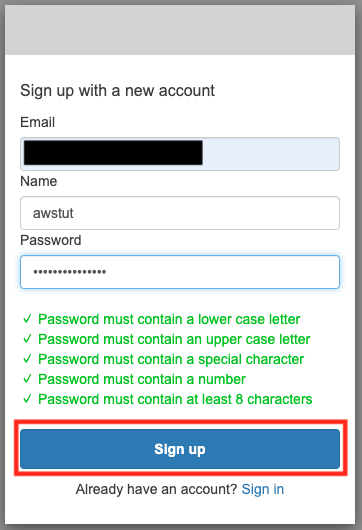
In addition to Email and Password, you will now see a form to enter Name. This is an additional attribute that we specified when we created the user pool. In this case, we will register with the name “awstut”.
After entering the appropriate values, click “Sign up”.
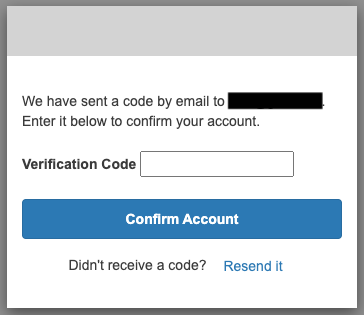
An authorization code entry form will appear. The code will be sent to the email address you entered earlier, so enter it here.
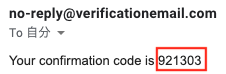
This time it was “921303”.
After entering the code in the previous form, click “Confirm Account” to validate the account.
You can check the information about the created user from the following command.
$ aws cognito-idp list-users \
--user-pool-id ap-northeast-1_Ajzqt7Te7 \
--filter "name='awstut'"
{
    "Users": [
        {
            "Username": "29c9a15d-9749-490c-83d9-ffbfd29392a6",
            "Attributes": [
                {
                    "Name": "sub",
                    "Value": "29c9a15d-9749-490c-83d9-ffbfd29392a6"
                },
                {
                    "Name": "email_verified",
                    "Value": "true"
                },
                {
                    "Name": "name",
                    "Value": "awstut"
                },
                {
                    "Name": "email",
                    "Value": "[email-address]"
                }
            ],
            "Enabled": true,
            "UserStatus": "CONFIRMED"
        }
    ]
}
Code language: Bash (bash)
You can see that the required attribute, username, is set to an auto-generated ID.
Accessing the hosted UI: Sign in
Your account has been created by the above procedure.
After accessing the top page (index.html) again, click the “Sign In” link.
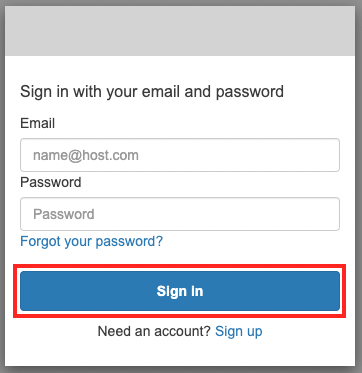
After entering your email address and password, click “Sign In”.

The sign-in process was successful, and the redirected site, signin.html, is now displayed.
Accessing the hosted UI: Sign out
Finally, go back to the top page and click on the “Sign Out” link.
This is the link to the sign-out URL.

The sign-out process was successful, and the redirected page, signout.html, was displayed.
Summary
We have confirmed that we can easily implement authentication system functions by using the Cognito user pool and hosted UI.