Configure to verify performance of cluster placement group
Here is a configuration to verify the performance of cluster placement group.
A placement group is an option that allows you to specify the hardware on which the EC2 instances will be launched.
When you launch a new EC2 instance, the EC2 service attempts to place the instance in such a way that all of your instances are spread out across underlying hardware to minimize correlated failures. You can use placement groups to influence the placement of a group of interdependent instances to meet the needs of your workload.
Placement groups
There are three types of placement group, among which the cluster placement group is expected to improve the network performance between EC2 instances. EC2 instances placed in a cluster placement group will be placed in the same AZ, which will lead to improved network performance.
A cluster placement group is a logical grouping of instances within a single Availability Zone…
Instances in the same cluster placement group enjoy a higher per-flow throughput limit for TCP/IP traffic and are placed in the same high-bisection bandwidth segment of the network…
Cluster placement groups are recommended for applications that benefit from low network latency, high network throughput, or both.
Placement groups
Environment
Set up a cluster placement group in the subnet. Then, place two EC2 instances in the same group.
To check the performance of the cluster placement group, use the ping command and follow the steps below.
- Conduct pings between EC2 instances installed in the cluster placement group and measure the RTT values.
- Delete the cluster placement group settings for both EC2 instances.
- Again, conduct a ping between EC2 instances and measure the RTT value.
CloudFormation template files
We will build the above configuration using CloudFormation.
Place the CloudFormation template at the following URL.
https://github.com/awstut-an-r/awstut-saa/tree/main/02/001
Template file points
We will cover the key points of each template file to configure this environment.
Create cluster placement group
Define the cluster placement group and EC2 instance in saa-02-001-ec2.yaml.
First, create a cluster placement group where you will place the EC2 instances.
Resources:
  PlacementGroup:
    Type: AWS::EC2::PlacementGroup
    Properties:
      Strategy: cluster
Code language: YAML (yaml)
Specify the type of placement group to be created in the Strategy property. In this case, we will create a cluster type, so we will specify “cluster”.
Place EC2 instances in cluster placement group
When creating EC2 instances, configure them to be placed in the cluster placement group that you just created.
Parameters:
  InstanceType:
    Type: String


Resources:
  Instance1:
    Type: AWS::EC2::Instance
    Properties:
      IamInstanceProfile: !Ref InstanceProfile
      ImageId: !Ref ImageId
      InstanceType: !Ref InstanceType
      PlacementGroupName: !Ref PlacementGroup
      NetworkInterfaces:
        - DeviceIndex: 0
          SubnetId: !Ref PrivateSubnet
          GroupSet:
            - !Ref InstanceSecurityGroup
Code language: YAML (yaml)
Specify the placement group to be placed with the PlacementGroupName property. In this case, we will place it in the cluster placement group that we defined earlier, so we will refer to it using the built-in function Fn::Ref.
In placing an instance in the cluster placement group, the instance type is important to note. There is a limit to the instance types that can be placed in a cluster placement group.
The following instance types are supported:
Current generation instances, except for burstable performance instances (for example, T2) and Mac1 instances.
Placement group rules and limitations
In accordance with the above, this time we will specify “m6g.medium” as the parameter (InstanceType) in the Parameters section, and refer to it in the InstanceType property to make it an instance type that can be placed in the cluster placement group.
Define an EC2 instance (Instance2) with the same settings as above (Instance1), and place two units in the cluster placement group.
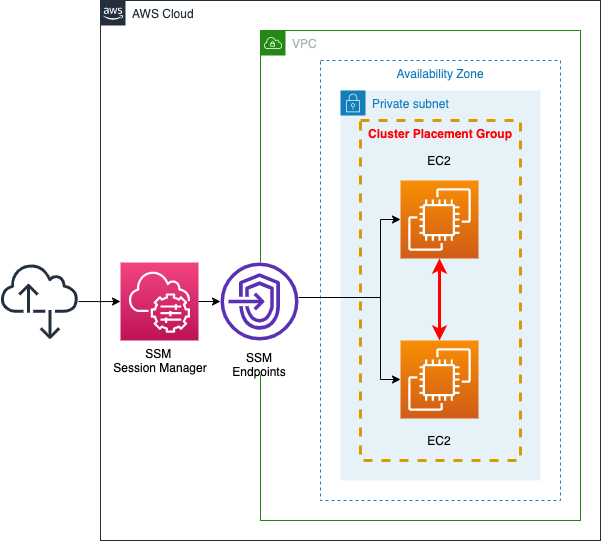
Architecting
Using CloudFormation, we will build this environment and check its actual behavior.
Create CloudFormation stacks and check resources in stacks
Create a CloudFormation stack.
For more information on how to create stacks and check each stack, please refer to the following page.

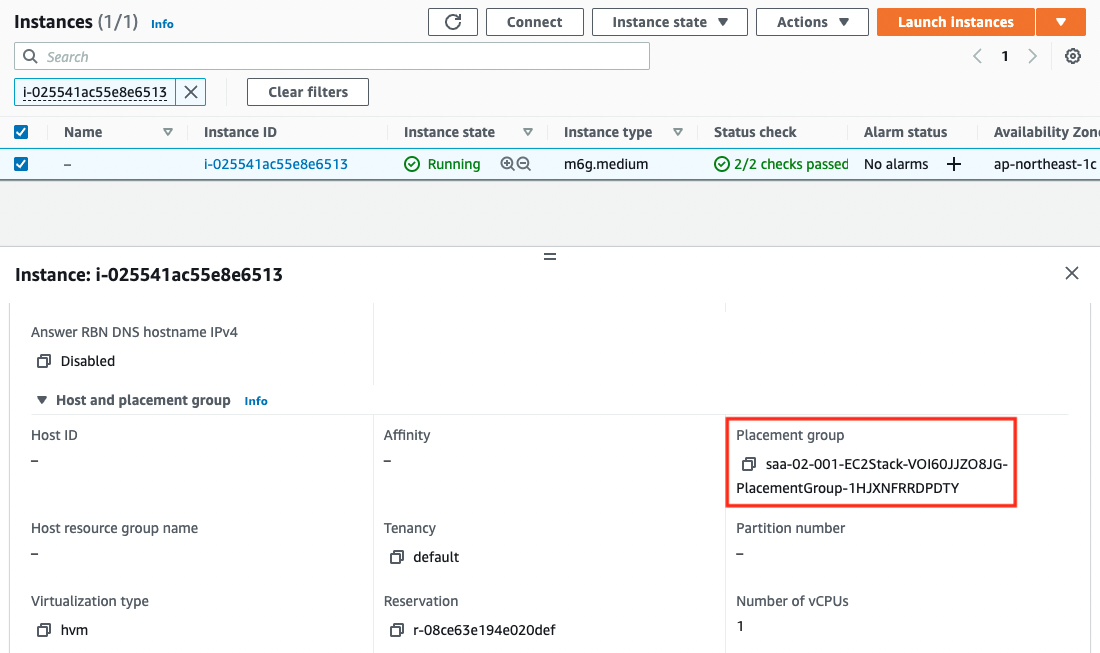
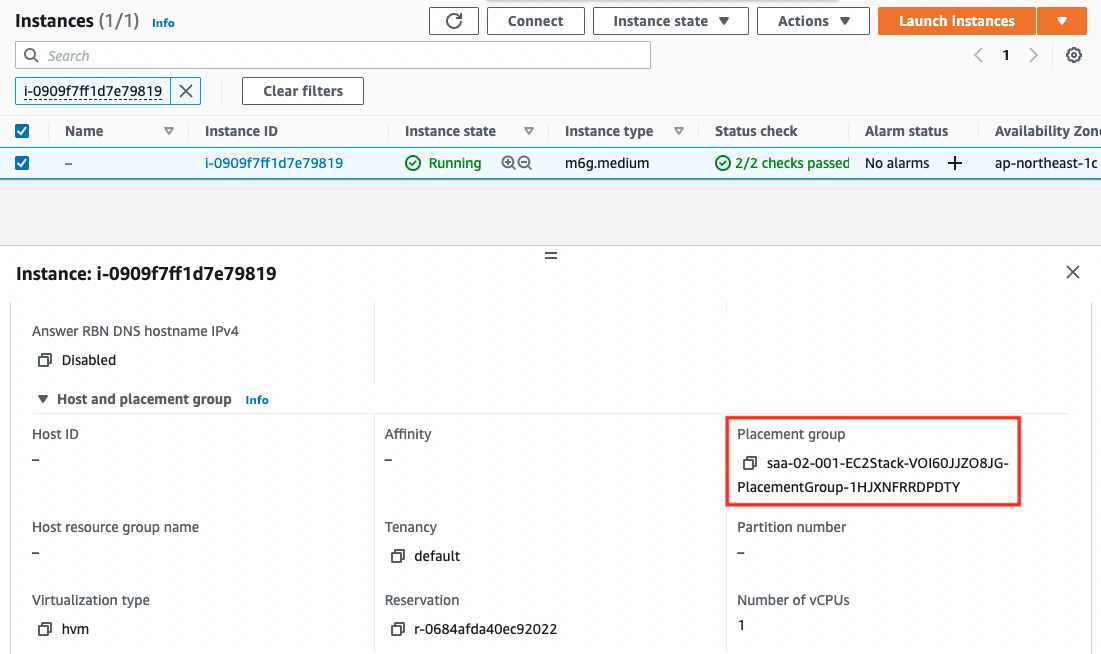
After checking the resources for each stack, the following information is available for the main resources created this time.
- ID of Instance1: i-025541ac55e8e6513
- ID of Instance2: i-0909f7ff1d7e79819
- Instance1’s private DNS name: ip-10-0-1-19.ap-northeast-1.compute.internal
- Instance2’s private DNS name: ip-10-0-1-98.ap-northeast-1.compute.internal
- Placement group name: saa-02-001-EC2Stack-VOI60JJZO8JG-PlacementGroup-1HJXNFRRDPDTY
Then, check the status of the placement group from the AWS Management Console.

The value of Strategry is the type of the placement group. The value of Strategry is the placement group type.
We will also check the placement group settings on the EC2 instance side.
The instances have been created successfully as well.
We can see that both instances are indeed placed in the placement group.
Accessing EC2 instances from Session Manager
Use the SSM Session Manager to access the EC2 instance.
Access the Instance1.
$ aws ssm start-session \
--target i-025541ac55e8e6513
...
sh-4.2$
Code language: Bash (bash)
I was able to access it normally.
Network Performance Measurement: Cluster Placement Group Available
Evaluate the performance of the cluster placement group by pinging.
We will measure the value when 100 pings are executed from the instance that is currently being accessed by Session Manager (Instance1) to the other instance (Instance2).
sh-4.2$ sudo ping -f -c 100 ip-10-0-1-98.ap-northeast-1.compute.internal
PING ip-10-0-1-98.ap-northeast-1.compute.internal (10.0.1.98) 56(84) bytes of data.
--- ip-10-0-1-98.ap-northeast-1.compute.internal ping statistics ---
100 packets transmitted, 100 received, 0% packet loss, time 5ms
rtt min/avg/max/mdev = 0.030/0.035/0.070/0.005 ms, ipg/ewma 0.059/0.035 ms
Code language: Bash (bash)
We were able to measure the data as intended.
The avg (average) of RTT is 0.035ms, which shows that the response time is quite fast.
Deleting Placement Group Settings
To check the validity of the cluster placement group settings, delete the existing placement group settings.
To delete the settings related to a placed placement group, follow the steps below.
- Stop the instance.
- Specify a blank placement group in which to place the instance.
- Start the instance.
Perform the above steps from the AWS CLI.
First, stop the instance.
$ aws ec2 stop-instances \
--instance-ids i-025541ac55e8e6513 i-0909f7ff1d7e79819
{
    "StoppingInstances": [
        {
            "InstanceId": "i-025541ac55e8e6513",
            "CurrentState": {
                "Name": "stopping",
                ...
            },
            ...
        },
        {
            "InstanceId": "i-0909f7ff1d7e79819",
            "CurrentState": {
                "Name": "stopping",
                ...
            },
            ...
        }
    ]
}
Code language: Bash (bash)
Next, modify the group name of the placement group to be blank and delete the settings related to the existing placement group.
$ aws ec2 modify-instance-placement \
--instance-id i-025541ac55e8e6513 \
--group-name ""
{
    "Return": true
}

$ aws ec2 modify-instance-placement \
--instance-id i-0909f7ff1d7e79819 \
--group-name ""
{
    "Return": true
}
Code language: Bash (bash)
Now that the placement group settings have been deleted, launch the instance again.
$ aws ec2 start-instances \
--instance-ids i-025541ac55e8e6513 i-0909f7ff1d7e79819
{
    "StartingInstances": [
        {
            "InstanceId": "i-025541ac55e8e6513",
            "CurrentState": {
                "Name": "pending"
            },
            "PreviousState": {
                "Name": "stopped"
            }
        },
        {
             "InstanceId": "i-0909f7ff1d7e79819",
            "CurrentState": {
                "Name": "pending"
            },
            "PreviousState": {
                "Name": "stopped"
            }
        }
    ]
}
Code language: Bash (bash)
After launching the instance, check the details of the instance again.
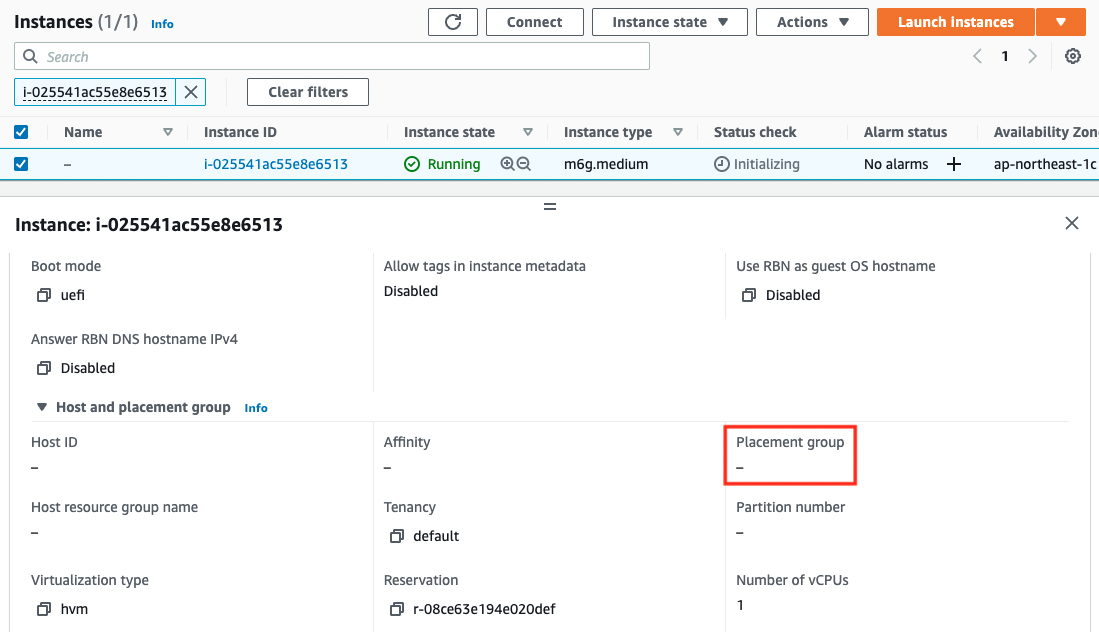
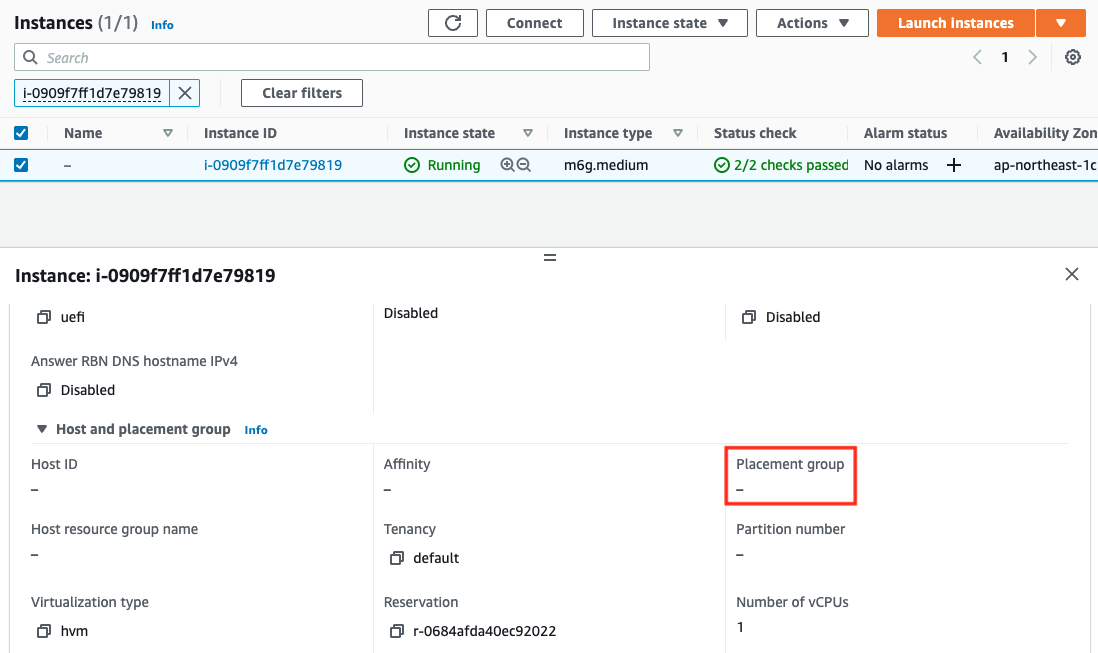
The value of Placement.GroupName for both instances has changed to “”. GroupName of both instances has changed to “”, which means that the settings related to the placement group have been deleted.
Network Performance Measurement: No Cluster Placement Group
Access the EC2 instance again and measure the performance.
sh-4.2$ sudo ping -f -c 100 ip-10-0-1-98.ap-northeast-1.compute.internal
PING ip-10-0-1-98.ap-northeast-1.compute.internal (10.0.1.98) 56(84) bytes of data.
--- ip-10-0-1-98.ap-northeast-1.compute.internal ping statistics ---
100 packets transmitted, 100 received, 0% packet loss, time 15ms
rtt min/avg/max/mdev = 0.036/0.138/0.388/0.117 ms, ipg/ewma 0.159/0.119 ms
Code language: Bash (bash)
The avg (average) RTT is 0.138ms, which means that it takes about 4 times longer than with the placement group.
Summary
In this case, we placed the EC2 instances in a cluster placement group.
We evaluated the network performance by pinging and confirmed that the speed was improved by about 4 times.