Configure Windows instance to join AWS Managed Microsoft AD domain using SSM document AWS-JoinDirectoryServiceDomain
AWS Managed Microsoft AD is a managed type directory service provided by AWS.
AWS Directory Service lets you run Microsoft Active Directory (AD) as a managed service. AWS Directory Service for Microsoft Active Directory, also referred to as AWS Managed Microsoft AD, is powered by Windows Server 2012 R2.
AWS Managed Microsoft AD
In this article, we will use the SSM document to check how to join a Windows instance to the AWS Managed Microsoft AD domain.
Environment
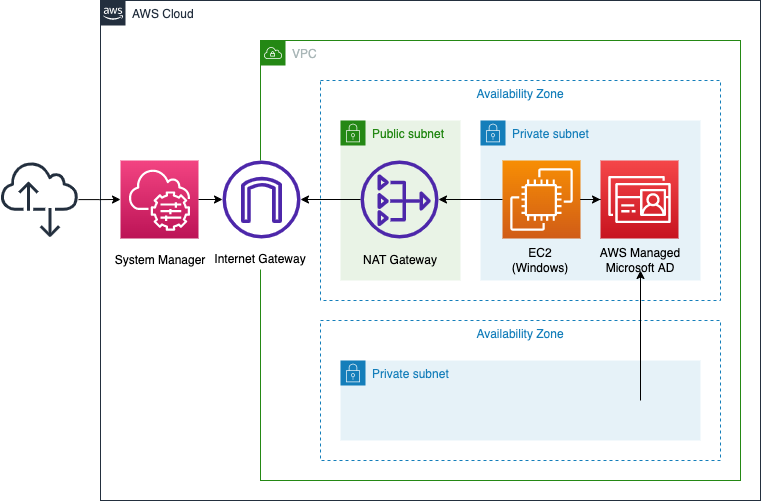
Set up a Windows instance on a private subnet. The OS of the instance will be the latest WindowsServer 2019.
Associate AWS Managed Microsoft AD with the two private subnets prepared in the same subnet and in another AZ.
Run the following two SSM documents to install the tools for joining and managing the AWS Managed Microsoft AD domain.
- AWS-JoinDirectoryServiceDomain
- AWS-RunPowerShellScript
CloudFormation template files
We will build the above configuration using CloudFormation.
We have placed the CloudFormation template at the following URL.
https://github.com/awstut-an-r/awstut-fa/tree/main/017
Explanation of key points of template files
We will cover the key points of each template file to configure this architecture.
Prepare communication route for SSM at NAT gateway
Prepare a route for Windows instances in the private subnet to access the Internet. The point is that VPC endpoints are not used.
Resources:
  VPC:
    Type: AWS::EC2::VPC
    Properties:
      CidrBlock: !Ref VPCCidrBlock

  IGW:
    Type: AWS::EC2::InternetGateway

  IGWAttachment:
    Type: AWS::EC2::VPCGatewayAttachment
    Properties:
      VpcId: !Ref VPC
      InternetGatewayId: !Ref IGW

  EIP:
    Type: AWS::EC2::EIP
    Properties:
      Domain: vpc

  NATGateway:
    Type: AWS::EC2::NatGateway
    Properties:
      AllocationId: !GetAtt EIP.AllocationId
      SubnetId: !Ref PublicSubnet
Code language: YAML (yaml)
In this configuration, the Windows instances are located in a private subnet. In order for the instances in the private subnet to access SSM, we need to use either VPC endpoints for SSM or a NAT gateway, and we will choose the latter. There is a reason for this in the conditions for AWS-JoinDirectoryServiceDomain execution.
If you use Amazon Virtual Private Cloud (Amazon VPC) endpoints for Systems Manager, then requests to join an EC2 instance to an AWS Directory Service domain fail
How do I use AWS Systems Manager to join a running EC2 Windows instance to my AWS Directory Service domain?
For these reasons, we will not use the VPC endpoints for SSM this time, but will deploy a NAT gateway to communicate with SSM through the Internet.
AWS Managed Microsoft AD associates two AZ subnets
Check AWS Managed Microsoft AD.
Resources:
  MSAD:
    Type: AWS::DirectoryService::MicrosoftAD
    Properties:
      Edition: Standard
      Name: !Ref MSADName
      Password: !Ref MSADPassword
      VpcSettings:
        SubnetIds:
          - !Ref PrivateSubnet1
          - !Ref PrivateSubnet2
        VpcId: !Ref VPC


Outputs:
  MSAD:
    Value: !Ref MSAD

  MSADDnsIpAddress1:
    Value: !Select [0, !GetAtt MSAD.DnsIpAddresses]

  MSADDnsIpAddress2:
    Value: !Select [1, !GetAtt MSAD.DnsIpAddresses]
Code language: YAML (yaml)
When creating an AWS Managed Microsoft AD, the key setting is the subnet configuration.
At least two subnets. Each of the subnets must be in a different Availability Zone.
AWS Managed Microsoft AD prerequisites
In addition to the subnet where the Windows instance is installed, specify another subnet created in another AZ in the SubnetIds property so that the above conditions are met.
In addition, specify the domain name in the Name property and the password of the administrator user (Admin) of the domain in the Password property.
The DNS address for AWS Managed Microsoft AD is required for executing the AWS-JoinDirectoryServiceDomain document described below, and since a DNS address is created for each associated subnet, there will be two in this case. There will be two DNS addresses, one for each subnet associated with it. Since these addresses need to be referenced from an external template, they will be listed in the Outputs section, but note the notation. Only numeric or string values can be defined for Outputs. So we will use the built-in function Fn::Select and define two values one by one to handle this.
The role for Windows instances attaches two AWS management policies
The IAM role for Windows instances is the key.
Resources:
  InstanceRole:
    Type: AWS::IAM::Role
    Properties:
      AssumeRolePolicyDocument:
        Version: 2012-10-17
        Statement:
          - Effect: Allow
            Action: sts:AssumeRole
            Principal:
              Service:
                - ec2.amazonaws.com
      ManagedPolicyArns:
        - arn:aws:iam::aws:policy/AmazonSSMManagedInstanceCore
        - arn:aws:iam::aws:policy/AmazonSSMDirectoryServiceAccess
Code language: YAML (yaml)
One of the conditions for running the SSM document AWS-JoinDirectoryServiceDomain is related to the IAM role that attaches to the Windows instance.
AWS Identity and Access Management (IAM) instance profile role with the following permissions policies attached for Systems Manager and directory join access:
AmazonSSMManagedInstanceCore
AmazonSSMDirectoryServiceAccess
How do I use AWS Systems Manager to join a running EC2 Windows instance to my AWS Directory Service domain?
This time, we will create an IAM role with the above two AWS management policies attached to it and assign it to the instance profile of the Windows instance.
The key to executing SSM AWS-JoinDirectoryServiceDomain document is DNS server address
First, we need to identify the relationship resources to run AWS-JoinDirectoryServiceDomain.
Resources:
  AWSJoinDirectoryServiceDomainAssociation:
    Type: AWS::SSM::Association
    Properties:
      AssociationName: !Sub "${Prefix}-aws-join-directory-service-domain-association"
      Name: AWS-JoinDirectoryServiceDomain
      Parameters:
        directoryId:
          - !Ref MSAD
        directoryName:
          - !Ref MSADName
        dnsIpAddresses:
          - !Ref MSADDnsIpAddress1
          - !Ref MSADDnsIpAddress2
      Targets:
        - Key: InstanceIds
          Values:
            - !Ref Instance
      WaitForSuccessTimeoutSeconds: !Ref WaitForSuccessTimeoutSeconds
Code language: YAML (yaml)
When running AWS-JoinDirectoryServiceDomain, the key setting is the DNS server address. In the dnsIpAddresses property, you need to specify the DNS addresses assigned to AWS Managed Microsoft AD. Therefore, specify the two addresses mentioned above in this property.
In addition, specify the ID of AWS Managed Microsoft AD in the directoryId property and the domain name in the directoryName property.
SSM AWS-RunPowerShellScript Document AD Management Tool Installation
Finally, define the SSM document that installs the tools for AD management on the Windows instance.
Resources:
  AWSRunPowerShellScriptAssociation:
    Type: AWS::SSM::Association
    DependsOn:
      - AWSJoinDirectoryServiceDomainAssociation
    Properties:
      AssociationName: !Sub "${Prefix}-aws-runpowershellscript-association"
      Name: AWS-RunPowerShellScript
      Parameters:
        commands:
          - "Install-WindowsFeature RSAT-ADDS"
      Targets:
        - Key: InstanceIds
          Values:
            - !Ref Instance
      WaitForSuccessTimeoutSeconds: !Ref WaitForSuccessTimeoutSeconds
Code language: YAML (yaml)
Since AWS Managed Microsoft AD is a managed service, it cannot be accessed directly by users. Instead, you can indirectly manipulate the settings in AWS Managed Microsoft AD by preparing an instance for management.
To manage your directory from an EC2 Windows instance, you need to install the Active Directory Domain Services and Active Directory Lightweight Directory Services Tools on the instance.
Installing the Active Directory administration tools
The tools required for management can be installed using GUI or PowerShell. This time, we will install it using the latter. The official website mentions how to install with PowerShell.
you can install the Active Directory remote administration tools from a PowerShell prompt using Install-WindowsFeature RSAT-ADDS.
Installing the Active Directory administration tools
This time, we will use the AWS-RunPowerShellScript document to run the above command, specifying it in the commands property.
Architecting
Using CloudFormation, we will build this environment and check its actual behavior.
Create CloudFormation stacks and check resources in stacks
Create CloudFormation stacks.
For more information on creating stacks and how to check each stack, please refer to the following page.

After checking the resources for each stack, the information for the main resource created this time is as follows
- ID of the instance: i-049a023af221c6399
- ID of AWS Managed Microsoft AD: d-956709c0ce
- Domain name of AD: awstut.com
- Domain Admin password: P@ssw0rd
Check the creation status of AWS Managed Microsoft AD from the AWS Management Console.
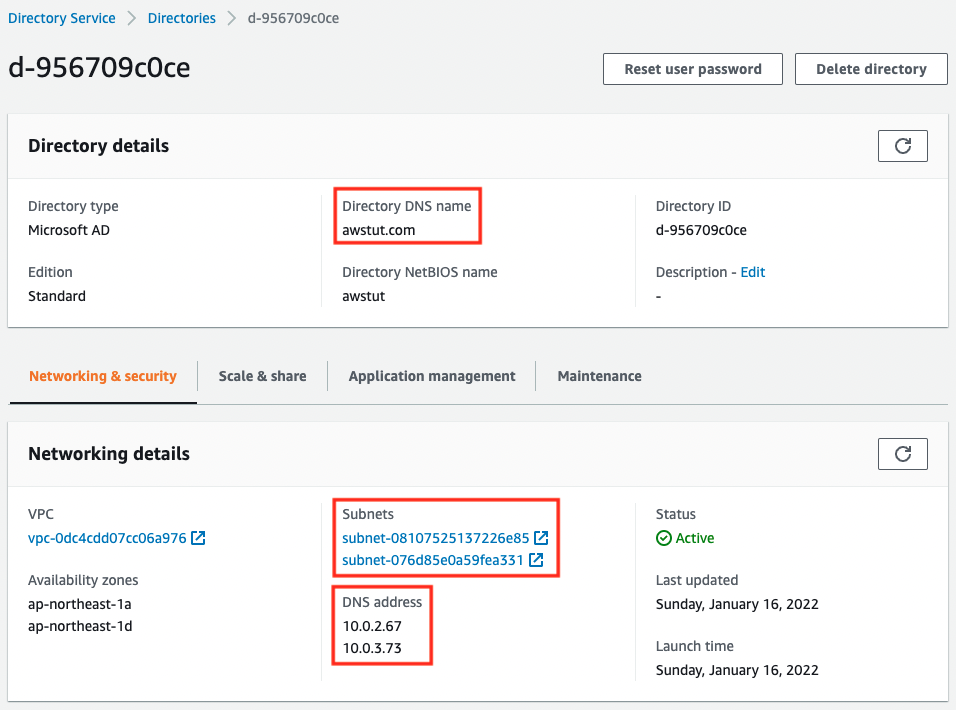
If you look at the value of Directory DNS name, you will see that the AD domain name is set as specified.
As specified in the CloudFormation template, two Subnets have been specified. Correspondingly, two DNS addresses have been assigned.
Check the execution status of SSM documents.
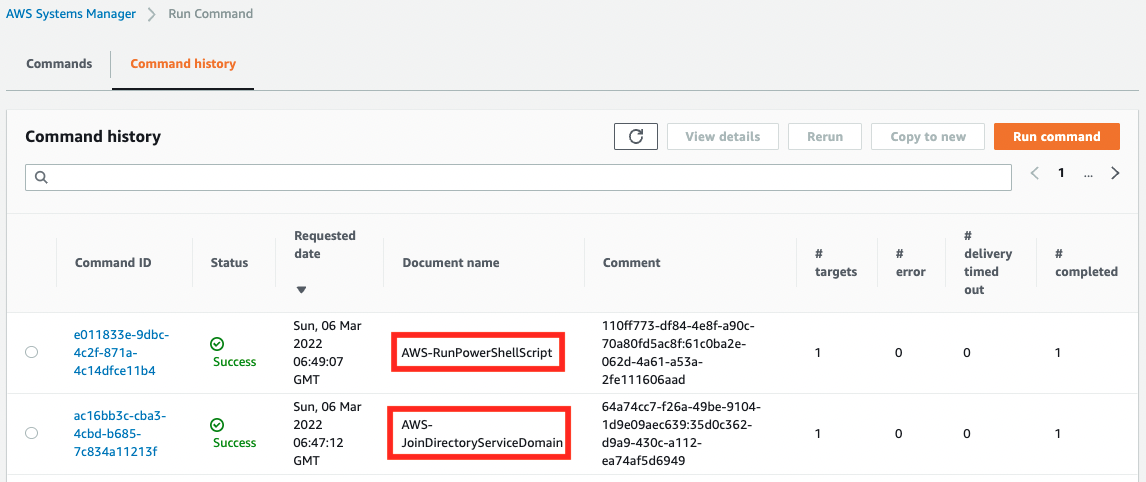
Indeed, two documents were executed. The instance has now completed the installation of the domain join and management tools.
Tunneling access via SSM Session Manager with remote desktop connection
Now that we are ready, we will access the EC2 instance.
This time, we will use tunneled access via SSM Session Manager and access it via a remote desktop connection.
For more information about SSM Session Manager, please refer to the following page.
First, execute the following command on the client side to perform tunneling access to the instance.
% aws ssm start-session \
--target i-049a023af221c6399 \
--document-name AWS-StartPortForwardingSession \
--parameters "portNumber=3389, localPortNumber=13389"
Code language: Bash (bash)
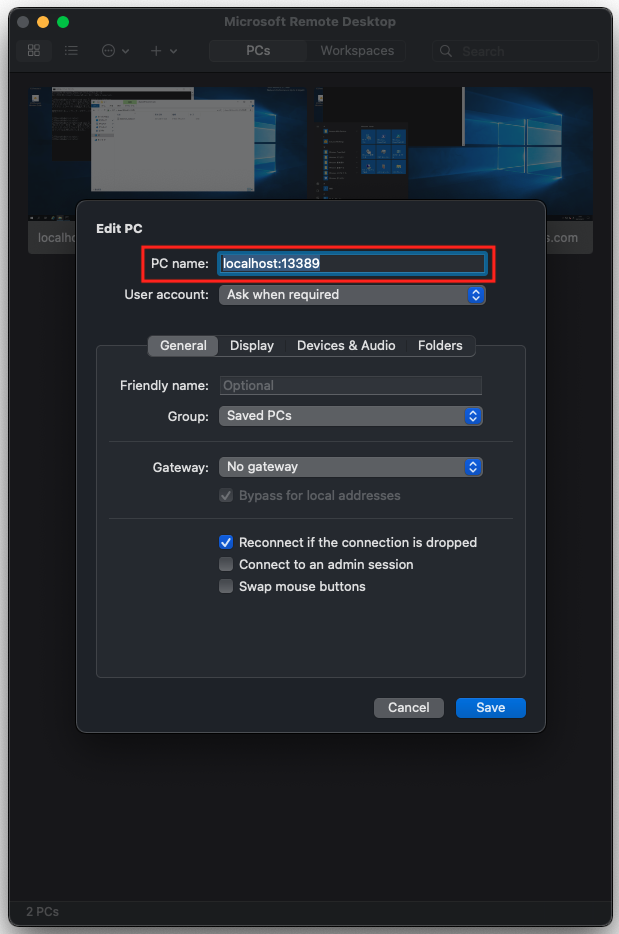
Next, start the Remote Desktop Client on the client side and make a remote desktop connection to localhost:13389.
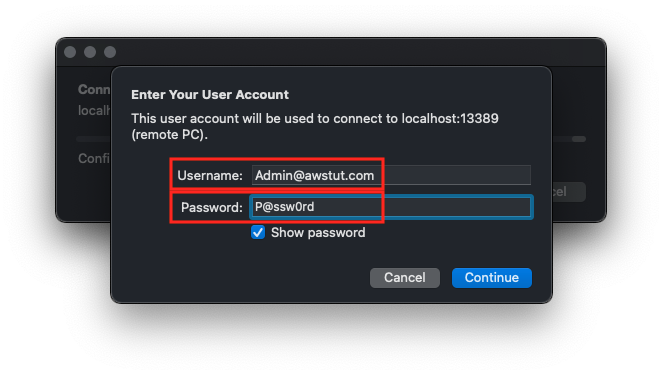
Enter the domain administrator’s (Admin) information in the User Name and Password fields. The user name should include the domain name. In this case, the user name will be “Admin@awstut.com”.
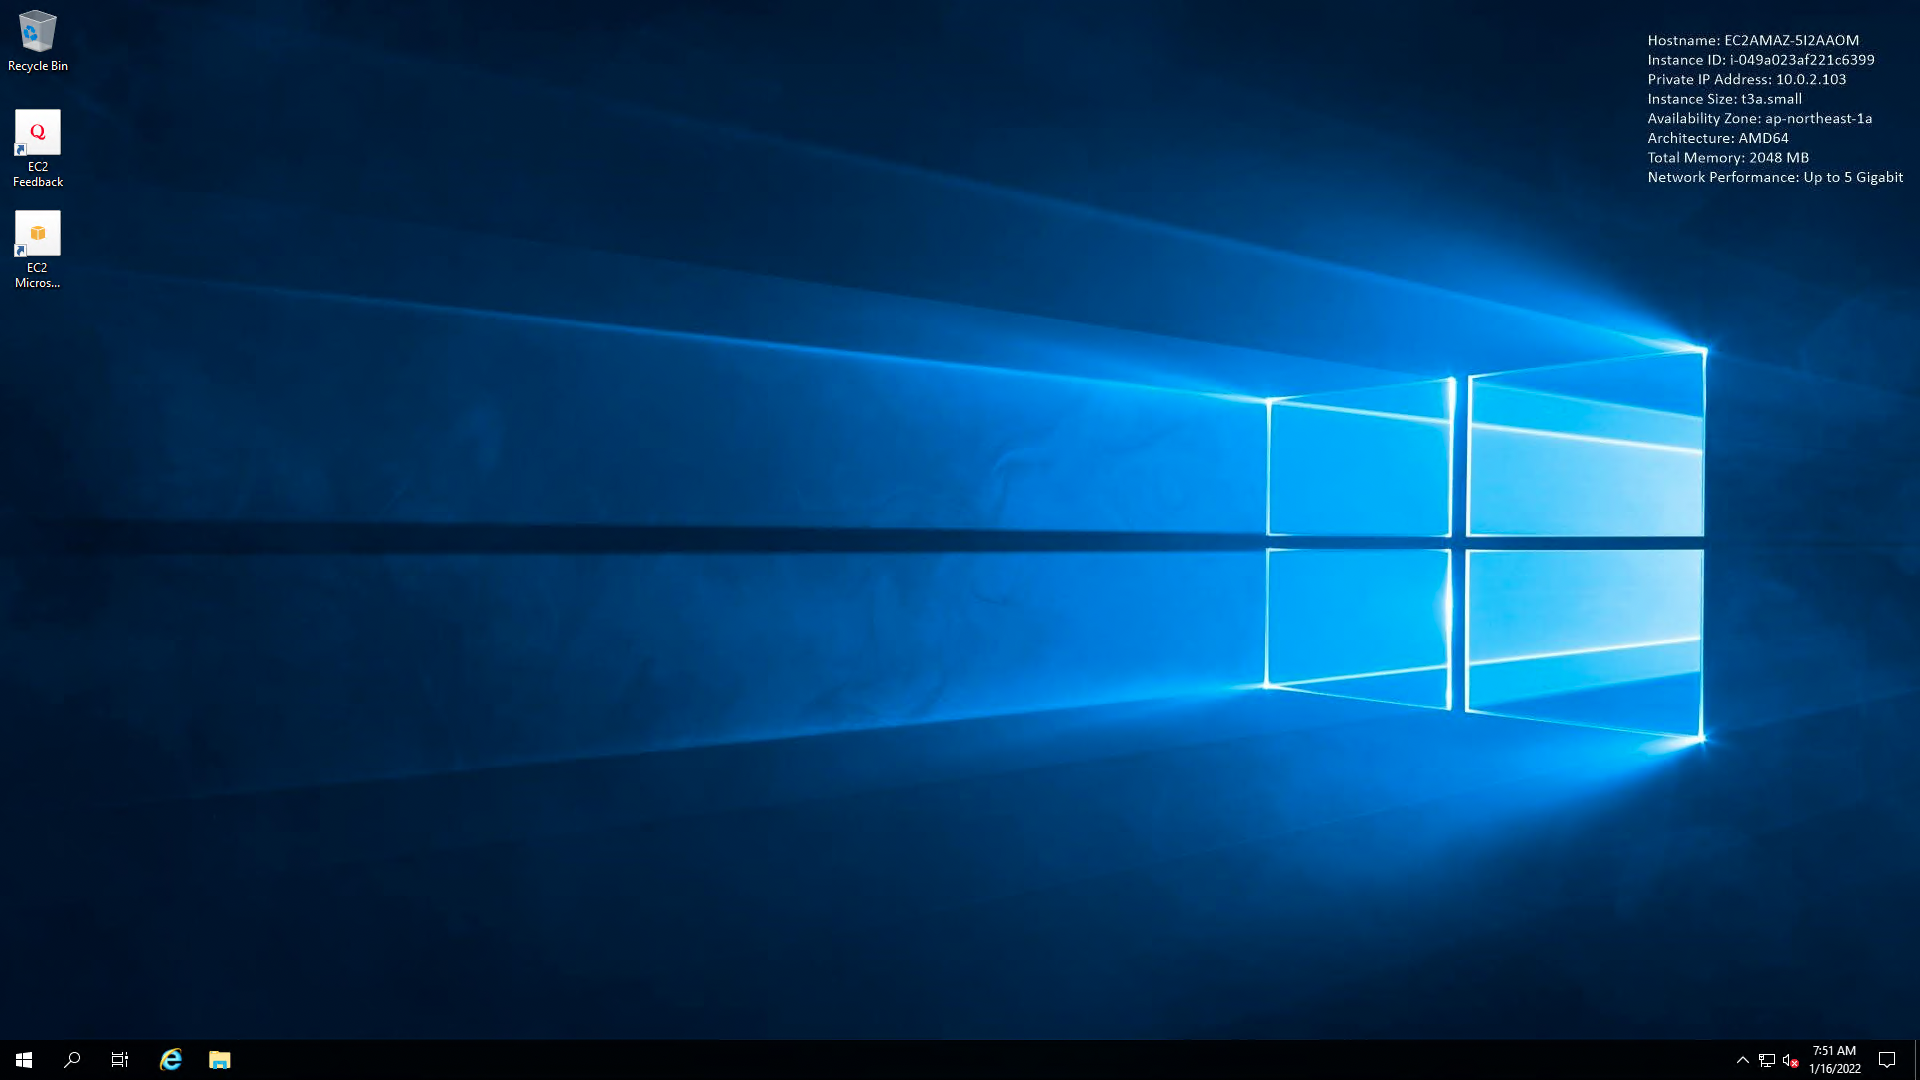
After a short wait, you will be signed in as a domain administrator and the desktop screen of your Windows instance will appear.
Check domain participation status
Let’s check the status of some domain participation.
First, access the following
Settings > Accounts
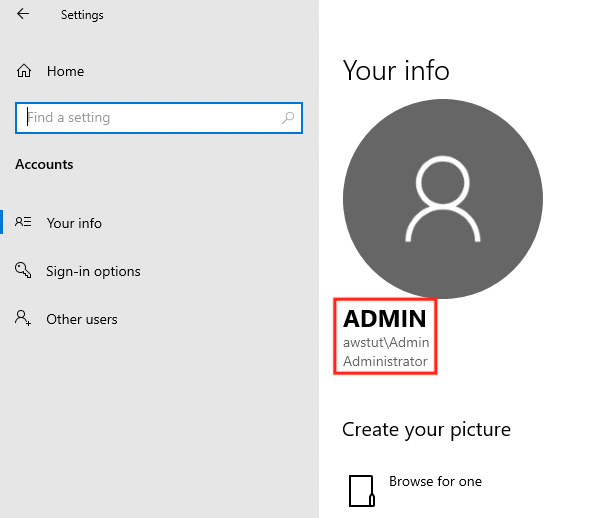
You will see that you are indeed signed in as the domain administrator.
Next, access the following
Control Panel > System and Security > System
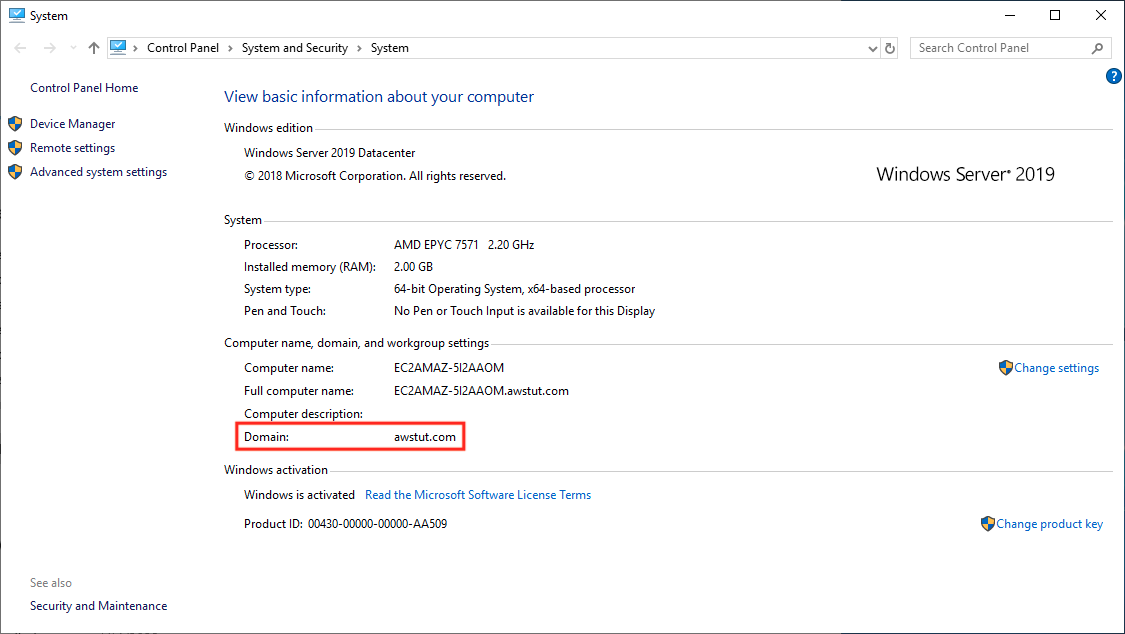
The value of Domain is “awstut.com”. We can see that the domain has been joined successfully.
Next, check the DNS server address of the Windows instance.
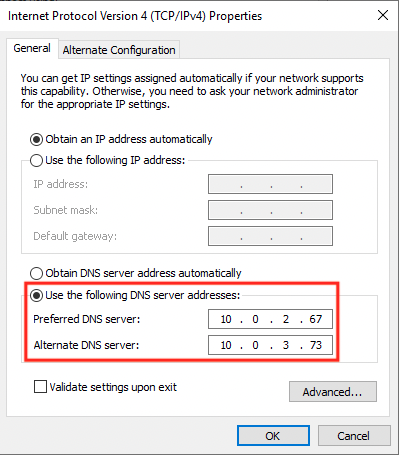
The DNS address of AWS Managed Microsoft AD that we checked earlier is specified.
By executing the AWS-JoinDirectoryServiceDomain document, we can see that the DNS server address has been properly changed and the domain join has been executed.
AD Management Tools
Finally, check the AD management tools you installed in the AWS-RunPowerShellScript document.
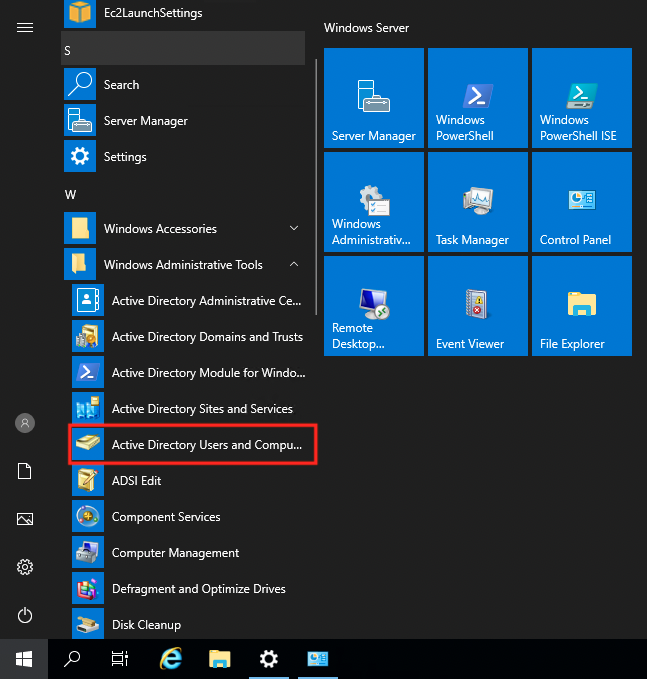
You can see the AD management tool “Active Directory Users and Computers” in the Start menu. You can see that the installation is indeed running.
Launch the tool.
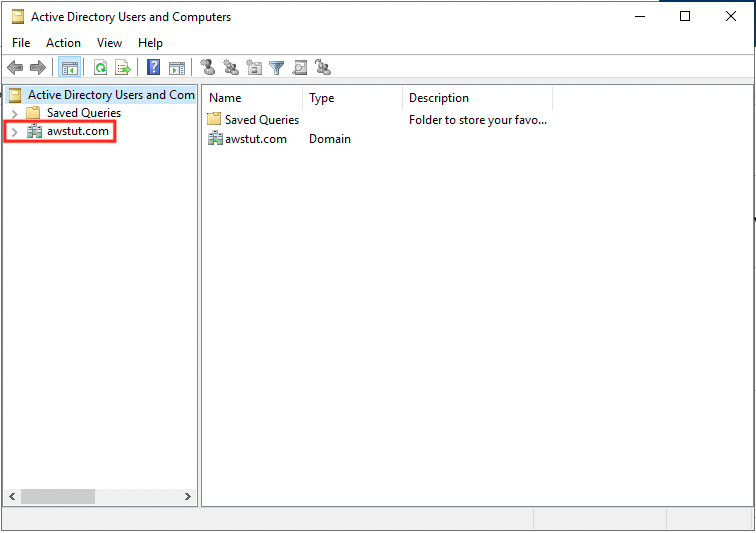
You can see “awstut.com” as the domain to be managed. You can now operate through this instance without directly accessing AWS Managed Microsoft AD.
Finally, we will check the existing objects.
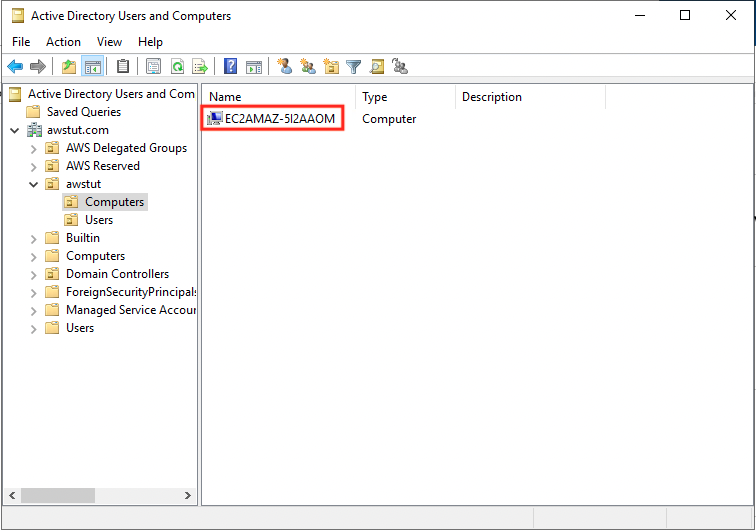
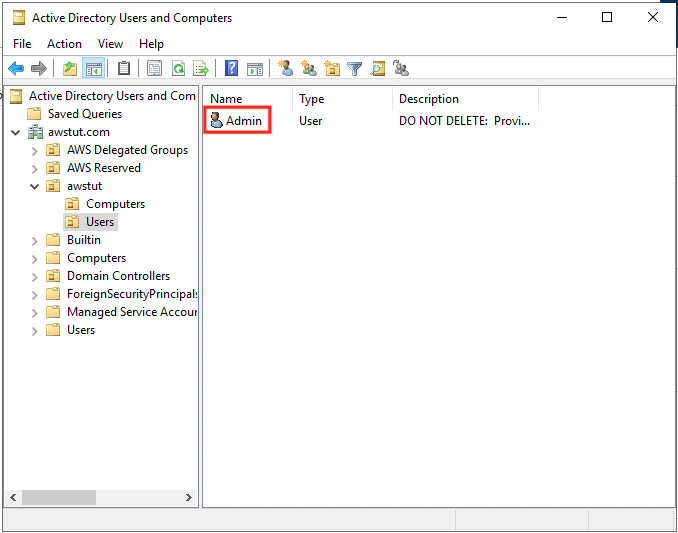
The Computers container has the computer object of this instance, and the Users container has the user object of the domain administrator who is currently signed in.
Summary
We have built an Active Directory environment with AWS Managed Microsoft AD.
Used the SSM document AWS-JoinDirectoryServiceDomain to join a domain to the same environment when building a Windows instance.
Using the SSM document AWS-RunPowerShellScript, we have confirmed that we can operate this environment by installing AD management tools and making it a management server.