Building Serverless Apps using DynamoDB built with SAM
This course is about deployment, which is one of the topics covered by AWS DVA.
Find out how to create a serverless app using AWS SAM (Serverless Application Model).
The following page shows you how to build a serverless app using SAM in combination with Lambda and API Gateway.
In this article, we will build a new serverless application that incorporates DynamoDB as a sequel to this one.
Environment
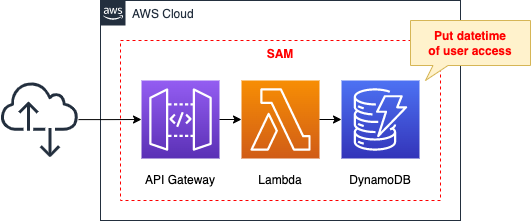
Basically, the configuration is the same as the previous one.
Create API Gateway as an endpoint and Lambda as the backend.
Access DynamoDB from Lambda to read and write data.
When accessed by a user, the date and time data is stored. It then scans all stored date/time data and returns the results.
SAM Template File
The following configuration is created in SAM.
The following URL contains the SAM template and script files for Lambda functions.
https://github.com/awstut-an-r/awstut-dva/tree/main/01/001
Explanation of Key Points
Please refer to the following pages for basic SAM matters.

For the basics of DynamoDB, please refer to the following page.
This page will cover points not mentioned above.
Permissions to access DynamoDB from Lambda
The definitions of Lambda functions and API Gateway are the same as in the aforementioned pages.
However, in order to access DynamoDB from Lambda, we will create an IAM role and grant the necessary permissions.
Resources:
  HelloWorldFunctionRole:
    Type: AWS::IAM::Role
    Properties:
      AssumeRolePolicyDocument:
        Version: 2012-10-17
        Statement:
          - Effect: Allow
            Action: sts:AssumeRole
            Principal:
              Service:
                - lambda.amazonaws.com
      ManagedPolicyArns:
        - arn:aws:iam::aws:policy/service-role/AWSLambdaBasicExecutionRole
      Policies:
        - PolicyName: HelloWorldFunctionPolicies
          PolicyDocument:
            Version: 2012-10-17
            Statement:
              - Effect: Allow
                Action:
                  - dynamodb:List*
                  - dynamodb:DescribeReservedCapacity*
                  - dynamodb:DescribeLimits
                  - dynamodb:DescribeTimeToLive
                Resource: "*"
              - Effect: Allow
                Action:
                  #- dynamodb:BatchGet*
                  #- dynamodb:DescribeStream
                  #- dynamodb:DescribeTable
                  #- dynamodb:Get*
                  #- dynamodb:Query
                  - dynamodb:Scan
                  #- dynamodb:BatchWrite*
                  #- dynamodb:CreateTable
                  #- dynamodb:Delete*
                  #- dynamodb:Update*
                  #- dynamodb:PutItem
                Resource: !GetAtt Table.Arn
Code language: YAML (yaml)
In this case, the IAM role was defined with reference to the official AWS article Amazon DynamoDB: Allows access to a specific table.
Defining DynamoDB with SAM
SAM has a dedicated notation.
This time, we will define a DynamoDB table for storing the current date and time according to the SAM notation.
Resources:
  Table:
    Type: AWS::Serverless::SimpleTable
    Properties:
      PrimaryKey:
        Name: dt
        Type: String
      #ProvisionedThroughput:
      TableName: !Sub ${Prefix}-Table
Code language: YAML (yaml)
In normal CloudFormation, when creating a DynamoDB, “AWS::DynamoDB::Table” is specified in the Type property, but following SAM notation, it becomes “AWS::Serverless::SimpleTable”.
Specify the partition key in the PrimaryKey property. This time, specify the string type attribute “dt” as the partition key.
This time, do not set the ProvisionedThroughput property. Not setting it means that the on-demand mode is selected.
ProvisionedThroughput
Read and write throughput provisioning information.
AWS::Serverless::SimpleTable
If ProvisionedThroughput is not specified BillingMode will be specified as PAY_PER_REQUEST.
Note that the on-demand mode is a model that does not require prior capacity provisioning and allows payment based on traffic volume.
DynamoDB on-demand offers simple pay-per-request pricing for read and write requests so that you only pay for what you use, making it easy to balance costs and performance.
Amazon DynamoDB On-Demand – No Capacity Planning and Pay-Per-Request Pricing
For reference, here is the code to create a similar table using the normal CloudFormation notation.
Resources:
  SampleTable:
    Type: AWS::DynamoDB::Table
    Properties:
      AttributeDefinitions:
        - AttributeName: dt
          AttributeType: S
      BillingMode: PAY_PER_REQUEST
      KeySchema:
        - AttributeName: dt
          KeyType: HASH
      TableName: !Sub ${Prefix}-SampleTable
Code language: YAML (yaml)
Accessing DynamoDB from Python
Check out how to access DynamoDB from a Python script to read and write items.
import json
import boto3
import datetime
import json

TABLE_NAME = 'dva-01-001-Table'
REGION_NAME = 'ap-northeast-1'

def lambda_handler(event, context):
    now = datetime.datetime.now()
    now_str = now.strftime('%Y-%m-%d %H:%M:%S')

    dynamodb_config = {
        'region_name': REGION_NAME
    }
    dynamodb = boto3.resource('dynamodb', **dynamodb_config)
    table = dynamodb.Table(TABLE_NAME)

    table.put_item(Item={
        'dt': now_str
    })

    result = table.scan()

    return {
        "statusCode": 200,
        "body": json.dumps(
            {"AccessDatetime": result},
            indent=2
        )
    }
Code language: Python (python)
We will cover the key points.
Create a datetime object and get the current date and time. After obtaining the date and time, specify the format and obtain the date and time as a string.
Create a client object in boto3.resource to access BynamoDB.
Using the same object, create a table object by specifying the table name.
You can save the items with the table object’s put_item method. This time, the attribute name is set to dt and the current date and time data obtained earlier is saved.
To retrieve all stored items, use the scan method of the same object.
Finally, the data retrieved by the scan method is returned with the HTTP status code.
Building and Deploying SAM Application
Use the sam command to build and deploy the application.
Please refer to the following page.

Information on the main resources generated in this case is as follows
- API Gateway: HelloWorldApi
- Lambda function: HelloWorldFunction
- DynamoDB: dva-01-001-SimpleTable
The AWS Management Console also checks the status of resource creation.
First, check the stack created by CloudFormation.
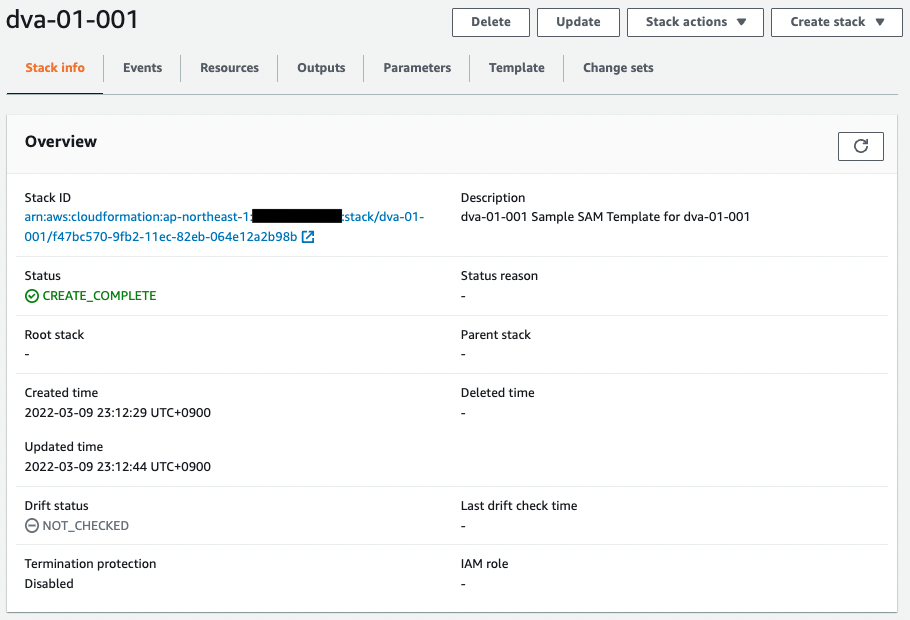
By deploying the SAM application, the CloudFormation stack was automatically created.
This is because SAM is a variant of CloudFormation.
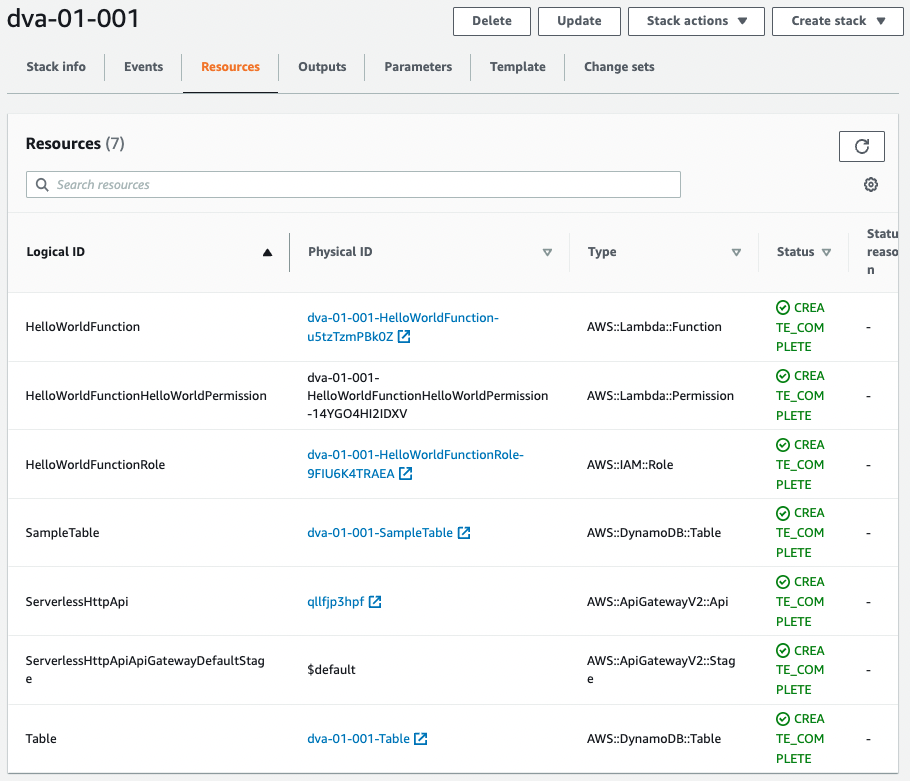
The Resources tab allows you to see the actual resources created.
Check the details of the created resources.
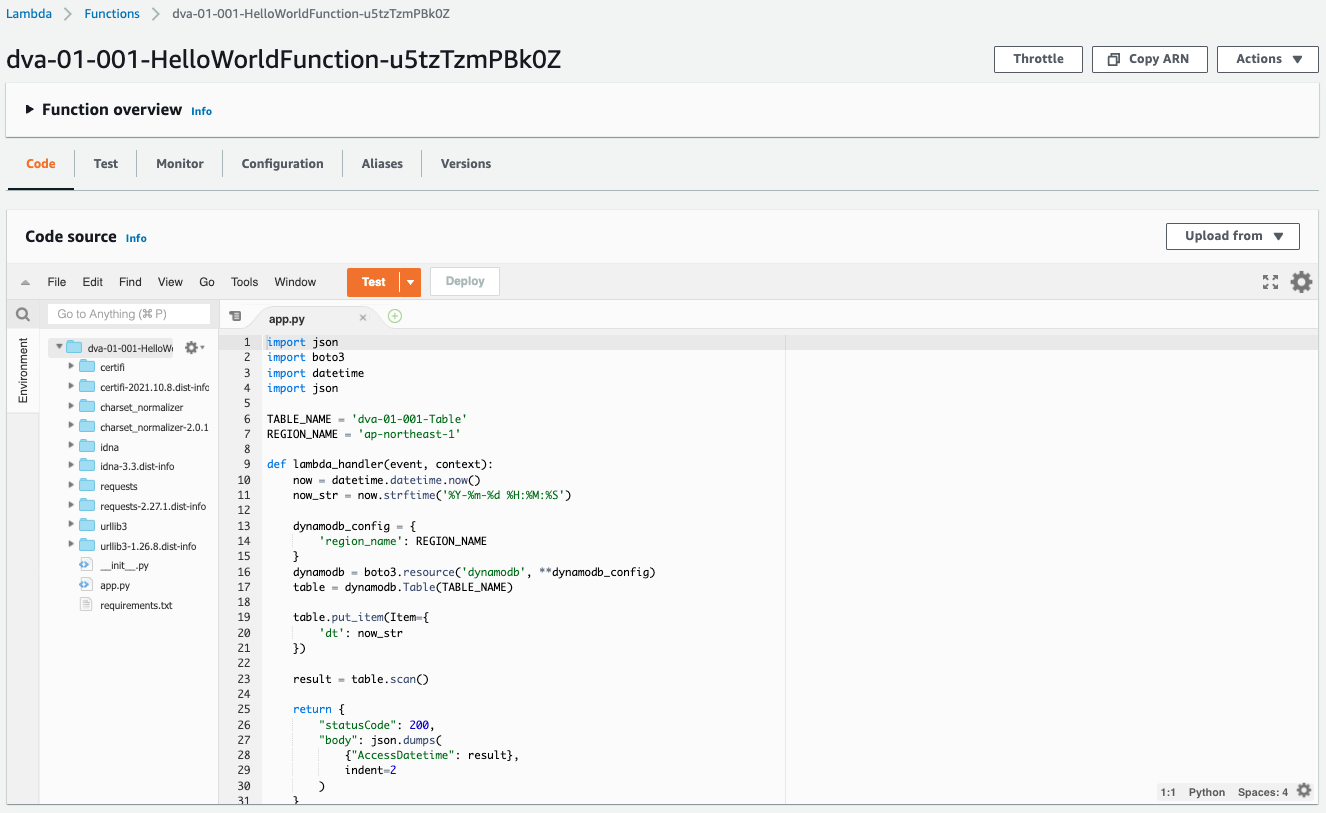

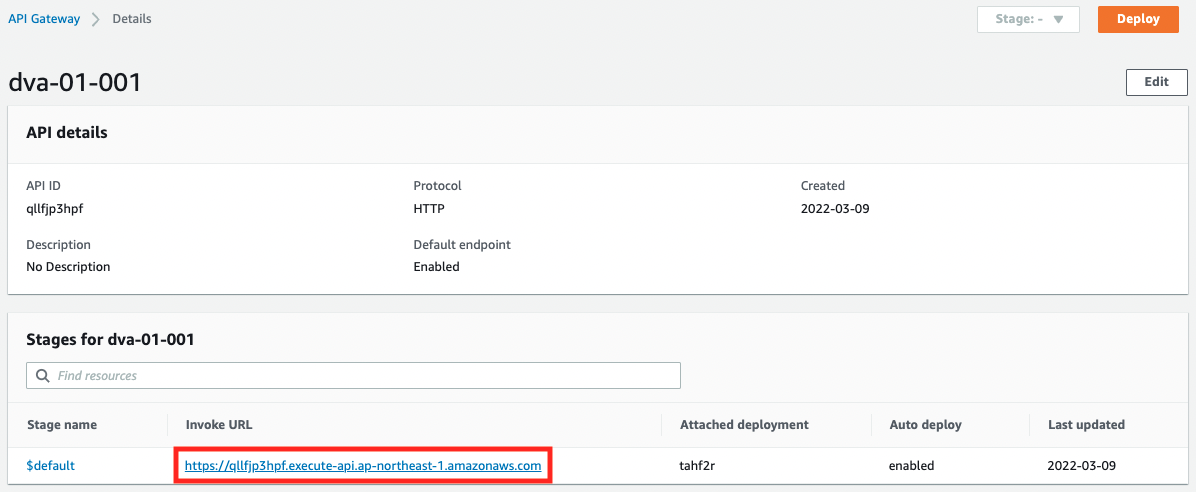
Lambda, DynamoDB, and API Gateway have been created. For API Gateway in particular, the URL of the endpoint can be confirmed.
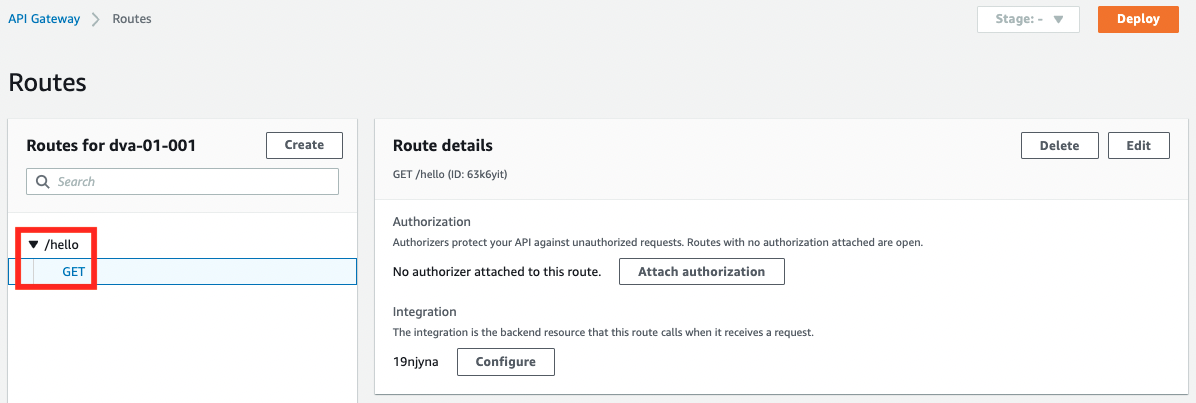
You can also see that the Lambda function is associated with /hello.
Accessing the SAM Application
Now that we are ready, we access the application.
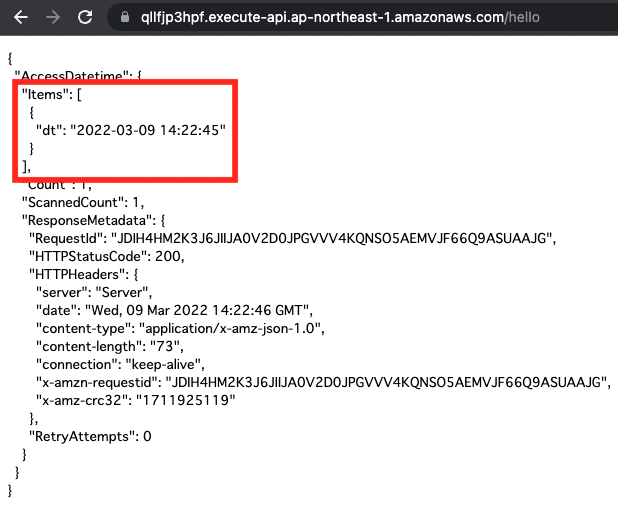
The Lambda function is called via API Gateway, and the DynamoDB is accessed from within the function.
You can see that one current datetime information is written and then a scan is performed.
Let’s try accessing it several times.
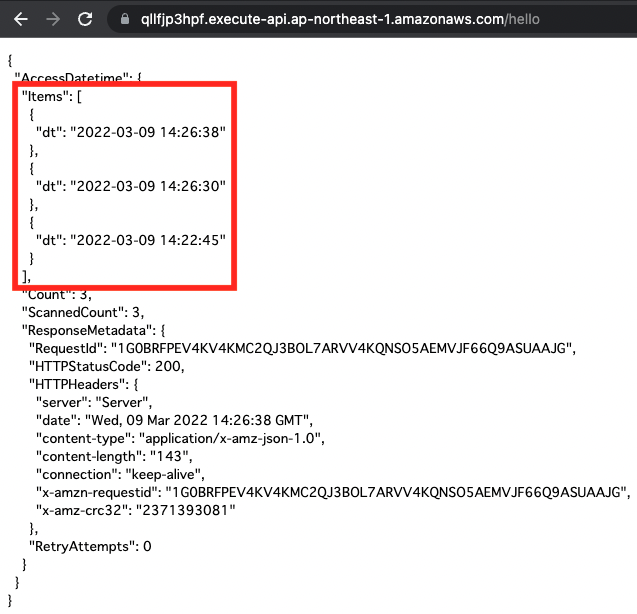
You can see that the number of items increases with each access.
Finally, check DynamoDB from the AWS Management Console.
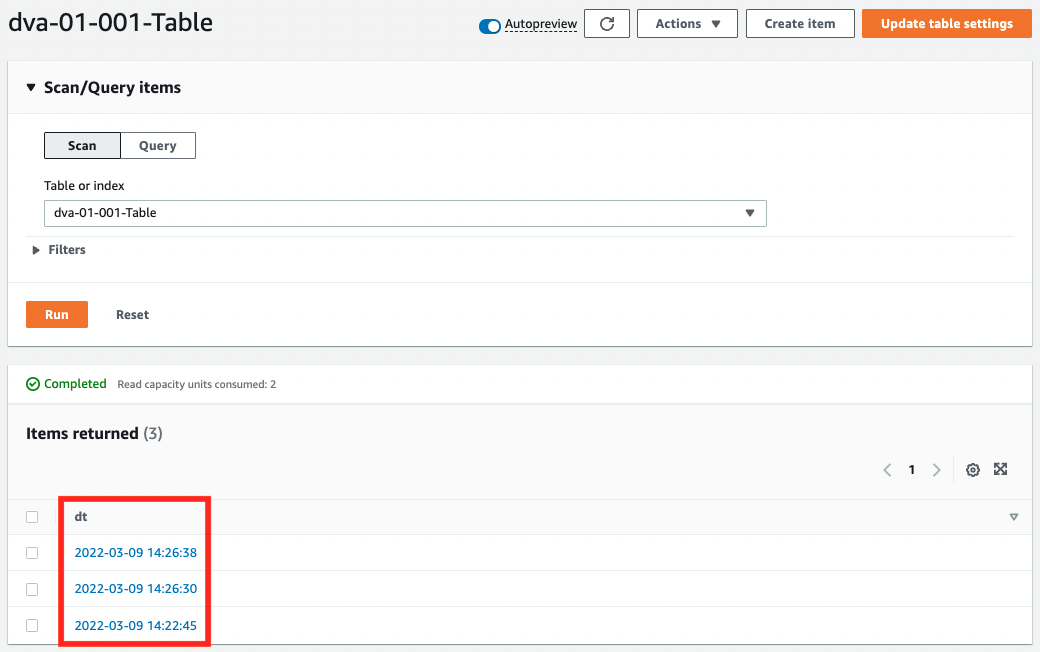
The stored items are displayed from here as well.
As before, we can see 3 items.
Summary
Using SAM, we have seen how to create a web app consisting of Lambda, API Gateway, and DynamoDB.