Restricting access to origin with OAC when delivering S3 content from CloudFront
The following page shows how to use OAI to restrict access to origin when delivering S3 bucket content from CloudFront.
OAC (Origin Access Control) was announced in August 2022.
AWS officially recommends using OAC rather than OAI.
We recommend using OAC because it supports:
All Amazon S3 buckets in all AWS Regions, including opt-in Regions launched after December 2022
Amazon S3 server-side encryption with AWS KMS (SSE-KMS)
Dynamic requests (PUT and DELETE) to Amazon S3
Restricting access to an Amazon S3 origin
In this article, we will see how to access S3 buckets via CloudFront using OAC.
Environment

The overall configuration is the same as in the opening page.
Create an OAC for CloudFront and configure the S3 bucket policy to allow access from this OAC.
CloudFormation template files
Build the above configuration with CloudFormation.
The CloudFormation templates are located at the following URL
https://github.com/awstut-an-r/awstut-fa/tree/main/096
Explanation of key points of the template files
S3 bucket
Resources:
  Bucket:
    Type: AWS::S3::Bucket
    Properties:
      BucketName: !Ref Prefix
      AccessControl: Private
Code language: YAML (yaml)
This is the bucket where the contents are placed.
No special configuration is required on the S3 bucket side when using OAC.
OAC
Resources:
  OAC:
    Type: AWS::CloudFront::OriginAccessControl
    Properties:
      OriginAccessControlConfig:
        Name: !Ref Prefix
        OriginAccessControlOriginType: s3
        SigningBehavior: always
        SigningProtocol: sigv4
Code language: YAML (yaml)
There are three important parameters for creating an OAC.
The first is the OriginAccessControlOriginType property.
This parameter can only be taken by “s3”.
The second is the SigningBehavior property.
This parameter is related to whether CloudFront signs the origin (S3) when accessing it.
AWS officially mentions the following
We recommend most customers use “Sign requests” option as it ensures your applications will always work because CloudFront will always sign the incoming request. Additionally, by having CloudFront to sign your requests, your applications’ performance is improved as less data is transferred between client and CloudFront.
Amazon CloudFront introduces Origin Access Control (OAC)
Follow the above and set it to “always” so that a signature request is always made.
The third is the SigningProtocol property.
This parameter can only take “sigv4”.
CloudFront
Resources:
  Distribution:
    Type: AWS::CloudFront::Distribution
    Properties:
      DistributionConfig:
        DefaultCacheBehavior:
          AllowedMethods:
            - GET
            - HEAD
          CachedMethods:
            - GET
            - HEAD
          Compress: true
          ForwardedValues:
            Cookies:
              Forward: none
            QueryString: false
          TargetOriginId: !Ref BucketName
          ViewerProtocolPolicy: allow-all
        DefaultRootObject: index.html
        Enabled: true
        Origins:
          - DomainName: !Ref BucketRegionalDomainName
            Id: !Ref BucketName
            #CustomOriginConfig:
            OriginAccessControlId: !GetAtt OAC.Id
            S3OriginConfig:
              OriginAccessIdentity: ""
        PriceClass: PriceClass_All
Code language: YAML (yaml)
The key item in the CloudFront configuration for using OAC is the Origins property.
The ID of the OAC defined earlier is set to the OriginAccessControlId property.
The S3OriginConfig property is also important.
Specify an empty string for the internal OriginAccessIdentity property.
If you do not set the above, the following error will occur when creating the CloudFormation stack.
Invalid request provided: Exactly one of CustomOriginConfig and S3OriginConfig must be specified
Note that the CustomOriginConfig property is a parameter for S3 buckets with static website hosting enabled, so do not set it.
Bucket Policy
Resources:
  BucketPolicy:
    Type: AWS::S3::BucketPolicy
    Properties:
      Bucket: !Ref BucketName
      PolicyDocument:
        Statement:
          Action:
            - s3:GetObject
          Effect: Allow
          Principal:
            Service:
              - cloudfront.amazonaws.com
          Resource: !Sub "arn:aws:s3:::${BucketName}/*"
          Condition:
            StringEquals:
              AWS:SourceArn: !Sub "arn:aws:cloudfront::${AWS::AccountId}:distribution/${Distribution}"
Code language: YAML (yaml)
Define the bucket policy with reference to the following official AWS page.
If the aforementioned CloudFront distribution is the principal, the content allows the action to retrieve the object.
(Reference) CloudFormation Custom Resources
Resources:
  CustomResource:
    Type: Custom::CustomResource
    Properties:
      ServiceToken: !GetAtt Function.Arn

  Function:
    Type: AWS::Lambda::Function
    Properties:
      Code:
        ZipFile: |
          import boto3
          import cfnresponse
          import os

          bucket_name = os.environ['BUCKET_NAME']

          object_name = 'index.html'
          object_body = """<html>
            <head></head>
            <body>
              <h1>index.html</h1>
              <p>{bucket_name}</p>
            </body>
          </html>""".format(bucket_name=bucket_name)
          content_type = 'text/html'
          char_code= 'utf-8'

          s3_client = boto3.client('s3')

          CREATE = 'Create'
          DELETE = 'Delete'
          response_data = {}

          def lambda_handler(event, context):
            try:
              if event['RequestType'] == CREATE:
                put_response = s3_client.put_object(
                  Bucket=bucket_name,
                  Key=object_name,
                  Body=object_body.encode(char_code),
                  ContentEncoding=char_code,
                  ContentType=content_type)
                print(put_response)

              elif event['RequestType'] == DELETE:
                list_response = s3_client.list_objects_v2(
                  Bucket=bucket_name)
                for obj in list_response['Contents']:
                  delete_response = s3_client.delete_object(
                    Bucket=bucket_name,
                    Key=obj['Key'])
                  print(delete_response)

              cfnresponse.send(event, context, cfnresponse.SUCCESS, response_data)

            except Exception as e:
              print(e)
              cfnresponse.send(event, context, cfnresponse.FAILED, response_data)
      Environment:
        Variables:
          BUCKET_NAME: !Ref BucketName
      FunctionName: !Sub "${Prefix}-function"
      Handler: !Ref Handler
      Runtime: !Ref Runtime
      Role: !GetAtt FunctionRole.Arn
Code language: YAML (yaml)
Use a CloudFormation custom resource to automatically create an object in an S3 bucket.
In this case, we will create index.html in the aforementioned S3 bucket.
For more information, please refer to the following page
Architecting
Using CloudFormation, build this environment and check the actual behavior.
Create CloudFormation stacks and check resources in stacks
Create a CloudFormation stack.
For information on how to create stacks and check each stack, please refer to the following page

After checking the resources in each stack, information on the main resources created this time is as follows
- CloudFront distribution: E3YPSL0CON945
- CloudFront domain name: d1ujnv40lgk4sa.cloudfront.net
- OAC: fa-096
- S3 bucket: fa-096
Confirm the created resource from AWS Management Console.
Check the OAC.
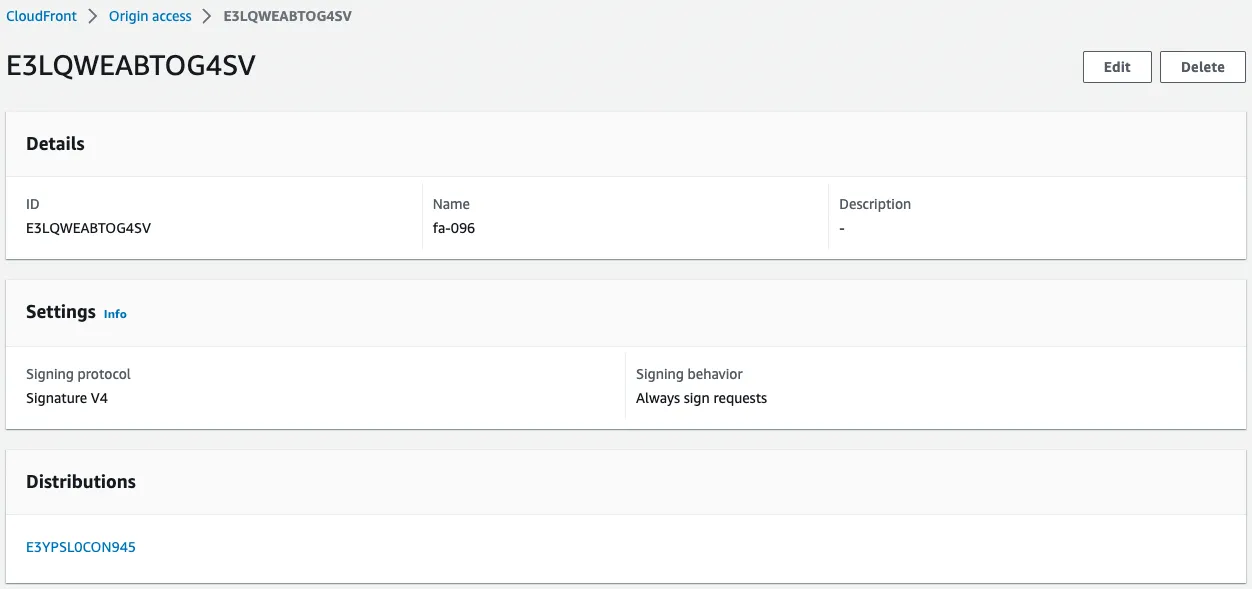
OAC is created.
You can see that it is configured to always enforce signing with SigV4.
You can also see that it is associated with the CloudFront distribution.
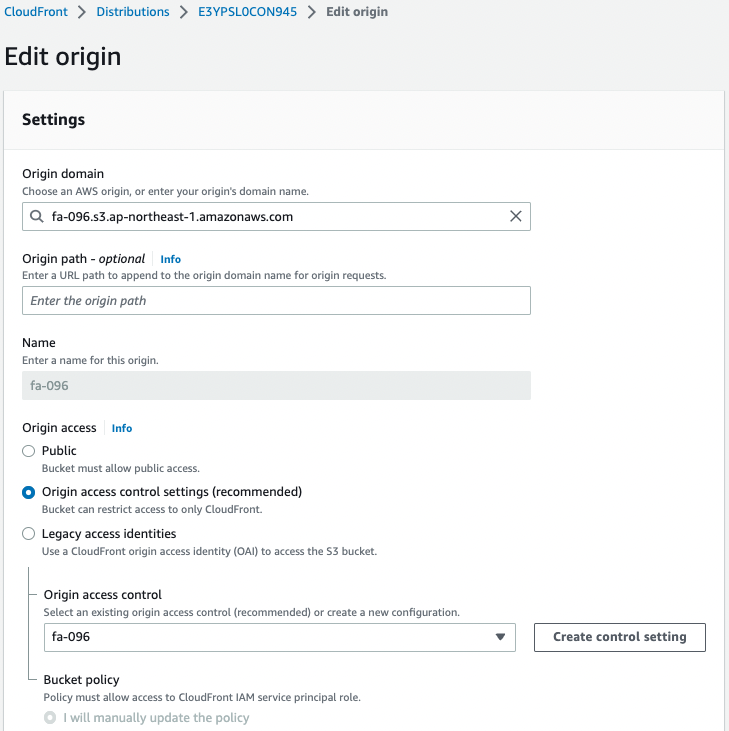
If you check the configuration page on the CloudFront distribution side, you will see that the OAC setting is enabled.
We can also see that an S3 bucket is specified as the origin.
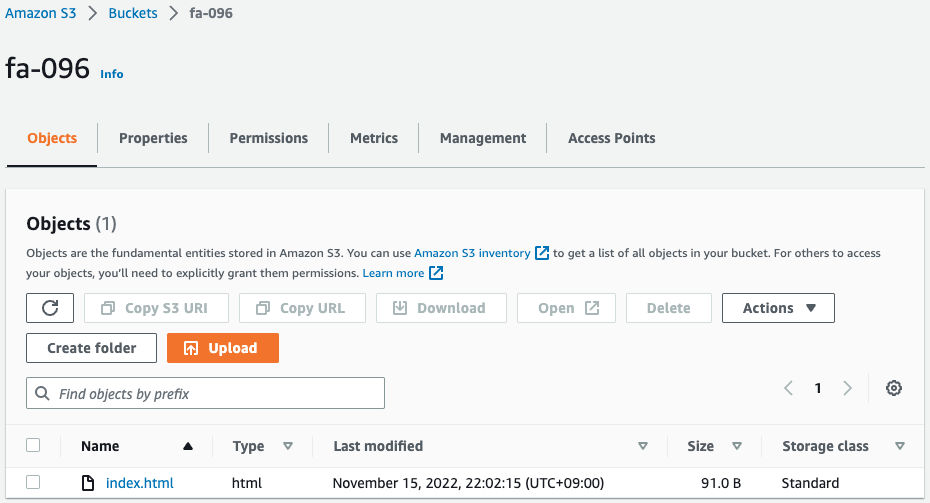
The index.html file is placed in the bucket.
The HTML file was automatically generated and placed by the Lambda function associated with the CloudFormation custom resource.
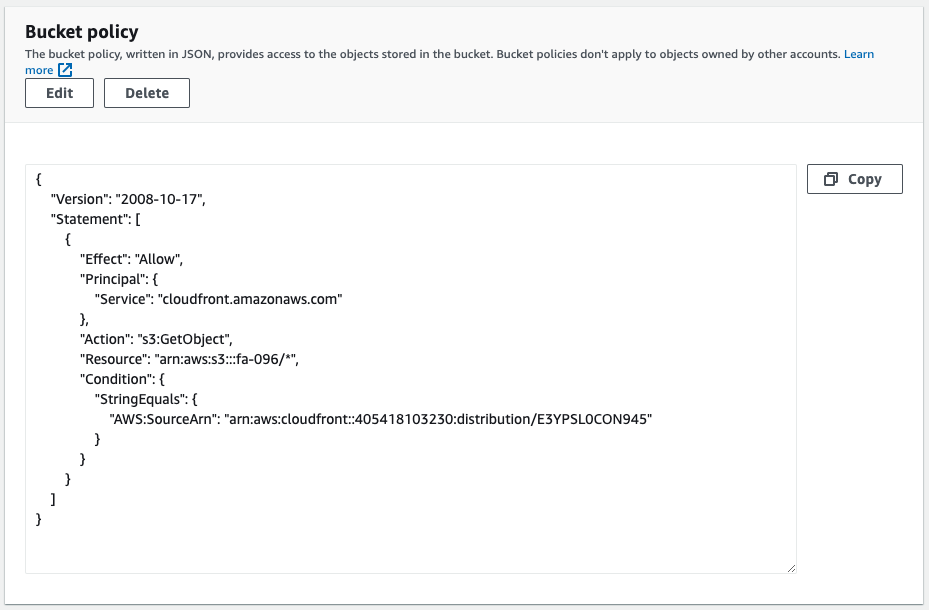
Checking the bucket policy, we can see that it allows access to the S3 bucket with CloudFront as the principal.
Check Operation
Now that everything is ready, access the CloudFront distribution.
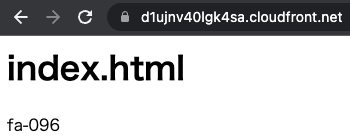
We were able to access the HTML file (index.html) in the S3 bucket.
This means that access to objects in the bucket, originally restricted by the bucket policy, is now allowed via CloudFront by using OAC.
Next, access the S3 bucket directly.

Denied.
This means that the bucket policy is in action and direct access is restricted.
SUMMARY
We have shown how to access S3 buckets via CloudFront using OAC.