Using CodePipeline to build CI/CD environment for CloudFormation
The following official AWS page covers how to build a CI/CD environment for CloudFormation using CodePipeline.
In this page, we will build and check the operation with reference to the above page.
Environment
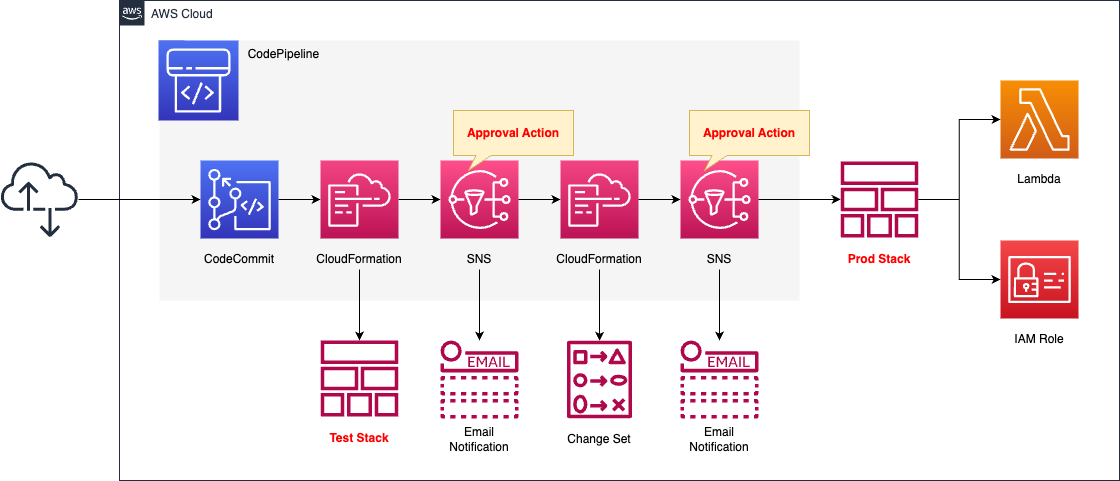
Configure a pipeline in CodePipeline.
The pipeline works in the following flow
First is CodeCommit.
CodeCommit is responsible for the source stage of CodePipeline.
It is used as a Git repository.
Next is CloudFormation.
The task of this CloudFormation is to build a stack for testing.
After the stack is created, an email notification is sent via SNS as an approval action.
Upon receiving the email notification, the user accesses the pipeline page and presses the “Approve” button to restart the pipeline.
Finally, we have CloudFormation again.
The task of this CloudFormation is to create the stack and change sets for the production environment.
After the change set is created, an email notification is sent via SNS again as an approval action.
Once the approval button is pressed, the pipeline is restarted and the production stack is created and updated from the change set.
The trigger for the CodePipeline to be started is a push to CodeCommit.
Specifically, we will prepare a rule in EventBridge that satisfies the above.
The resources to be created in the test and production stacks will be Lambda functions.
IAM roles for the functions will also be created.
CloudFormation template files
The above configuration is built with CloudFormation.
The CloudFormation templates are placed at the following URL
https://github.com/awstut-an-r/awstut-fa/tree/main/117
Explanation of key points of template files
The purpose of this page is to build a CI/CD environment for CloudFormation using CodePipeline.
For basic information on CodePipeline, please refer to the following pages.
CodePipeline
Resources:
  Pipeline:
    Type: AWS::CodePipeline::Pipeline
    Properties:
      ArtifactStore:
        Location: !Ref BucketName
        Type: S3
      Name: !Ref Prefix
      RoleArn: !GetAtt CodePipelineRole.Arn
      Stages:
        - Actions:
            - ActionTypeId:
                Category: Source
                Owner: AWS
                Provider: CodeCommit
                Version: 1
              Configuration:
                BranchName: !Ref BranchName
                OutputArtifactFormat: CODE_ZIP
                PollForSourceChanges: false
                RepositoryName: !GetAtt CodeCommitRepository.Name
              Name: SourceAction
              OutputArtifacts:
                - Name: !Ref PipelineSourceArtifact
              Region: !Ref AWS::Region
              RunOrder: 1
          Name: CodeCommitSource
        - Actions:
            - ActionTypeId:
                Category: Deploy
                Owner: AWS
                Provider: CloudFormation
                Version: 1
              Configuration:
                ActionMode: REPLACE_ON_FAILURE
                Capabilities: CAPABILITY_IAM
                RoleArn: !GetAtt CloudFormationRole.Arn
                StackName: !Ref TestStackName
                TemplateConfiguration: !Sub "${PipelineSourceArtifact}::${TestStackConfig}"
                TemplatePath: !Sub "${PipelineSourceArtifact}::${TemplateFileName}"
              InputArtifacts:
                - Name: !Ref PipelineSourceArtifact
              Name: CreateTestStack
              RunOrder: 1
            - ActionTypeId:
                Category: Approval
                Owner: AWS
                Provider: Manual
                Version: 1
              Configuration:
                CustomData: !Sub "Do you want to create a change set against the production stack and delete the ${TestStackName} stack?"
                NotificationArn: !Ref TopicArn
              Name: ApproveTestStack
              RunOrder: 2
            - ActionTypeId:
                Category: Deploy
                Owner: AWS
                Provider: CloudFormation
                Version: 1
              Configuration:
                ActionMode: DELETE_ONLY
                RoleArn: !GetAtt CloudFormationRole.Arn
                StackName: !Ref TestStackName
              Name: DeleteTestStack
              RunOrder: 3
          Name: DeployTestStack
        - Actions:
            - ActionTypeId:
                Category: Deploy
                Owner: AWS
                Provider: CloudFormation
                Version: 1
              Configuration:
                ActionMode: CHANGE_SET_REPLACE
                Capabilities: CAPABILITY_IAM
                ChangeSetName: !Ref ChangeSetName
                RoleArn: !GetAtt CloudFormationRole.Arn
                StackName: !Ref ProdStackName
                TemplateConfiguration: !Sub "${PipelineSourceArtifact}::${ProdStackConfig}"
                TemplatePath: !Sub "${PipelineSourceArtifact}::${TemplateFileName}"
              InputArtifacts:
                - Name: !Ref PipelineSourceArtifact
              Name: CreateProdStack
              RunOrder: 1
            - ActionTypeId:
                Category: Approval
                Owner: AWS
                Provider: Manual
                Version: 1
              Configuration:
                CustomData: !Sub "A new change set was created for the ${ProdStackName} stack. Do you want to implement the changes?"
                NotificationArn: !Ref TopicArn
              Name: ApproveChangeSet
              RunOrder: 2
            - ActionTypeId:
                Category: Deploy
                Owner: AWS
                Provider: CloudFormation
                Version: 1
              Configuration:
                ActionMode: CHANGE_SET_EXECUTE
                ChangeSetName: !Ref ChangeSetName
                RoleArn: !GetAtt CloudFormationRole.Arn
                StackName: !Ref ProdStackName
              Name: ExecuteChangeSet
              RunOrder: 3
          Name: DeployProdStack
Code language: YAML (yaml)
The basic structure is based on the following pages.
https://s3.amazonaws.com/cloudformation-examples/user-guide/continuous-deployment/basic-pipeline.yml
Identify each stage that makes up the pipeline.
Stage 1
The first is the source stage.
In the code shown on the above page, an S3 bucket is set up in the source.
In this page, CodeCommit is specified for the source.
Stage 2
The second stage is to build the test stack, which consists of three actions.
The first action is to build a test stack in CloudFormation.
The following is a description of how to set it up on the official AWS website.
When you specify CloudFormation as a provider for a stage action, define the following properties in the Configuration property. Use the JSON object for the AWS CLI, CodePipeline API, or AWS CloudFormation templates.
Configuration properties (JSON object)
We will cover the key parameters.
When updating or creating a new stack, specify “REPLACE_ON_FAILURE” for the ActionMode property.
This option is described as follows
REPLACE_ON_FAILURE creates a stack, if the specified stack doesn’t exist. If the stack exists and is in a failed state (reported as ROLLBACK_COMPLETE, ROLLBACK_FAILED, CREATE_FAILED, DELETE_FAILED, or UPDATE_ROLLBACK_FAILED), AWS CloudFormation deletes the stack and then creates a new stack. If the stack isn’t in a failed state, AWS CloudFormation updates it. Use this action to automatically replace failed stacks without recovering or troubleshooting them. You would typically choose this mode for testing.
Configuration properties (JSON object)
The TemplatePath property specifies the template file that will be the source of the stack.
The notation is as follows
Artifactname::TemplateFileName
Configuration properties (JSON object)
Specify a template file for the test stack according to the above.
The TemplateConfiguration property allows you to specify a template configuration file for test stack creation.
The notation is as follows
Artifactname::TemplateConfigurationFileName
Configuration properties (JSON object)
Specify the configuration file for the test stack according to the above.
The second action is an approval action.
An approval email is sent to the email address specified in the SNS topic.
The recipient of the email will review the contents of the test stack and approve it if all is well.
The third action is to delete the test stack.
Specify “DELETE_ONLY” in the ActionMode property.
The options here are described as follows.
DELETE_ONLY deletes a stack. If you specify a stack that doesn’t exist, the action is completed successfully without deleting a stack.
Configuration properties (JSON object)
Stage 3
The third stage is to build the production stack, which consists of three actions.
The first action is to build a change set for the production stack in CloudFormation.
The key is the ActionMode property, which specifies “CHANGE_SET_REPLACE”.
The options here are described as follows
CHANGE_SET_REPLACE creates the change set, if it doesn’t exist, based on the stack name and template that you submit. If the change set exists, AWS CloudFormation deletes it, and then creates a new one.
Configuration properties (JSON object)
For more information on change sets, please see the following pages
Specify the template file for the production stack and the template configuration file for creating the production stack in the TemplatePath and TemplateConfiguration properties, respectively.
The second action is an approval action.
An approval email is sent to the email address specified in the SNS topic.
The recipient of the email will review the contents of the change set for the production stack and approve it if all is well.
The third action is to create a production stack using CloudFormation.
It creates the production stack from the change set created earlier.
Specify “CHANGE_SET_EXECUTE” for the ActionMode property.
The options here are described as follows.
CHANGE_SET_EXECUTE executes a change set.
Configuration properties (JSON object)
IAM Role
Create the following two IAM roles
- IAM Roles for CodePipeline execution
- IAM role for CloudFormation execution
Check the IAM role for CodePipeline execution.
Resources:
  CodePipelineRole:
    Type: AWS::IAM::Role
    Properties:
      AssumeRolePolicyDocument:
        Version: 2012-10-17
        Statement:
          - Effect: Allow
            Principal:
              Service:
                - codepipeline.amazonaws.com
            Action:
              - sts:AssumeRole
      Policies:
        - PolicyName: PipelinePolicy
          PolicyDocument:
            Version: 2012-10-17
            Statement:
              - Effect: Allow
                Action:
                  - codecommit:CancelUploadArchive
                  - codecommit:GetBranch
                  - codecommit:GetCommit
                  - codecommit:GetRepository
                  - codecommit:GetUploadArchiveStatus
                  - codecommit:UploadArchive
                Resource:
                  - !GetAtt CodeCommitRepository.Arn
              - Effect: Allow
                Action:
                  - s3:PutObject
                  - s3:GetObject
                  - s3:GetObjectVersion
                  - s3:GetBucketAcl
                  - s3:GetBucketLocation
                Resource:
                  - !Sub "arn:aws:s3:::${BucketName}"
                  - !Sub "arn:aws:s3:::${BucketName}/*"
              - Effect: Allow
                Action:
                  - sns:Publish
                Resource:
                  - !Ref TopicArn
              - Effect: Allow
                Action:
                  - cloudformation:CreateStack
                  - cloudformation:DescribeStacks
                  - cloudformation:DeleteStack
                  - cloudformation:UpdateStack
                  - cloudformation:CreateChangeSet
                  - cloudformation:ExecuteChangeSet
                  - cloudformation:DeleteChangeSet
                  - cloudformation:DescribeChangeSet
                  - cloudformation:SetStackPolicy
                  - iam:PassRole
                Resource: "*"
Code language: YAML (yaml)
Grant permissions on the resources that make up the pipeline (CodeCommit, S3, SNS, CloudFormation).
Next, check the IAM role for CloudFormation execution.
Resources:
  CloudFormationRole:
    Type: AWS::IAM::Role
    DeletionPolicy: Delete
    Properties:
      AssumeRolePolicyDocument:
        Version: 2012-10-17
        Statement:
          - Effect: Allow
            Principal:
              Service:
                - cloudformation.amazonaws.com
            Action:
              - sts:AssumeRole
      ManagedPolicyArns:
        - arn:aws:iam::aws:policy/service-role/AWSLambdaBasicExecutionRole
      Policies:
        - PolicyName: CloudFormationDeployPolicy
          PolicyDocument:
            Version: 2012-10-17
            Statement:
              - Effect: Allow
                Action:
                  - iam:*
                  - lambda:*
                Resource: "*"
Code language: YAML (yaml)
Grant permissions on resources (Lambda functions, IAM roles for functions, CloudWatch Logs) to be created through CloudFormation.
CloudFormation-related files
Check the files to run CloudFormation in CodePipeline.
Template File
AWSTemplateFormatVersion: 2010-09-09

Parameters:
  Prefix:
    Type: String
    Default: fa-117-sample-lambda

  Environment:
    Type: String
    Default: test

  Handler:
    Type: String
    Default: index.lambda_handler

  MemorySize:
    Type: Number
    Default: 128

  Runtime:
    Type: String
    Default: python3.8

  Timeout:
    Type: Number
    Default: 5


Resources:
  Function:
    Type: AWS::Lambda::Function
    Properties:
      Code:
        ZipFile: |
          def lambda_handler(event, context):
            print('sample lambda')
      FunctionName: !Sub "${Prefix}-${Environment}-Function"
      Handler: !Ref Handler
      MemorySize: !Ref MemorySize
      Runtime: !Ref Runtime
      Role: !GetAtt LambdaRole.Arn

  LambdaRole:
    Type: AWS::IAM::Role
    DeletionPolicy: Delete
    Properties:
      AssumeRolePolicyDocument:
        Version: 2012-10-17
        Statement:
          - Effect: Allow
            Action: sts:AssumeRole
            Principal:
              Service:
                - lambda.amazonaws.com
      ManagedPolicyArns:
        - arn:aws:iam::aws:policy/service-role/AWSLambdaBasicExecutionRole
Code language: YAML (yaml)
Define Lambda functions and IAM roles.
The key points are the function name (FunctionName) and memory size (MemorySize).
These values are set differently for the test and production stacks according to the template configuration file described below.
Template configuration file for test stack
{
  "Parameters" : {
    "Environment": "test",
    "MemorySize": "128"
  }
}
Code language: JSON / JSON with Comments (json)
Two parameters are set.
The memory size is particularly important.
Specify 128 (MB).
Template file for production stack
{
  "Parameters" : {
    "Environment": "prod",
    "MemorySize": "512"
  }
}
Code language: JSON / JSON with Comments (json)
Two parameters are also set here.
Specify 512 (MB) for memory size.
Architecting
Use CloudFormation to build this environment and check its actual behavior.
Create CloudFormation stacks
Create CloudFormation stacks.
For information on how to create stacks and check each stack, please refer to the following pages.

After reviewing the resources in each stack, information on the main resources created in this case is as follows
- SNS Topic: fa-117
- CodeCommit: fa-117
- CodePipeline: fa-117
Email Address Authentication
If you have designated an email address as a subscriber to an SNS topic, you must authenticate that email address.
The following authentication email will be sent to the specified email address.
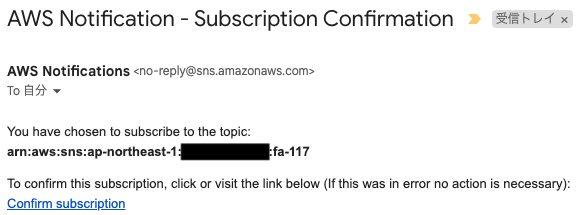
Press “Confirm subscription” to proceed with the authentication.
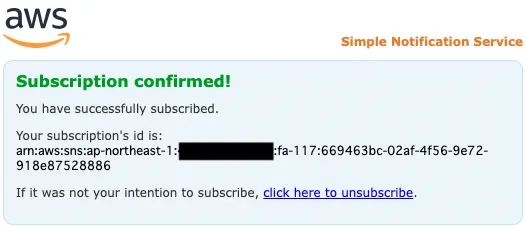
The above page will appear, indicating that authentication has been completed.
Resource Check
Check each resource from the AWS Management Console.
First, check the SNS topic.
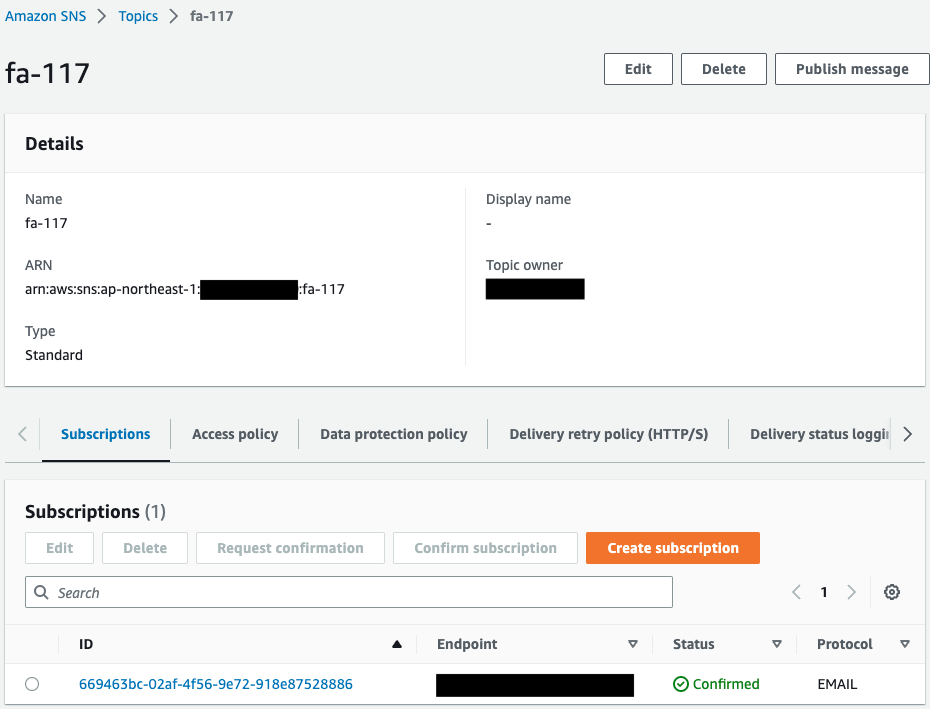
An email address is specified as a subscriber to the SNS topic.
Check CodePipeline.
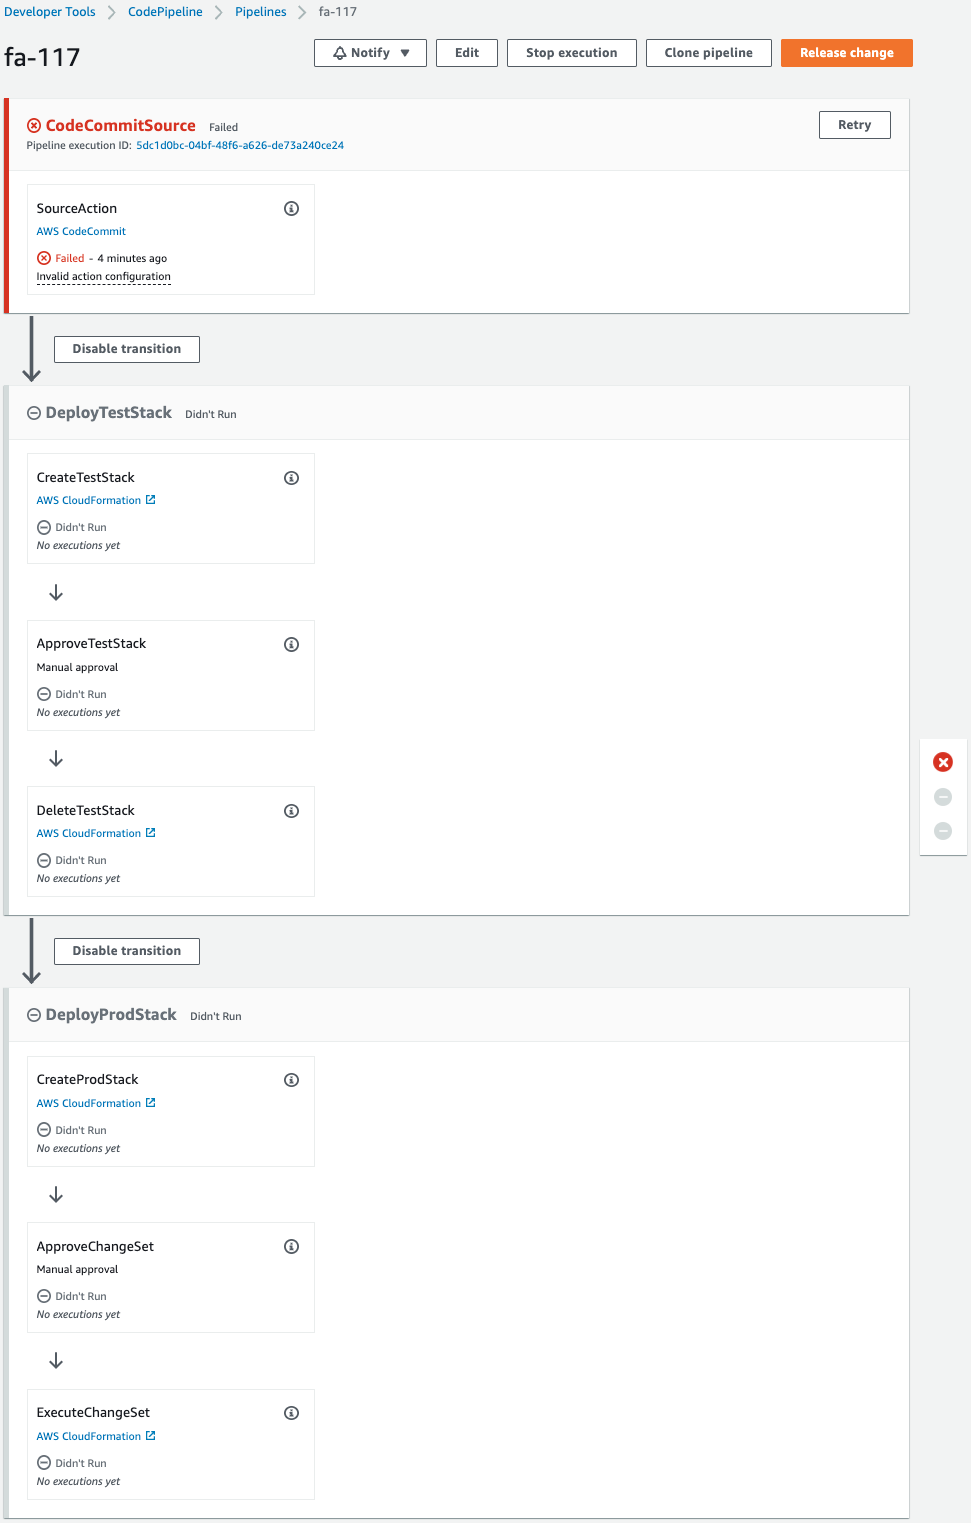
The pipeline is failing to execute.
This is because the pipeline was triggered by the creation of CodeCommit when the CloudFormation stack was created.
Since we are not pushing code to CodeCommit at this time, an error occurred during the pipeline execution process.
Note the stages that are created.
There are stages named DeployTestStack and DeployTestStack that create the CloudFormation stack.
We will look at the contents of each stage.
The former deletes the test stack after it is created and approved.
The latter creates and updates the production stack after creating a change set and upon approval.
Operation Check
Now that you are ready, push the code to CodeCommit.
First pull the CodeCommit repository.
$ git clone https://git-codecommit.ap-northeast-1.amazonaws.com/v1/repos/fa-117
Cloning into 'fa-117'...
warning: You appear to have cloned an empty repository.
Code language: Bash (bash)
An empty repository has been pulled.
Add three files (sample-lambda.yaml, test-stack-configuration.json, and prod-stack-configuration.json) to the repository.
$ ls -al
total 12
drwxrwxr-x 3 ec2-user ec2-user  118 Jan 18 12:33 .
drwxrwxr-x 4 ec2-user ec2-user  131 Jan 18 12:32 ..
drwxrwxr-x 7 ec2-user ec2-user  119 Jan 18 12:32 .git
-rw-rw-r-- 1 ec2-user ec2-user   94 Jan 18 11:50 prod-stack-configuration.json
-rw-rw-r-- 1 ec2-user ec2-user 1667 Jan 18 11:40 sample-lambda.yaml
-rw-rw-r-- 1 ec2-user ec2-user   93 Jan 18 11:48 test-stack-configuration.json
Code language: Bash (bash)
Push 3 files.
$ git add .

$ git commit -m 'first commit'
...
 3 files changed, 92 insertions(+)
 create mode 100644 prod-stack-configuration.json
 create mode 100644 sample-lambda.yaml
 create mode 100644 test-stack-configuration.json

$ git push
...
 * [new branch]      master -> master
Code language: Bash (bash)
We were able to push successfully.
The pipeline should now be started.
After a short wait, I received the following email
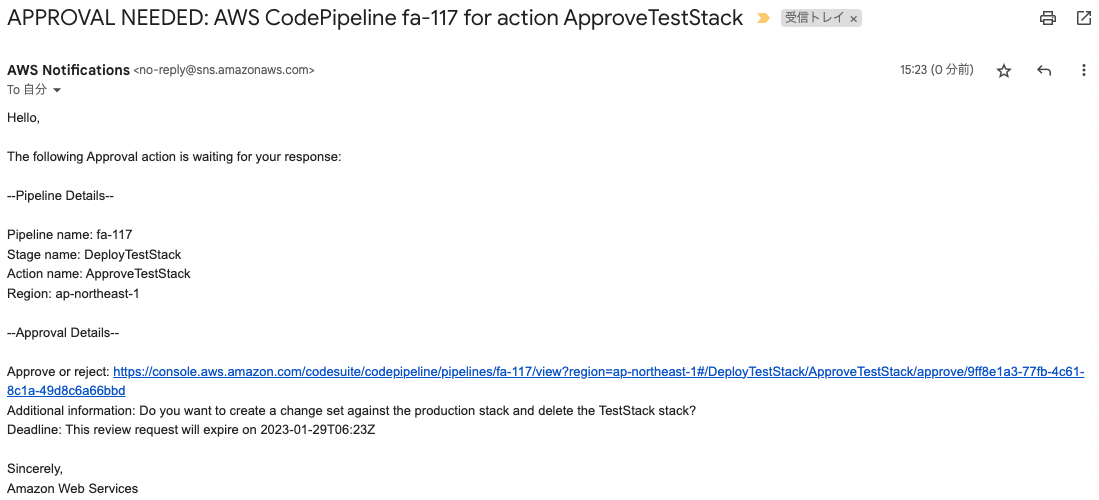
The content is about approving the contents of the test stack.
Check the pipeline.
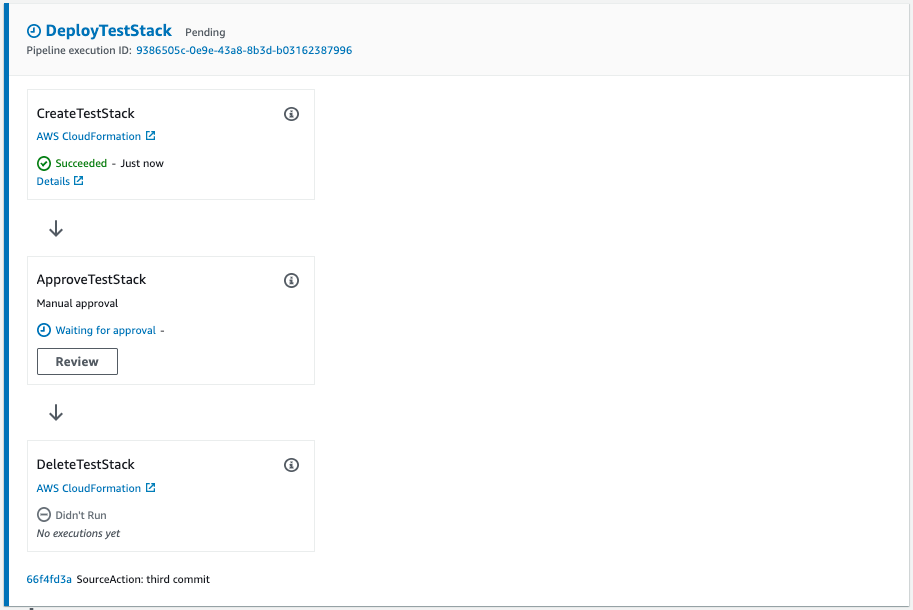
Test stack creation succeeded and is paused in the authentication action.
Check the created test stack.
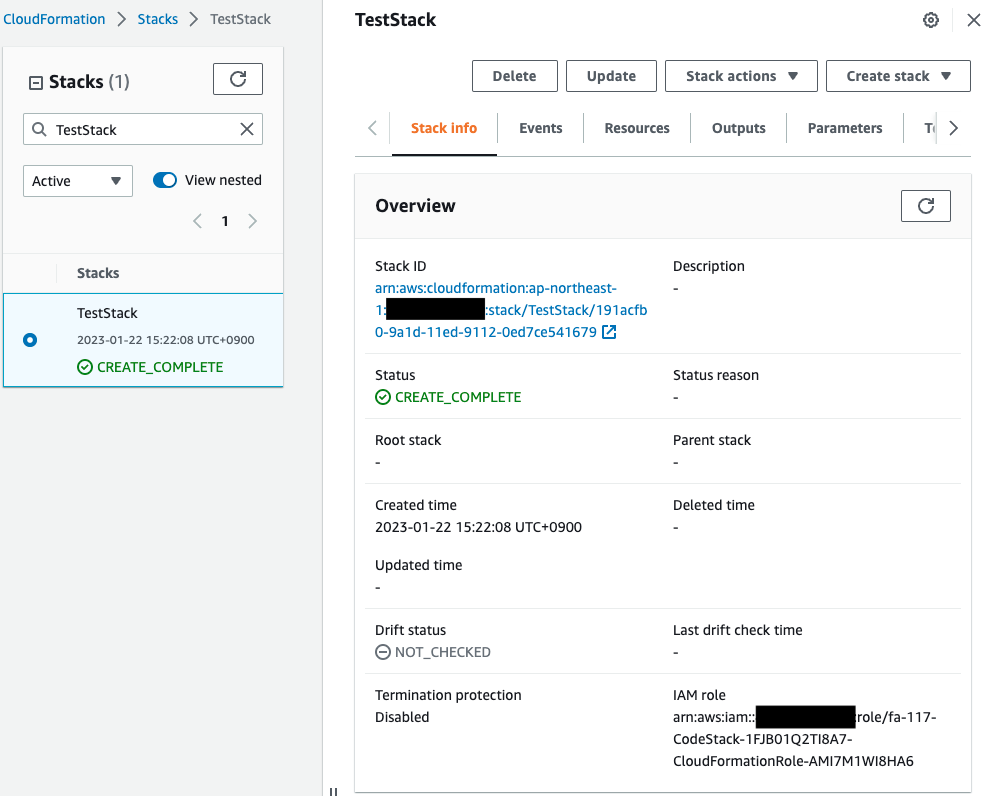
Indeed, a test stack is created.
Check the Lambda functions in the stack.
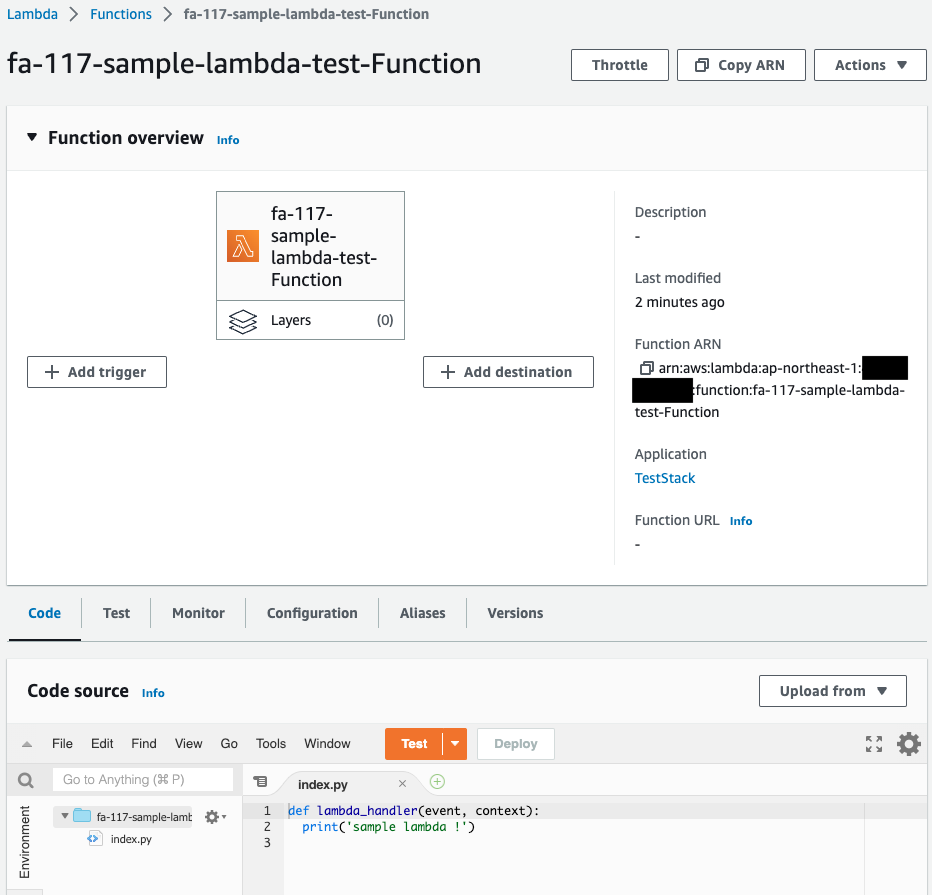

Indeed, a Lambda function is created.
The function name is “fa-117-sample-lambda-test-Function” and the memory size is “128 MB,” indicating that the stack was created after the template configuration file for the test stack was read.
Now that we have confirmed that the test stack has been successfully created, we perform the pipeline approval action.
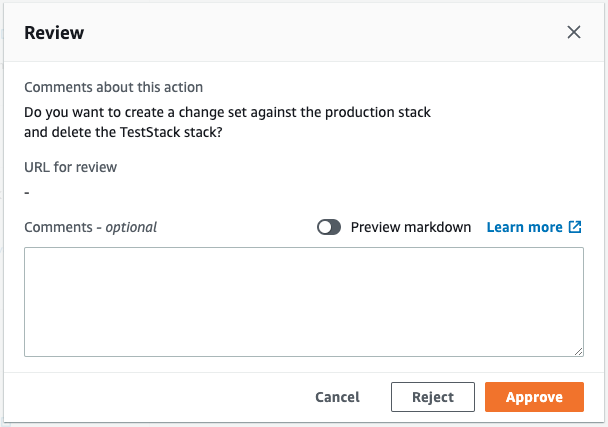
When “Approve” is pressed, the paused pipeline is restarted.
Check the test stack again.
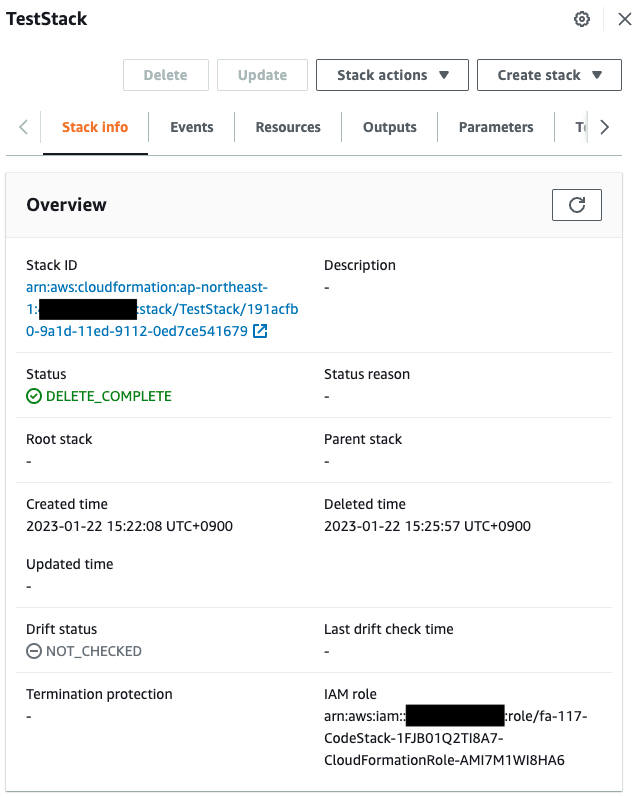
The pipeline was restarted, which automatically deleted the test stack.
After waiting for a while again, I received the following email.
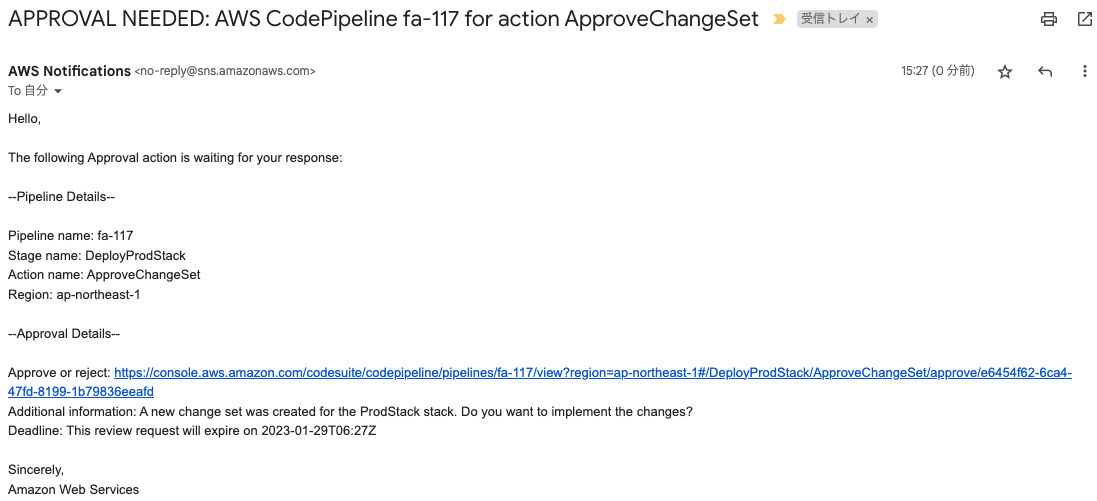
The email concerns the approval of a change set for the production stack.
Check the pipeline.
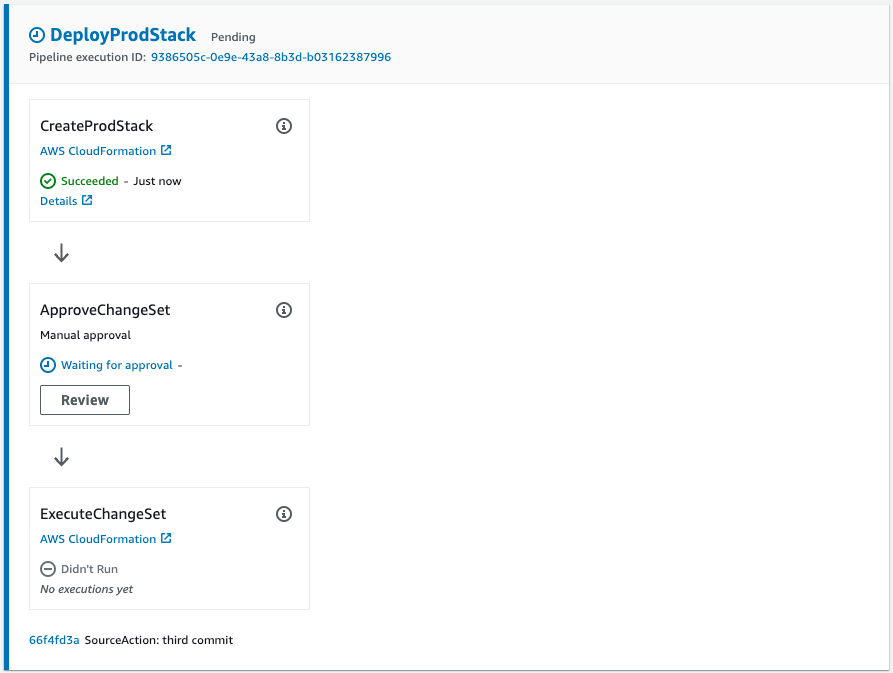
The change set for the production stack has been successfully created and paused in the authentication action.
Check the created change set.
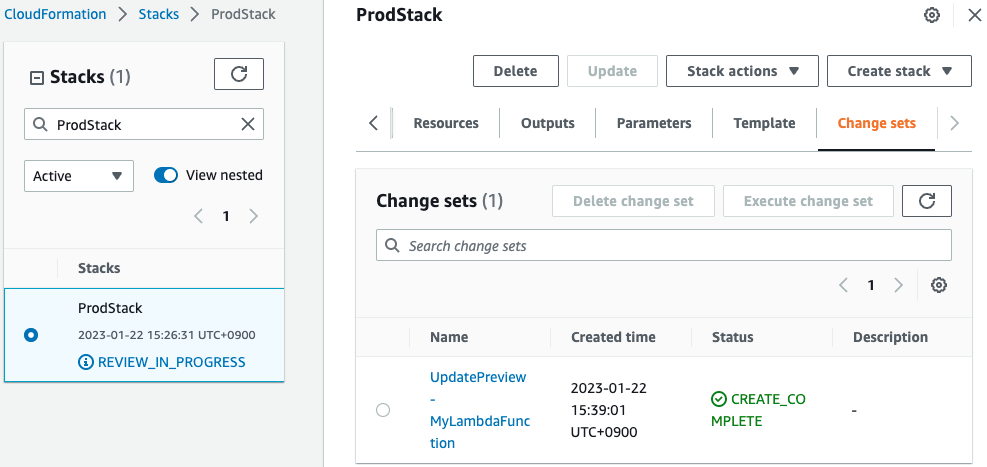
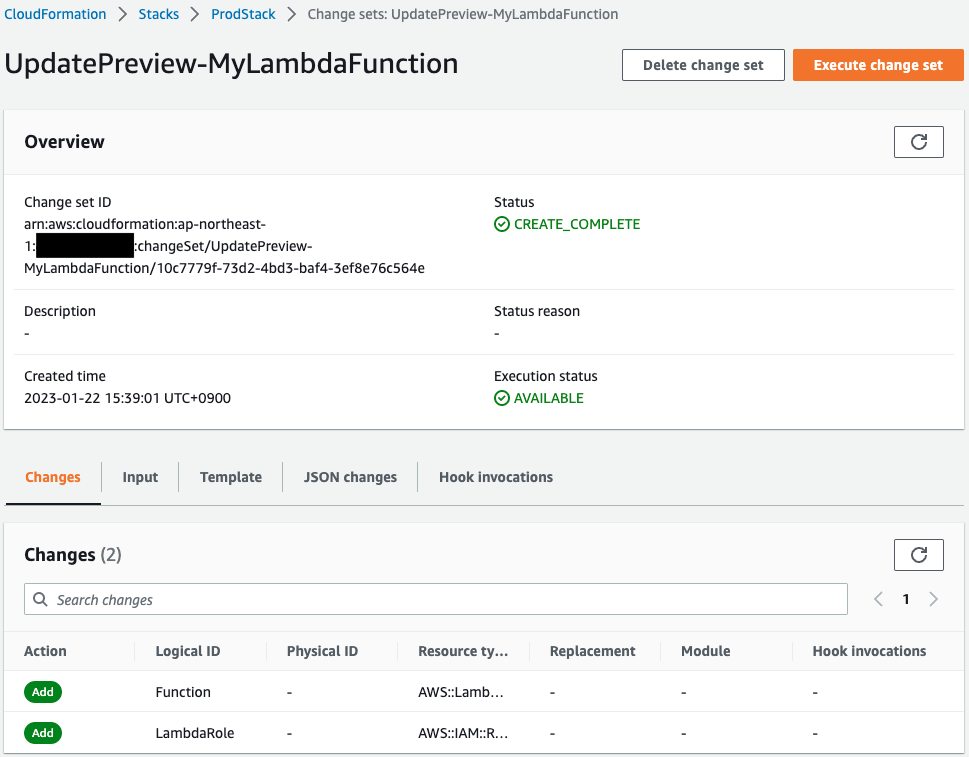
The changeset reads that a new Lambda function and IAM role for the function will be created.
Now that we have verified that the change set has been successfully created, we perform the pipeline approval action.
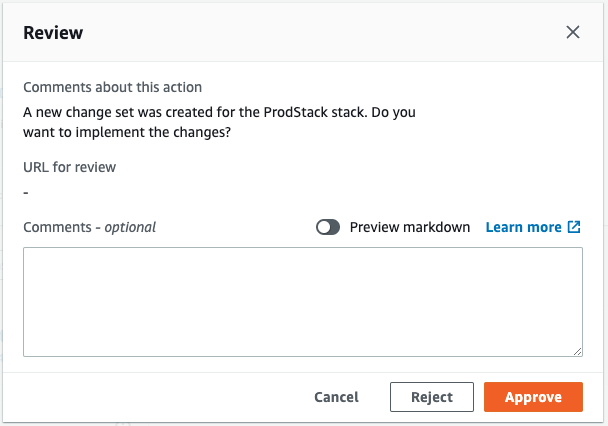
When “Approve” is pressed, the paused pipeline is restarted.
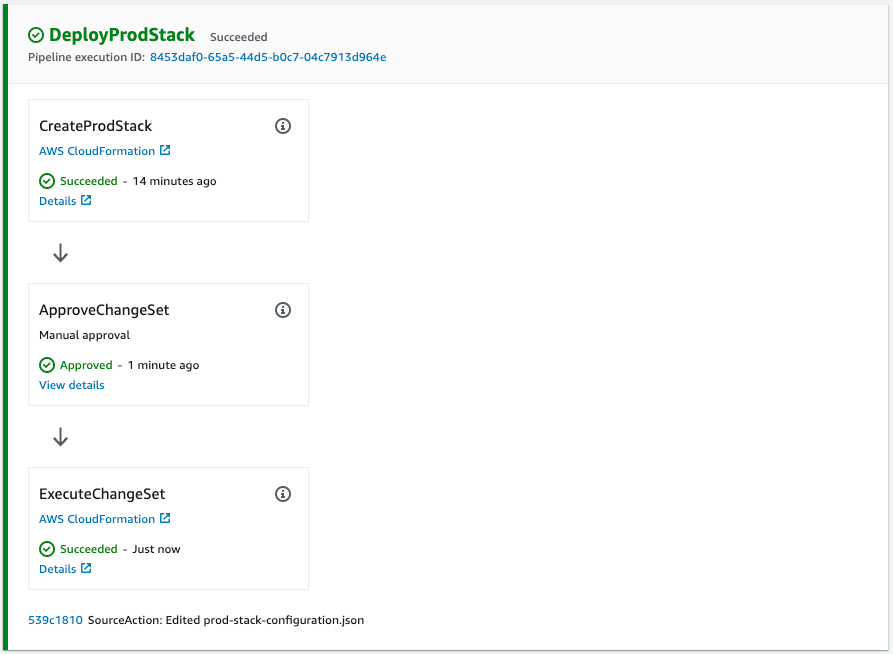
The pipeline has reached the end and terminated successfully.
Check the production stack created from the change set.
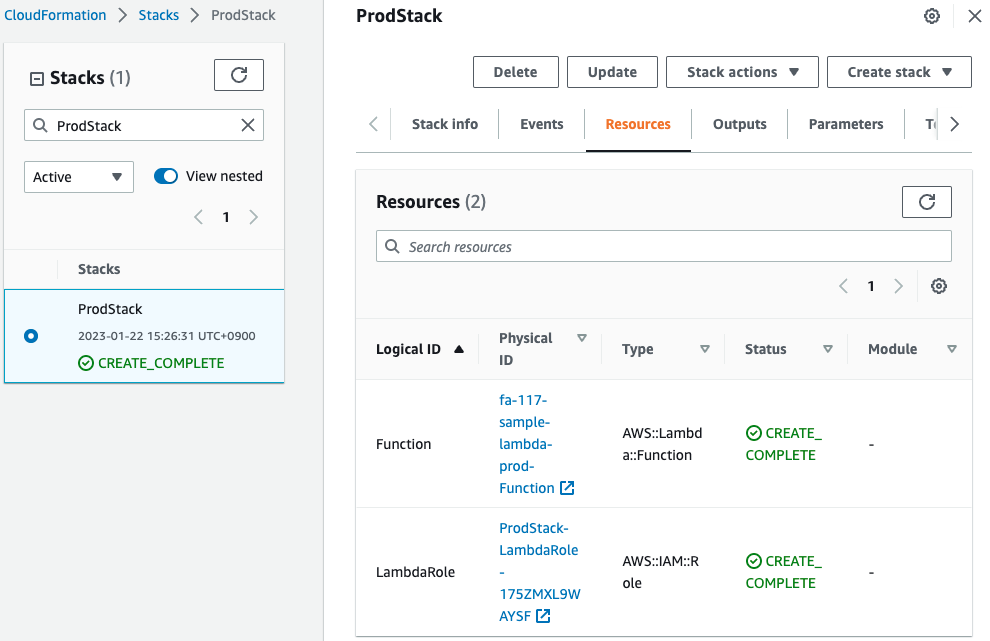
Indeed, a production stack has been created.
You can also see that two resources (Lambda functions, IAM role) have been created in the stack.
Finally, check the Lambda function.
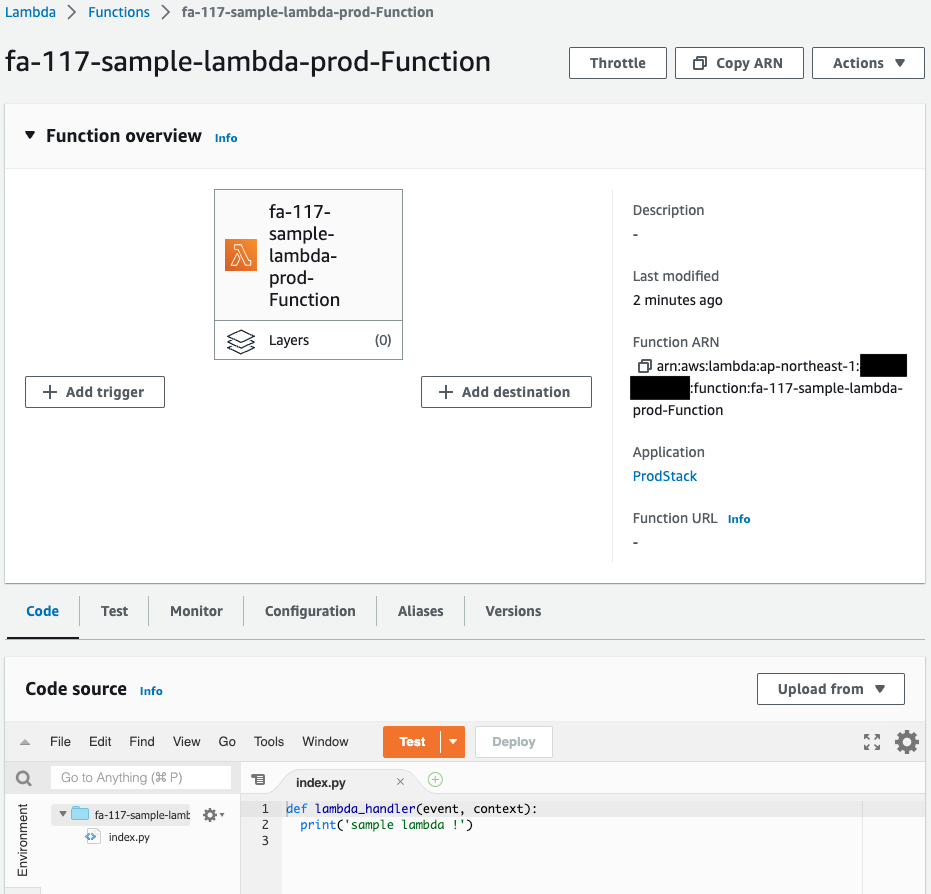

Indeed, a Lambda function is created.
The function name is “fa-117-sample-lambda-prod-Function” and the memory size is “512 MB,” indicating that the stack was created after the template configuration file for the production stack was read.
As described above, a CI/CD environment for CloudFormation using CodePipeline has been established.
Summary
How to build a CI/CD environment for CloudFormation using CodePipeline.