Introduction to Elastic Beanstalk with CloudFormation
Elastic Beanstalk will be covered.
With Elastic Beanstalk, you can quickly deploy and manage applications in the AWS Cloud without having to learn about the infrastructure that runs those applications. Elastic Beanstalk reduces management complexity without restricting choice or control. You simply upload your application, and Elastic Beanstalk automatically handles the details of capacity provisioning, load balancing, scaling, and application health monitoring.
What is AWS Elastic Beanstalk?
This page will introduce you to Elastic Beanstalk.
Specifically, we will use CloudFormation to build a minimally configured Elastic Beanstalk environment.
Environment
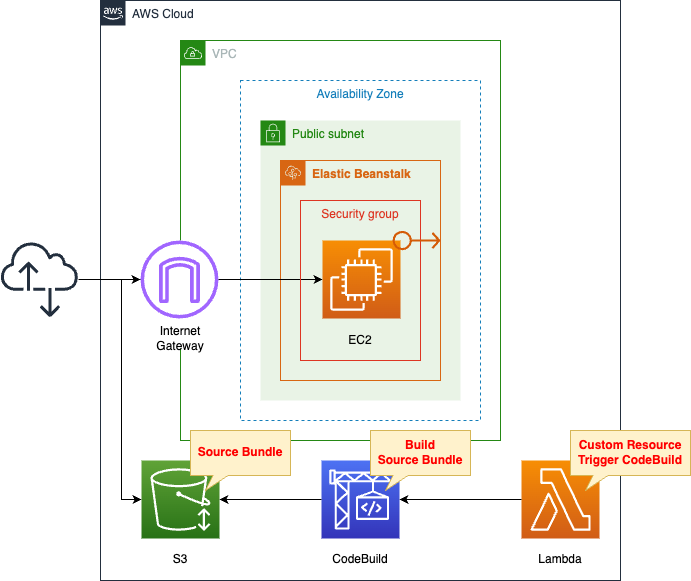
Create a VPC and build an Elastic Beanstalk environment inside it.
Specifically, we will build a web server environment.
Through Elastic Beanstalk, create the following resources
- EC2 Instance
- Security group
- Elastic IP Address
For the Elastic Beanstalk environment, select Web Server.
Select Python 3.8 for the platform.
Automatically build a Python script to run on an EC2 instance.
Specifically, after creating the script with CodeBuild, place it in an S3 bucket.
The trigger to run this CodeBuild is a CloudFormation custom resource.
The timing of when to start building Elastic Beanstalk is controlled by CloudFormation’s WaitCondition.
In concrete terms, we will ensure that the build of Elastic Beanstalk starts after CodeBuild completes placing the source bundle in the S3 bucket.
CloudFormation template files
The above configuration is built with CloudFormation.
The CloudFormation templates are placed at the following URL
https://github.com/awstut-an-r/awstut-fa/tree/main/141
Explanation of key points of template files
S3 bucket
Resources:
  Bucket:
    Type: AWS::S3::Bucket
    Properties:
      AccessControl: Private
      BucketName: !Ref Prefix
      NotificationConfiguration:
        EventBridgeConfiguration:
          EventBridgeEnabled: true
Code language: YAML (yaml)
Create an S3 bucket.
This bucket will be used to place scripts to be run on the Elastic Beanstalk environment, as described below.
The NotificationConfiguration property is a parameter related to the event notification functionality.
The details are described below, this is a setting to control when CloudFormation builds Elastic Beanstalk.
So it is not directly related to building Elastic Beanstalk. Specify EventBridge as the notification destination.
CodeBuild
Resources:
  CodeBuildProject:
    Type: AWS::CodeBuild::Project
    Properties:
      Artifacts:
        Type: NO_ARTIFACTS
      Cache:
        Type: NO_CACHE
      Environment:
        ComputeType: !Ref ProjectEnvironmentComputeType
        EnvironmentVariables:
          - Name: BUCKET_NAME
            Type: PLAINTEXT
            Value: !Ref BucketName
          - Name: SOURCE_BUNDLE_NAME
            Type: PLAINTEXT
            Value: !Ref SourceBundleName
          - Name: SOURCE_FILE_NAME
            Type: PLAINTEXT
            Value: !Ref SourceFileName
        Image: !Ref ProjectEnvironmentImage
        ImagePullCredentialsType: CODEBUILD
        Type: !Ref ProjectEnvironmentType
        PrivilegedMode: true
      LogsConfig:
        CloudWatchLogs:
          Status: DISABLED
        S3Logs:
          Status: DISABLED
      Name: !Ref Prefix
      ServiceRole: !GetAtt CodeBuildRole.Arn
      Source:
        Type: NO_SOURCE
        BuildSpec: !Sub |
          version: 0.2

          phases:
            pre_build:
              commands:
                - |
                  cat << EOF > $SOURCE_FILE_NAME
                  import datetime

                  def application(environ, start_response):
                      response = str(datetime.datetime.now())
                      start_response("200 OK", [
                          ("Content-Type", "text/html")
                      ])
                      return [bytes(response, 'utf-8')]
                  EOF
            build:
              commands:
                - zip $SOURCE_BUNDLE_NAME -r * .[^.]*
            post_build:
              commands:
                - aws s3 cp $SOURCE_BUNDLE_NAME s3://$BUCKET_NAME/
      Visibility: PRIVATE
Code language: YAML (yaml)
Use CodeBuild to create source bundles for Elastic Beanstalk.
Describe the contents of buildspec.yml in the BuildSpec property.
Create the source code to run on Elastic Beanstalk in the pre_build phase.
The content is simple: return the current date and time.
Create the deployment package in the build phase.
Specifically, zip the file created in the previous phase.
In the post_build phase, upload the source bundle to the S3 bucket mentioned earlier.
The following are the IAM roles for CodeBuild.
Resources:
  CodeBuildRole:
    Type: AWS::IAM::Role
    Properties:
      AssumeRolePolicyDocument:
        Version: 2012-10-17
        Statement:
          - Effect: Allow
            Principal:
              Service:
                - codebuild.amazonaws.com
            Action:
              - sts:AssumeRole
      Policies:
        - PolicyName: PutS3ObjectPolicy
          PolicyDocument:
            Version: 2012-10-17
            Statement:
              - Effect: Allow
                Action:
                  - s3:PutObject
                Resource:
                  - !Sub "arn:aws:s3:::${BucketName}/*"
Code language: YAML (yaml)
Grant permissions to place objects in S3 buckets.
Elastic Beanstalk
When building Elastic Beanstalk using CloudFormation, the following four resources must be created
- Application
- ApplicationVersion
- Environment
- Configuration Template
Application
Resources:
  Application:
    Type: AWS::ElasticBeanstalk::Application
    Properties:
      ApplicationName: !Sub "${Prefix}-application"
Code language: YAML (yaml)
The following is a quote from the official AWS description of the Application
An Elastic Beanstalk application is a logical collection of Elastic Beanstalk components, including environments, versions, and environment configurations. In Elastic Beanstalk an application is conceptually similar to a folder.
Application
Therefore, the only setting item is the name (ApplicationName property).
ApplicationVersion
Resources:
  ApplicationVersion:
    Type: AWS::ElasticBeanstalk::ApplicationVersion
    Properties:
      ApplicationName: !Ref Application
      SourceBundle:
        S3Bucket: !Ref BucketName
        S3Key: !Ref SourceBundleName
Code language: YAML (yaml)
The following is a quote from the official AWS explanation of ApplicationVersion.
In Elastic Beanstalk, an application version refers to a specific, labeled iteration of deployable code for a web application. An application version points to an Amazon Simple Storage Service (Amazon S3) object that contains the deployable code, such as a Java WAR file.
Application version
In other words, ApplicationVertion is the programs that will run on Elastic Beanstalk.
SourceBundle property specifies the S3 bucket where the programs will be placed and the object name.
In this configuration, the object specified by this property is the one built with CodeBuild as described above.
So specify the ZIP file that was built and the name of the S3 bucket to upload to.
Environment
Resources:
  Environment:
    Type: AWS::ElasticBeanstalk::Environment
    Properties:
      ApplicationName: !Ref Application
      CNAMEPrefix: !Ref Prefix
      EnvironmentName: !Sub "${Prefix}-env"
      TemplateName: !Ref ConfigurationTemplate
      Tier:
        Name: WebServer
        Type: Standard
      VersionLabel: !Ref ApplicationVersion
Code language: YAML (yaml)
The following is a quote from the official AWS description of Environment.
An environment is a collection of AWS resources running an application version. Each environment runs only one application version at a time, however, you can run the same application version or different application versions in many environments simultaneously.
Environment
The key point is the Tier property.
This property specifies the environment frame.
The environment tier designates the type of application that the environment runs, and determines what resources Elastic Beanstalk provisions to support it. An application that serves HTTP requests runs in a web server environment tier. A backend environment that pulls tasks from an Amazon Simple Queue Service (Amazon SQS) queue runs in a worker environment tier.
Environment tier
This time we will create a Web server environment.
So specify “WebServer” for the Name property.
And specify “Standard” for the Type property.
This is a fixed value in a web server environment.
ConfigurationTemplate
Resources:
  ConfigurationTemplate:
    Type: AWS::ElasticBeanstalk::ConfigurationTemplate
    Properties:
      ApplicationName: !Ref Application
      OptionSettings:
        - Namespace: aws:autoscaling:launchconfiguration
          OptionName: IamInstanceProfile
          Value: !Ref InstanceProfile
        - Namespace: aws:autoscaling:launchconfiguration
          OptionName: InstanceType
          Value: !Ref InstanceType
        - Namespace: aws:elasticbeanstalk:environment
          OptionName: EnvironmentType
          Value: !Ref EnvironmentType
        - Namespace: aws:elasticbeanstalk:environment
          OptionName: ServiceRole
          Value: !Sub "arn:aws:iam::${AWS::AccountId}:role/service-role/aws-elasticbeanstalk-service-role"
        - Namespace: aws:ec2:vpc
          OptionName: VPCId
          Value: !Ref VPC
        - Namespace: aws:ec2:vpc
          OptionName: Subnets
          Value: !Ref PublicSubnet1
      SolutionStackName: !Ref SolutionStackName
Code language: YAML (yaml)
ConfigurationTemplate is the equivalent of a saved configuration in the console and other documents.
To quote the official AWS description of a saved configuration.
A saved configuration is a template that you can use as a starting point for creating unique environment configurations.
Saved configuration
In other words, it sets various parameters for building an Elastic Beanstalk environment. There are a myriad of these parameters.
https://docs.aws.amazon.com/elasticbeanstalk/latest/dg/command-options-general.html
The following is a brief overview of the parameters specified in this case.
In the namespace aws:autoscaling:launchconfiguration, two options are set, IamInstanceProfile and InstanceType.
Both are related to the instance to launch on the Elastic Beanstalk environment.
The former is the instance profile to assign to the instance and the latter is the instance type.
In this case, we specify t3.nano as the instance type.
In the namespace aws:elasticbeanstalk:environment, two options are set: EnvironmentType and ServiceRole.
Both options are related to Elastic Beanstalk.
The former allows you to set the environment type (single instance environment or scable environment).
In this case, “SingleInstance” is specified to create a single instance environment.
The latter specifies the service role for Elastic Beanstalk.
In this case, we specify the default service role aws-elasticbeanstalk-service-role.
Please see the following page for more information about this.
https://docs.aws.amazon.com/elasticbeanstalk/latest/dg/iam-servicerole.html
In the namespace aws:ec2:vpc, two options are set, VPCId and Subnets.
Both specify the VPC and subnet where the instance will run within the Elastic Beanstalk environment.
Below are instance profiles and IAM roles for EC2 instances.
Resources:
  InstanceProfile:
    Type: AWS::IAM::InstanceProfile
    Properties:
      Path: /
      Roles:
        - !Ref InstanceRole

  InstanceRole:
    Type: AWS::IAM::Role
    DeletionPolicy: Delete
    Properties:
      AssumeRolePolicyDocument:
        Version: 2012-10-17
        Statement:
          - Effect: Allow
            Action: sts:AssumeRole
            Principal:
              Service:
                - ec2.amazonaws.com
      ManagedPolicyArns:
        - arn:aws:iam::aws:policy/AWSElasticBeanstalkWebTier
Code language: YAML (yaml)
Create an IAM role with the AWS management policy AWSElasticBeanstalkWebTier attached.
(Reference) CloudFormation Custom Resources
Resources:
  CustomResource:
    Type: Custom::CustomResource
    Properties:
      ServiceToken: !GetAtt Function1.Arn

  Function1:
    Type: AWS::Lambda::Function
    Properties:
      Architectures:
        - !Ref Architecture
      Environment:
        Variables:
          CODEBUILD_PROJECT: !Ref CodeBuildProject
      Code:
        ZipFile: |
          import boto3
          import cfnresponse
          import os

          codebuild_project = os.environ['CODEBUILD_PROJECT']

          CREATE = 'Create'
          response_data = {}

          client = boto3.client('codebuild')

          def lambda_handler(event, context):
            try:
              if event['RequestType'] == CREATE:
                response = client.start_build(
                  projectName=codebuild_project
                )
                print(response)

              cfnresponse.send(event, context, cfnresponse.SUCCESS, response_data)

            except Exception as e:
              print(e)
              cfnresponse.send(event, context, cfnresponse.FAILED, response_data)
      FunctionName: !Sub "${Prefix}-function-01"
      Handler: !Ref Handler
      Runtime: !Ref Runtime
      Role: !GetAtt FunctionRole1.Arn

  FunctionRole1:
    Type: AWS::IAM::Role
    DeletionPolicy: Delete
    Properties:
      AssumeRolePolicyDocument:
        Version: 2012-10-17
        Statement:
          - Effect: Allow
            Action: sts:AssumeRole
            Principal:
              Service:
                - lambda.amazonaws.com
      ManagedPolicyArns:
        - arn:aws:iam::aws:policy/service-role/AWSLambdaBasicExecutionRole
      Policies:
        - PolicyName: StartCodeBuildPolicy
          PolicyDocument:
            Version: 2012-10-17
            Statement:
              - Effect: Allow
                Action:
                  - codebuild:StartBuild
                Resource:
                  - !Sub "arn:aws:codebuild:${AWS::Region}:${AWS::AccountId}:project/${CodeBuildProject}"
Code language: YAML (yaml)
Use CloudFormation custom resources to automatically execute Lambda functions when creating CloudFormation stacks.
For more information on custom resources, please refer to the following page.

The function of the Lambda function to be executed is to run the CodeBuild project described earlier.
Execute the start_build method of the client object for CodeBuild.
In the IAM role for this function, authorization to run the CodeBuild project is granted.
(Reference) WaitCondition
Resources:
  WaitConditionHandle:
    Type: AWS::CloudFormation::WaitConditionHandle

  WaitCondition:
    Type: AWS::CloudFormation::WaitCondition
    Properties:
      Handle: !Ref WaitConditionHandle
      Timeout: !Ref WaitConditionTimeout

  EventsRule:
    Type: AWS::Events::Rule
    Properties:
      EventBusName: !Ref EventBusName
      EventPattern:
        source:
          - aws.s3
        detail-type:
          - Object Created
        detail:
          bucket:
            name:
              - !Ref BucketName
      Name: !Sub "${Prefix}-EventsRule"
      State: ENABLED
      Targets:
        - Arn: !GetAtt Function2.Arn
          Id: !Ref Function2

  EventsRulePermission:
    Type: AWS::Lambda::Permission
    Properties:
      Action: lambda:InvokeFunction
      FunctionName: !Ref Function2
      Principal: events.amazonaws.com
      SourceArn: !GetAtt EventsRule.Arn

  Function2:
    Type: AWS::Lambda::Function
    Properties:
      Architectures:
        - !Ref Architecture
      Environment:
        Variables:
          SIGNAL_URL: !Ref WaitConditionHandle
      Code:
        ZipFile: |
          import json
          import os
          import urllib3
          import uuid

          def lambda_handler(event, context):
            body = json.dumps({
                "Status": "SUCCESS",
                "Reason": "CodeBuild Project Finished Successfully",
                "UniqueId": str(uuid.uuid4()),
                "Data": "CodeBuild Project Finished Successfully"
            })
            http = urllib3.PoolManager()
            http.request('PUT', os.environ['SIGNAL_URL'], body=body)
      FunctionName: !Sub "${Prefix}-function-02"
      Handler: !Ref Handler
      Runtime: !Ref Runtime
      Role: !GetAtt FunctionRole2.Arn

  FunctionRole2:
    Type: AWS::IAM::Role
    DeletionPolicy: Delete
    Properties:
      AssumeRolePolicyDocument:
        Version: 2012-10-17
        Statement:
          - Effect: Allow
            Action: sts:AssumeRole
            Principal:
              Service:
                - lambda.amazonaws.com
      ManagedPolicyArns:
        - arn:aws:iam::aws:policy/service-role/AWSLambdaBasicExecutionRole
Code language: YAML (yaml)
The key to using CloudFormation to simultaneously create source bundles for Elastic Beanstalk and applications running in the same environment is the order in which they are created.
Create the source bundle first and place it in the S3 bucket.
Then create the Elastic Beanstalk.
To do so, use CloudFormation WaitCondition to control the timing of resource creation.
Use WaitCondition to wait for Elastic Beanstalk creation.
As mentioned earlier, the CodeBuild project creates the source bundle and places it in the S3 bucket.
The EventBridge rule causes a Lambda function to be triggered by the placement of the object in the S3 bucket.
This function will notify WaitCondition of a success signal and release the wait.
In this way, WaitCondition can be used to control when Elastic Beanstalk is created after the source bundle is placed in the S3 bucket.
For details, please refer to the following page.
The above page covers how to control the order in which the function itself and the deployment package are created when creating a Lambda function.
There is a difference between a deployment package for a Lambda function and a source bundle for Elastic Beanstalk, but the idea is exactly the same.
Architecting
Use CloudFormation to build this environment and check its actual behavior.
Create CloudFormation stacks and check the resources in the stacks
Create CloudFormation stacks.
For information on how to create stacks and check each stack, please see the following page.

After reviewing the resources in each stack, information on the main resources created in this case is as follows
- CodeBuild project: fa-141
- S3 bucket: fa-141
- Elastic Beanstalk application: fa-141-application
- Elastic Beanstalk environment: fa-141-env
Check the creation status of each resource from the AWS Management Console.
Check the working status of your CodeBuild project.
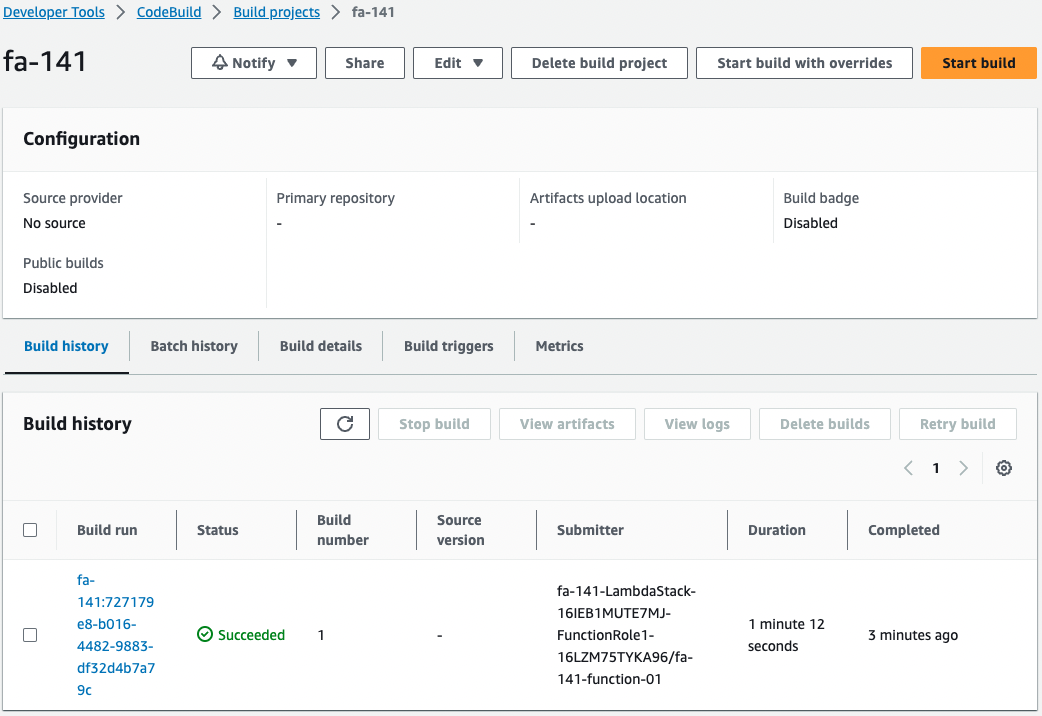
CodeBuild is running automatically.
This means that the project was automatically started by a Lambda function tied to a CloudFormation custom resource.
This has resulted in a source bundle being built to run on Elastic Beanstalk.
Check the S3 bucket.
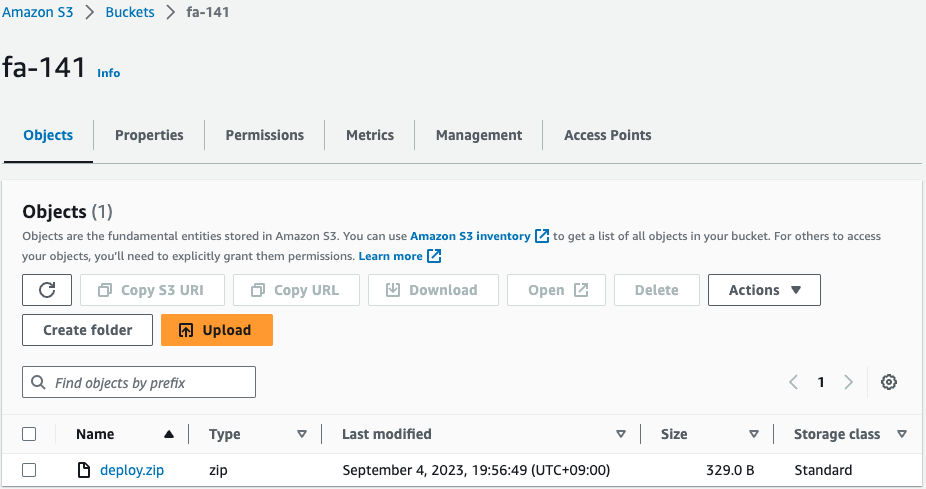
object is located.
This is the source bundle built by the CodeBuild project.
This file is executed on Elastic Beanstalk.
Operation Check
Now that you are ready, check Elastic Beanstalk.
First, check the Elastic Beanstalk application.

Indeed, an application has been created.
The Elastic Beanstalk environment is created within the framework of the application.
Check the Elastic Beanstalk environment.
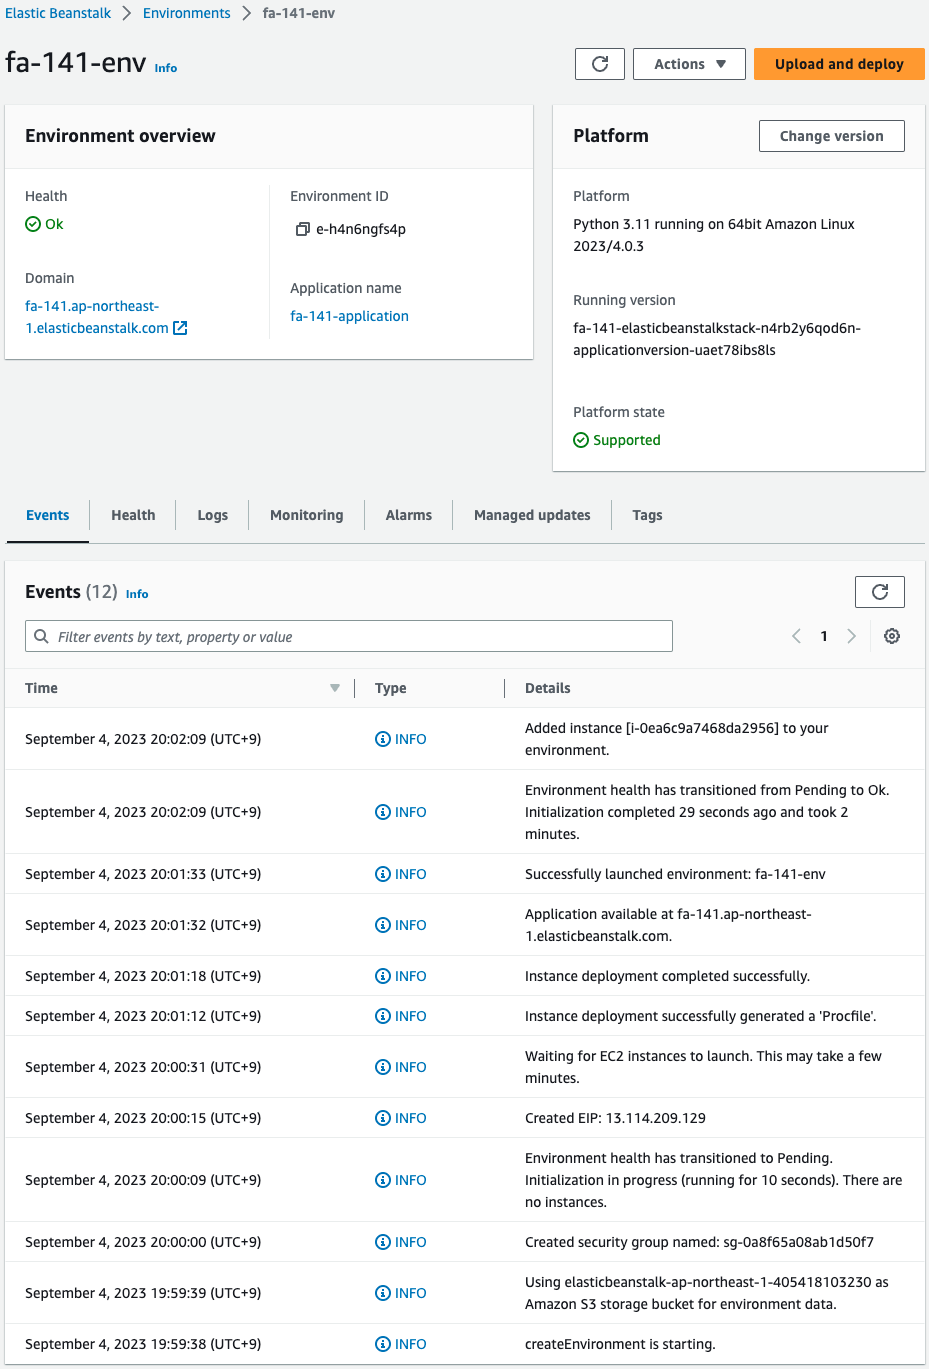
The environment has been successfully created.
Domain, you can see the URL (http://fa-141.ap-northeast-1.elasticbeanstalk.com/) of the application created this time.
Access this application.
$ curl http://fa-141.ap-northeast-1.elasticbeanstalk.com/
2023-09-04 11:07:10.449608

$ curl http://fa-141.ap-northeast-1.elasticbeanstalk.com/
2023-09-04 11:07:12.973500Code language: Bash (bash)
Indeed, it returns the execution result of a Python script built with CodeBuild.
As an introduction to Elastic Beanstalk, we used CloudFormation to build a minimal configuration.
(Reference) Relationship between Elastic Beanstalk and CloudFormation
Inside Elastic Beanstalk, CloudFormation is running.
The following image shows the CloudFormation stack that was automatically created when the above configuration was built.
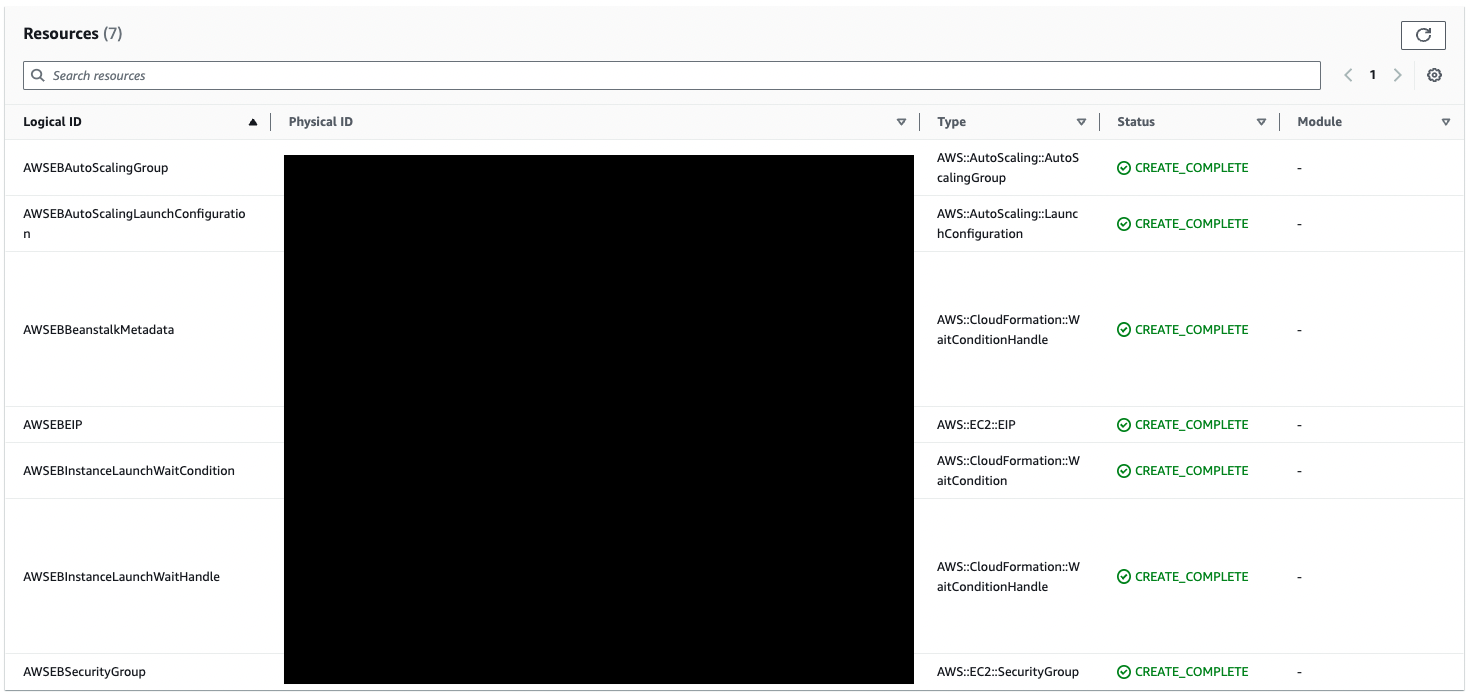
Below are the main resources that were automatically generated.
- Auto Scaling Group
- security group
- EIP
Check the Auto Scaling group.
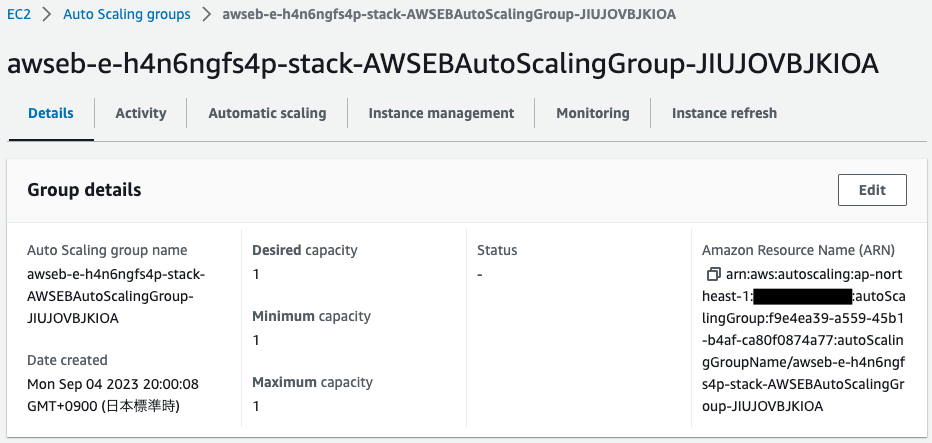
Looking at the Auto Scaling group size, the desired/minimum/maximum values are all “1”.
This is due to the single instance type selected in the Elastic Beanstalk environment type.
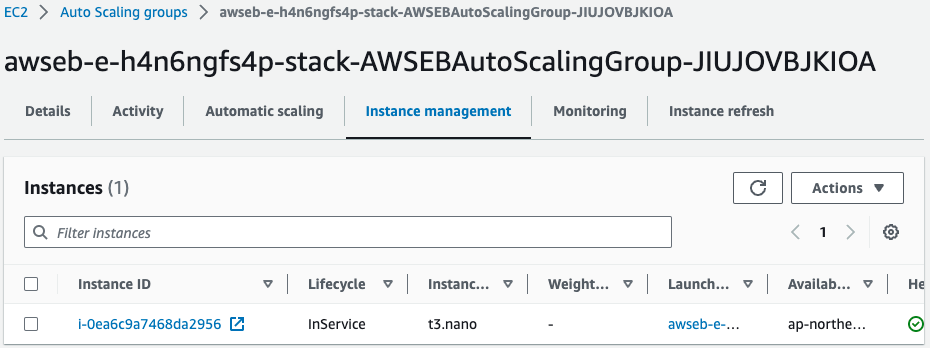
Looking in the same group, there is indeed one EC2 instance running.
I look at the instance type and see “t3.nano”.
This is the type as specified in Elastic Beanstalk’s ConfigurationTemplate.
Check the security group.

Looking at the inbound rule, it was to allow HTTP communication from all IP addresses.
Summary
CloudFormation was used to build a minimally configured Elastic Beanstalk.