How to Send MQTT Messages from an EC2 Instance to AWS IoT Core
In this article, we will explore how to send MQTT messages from an EC2 instance using AWS IoT Core.
AWS IoT Core services connect IoT devices to AWS IoT services and other AWS services. AWS IoT Core includes the device gateway and the message broker, which connect and process messages between your IoT devices and the cloud.
Getting started with AWS IoT Core
This time, we will set up an EC2 instance as an IoT device (Thing) by referring to the official tutorial and connect it to AWS IoT Core to send messages. This approach helps you learn the basic operations of AWS IoT Core and enables message sending from IoT devices.
Configuration
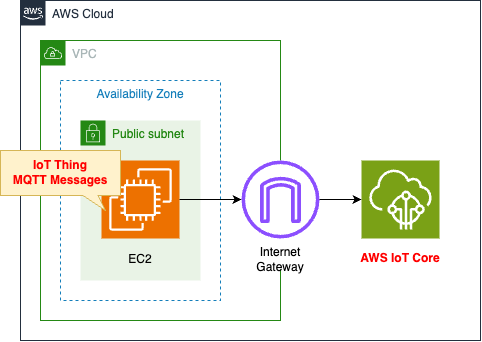
- Configure this instance as an IoT device (Thing).
- Connect from the EC2 instance to AWS IoT Core and send MQTT messages.
- Use the AWS IoT Device SDK for Python to send messages.
Resources
This page confirms the following
- Thing objects
- AWS IoT Policy
- IoT Device
- Client Certificate
Thing
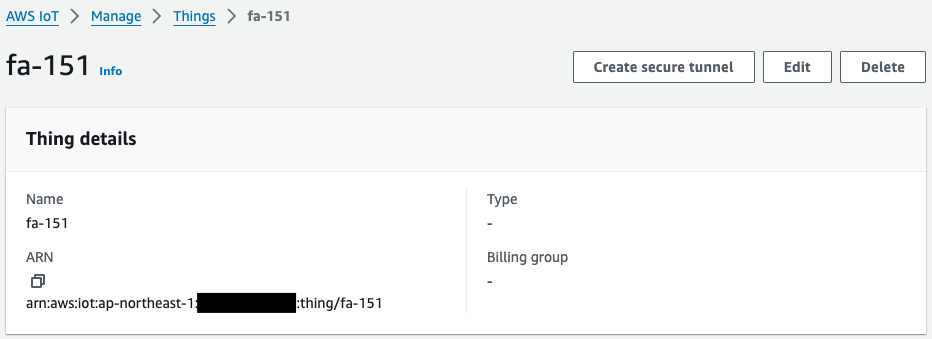
A Thing object represents a device managed by AWS IoT. In this case, we create this Thing object by treating the EC2 instance as an IoT device.
Devices connected to AWS IoT Core are represented by thing objects in the AWS IoT registry. A thing object represents a specific device or logical entity. It can be a physical device or sensor (for example, a light bulb or a light switch on the wall).
Create a thing object
Policy
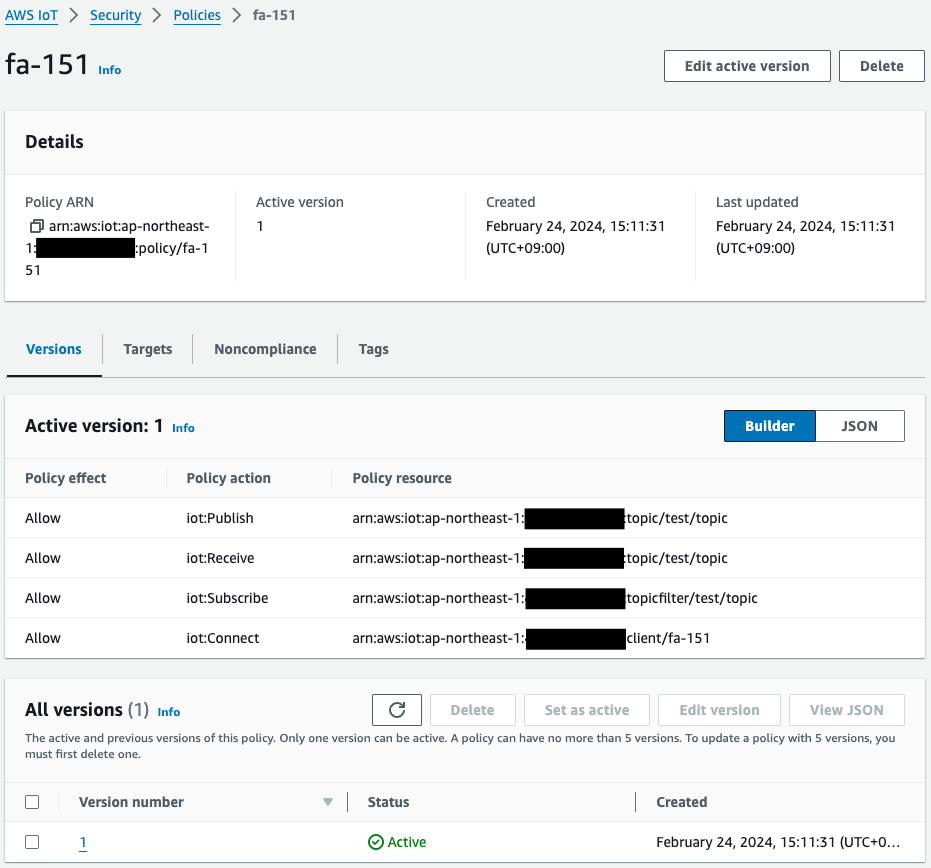
An AWS IoT policy defines the actions that a device can perform against AWS IoT.
Devices use an X.509 certificate to authenticate with AWS IoT Core. The certificate has AWS IoT policies attached to it. These policies determine which AWS IoT operations, such as subscribing or publishing to MQTT topics, the device is permitted to perform. Your device presents its certificate when it connects and sends messages to AWS IoT Core.
Create an AWS IoT policy
In this case, since this is a verification, we created it based on what is described in the following official tutorial.
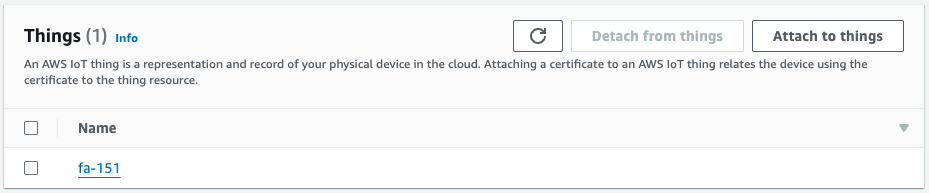
“test/topic” is specified for the topic name and “fa-151” for the client ID. These are the values that the EC2 instance will specify when executing the sample script.
EC2 Instance
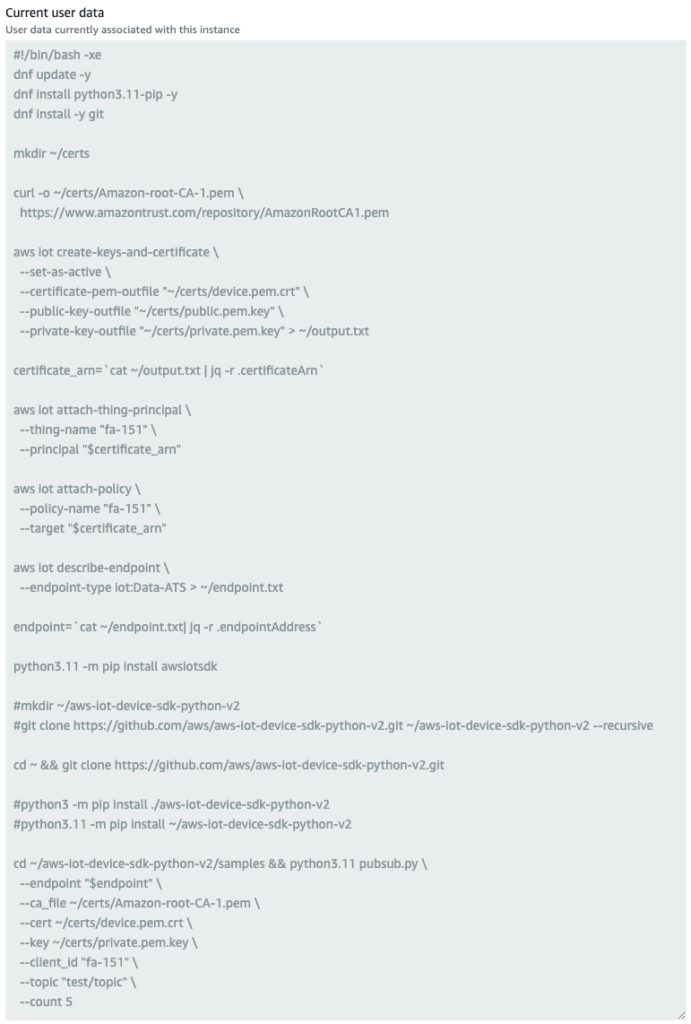
User data for an EC2 instance running as a thing.
Install Python11 and Git using dnf. These are used to obtain and run the AWS IoT Device SDK for Python.
Use the curl command to obtain an Amazon CA certificate (AmazonRootCA1.pem). This certificate is used for server certification to verify that the destination is correct when sending MQTT messages from the IoT device to AWS IoT Core.
Create a certificate with the aws iot create-keys-and-certificate command. Generate a client certificate (device.pem.crt) to be used when the thing communicates with AWS IoT Core. The certificate is generated on the EC2 instance and also registered on the AWS IoT side.
The command also allows you to retrieve the public key (public.pem.key) and private key (private.pem.key) used to create the certificate. The private key in particular is used to send MQTT messages to AWS IoT Core. Save the result of executing this command in a text file (output.txt). Use the jq command to retrieve the ARN assigned to the certificate when it is registered with AWS IoT and store it in a variable. Incidentally, the result of executing this command is returned in the following format
{
    "certificateArn": "arn:aws:iot:[region]:[account-id]:cert/[cert-id]",
    "certificateId": "[cert-id]",
    "certificatePem": "-----BEGIN CERTIFICATE-----\n[cert-pem]\n-----END CERTIFICATE-----\n",
    "keyPair": {
        "PublicKey": "-----BEGIN PUBLIC KEY-----\n[public-key]\n-----END PUBLIC KEY-----\n",
        "PrivateKey": "-----BEGIN RSA PRIVATE KEY-----\n[private-key]\n-----END RSA PRIVATE KEY-----\n"
    }
}
Code language: JSON / JSON with Comments (json)
Execute the aws iot attach-thing-principal command to associate a thing with a certificate. Specify the resource name of the aforementioned thing and the ARN of the certificate, respectively.
Execute the aws iot attach-policy command to associate the AWS IoT policy with the certificate. Note that the object to be associated with the AWS IoT policy is not a thing, but a certificate. Specify the aforementioned policy name and the ARN of the certificate.
Run the aws iot describe-endpoint command to get the endpoints to which MQTT messages are sent. There are two types of endpoints, as shown below, follow the quote below and specify “iot:Data-ATS” for the endpoint-type option.
Every customer has an iot:Data-ATS and an iot:Data endpoint. Each endpoint uses an X.509 certificate to authenticate the client. We strongly recommend that customers use the newer iot:Data-ATS endpoint type to avoid issues related to the widespread distrust of Symantec certificate authorities.
Connecting devices to AWS IoT
The result of executing this command is saved to a text file (endpoint.txt) and the endpoint name is stored in a variable. Again, use the jq command to extract the endpoint name from the following JSON-formatted data.
{
    "endpointAddress": "[endpoint-id]-ats.iot.[region].amazonaws.com"
}
Code language: JSON / JSON with Comments (json)
Install the AWS IoT Device SDK for Python (awsiotsdk) using pip. Then use Git to also get the sample scripts for this SDK.
Finally, run the sample script pubsub.py. This sample script sends a test message (Hello World!) to AWS IoT Core. To run this script, we pass the endpoints we have obtained so far, the Amazon CA certificate, the client certificate, and the private key for the client certificate. In addition, two parameters are specified: the first is the client ID. The first is the name of the thing, as quoted below.
A typical device use case involves the use of the thing name as the default MQTT client ID. Although we don’t enforce a mapping between a thing’s registry name and its use of MQTT client IDs, certificates, or shadow state, we recommend you choose a thing name and use it as the MQTT client ID for both the registry and the Device Shadow service.
Managing devices with AWS IoT
The second is the topic name. This is as quoted below, but this time “test/topic” is specified.
MQTT topics identify AWS IoT messages. AWS IoT clients identify the messages they publish by giving the messages topic names. Clients identify the messages to which they want to subscribe (receive) by registering a topic filter with AWS IoT Core. The message broker uses topic names and topic filters to route messages from publishing clients to subscribing clients.
MQTT topics
Certificate
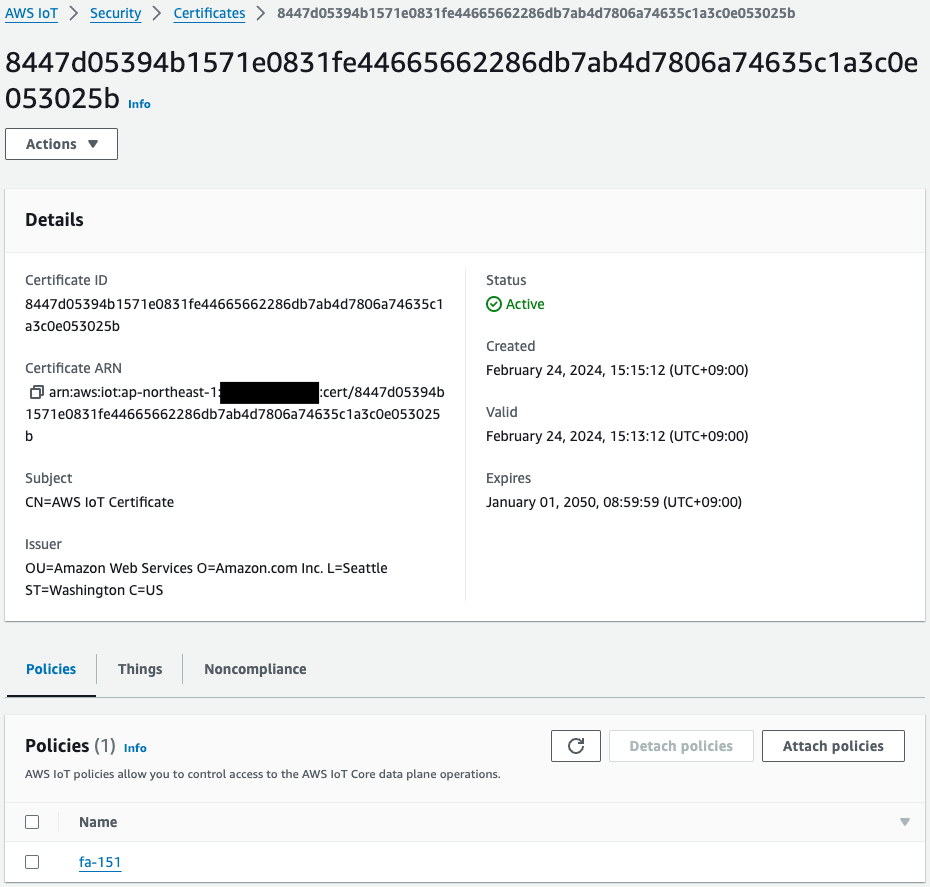
This is the certificate generated by the aws iot create-keys-and-certificate command on the aforementioned EC2 instance. The aws iot attach-thing-principal and aws iot attach-policy commands are then used to attach the thing and policy to this certificate.
IAM Role
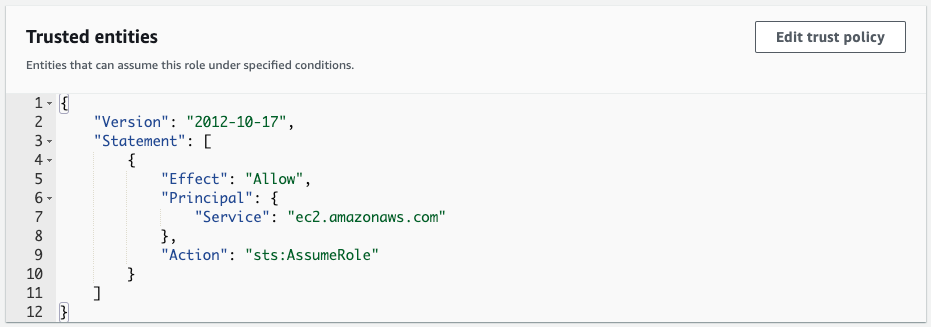
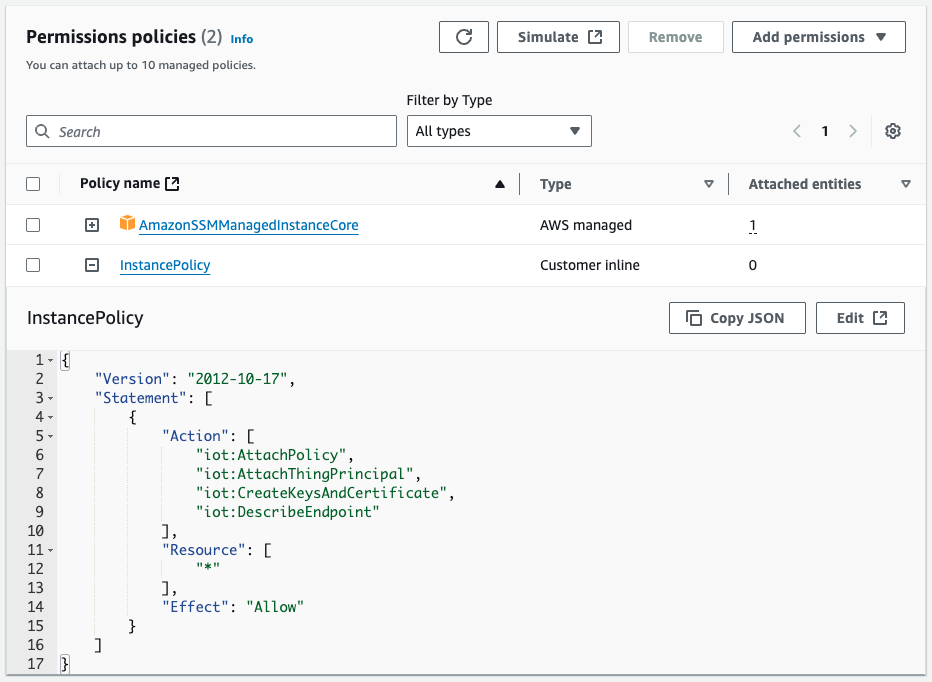
We create an IAM role so that the EC2 instance can access necessary AWS resources. We allow ec2.amazonaws.com in the trust policy and attach an IAM policy with the required permissions.
CloudFormation Template
Thing
Resources:
  Thing:
    Type: AWS::IoT::Thing
    Properties:
      ThingName: !Ref Prefix
Code language: YAML (yaml)
Policy
Resources:
  Policy:
    Type: AWS::IoT::Policy
    Properties:
      PolicyDocument:
        Version: 2012-10-17
        Statement:
          - Effect: Allow
            Action:
              - iot:Publish
              - iot:Receive
            Resource:
              - !Sub "arn:aws:iot:${AWS::Region}:${AWS::AccountId}:topic/${TopicName}"
          - Effect: Allow
            Action:
              - iot:Subscribe
            Resource:
              - !Sub "arn:aws:iot:${AWS::Region}:${AWS::AccountId}:topicfilter/${TopicName}"
          - Effect: Allow
            Action:
              - iot:Connect
            Resource:
              - !Sub "arn:aws:iot:${AWS::Region}:${AWS::AccountId}:client/${Thing}"
      PolicyName: !Ref Prefix
Code language: YAML (yaml)
EC2 Instance
Resources:
  Instance:
    Type: AWS::EC2::Instance
    Properties:
      IamInstanceProfile: !Ref InstanceProfile
      ImageId: !Ref ImageId
      InstanceType: !Ref InstanceType
      NetworkInterfaces:
        - AssociatePublicIpAddress: true
          DeviceIndex: 0
          GroupSet:
            - !Ref InstanceSecurityGroup
          SubnetId: !Ref PublicSubnet1
      UserData: !Base64
        Fn::Sub: |
          #!/bin/bash -xe
          dnf update -y
          dnf install python3.11-pip -y
          dnf install -y git

          mkdir ~/certs

          curl -o ~/certs/Amazon-root-CA-1.pem \
            https://www.amazontrust.com/repository/AmazonRootCA1.pem

          aws iot create-keys-and-certificate \
            --set-as-active \
            --certificate-pem-outfile "~/certs/device.pem.crt" \
            --public-key-outfile "~/certs/public.pem.key" \
            --private-key-outfile "~/certs/private.pem.key" > ~/output.txt

          certificate_arn=`cat ~/output.txt | jq -r .certificateArn`

          aws iot attach-thing-principal \
            --thing-name "${Thing}" \
            --principal "$certificate_arn"

          aws iot attach-policy \
            --policy-name "${Policy}" \
            --target "$certificate_arn"

          aws iot describe-endpoint \
            --endpoint-type iot:Data-ATS > ~/endpoint.txt

          endpoint=`cat ~/endpoint.txt| jq -r .endpointAddress`

          python3.11 -m pip install awsiotsdk
          cd ~ && git clone https://github.com/aws/aws-iot-device-sdk-python-v2.git

          cd ~/aws-iot-device-sdk-python-v2/samples && python3.11 pubsub.py \
            --endpoint "$endpoint" \
            --ca_file ~/certs/Amazon-root-CA-1.pem \
            --cert ~/certs/device.pem.crt \
            --key ~/certs/private.pem.key \
            --client_id "${Thing}" \
            --topic "${TopicName}" \
            --count 5
Code language: YAML (yaml)
IAM Role
Resources:
  InstanceRole:
    Type: AWS::IAM::Role
    DeletionPolicy: Delete
    Properties:
      AssumeRolePolicyDocument:
        Version: 2012-10-17
        Statement:
          - Effect: Allow
            Action: sts:AssumeRole
            Principal:
              Service:
                - ec2.amazonaws.com
      ManagedPolicyArns:
        - arn:aws:iam::aws:policy/AmazonSSMManagedInstanceCore
      Policies:
        - PolicyName: InstancePolicy
          PolicyDocument:
            Version: 2012-10-17
            Statement:
              - Effect: Allow
                Action:
                  - iot:AttachPolicy
                  - iot:AttachThingPrincipal
                  - iot:CreateKeysAndCertificate
                  - iot:DescribeEndpoint
                Resource:
                  - "*"
Code language: YAML (yaml)
Full Template

Verification
User Data
Access the EC2 instance and check the execution status of the processes defined in the user data. Use SSM Session Manager to access the instance. For more information about SSM Session Manager, please refer to:

Use the tree command to check the contents of the /root directory.
sh-5.2$ sudo tree /root
/root
├── aws-iot-device-sdk-python-v2
│    ├── ...
│    ├── samples
│   │    │   ├── ...
│   │    │   ├── pubsub.py
│   │    │   └── ...
│    └── ...
├── certs
│    ├── Amazon-root-CA-1.pem
│    ├── device.pem.crt
│    ├── private.pem.key
│    └── public.pem.key
├── endpoint.txt
└── output.txt
Code language: Bash (bash)
We can confirm that the various files are properly placed as defined in the user data.
Sending Messages to AWS IoT Core
Run the journalctl command to check the instance logs and confirm that MQTT messages are being sent to AWS IoT Core.
sh-5.2$ sudo journalctl --no-pager
...
Feb 24 06:15:19 ip-10-0-1-45.ap-northeast-1.compute.internal cloud-init[1672]: + python3.11 pubsub.py --endpoint a2oxckhng7gmur-ats.iot.ap-northeast-1.amazonaws.com --ca_file /root/certs/Amazon-root-CA-1.pem --cert /root/certs/device.pem.crt --key /root/certs/private.pem.key --client_id fa-151 --topic test/topic --count 5
...
Feb 24 06:15:25 ip-10-0-1-45.ap-northeast-1.compute.internal cloud-init[1672]: Connecting to a2oxckhng7gmur-ats.iot.ap-northeast-1.amazonaws.com with client ID 'fa-151'...
Feb 24 06:15:25 ip-10-0-1-45.ap-northeast-1.compute.internal cloud-init[1672]: Connected!
Feb 24 06:15:25 ip-10-0-1-45.ap-northeast-1.compute.internal cloud-init[1672]: Subscribing to topic 'test/topic'...
Feb 24 06:15:25 ip-10-0-1-45.ap-northeast-1.compute.internal cloud-init[1672]: Connection Successful with return code: 0 session present: False
Feb 24 06:15:25 ip-10-0-1-45.ap-northeast-1.compute.internal cloud-init[1672]: Subscribed with 1
Feb 24 06:15:25 ip-10-0-1-45.ap-northeast-1.compute.internal cloud-init[1672]: Sending 5 message(s)
Feb 24 06:15:25 ip-10-0-1-45.ap-northeast-1.compute.internal cloud-init[1672]: Publishing message to topic 'test/topic': Hello World!  [1]
Feb 24 06:15:25 ip-10-0-1-45.ap-northeast-1.compute.internal cloud-init[1672]: Received message from topic 'test/topic': b'"Hello World!  [1]"'
Feb 24 06:15:25 ip-10-0-1-45.ap-northeast-1.compute.internal cloud-init[1672]: Publishing message to topic 'test/topic': Hello World!  [2]
Feb 24 06:15:25 ip-10-0-1-45.ap-northeast-1.compute.internal cloud-init[1672]: Received message from topic 'test/topic': b'"Hello World!  [2]"'
Feb 24 06:15:25 ip-10-0-1-45.ap-northeast-1.compute.internal cloud-init[1672]: Publishing message to topic 'test/topic': Hello World!  [3]
Feb 24 06:15:25 ip-10-0-1-45.ap-northeast-1.compute.internal cloud-init[1672]: Received message from topic 'test/topic': b'"Hello World!  [3]"'
Feb 24 06:15:25 ip-10-0-1-45.ap-northeast-1.compute.internal cloud-init[1672]: Publishing message to topic 'test/topic': Hello World!  [4]
Feb 24 06:15:25 ip-10-0-1-45.ap-northeast-1.compute.internal cloud-init[1672]: Received message from topic 'test/topic': b'"Hello World!  [4]"'
Feb 24 06:15:25 ip-10-0-1-45.ap-northeast-1.compute.internal cloud-init[1672]: Publishing message to topic 'test/topic': Hello World!  [5]
Feb 24 06:15:25 ip-10-0-1-45.ap-northeast-1.compute.internal cloud-init[1672]: Received message from topic 'test/topic': b'"Hello World!  [5]"'
Feb 24 06:15:25 ip-10-0-1-45.ap-northeast-1.compute.internal cloud-init[1672]: 5 message(s) received.
Feb 24 06:15:25 ip-10-0-1-45.ap-northeast-1.compute.internal cloud-init[1672]: Disconnecting...
Feb 24 06:15:25 ip-10-0-1-45.ap-northeast-1.compute.internal cloud-init[1672]: Connection closed
Feb 24 06:15:25 ip-10-0-1-45.ap-northeast-1.compute.internal cloud-init[1672]: Disconnected!
...
Code language: Bash (bash)
We have extracted the part of the program that sends MQTT messages to the AWS IoT endpoint. This is the result of executing the AWS IoT Device SDK sample program defined in the user data. You can see that the sample script is executed to connect to AWS IoT and send messages 5 times.
Finally, use the AWS IoT MQTT client to check messages sent from the EC2 instance.
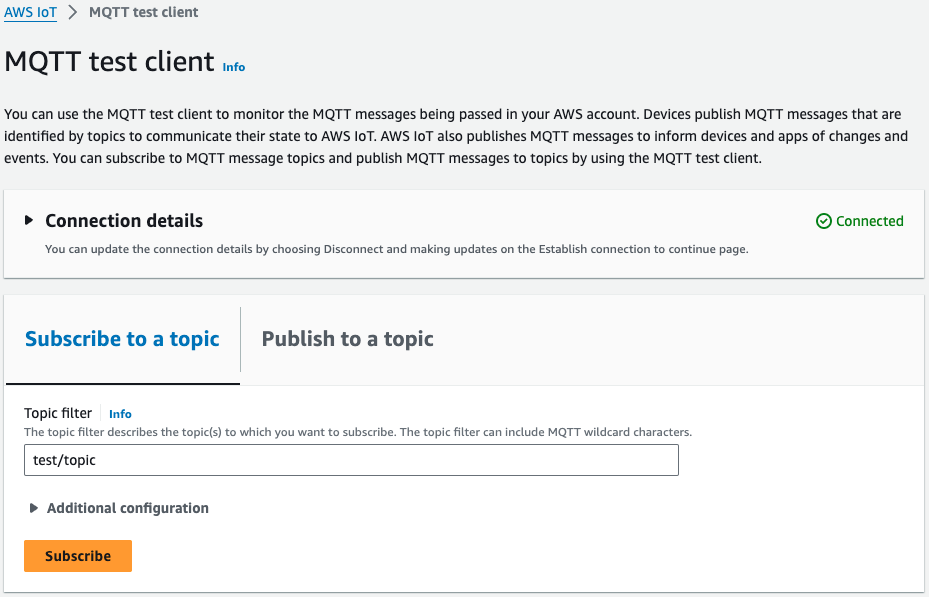
In the AWS IoT console, select “Subscribe to a topic”, enter “test/topic” as the topic name, and click “Subscribe”.
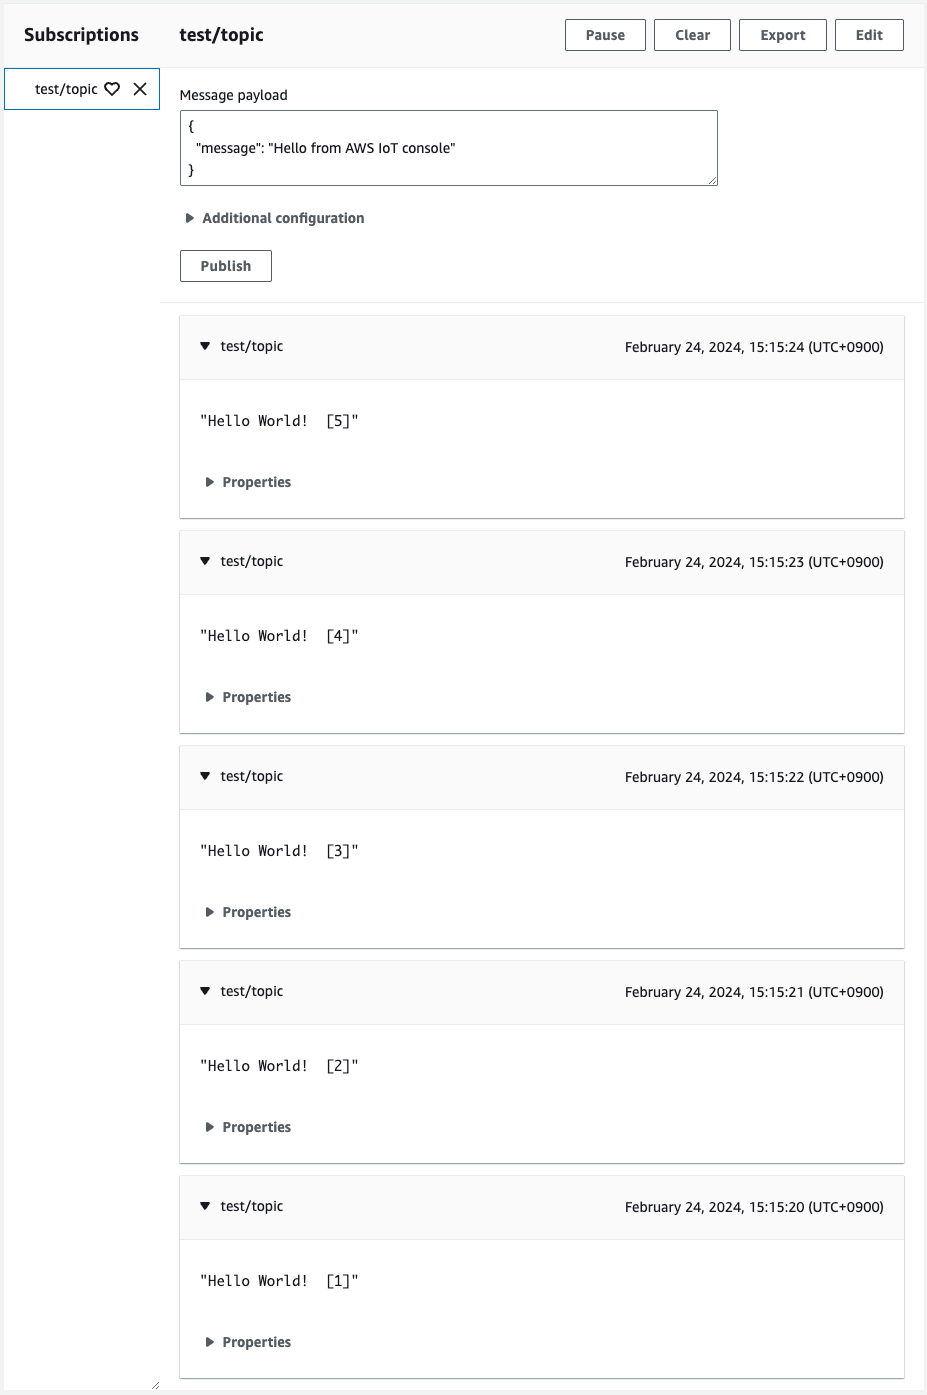
A message appears, confirming that it was sent from the EC2 instance.
Detach Certificates Before Deleting Thing and AWS IoT Policy
Before deleting the CloudFormation stack, you need to detach the certificates attached to the Thing and AWS IoT Policy.
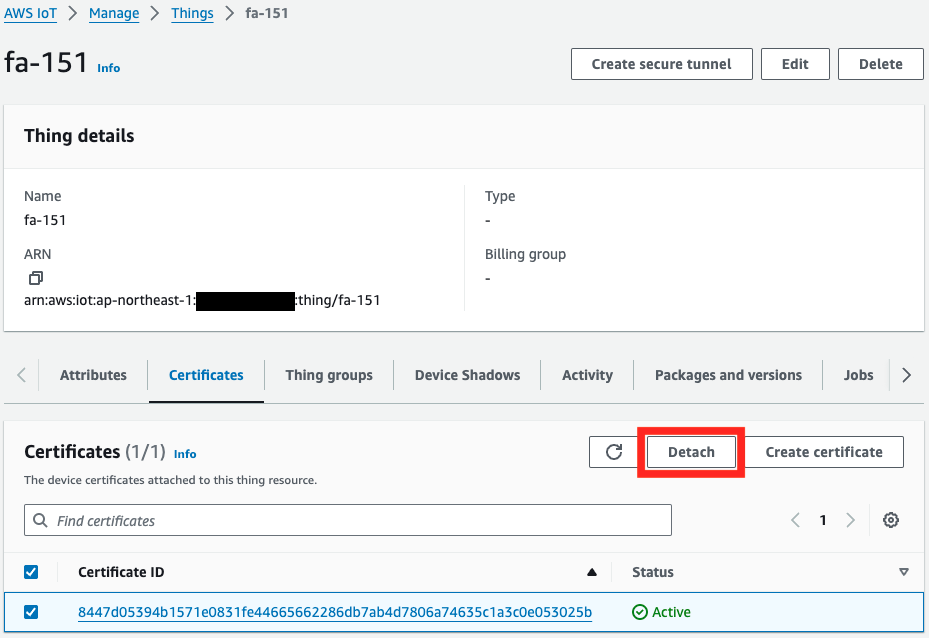
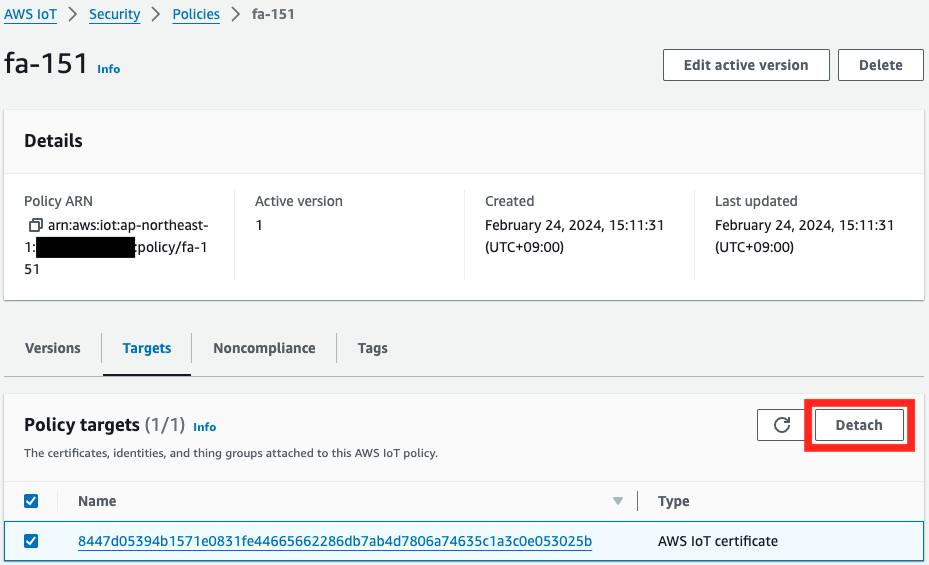
Please be aware that if you try to delete the resources without performing this step, the deletion will fail.
Conclusion
We have confirmed how to set up an EC2 instance as an IoT device and send MQTT messages to AWS IoT Core. We used the AWS IoT Device SDK for Python and performed tasks like creating certificates and setting up policies. This allows you to understand the basics of sending messages from IoT devices to the cloud.