Configure instances in private subnets to be attached to ALB
We will see how to attach an instance located in a private subnet to an ALB.
The following methods are introduced in the AWS official website on this subject.
To attach Amazon EC2 instances located in a private subnet, create public subnets in the same Availability Zones as the private subnets used by the backend instances. Then, associate the public subnets with your load balancer.
How do I attach backend instances with private IP addresses to my internet-facing load balancer in ELB?
Placing instances to be attached to the ALB in private subnets lowers the risk of unauthorized access to the instances.
Attaching instances in private subnets to the ALB can increase overall system security.
Environment
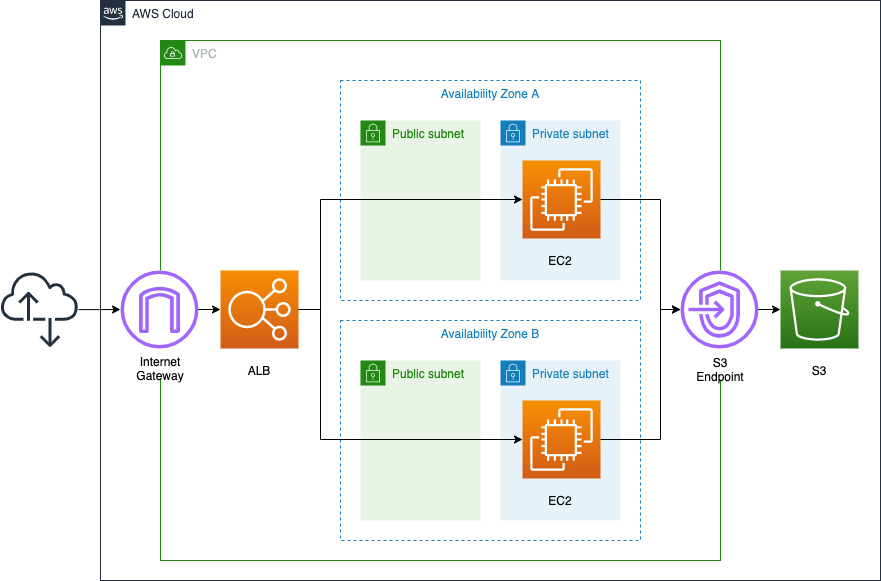
Place the ELB in front of the EC2 instance, and the ELB should be of type ALB.
The instance is Amazon Linux 2023.
Instances will be placed on private subnets, but public subnets will also be created for each AZ.
CloudFormation template files
We will build the above configuration using CloudFormation.
The CloudFormation template is placed at the following URL
https://github.com/awstut-an-r/awstut-fa/tree/main/001
Template file points
To attach an instance in a private subnet to an ALB, create a public subnet – VPC side
Check the public subnet-related resources.
The key points are the public subnets and the route table for the subnets.
Resources:
  IGW:
    Type: AWS::EC2::InternetGateway

  IGWAttachment:
    Type: AWS::EC2::VPCGatewayAttachment
    Properties:
      VpcId: !Ref VPC
      InternetGatewayId: !Ref IGW

  PublicSubnet1:
    Type: AWS::EC2::Subnet
    Properties:
      CidrBlock: !Ref CidrIp1
      VpcId: !Ref VPC
      AvailabilityZone: !Sub ${AWS::Region}${AvailabilityZone1}

  PublicSubnet2:
    Type: AWS::EC2::Subnet
    Properties:
      CidrBlock: !Ref CidrIp2
      VpcId: !Ref VPC
      AvailabilityZone: !Sub ${AWS::Region}${AvailabilityZone2}

  PublicRouteTable:
    Type: AWS::EC2::RouteTable
    Properties:
      VpcId: !Ref VPC

  RouteToInternet:
    Type: AWS::EC2::Route
    Properties:
      RouteTableId: !Ref PublicRouteTable
      DestinationCidrBlock: 0.0.0.0/0
      GatewayId: !Ref IGW

  PublicSubnetRouteTableAssociation1:
    Type: AWS::EC2::SubnetRouteTableAssociation
    Properties:
      SubnetId: !Ref PublicSubnet1
      RouteTableId: !Ref PublicRouteTable

  PublicSubnetRouteTableAssociation2:
    Type: AWS::EC2::SubnetRouteTableAssociation
    Properties:
      SubnetId: !Ref PublicSubnet2
      RouteTableId: !Ref PublicRouteTable
Code language: YAML (yaml)
In the environment we will be building, an EC2 instance will be created on private subnets. However, in order to associate an EC2 instance placed on a private subnets with the ALB, it is necessary to prepare public subnets for the ALB, as shown in the first quote.
A public subnet must be created for each AZ in which a private subnet is created. In this case, there is one private subnet in each of the two AZs where the instances are located. Therefore, one public subnet must also be created in each of the two AZs.
We will also prepare a route table for the public subnet and define the route for the Internet gateway.
To attach an instance in a private subnet to an ALB, create a public subnet – ALB side
Check the subnet settings on the ALB side.
Resources:
  ALB:
    Type: AWS::ElasticLoadBalancingV2::LoadBalancer
    Properties:
      Name: !Sub ${Prefix}-ALB
      Scheme: internet-facing
      SecurityGroups:
        - !Ref ALBSecurityGroup
      Subnets:
        - !Ref PublicSubnet1
        - !Ref PublicSubnet2
      Type: application
Code language: YAML (yaml)
Continuing from the previous section on public subnets, we will associate them with ALB.
Specify the public subnets in the Subnets property. You can now associate EC2 instances in the private subnet of the same AZ with the ALB.
In addition, create a target group and a listener for the ALB.
Resources:
  ALBTargetGroup:
    Type: AWS::ElasticLoadBalancingV2::TargetGroup
    Properties:
      VpcId: !Ref VPC
      Name: !Sub ${Prefix}-ALBTargetGroup
      Protocol: HTTP
      Port: !Ref HTTPPort
      HealthCheckProtocol: HTTP
      HealthCheckPath: /
      HealthCheckPort: traffic-port
      HealthyThresholdCount: !Ref HealthyThresholdCount
      UnhealthyThresholdCount: !Ref UnhealthyThresholdCount
      HealthCheckTimeoutSeconds: !Ref HealthCheckTimeoutSeconds
      HealthCheckIntervalSeconds: !Ref HealthCheckIntervalSeconds
      Matcher:
        HttpCode: !Ref HttpCode
      Targets:
        - Id: !Ref Instance1
        - Id: !Ref Instance2

  ALBListener:
    Type: AWS::ElasticLoadBalancingV2::Listener
    Properties:
      DefaultActions:
        - TargetGroupArn: !Ref ALBTargetGroup
          Type: forward
      LoadBalancerArn: !Ref ALB
      Port: !Ref HTTPPort
      Protocol: HTTP
Code language: YAML (yaml)
This time, we will configure the ALB listener to accept HTTP (tcp/80) and route it to the target group to which the two instances belong.
Run dnf(yum) via VPC endpoint
Install Apache using dnf (yum) to run an EC2 instance as a web server.
Normally, to run dnf, you need to access yum repositories located on the Internet. However, exceptionally, if the OS of the EC2 instance is Amazon Linux (2, 2023), you can access the dnf/yum repository for the same OS without going through the Internet by installing a VPC endpoint for S3.
For more information, please see the following page.
This time, dnf will be used to install Apache.
Resources:
  Instance1:
    Type: AWS::EC2::Instance
    Properties:
      ImageId: !Ref ImageId
      InstanceType: !Ref InstanceType
      NetworkInterfaces:
        - DeviceIndex: 0
          SubnetId: !Ref PrivateSubnet1
          GroupSet:
            - !Ref InstanceSecurityGroup
      UserData: !Base64 |
        #!/bin/bash -xe
        dnf update -y
        dnf install -y httpd
        systemctl start httpd
        systemctl enable httpd
        ec2-metadata -i > /var/www/html/index.html
Code language: YAML (yaml)
dnf is executed as part of the instance initialization process with user data.
For more information on user data, please see the following page.
This time, the following is executed as the initialization process
- Apache installation and startup configuration.
- Write the instance ID in index.html.
Architecting
Using CloudFormation, we will build this environment and check its actual behavior.
Create CloudFormation stack and check resources in stacks
Create a CloudFormation stacks.
For instructions on how to run CloudFormation from the AWS CLI, please refer to the following page.

You can check the status of resource creation in the AWS Managemet Console.
Let’s start with the ALB.
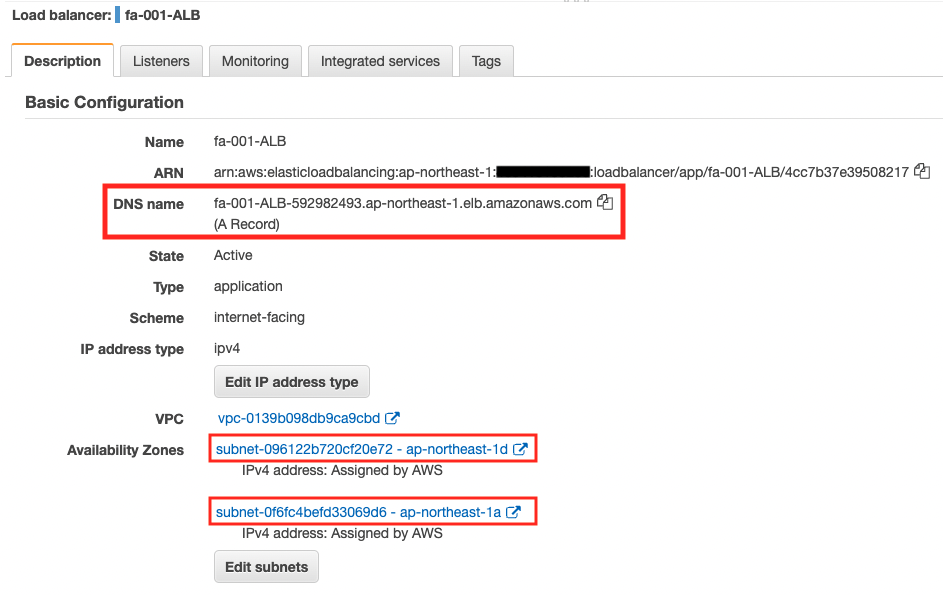
You can see that there are two public subnets tied to the ALB.
Additionally, you can check the DNS name assigned to the ALB.
Next, check the target group of the ALB.
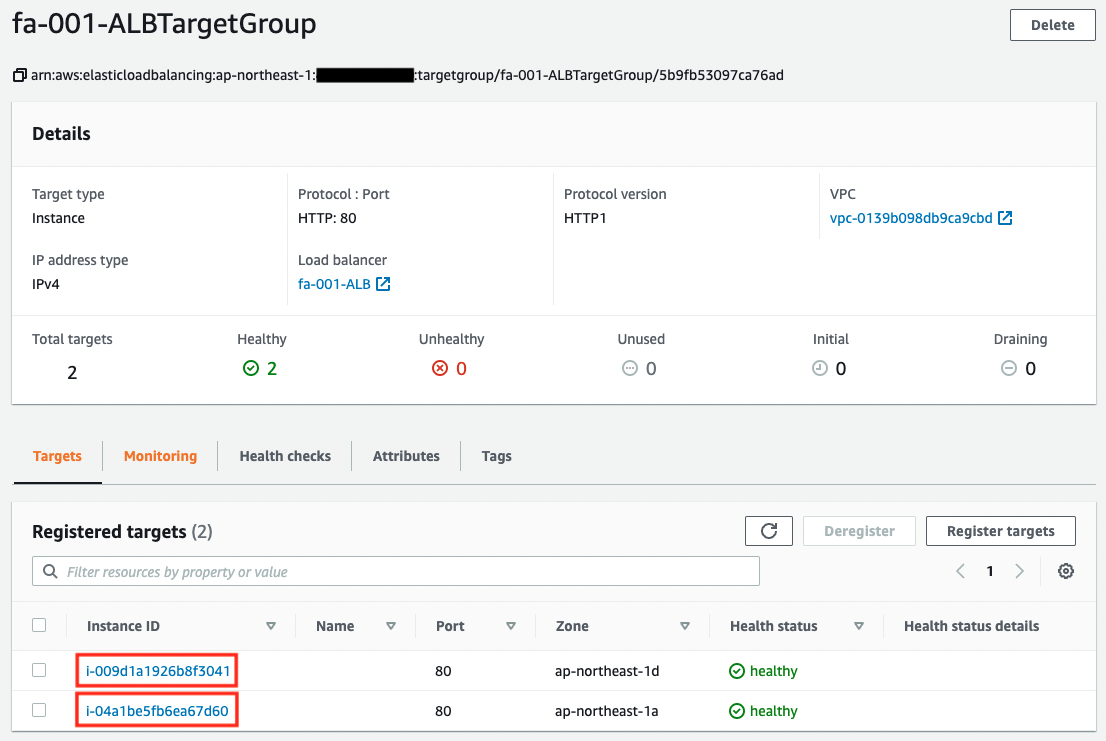
You can see that this one contains instances in a private subnets.
Operation check
Now that we are ready, let’s check the actual behavior.
$ curl http://fa-001-ALB-592982493.ap-northeast-1.elb.amazonaws.com
instance-id: i-009d1a1926b8f3041

$ curl http://fa-001-ALB-592982493.ap-northeast-1.elb.amazonaws.com
instance-id: i-04a1be5fb6ea67d60

$ curl http://fa-001-ALB-592982493.ap-northeast-1.elb.amazonaws.com
instance-id: i-009d1a1926b8f3041

$ curl http://fa-001-ALB-592982493.ap-northeast-1.elb.amazonaws.com
instance-id: i-04a1be5fb6ea67d60
Code language: Basic (basic)
We were able to access the ALB successfully.
From the output results, we can see that the two instances placed in the private subnet are accessed alternately.
Summary
We found that in order to attach an instance in private subnets to the ELB, we need to create public subnets.
By placing instances attached to ALB on private subnets, the risk of unauthorized access to the instances can be lowered. This can then improve the overall security of the system.