Four ways to initialize a Linux instance
Consider how to perform the initialization process when an EC2 instance is started.
We will cover the following four methods of initializing an EC2 instance at build time
- How to use user data
- How to use cfn-init
- How to run Ansible Playbook in SSM State Manager
- How to execute shell scripts in SSM State Manager
There are several methods of initialization processing, so you can choose the method that best suits your needs.
Selecting the appropriate method allows you to manage and manipulate instances efficiently.
Environment
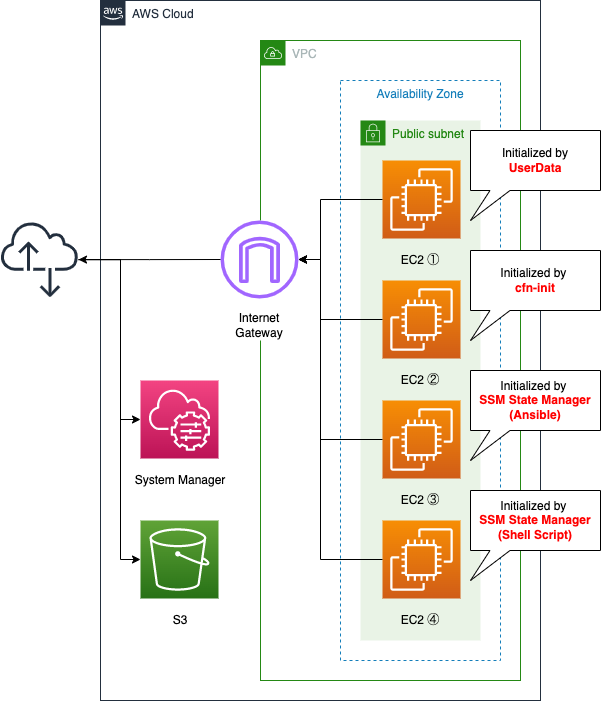
Create two subnets within the VPC, one of which will be a public subnet with access to the Internet.
Place four EC2 instances on the subnets. All instances will be based on the latest Amazon Linux 2.
Instances 3 and 4 use System Manager to perform the initialization process.
Instance 3 is initialized by executing the Ansible Playbook, which is stored in an S3 bucket.
In addition, this Playbook is created using CodeBuild and placed in the same bucket.
Scenario
Perform the initialization process for the four EC2 instances using the four methods described above.
The following are commonly performed
- Update yum.
- Install, start and activate Apache with yum.
- Write the instance ID in index.html and make it the root page of Apache.
CloudFormation template files
We will build the above configuration using CloudFormation.
Place the CloudFormation template at the following URL.
https://github.com/awstut-an-r/awstut-fa/tree/main/004
Template file points
We will cover the key points of each template file to configure this environment.
Define the initialization process using user data
Resources:
  Instance1:
    Type: AWS::EC2::Instance
    Properties:
      IamInstanceProfile: !Ref InstanceProfile1
      ImageId: !Ref ImageId
      InstanceType: !Ref InstanceType
      NetworkInterfaces:
        - AssociatePublicIpAddress: true
          DeviceIndex: 0
          SubnetId: !Ref PublicSubnet
          GroupSet:
            - !Ref InstanceSecurityGroup
      UserData: !Base64 |
        #!/bin/bash -xe
        yum update -y
        yum install -y httpd
        systemctl start httpd
        systemctl enable httpd
        ec2-metadata -i > /var/www/html/index.html
Code language: YAML (yaml)
By using user data, you can define the initialization process of the instance.
When you launch an instance in Amazon EC2, you have the option of passing user data to the instance that can be used to perform common automated configuration tasks and even run scripts after the instance starts.
Run commands on your Linux instance at launch
The UserData property allows you to define user data. The content specified in the user data must not be plain text, but must be encoded in Base64.
User data must be base64-encoded. The Amazon EC2 console can perform the base64-encoding for you or accept base64-encoded input.
Work with instance user data
This time, we will use CloudFormation’s built-in function Fn::Base64 to encode and pass the initialization process.
Use cfn-init to define the initialization process
Resources:
  Instance2:
    Type: AWS::EC2::Instance
    Metadata:
      AWS::CloudFormation::Init:
        config:
          packages:
            yum:
              httpd: []
          services:
            sysvinit:
              httpd:
                enabled: "true"
                ensureRunning: "true"
          commands:
            001make-index.html:
              command: ec2-metadata -i > /var/www/html/index.html
    Properties:
      IamInstanceProfile: !Ref InstanceProfile1
      ImageId: !Ref ImageId
      InstanceType: !Ref InstanceType
      NetworkInterfaces:
        - AssociatePublicIpAddress: true
          DeviceIndex: 0
          SubnetId: !Ref PublicSubnet
          GroupSet:
            - !Ref InstanceSecurityGroup
      UserData:
        Fn::Base64: !Sub |
          #!/bin/bash -xe
          yum install -y aws-cfn-bootstrap

          /opt/aws/bin/cfn-init -v \
          --stack ${AWS::StackName} \
          --resource Instance2 \
          --region ${AWS::Region} \
Code language: YAML (yaml)
By using cfn-init, a kind of CloudFormation helper script, you can define the instance initialization process.
The cfn-init helper script reads template metadata from the AWS::CloudFormation::Init key and acts accordingly to:
cfn-init
Fetch and parse metadata from CloudFormation
Install packages
Write files to disk
Enable/disable and start/stop services
Define the execution of the script in user data. Define the process to be executed by the script as metadata.
Use the AWS::CloudFormation::Init type to include metadata on an Amazon EC2 instance for the cfn-init helper script. If your template calls the cfn-init script, the script looks for resource metadata rooted in the AWS::CloudFormation::Init metadata key.
AWS::CloudFormation::Init
Under the config property, define the process to be executed in the corresponding section.
The configuration is separated into sections…
AWS::CloudFormation::Init
The cfn-init helper script processes these configuration sections in the following order: packages, groups, users, sources, files, commands, and then services.
In this case, we will define it as follows.
- packages section: Installing Apache.
- services section: Start and activate Apache.
- commands section: Write the instance ID into index.html to make it the root page of Apache.
Run the Ansible Playbook in SSM State Manager to initialize
Resources:
  ApplyAnsiblePlaybooksAssociation:
    Type: AWS::SSM::Association
    Properties:
      AssociationName: !Sub "${Prefix}-playbook-association"
      Name: AWS-ApplyAnsiblePlaybooks
      OutputLocation:
        S3Location:
          OutputS3BucketName: !Ref BucketName
          OutputS3KeyPrefix: !Sub "playbook-association-log"
      Parameters:
        Check:
          - "False"
        ExtraVariables:
          - SSM=True
        InstallDependencies:
          - "True"
        PlaybookFile:
          - !Ref PlaybookFileName
        SourceInfo:
          - !Sub '{"path": "https://${BucketName}.s3.${AWS::Region}.amazonaws.com/${PlaybookPackageName}"}'
        SourceType:
          - S3
        Verbose:
          - -v
      Targets:
        - Key: InstanceIds
          Values:
            - !Ref Instance3
      WaitForSuccessTimeoutSeconds: !Ref WaitForSuccessTimeoutSeconds
Code language: YAML (yaml)
By using the SSM State Manager, you can define the initialization process of the instance.
State Manager, a capability of AWS Systems Manager, is a secure and scalable configuration management service that automates the process of keeping your Amazon Elastic Compute Cloud (Amazon EC2) and hybrid infrastructure in a state that you define.
AWS Systems Manager State Manager
AWS recommends using SSM State Manager for initialization rather than CloudFormation’s cfn-init.
There are many patterns that you can explore between CloudFormation and State Manager, but we recommend using CloudFormation to define your AWS Resources and Systems Manager to perform configuration management… start to think about using State Manager instead of cfn-init.
Using State Manager over cfn-init in CloudFormation and its benefits
In order to initialize an instance by SSM State Manager, a State Manager association needs to be defined. The key parameter in creating the association is the SSM documentation.
An AWS Systems Manager document (SSM document) defines the actions that Systems Manager performs on your managed instances. Systems Manager includes more than 100 pre-configured documents that you can use by specifying parameters at runtime.
AWS Systems Manager documents
In instance ③, we will use Ansible Playbook to perform the initialization. Therefore, specify “AWS-ApplyAnsiblePlaybooks” in the Name property.
Also, in the OutputLocation property, specify the location where the log will be saved during processing. In this case, we will set it so that the log will be output to the same location as the Playbook file described below.
Specify the target instance to be associated with in the Targets property. In this case, we will specify it using the instance ID.
In the Parameters property, specify the file name of the Playbook file and the location of the file. In this case, I referred to Create an association that runs Ansible playbooks (CLI) for the settings.
Define the IAM role for the instance.
Resources:
  InstanceRole2:
    Type: AWS::IAM::Role
    DeletionPolicy: Delete
    Properties:
      AssumeRolePolicyDocument:
        Version: 2012-10-17
        Statement:
          - Effect: Allow
            Action: sts:AssumeRole
            Principal:
              Service:
                - ec2.amazonaws.com
      Policies:
        - PolicyName: SSMStateManagerPolicy
          PolicyDocument:
            Version: 2012-10-17
            Statement:
              - Effect: Allow
                Action:
                  - s3:GetObject
                  - s3:PutObject
                  - s3:PutObjectAcl
                  - s3:ListBucket
                Resource:
                  - !Sub "arn:aws:s3:::${BucketName}"
                  - !Sub "arn:aws:s3:::${BucketName}/*"
      ManagedPolicyArns:
        - arn:aws:iam::aws:policy/AmazonSSMManagedInstanceCore
Code language: YAML (yaml)
In order to initialize using the SSM State Manager, you need to grant two permissions to the instance.
The first is access to the S3 bucket where the Ansible Playbook and logs are located. You can define the required permissions in the inline policy.
The second is the permissions to meet the requirements of SSM managed instances, which are the instances that can be targeted by SSM State Manager.
A managed node is any machine configured for AWS Systems Manager. You can configure Amazon Elastic Compute Cloud (Amazon EC2) instances; AWS IoT Greengrass core devices; and on-premises servers, edge devices, and virtual machines (VMs) in a hybrid environment as managed nodes.
Managed nodes
Amazon Linux 2-based instances can be treated as SSM managed instances by granting them permissions under the AWS managed policy AmazonSSMManagedInstanceCore.
The playbook to be executed this time is created using CodeBuild and placed in an S3 bucket.
Resources:
  CodeBuildProject:
    Type: AWS::CodeBuild::Project
    Properties:
      Artifacts:
        Type: NO_ARTIFACTS
      Cache:
        Type: NO_CACHE
      Environment:
        ComputeType: !Ref ProjectEnvironmentComputeType
        EnvironmentVariables:
          - Name: BUCKET_NAME
            Type: PLAINTEXT
            Value: !Ref BucketName
          - Name: PLAYBOOK_FILE_NAME
            Type: PLAINTEXT
            Value: !Ref PlaybookFileName
          - Name: PLAYBOOK_PACKAGE_NAME
            Type: PLAINTEXT
            Value: !Ref PlaybookPackageName
        Image: !Ref ProjectEnvironmentImage
        ImagePullCredentialsType: CODEBUILD
        Type: !Ref ProjectEnvironmentType
      LogsConfig:
        CloudWatchLogs:
          GroupName: !Ref LogGroup
          Status: ENABLED
      Name: !Sub "${Prefix}-project"
      ServiceRole: !GetAtt CodeBuildRole.Arn
      Source:
        Type: NO_SOURCE
        BuildSpec: |
          version: 0.2

          phases:
            pre_build:
              commands:
                - |
                  cat << EOF > $PLAYBOOK_FILE_NAME
                  - hosts: all
                    gather_facts: no
                    become: yes

                    tasks:
                      - name: update yum
                        yum: name=*
                      - name: install the latest version of Apache
                        yum: name=httpd state=latest
                      - name: start and enable Apache
                        service: name=httpd state=started enabled=yes
                      - name: make index.html for awstut.net
                        shell: ec2-metadata -i > /var/www/html/index.html
                  EOF
            build:
              commands:
                - zip -r $PLAYBOOK_PACKAGE_NAME $PLAYBOOK_FILE_NAME
                - aws s3 cp ./$PLAYBOOK_PACKAGE_NAME s3://$BUCKET_NAME/
      Visibility: PRIVATE
Code language: YAML (yaml)
The BuildSpec property is the key.
It describes what is to be executed at build time.
Create the Playbook (playbook.yml) in the pre_build phase.
Zip the Playbook in the build phase and place it in the S3 bucket.
This CodeBuild project is automatically run when the CloudFormation stack is created.
This will use CloudFormation custom resources.
For details, please refer to the following page.

Run a shell script in SSM State Manager to initialize
Resources:
  RunShellScriptAssociation:
    Type: AWS::SSM::Association
    Properties:
      AssociationName: !Sub ${Prefix}-shellscript-association
      Name: AWS-RunShellScript
      OutputLocation:
        S3Location:
          OutputS3BucketName: !Ref LogBucketName
          OutputS3KeyPrefix: !Sub "${Prefix}/shellscript-association-log"
      Parameters:
        commands:
          - "sudo yum update -y"
          - "sudo yum install -y httpd"
          - "sudo systemctl start httpd"
          - "sudo systemctl enabled httpd"
          - "ec2-metadata -i > /var/www/html/index.html"
      Targets:
        - Key: InstanceIds
          Values:
            - !Ref Instance4
      WaitForSuccessTimeoutSeconds: !Ref WaitForSuccessTimeoutSeconds
Code language: YAML (yaml)
Basically, it is the same as the case of the Ansible Playbook described earlier.
This time, we will simply specify “AWS-RunShellScript” in the SSM document for the purpose of executing a shell script.
You can define the command to be executed in the commands property in the Parameters property.
Architecting
Use CloudFormation to build this environment and check its actual behavior.
Create CloudFormation stacks and check the resources in the stacks
Next, create the CloudFormation stacks.
For information on how to create a CloudFormation stack from the AWS CLI, please see the following page.

Check each resource from the AWS Management Console.
Check CodeBuild.
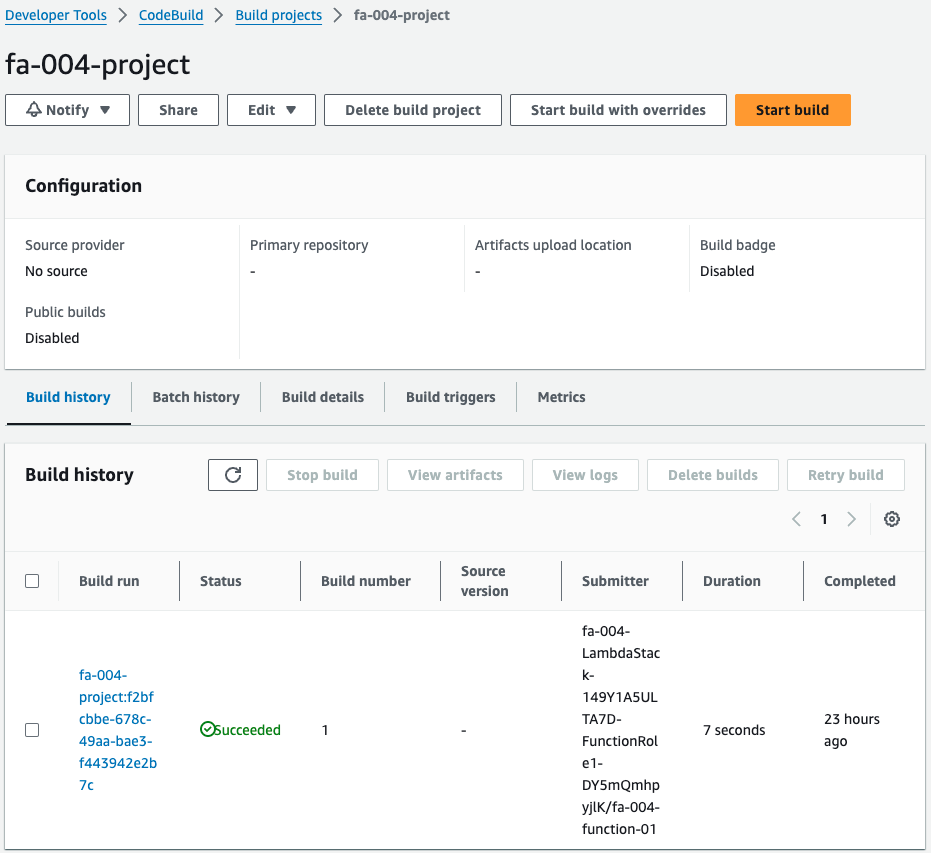
Indeed, the CodeBuild project is running.
That means it was automatically started when the CloudFormation stack was created by a CloudFormation custom resource.
This project is for creating an Ansible Playbook for instance 3.
Check the log when the project is run.
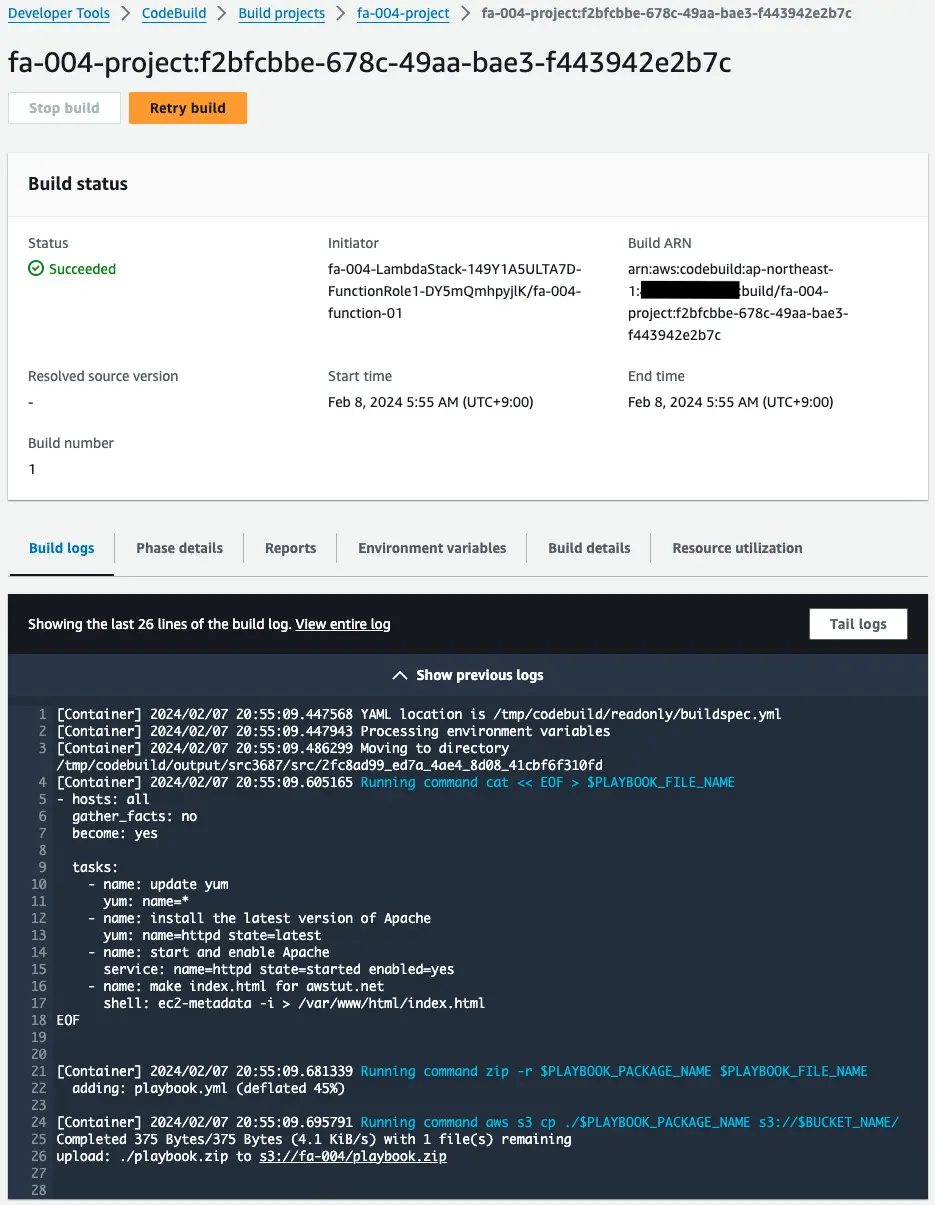
Indeed, after the Playbook is created, this is zipped and uploaded to the S3 bucket.
Check the S3 bucket.
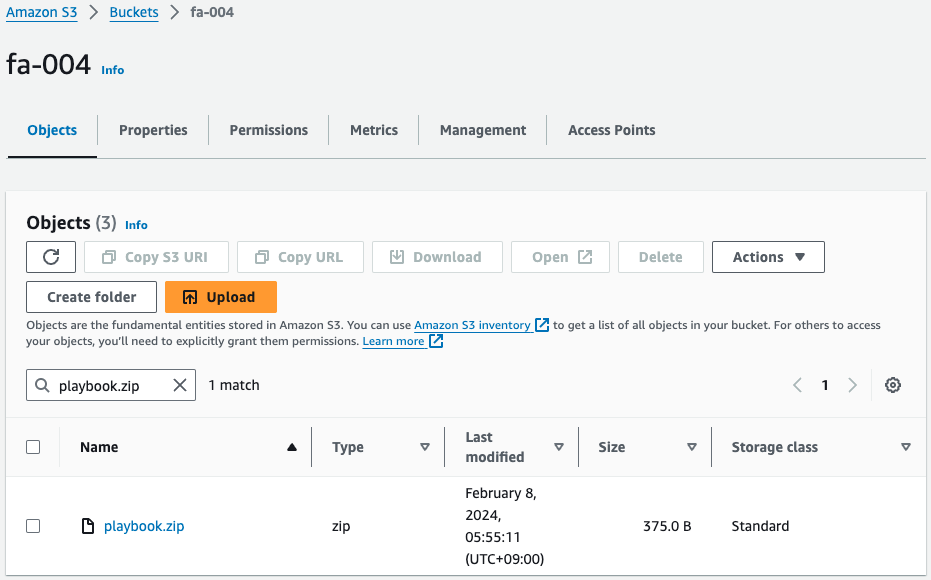
Sure enough, there is a playbook.zip stored in the S3 bucket.
This was created by the CodeBuild project I mentioned earlier.
Behavior check 1: Initialize the instance with user data
Now that we are ready, we can actually check the behavior.
First access instance 1 (i-0a9b66cd7cedd7c32).
Use SSM Session Manager to access the EC2 instance.
$ aws ssm start-session --target i-0a9b66cd7cedd7c32
...
sh-5.2$
Code language: Bash (bash)
I was able to access the site successfully.
For more information on SSM Session Manager, please see the following page
Check the log during the initialization process.
[ec2-user@ip-10-0-1-253 ~]$ sudo cat /var/log/cloud-init-output.log
...
+ yum update -y
...
Complete!
+ yum install -y httpd
...
Installed:
  httpd.x86_64 0:2.4.48-2.amzn2
...
Complete!
+ systemctl start httpd
+ systemctl enable httpd
...
+ ec2-metadata -i
Code language: Bash (bash)
In /var/log/cloud-init-output.log, we could check the log at the time of initialization.
If initialized with user data in this manner, the log will be placed locally on the instance to be processed, unless configured otherwise.
Behavior check 2: Initialize the instance using cfn-init
Access instance 2 (i-0e809df5ce3202e36).
$ aws ssm start-session --target i-0e809df5ce3202e36
...
sh-5.2$
Code language: Bash (bash)
Check the log at the time of initialization.
[ec2-user@ip-10-0-1-82 ~]$ sudo cat /var/log/cfn-init.log
2021-10-03 05:02:50,379 [INFO] -----------------------Starting build-----------------------
2021-10-03 05:02:50,380 [DEBUG] Not setting a reboot trigger as scheduling support is not available
2021-10-03 05:02:50,381 [INFO] Running configSets: default
2021-10-03 05:02:50,382 [INFO] Running configSet default
2021-10-03 05:02:50,384 [INFO] Running config config
2021-10-03 05:02:53,990 [DEBUG] Installing/updating ['httpd'] via yum
2021-10-03 05:02:57,144 [INFO] Yum installed ['httpd']
2021-10-03 05:02:57,144 [DEBUG] No groups specified
2021-10-03 05:02:57,144 [DEBUG] No users specified
2021-10-03 05:02:57,144 [DEBUG] No sources specified
2021-10-03 05:02:57,144 [DEBUG] No files specified
2021-10-03 05:02:57,144 [DEBUG] Running command 001make-index.html
2021-10-03 05:02:57,144 [DEBUG] No test for command 001make-index.html
2021-10-03 05:02:57,182 [INFO] Command 001make-index.html succeeded
2021-10-03 05:02:57,182 [DEBUG] Command 001make-index.html output:
2021-10-03 05:02:57,182 [DEBUG] Using service modifier: /sbin/chkconfig
2021-10-03 05:02:57,182 [DEBUG] Setting service httpd to enabled
2021-10-03 05:02:57,278 [INFO] enabled service httpd
2021-10-03 05:02:57,278 [DEBUG] Using service runner: /sbin/service
2021-10-03 05:02:57,297 [DEBUG] Starting service httpd as it is not running
2021-10-03 05:02:57,370 [INFO] Started httpd successfully
2021-10-03 05:02:57,371 [INFO] ConfigSets completed
2021-10-03 05:02:57,371 [DEBUG] Not clearing reboot trigger as scheduling support is not available
2021-10-03 05:02:57,371 [INFO]
-----------------------Build complete-----------------------
Code language: Bash (bash)
[ec2-user@ip-10-0-1-82 ~]$ sudo cat /var/log/cfn-init-cmd.log
2021-10-03 05:02:50,382 P2445 [INFO] ************************************************************
2021-10-03 05:02:50,382 P2445 [INFO] ConfigSet default
2021-10-03 05:02:50,384 P2445 [INFO] ++++++++++++++++++++++++++++++++++++++++++++++++++++++++++++
2021-10-03 05:02:50,384 P2445 [INFO] Config config
2021-10-03 05:02:53,991 P2445 [INFO] ============================================================
2021-10-03 05:02:53,991 P2445 [INFO] yum install httpd
2021-10-03 05:02:57,135 P2445 [INFO] -----------------------Command Output-----------------------
...
2021-10-03 05:02:57,142 P2445 [INFO] Installed:
2021-10-03 05:02:57,142 P2445 [INFO] httpd.x86_64 0:2.4.48-2.amzn2
...
2021-10-03 05:02:57,143 P2445 [INFO] Complete!
2021-10-03 05:02:57,144 P2445 [INFO] ------------------------------------------------------------
2021-10-03 05:02:57,144 P2445 [INFO] Completed successfully.
2021-10-03 05:02:57,144 P2445 [INFO] ============================================================
2021-10-03 05:02:57,145 P2445 [INFO] Command 001make-index.html
2021-10-03 05:02:57,181 P2445 [INFO] Completed successfully.
Code language: Bash (bash)We were able to check the logs during initialization in /var/log/cfn-init.log and /var/log/cfn-init-cmd.log.
As you can see, when you initialize with cfn-init, the logs will be placed locally on the instance to be processed, unless you configure otherwise.
Behavior check 3: Run Ansible Playbook in SSM State Manager to initialize the instance
Access instance 3 (i-0972c3d05d89efeba).
$ aws ssm start-session --target i-0972c3d05d89efeba
...
sh-5.2$
Code language: Bash (bash)
Next, check the execution status of the SSM Run Command from the AWS Management Console.
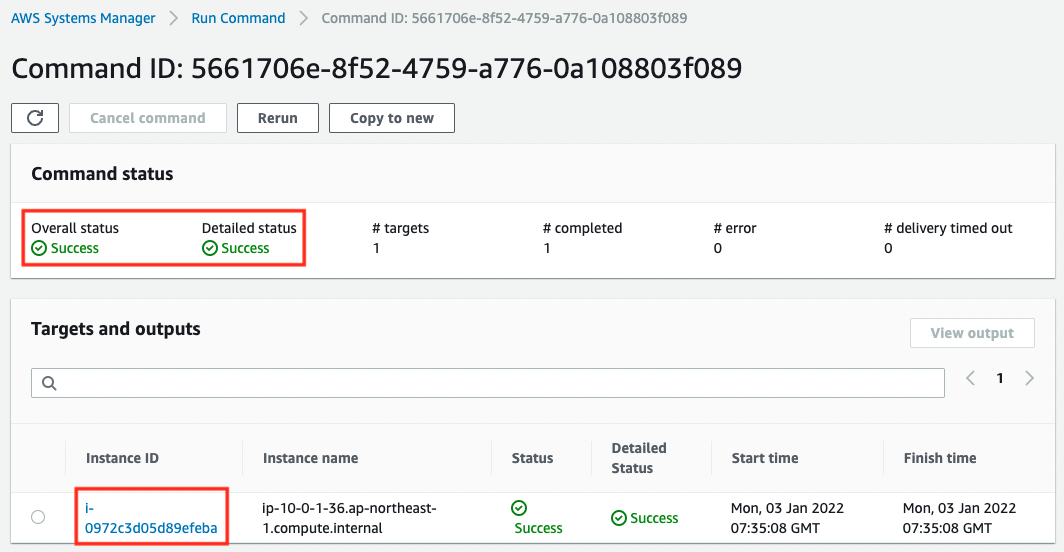
You can see that the Run Command has been executed for Instance3 and it has finished successfully.
You can also check the details of the execution result.
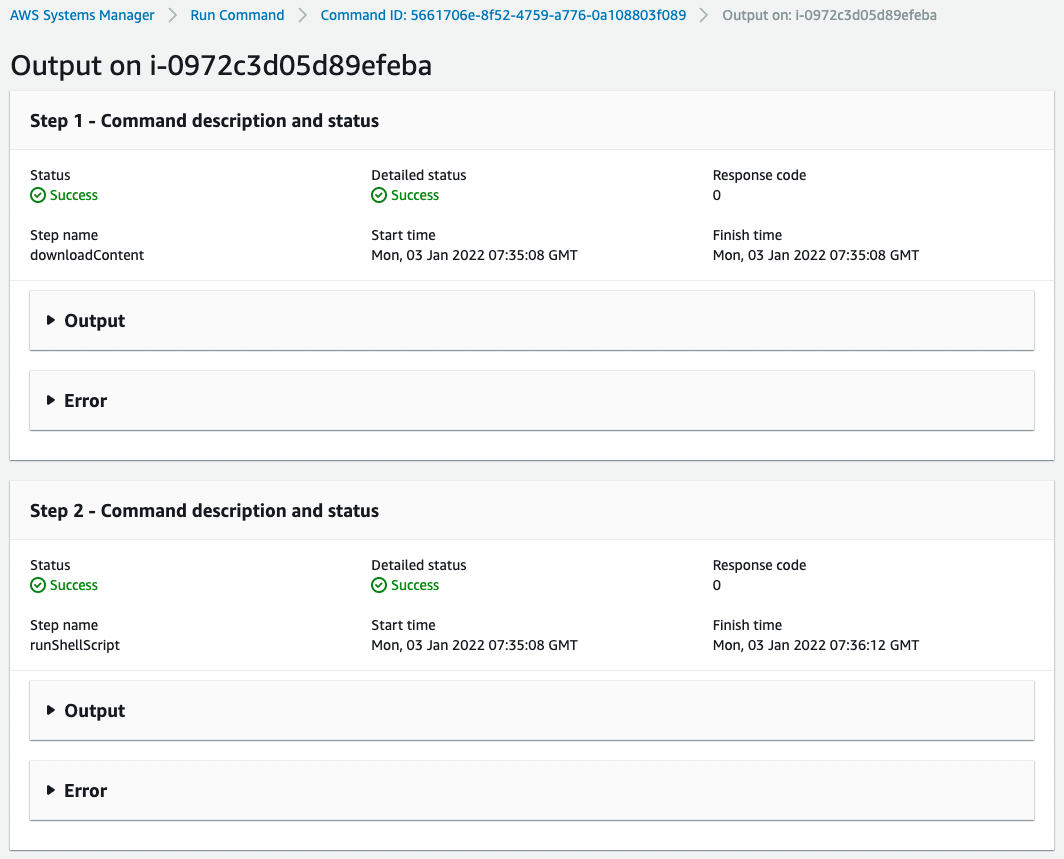
You can see that the command was executed in two separate steps to run the Ansible Playbook.
If you enable the option, you can output the log to the S3 bucket.
s3://[bucket-name]/[folder-name]/[command-id]/[instance-id]/awsrunShellScript/runShellScript/stdout
The contents are as follows.
$ cat stdout
...
Installed:
  ansible.noarch 0:2.9.25-1.el7
...
Running Ansible in /var/lib/amazon/ssm/i-079d3fa8b1503d6b2/document/orchestration/4649a395-5815-400d-bf21-596b1c098a20/downloads
Archive:  ./playbook.zip
  inflating: playbook.yml
Using /etc/ansible/ansible.cfg as config file

PLAY [all] *********************************************************************

TASK [update yum] **************************************************************
...

TASK [install the latest version of Apache] ************************************
...

TASK [start and enable Apache] *************************************************
...

TASK [make index.html] ******************************************
...

PLAY RECAP *********************************************************************
localhost                  : ok=4    changed=3    unreachable=0    failed=0    skipped=0    rescued=0    ignored=0
Code language: Bash (bash)
If you check the log, you can see that after installing Ansible, the Playbook is downloaded and the Tasks are executed in order.
When initialized with SSM State Manager in this way, the logs can be output to the S3 bucket.
Behavior Check 4: Initialize the instance by running a shell script in SSM State Manager
Access instance 4 (i-02fb072859880b2d8).
$ aws ssm start-session --target i-02fb072859880b2d8
...
sh-5.2$
Code language: Bash (bash)
Next, check the execution status of the SSM Run Command from the AWS Management Console.
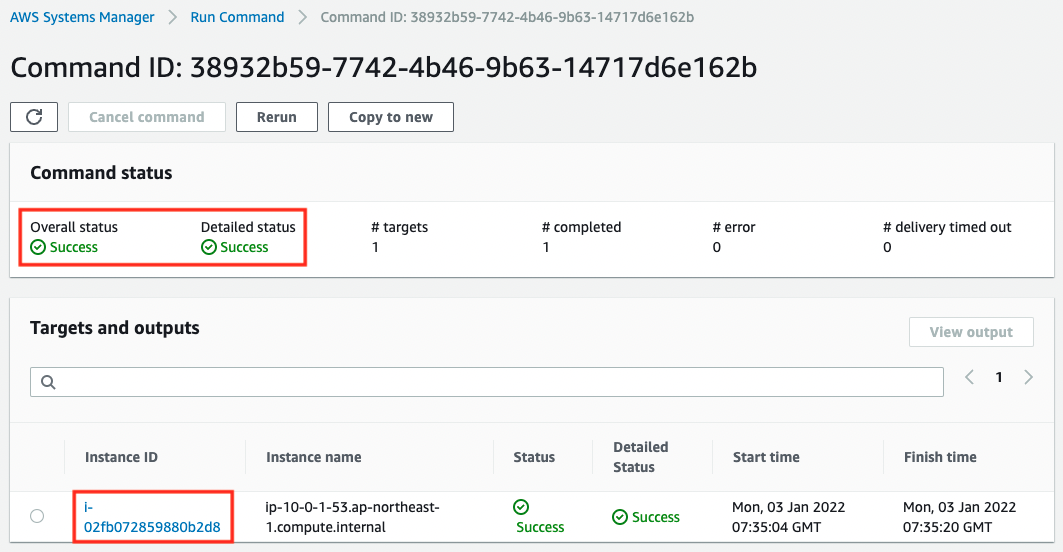
You can see that it was executed against Instance4 and was successful.
The detailed page is as follows

You can see that it was executed in one step.
This one is also configured to save the execution results to an S3 bucket. The log will be placed in the following location
s3://[bucket-name]/[folder-name]/[command-id]/[instance-id]/awsrunShellScript/0.awsrunShellScript/stdout
The contents are as follows.
$ cat stdout
Loaded plugins: extras_suggestions, langpacks, priorities, update-motd
...
Installed:
  httpd.x86_64 0:2.4.48-2.amzn2
Complete!
Code language: Bash (bash)
Checking the log, we can see that the standard output of the specified command has been written.
Thus, when initialized with SSM State Manager, the log can be output to the S3 bucket.
Summary
We have identified four ways to initialize an EC2 instance.
The method using user data and cfn-init will place the logs locally on the instance to be processed.
With SSM State Manager, you can initialize it with Ansible Playbook or shell scripts, and output the logs to S3 buckets.
By selecting the appropriate initialization process method, you will be able to manage and manipulate instances efficiently.