Four ways to attach EBS to EC2 instance
We will check the configuration of attaching EBS (Elastic Block Store) to a Linux instance.
EBS is block storage provided by AWS.
Amazon EBS allows you to create storage volumes and attach them to Amazon EC2 instances. Once attached, you can create a file system on top of these volumes, run a database, or use them in any other way you would use block storage.
Amazon EBS features
In this page, we will check the steps to attach EBS to a Linux instance and make it available for storage.
The procedures after attaching will follow those described in the AWS official website Make an Amazon EBS volume available for use on Linux.
Specifically, the following three patterns are identified
- if it is not an instance built with Nitro System
- for instances built with Nitro System
- how to execute shell scripts from SSM documentation
Also, please refer to the following page for the procedure to attach EBS to a Windows instance.
Environment

Create one subnet within the VPC. This subnet should be a private subnet with no access to the Internet.
Locate two EC2 instances on this subnet. Both will be the latest Amazon Linux 2-based instances. However, the instance type you specify will vary. One (①) will be T2.nano and the other (②) will be T4g.nano.
Create two EBSs on the same subnet. Attach one EBS to each of the two instances mentioned above.
Place a VPC endpoint for SSM. This is used to access the instances in the private subnet with the Session Manager functionality of the service.
CloudFormation template files
We will build the above configuration using CloudFormation.
The CloudFormation template is placed at the following URL
https://github.com/awstut-an-r/awstut-fa/tree/main/008
Template file points
(Reference) Create an instance from the latest AMI by referring to the SSM Parameter Store
Check the EC2 to which the EBS will be attached.
The point is that you need to set the AMI according to the architecture of the instance you are creating.
Parameters:
  ImageId1:
    Type: AWS::SSM::Parameter::Value<AWS::EC2::Image::Id>

  ImageId2:
    Type: AWS::SSM::Parameter::Value<AWS::EC2::Image::Id>

  InstanceType1:
    Type: String

  InstanceType2:
    Type: String


Resources:
  Instance1:
    Type: AWS::EC2::Instance
    Properties:
      IamInstanceProfile: !Ref InstanceProfile
      ImageId: !Ref ImageId1
      InstanceType: !Ref InstanceType1
      NetworkInterfaces:
        - DeviceIndex: 0
          SubnetId: !Ref PrivateSubnet
          GroupSet:
            - !Ref InstanceSecurityGroup

  Instance2:
    Type: AWS::EC2::Instance
    Properties:
      IamInstanceProfile: !Ref InstanceProfile
      ImageId: !Ref ImageId2
      InstanceType: !Ref InstanceType2
      NetworkInterfaces:
        - DeviceIndex: 0
          SubnetId: !Ref PrivateSubnet
          GroupSet:
            - !Ref InstanceSecurityGroup
Code language: YAML (yaml)
The key settings in this configuration are the InstanceType and ImageId properties.
As mentioned earlier, the instance types are specified for the two instances this time as follows.
- Instance 1: T2.nano
- Instance 2: T4g.nano
Use the built-in function Fn::Ref to refer to the value in the Parameters section and set the InstanceType property of the two instances.
The two instances share the same OS and run Amazon Linux 2, but it is important to note that the two instances run Amazon Linux 2.
That is, the above instance types have different architectures, so you cannot specify the same AMI.
T2 is an x86_64 based instance.
Features:
Amazon EC2 Instance Types
High frequency Intel Xeon processors
T4g, on the other hand, is an Arm-based instance.
Features:
Custom built AWS Graviton2 Processor with 64-bit Arm Neoverse cores
Powered by the AWS Nitro System, a combination of dedicated hardware and lightweight hypervisor
Amazon EC2 Instance Types
The SSM Parameter Store can be used to obtain the latest AMI IDs for your architecture.
Want a simpler way to query for the latest Amazon Linux AMI? AWS Systems Manager Parameter Store already allows for querying the latest Windows AMI. Now, support has been expanded to include the latest Amazon Linux AMI. Each Amazon Linux AMI now has its own Parameter Store namespace that is public and describable. Upon querying, an AMI namespace returns only its regional ImageID value.
Query for the latest Amazon Linux AMI IDs using AWS Systems Manager Parameter Store
In CloudFormation, the values stored in the SSM Parameter Store can be retrieved by specifying “AWS::SSM::Parameter::Value<AWS::EC2::Image::Id>” in the Type property of the Parameters section.
You can use the existing Parameters section of your CloudFormation template to define Systems Manager parameters, along with other parameters. Systems Manager parameters are a unique type that is different from existing parameters because they refer to actual values in the Parameter Store. The value for this type of parameter would be the Systems Manager (SSM) parameter key instead of a string or other value. CloudFormation will fetch values stored against these keys in Systems Manager in your account and use them for the current stack operation.
Integrating AWS CloudFormation with AWS Systems Manager Parameter Store
This time, the latest AMI ID for each architecture is obtained by referencing values from the SSM Parameter Store under the following conditions.
- Instance 1: /aws/service/ami-amazon-linux-latest/amzn2-ami-hvm-x86_64-gp2
- Instance 2: /aws/service/ami-amazon-linux-latest/amzn2-ami-hvm-arm64-gp2
As of October 2021, the AMI IDs that can be obtained when accessing the SSM Parameter Store under the above conditions are as follows
- Instance 1
- AMI ID: ami-0701e21c502689c31
- Virtualization type: hvm
- Instance 2
- AMI ID: ami-0427ff21031d224a8
- Virtualization type: hvm
The virtualization type is information related to the root device name described below.
Attaching EBS to instances
Find out how to attach EBS to an EC2 instance.
Resources:
  EBS1:
    Type: AWS::EC2::Volume
    Properties:
      AvailabilityZone: !Sub "${AWS::Region}${AvailabilityZone}"
      Size: !Ref VolumeSize
      VolumeType: !Ref VolumeType

  EBSAttachment1:
    Type: AWS::EC2::VolumeAttachment
    Properties:
      Device: !Sub "/dev/sd${DeviceNameSuffix}"
      InstanceId: !Ref Instance1
      VolumeId: !Ref EBS1
Code language: YAML (yaml)
First, define the EBS resource.
Specify the AZ in which to place the EBS in the AvailabilityZone property; the EBS must be placed in the same AZ as the EC2 instance to which it is attached.
You can attach an available EBS volume to one or more of your instances that is in the same Availability Zone as the volume.
Attach an Amazon EBS volume to an instance
Follow the above and use the built-in function Fn::Sub to specify that it should be placed in the same AZ as the instance.
Specify the volume type of the EBS with the VolumeType property. The following five volume types can be specified.
- General Purpose SSD
- Provisioned IOPS SSD
- Throughput Optimized HDD
- Cold HDD
- Magnetic (older generation)
In this case, a general-purpose SSD is selected.
There are two types of General Purpose SSD.
The first is gp2. It has two indicators (baseline and burst) for performance (IOPS), and features a mechanism that increases the baseline in proportion to the reserved capacity.
Baseline IOPS performance scales linearly between a minimum of 100 and a maximum of 16,000 at a rate of 3 IOPS per GiB of volume size.
General Purpose SSD volumes
The second is gp3. It provides constant performance regardless of the volume capacity.
gp3 volumes deliver a consistent baseline IOPS performance of 3,000 IOPS, which is included with the price of storage.
gp3 volumes deliver a consistent baseline throughput performance of 125 MiB/s, which is included with the price of storage.
General Purpose SSD volumes
From a performance standpoint, gp3 is more effective if the amount of space to be reserved is less than 1024 GiB, where 3000 IOPS can be expected at any given time.
On the other hand, if you are seeking higher performance from a general-purpose SSD, select gp2 and secure more capacity, which can be expected to improve up to 16,000 IOPS.
In this case, we specify that gp3 should be selected.
Specify the capacity to be reserved in the Size property.
General-purpose SSDs can be specified from 1 GiB to 16 TiB.
In this case, we will reserve the minimum amount of 1 GiB.
Next, define the resources for attaching the EBS to the EC2 instance.
Resources:
  EBSAttachment1:
    Type: AWS::EC2::VolumeAttachment
    Properties:
      Device: !Sub "/dev/sd${DeviceNameSuffix}"
      InstanceId: !Ref Instance1
      VolumeId: !Ref EBS1
Code language: YAML (yaml)
Specify the instance and the EBS to attach in the InstanceId and VolumeId properties.
Specify the device name to be assigned to the EBS in the Device property; the possible values for the device name in the Linux AMI depend on the virtualization type. As mentioned earlier, both AMIs for the two instances are hvm type. hvm root or recommended device names are as follows
Reserved for root: /dev/sda1 or /dev/xvda
Recommended for EBS volumes: /dev/sd[f-p] *
Device names on Linux instances
Therefore, this time, “/dev/sdf” is specified as the device name for 2EBS.
No key pair configuration required if accessed using SSM Session Manager
The most common way to access a Linux instance is SSH using a key pair, but this time we will use SSM Session Manager.
Session Manager is a fully managed AWS Systems Manager capability that lets you manage your Amazon EC2 instances through an interactive one-click browser-based shell or through the AWS CLI. You can use Session Manager to start a session with an instance in your account. After the session is started, you can run bash commands as you would through any other connection type.
Connect to your Linux instance using Session Manager
In this configuration, the instance is located on a private subnet, so SSM is accessed through the VPC endpoint for SSM.
For more information, please see the following page.

Enabling EBS with SSM Documentation
We will show you the commands to enable EBS later, but in addition to executing the commands manually, you can also execute them through the SSM documentation.
Resources:
  RunShellScriptAssociation:
    Type: AWS::SSM::Association
    Properties:
      AssociationName: !Sub "${Prefix}-run-shellscript-association"
      Name: AWS-RunShellScript
      Parameters:
        commands:
          - !Sub |
            for d in $(lsblk -n -r -p | grep disk | awk '{ print $1 }' )
            do
              if  [ "$(sudo file -s -b $d)" == data ]; then
                sudo mkfs -t xfs $d
                sudo mkdir ${MountPoint}
                sudo mount $d ${MountPoint}
              fi
            done
      Targets:
        - Key: InstanceIds
          Values:
            - !Ref Instance
      WaitForSuccessTimeoutSeconds: !Ref WaitForSuccessTimeoutSeconds
Code language: YAML (yaml)
The SSM document AWS-RunShellScript can be used to execute the specified command against a Linux instance (Amazon Linux 2).
Details will be confirmed later.
Architecting
Using CloudFormation, we will build this environment and check its actual behavior.
Create CloudFormation stacks
Create a CloudFormation stacks.
For more information on how to create stacks and check each stack, please refer to the following page.

Check the EBS attach status
Check the status of each instance from the AWS Management Console.
Instances 1 and 2 will be taken up as representative.


Looking at the Block devices items of both instances, we can see that two EBSs are attached to each instance.
The “dev/xvda” is the root device. As mentioned earlier, this device name is reserved for the root device.
The other “/dev/sdf” is the EBS created this time.
Checking the EBS Attachment Status 2: For Instances Not on Nitro System
Next, we will actually access the instances to check the EBS attach status.
First, we will access Instance1(i-00f95cd8419e73461). We will use the SSM Session Manager to access the instance.
<meta charset="utf-8">$ aws ssm start-session \
--target i-00f95cd8419e73461
...
sh-4.2$
Code language: Bash (bash)
You can use the lsblk command to check the status of block devices.
sh-4.2$ lsblk
NAME    MAJ:MIN RM SIZE RO TYPE MOUNTPOINT
xvda    202:0    0   8G  0 disk
└─xvda1 202:1    0   8G  0 part /
xvdf    202:80   0   1G  0 disk
Code language: Bash (bash)
You can see that two block devices, “xvda” and “xvdf”, are recognized.
As we saw earlier, the former is the root device.
The latter is the EBS that we attached this time. The device name has been changed from the one specified in the CloudFormation template (/dev/sdf). This is due to the specification of EBS.
Depending on the block device driver of the kernel, the device could be attached with a different name than you specified. For example, if you specify a device name of /dev/sdh, your device could be renamed /dev/xvdh or /dev/hdh. In most cases, the trailing letter remains the same.
Device names on Linux instances
From the above, we found out that the device name specified when attaching EBS and the device name recognized by the instance may differ.
Checking the EBS Attachment Status 3: For instances on Nitro System
Next, access Instance2(i-03f376aac4fcc98ab) to check the EBS attach status.
<meta charset="utf-8">$ aws ssm start-session \
--target i-03f376aac4fcc98ab
...
sh-4.2$
Code language: Bash (bash)
sh-4.2$ lsblk
NAME MAJ:MIN RM SIZE RO TYPE MOUNTPOINT
nvme0n1 259:0 0 8G 0 disk
├─nvme0n1p1 259:1 0 8G 0 part /
└─nvme0n1p128 259:2 0 10M 0 part /boot/efi
nvme1n1 259:3 0 1G 0 disk
Code language: Bash (bash)You can see that two block devices, “nvme0n1” and “nvme1n1”, are recognized. This is due to the specification of the instance on the Nitro System.
EBS volumes are exposed as NVMe block devices on instances built on the Nitro System. The device names are /dev/nvme0n1, /dev/nvme1n1, and so on. The device names that you specify in a block device mapping are renamed using NVMe device names (/dev/nvme[0-26]n1).
Amazon EBS and NVMe on Linux instances
The instance type specified for Instance2 is T4g, which is the type that runs on the Nitro System.
The following instances are built on the Nitro System:
Instance types
Virtualized: A1, C5, C5a, C5ad, C5d, C5n, C6g, C6gd, C6gn, C6i, D3, D3en, DL1, G4, G4ad, G5, G5g, I3en, Im4gn, Inf1, Is4gen, M5, M5a, M5ad, M5d, M5dn, M5n, M5zn, M6a, M6g, M6gd, M6i, p3dn.24xlarge, P4, R5, R5a, R5ad, R5b, R5d, R5dn, R5n, R6g, R6gd, R6i, T3, T3a, T4g, high memory (u-*), VT1, X2gd, and z1d
From the above, “nvme0n1” is the root device and “nvme1n1” is the attached EBS.
Steps to make the attached EBS ready for use
We will continue to check the subsequent steps on Instance2.
The steps after attaching are covered in the AWS official website, Make an Amazon EBS volume available for use on Linux, and can be summarized as follows
- Create a file system
- Create a mount point and mount the volume.
Let’s actually do it.
First, create a file system with mkfs command.
sh-4.2$ sudo mkfs -t xfs /dev/nvme1n1
meta-data=/dev/nvme1n1           isize=512    agcount=4, agsize=65536 blks
         =                       sectsz=512   attr=2, projid32bit=1
         =                       crc=1        finobt=1, sparse=0
data     =                       bsize=4096   blocks=262144, imaxpct=25
         =                       sunit=0      swidth=0 blks
naming   =version 2              bsize=4096   ascii-ci=0 ftype=1
log      =internal log           bsize=4096   blocks=2560, version=2
         =                       sectsz=512   sunit=0 blks, lazy-count=1
realtime =none                   extsz=4096   blocks=0, rtextents=0
Code language: Bash (bash)
We specified XFS as the file system to be created.
Next, create a mount point with the mkdir command, and then mount the volume with the mount command.
sh-4.2$ sudo mkdir /data
sh-4.2$ sudo mount /dev/nvme1n1 /data
Code language: Bash (bash)
Once again, check the status with the lsblk command.
sh-4.2$ lsblk -f
NAME          FSTYPE LABEL UUID                                 MOUNTPOINT
nvme0n1
├─nvme0n1p1   xfs    /     9e2f3182-7352-4382-adbd-c67f6be433ed /
└─nvme0n1p128 vfat         2EE0-5AE9                            /boot/efi
nvme1n1       xfs          5c851eca-35be-4d6a-a4e8-e10c1efed050 /data
Code language: Bash (bash)
You can check the file system and mount point.
Write a file to try it out.
sh-4.2$ cd /data
sh-4.2$ sudo touch test.txt
sh-4.2$ ls
test.txt
Code language: Bash (bash)
We were able to access the mount point and install the files.
Thus, after attaching the EBS, we found that by creating and mounting the file system, we could use it just like normal storage.
How to automatically mount EBS on reboot
We will see how to automatically mount the EBS volume.
On the official website, you can find instructions on how to edit /etc/fstab. Open the file with an editor such as vim, and edit it as follows.
sh-4.2$ sudo vim /etc/fstab
sh-4.2$ cat /etc/fstab
#
UUID=9e2f3182-7352-4382-adbd-c67f6be433ed     /           xfs    defaults,noatime  1   1
UUID=2EE0-5AE9        /boot/efi       vfat    defaults,noatime,uid=0,gid=0,umask=0077,shortname=winnt 0 0
UUID=5c851eca-35be-4d6a-a4e8-e10c1efed050     /data       xfs    defaults,nofail   0   2
Code language: Bash (bash)
The third line is the relevant part: specify the UUID confirmed by the lsblk command and write it so that it is automatically mounted at the mount point (/data).
To confirm the correctness of the configuration, you can follow the steps below.
- Unmount the EBS volume
- Mount all volumes according to /etc/fstab
- Access the mount point.
If you get to the end without any errors, you can call it a success.
sh-4.2$ sudo umount /data
sh-4.2$ sudo mount -a
sh-4.2$ ls /data
test.txt
Code language: Bash (bash)
We were able to proceed to the end successfully.
Now the EBS volume will be mounted automatically after reboot.
SSM documentation to make EBS ready for use
Finally, we will show you how to use the SSM document AWS-RunShellScript to automatically configure EBS to be ready for use on a Linux instance (Amazon Linux 2).
Once again, the shell script to run is described below.
- !Sub |
  for d in $(lsblk -n -r -p | grep disk | awk '{ print $1 }' )
  do
    if  [ "$(sudo file -s -b $d)" == data ]; then
      sudo mkfs -t ${FileSystem} $d
      sudo mkdir ${MountPoint}
      sudo mount $d ${MountPoint}

      uuid=$(sudo blkid $d -o export | grep ^UUID)
      echo -e "$uuid\t/data\t${FileSystem}\tdefaults,nofail\t0\t2" >> /etc/fstab
    fi
  done
Code language: YAML (yaml)
The contents of the script are as described above, but in case you are interested, here is a brief explanation.
- run the lsblk command to obtain the device name whose TYPE is disk.
- use the file command to check the information of each device, and regard the one with “data” as an EBS and an unprocessed device, and proceed with the processing.
- after creating the file system, mount the EBS.
- obtain UUID and add it to /etc/fstab for automatic mount setting.
This script will be automatically executed when the CloudFormation stack is created.
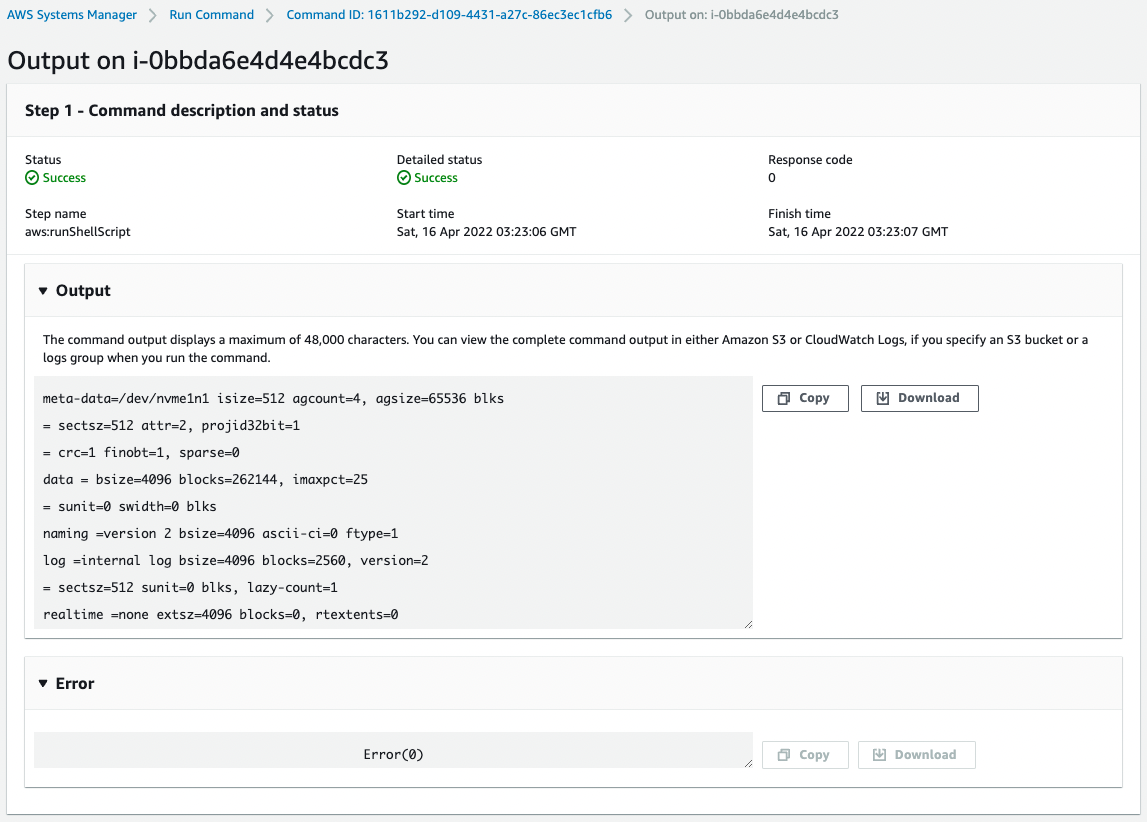
Access instance 3 to verify that the script worked successfully.
% aws ssm start-session \
--target i-0bbda6e4d4e4bcdc3
...
sh-4.2$

sh-4.2$ lsblk
NAME          MAJ:MIN RM SIZE RO TYPE MOUNTPOINT
nvme0n1       259:0    0   8G  0 disk
├─nvme0n1p1   259:1    0   8G  0 part /
└─nvme0n1p128 259:2    0  10M  0 part /boot/efi
nvme1n1       259:3    0   1G  0 disk /data
Code language: Bash (bash)
You can see that the file system has been created on the EBS and mounted successfully.
Check the settings related to automount.
sh-4.2$ cat /etc/fstab
#
UUID=b2d2af18-472e-4a07-a7f5-313592c907b9     /           xfs    defaults,noatime  1   1
UUID=7882-6D24        /boot/efi       vfat    defaults,noatime,uid=0,gid=0,umask=0077,shortname=winnt 0 0
UUID=a38658f8-ad51-417d-b7a7-4d865bd500b9	/data	xfs	defaults,nofail	0	2

sh-4.2$ sudo umount /data

sh-4.2$ lsblk
NAME          MAJ:MIN RM SIZE RO TYPE MOUNTPOINT
nvme0n1       259:0    0   8G  0 disk
├─nvme0n1p1   259:1    0   8G  0 part /
└─nvme0n1p128 259:2    0  10M  0 part /boot/efi
nvme1n1       259:3    0   1G  0 disk

sh-4.2$ sudo mount -a

sh-4.2$ lsblk
NAME          MAJ:MIN RM SIZE RO TYPE MOUNTPOINT
nvme0n1       259:0    0   8G  0 disk
├─nvme0n1p1   259:1    0   8G  0 part /
└─nvme0n1p128 259:2    0  10M  0 part /boot/efi
nvme1n1       259:3    0   1G  0 disk /data
Code language: Bash (bash)
We have confirmed that the EBS information is written to /etc/fstab and mounted accordingly.
Summary
We have confirmed how to attach EBS to an EC2 instance using CloudFormation.
We confirmed the steps to make the attached EBS available for use and the steps to mount it automatically.
We have shown you how to use SSM documentation to automatically set your EBS to a usable state.