Authorization by Cognito ID Pool after Authentication by User Pool – Implicit Grant Ver
Use the Cognito user pool and identity pool to grant signed-in users access to AWS resources.
Create a sign-in page using the hosted UI of the Cognito user pool.
Use JavaScript to perform authentication and authorization with Cognito.
We will use AWS SDK for JavaScript v3.
For this Oauth flow, select Implicit Grant.
Environment
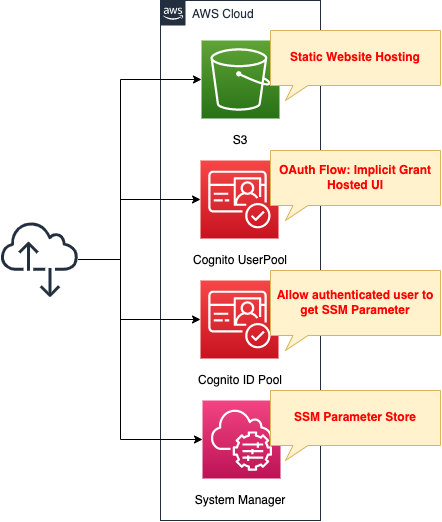
Create an S3 bucket and enable the static website hosting feature. Prepare content by placing HTML files inside.
Combine the hosted UI of the Cognito user pool with the identity pool and authorize authenticated users to access SSM parameters.
CloudFormation template files
The above configuration is built with CloudFormation.
The following URL contains the CloudFormation template, browser scripts, etc.
https://github.com/awstut-an-r/awstut-fa/tree/main/012
Point Explanation
Hosted UI for Cognito User Pool
One of the features offered by the Cognito user pool is a hosted UI. This is a managed authentication feature. In this case, we will use it to build a sign-in page.
For more information on Cognito hosted UI, please see the following page.

This page will cover only the key points.
Resources:
  UserPoolClient:
    Type: AWS::Cognito::UserPoolClient
    Properties:
      AllowedOAuthFlowsUserPoolClient: true
      AllowedOAuthFlows:
        #- code
        - implicit
      AllowedOAuthScopes:
        - openid
        - profile
      CallbackURLs:
        - !Sub "${BucketWesSiteEndpointUrl}/${SigninHtml}"
      ClientName: !Sub ${Prefix}-UserPoolClient
      ExplicitAuthFlows:
        - ALLOW_REFRESH_TOKEN_AUTH
        - ALLOW_USER_SRP_AUTH
      LogoutURLs:
        - !Sub "${BucketWesSiteEndpointUrl}/${SignoutHtml}"
      SupportedIdentityProviders:
        - COGNITO
      UserPoolId: !Ref UserPool
Code language: YAML (yaml)
The key setting is the AllowedOAuthFlows property.
Since this OAuth flow is Implicit Grant, set this property to “implicit”.
Next, check the URL of the sign-in/sign-out page by the hosted UI.
The URLs are as follows
- https://[prefix].auth.ap-northeast-1.amazoncognito.com/login?response_type=token&client_id=[app-client-id]&redirect_uri=[callback-url]
- https://[prefix].auth.ap-northeast-1.amazoncognito.com/logout?response_type=token&client_id=[app-client-id]&logout_uri=[sign-out-url]
The key point is the URL parameter response_type.
In case of Implicit Grant, set this parameter to “token” since the token can be obtained directly.
Granting Authorization to Authenticated Users in Cognito ID Pool
Let’s look at the resources related to the ID pool, which is responsible for authorization functions when accessing AWS resources.
First, let’s look at the ID pool itself.
Resources:
  IdentityPool:
    Type: AWS::Cognito::IdentityPool
    Properties:
      AllowUnauthenticatedIdentities: false
      CognitoIdentityProviders:
        - ClientId: !Ref UserPoolClient
          ProviderName: !Sub "cognito-idp.${AWS::Region}.amazonaws.com/${UserPool}"
      IdentityPoolName: !Sub ${Prefix}-IdentityPool
Code language: YAML (yaml)
The AllowUnauthenticatedIdentities property allows you to set whether to grant access privileges to AWS resources to users who are not authenticated in the user pool. In this case, only authenticated users will be granted access privileges, so this property is set to “false”.
In the CognitoIdentityProviders property, specify the user pool and app client to be associated with the identity pool.
Define the privileges to be granted to authenticated users as IAM roles and attach them to the identity pool.
Resources:
  IdentityPoolRoleAttachment:
    Type: AWS::Cognito::IdentityPoolRoleAttachment
    Properties:
      IdentityPoolId: !Ref IdentityPool
      Roles:
        authenticated: !GetAtt IdentityPoolAuthenticatedRole.Arn

  IdentityPoolAuthenticatedRole:
    Type: AWS::IAM::Role
    Properties:
      AssumeRolePolicyDocument:
        Version: 2012-10-17
        Statement:
          - Effect: Allow
            Action: sts:AssumeRoleWithWebIdentity
            Principal:
              Federated: cognito-identity.amazonaws.com
            Condition:
              StringEquals:
                cognito-identity.amazonaws.com:aud: !Ref IdentityPool
              ForAnyValue:StringLike:
                cognito-identity.amazonaws.com:amr: authenticated
      Policies:
        - PolicyName: IdentityPoolAuthenticatedPolicy
          PolicyDocument:
            Version: 2012-10-17
            Statement:
              - Effect: Allow
                Action:
                  - ssm:GetParameter
                Resource:
                  - !Sub "arn:aws:ssm:${AWS::Region}:${AWS::AccountId}:parameter/${AuthenticatedParameter}"
Code language: YAML (yaml)
This time, we will grant authenticated users access to the SSM parameter store.
Create an IAM role with permission to retrieve SSM parameter store strings and associate it with the identity pool.
For the federation settings, refer to the following page.
https://docs.aws.amazon.com/cognito/latest/developerguide/role-trust-and-permissions.html
JavaScript
Use JavaScript to implement Cognito functionality after sign-in.
For instructions on how to create a browser script using AWS SDK for JavaScript v3, please see the following page.
This time, we will use CodeBuild to create the HTML and JavaScript files.
For more details, please refer to the page below.

On this page, we highlight key points based on the CodeBuild BuildSpec.
Installing npm packages
npm install --save-dev webpack
npm install --save-dev path-browserify
npm install -D webpack-cli
npm install @aws-sdk/client-cognito-identity
npm install @aws-sdk/credential-provider-cognito-identity
npm install @aws-sdk/client-ssm
Code language: Bash (bash)
We install packages related to webpack, Cognito, and SSM.
config.js
window.APP_CONFIG = {
  REGION: "[region]",
  USER_POOL_ID: "[user-pool-id]",
  IDENTITY_POOL_ID: "[identity-pool-id]",
  PARAMETER_NAME: "[ssm-parameter-name]"
};
Code language: JavaScript (javascript)
This file defines parameters such as the region where the resources were created and the IDs of the user pool and identity pool. This file is loaded by the JavaScript file described later.
browser.js
import {
  CognitoIdentityClient
} from "@aws-sdk/client-cognito-identity";

import {
  fromCognitoIdentityPool
} from "@aws-sdk/credential-provider-cognito-identity";

import {
  SSMClient,
  GetParameterCommand
} from "@aws-sdk/client-ssm";

// Read config injected at build time
const {
  REGION,
  USER_POOL_ID,
  IDENTITY_POOL_ID,
  PARAMETER_NAME
} = window.APP_CONFIG;

const params = new URLSearchParams(location.hash.slice(1));
const idToken = params.get("id_token");

const PROVIDER = "cognito-idp." + REGION + ".amazonaws.com/" + USER_POOL_ID;

const ssmClient = new SSMClient({
  region: REGION,
  credentials: fromCognitoIdentityPool({
    client: new CognitoIdentityClient({ region: REGION }),
    identityPoolId: IDENTITY_POOL_ID,
    logins: {
      [PROVIDER]: idToken
    }
  })
});

const getParameter = async () => {
  try {
    const response = await ssmClient.send(
      new GetParameterCommand({ Name: PARAMETER_NAME })
    );
    document.getElementById('parameter').innerText = `SSM Parameter Store: ${response.Parameter.Value}`;
  } catch (err) {
    console.log(err);
    document.getElementById('parameter').innerText = 'Deny access to SSM Parameter Store.';
  }
};

const getName = async () => {
  try {
    const tokens = idToken.split('.');
    const tokenDecoded = JSON.parse(atob(tokens[1]));
    document.getElementById('name').innerText = `Name: ${tokenDecoded.name}`;
  } catch (err) {
    console.log(err);
    document.getElementById('name').innerText = 'Name: Guest';
  }
};

window.getParameter = getParameter;
window.getName = getName;
Code language: JavaScript (javascript)
At the beginning of the file, the packages installed earlier are imported.
Next, the variables defined in config.js are loaded.
The ID token is extracted from the URL of the page displayed after signing in.
This is because the OAuth flow used this time is the Implicit Grant.
The URL of the page displayed after signing in is as follows:
https://s3-ap-northeast-1.amazonaws.com/[bucket-name]/signin.html#id_token=[id-token]&expires_in=3600&token_type=Bearer
An SSM client object (ssmClient) is created to access SSM resources.
By passing a GetParameterCommand object to the created SSM client, a string value is retrieved from Parameter Store.
If the value is retrieved successfully, it is embedded in the HTML.
A function (getName) is defined to retrieve the user name.
The ID token issued by the user pool is a JWT (JSON Web Token).
The ID token is a JSON web token (JWT) that contains claims about the identity of the authenticated user, such as name, email, and phone_number. You can use this identity information inside your application. The ID token can also be used to authenticate users to your resource servers or server applications.
Using the ID token
By decoding the token, user information can be obtained.
In this example, the user’s name (name) obtained from the token is embedded in a <p> tag.
For more information on the payload of ID tokens, please refer to the following page.
webpack.config.js
var path = require("path");
module.exports = {
  entry: [path.join(__dirname, "browser.js")],
  output: {
    path: __dirname,
    filename: "main.js"
  },
   resolve:{
  fallback: { path: require.resolve("path-browserify")}
  }
};
Code language: JavaScript (javascript)
browser.js is built by webpack and output as main.js.
package.json
{
  "devDependencies": {
    "path-browserify": "^1.0.1",
    "webpack": "^5.104.1",
    "webpack-cli": "^6.0.1"
  },
  "dependencies": {
    "@aws-sdk/client-cognito-identity": "^3.958.0",
    "@aws-sdk/client-ssm": "^3.958.0",
    "@aws-sdk/credential-provider-cognito-identity": "^3.958.0"
  },
  "scripts": {
    "build": "webpack"
  }
}
Code language: JSON / JSON with Comments (json)
The highlighted lines are the key points.
They specify the build options.
Webpack is used for the build.
Build
npm run build
Code language: Bash (bash)
Build main.js.
HTML
index.html
<html>
  <head></head>
  <body>
    <h1>index.html</h1>
    <ul>
      <li>
        <p><a href="https://fa-012.auth.ap-northeast-1.amazoncognito.com/login?response_type=token&client_id=[user-pool-client-id]&redirect_uri=https://s3-ap-northeast-1.amazonaws.com/[bucket-name]/signin.html">Sign In</a></p>
      </li>
      <li>
        <p><a href="https://fa-012.auth.ap-northeast-1.amazoncognito.com/logout?response_type=token&client_id=[user-pool-client-id]&logout_uri=https://s3-ap-northeast-1.amazonaws.com/[bucket-name]/signout.html">Sign Out</a></p>
      </li>
    </ul>
  </body>
</html>
Code language: HTML, XML (xml)
This is the HTML file for the main page.
It contains links to the sign-in and sign-out pages.
signin.html
<html>
  <head>
  </head>
  <body>
    <h1>signin.html</h1>
    <p id="name"></p>
    <p id="parameter"></p>
    <script type="text/javascript" src="./main.js"></script>
    <script type="text/javascript" src="./config.js"></script>
    <script>
      getName();
      getParameter();
    </script>
  </body>
</html>
Code language: HTML, XML (xml)
This HTML file is for the page displayed after signing in.
It executes the two functions discussed earlier and dynamically displays the user name and the string retrieved from AWS Systems Manager Parameter Store.
signout.html
<html>
  <head></head>
  <body>
    <h1>signout.html</h1>
  </body>
</html>
Code language: HTML, XML (xml)
This HTML file is for the page displayed after signing out.
Uploading to an S3 bucket
aws s3 cp . s3://[bucket-name]/ --recursive --exclude "node_modules/*"
Code language: Bash (bash)
Using the AWS CLI, the JavaScript and HTML files described above are uploaded.
S3 static website hosting feature
Using the static website hosting feature, the HTML files placed in the S3 bucket are published.
For more details, please refer to the page below.
SSM Parameter Store
Resources:
  AuthenticatedParameter:
    Type: AWS::SSM::Parameter
    Properties:
      Name: !Sub "${Prefix}-authenticated"
      Type: String
      Value: Authenticated
Code language: YAML (yaml)
No special configuration is required; just store the string in the parameter store.
In this case, configure as follows
- Parameter name: fa-012-authenticated
- Value to be stored: Authenticated
Architecting
We will use CloudFormation to build this environment and check its actual behavior.
Create CloudFormation stacks and check resources in stacks
Create a CloudFormation stacks.
For more information on how to create stacks and check each stack, please refer to the following page.

After checking the resources for each stack, the information for the main resource created this time is as follows
- Name of the S3 bucket: fa-012-02a2d030-e61d-11f0-997c-06645dbedfd
- Cognito user pool ID: ap-northeast-1_W8ZPnQYRK
- Cognito user pool app client ID: 2lp4695vpuo88ettvk78lmq694
- Cognito user pool domain prefix: fa-012
- Cognito ID pool ID: ap-northeast-1:6d117ebe-506b-4f0d-b7dc-a438a4dbd57b
From the above, the URL for the sign-in/sign-out page with the hosted UI mentioned above is defined as follows
- URL for sign-in page
- https://[prefix].auth.ap-northeast-1.amazoncognito.com/login?response_type=token&client_id=[app-client-id]&redirect_uri=[callback-url]
- URL for sign-out page
- https://[prefix].auth.ap-northeast-1.amazoncognito.com/logout?response_type=token&client_id=[app-client-id]&logout_uri=[sign-out-url]
Accessing content for authenticated users: on success
Now that we are ready, let’s actually access the hosted UI.
First, access the following URL
https://s3-ap-northeast-1.amazonaws.com/fa-012-02a2d030-e61d-11f0-997c-06645dbedfd/index.html
The root page, index.html, will be displayed.
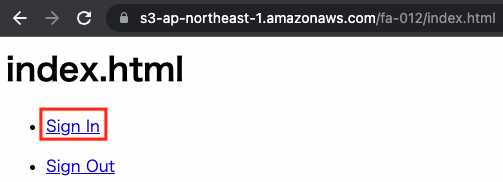
Click “Sign In” to go to the sign-in page.
The sign-up process is required only for the first time. For more information about the signup process, please refer to Creating sign in page in Cognito user pool – Accessing the hosted UI: Sign up.
In this case, we will register the user name “awstut”. The sign-in page is as follows
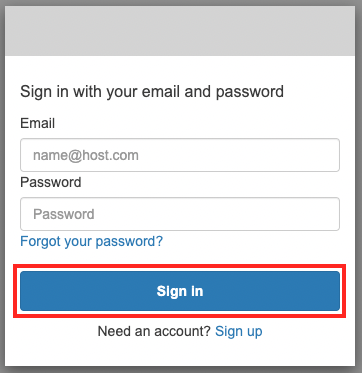
After entering your email address and password, click “Sign In”.
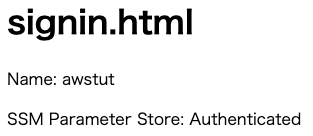
The signin.html page is now displayed. The user’s name and the SSM parameter store values are displayed. The former was retrieved from the identity token, while the latter was retrieved from the identity pool using temporary credentials to access the parameter store.
From the above, we were able to publish content restricted to authenticated users by combining Cognito user pool and identity pool.
Accessing content for authenticated users: In case of error
Finally, let’s check the behavior when the sign-in process fails or is not performed.
In the previous example, we went through the sign-in URL to access signin.html, but now we will access signin.html directly.
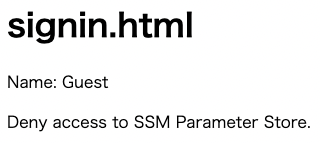
The signin.html is now displayed, but the content is different from what we saw earlier. Because we accessed the page directly, there was no ID token information and the credential acquisition failed. Therefore, the user name became “Guest” and the SSM parameter store could not be accessed.
From the above, we have confirmed that only an authenticated user can access AWS resources.
Summary
By combining the Cognito user pool, hosted UI and identity pool, we were able to confirm that we can grant access privileges to AWS resources only to authenticated users.