Configuration for Getting Started with Fargate with CloudFormation
AWS Fargate is a serverless service that allows you to run Docker containers.
In this introduction to Fargate, I’ll show you how to configure CloudFormation to run a container on Fargate.
Environment
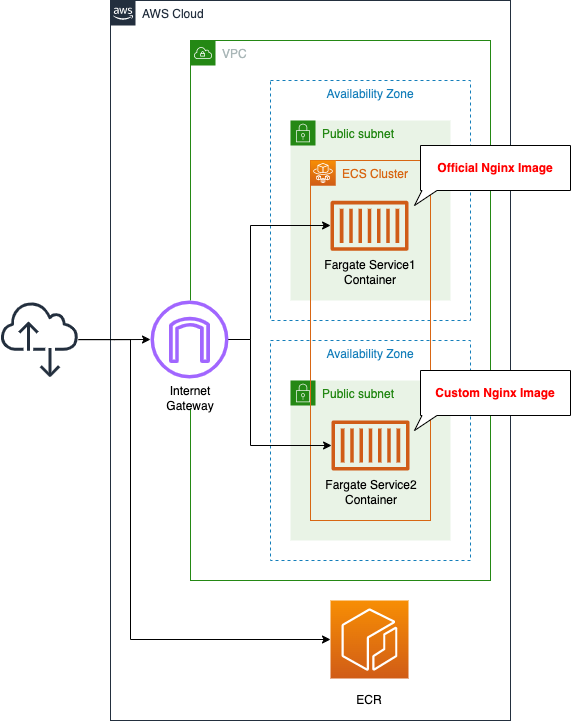
Create an ECS cluster and associate a Fargate-type ECS task with the public subnet.
The tasks will be created using the following two types of images:
- an image that is publicly available on DockerHub
- an image that we created ourselves and pushed to ECR
In both containers, we will start Nginx, give it a public address, and run it as an HTTP server.
CloudFormation template files
We will build the above configuration using CloudFormation.
We will place a sample CloudFormation template at the following URL
https://github.com/awstut-an-r/awstut-fa/tree/main/018
Explanation of key points of template files
We will cover the key points of each template file to configure this architecture.
ECR Repository
Define ECR.
Resources:
  Repository:
    Type: AWS::ECR::Repository
    Properties:
      RepositoryName: !Ref Prefix
Code language: YAML (yaml)
Container 2 uses a self-made image.
Therefore, you need to prepare a repository to store your own images.
No special configuration is required, just set the repository name in the RegistoryName property.
Define ECS cluster
Create ECS cluster-related resources.
The first is a cluster.
Resources:
  Cluster:
    Type: AWS::ECS::Cluster
    Properties:
      ClusterName: !Sub "${Prefix}-cluster"
Code language: YAML (yaml)
A cluster is a group of services and tasks.
It is the foundation on which containers are launched.
No special configuration is required, just specify the cluster name in the ClusterName property.
Define permissions required to execute task as IAM role
Executing a task, i.e., starting a container, is itself not allowed by default.
For example, actions such as pulling an image from ECR are included in the task execution.
Therefore, it is necessary to prepare a dedicated IAM role and grant permissions to it.
Resources:
  FargateTaskExecutionRole:
    Type: AWS::IAM::Role
    Properties:
      AssumeRolePolicyDocument:
        Version: 2012-10-17
        Statement:
          - Effect: Allow
            Principal:
              Service:
                - ecs-tasks.amazonaws.com
            Action:
              - sts:AssumeRole
      ManagedPolicyArns:
        - arn:aws:iam::aws:policy/service-role/AmazonECSTaskExecutionRolePolicy
Code language: YAML (yaml)
AWS management policy provides “AmazonECSTaskExecutionRolePolicy” which summarizes the minimum privileges for task execution.
We will use this policy this time.
The following actions are allowed in this policy.
- ecr:GetAuthorizationToken
- ecr:BatteryCheckLayerAvailability
- ecr:GetDownloadUrlForLayer
- ecr:BatchGetImage
- logs:CreateLogStream
- logs:PutLogEvents
We can see that the content permits ECR to retrieve images and the layers that make up the images, and to write data to CloudWatch Logs.
Task Definition
Create task definitions and services.
First, check the task definitions for the two containers.
A task definition is a set of parameters to execute a container.
It specifies the image to be executed, CPU, memory, etc.
Resources:
  TaskDefinition1:
    Type: AWS::ECS::TaskDefinition
    Properties:
      RequiresCompatibilities:
        - FARGATE
      Cpu: !Ref TaskCpu
      Memory: !Ref TaskMemory
      NetworkMode: awsvpc
      ExecutionRoleArn: !Ref FargateTaskExecutionRole
      TaskRoleArn: !Ref TaskRole
      ContainerDefinitions:
        - Name: !Sub "${Prefix}-task1-container"
          Image: nginx:latest

  TaskDefinition2:
    Type: AWS::ECS::TaskDefinition
    Properties:
      RequiresCompatibilities:
        - FARGATE
      Cpu: !Ref TaskCpu
      Memory: !Ref TaskMemory
      NetworkMode: awsvpc
      ExecutionRoleArn: !Ref FargateTaskExecutionRole
      TaskRoleArn: !Ref TaskRole
      ContainerDefinitions:
        - Name: !Sub "${Prefix}-task2-container"
          Image: !Sub "${AWS::AccountId}.dkr.ecr.${AWS::Region}.amazonaws.com/${RepositoryName}:latest"
Code language: YAML (yaml)
The two resources are almost identical.
The difference between the two is the image that the container is based on.
The former is the official nginx image available on Docker Hub.
Specify the image name in the Image property in ContainerDefinitions.
Specify “FARGATE” for the RequiresCompatibilities property.
This means that the task defined in this resource needs to run on a Fargate-type service.
Specify the CPU and memory allocation for a single task in the Cpu and Memory properties.
In this case, we specified 512 (0.5vCPU) for CPU and 1024 (1GB) for memory.
Please note that if you set the values lower than these values, the task will not start properly in the container to be run this time.
The NetworkMode property specifies the network mode of the task; in the case of Fargate, it should be “awsvpc”.
If you are using the Fargate launch type, the awsvpc network mode is required.
AWS::ECS::TaskDefinition NetworkMode
In the task definition, there are two IAM role-related parameters: the ExecutionRoleArn property and the TaskRoleArn property.
The former has been described earlier, and is organized again as follows.
- Task execution IAM role (ExecutionRoleArn): Permissions required to execute the task itself, such as the permission to pull the Docker image from the ECR.
- Task Roles (TaskRoleArn): Permissions assigned to the containers to be executed in the task. This will be described later.
Specify the ARN of the IAM role you prepared for each.
Prepare services
The next step is to define a service for the two containers.
A service is a function that manages and adjusts the number of tasks.
For example, scaling of tasks can be configured for a service.
Resources:
  Service1:
    Type: AWS::ECS::Service
    Properties:
      Cluster: !Ref Cluster
      LaunchType: FARGATE
      DesiredCount: 1
      TaskDefinition: !Ref TaskDefinition1
      ServiceName: !Sub "${Prefix}-service1"
      NetworkConfiguration:
        AwsvpcConfiguration:
          AssignPublicIp: ENABLED
          SecurityGroups:
            - !Ref ContainerSecurityGroup
          Subnets:
            - !Ref PublicSubnet1

  Service2:
    Type: AWS::ECS::Service
    Properties:
      Cluster: !Ref Cluster
      LaunchType: FARGATE
      DesiredCount: 1
      TaskDefinition: !Ref TaskDefinition2
      ServiceName: !Sub "${Prefix}-service2"
      NetworkConfiguration:
        AwsvpcConfiguration:
          AssignPublicIp: ENABLED
          SecurityGroups:
            - !Ref ContainerSecurityGroup
          Subnets:
            - !Ref PublicSubnet2
Code language: YAML (yaml)
In the Cluster property, specify the cluster in which this service will be launched.
Specify the launch type of the service in the LaunchType property.
In this case, we will use the Fargate type, so we will use “FARGATE”.
The DesiredCount property allows you to specify the desired number of tasks to be launched on the service.
In this case, we will set it to “1” so that one task will be started.
If a task is stopped for some reason, a new task will be automatically started and the service will adjust to meet the desired number.
Specify the task definition to be executed in the TaskDefinition property.
Specify the security group that will be assigned to the task and the subnet on which it will be placed in the AwsvpcConfiguration property in the NetworkConfiguration property.
In this case, we will create two public subnets, and we will specify to place one container on each.
Prepare IAM roles for what the task will do
Finally, define the IAM role for the task.
Resources:
  TaskRole1:
    Type: AWS::IAM::Role
    Properties:
      AssumeRolePolicyDocument:
        Version: 2012-10-17
        Statement:
          - Effect: Allow
            Principal:
              Service:
                - ecs-tasks.amazonaws.com
            Action:
              - sts:AssumeRole
Code language: YAML (yaml)
The container is empty.
This is because the container we are going to create will only run as a web server and will not access any AWS services.
Dockerfile, etc
Prepare a file for the image you will create.
This is the Dockerfile.
FROM nginx:latest

COPY index.html /usr/share/nginx/html

EXPOSE 80
Code language: Dockerfile (dockerfile)
Using the official image of nginx as a base, place your own index.html file on the main page.
This is index.html.
<html>
  <head>
  </head>
  <body>
    <h1>fa-018 index.html</h1>
  </body>
</html>
Code language: HTML, XML (xml)
This is a simple HTML file.
Architecting
We will use CloudFormation to build this environment and check its actual behavior.
In this article, we will create a CloudFormation stack in two parts.
Create ECR repository
First, create an ECR repository.
The following is an example of creating a stack from a template file placed in an S3 bucket.
$ aws cloudformation create-stack \
--stack-name fa-018-ecr \
--template-url https:/[bucket-name].s3.[region].amazonaws.com/fa-018-ecr.yaml
Code language: Bash (bash)
The next step is to push the Docker image to the ECR repository you created. The necessary commands can be found in the AWS Management Console.
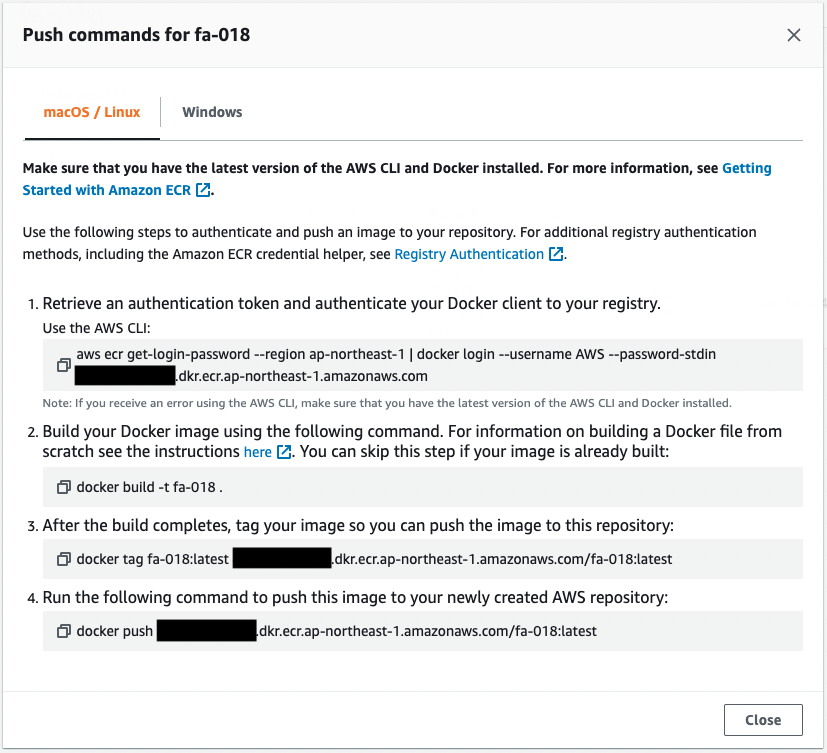
The result of executing the above command is as follows.
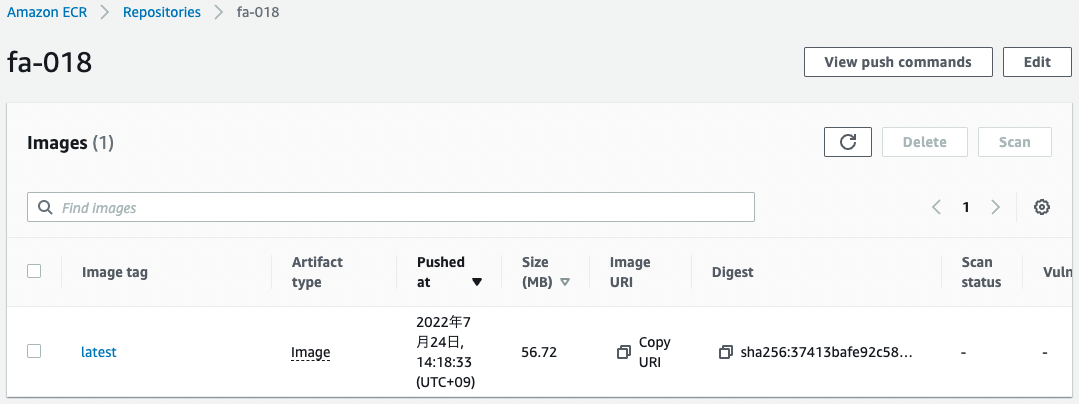
You can confirm that the image has been pushed successfully.
Create rest of CloudFormation stacks
Create a CloudFormation stack.
Please continue to check the following pages for more information on creating stacks and how to check each stack.

After checking the resources for each stack, the information for the main resources created this time is as follows
- ECS cluster: fa-018-cluster
- ECS service 1 name: fa-018-service-1-service
- ECS Service 2 name: fa-018-service-2-service
Check the created resources from the AWS Management Console.
First, check the cluster.

You can see that the cluster has indeed been created.
Next, let’s check the details of the cluster.
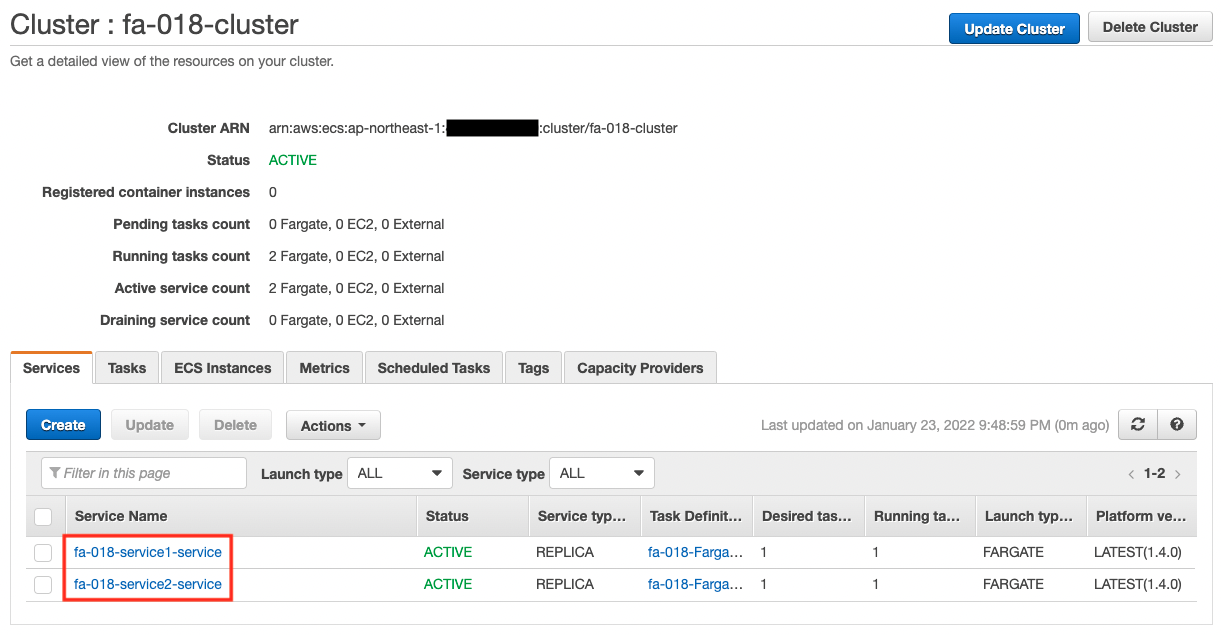
You can see that there are two services running in the cluster.
Check the details of the tasks running on each service.
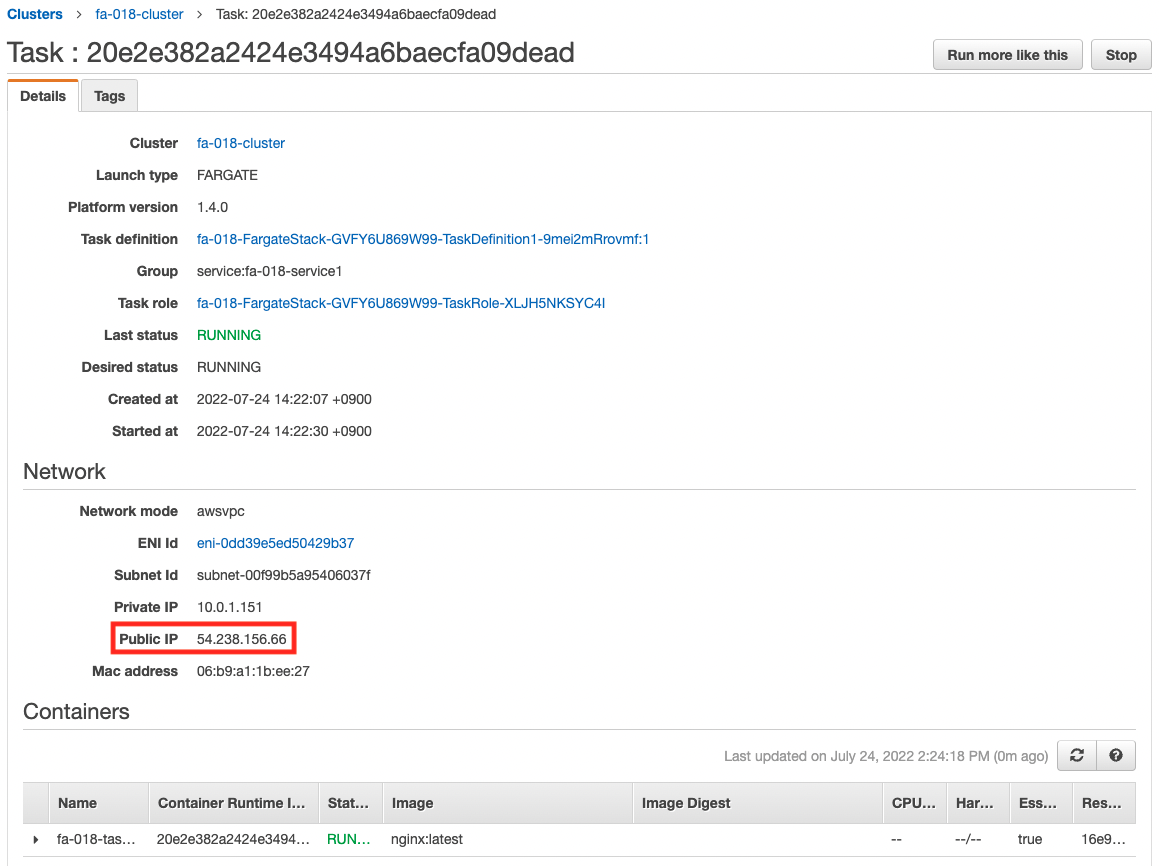
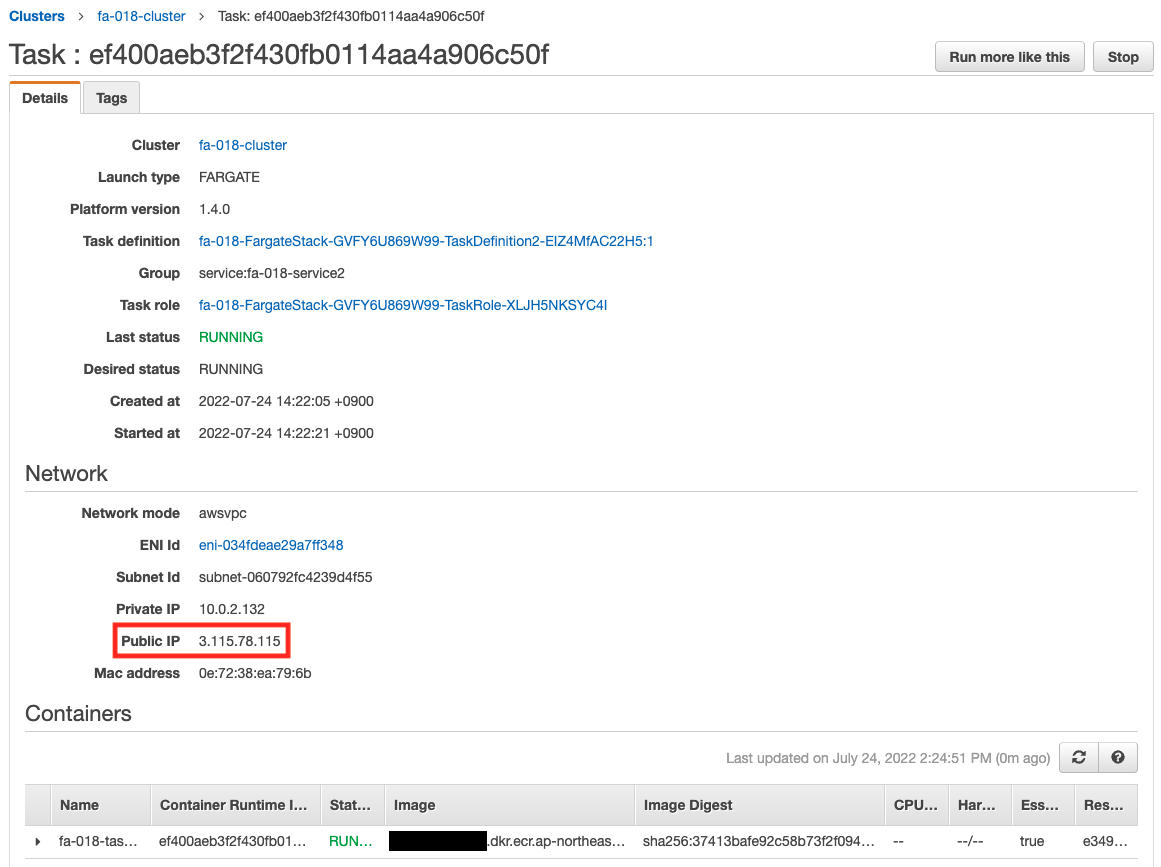
You can see the public address assigned to each task.
Access to Containers
Now that you are ready, you can actually access the site from your browser.
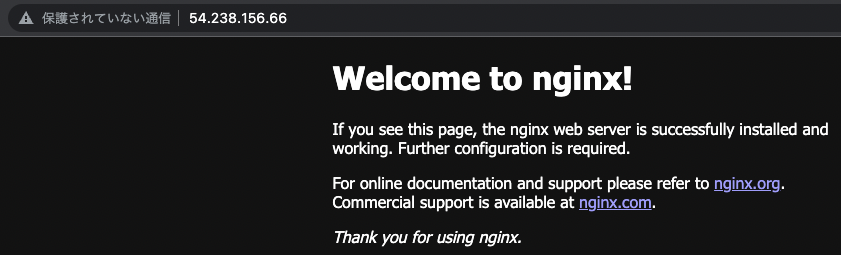
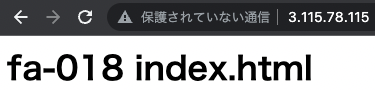
I was able to access each container normally.
The former is the top page of the official Nginx image, and the latter is the HTML file of the self-made image.
Summary
Using CloudFormation, we were able to create a Fargate-type ECS container.