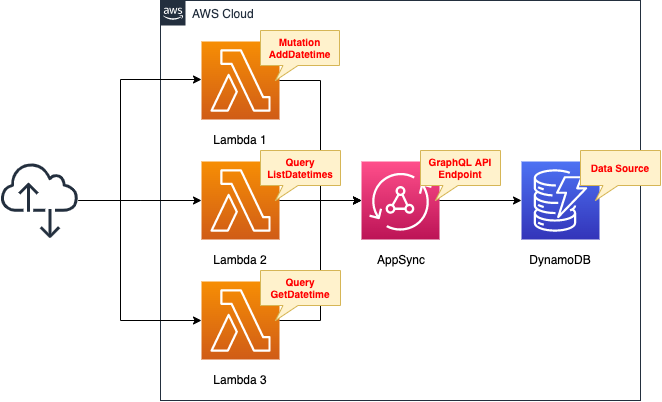
Building AppSync Environment with CloudFormation
AppSync is one of the managed services provided by AWS that allows you to easily build GraphQL APIs.
This page is an introduction to AppSync, so we will build a basic AppSync environment using CloudFormation.
Environment
Please refer to the following page for basic AppSync terminology.
https://docs.aws.amazon.com/appsync/latest/devguide/system-overview-and-architecture.html
Build AppSync as a GraphQL API endpoint.
Select DynamoDB as the AppSync data source.
Consider storing the following data through AppSync
- ID
- Date and time information
- Epoch seconds
Next, consider manipulating the above data with GraphQL.
Create the following mutation and query.
- Mutation
- addDatetime: Store date and time information
- Query
- listDatetimes: retrieve all stored date/time information
- getDatetime: Retrieve specific datetime information by specifying an ID
Create three Lambda functions as GraphQL clients.
Each corresponds to a mutated query.
- Function 1: addDatetime
- Function 2: listDatetimes
- Function 3: getDatetime
The three functions are created in Python 3.8 and configured to run over the Internet by enabling the Function URL.
CloudFormation template files
The above configuration is built using CloudFormation.
The CloudFormation template is located at the following URL
https://github.com/awstut-an-r/awstut-fa/tree/main/041
Explanation of key points of the template files
DynamoDB for data source
Various services can be selected as data sources for AppSync.
Examples of data sources include NoSQL databases, relational databases, AWS Lambda functions, and HTTP APIs.
System Overview and Architecture
In this case, DynamoDB will be used as the data source.
Below is the CloudFormation template for creating the DynamoDB table.
Resources:
  Table:
    Type: AWS::DynamoDB::Table
    Properties:
      AttributeDefinitions:
        - AttributeName: id
          AttributeType: S
      BillingMode: PAY_PER_REQUEST
      KeySchema:
        - AttributeName: id
          KeyType: HASH
      TableName: !Sub "${Prefix}-table"
Code language: YAML (yaml)
The id attribute is set to the partition key, so set “HASH”.
For more information on DynamoDB, please refer to the following page
AppSync
To build AppSync, the following four resources must be created
- API
- Data source
- Schema
- Resolver
In addition, the following will also be created this time
- API key
API
Check the API, the main resource of AppSync.
Resources:
  GraphQLApi:
    Type: AWS::AppSync::GraphQLApi
    Properties:
      AuthenticationType: API_KEY
      Name: !Sub "${Prefix}-GraphQLApi"
Code language: YAML (yaml)
No special configuration is required.
The point is to configure the settings related to authentication.
There are five ways you can authorize applications to interact with your AWS AppSync GraphQL API.
Authorization and Authentication
In this case, we will use the method that uses an API key for authentication.
Therefore, set the AuthenticationType property to “API_KEY”.
Data Source
The data source is the data storage where the data to be read/written by AppSync is stored.
As mentioned earlier, DynamoDB will be used as the data source in this case, so we will configure the settings for it.
Resources:
  DataSource:
    Type: AWS::AppSync::DataSource
    Properties:
      ApiId: !GetAtt GraphQLApi.ApiId
      DynamoDBConfig:
        AwsRegion: !Ref AWS::Region
        TableName: !Ref TableName
        UseCallerCredentials: false
        Versioned: false
      Name: DataSource
      ServiceRoleArn: !GetAtt DataSourceRole.Arn
      Type: AMAZON_DYNAMODB
Code language: YAML (yaml)
Set the data source type in the Type property.
Set “AMAZON_DYNAMODB”.
In the DynamoDBConfig property, set the detailed settings to make DynamoDB the data source.
The key point is the TableName property.
Specify the name of the DynamoDB table mentioned above.
The following is the IAM role for the data source.
Resources:
  DataSourceRole:
    Type: AWS::IAM::Role
    Properties:
      AssumeRolePolicyDocument:
        Version: 2012-10-17
        Statement:
          - Effect: Allow
            Action: sts:AssumeRole
            Principal:
              Service: appsync.amazonaws.com
      Policies:
        - PolicyName: !Sub "${Prefix}-DataSourcePolicy"
          PolicyDocument:
            Version: 2012-10-17
            Statement:
              - Effect: Allow
                Action:
                  - dynamodb:DeleteItem
                  - dynamodb:GetItem
                  - dynamodb:PutItem
                  - dynamodb:Query
                  - dynamodb:Scan
                  - dynamodb:UpdateItem
                Resource:
                  - !Sub "arn:aws:dynamodb:${AWS::Region}:${AWS::AccountId}:table/${TableName}"
                  - !Sub "arn:aws:dynamodb:${AWS::Region}:${AWS::AccountId}:table/${TableName}/*"
Code language: YAML (yaml)
The contents grant permissions to read and write to the DynamoDB table specified as the data source.
Schema
Schema is a GraphQL term.
It defines the specification of the API, the structure of the data to be stored, and how queries and mutations work.
Resources:
  GraphQLSchema:
    Type: AWS::AppSync::GraphQLSchema
    Properties:
      ApiId: !GetAtt GraphQLApi.ApiId
      Definition: |
        schema {
          query: Query
          mutation: Mutation
        }

        type Query {
          getDatetime(id: ID!): Datetime
          listDatetimes: [Datetime]
        }

        type Mutation {
          addDatetime(input: AddDatetimeInput!): Datetime
        }

        type Datetime {
          id: ID!
          datetime: String
          epoch: Int
        }

        input AddDatetimeInput {
          datetime: String
          epoch: Int
        }
      #DefinitionS3Location:
Code language: YAML (yaml)
There are two ways to create an AppSync schema resource using CloudFormation.
Either directly in a template file or by referencing a schema file placed in an S3 bucket.
In this case, we will use the former method.
Describe the schema in the Definition property.
The details of the schema are omitted since this is the story of GraphQL, but the key point is the root (where “schema” is described).
The root is mandatory.
Every schema has this root for processing. This fails to process until you add a root query type.
Designing Your Schema
The other descriptions are intended to express what is described in the Environment section.
Resolver
Resolver is a resource that defines the backend processing as a GraphQL API for AppSync.
It defines how to process and respond to mutation queries received from clients in GraphQL.
Resolvers are created for each mutation and query.
Resolver for Mutation
First, let’s start with a resolver for mutation (addDatetime), which registers the current date and time information.
Resources:
  AddDatetimeResolver:
   Type: AWS::AppSync::Resolver
   Properties:
     ApiId: !GetAtt GraphQLApi.ApiId
     DataSourceName: !GetAtt DataSource.Name
     FieldName: addDatetime
     Kind: UNIT
     RequestMappingTemplate: |
        {
          "version": "2017-02-28",
          "operation": "PutItem",
          "key": {
            "id": $util.dynamodb.toDynamoDBJson($util.autoId()),
          },
          "attributeValues": $util.dynamodb.toMapValuesJson($ctx.args.input),
          "condition": {
            "expression": "attribute_not_exists(#id)",
            "expressionNames": {
              "#id": "id",
            },
          },
        }
     #RequestMappingTemplateS3Location:
     ResponseMappingTemplate: |
       $util.toJson($context.result)
     #ResponseMappingTemplateS3Location:
     TypeName: Mutation
Code language: YAML (yaml)
The FieldName property should be set to the mutation name defined in the schema, and the TypeName should be set to “Mutation”.
The key point is the settings related to request mapping and response mapping.
Resolvers are comprised of request and response mapping templates, which contain transformation and execution logic.
Designing Your Schema
The resolver consists of a request mapping template and a response mapping template that contain the transformation and execution logic.
https://docs.aws.amazon.com/ja_jp/appsync/latest/devguide/system-overview-and-architecture.html
System Overview and Architecture
Both can be written directly in the CloudFormation template file or referenced in a file placed in an S3 bucket.
In this case, we will choose the former and configure it with the property of the same name.
Both properties are configured by referring to the following page
https://docs.aws.amazon.com/appsync/latest/devguide/configuring-resolvers.html
The following is an overview of the request mapping template.
- The content to be executed is “PutItem” in DynamoDB.
- The partition key is set to be automatically numbered as the “id” of the passed value.
- Save only if the ID is not yet registered.
The following is an overview of the response mapping template.
- Converts the value returned from DynamoDB into JSON and returns it.
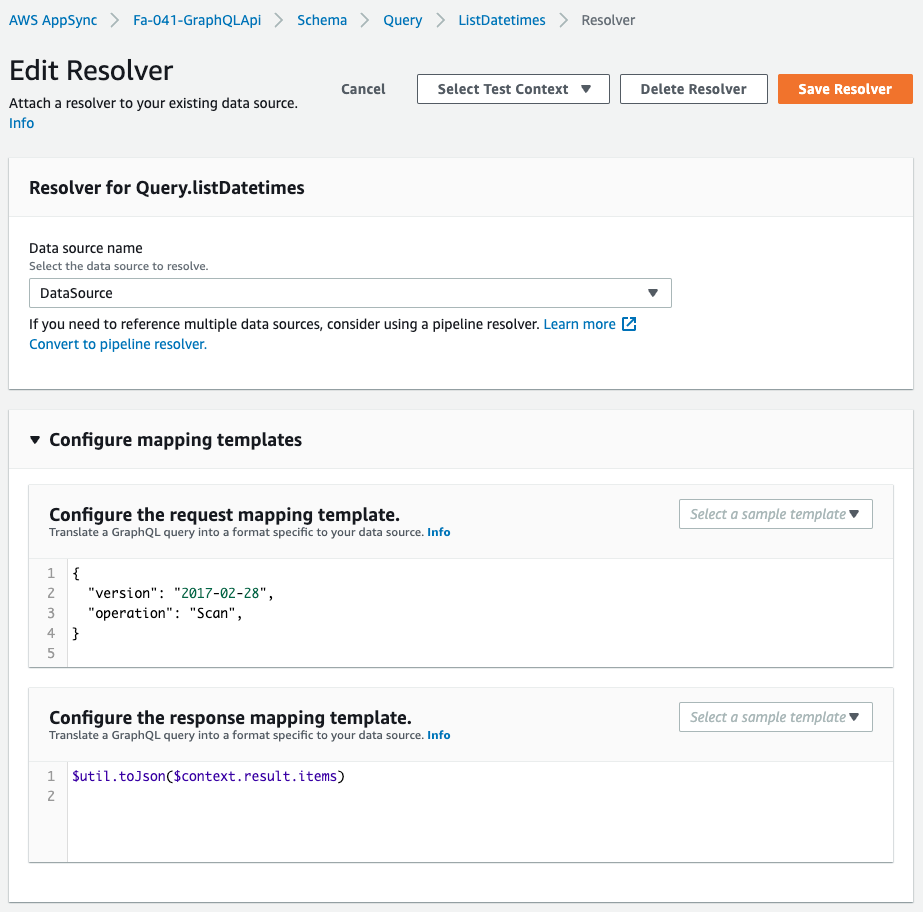
Resolver for query1
Check the resolver for the query (listDatetimes) to retrieve all stored date/time information.
Resources:
  ListDatetimesResolver:
    Type: AWS::AppSync::Resolver
    Properties:
      ApiId: !GetAtt GraphQLApi.ApiId
      DataSourceName: !GetAtt DataSource.Name
      FieldName: listDatetimes
      Kind: UNIT
      RequestMappingTemplate: |
        {
          "version": "2017-02-28",
          "operation": "Scan",
        }
      #RequestMappingTemplateS3Location:
      ResponseMappingTemplate: |
        $util.toJson($context.result.items)
      #ResponseMappingTemplateS3Location:
      TypeName: Query
Code language: YAML (yaml)
The following is an overview of the request mapping template.
- The content to be executed is “Scan” in DynamoDB
The outline of the Response Mapping Template is as follows.
- Return values returned from DynamoDB in JSON format as a list.
The point is the format of the response.
It must be returned as a list, not an object, according to the schema settings.
the context object (aliased as $ctx) for lists of items has the form $context.result.items.
Configuring Resolvers
Resolver for query2
Check the resolver for the query (getDatetime) to get the date and time information by specifying the ID.
Resources:
  GetDatetimeResolver:
    Type: AWS::AppSync::Resolver
    Properties:
      ApiId: !GetAtt GraphQLApi.ApiId
      DataSourceName: !GetAtt DataSource.Name
      FieldName: getDatetime
      Kind: UNIT
      RequestMappingTemplate: |
        {
          "version": "2017-02-28",
          "operation": "GetItem",
          "key": {
            "id": $util.dynamodb.toDynamoDBJson($ctx.args.id),
          },
        }
      #RequestMappingTemplateS3Location:
      ResponseMappingTemplate: |
        $util.toJson($context.result)
      #ResponseMappingTemplateS3Location:
      TypeName: Query
Code language: YAML (yaml)
The following is an overview of the request mapping template.
- The content to be executed is “GetItem” in DynamoDB
- Use the ID passed in the argument as the partition key
The outline of the response mapping template is as follows
- Returns the value returned from DynamoDB in JSON format
API key
The AppSync API to be created this time authenticates with an API key, so create an API key.
Resources:
  ApiKey:
    Type: AWS::AppSync::ApiKey
    Properties:
     ApiId: !GetAtt GraphQLApi.ApiId
Code language: YAML (yaml)
No special configuration is required.
Just specify the ID of the API you created.
Lambda
Lambda Layer
To run GraphQL from Python, use the client library.
The official GraphQL website has several clients.
https://graphql.org/code/#python
Among them, we will use GQL.
https://github.com/graphql-python/gql
Since this library will be used by three functions, we will create a Lambda layer and include it there.
For more information on Lambda layers, please see the following page
The command to create the package for this Lambda layer is as follows
$ sudo pip3 install --pre gql[all] -t python

$ zip -r layer.zip python
Code language: Bash (bash)
Template for Lambda functions
Create 3 Lambda functions as clients executing mutation queries.
The templates for building the three functions are almost the same, so we will check function 1 as a representative example.
Resources:
  Function1:
    Type: AWS::Lambda::Function
    Properties:
      Environment:
        Variables:
          API_KEY: !Ref ApiKey
          GRAPHQL_URL: !Ref GraphQLUrl
      Code:
        S3Bucket: !Ref CodeS3Bucket
        S3Key: !Ref CodeS3Key1
      FunctionName: !Sub "${Prefix}-function-01"
      Handler: !Ref Handler
      Layers:
        - !Ref LambdaLayer
      Runtime: !Ref Runtime
      Role: !GetAtt FunctionRole.Arn
      Timeout: !Ref Timeout
Code language: YAML (yaml)
The key point is the environment variable (Environment property).
Set the aforementioned API key and the API endpoint URL to the environment variable.
By defining an environment variable in this way, the value of the variable can be referenced from within the function.
Function 1 (addDatetime)
Check the code for function 1.
Function 1 performs a mutation to store the current date and time information.
import datetime
import json
import os
import time
from gql import Client, gql
from gql.transport.aiohttp import AIOHTTPTransport

api_key = os.environ['API_KEY']
graphql_url = os.environ['GRAPHQL_URL']

transport = AIOHTTPTransport(
  url=graphql_url,
  headers={
    'x-api-key': api_key
  })
client = Client(transport=transport, fetch_schema_from_transport=True)

mutation = gql(
  """
  mutation AddDatetimeMutation($adddatetimeinput: AddDatetimeInput!) {
    addDatetime(input: $adddatetimeinput) {
      id
      datetime
      epoch
    }
  }
""")

def lambda_handler(event, context):
  now = datetime.datetime.now()
  now_str = now.strftime('%Y%m%d%H%M%S%f')
  epoch_time = int(time.mktime(now.timetuple()))

  params = {
    'adddatetimeinput': {
      'datetime': now_str,
      'epoch': epoch_time
    }
  }

  result = client.execute(mutation, variable_values=params)

  return {
    'statusCode': 200,
    'body': json.dumps(result, indent=2)
  }
Code language: Python (python)
The way to run GraphQL is implemented by referring to the official GQL website.
https://gql.readthedocs.io/en/latest/usage/basic_usage.html
https://gql.readthedocs.io/en/v3.0.0a6/usage/variables.html
The key to running GraphQL is the API key.
You can refer to the environment variable defined in the CloudFormation template.
In this case, API key authentication is used, so the API key is set in the HTTP header.
On the client, the API key is specified by the header x-api-key.
Authorization and Authentication
As an overview of the code content, after acquiring the current date, time, and epoch seconds, set them as GraphQL parameters, and execute the code.
The result of the execution is then returned to the user.
Function 2 (listDatetimes)
Check the code for function 2, which executes a query to retrieve all stored data.
Review the code for function 2.
Function 2 executes a query to retrieve all stored data.
import json
import os
from gql import Client, gql
from gql.transport.aiohttp import AIOHTTPTransport

api_key = os.environ['API_KEY']
graphql_url = os.environ['GRAPHQL_URL']

transport = AIOHTTPTransport(
  url=graphql_url,
  headers={
    'x-api-key': api_key
  })
client = Client(transport=transport, fetch_schema_from_transport=True)

query = gql(
  """
  query ListDatetimesQuery {
    listDatetimes {
      id
      datetime
    }
  }
""")

def lambda_handler(event, context):
  result = client.execute(query)

  return {
    'statusCode': 200,
    'body': json.dumps(result, indent=2)
  }
Code language: Python (python)
Simply execute GraphQL and return the result of the execution to the user.
A minor point is that the data to be retrieved is restricted.
Set the query to return only ID and date/time information, excluding epoch seconds.
Function 3 (getDatetime)
Check the code for function 3.
Function 3 executes a query to retrieve stored data, given an ID.
import json
import os
from gql import Client, gql
from gql.transport.aiohttp import AIOHTTPTransport

api_key = os.environ['API_KEY']
graphql_url = os.environ['GRAPHQL_URL']

transport = AIOHTTPTransport(
  url=graphql_url,
  headers={
    'x-api-key': api_key
  })
client = Client(transport=transport, fetch_schema_from_transport=True)

query = gql(
  """
  query GetDatetimeQuery($id_: ID!) {
    getDatetime(id: $id_) {
      id
      datetime
      epoch
    }
  }
""")

def lambda_handler(event, context):
  if not 'queryStringParameters' in event or (
      not 'id' in event['queryStringParameters']):
    return {
      'statusCode': 200,
      'body': 'No ID.'
    }

  id_ = event['queryStringParameters']['id']

  params = {
    'id_': id_
  }

  result = client.execute(query, variable_values=params)

  return {
    'statusCode': 200,
    'body': json.dumps(result, indent=2)
  }
Code language: Python (python)
Specify the ID in the URL query parameter.
Execute GraphQL with the ID as a parameter and return the execution result to the user.
This query is set up to return three pieces of data (ID, date/time data, and epoch seconds).
Architecting
Use CloudFormation to build this environment and check the actual behavior.
Prepare deployment packages for Lambda functions
There are three ways to create a Lambda function.
In this case, we will choose the method of uploading a deployment package to an S3 bucket.
For more information, please refer to the following page
Create CloudFormation stacks and check resources in stacks
Create a CloudFormation stack.
For more information on how to create stacks and check each stack, please refer to the following page

After checking the resources in each stack, information on the main resources created this time is as follows
- DynamoDB table: fa-041-table
- Function URL for function 1: https://xay4g7fx377bslkd2g6scsdev40ascum.lambda-url.ap-northeast-1.on.aws/
- Function URL for function 2: https://pbxyn5tnpcicwy6kofraiewfem0yrvaa.lambda-url.ap-northeast-1.on.aws/
- Function URL for function 3: https://vo6ijjjsliqzsbuetfdflp5g4i0qvadm.lambda-url.ap-northeast-1.on.aws/
Check AppSync from the AWS Management Console as well.
First, check the API.
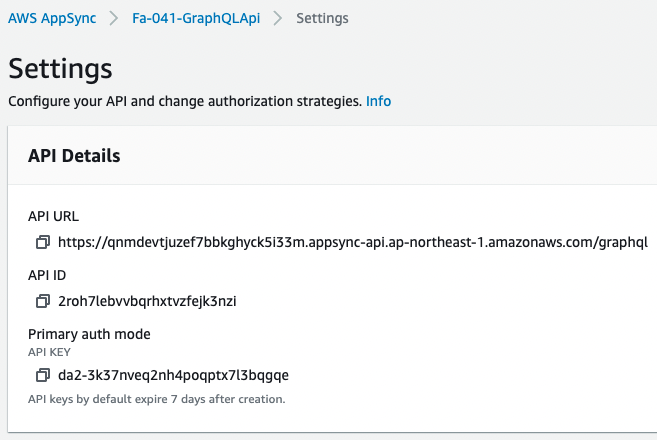
You will see that the API has been created and the API URL has been created.
You can also see that the API key has been created.
Check the data source.
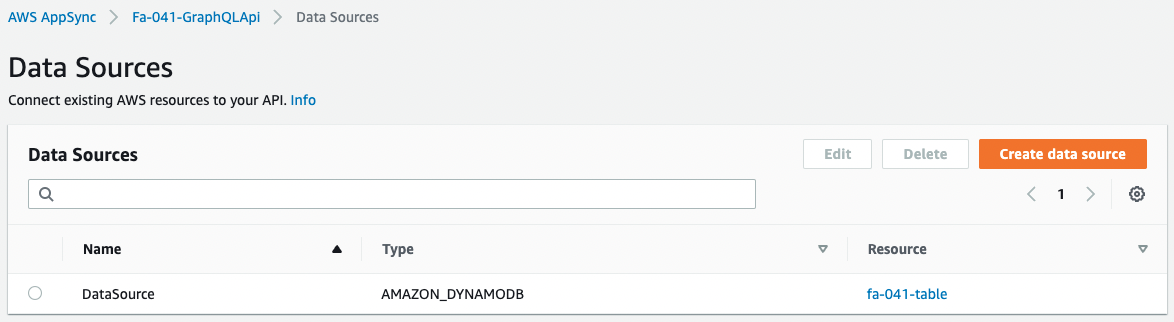
You can see that the DynamoDB table is registered as a data source.
Check the schema.

The schema has been created as described in the CloudFormation template file.
Check the three resolvers created.
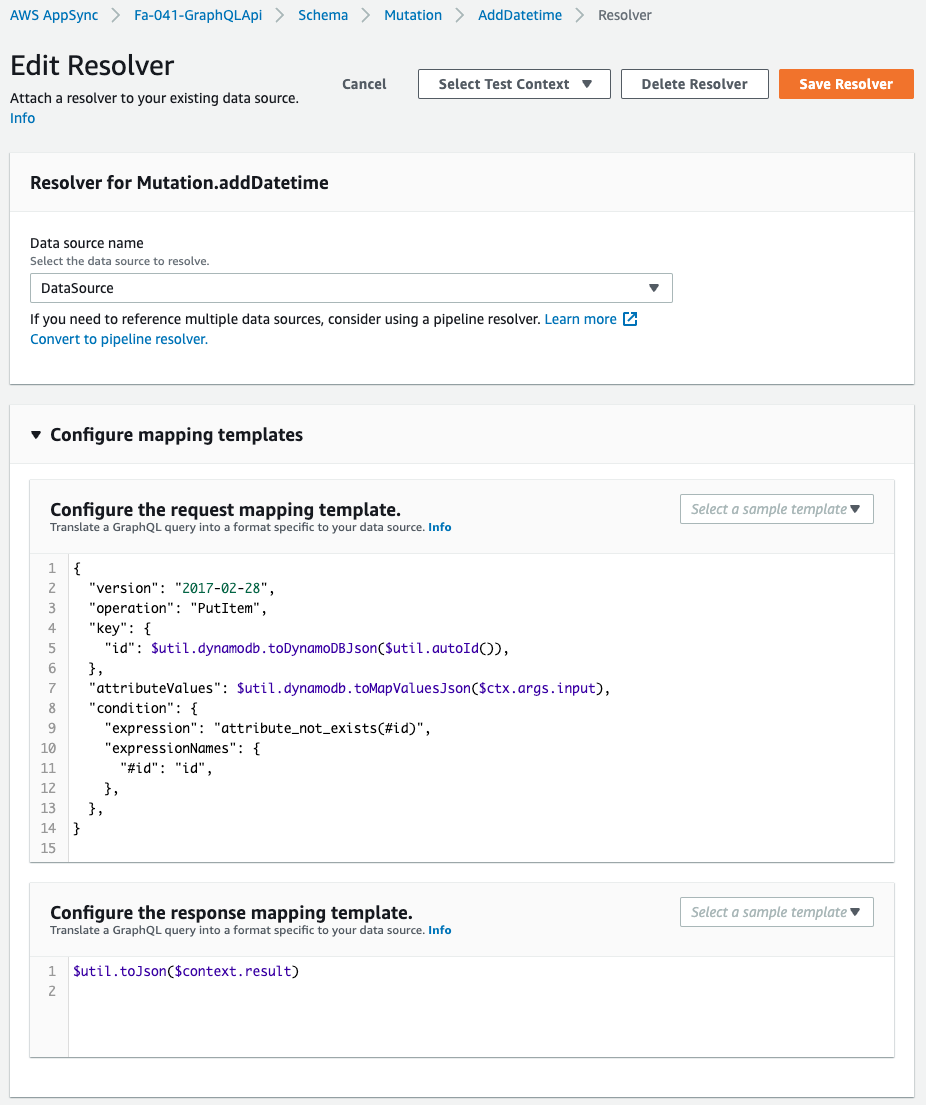
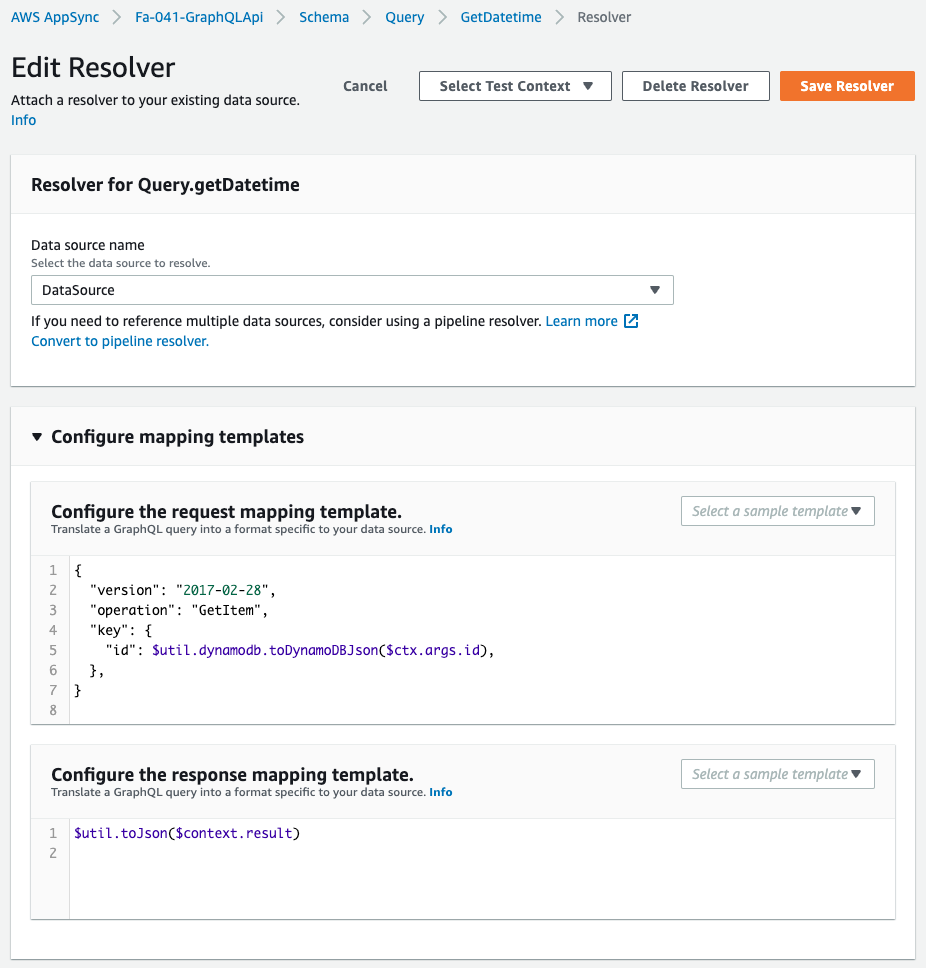
The contents are also as described in the CloudFormation template file.
Confirmation of Operation
Now that everything is ready, access each Function URL.
First, let’s look at Function 1.
Function 1 is responsible for storing date and time information.
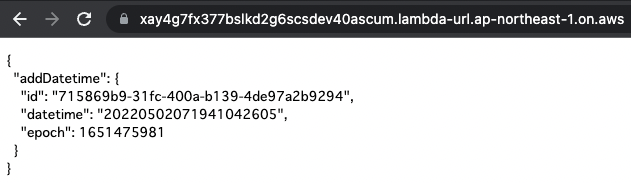
Mutation is successfully executed.
The date/time information is saved and the saved value is returned.
In this way, data could be written through AppSync’s GraphQL API.
Next is Function 2.
Function 2 works to retrieve all stored date/time information.
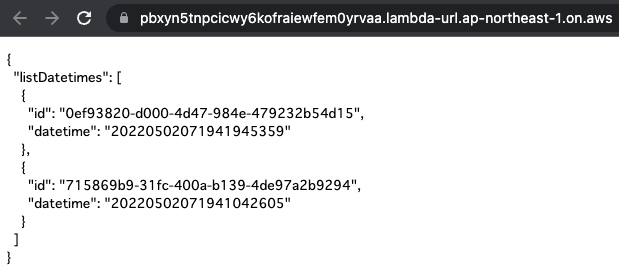
The query was successfully executed.
Of the stored data, only the ID and date/time data, excluding the epoch seconds, were returned.
Thus, through AppSync’s GraphQL API, the user was able to retrieve the data in the format needed.
Finally, we come to function 3.
Function 3 works to retrieve date and time information by specifying an ID.

The ID was specified in the URL query parameter and the query was successfully executed.
In this query, we have executed a query to retrieve all three types of data, so the results will be accordingly.
Summary
As an introduction to AppSync, we used CloudFormation to build an AppSync environment.
Through building the environment, we have identified several resources that make up AppSync and how to execute the GraphQL API built with AppSync using Lambda functions (Python).