Create ECS (Fargate) in Private Subnet
The following page shows how to create a Fargate type ECS container.

In this article, we will see how to create a Fargate on a private subnet.
Environment
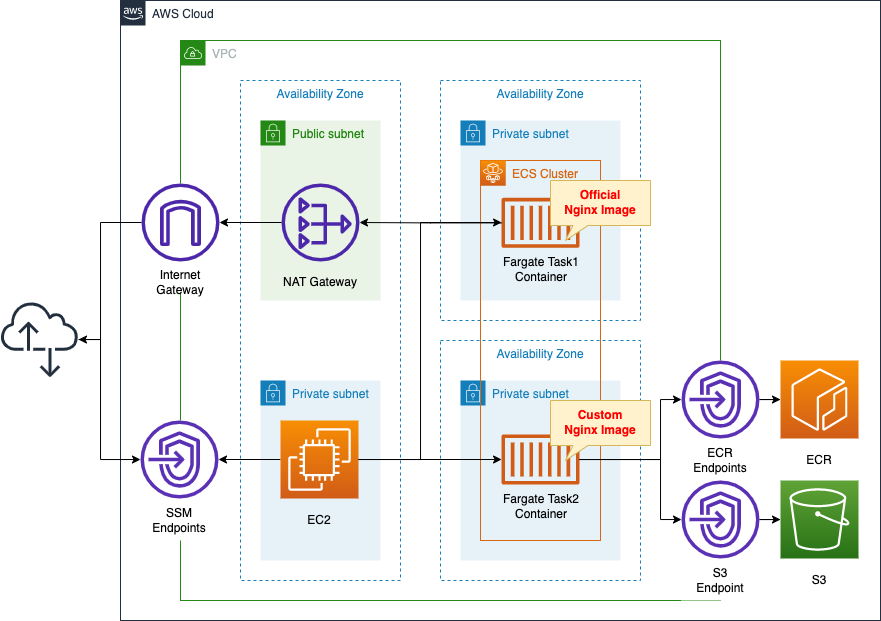
Create an ECS cluster and associate a Fargate type ECS task to the private subnet.
The task will be created using the following two types of images
- official Nginx image available on DockerHub
- a custom Nginx image that you have created yourself and pushed to ECR
To get the official Nginx image, place a NAT gateway on a public subnet.
Create VPC endpoints for ECR and for S3 to retrieve the image pushed to ECR.
Create an EC2 instance.
Use it as a client to access the two image-created containers.
CloudFormation template files
Build the above configuration with CloudFormation.
The CloudFormation templates are located at the following URL
https://github.com/awstut-an-r/awstut-fa/tree/main/068
Explanation of key points of template files
For basic information about ECS and Fargate, please refer to the page at the beginning of this document.
This page will cover the key points of configuring Fargate on a private subnet.
Configuration for image acquisition
In creating a task, you will need to acquire a Docker image.
The response depends on whether the image to be acquired is an image published on DockerHub or an image pushed to the ECR.
Obtaining DockerHub image from Private Subnet
Resources:
  IGW:
    Type: AWS::EC2::InternetGateway

  IGWAttachment:
    Type: AWS::EC2::VPCGatewayAttachment
    Properties:
      VpcId: !Ref VPC
      InternetGatewayId: !Ref IGW

  EIP:
    Type: AWS::EC2::EIP
    Properties:
      Domain: vpc

  NATGateway:
    Type: AWS::EC2::NatGateway
    Properties:
      AllocationId: !GetAtt EIP.AllocationId
      SubnetId: !Ref PublicSubnet

  PublicSubnet:
    Type: AWS::EC2::Subnet
    Properties:
      CidrBlock: !Ref CidrIp1
      VpcId: !Ref VPC
      AvailabilityZone: !Sub "${AWS::Region}${AvailabilityZone1}"

  ContainerRouteTable1:
    Type: AWS::EC2::RouteTable
    Properties:
      VpcId: !Ref VPC

  RouteToInternet:
    Type: AWS::EC2::Route
    Properties:
      RouteTableId: !Ref PublicRouteTable
      DestinationCidrBlock: 0.0.0.0/0
      GatewayId: !Ref IGW

  RouteToNATGateway:
    Type: AWS::EC2::Route
    Properties:
      RouteTableId: !Ref ContainerRouteTable1
      DestinationCidrBlock: 0.0.0.0/0
      NatGatewayId: !Ref NATGateway

  PublicRouteTableAssociation:
    Type: AWS::EC2::SubnetRouteTableAssociation
    Properties:
      SubnetId: !Ref PublicSubnet
      RouteTableId: !Ref PublicRouteTable

  ContainerRouteTableAssociation1:
    Type: AWS::EC2::SubnetRouteTableAssociation
    Properties:
      SubnetId: !Ref ContainerSubnet1
      RouteTableId: !Ref ContainerRouteTable1
Code language: YAML (yaml)
In order to retrieve images published on DockerHub, a route to the Internet must be provided.
To connect to the Internet from an ECS cluster deployed in a private subnet, a NAT gateway is placed in the public subnet.
In addition, a route table will be configured to access the Internet via the NAT gateway.
The route table associated with the private subnet where the ECS cluster will be deployed is configured with routes for the NAT gateway.
The route table associated with the public subnet where the NAT gateway is located is configured with a route for the Internet gateway.
Retrieve images pushed to ECR from Private Subnet
Resources:
  ContainerSubnet2:
    Type: AWS::EC2::Subnet
    Properties:
      CidrBlock: !Ref CidrIp4
      VpcId: !Ref VPC
      AvailabilityZone: !Sub "${AWS::Region}${AvailabilityZone3}"

  ContainerRouteTable2:
    Type: AWS::EC2::RouteTable
    Properties:
      VpcId: !Ref VPC

  ContainerRouteTableAssociation2:
    Type: AWS::EC2::SubnetRouteTableAssociation
    Properties:
      SubnetId: !Ref ContainerSubnet2
      RouteTableId: !Ref ContainerRouteTable2

  S3Endpoint:
    Type: AWS::EC2::VPCEndpoint
    Properties:
      RouteTableIds:
        - !Ref ContainerRouteTable2
      ServiceName: !Sub "com.amazonaws.${AWS::Region}.s3"
      VpcId: !Ref VPC

  ECRDkrEndpoint:
    Type: AWS::EC2::VPCEndpoint
    Properties:
      PrivateDnsEnabled: true
      SecurityGroupIds:
        - !Ref EndpointSecurityGroup2
      ServiceName: !Sub "com.amazonaws.${AWS::Region}.ecr.dkr"
      SubnetIds:
        - !Ref ContainerSubnet2
      VpcEndpointType: Interface
      VpcId: !Ref VPC

  ECRApiEndpoint:
    Type: AWS::EC2::VPCEndpoint
    Properties:
      PrivateDnsEnabled: true
      SecurityGroupIds:
        - !Ref EndpointSecurityGroup2
      ServiceName: !Sub "com.amazonaws.${AWS::Region}.ecr.api"
      SubnetIds:
        - !Ref ContainerSubnet2
      VpcEndpointType: Interface
      VpcId: !Ref VPC
Code language: YAML (yaml)
Fargate has several platform versions, but LATEST (1.4.0) is selected by default.
With version 1.4.0 of Fargate, three different VPC endpoints for ECR are required.
Amazon ECS tasks hosted on Fargate using platform version 1.4.0 or later require both the com.amazonaws.region.ecr.dkr and com.amazonaws.region.ecr.api Amazon ECR VPC endpoints as well as the Amazon S3 gateway endpoint to take advantage of this feature.
Considerations for Amazon ECR VPC endpoints
VPC endpoints for ECR are created as interforce type and VPC endpoints for S3 are created as gateway type.
Do not assign public address to task
Parameters:
  Service1:
    Type: AWS::ECS::Service
    Properties:
      #Cluster: !Ref Cluster1
      Cluster: !Ref Cluster
      LaunchType: FARGATE
      DesiredCount: 1
      TaskDefinition: !Ref TaskDefinition1
      ServiceName: !Sub "${Prefix}-service1"
      NetworkConfiguration:
        AwsvpcConfiguration:
          #AssignPublicIp: ENABLED
          SecurityGroups:
            - !Ref ContainerSecurityGroup
          Subnets:
            - !Ref ContainerSubnet1

  Service2:
    Type: AWS::ECS::Service
    Properties:
      #Cluster: !Ref Cluster1
      Cluster: !Ref Cluster
      LaunchType: FARGATE
      DesiredCount: 1
      TaskDefinition: !Ref TaskDefinition2
      ServiceName: !Sub "${Prefix}-service2"
      NetworkConfiguration:
        AwsvpcConfiguration:
          #AssignPublicIp: ENABLED
          SecurityGroups:
            - !Ref ContainerSecurityGroup
          Subnets:
            - !Ref ContainerSubnet2
Code language: YAML (yaml)
The AssignPublicIp property allows you to set whether the task (container) will be assigned a public address.
This property is not used in this case because the task will be created in a private subnet.
Architecting
Using CloudFormation, we will build this environment and check the actual behavior.
Create CloudFormation stacks and check resources in stacks
The operation is the same as in the first page.
First, create a CloudFormation stack for the ECR repository, and then create the rest of the stack.
After checking the resources in each stack, information on the main resources created this time is as follows
- ECR repository: [account-id].dkr.ecr.ap-northeast-1.amazonaws.com/fa-068:latest
- ECS cluster: fa-068-cluster
- ECS service 1: fa-068-service1
- ECS service 2: fa-068-service2
- EC2 instance: i-0daf944e613851dd3
Check the created resource from the AWS Management Console.
First, check the ECR.
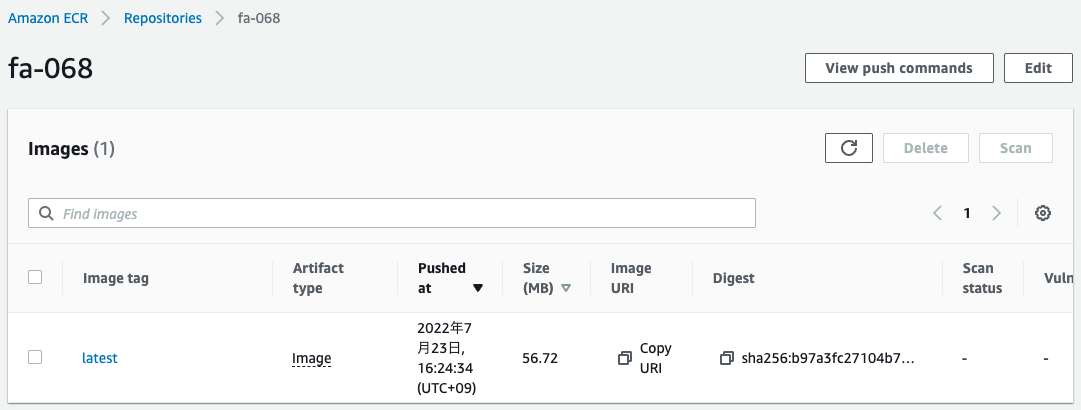
You can see that the ECR repository has been successfully created and the image has been pushed.
Next, check the ECS cluster.
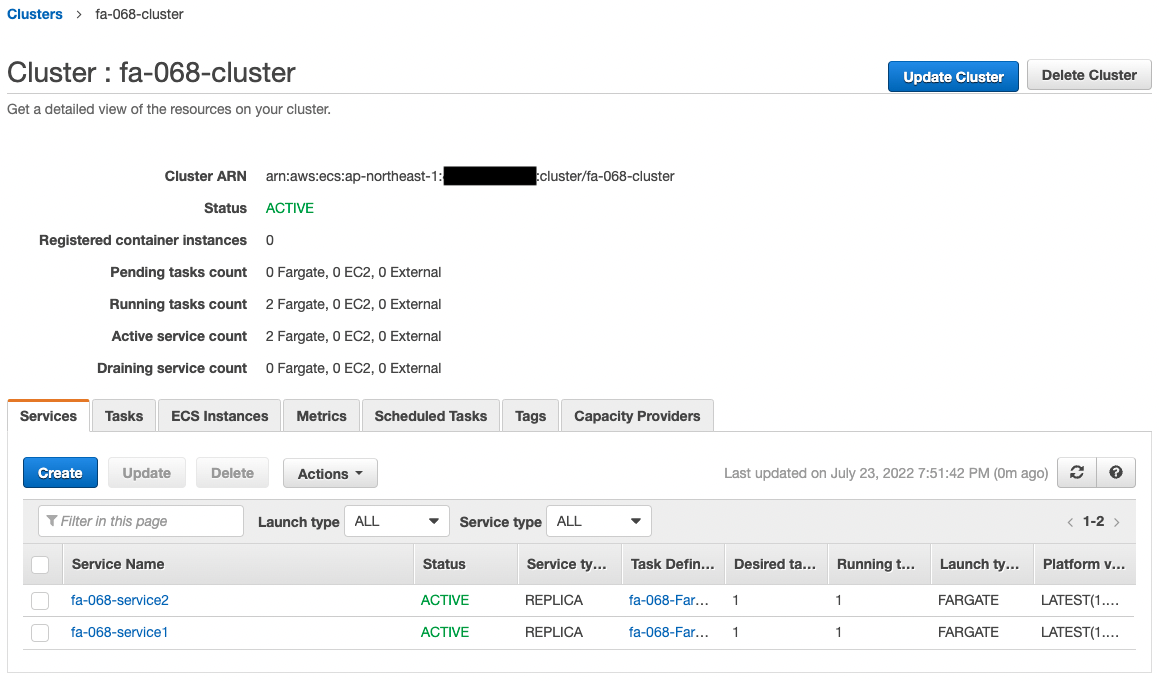
We see that the cluster has been successfully created and two ECS services have been created.
Below are the details of the tasks created within each service.
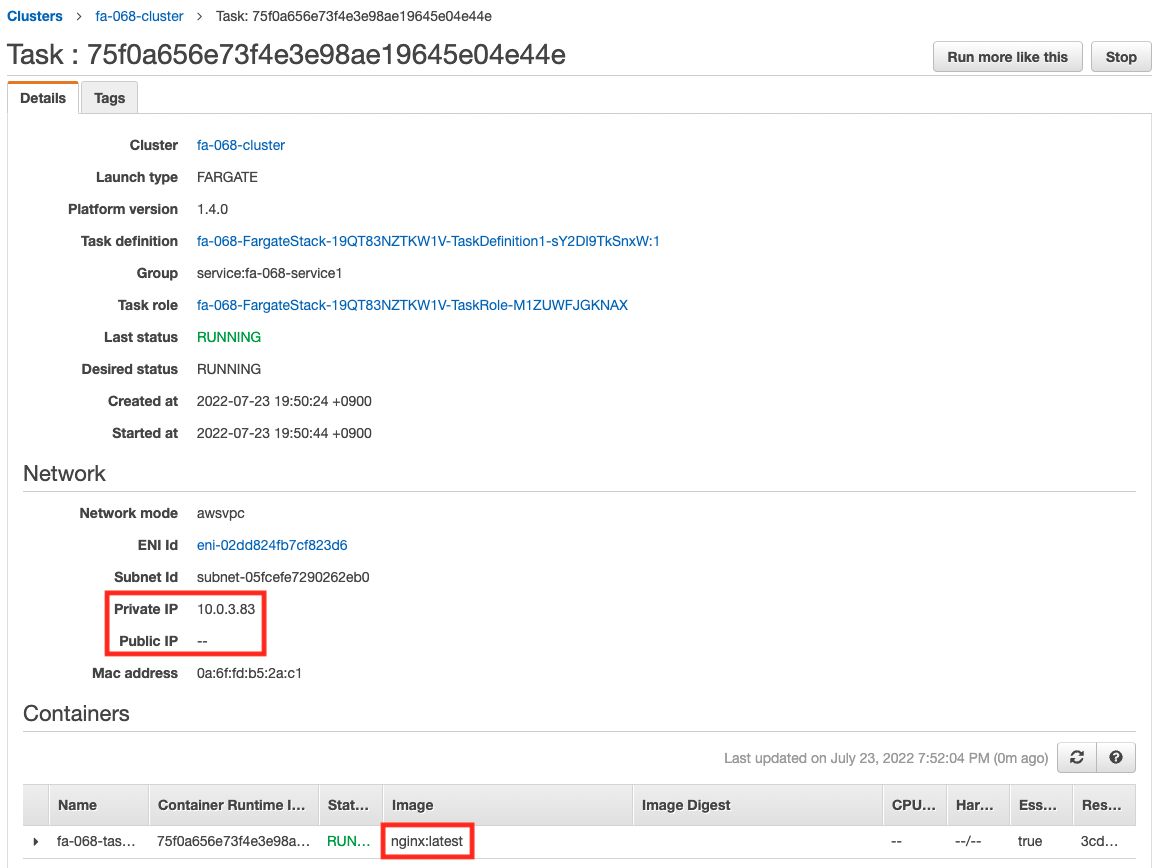
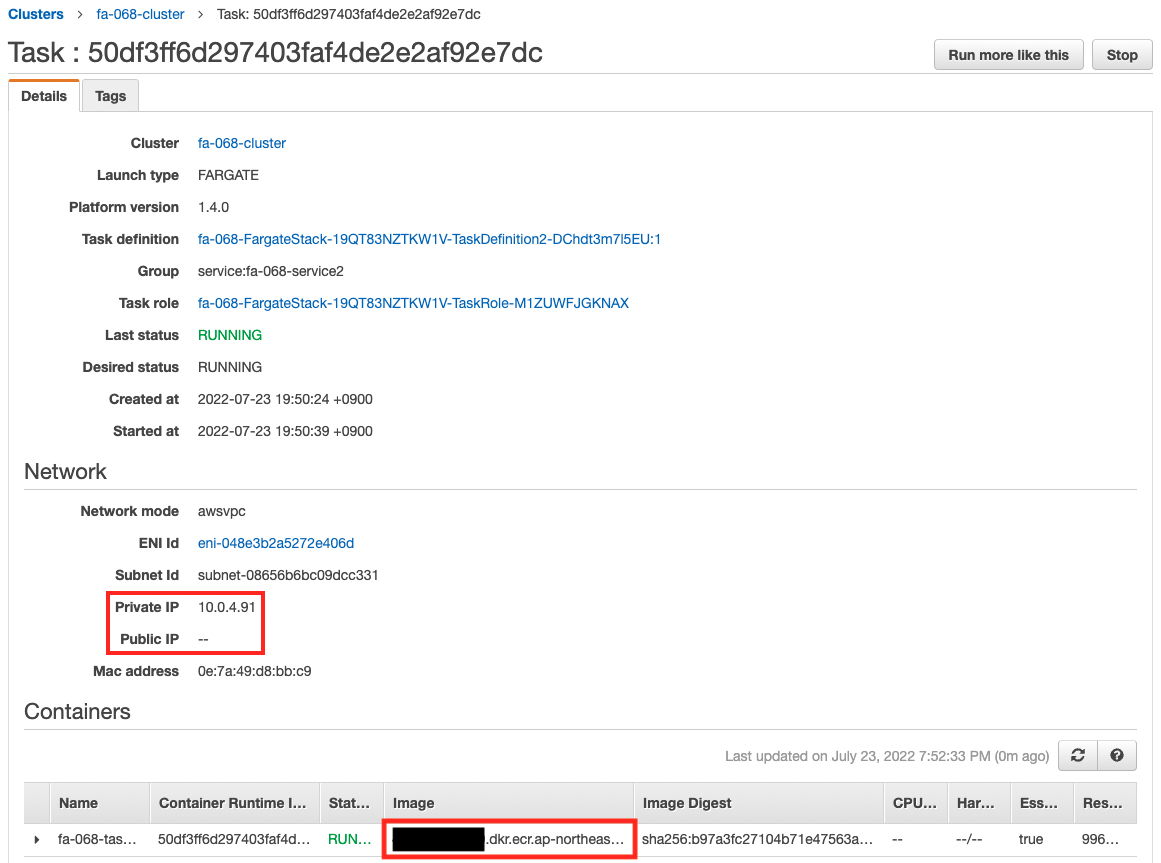
You can see that each container is created based on images obtained from the DockerHub and ECR repositories, respectively.
You can also see that each task (container) is assigned a private subnet, while no public subnet is assigned.
The assigned private addresses are organized as follows
- Task 1: 10.0.3.83
- Task 2: 10.0.4.91
Checking Action
After accessing the EC2 instance, access the two tasks.
Use SSM Session Manager to access the instance.
% aws ssm start-session --target i-0daf944e613851dd3

Starting session with SessionId: root-0f881269c9b4cb613
sh-4.2$
Code language: Bash (bash)
For more information on SSM Session Manager, please refer to the following page
Task 1
Access the container in Task 1 with the curl command.
sh-4.2$ curl http://10.0.3.83
<!DOCTYPE html>
<html>
<head>
<title>Welcome to nginx!</title>
<style>
html { color-scheme: light dark; }
body { width: 35em; margin: 0 auto;
font-family: Tahoma, Verdana, Arial, sans-serif; }
</style>
</head>
<body>
<h1>Welcome to nginx!</h1>
<p>If you see this page, the nginx web server is successfully installed and
working. Further configuration is required.</p>

<p>For online documentation and support please refer to
<a href="http://nginx.org/">nginx.org</a>.<br/>
Commercial support is available at
<a href="http://nginx.com/">nginx.com</a>.</p>

<p><em>Thank you for using nginx.</em></p>
</body>
</html>
Code language: Bash (bash)
It was successfully accessed.
You can see that the container was generated from an official image.
Task 2
Next, we access the container in Task 2 with the curl command.
sh-4.2$ curl http://10.0.4.91
<html>
  <head>
  </head>
  <body>
    <h1>fa-068 index.html</h1>
  </body>
</html>Code language: JavaScript (javascript)
This one was also accessed successfully.
You can see that the container was generated from a custom image.
Summary
We have seen how to create Fargate on a private subnet.