Introduction to FSx for Lustre using CloudFormation
FSx for Lustre is one of the managed storage services offered by AWS.
FSx for Lustre makes it easy and cost-effective to launch and run the popular, high-performance Lustre file system. You use Lustre for workloads where speed matters, such as machine learning, high performance computing (HPC), video processing, and financial modeling.
What is Amazon FSx for Lustre?
In this page, as an introduction to FSx for Lustre, we will build the configuration introduced in the following page using CloudFormation and check its operation.
https://docs.aws.amazon.com/fsx/latest/LustreGuide/getting-started.html
Environment
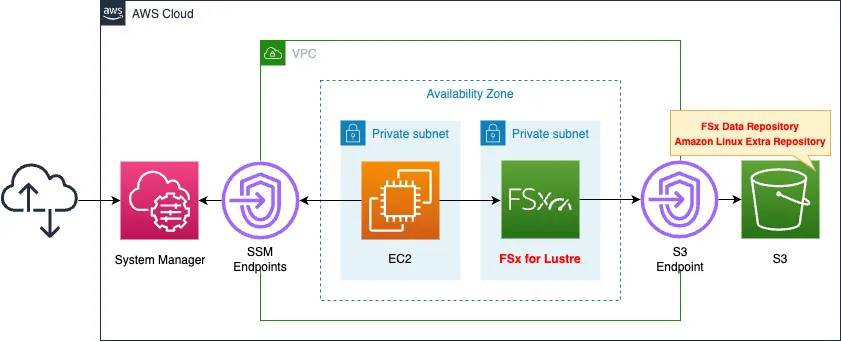
Create two private subnets in the VPC.
On the first subnet, FSx for Lustre is created.
On the second subnet, create an EC2 instance.
This instance will be used as a client connecting to FSx for Lustre.
Create an S3 bucket.
This bucket will be used as the data repository for FSx for Lustre.
FSx for Lustre is located on a private subnet, so it accesses S3 buckets via a VPC endpoint.
You can also use Amazon Linux Extras to install the client package for FSx for Lustre on your EC2 instance, which also goes through this VPC endpoint.
CloudFormation template files
The above configuration is built with CloudFormation.
The CloudFormation templates are placed at the following URL
https://github.com/awstut-an-r/awstut-saa/tree/main/02/010
Explanation of key points of template files
S3 bucket
Resources:
  Bucket:
    Type: AWS::S3::Bucket
    Properties:
      AccessControl: Private
      BucketName: !Ref Prefix
Code language: YAML (yaml)
Create an S3 bucket for the data repository.
No special settings are required.
FSx for Lustre
Resources:
  FSxLustre:
    Type: AWS::FSx::FileSystem
    Properties:
      FileSystemType: LUSTRE
      FileSystemTypeVersion: 2.12
      LustreConfiguration:
        DeploymentType: SCRATCH_1
        ImportPath: !Sub "s3://${Bucket}/"
      SecurityGroupIds:
        - !Ref FSxSecurityGroup
      StorageCapacity: !Ref FSxStorageCapacity
      StorageType: SSD
      SubnetIds:
        - !Ref FSxSubnet
Code language: YAML (yaml)
To create a Lustre type FSx, specify “LUSTRE” for the FileSystemType property.
Also, two file system versions (2.10 and 2.12) can be selected.
This time, select the latter and set it to the FileSystemTypeVersion property.
The LustreConfiguration property is used to configure settings related to Lustre.
The DeploymentType property sets the deployment options for Lustre.
See the following page for details.
https://docs.aws.amazon.com/fsx/latest/LustreGuide/using-fsx-lustre.html
This time, specify the default “SCRATCH_1” and select the scratch type.
Scratch file systems are designed for temporary storage and shorter-term processing of data. Data isn’t replicated and doesn’t persist if a file server fails.
Scratch file systems
Set the S3 bucket to be used as the data repository with the ImportPath property.
Specify the bucket in the form of an S3 URI.
If SCRATCH_1 is selected as the deployment option, the capacity and storage type to be allocated is limited.
As quoted below, the minimum capacity is 1200 GiB.
For SCRATCH_1 deployment type, valid values are 1200 GiB, 2400 GiB, and increments of 3600 GiB.
AWS::FSx::FileSystem
Specify “1200” for the StorageCapacity property.
And the storage type is SSD only.
hard disk drive (HDD) storage is supported only in one of the persistent deployment types.
File system deployment options for FSx for Lustre
Specify “SSD” for the StorageType property.
Specify the security group to be applied to Lustre with the SecurityGroupIds property.
In this case, the following security group is created and specified in this property.
Resources:
  FSxSecurityGroup:
    Type: AWS::EC2::SecurityGroup
    Properties:
      GroupName: !Sub "${Prefix}-FSxSecurityGroup"
      GroupDescription: FSx for Lustre SecurityGroup.
      VpcId: !Ref VPC
      SecurityGroupIngress:
        - IpProtocol: tcp
          FromPort: 988
          ToPort: 988
          CidrIp: 0.0.0.0/0
        - IpProtocol: tcp
          FromPort: 1021
          ToPort: 1023
          CidrIp: 0.0.0.0/0
Code language: YAML (yaml)
The security groups that apply to FSx for Lustre are defined as follows
You must set up the security group to allow inbound traffic on ports 988 and 1018-1023 from the security group itself or the full subnet CIDR, which is required to allow the file system hosts to communicate with each other.
Step 1: Create your Amazon FSx for Lustre file system
Architecting
Use CloudFormation to build this environment and check its actual behavior.
Create CloudFormation stacks and check the resources in the stacks
Create CloudFormation stacks.
For information on how to create stacks and check each stack, please refer to the following pages.

After reviewing the resources in each stack, information on the main resources created in this case is as follows
- EC2 instance: i-0a1691dc22020c4d0
- FSx for Lustre: fs-004328e6b35652be4
- S3 bucket: saa-02-010
Check FSx for Lustre from the AWS Management Console.
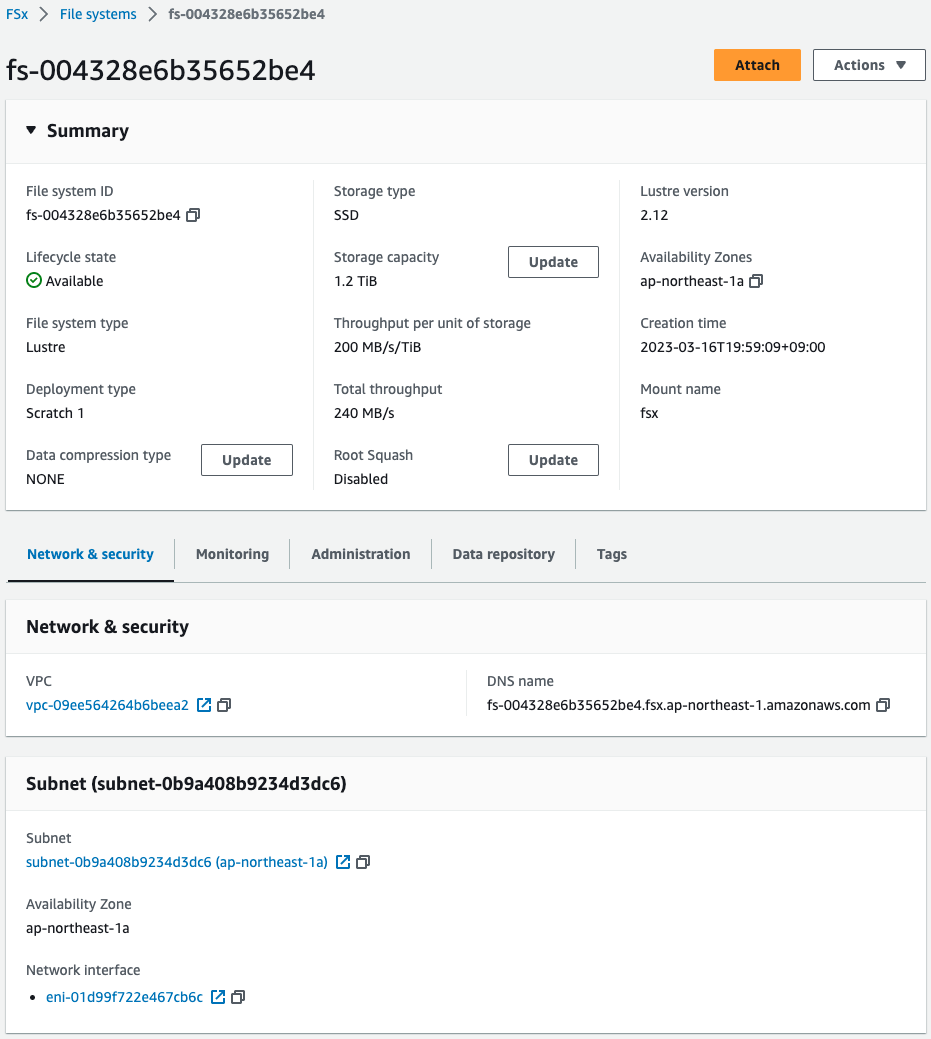
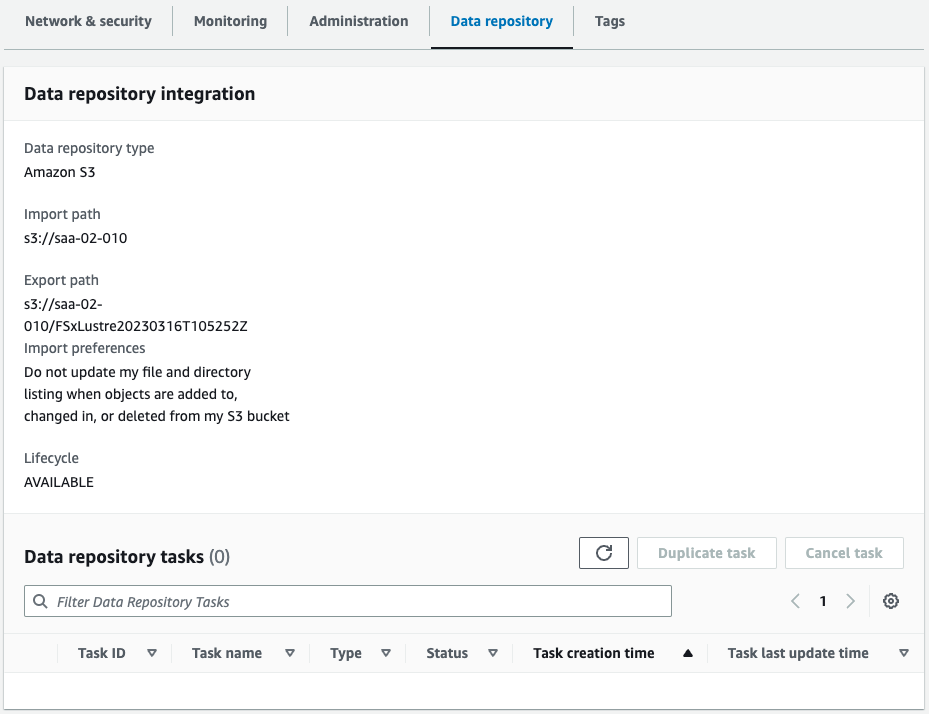
You can see that FSx for Lustre has been successfully created.
You can see that the parameters have been set as specified in the CloudFormation template.
You can also see that the S3 bucket (saa-02-010) is set as the data repository.
Two values of particular interest are discussed.
- DNS mame:fs-004328e6b35652be4.fsx.ap-northeast-1.amazonaws.com
- Mount name:fsx
These parameters are required when an EC2 instance mounts FSx for Lustre.
Operation Check
Connect to EC2 instance
Connect to an EC2 instance using SSM Session Manager.
% aws ssm start-session --target i-0a1691dc22020c4d0
...
sh-4.2$
Code language: Bash (bash)
For more information on SSM Session Manager, please see the following page
Lustre Client Installation
Proceed with the client installation according to the following page.
https://docs.aws.amazon.com/fsx/latest/LustreGuide/getting-started-step2.html
Identify the kernel.
sh-4.2$ uname -r
4.14.305-227.531.amzn2.aarch64
Code language: Bash (bash)
Since this is a Graviton2-based instance, the Lustre client is installed using Amazon Linux Extras.
sh-4.2$ sudo amazon-linux-extras install -y lustre
Installing lustre-client

...

Loaded plugins: extras_suggestions, langpacks, priorities, update-motd
amzn2-core                                                                                                                       | 3.7 kB  00:00:00
amzn2extra-docker                                                                                                                | 3.0 kB  00:00:00
amzn2extra-lustre                                                                                                                | 3.0 kB  00:00:00

...

Installed:
  lustre-client.aarch64 0:2.12.8-2.amzn2

Complete!
Code language: Bash (bash)
Client installation is complete.
Create a point to mount Lustre.
sh-4.2$ sudo mkdir -p /mnt/fsx
Code language: Bash (bash)
Mount Lustre.
The mount command uses the DNS name and Mount name described above.
sh-4.2$ sudo mount -t lustre -o noatime,flock fs-004328e6b35652be4.fsx.ap-northeast-1.amazonaws.com@tcp:/fsx /mnt/fsx
Code language: Bash (bash)
Check the mount status with the df command.
sh-4.2$ df
Filesystem          1K-blocks    Used  Available Use% Mounted on
devtmpfs               181468       0     181468   0% /dev
tmpfs                  219540       0     219540   0% /dev/shm
tmpfs                  219540     408     219132   1% /run
tmpfs                  219540       0     219540   0% /sys/fs/cgroup
/dev/nvme0n1p1        8367084 1583628    6783456  19% /
/dev/nvme0n1p128        10202    3820       6382  38% /boot/efi
tmpfs                   43908       0      43908   0% /run/user/0
10.0.2.38@tcp:/fsx 1169131264    7936 1169121280   1% /mnt/fsx
Code language: Bash (bash)
Indeed, Lustre is mounted.
Writing files and exporting to data repositories
Follow the pages below to proceed with writing the file and exporting it to the data repository.
https://docs.aws.amazon.com/fsx/latest/LustreGuide/getting-started-step3.html
Writes files to the mounted Lustre.
sh-4.2$ sudo touch /mnt/fsx/test.txt

sh-4.2$ ls /mnt/fsx
test.txt
Code language: Bash (bash)
The file was indeed written.
The following command escorts the files in Lustre to the S3 bucket.
sh-4.2$ sudo lfs hsm_archive /mnt/fsx/test.txt
Code language: Bash (bash)
Check the export results.
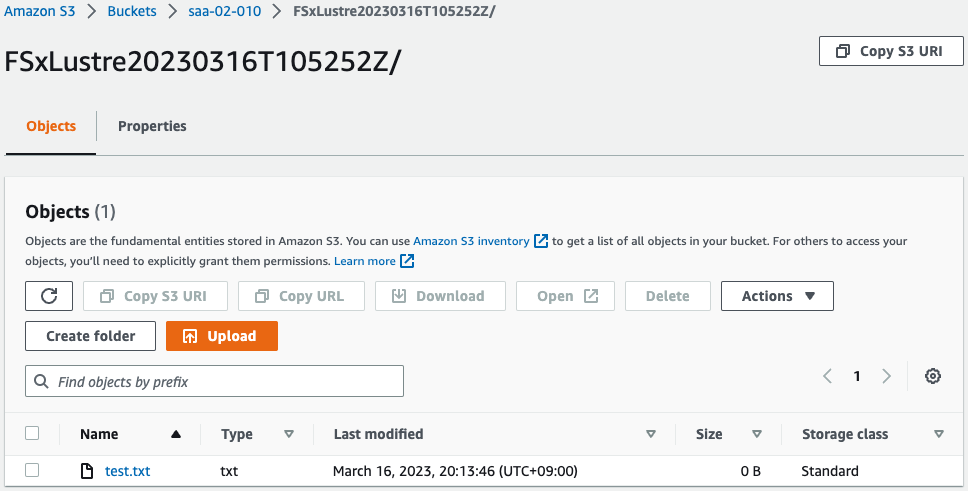
Sure enough, the file was exported to an S3 bucket.
Thus, FSx for Lustre allows S3 buckets to be used as persistent data repositories.
Summary
As an introduction to FSx for Lustre, we built a Lustre environment using CloudFormation and verified its operation.