Build Elastic Beanstalk ALB environment using CloudFormation
In the following pages, we have introduced the minimum configuration for Elastic Beanstalk.
This time, we will expand on the above to create an ALB configuration with Elastic Beanstalk.
Environment
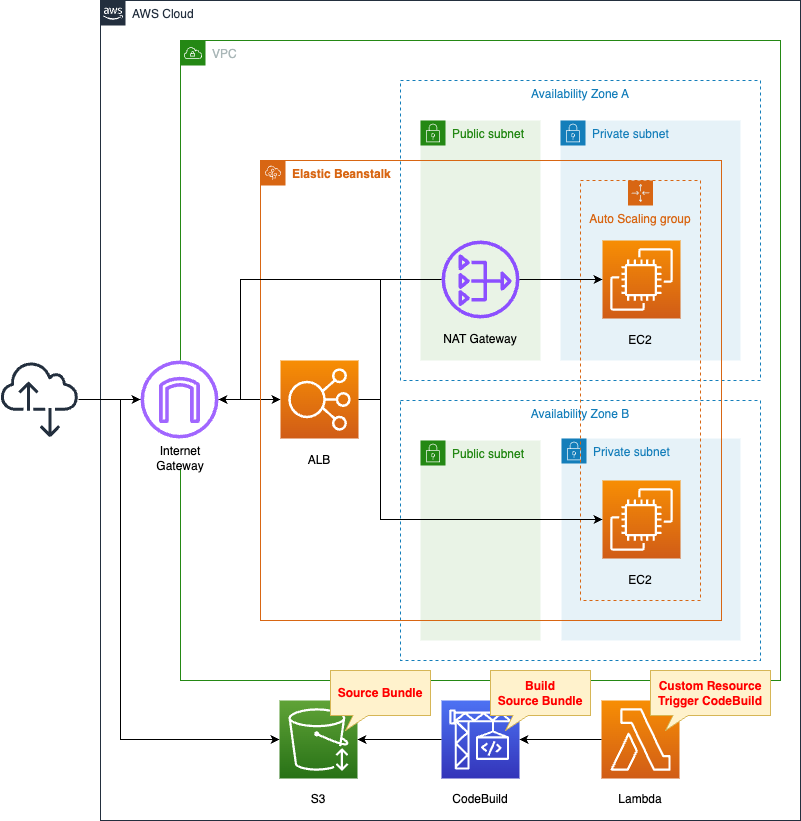
Within the VPC, create an Elastic Beanstalk environment.
Specifically, we will create a web server environment configured with an ALB and Auto Scaling group.
Choose Python 3.8 as the platform.
Create two subnets in the VPC, one in each of the two AZs.
They will be public and private subnets respectively.
Automatically build a Python script to run on an EC2 instance.
Specifically, after creating the script with CodeBuild, place it in an S3 bucket.
The trigger to run this CodeBuild is a CloudFormation custom resource.
The timing of when to start building Elastic Beanstalk is controlled by CloudFormation’s WaitCondition.
In concrete terms, we will ensure that the build of Elastic Beanstalk starts after CodeBuild completes placing the source bundle in the S3 bucket.
CloudFormation template files
The above configuration is built with CloudFormation.
The CloudFormation templates are placed at the following URL
https://github.com/awstut-an-r/awstut-fa/tree/main/143
Explanation of key points of template files
(Reference) VPC
Resources:
  VPC:
    Type: AWS::EC2::VPC
    Properties:
      CidrBlock: !Ref VPCCidrBlock

  IGW:
    Type: AWS::EC2::InternetGateway

  IGWAttachment:
    Type: AWS::EC2::VPCGatewayAttachment
    Properties:
      VpcId: !Ref VPC
      InternetGatewayId: !Ref IGW

  EIP:
    Type: AWS::EC2::EIP
    Properties:
      Domain: vpc

  NATGateway:
    Type: AWS::EC2::NatGateway
    Properties:
      AllocationId: !GetAtt EIP.AllocationId
      SubnetId: !Ref PublicSubnet1

  PublicSubnet1:
    Type: AWS::EC2::Subnet
    Properties:
      CidrBlock: !Ref CidrIp1
      VpcId: !Ref VPC
      AvailabilityZone: !Sub "${AWS::Region}${AvailabilityZone1}"

  PublicSubnet2:
    Type: AWS::EC2::Subnet
    Properties:
      CidrBlock: !Ref CidrIp2
      VpcId: !Ref VPC
      AvailabilityZone: !Sub "${AWS::Region}${AvailabilityZone2}"

  PrivateSubnet1:
    Type: AWS::EC2::Subnet
    Properties:
      CidrBlock: !Ref CidrIp3
      VpcId: !Ref VPC
      AvailabilityZone: !Sub "${AWS::Region}${AvailabilityZone1}"

  PrivateSubnet2:
    Type: AWS::EC2::Subnet
    Properties:
      CidrBlock: !Ref CidrIp4
      VpcId: !Ref VPC
      AvailabilityZone: !Sub "${AWS::Region}${AvailabilityZone2}"

  PublicRouteTable:
    Type: AWS::EC2::RouteTable
    Properties:
      VpcId: !Ref VPC

  RouteToInternet:
    Type: AWS::EC2::Route
    Properties:
      RouteTableId: !Ref PublicRouteTable
      DestinationCidrBlock: 0.0.0.0/0
      GatewayId: !Ref IGW

  PublicSubnetRouteTableAssociation1:
    Type: AWS::EC2::SubnetRouteTableAssociation
    Properties:
      SubnetId: !Ref PublicSubnet1
      RouteTableId: !Ref PublicRouteTable

  PublicSubnetRouteTableAssociation2:
    Type: AWS::EC2::SubnetRouteTableAssociation
    Properties:
      SubnetId: !Ref PublicSubnet2
      RouteTableId: !Ref PublicRouteTable

  PrivateRouteTable:
    Type: AWS::EC2::RouteTable
    Properties:
      VpcId: !Ref VPC

  RouteToNATGateway:
    Type: AWS::EC2::Route
    Properties:
      RouteTableId: !Ref PrivateRouteTable
      DestinationCidrBlock: 0.0.0.0/0
      NatGatewayId: !Ref NATGateway

  PrivateSubnetRouteTableAssociation1:
    Type: AWS::EC2::SubnetRouteTableAssociation
    Properties:
      SubnetId: !Ref PrivateSubnet1
      RouteTableId: !Ref PrivateRouteTable

  PrivateSubnetRouteTableAssociation2:
    Type: AWS::EC2::SubnetRouteTableAssociation
    Properties:
      SubnetId: !Ref PrivateSubnet2
      RouteTableId: !Ref PrivateRouteTable
Code language: YAML (yaml)
Define the VPCs, subnets, etc. that will serve as the foundation for ALB and Auto Scaling groups.
A particularly key resource is the NAT gateway.
In this configuration, the Auto Scaling group will be created on a private subnet.
This means that the EC2 instances managed in Elastic Beanstalk will be created in the private subnet.
In Elastic Beanstalk, there are some things to keep in mind when creating EC2 instances on private subnets.
That is, reachability to the Internet.
Private Subnet – Instances use a NAT device to access the internet.
Using Elastic Beanstalk with Amazon VPC
Place a NAT gateway on the public subnet as described above.
Then define a route for this gateway in the route table for the private subnet.
Elastic Beanstalk
Resources:
  Application:
    Type: AWS::ElasticBeanstalk::Application
    Properties:
      ApplicationName: !Sub "${Prefix}-application"

  ApplicationVersion:
    Type: AWS::ElasticBeanstalk::ApplicationVersion

    Properties:
      ApplicationName: !Ref Application
      SourceBundle:
        S3Bucket: !Ref BucketName
        S3Key: !Ref SourceBundleName

  Environment:
    Type: AWS::ElasticBeanstalk::Environment
    Properties:
      ApplicationName: !Ref Application
      CNAMEPrefix: !Ref Prefix
      EnvironmentName: !Sub "${Prefix}-env"
      TemplateName: !Ref ConfigurationTemplate
      Tier:
        Name: WebServer
        Type: Standard
      VersionLabel: !Ref ApplicationVersion

  ConfigurationTemplate:
    Type: AWS::ElasticBeanstalk::ConfigurationTemplate
    Properties:
      ApplicationName: !Ref Application
      OptionSettings:
        - Namespace: aws:autoscaling:asg
          OptionName: MaxSize
          Value: !Ref MaxSize
        - Namespace: aws:autoscaling:asg
          OptionName: MinSize
          Value: !Ref MinSize
        - Namespace: aws:autoscaling:launchconfiguration
          OptionName: IamInstanceProfile
          Value: !Ref InstanceProfile
        - Namespace: aws:ec2:instances
          OptionName: InstanceTypes
          Value: !Ref InstanceType
        - Namespace: aws:ec2:instances
          OptionName: SupportedArchitectures
          Value: !Ref InstanceArchitecture
        - Namespace: aws:ec2:vpc
          OptionName: VPCId
          Value: !Ref VPC
        - Namespace: aws:ec2:vpc
          OptionName: Subnets
          Value: !Join
            - ","
            - - !Ref PrivateSubnet1
              - !Ref PrivateSubnet2
        - Namespace: aws:ec2:vpc
          OptionName: ELBSubnets
          Value: !Join
            - ","
            - - !Ref PublicSubnet1
              - !Ref PublicSubnet2
        - Namespace: aws:elasticbeanstalk:environment
          OptionName: EnvironmentType
          Value: !Ref EnvironmentType
        - Namespace: aws:elasticbeanstalk:environment
          OptionName: ServiceRole
          Value: !Sub "arn:aws:iam::${AWS::AccountId}:role/service-role/aws-elasticbeanstalk-service-role"
        - Namespace: aws:elasticbeanstalk:environment
          OptionName: LoadBalancerType
          Value: !Ref LoadBalancerType
      SolutionStackName: !Ref SolutionStackName

  InstanceProfile:
    Type: AWS::IAM::InstanceProfile
    Properties:
      Path: /
      Roles:
        - !Ref InstanceRole

  InstanceRole:
    Type: AWS::IAM::Role
    DeletionPolicy: Delete
    Properties:
      AssumeRolePolicyDocument:
        Version: 2012-10-17
        Statement:
          - Effect: Allow
            Action: sts:AssumeRole
            Principal:
              Service:
                - ec2.amazonaws.com
      ManagedPolicyArns:
        - arn:aws:iam::aws:policy/AWSElasticBeanstalkWebTier
Code language: YAML (yaml)
This page focuses on how to create an ALB environment using Elastic Beanstalk.
For basic information about Elastic Beanstalk, please see the following pages.
ConfigurationTemplate is an important resource for creating ALBs using Elastic Beanstalk.
Configure the settings for the ALB with the OptionSettings property.
The following are important parameters.
In the namespace aws:autoscaling:asg, set MaxSize and MinSize.
This specifies the maximum and minimum EC2 instances to create in the Auto Scaling group.
In this case, specify “2” for both parameters.
In the namespace aws:ec2:vpc, set Subnets and ELBSubnets.
The former specifies the subnet where the Auto Scaling group will be created, and the latter specifies the subnet associated with the ELB.
In this configuration, we will create the Auto Scaling group on a private subnet, so we specify two private subnets in the former.
And since we need to associate a public subnet to the ELB, we specify two public subnets in the latter.
In the namespace aws:elasticbeanstalk:environment, set two settings: EnvironmentType and LoadBalancerType.
You can create an ALB by specifying “LoadBalanced” for the former and “application” for the latter.
(Reference) CodeBuild Project
Resources:
  CodeBuildProject:
    Type: AWS::CodeBuild::Project
    Properties:
      Artifacts:
        Type: NO_ARTIFACTS
      Cache:
        Type: NO_CACHE
      Environment:
        ComputeType: !Ref ProjectEnvironmentComputeType
        EnvironmentVariables:
          - Name: BUCKET_NAME
            Type: PLAINTEXT
            Value: !Ref BucketName
          - Name: SOURCE_BUNDLE_NAME
            Type: PLAINTEXT
            Value: !Ref SourceBundleName
          - Name: SOURCE_FILE_NAME
            Type: PLAINTEXT
            Value: !Ref SourceFileName
        Image: !Ref ProjectEnvironmentImage
        ImagePullCredentialsType: CODEBUILD
        Type: !Ref ProjectEnvironmentType
        PrivilegedMode: true
      LogsConfig:
        CloudWatchLogs:
          Status: DISABLED
        S3Logs:
          Status: DISABLED
      Name: !Ref Prefix
      ServiceRole: !GetAtt CodeBuildRole.Arn
      Source:
        Type: NO_SOURCE
        BuildSpec: !Sub |
          version: 0.2

          phases:
            pre_build:
              commands:
                - |
                  cat << EOF > $SOURCE_FILE_NAME
                  import datetime
                  import subprocess

                  def application(environ, start_response):
                      result = subprocess.run(
                        ['ec2-metadata', '-i'],
                        stdout=subprocess.PIPE,
                        stderr=subprocess.PIPE,
                        encoding='utf-8'
                      )
                      start_response("200 OK", [
                          ("Content-Type", "text/html")
                      ])
                      return [bytes(result.stdout, 'utf-8')]
                  EOF
            build:
              commands:
                - zip $SOURCE_BUNDLE_NAME -r * .[^.]*
            post_build:
              commands:
                - aws s3 cp $SOURCE_BUNDLE_NAME s3://$BUCKET_NAME/
      Visibility: PRIVATE

  CodeBuildRole:
    Type: AWS::IAM::Role
    Properties:
      AssumeRolePolicyDocument:
        Version: 2012-10-17
        Statement:
          - Effect: Allow
            Principal:
              Service:
                - codebuild.amazonaws.com
            Action:
              - sts:AssumeRole
      Policies:
        - PolicyName: PutS3ObjectPolicy
          PolicyDocument:
            Version: 2012-10-17
            Statement:
              - Effect: Allow
                Action:
                  - s3:PutObject
                Resource:
                  - !Sub "arn:aws:s3:::${BucketName}/*"
Code language: YAML (yaml)
Use CodeBuild to build the application to run on Elastic Beanstalk and place it in an S3 bucket.
The contents of the application to be executed, which returns the ID of the EC2 instance on which the application is to be executed.
Architecting
Use CloudFormation to build this environment and check its actual behavior.
Create CloudFormation stacks and check the resources in the stacks
Create CloudFormation stacks.
For information on how to create stacks and check each stack, please see the following page.

After reviewing the resources in each stack, information on the main resources created in this case is as follows
- CodeBuild project: fa-141
- S3 bucket: fa-141
- Elastic Beanstalk application: fa-143-application
- Elastic Beanstalk environment: fa-143-env
Check the creation status of each resource from the AWS Management Console.
Check the working status of your CodeBuild project.
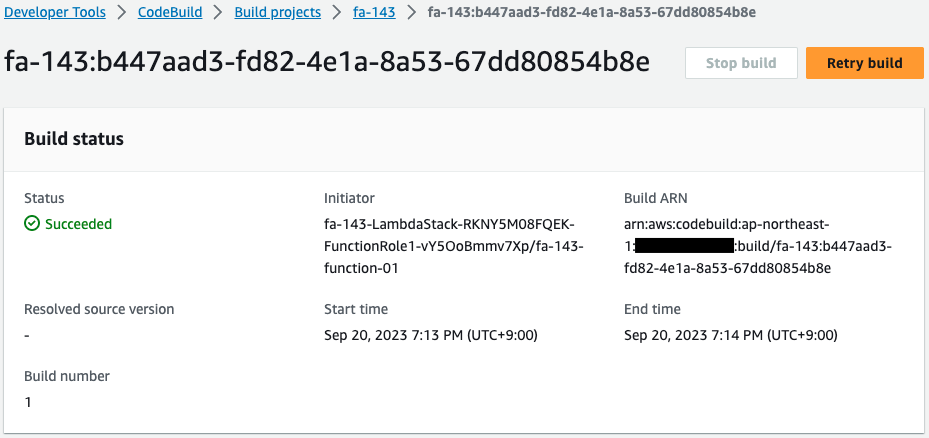
CodeBuild is running automatically.
This means that the project was automatically started by a Lambda function tied to a CloudFormation custom resource.
This has resulted in a source bundle being built to run on Elastic Beanstalk.
Check the S3 bucket.
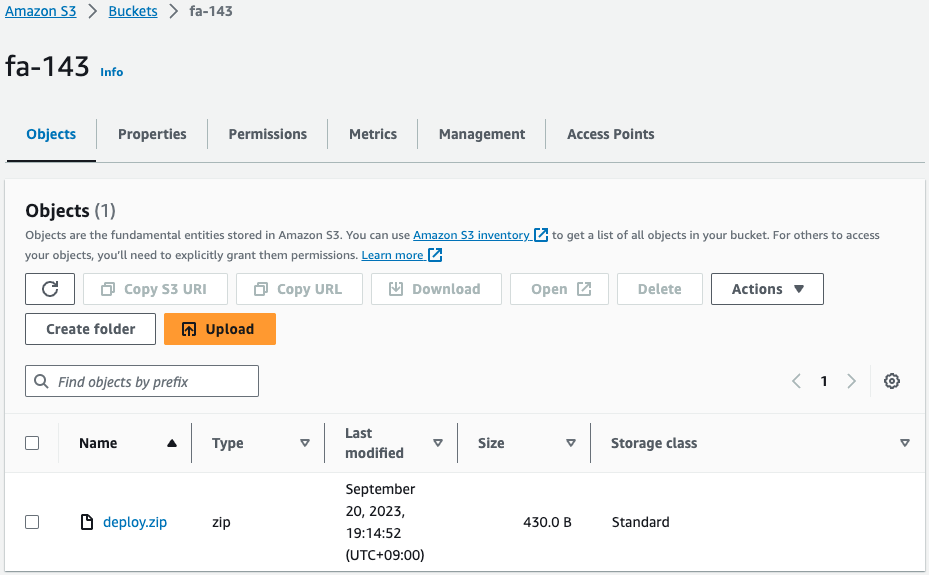
object is located.
This is the source bundle built by the CodeBuild project.
This file is executed on Elastic Beanstalk.
Operation Check
Now that you are ready, check Elastic Beanstalk.
First, check the Elastic Beanstalk application.

Indeed, an application has been created.
The Elastic Beanstalk environment is created within the framework of the application.
Check the Elastic Beanstalk environment.
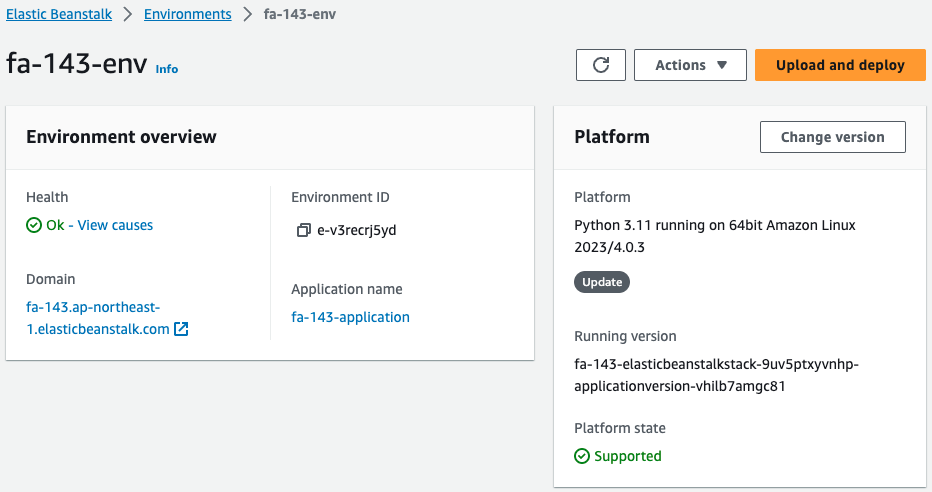
The environment has been successfully created.
Check the log at the time of environment creation.

You can see that ALB has indeed been built.
And you can also see that two EC2 instances have been created in the Auto Scaling group.
Access this application.
$ curl http://fa-143.ap-northeast-1.elasticbeanstalk.com
instance-id: i-04435211511b2387b

$ curl http://fa-143.ap-northeast-1.elasticbeanstalk.com
instance-id: i-03162d9ad59a56328Code language: Bash (bash)
It is indeed possible to access the two instances under the ALB.
In this way, an ALB environment can be built using Elastic Beanstalk.
Finally, we will review the security groups.
Two security groups are automatically created by Elastic Beanstalk.
- For ALB
- For EC2 instances
Check each of the following.
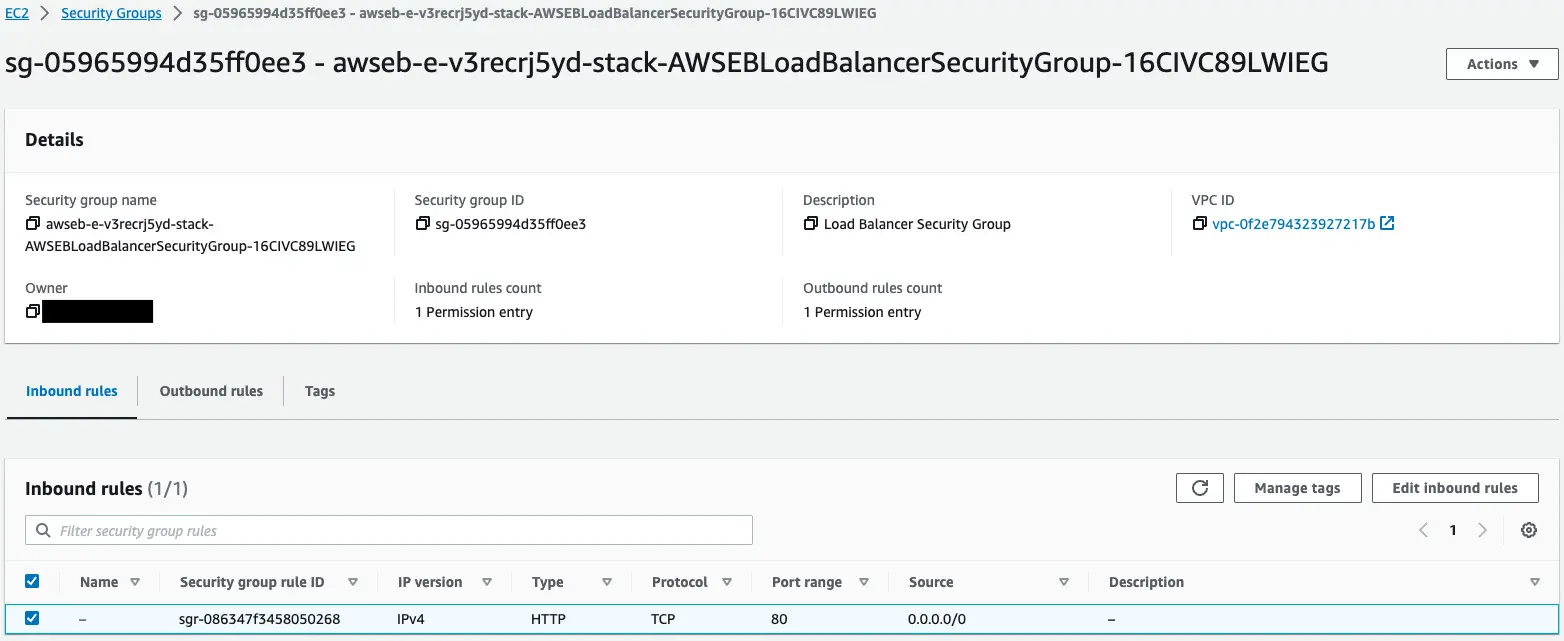
The first one is for ALB.
This content allows HTTP communication (80/tcp) from all senders.
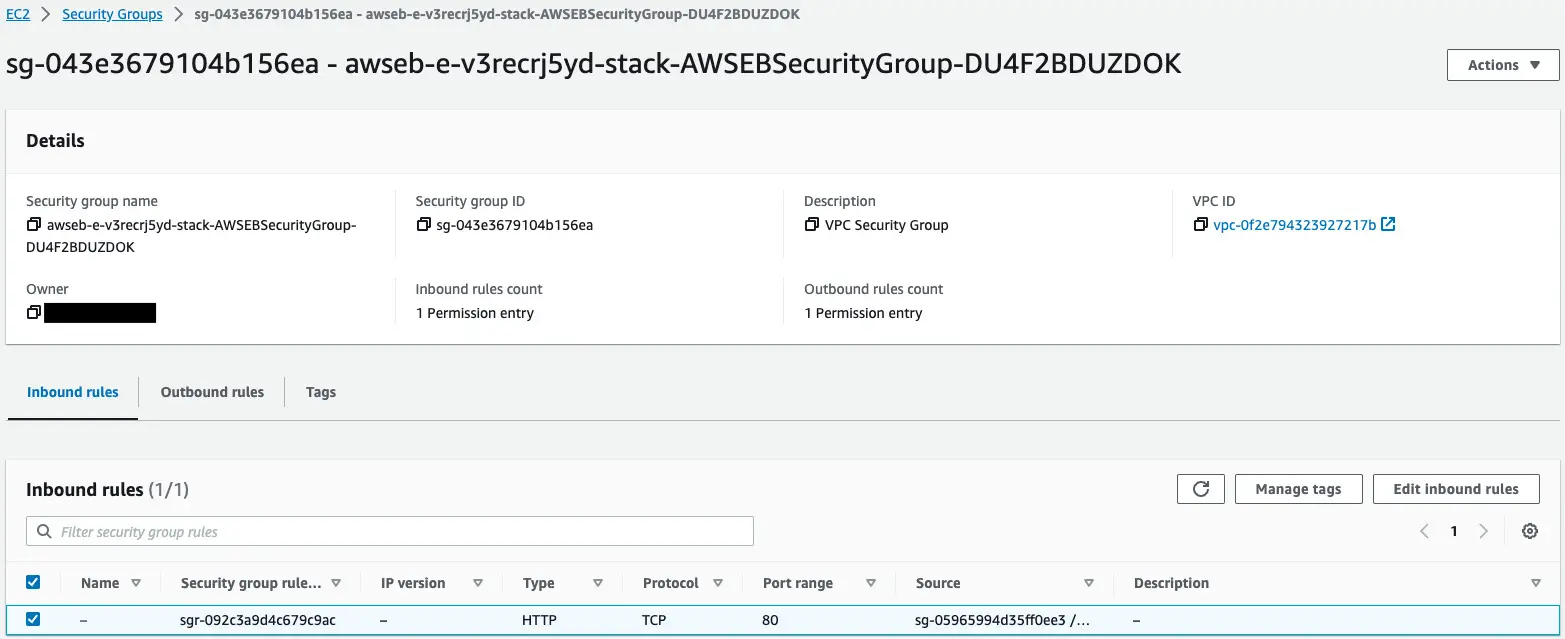
The second one is for an EC2 instance.
This content allows HTTP communication (80/tcp) from the security group for ALB.
Summary
ALB configuration was created in Elastic Beanstalk.