Elastic Beanstalk deployment policy: Rolling with an additional batch
Elastic Beanstalk offers a variety of deployment policies.
https://docs.aws.amazon.com/elasticbeanstalk/latest/dg/using-features.deploy-existing-version.html
This time we will examine the behavior of Rolling with an additional batch.
Rolling with additional batch – Avoids any reduced availability, at a cost of an even longer deployment time compared to the Rolling method. Suitable if you must maintain the same bandwidth throughout the deployment. With this method, Elastic Beanstalk launches an extra batch of instances, then performs a rolling deployment. Launching the extra batch takes time, and ensures that the same bandwidth is retained throughout the deployment.
Choosing a deployment policy
Environment

The basic structure is the same as the following page.
Specifically, create a web server environment configured with an ALB and Auto Scaling group. Choose Python 3.8 as the platform.
The difference from the above page is that we have set a deployment policy: Rolling with an additional batch in Elastic Beanstalk. In this configuration, the instance size in the Auto Scaling group is 2. Batch size type in the deployment policy is set to Fixed and batch size to 1, so the number of instances is temporarily 3 while deploying. After deployment is complete, the number of instances will return to 2 again.
CloudFormation template files
The above configuration is built with CloudFormation. The CloudFormation templates are placed at the following URL
https://github.com/awstut-an-r/awstut-dva/tree/main/01/003
Explanation of key points of template files
The purpose of this page is to check the behavior of Elastic Beanstalk’s deployment policy (Rolling with an additional batch).
For information on how to build an ALB environment with Elastic Beanstalk, please refer to the following page.
Elastic Beanstalk
Resources:
  Application:
    Type: AWS::ElasticBeanstalk::Application
    Properties:
      ApplicationName: !Sub "${Prefix}-application"

  ApplicationVersion1:
    Type: AWS::ElasticBeanstalk::ApplicationVersion
    Properties:
      ApplicationName: !Ref Application
      SourceBundle:
        S3Bucket: !Ref BucketName
        S3Key: !Ref SourceBundleName1

  ApplicationVersion2:
    Type: AWS::ElasticBeanstalk::ApplicationVersion
    Properties:
      ApplicationName: !Ref Application
      SourceBundle:
        S3Bucket: !Ref BucketName
        S3Key: !Ref SourceBundleName2

  Environment:
    Type: AWS::ElasticBeanstalk::Environment
    Properties:
      ApplicationName: !Ref Application
      CNAMEPrefix: !Ref Prefix
      EnvironmentName: !Sub "${Prefix}-env"
      TemplateName: !Ref ConfigurationTemplate
      Tier:
        Name: WebServer
        Type: Standard
      VersionLabel: !Ref ApplicationVersion1

  ConfigurationTemplate:
    Type: AWS::ElasticBeanstalk::ConfigurationTemplate
    Properties:
      ApplicationName: !Ref Application
      OptionSettings:
        - Namespace: aws:autoscaling:asg
          OptionName: MaxSize
          Value: !Ref MaxSize
        - Namespace: aws:autoscaling:asg
          OptionName: MinSize
          Value: !Ref MinSize
        - Namespace: aws:autoscaling:launchconfiguration
          OptionName: IamInstanceProfile
          Value: !Ref InstanceProfile
        - Namespace: aws:ec2:instances
          OptionName: InstanceTypes
          Value: !Ref InstanceType
        - Namespace: aws:ec2:instances
          OptionName: SupportedArchitectures
          Value: !Ref InstanceArchitecture
        - Namespace: aws:ec2:vpc
          OptionName: VPCId
          Value: !Ref VPC
        - Namespace: aws:ec2:vpc
          OptionName: Subnets
          Value: !Join
            - ","
            - - !Ref PrivateSubnet1
              - !Ref PrivateSubnet2
        - Namespace: aws:ec2:vpc
          OptionName: ELBSubnets
          Value: !Join
            - ","
            - - !Ref PublicSubnet1
              - !Ref PublicSubnet2
        - Namespace: aws:elasticbeanstalk:command
          OptionName: DeploymentPolicy
          Value: !Ref DeploymentPolicy
        - Namespace: aws:elasticbeanstalk:command
          OptionName: BatchSizeType
          Value: !Ref BatchSizeType
        - Namespace: aws:elasticbeanstalk:command
          OptionName: BatchSize
          Value: !Ref BatchSize
        - Namespace: aws:elasticbeanstalk:environment
          OptionName: EnvironmentType
          Value: !Ref EnvironmentType
        - Namespace: aws:elasticbeanstalk:environment
          OptionName: ServiceRole
          Value: !Sub "arn:aws:iam::${AWS::AccountId}:role/service-role/aws-elasticbeanstalk-service-role"
        - Namespace: aws:elasticbeanstalk:environment
          OptionName: LoadBalancerType
          Value: !Ref LoadBalancerType
      SolutionStackName: !Ref SolutionStackName

  InstanceProfile:
    Type: AWS::IAM::InstanceProfile
    Properties:
      Path: /
      Roles:
        - !Ref InstanceRole

  InstanceRole:
    Type: AWS::IAM::Role
    DeletionPolicy: Delete
    Properties:
      AssumeRolePolicyDocument:
        Version: 2012-10-17
        Statement:
          - Effect: Allow
            Action: sts:AssumeRole
            Principal:
              Service:
                - ec2.amazonaws.com
      ManagedPolicyArns:
        - arn:aws:iam::aws:policy/AWSElasticBeanstalkWebTier
Code language: YAML (yaml)
There are two points.
The first point is to create two application versions. The first (ApplicationVersion1) is referenced when initially building Elastic Beanstalk. The second (ApplicationVersion2) will be referenced at update time. Both are created using source bundles built with the CodeBuild project described below.
The second point is the parameter for the deployment policy in ConfigurationTemplate. The parameter for the namespace aws:elasticbeanstalk:command in the OptionSettings property is particularly important. DeploymentPolicy specifies the deployment policy. This time, specify “RollingWithAdditionalBatch” to select Rolling with an additional batch. Specify “1” and “Fixed” for BatchSize and BatchSizeType, respectively. This will cause the behavior to deploy one by one.
(Reference) CodeBuild Project
Resources:
  CodeBuildProject:
    Type: AWS::CodeBuild::Project
    Properties:
      Artifacts:
        Type: NO_ARTIFACTS
      Cache:
        Type: NO_CACHE
      Environment:
        ComputeType: !Ref ProjectEnvironmentComputeType
        EnvironmentVariables:
          - Name: BUCKET_NAME
            Type: PLAINTEXT
            Value: !Ref BucketName
          - Name: SOURCE_BUNDLE_NAME1
            Type: PLAINTEXT
            Value: !Ref SourceBundleName1
          - Name: SOURCE_BUNDLE_NAME2
            Type: PLAINTEXT
            Value: !Ref SourceBundleName2
          - Name: SOURCE_FILE_NAME
            Type: PLAINTEXT
            Value: !Ref SourceFileName
        Image: !Ref ProjectEnvironmentImage
        ImagePullCredentialsType: CODEBUILD
        Type: !Ref ProjectEnvironmentType
        PrivilegedMode: true
      LogsConfig:
        CloudWatchLogs:
          Status: DISABLED
        S3Logs:
          Status: DISABLED
      Name: !Ref Prefix
      ServiceRole: !GetAtt CodeBuildRole.Arn
      Source:
        Type: NO_SOURCE
        BuildSpec: !Sub |
          version: 0.2

          phases:
            pre_build:
              commands:
                - mkdir app1
                - mkdir app2
                - |
                  cat << EOF > app1/$SOURCE_FILE_NAME
                  import datetime
                  import subprocess

                  def application(environ, start_response):
                      result = subprocess.run(
                        ['ec2-metadata', '-i'],
                        stdout=subprocess.PIPE,
                        stderr=subprocess.PIPE,
                        encoding='utf-8'
                      )
                      start_response("200 OK", [
                          ("Content-Type", "text/html")
                      ])
                      return [bytes(result.stdout, 'utf-8')]
                  EOF
                - |
                  cat << EOF > app2/$SOURCE_FILE_NAME
                  import datetime
                  import subprocess

                  def application(environ, start_response):
                      result = subprocess.run(
                        ['ec2-metadata', '-i'],
                        stdout=subprocess.PIPE,
                        stderr=subprocess.PIPE,
                        encoding='utf-8'
                      )
                      start_response("200 OK", [
                          ("Content-Type", "text/html")
                      ])
                      return [bytes('updated: '+result.stdout, 'utf-8')]
                  EOF
            build:
              commands:
                - zip -j $SOURCE_BUNDLE_NAME1 -r app1/*
                - zip -j $SOURCE_BUNDLE_NAME2 -r app2/*
            post_build:
              commands:
                - aws s3 cp $SOURCE_BUNDLE_NAME1 s3://$BUCKET_NAME/
                - aws s3 cp $SOURCE_BUNDLE_NAME2 s3://$BUCKET_NAME/
      Visibility: PRIVATE
Code language: YAML (yaml)
Use CodeBuild to build the application to run on Elastic Beanstalk and place it in an S3 bucket.
In this case, since we are validating the deployment policy, we will prepare two source bundles for the application. The first is for the application during the initial build of Elastic Beanstalk. The second is for updates to validate the deployment policy.
This is what both applications will do, but it returns the ID of the EC2 instance that will run the application. For updates, add the string “updated:” before the instance ID.
(Reference) Creating Elastic Beanstalk resources after the source bundle is created in CodeBuild project
Resources:
  WaitConditionHandle:
    Type: AWS::CloudFormation::WaitConditionHandle

  WaitCondition:
    Type: AWS::CloudFormation::WaitCondition
    Properties:
      Handle: !Ref WaitConditionHandle
      Timeout: !Ref WaitConditionTimeout

  EventsRule:
    Type: AWS::Events::Rule
    Properties:
      EventBusName: !Ref EventBusName
      EventPattern:
        source:
          - aws.codebuild
        detail-type:
          - CodeBuild Build State Change
        detail:
          build-status:
            - SUCCEEDED
          project-name:
            - !Ref CodeBuildProject
      Name: !Sub "${Prefix}-EventsRule"
      State: ENABLED
      Targets:
        - Arn: !GetAtt Function2.Arn
          Id: !Ref Function2

  EventsRulePermission:
    Type: AWS::Lambda::Permission
    Properties:
      Action: lambda:InvokeFunction
      FunctionName: !Ref Function2
      Principal: events.amazonaws.com
      SourceArn: !GetAtt EventsRule.Arn

  Function2:
    Type: AWS::Lambda::Function
    Properties:
      Architectures:
        - !Ref Architecture
      Environment:
        Variables:
          SIGNAL_URL: !Ref WaitConditionHandle
      Code:
        ZipFile: |
          import json
          import os
          import urllib3
          import uuid

          def lambda_handler(event, context):
            body = json.dumps({
                "Status": "SUCCESS",
                "Reason": "CodeBuild Project Finished Successfully",
                "UniqueId": str(uuid.uuid4()),
                "Data": "CodeBuild Project Finished Successfully"
            })
            http = urllib3.PoolManager()
            http.request('PUT', os.environ['SIGNAL_URL'], body=body)
      FunctionName: !Sub "${Prefix}-function-02"
      Handler: !Ref Handler
      Runtime: !Ref Runtime
      Role: !GetAtt FunctionRole2.Arn

  FunctionRole2:
    Type: AWS::IAM::Role
    DeletionPolicy: Delete
    Properties:
      AssumeRolePolicyDocument:
        Version: 2012-10-17
        Statement:
          - Effect: Allow
            Action: sts:AssumeRole
            Principal:
              Service:
                - lambda.amazonaws.com
      ManagedPolicyArns:
        - arn:aws:iam::aws:policy/service-role/AWSLambdaBasicExecutionRole
Code language: YAML (yaml)
The WaitCondition in CloudFormation controls when the building of the Elastic Beanstalk resource will start. Specifically, after the source bundle has been placed in the S3 bucket by the CodeBuild project.
The concept is similar to that described on the following pages.
The difference from the above page is the EventBridge rule. In the above page, the condition for invoking the Lambda function that notifies the success signal to WaitCondition is that the source bundle is placed in the S3 bucket. In this configuration, the condition was that the CodeBuild project terminates successfully. This is because this configuration creates two source bundles. This is to prevent Elastic Beanstalk resource creation from starting before both bundles have been built. In addition, the following page was used as a reference for creating the EventBridge rules for CodeBuild.
https://docs.aws.amazon.com/codebuild/latest/userguide/sample-build-notifications.html
Architecting
Use CloudFormation to build this environment and check its actual behavior.
Create CloudFormation stacks and check the resources in the stacks
Create CloudFormation stacks. For information on how to create stacks and check each stack, please see the following page.

After reviewing the resources in each stack, information on the main resources created in this case is as follows
- Elastic Beanstalk application: fa-143-application
- Elastic Beanstalk environment: fa-143-env
- Elastic Beanstalk version 1: dva-01-003-elasticbeanstalkstack-gskerhhpiq7r-applicationversion1-0dzuyn8onsz7
- Elastic Beanstalk version 2: dva-01-003-elasticbeanstalkstack-gskerhhpiq7r-applicationversion2-wgik48ddoasm
- Elastic Beanstalk domain: http://dva-01-003.ap-northeast-1.elasticbeanstalk.com/
Check the creation status of each resource from the AWS Management Console.
Check the Elastic Beanstalk application.

The application has been created successfully.
Check the application version.

Two application versions have been created. We can see that the first version is applied to the existing environment. We also see in the Source column that it is a source bundle built with the CodeBuild project. This means that both versions were created using source bundles built in the same project and placed in S3 buckets.
Check the application environment.
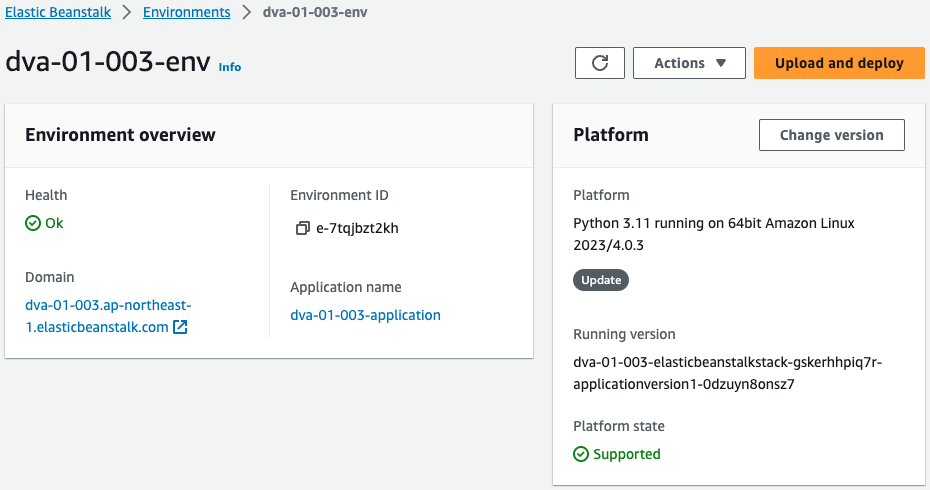
This one is also created successfully.
Several resources are automatically created by Elastic Beanstalk. In this case, we will check the Auto Scaling group associated with the ALB.

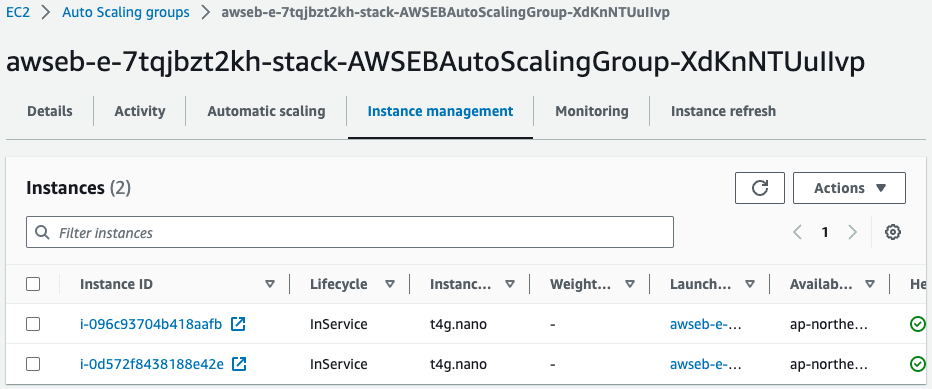
You can see that there are two EC2 instances running in a group where the maximum/minimum/desired numbers are all 2.
Operation Check
Before Deployment
We are ready to go. First we check the behavior before deployment. Use the curl command to access the Elastic Beanstalk domain.
$ curl http://dva-01-003.ap-northeast-1.elasticbeanstalk.com/
instance-id: i-096c93704b418aafb

$ curl http://dva-01-003.ap-northeast-1.elasticbeanstalk.com/
instance-id: i-0d572f8438188e42e
Code language: Bash (bash)
It is indeed possible to access the two EC2 instances under the ALB.
Deployment
Finally, deploy the new version.
Apply the other version you just checked to your environment.

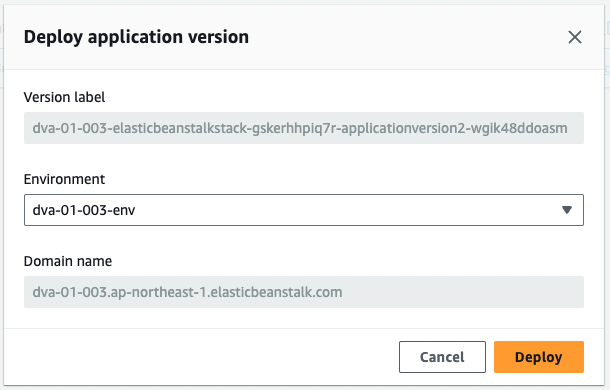
Deployment will begin immediately.
Below are the logs displayed in the Elastic Beanstalk environment.
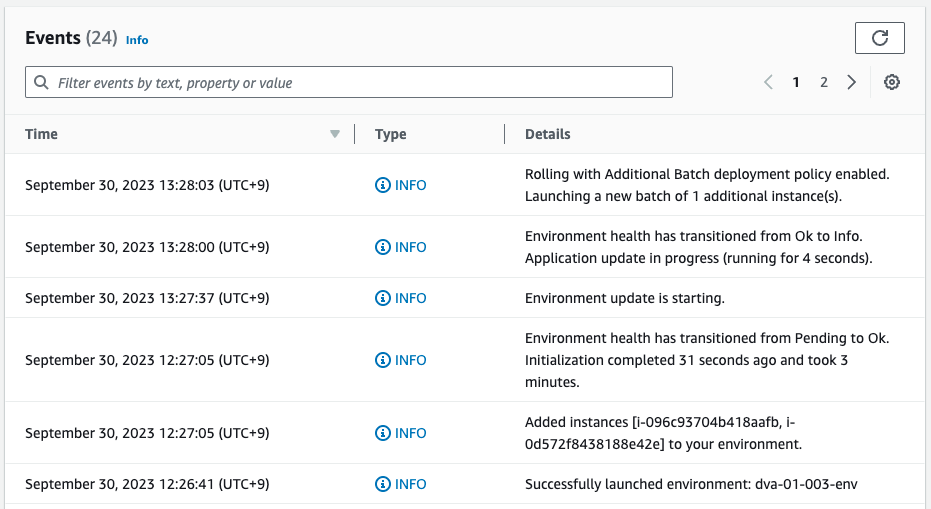
Deployment started with the deployment policy Rolling with an additional batch.
Check the Auto Scaling group at this point.
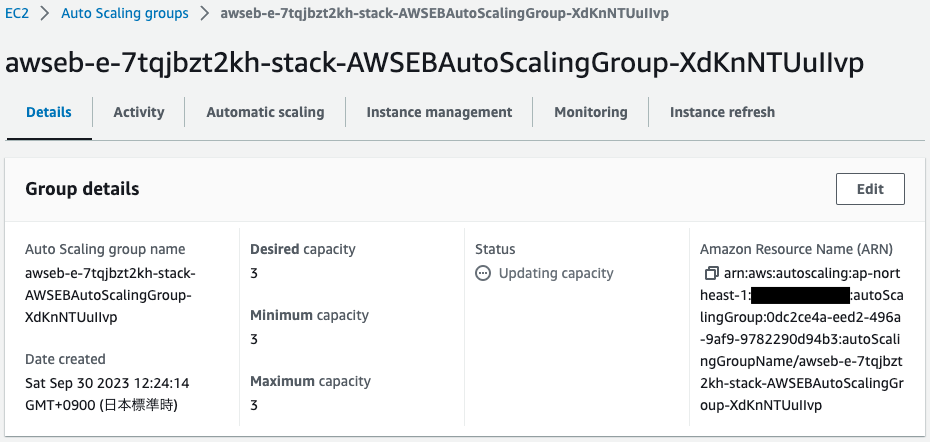
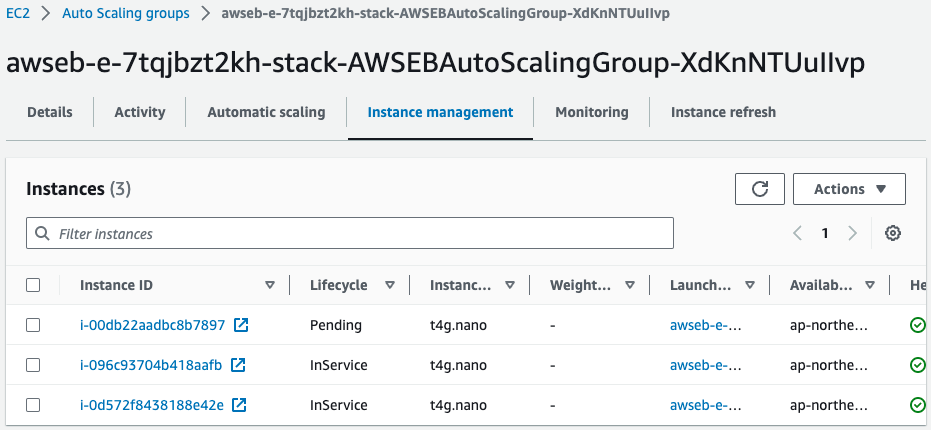
The maximum/minimum/desired numbers have all been changed to 3. And in addition to the two existing EC2 instances, one new instance is being activated.
The following is the result of accessing the Elastic Beanstalk domain immediately after this.
$ curl http://dva-01-003.ap-northeast-1.elasticbeanstalk.com/
instance-id: i-0d572f8438188e42e

$ curl http://dva-01-003.ap-northeast-1.elasticbeanstalk.com/
instance-id: i-096c93704b418aafb

$ curl http://dva-01-003.ap-northeast-1.elasticbeanstalk.com/
updated: instance-id: i-00db22aadbc8b7897
Code language: Bash (bash)
Three EC2 instances responded. Two have the contents of the old application version. The remaining one has the contents of the new application version.
If the deployment policy Rolling with an additional batch is selected, the number of instances is maintained, but the old and new applications are mixed.
Continue to check deployment status.
$ curl http://dva-01-003.ap-northeast-1.elasticbeanstalk.com/
instance-id: i-0d572f8438188e42e

$ curl http://dva-01-003.ap-northeast-1.elasticbeanstalk.com/
updated: instance-id: i-00db22aadbc8b7897

$ curl http://dva-01-003.ap-northeast-1.elasticbeanstalk.com/
updated: instance-id: i-096c93704b418aafb
Code language: Bash (bash)
New application versions were applied to two of the three instances.
After Deployment is Complete
After a short wait, deployment is complete.
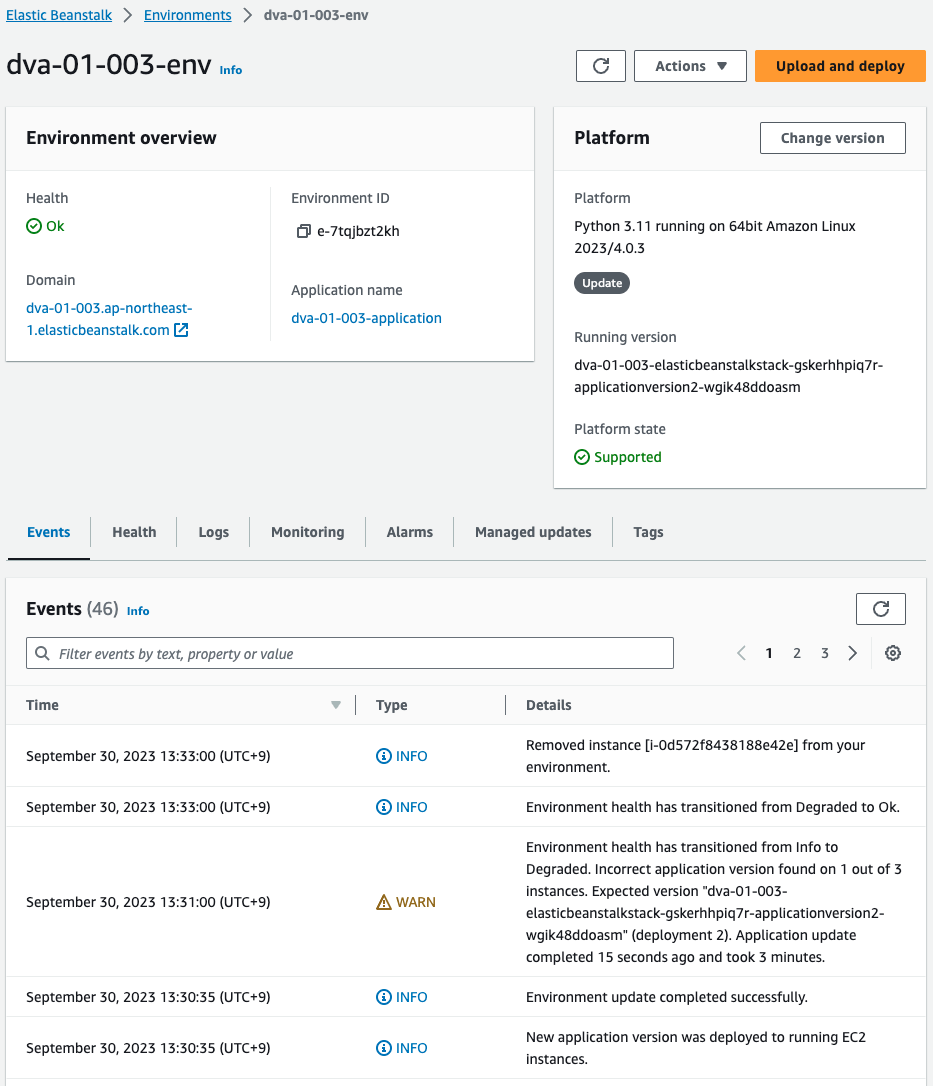
The logs indicate that the instances that were temporarily added were deleted as the deployment was completed.
Check the Auto Scaling group again.
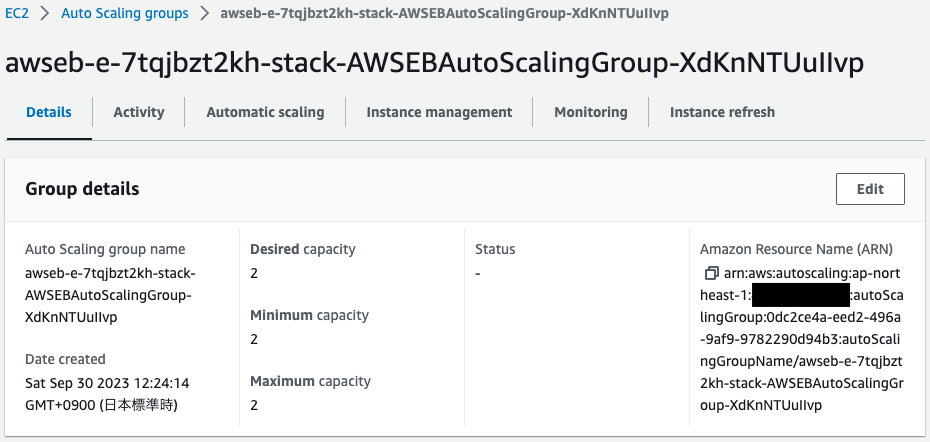
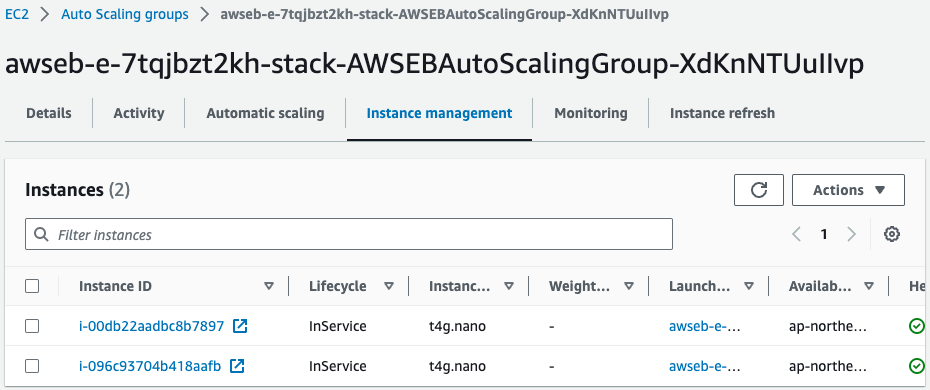
The maximum/minimum/desired numbers are all back to 2, and there are two instances running in the group.
Finally, access the Elastic Beanstalk domain.
$ curl http://dva-01-003.ap-northeast-1.elasticbeanstalk.com/
updated: instance-id: i-096c93704b418aafb

$ curl http://dva-01-003.ap-northeast-1.elasticbeanstalk.com/
updated: instance-id: i-00db22aadbc8b7897
Code language: Bash (bash)
Indeed, the new application version is applied to the two instances.
Summary
We verified the behavior of Rolling with an additional batch in Elastic Beanstalk.