Create network ACLs using CloudFormation
This page covers network ACLs.
A network access control list (ACL) allows or denies specific inbound or outbound traffic at the subnet level.
Control traffic to subnets using network ACLs
This time, we will use CloudFormation to create network ACLs and check their behavior.
Environment
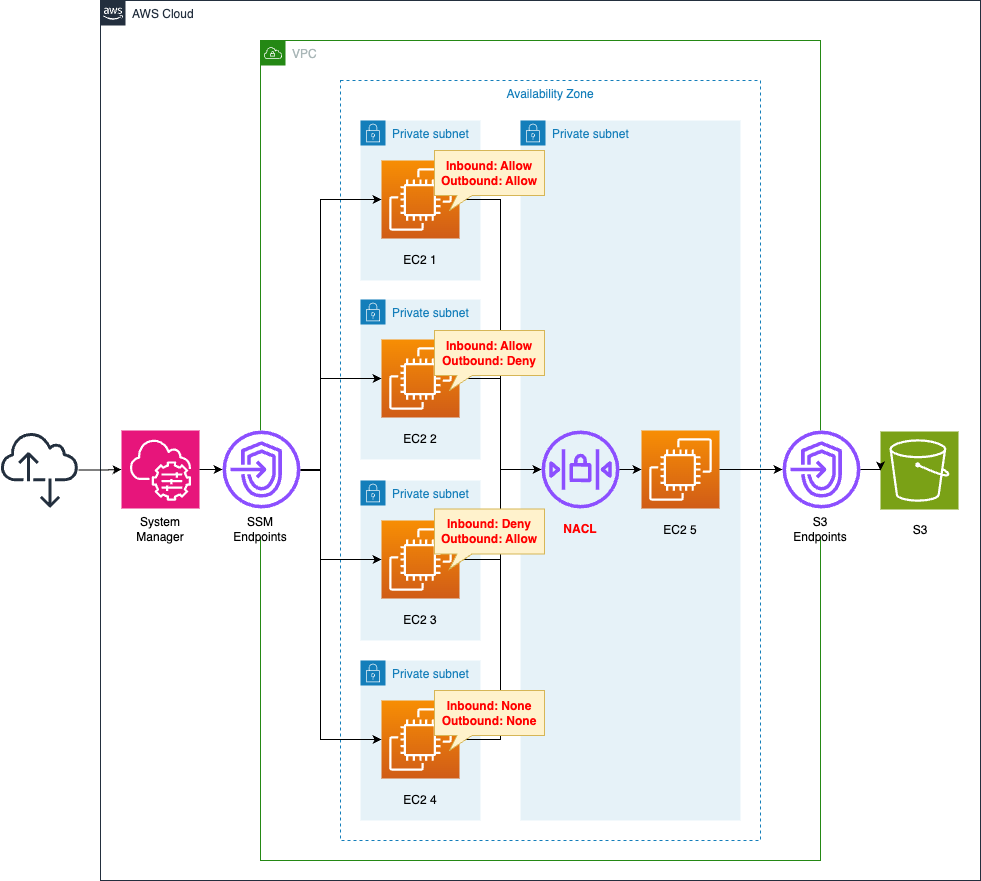
Create 5 subnets in the VPC and place an EC2 instance in each.
The instance is Amazon Linux 2.
Create a network ACL on the subnet where instance 5 is located.
Install Apache on this instance to be the web server.
Instances 1~4 are used as clients to access instance 5.
Attempt to access instance 5 from each instance using the curl command.
Check the impact of the network ACL settings.
CloudFormation template files
The above configuration is built with CloudFormation.
The CloudFormation templates are placed at the following URL
https://github.com/awstut-an-r/awstut-saa/tree/main/03/005
Explanation of key points of template files
network ACL
To create a network ACL, the following three types of resources must be created
- Network ACL main unit
- Network ACL association
- Network ACL entry
Network ACL main unit
Resources:
  NetworkAcl:
    Type: AWS::EC2::NetworkAcl
    Properties:
      VpcId: !Ref VPC
Code language: YAML (yaml)
Network ACL body.
Specifies the VPC where the network ACL will be created.
Network ACL association
Resources:
  NetworkAclAssociation:
    Type: AWS::EC2::SubnetNetworkAclAssociation
    Properties:
      NetworkAclId: !Ref NetworkAcl
      SubnetId: !Ref PrivateSubnet5
Code language: YAML (yaml)
Associate a network ACL with a subnet.
This time, we will associate a network ACL with the subnet where the web server instance is located.
Network ACL entry
The entries are resources that correspond to the specific rules of the network ACL.
Before we look at the rules, let’s review the communication we will be dealing with in this configuration.
This time we will handle HTTP communication (80/tcp) from each client instance to the web server instance.
The following table summarizes this communication.
| Source address | Source port | Destination address | Destination port | Protocol |
| 10.0.1.0/2410.0.2.0/2410.0.3.0/2410.0.4.0/24 | 1024-65535 | 10.0.5.0/24 | 80 | TCP |
Entry for instance 1
Resources:
  NetworkAclEntry1Ingress:
    Type: AWS::EC2::NetworkAclEntry
    Properties:
      CidrBlock: !Ref CidrIp1
      Egress: false
      NetworkAclId: !Ref NetworkAcl
      PortRange:
        From: !Ref HTTPPort
        To: !Ref HTTPPort
      Protocol: !Ref TCPProtocolNumber
      RuleAction: allow
      RuleNumber: 10

  NetworkAclEntry1Egress:
    Type: AWS::EC2::NetworkAclEntry
    Properties:
      CidrBlock: !Ref CidrIp1
      Egress: true
      NetworkAclId: !Ref NetworkAcl
      PortRange:
        From: !Ref RandomPortFrom
        To: !Ref RandomPortTo
      Protocol: !Ref TCPProtocolNumber
      RuleAction: allow
      RuleNumber: 20
Code language: YAML (yaml)
Entry for the first instance.
The key to setting up a network ACL is that you need two entries, one for inbound and one for outbound.
This is because network ACLs are states.
NACLs are stateless, which means that information about previously sent or received traffic is not saved. If, for example, you create a NACL rule to allow specific inbound traffic to a subnet, responses to that traffic are not automatically allowed.
Control traffic to subnets using network ACLs
In the above example, the first resource is the rule for communication from the subnet where instance 1 is located to the subnet where instance 5 is located.
The second resource is for the reverse communication.
The Egress property allows you to define the direction of communication.
False means inbound, true means outbound.
Specify the target CIDR with the CidrBlock property.
Points to the source for inbound and the destination for outbound.
Specify the port number of the target communication with the PortRange property.
In this case, we are dealing with HTTP communication (80/tcp) from the client instance to the web server instance.
So the destination port number for this communication is 80 and the source port number is randomly determined from the range 1024~65535.
So for this property in the inbound entry, both should be 80.
And for outbound entries, specify 1024 and 65535.
The Protocol property specifies the protocol number.
HTTP uses TCP, so specify 6, the TCP protocol number.
The RuleAction property specifies whether to allow or deny the communication to be handled.
Communication regarding instance 1 is allowed both inbound and outbound.
You can specify the rule number with the RuleNumber property.
In this case we specify 10, 20.
The following table summarizes the settings.
| No | Direction | CIDR | Port | Protocol | Action |
| 10 | Inbound | 10.0.1.0/24 | 80 | 6(TCP) | allow |
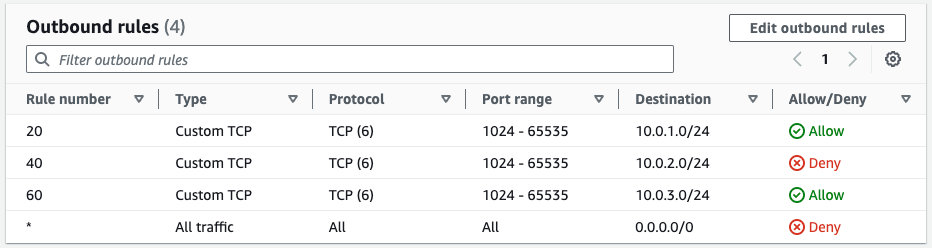
| 20 | Outbound | 10.0.1.0/24 | 1024-65535 | 6(TCP) | allow |
Entry for instance 2
Resources:
  NetworkAclEntry2Ingress:
    Type: AWS::EC2::NetworkAclEntry
    Properties:
      CidrBlock: !Ref CidrIp2
      Egress: false
      NetworkAclId: !Ref NetworkAcl
      PortRange:
        From: !Ref HTTPPort
        To: !Ref HTTPPort
      Protocol: !Ref TCPProtocolNumber
      RuleAction: allow
      RuleNumber: 30

  NetworkAclEntry2Egress:
    Type: AWS::EC2::NetworkAclEntry
    Properties:
      CidrBlock: !Ref CidrIp2
      Egress: true
      NetworkAclId: !Ref NetworkAcl
      PortRange:
        From: !Ref RandomPortFrom
        To: !Ref RandomPortTo
      Protocol: !Ref TCPProtocolNumber
      RuleAction: deny
      RuleNumber: 40
Code language: YAML (yaml)
Here is the entry for the second instance.
The concept is the same as before.
This one allows inbound communication but denies outbound communication.
The following table summarizes the settings.
| No | Direction | CIDR | Port | Protocol | Action |
| 30 | Inbound | 10.0.1.0/24 | 80 | 6(TCP) | allow |
| 40 | Outbound | 10.0.1.0/24 | 1024-65535 | 6(TCP) | deny |
Entry for instance 3
Resources:
  NetworkAclEntry3Ingress:
    Type: AWS::EC2::NetworkAclEntry
    Properties:
      CidrBlock: !Ref CidrIp3
      Egress: false
      NetworkAclId: !Ref NetworkAcl
      PortRange:
        From: !Ref HTTPPort
        To: !Ref HTTPPort
      Protocol: !Ref TCPProtocolNumber
      RuleAction: deny
      RuleNumber: 50

  NetworkAclEntry3Egress:
    Type: AWS::EC2::NetworkAclEntry
    Properties:
      CidrBlock: !Ref CidrIp3
      Egress: true
      NetworkAclId: !Ref NetworkAcl
      PortRange:
        From: !Ref RandomPortFrom
        To: !Ref RandomPortTo
      Protocol: !Ref TCPProtocolNumber
      RuleAction: allow
      RuleNumber: 60
Code language: YAML (yaml)
This entry is for the third instance.
This one denies inbound communication but allows outbound communication.
The following table summarizes the settings.
| No | Direction | CIDR | Port | Protocol | Action |
| 50 | Inbound | 10.0.1.0/24 | 80 | 6(TCP) | deny |
| 60 | Outbound | 10.0.1.0/24 | 1024-65535 | 6(TCP) | allow |
Entry for instance 4
No entry is created for instance 4.
This means that the network ACL has no configuration for communication from instance 4.
This is to check the behavior of the network ACL when there is no configuration.
(Reference) Security Group
Resources:
  InstanceSecurityGroup1:
    Type: AWS::EC2::SecurityGroup
    Properties:
      GroupName: !Sub "${Prefix}-InstanceSecurityGroup1"
      GroupDescription: Deny All.
      VpcId: !Ref VPC

  InstanceSecurityGroup2:
    Type: AWS::EC2::SecurityGroup
    Properties:
      GroupName: !Sub "${Prefix}-InstanceSecurityGroup2"
      GroupDescription: Allow HTTP from InstanceSecurityGroup1.
      VpcId: !Ref VPC
      SecurityGroupIngress:
        - IpProtocol: tcp
          FromPort: !Ref HTTPPort
          ToPort: !Ref HTTPPort
          SourceSecurityGroupId: !Ref InstanceSecurityGroup1
Code language: YAML (yaml)
Instances 1~4 will be associated with the first security group and instance 5 with the second.
As you can see, the web server configuration is for allowing HTTP communication from the client instance.
(Reference) EC2
Resources:
  Instance1:
    Type: AWS::EC2::Instance
    Properties:
      IamInstanceProfile: !Ref InstanceProfile
      ImageId: !Ref ImageId
      InstanceType: !Ref InstanceType
      NetworkInterfaces:
        - DeviceIndex: 0
          SubnetId: !Ref PrivateSubnet1
          GroupSet:
            - !Ref InstanceSecurityGroup1

  Instance5:
    Type: AWS::EC2::Instance
    Properties:
      ImageId: !Ref ImageId
      InstanceType: !Ref InstanceType
      NetworkInterfaces:
        - DeviceIndex: 0
          SubnetId: !Ref PrivateSubnet5
          GroupSet:
            - !Ref InstanceSecurityGroup2
      UserData: !Base64 |
        #!/bin/bash -xe
        yum update -y
        yum install -y httpd
        systemctl start httpd
        systemctl enable httpd
        ec2-metadata -i > /var/www/html/index.html
Code language: YAML (yaml)
Configuration for instance 1 and instance 5.
Only one instance is shown since instances 1~4 are identical except for the subnet.
Instances 1~4 do not require any special configuration.
Instance 5 uses user data to install Apache and run it as a web server.
Architecting
Use CloudFormation to build this environment and check its actual behavior.
Create CloudFormation stacks and check the resources in the stacks
Create CloudFormation stacks.
For information on how to create stacks and check each stack, please see the following page.

After reviewing the resources in each stack, information on the main resources created in this case is as follows
- Network ACL: acl-08b8d8a5e5cb97e90
- Instance 1: i-0ffa7081a96da4a95
- Instance 2: i-054bb5c83794ee9a0
- Instance 3: i-04c9ee40fe26feb62
- Instance 4: i-0832c58a73d109af6
- Private DNS for instance 5: ip-10-0-5-44.ap-northeast-1.compute.internal
Check the network ACLs from the AWS Management Console.
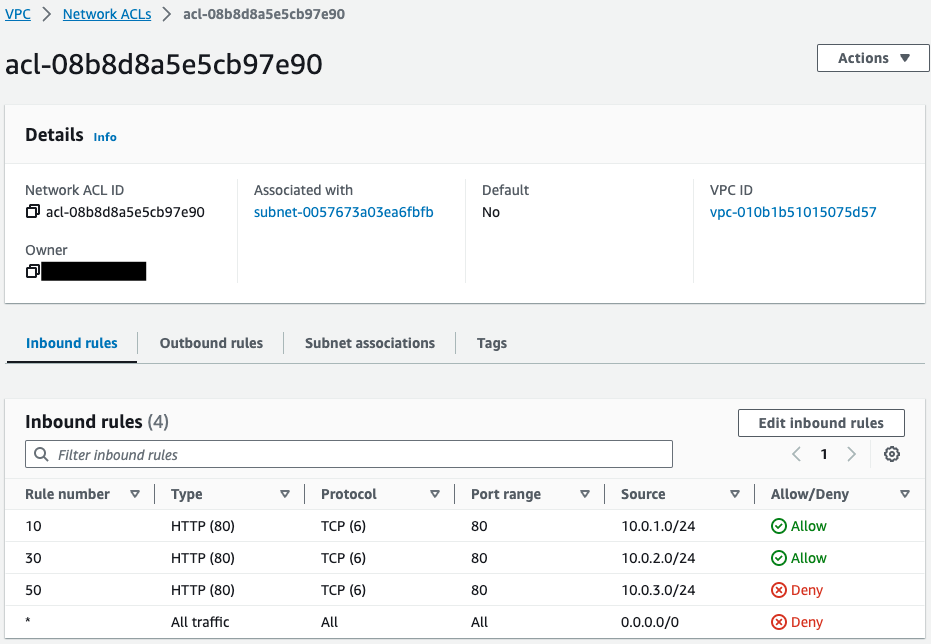
Network ACLs have been successfully created.
Inbound/outbound rules have been created for each client instance.
Notice that a Deny rule is added to the last line of each.
This is the so-called “implicit Deny”, meaning that all communications except those allowed above this line are denied.
Operation Check
Now that we are ready, we can actually check the behavior.
Allow inbound and outbound
First access instance 1.
Instance 1 is allowed both inbound and outbound communication by the network ACL.
SSM Session Manager is used to access the instance.
% aws ssm start-session --target i-0ffa7081a96da4a95
...
sh-4.2$
Code language: Bash (bash)
For more information on SSM Session Manager, please see the following page
Access instance 5 using the curl command.
sh-4.2$ curl http://ip-10-0-5-44.ap-northeast-1.compute.internal
instance-id: i-0f918893101c6d102
Code language: Bash (bash)
The response was returned successfully.
In this way, if both inbound and outbound are allowed by the network ACL, the communication is successful.
Permitted inbound only
Access and test instance 2 as before.
Instance 2 is allowed to communicate only inbound with the network ACL.
% aws ssm start-session --target i-054bb5c83794ee9a0
...
sh-4.2$

sh-4.2$ curl http://ip-10-0-5-44.ap-northeast-1.compute.internal
curl: (28) Failed to connect to ip-10-0-5-44.ap-northeast-1.compute.internal port 80 after 132026 ms: Couldn't connect to server
Code language: Bash (bash)
Communication failed.
If only inbound is allowed in the network ACL like this, it cannot communicate successfully.
Permitted outbound only
Instance 3 is accessed and tested.
Instance 3 is allowed outbound communication only in the network ACL.
% aws ssm start-session --target i-04c9ee40fe26feb62
...
sh-4.2$

sh-4.2$ curl http://ip-10-0-5-44.ap-northeast-1.compute.internal
curl: (28) Failed to connect to ip-10-0-5-44.ap-northeast-1.compute.internal port 80 after 132513 ms: Couldn't connect to server
Code language: Bash (bash)
Communication failed.
If only outbound is allowed in the network ACL like this, it cannot communicate successfully.
If neither is allowed
Finally, instance 4 is accessed and tested.
Instance 4 does not allow either communication in the network ACL.
% aws ssm start-session --target i-0832c58a73d109af6
...
sh-4.2$

sh-4.2$ curl http://ip-10-0-5-44.ap-northeast-1.compute.internal
curl: (28) Failed to connect to ip-10-0-5-44.ap-northeast-1.compute.internal port 80 after 132510 ms: Couldn't connect to server
Code language: Bash (bash)
Communication failed.
If nothing is set in the network ACL like this, it still cannot communicate properly.
Summary
Using CloudFormation, we have created a network ACL and verified its behavior.
When using network ACLs, inbound/outbound communication must be allowed.