Demonstrate AWS IoT Device Client MQTT message communication using a Raspberry Pi registered with Systems Manager
The following page shows how to install the AWS IoT Device Client on a Raspberry Pi.

This time, as a continuation, we will experience sending and receiving messages using AWS IoT Device Client, following the official tutorial below.
Environment
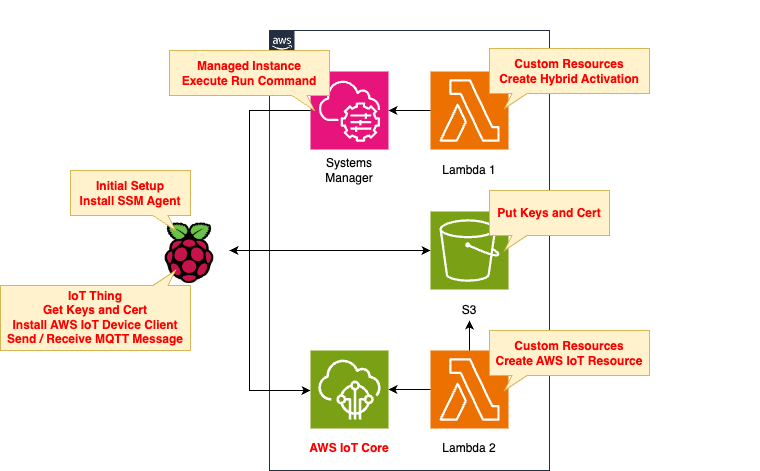
The basic structure is the same as the page introduced at the beginning of this document.
There are two changes.
The first point is the IoT Policy.
This is the policy that applies to the AWS IoT Thing that correspond to the Rasbperry Pi.
Make modifications according to the above tutorial.
The second point is the command to execute in the SSM document.
Run the SSM document against the Raspberry Pi to set up the AWS IoT Device Client installation, etc.
This will also be modified according to the tutorial.
CloudFormation template files
The above configuration is built with CloudFormation.
The CloudFormation template is placed at the following URL

Explanation of key points of template files
As mentioned earlier, the structure of this issue is largely the same as that introduced at the beginning of this report, so we will focus on the changes.
IoT Policy
Resources:
  Policy:
    Type: AWS::IoT::Policy
    Properties:
      PolicyDocument:
        Version: 2012-10-17
        Statement:
          - Effect: Allow
            Action:
              - iot:Connect
            Resource:
              - !Sub "arn:aws:iot:${AWS::Region}:${AWS::AccountId}:client/${Thing}"
          - Effect: Allow
            Action:
              - iot:Publish
            Resource:
              - !Sub "arn:aws:iot:${AWS::Region}:${AWS::AccountId}:topic/${PublishTopicName}"
          - Effect: Allow
            Action:
              - iot:Subscribe
            Resource:
              - !Sub "arn:aws:iot:${AWS::Region}:${AWS::AccountId}:topicfilter/${SubscribeTopicName}"
          - Effect: Allow
            Action:
              - iot:Receive
            Resource:
              - !Sub "arn:aws:iot:${AWS::Region}:${AWS::AccountId}:topic/${SubscribeTopicName}"
      PolicyName: !Sub "${Prefix}-policy"
Code language: YAML (yaml)
The above settings were made with reference to the following page.
In the tutorial we are referring to, the theme is sending/receiving messages.
Therefore, it is necessary to set appropriate permissions on the topics for sending/receiving.
Please see the following page for information on the policy settings required to send and receive messages.
SSM Document
Resources:
  RunShellScriptAssociation:
    Type: AWS::SSM::Association
    Properties:
      AssociationName: !Sub "${Prefix}-shellscript-association"
      Name: AWS-RunShellScript
      OutputLocation:
        S3Location:
          OutputS3BucketName: !Ref BucketName
          OutputS3KeyPrefix: shellscript-association-log
      Parameters:
        commands:
          - "apt-get -y install build-essential libssl-dev cmake unzip git python3-pip"
          - !Sub 'su - ${UserName} -c "export PATH=$PATH:~/.local/bin"'
          - !Sub 'su - ${UserName} -c "git clone https://github.com/aws/aws-cli.git"'
          - !Sub 'su - ${UserName} -c "cd aws-cli && git checkout v2 && sudo pip3 install --break-system-packages -r requirements.txt"'
          - !Sub 'su - ${UserName} -c "cd aws-cli && git checkout v2 && sudo pip3 install --break-system-packages ."'

          - !Sub 'su - ${UserName} -c "mkdir ~/certs"'
          - !Sub 'su - ${UserName} -c "curl -o ~/certs/AmazonRootCA1.pem https://www.amazontrust.com/repository/AmazonRootCA1.pem"'
          - !Sub 'su - ${UserName} -c "chmod 745 ~"'
          - !Sub 'su - ${UserName} -c "chmod 700 ~/certs"'
          - !Sub 'su - ${UserName} -c "chmod 644 ~/certs/AmazonRootCA1.pem"'

          - !Sub 'su - ${UserName} -c "git clone https://github.com/awslabs/aws-iot-device-client aws-iot-device-client"'
          - !Sub 'su - ${UserName} -c "mkdir ~/aws-iot-device-client/build"'
          - !Sub 'su - ${UserName} -c "cd ~/aws-iot-device-client/build && cmake ../"'
          - !Sub 'su - ${UserName} -c "cd ~/aws-iot-device-client/build && cmake --build . --target aws-iot-device-client"'

          - !Sub 'su - ${UserName} -c "mkdir ~/dc-configs"'
          - !Sub 'su - ${UserName} -c "mkdir ~/messages"'
          - !Sub 'su - ${UserName} -c "mkdir ~/certs/pubsub"'
          - !Sub 'su - ${UserName} -c "mkdir ~/certs/jobs"'
          - !Sub 'su - ${UserName} -c "chmod 745 ~"'
          - !Sub 'su - ${UserName} -c "chmod 700 ~/certs/pubsub"'
          - !Sub 'su - ${UserName} -c "chmod 700 ~/certs/jobs"'
          - !Sub 'su - ${UserName} -c "chmod 745 ~/messages"'

          - !Sub 'su - ${UserName} -c "sudo aws s3 cp s3://${BucketName}/${Thing}/${CertificateName} ~/certs/pubsub/"'
          - !Sub 'su - ${UserName} -c "sudo aws s3 cp s3://${BucketName}/${Thing}/${PrivateKeyName} ~/certs/pubsub/"'
          - !Sub 'su - ${UserName} -c "sudo aws s3 cp s3://${BucketName}/${Thing}/${PublicKeyName} ~/certs/pubsub"'
          - !Sub 'su - ${UserName} -c "sudo chown ${UserName}:${UserName} ~/certs/pubsub/*"'

          - !Sub 'su - ${UserName} -c "sudo chmod 644 ~/certs/pubsub/*"'
          - !Sub 'su - ${UserName} -c "sudo chmod 600 ~/certs/pubsub/${PrivateKeyName}"'

          - !Sub 'su - ${UserName} -c "mkdir ~/.aws-iot-device-client"'
          - !Sub 'su - ${UserName} -c "mkdir ~/.aws-iot-device-client/log"'
          - !Sub 'su - ${UserName} -c "chmod 745 ~/.aws-iot-device-client/log"'
          - !Sub 'su - ${UserName} -c "echo " " > ~/.aws-iot-device-client/log/aws-iot-device-client.log"'
          - !Sub 'su - ${UserName} -c "echo " " > ~/.aws-iot-device-client/log/pubsub_rx_msgs.log"'
          - !Sub 'su - ${UserName} -c "chmod 600 ~/.aws-iot-device-client/log/*"'

          - !Sub |
            cat << EOF > /home/${UserName}/messages/sample-ws-message.json
            {
              "temperature": 28,
              "humidity": 80,
              "barometer": 1013,
              "wind": {
                "velocity": 22,
                "bearing": 255
              }
            }
            EOF
          - !Sub 'su - ${UserName} -c "sudo chown ${UserName}:${UserName} ~/messages/sample-ws-message.json"'
          - !Sub 'su - ${UserName} -c "chmod 600 ~/messages/*"'

          - !Sub 'su - ${UserName} -c "chmod 745 ~/dc-configs"'
          - !Sub |
            cat << EOF > /home/${UserName}/dc-configs/dc-pubsub-custom-config.json
            {
              "endpoint": "${Endpoint}",
              "cert": "~/certs/pubsub/${CertificateName}",
              "key": "~/certs/pubsub/${PrivateKeyName}",
              "root-ca": "~/certs/AmazonRootCA1.pem",
              "thing-name": "${Thing}",
              "logging": {
                "enable-sdk-logging": true,
                "level": "DEBUG",
                "type": "STDOUT",
                "file": ""
              },
              "jobs": {
                "enabled": false,
                "handler-directory": ""
              },
              "tunneling": {
                "enabled": false
              },
              "device-defender": {
                "enabled": false,
                "interval": 300
              },
              "fleet-provisioning": {
                "enabled": false,
                "template-name": "",
                "template-parameters": "",
                "csr-file": "",
                "device-key": ""
              },
              "samples": {
                "pub-sub": {
                  "enabled": true,
                  "publish-topic": "${PublishTopicName}",
                  "publish-file": "~/messages/sample-ws-message.json",
                  "subscribe-topic": "${SubscribeTopicName}",
                  "subscribe-file": "~/.aws-iot-device-client/log/pubsub_rx_msgs.log"
                }
              },
              "config-shadow": {
                "enabled": false
              },
              "sample-shadow": {
                "enabled": false,
                "shadow-name": "",
                "shadow-input-file": "",
                "shadow-output-file": ""
              }
            }
            EOF
          - !Sub 'su - ${UserName} -c "sudo chown ${UserName}:${UserName} ~/dc-configs/dc-pubsub-config.json"'
          - !Sub 'su - ${UserName} -c "chmod 644 ~/dc-configs/dc-pubsub-config.json"'

          - !Sub 'su - ${UserName} -c "sudo mkdir /var/log/aws-iot-device-client"'
          - !Sub 'su - ${UserName} -c "sudo chmod 745 /var/log/aws-iot-device-client"'
          - !Sub 'su - ${UserName} -c "sudo chown ${UserName}:${UserName} /var/log/aws-iot-device-client"'
      Targets:
        - Key: InstanceIds
          Values:
            - !Ref InstanceId
      WaitForSuccessTimeoutSeconds: !Ref WaitForSuccessTimeoutSeconds
Code language: YAML (yaml)
There are three main changes from the page introduced at the beginning of this report.
The first point is a process related to the .aws-iot-device-client directory.
This directory is for logs generated when messages are sent and received using the AWS IoT Device Client.
After creating this directory, create the log file as well.
The second point is to create sample-ws-message.json.
This corresponds to the content of the MQTT message to be sent to AWS IoT Core using AWS IoT Device Client.
The third point is to create dc-pubsub-custom-config.json.
Originally, dc-pubsub-config.json was used, but this file is created by modifying it.
The changes from the original file are as follows: When a message is sent, the contents of sample-ws-message.json is sent, and when a message is received, the received message is written to the log file (pubsub_rx_msgs.log) under the .aws-iot-device-client directory.When a message is received, the message is written to a log file under the .awsub_rx_msgs.log directory.
Architecting
Registering the Raspberry Pi with SSM
Create the first CloudFormation stack.
Create a CloudFormation stack using the AWS CLI.
After placing the above template file in any S3 bucket, execute the following command
$ aws cloudformation create-stack \
--stack-name fa-155-01 \
--template-url https://[bucket-name].s3.[region].amazonaws.com/fa-155/fa-155-01.yaml \
--capabilities CAPABILITY_IAM
Code language: Bash (bash)
For more information on creating stacks, please see the following page.

This stack primarily creates the following resources
- S3 bucket to place client certificates and keys
- SSM Hybrid Activation
- IAM role for activation
Once the stack has been created, you will receive a hybrid activation code and ID as shown below.
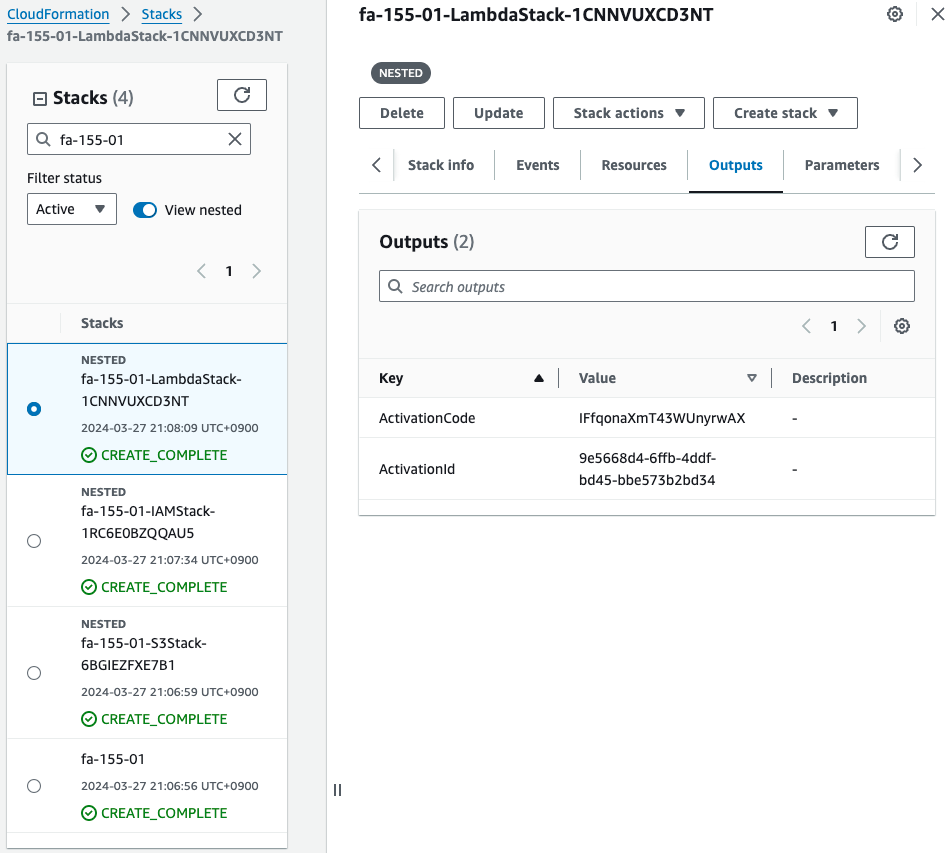
Install SSM Agent on Raspberry Pi
On the Raspberry Pi, run the following command to install SSM Agent.
sudo apt-get -y update
sudo apt-get -y upgrade
sudo apt-get -y install libc6:armhf
mkdir /tmp/ssm
curl https://amazon-ssm-ap-northeast-1.s3.ap-northeast-1.amazonaws.com/latest/debian_arm/ssm-setup-cli -o /tmp/ssm/ssm-setup-cli
sudo chmod +x /tmp/ssm/ssm-setup-cli
sudo /tmp/ssm/ssm-setup-cli -register -activation-code "[activation-code]" -activation-id "[activation-id]" -region "ap-northeast-1"
Code language: Bash (bash)
Embed the activation ID and code you identified earlier in the last command.
Please refer to the following page for details on the procedure.
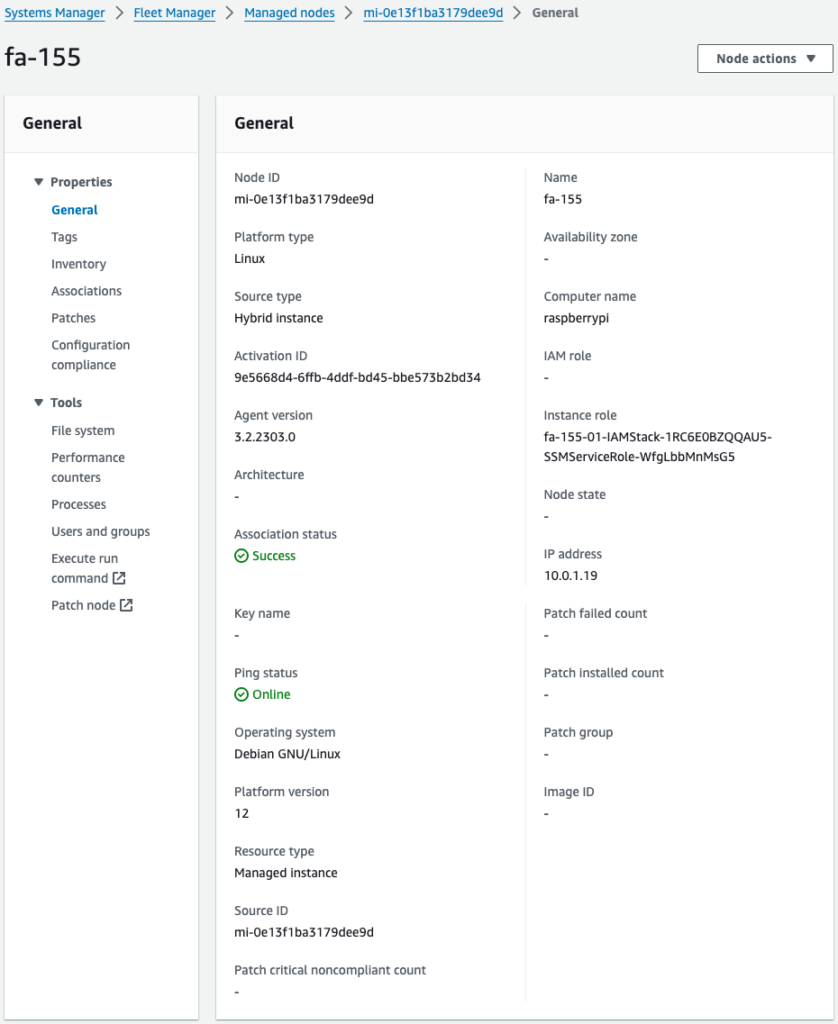
Checking SSM Fleet Manager, we see that the SSM agent is indeed installed and managed on the Raspberry Pi.
Set up AWS IoT Device Client after registering Raspberry Pi to AWS IoT using SSM documentation
Create a second CloudFormation stack.
Create a stack using the AWS CLI as before.
$ aws cloudformation create-stack \
--stack-name fa-155-02 \
--template-url https://[bucket-name].s3.[region].amazonaws.com/fa-155/fa-155-02.yaml \
--capabilities CAPABILITY_IAM
Code language: Bash (bash)
This stack primarily creates the following resources
- IoT Thing
- IoT Policy
- Client Certificates and Keys
- Attach client certificates to Thing and IoT policy
In addition, the SSM document will download the client certificate and key to the Raspberry Pi, allowing the Raspberry Pi to be treated as a Thing.
The necessary steps to use the AWS IoT Device Client are then performed.
Check the resources created from the management console.
Identify resources related to AWS IoT.
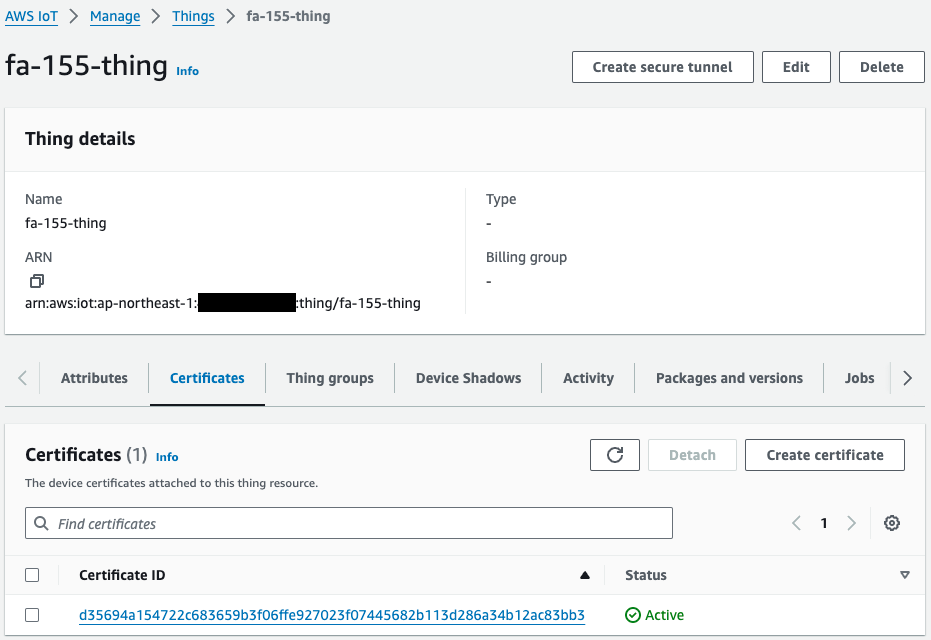
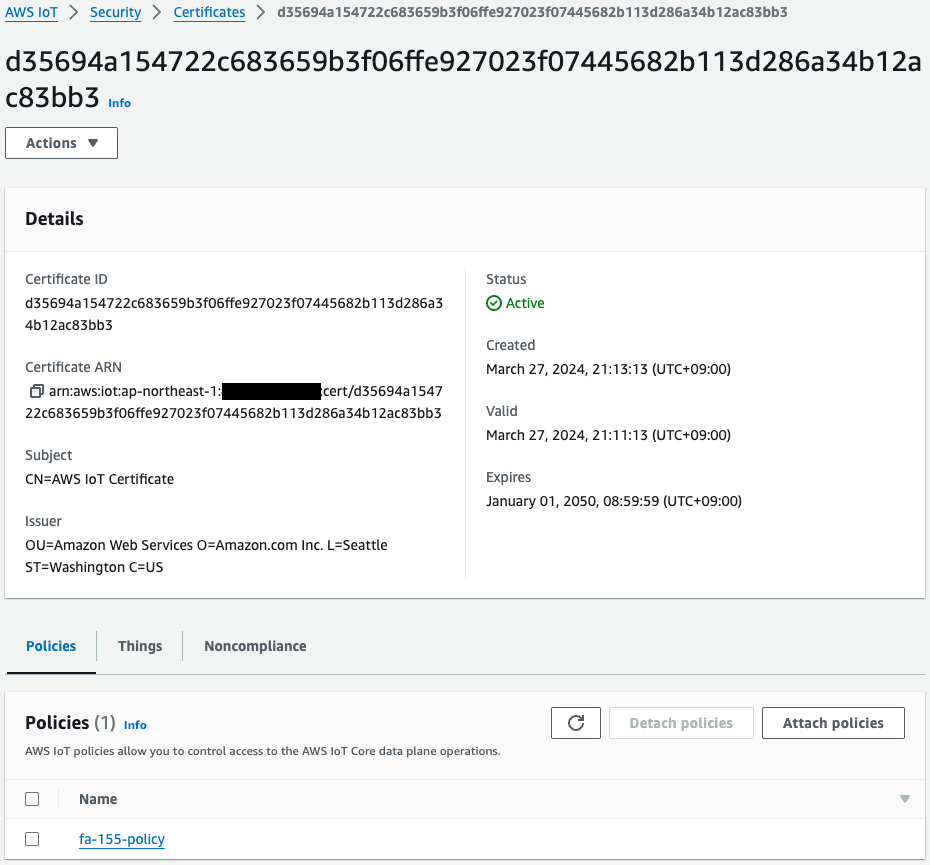

Thing, certificate, and policy have been successfully created.
Operation Check
Check the installation status of AWS IoT Device Client
Now that you are ready, access the Raspberry Pi.
Access is done via SSH from the local machine.
Check the availability of certificates and keys.
awstut@raspberrypi:~ $ ls -l ~/certs/pubsub/
total 12
-rw-r--r-- 1 awstut awstut 1220 Mar 27 21:13 device.pem.crt
-rw------- 1 awstut awstut 1675 Mar 27 21:13 private.pem.key
-rw-r--r-- 1 awstut awstut  451 Mar 27 21:13 public.pem.key
Code language: Bash (bash)
Indeed, the certificate and key are downloaded from the S3 bucket.
This means that this Raspberry Pi can act as an AWS IoT device.
Check the installation status of AWS IoT Device Client.
awstut@raspberrypi:~ $ cd ~/aws-iot-device-client/build/
awstut@raspberrypi:~/aws-iot-device-client/build $ ./aws-iot-device-client --version
v1.9.2-cf76107
Code language: Bash (bash)
You can see that the AWS IoT Device Client is indeed installed and ready to use.
Send messages using AWS IoT Device Client
Send a message according to the following page.
awstut@raspberrypi:~/aws-iot-device-client/build $ ./aws-iot-device-client --config-file ~/dc-configs/dc-pubsub-config.json
2024-03-30T10:30:33.123Z [WARN]  {FileUtils.cpp}: Permissions to given file/dir path '/home/awstut/dc-configs/dc-pubsub-config.json' is not set to recommended value... {Permissions: {desired: 640, actual: 644}}
2024-03-30T10:30:33.124Z [INFO]  {Config.cpp}: Successfully fetched JSON config file: {
  "endpoint": "a2oxckhng7gmur-ats.iot.ap-northeast-1.amazonaws.com",
  "cert": "~/certs/pubsub/device.pem.crt",
  "key": "~/certs/pubsub/private.pem.key",
  "root-ca": "~/certs/AmazonRootCA1.pem",
  "thing-name": "fa-155-thing",
  "logging": {
    "enable-sdk-logging": true,
    "level": "DEBUG",
    "type": "STDOUT",
    "file": ""
  },
  "jobs": {
    "enabled": false,
    "handler-directory": ""
  },
  "tunneling": {
    "enabled": false
  },
  "device-defender": {
    "enabled": false,
    "interval": 300
  },
  "fleet-provisioning": {
    "enabled": false,
    "template-name": "",
    "template-parameters": "",
    "csr-file": "",
    "device-key": ""
  },
  "samples": {
    "pub-sub": {
      "enabled": true,
      "publish-topic": "test/dc/pubtopic",
      "publish-file": "~/messages/sample-ws-message.json",
      "subscribe-topic": "test/dc/subtopic",
      "subscribe-file": "~/.aws-iot-device-client/log/pubsub_rx_msgs.log"
    }
  },
  "config-shadow": {
    "enabled": false
  },
  "sample-shadow": {
    "enabled": false,
    "shadow-name": "",
    "shadow-input-file": "",
    "shadow-output-file": ""
  }
}

2024-03-30T10:30:33.124Z [INFO]  {FileUtils.cpp}: Successfully create directory /home/awstut/.aws-iot-device-client/sample-shadow/ with required permissions 700
2024-03-30T10:30:33.124Z [INFO]  {Config.cpp}: ~/.aws-iot-device-client/sample-shadow/default-sample-shadow-document
2024-03-30T10:30:33.124Z [INFO]  {Config.cpp}: Succesfully create default file: /home/awstut/.aws-iot-device-client/sample-shadow/default-sample-shadow-document required for storage of shadow document
2024-03-30T10:30:33.124Z [DEBUG] {Config.cpp}: Did not find a runtime configuration file, assuming Fleet Provisioning has not run for this device
2024-03-30T10:30:33.124Z [DEBUG] {Config.cpp}: Did not find a http proxy config file /home/awstut/.aws-iot-device-client/http-proxy.conf, assuming HTTP proxy is disabled on this device
2024-03-30T10:30:33.124Z [DEBUG] {EnvUtils.cpp}: Updated PATH environment variable to: /usr/local/sbin:/usr/local/bin:/usr/sbin:/usr/bin:/sbin:/bin:/usr/local/games:/usr/games:/home/awstut/.aws-iot-device-client:/home/awstut/.aws-iot-device-client/jobs:/home/awstut/aws-iot-device-client/build:/home/awstut/aws-iot-device-client/build/jobs
2024-03-30T10:30:33.124Z [DEBUG] {LockFile.cpp}: creating lockfile
2024-03-30T10:30:33.124Z [INFO]  {Main.cpp}: Now running AWS IoT Device Client version v1.9.2-cf76107
2024-03-30T10:30:33.124Z [INFO]  {SharedCrtResourceManager.cpp}: SDK logging is enabled. Check /var/log/aws-iot-device-client/sdk.log for SDK logs.
2024-03-30T10:30:33.124Z [DEBUG] {Retry.cpp}: Retryable function starting, it will retry until success
2024-03-30T10:30:33.174Z [INFO]  {SharedCrtResourceManager.cpp}: Establishing MQTT connection with client id fa-155-thing...
2024-03-30T10:30:33.363Z [INFO]  {SharedCrtResourceManager.cpp}: MQTT connection established with return code: 0
2024-03-30T10:30:33.363Z [INFO]  {SharedCrtResourceManager.cpp}: Shared MQTT connection is ready!
2024-03-30T10:30:33.363Z [INFO]  {Main.cpp}: Provisioning with Secure Elements is disabled
2024-03-30T10:30:33.363Z [INFO]  {Main.cpp}: Config shadow is disabled
2024-03-30T10:30:33.363Z [INFO]  {Main.cpp}: Jobs is disabled
2024-03-30T10:30:33.363Z [INFO]  {Main.cpp}: Secure Tunneling is disabled
2024-03-30T10:30:33.363Z [INFO]  {Main.cpp}: Device Defender is disabled
2024-03-30T10:30:33.363Z [INFO]  {Main.cpp}: Sample shadow is disabled
2024-03-30T10:30:33.363Z [INFO]  {Main.cpp}: PubSub is enabled
2024-03-30T10:30:33.363Z [INFO]  {samples/PubSubFeature.cpp}: Creating Pub/Sub file: /home/awstut/messages/sample-ws-message.json
2024-03-30T10:30:33.363Z [INFO]  {samples/PubSubFeature.cpp}: Creating Pub/Sub file: /home/awstut/.aws-iot-device-client/log/pubsub_rx_msgs.log
2024-03-30T10:30:33.363Z [INFO]  {Main.cpp}: Sensor Publish is disabled
2024-03-30T10:30:33.363Z [INFO]  {SharedCrtResourceManager.cpp}: Starting Device Client features.
2024-03-30T10:30:33.363Z [DEBUG] {FeatureRegistry.cpp}: Attempting to start Pub Sub Sample
2024-03-30T10:30:33.363Z [INFO]  {samples/PubSubFeature.cpp}: Starting Pub Sub Sample
2024-03-30T10:30:33.363Z [INFO]  {Main.cpp}: Client base has been notified that Pub Sub Sample has started
2024-03-30T10:30:33.399Z [DEBUG] {samples/PubSubFeature.cpp}: PublishCompAck: PacketId:(Pub Sub Sample), ErrorCode:0
2024-03-30T10:30:33.417Z [DEBUG] {samples/PubSubFeature.cpp}: SubAck: PacketId:(Pub Sub Sample), ErrorCode:0
Code language: Bash (bash)
The log shows that MQTT messages were successfully sent.
Then check the MQTT test client page of the Managed Console.
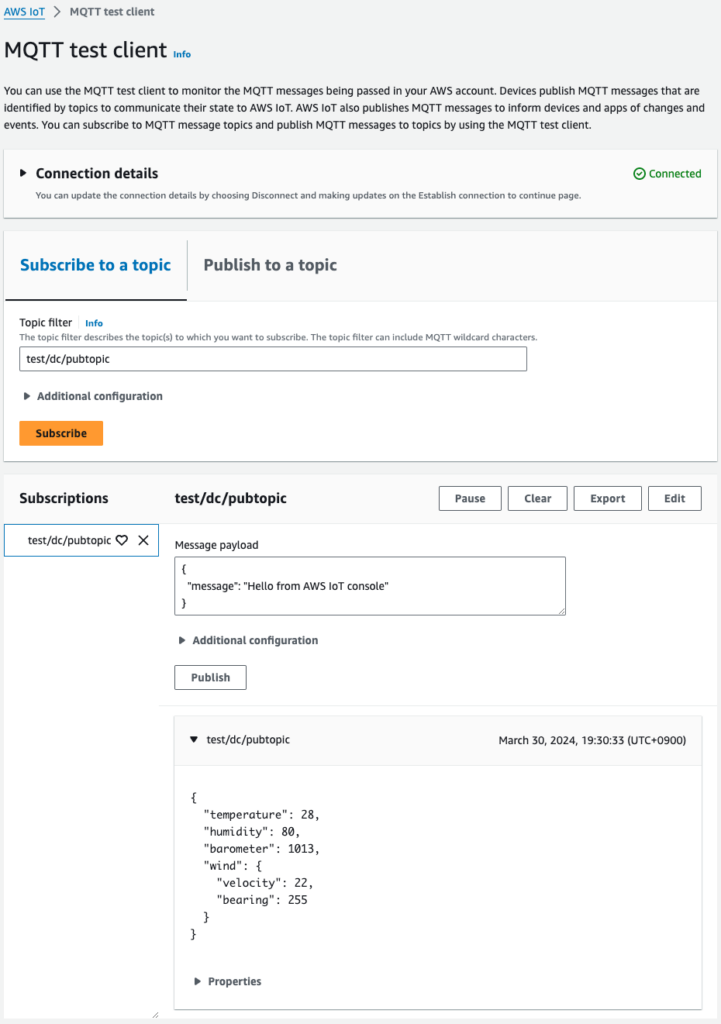
Indeed, a message is sent to test/dc/pubtopic.
Looking at the content, we can see that it is indeed the content specified in sample-ws-message.json.
Thus, it is possible to send any message using the AWS IoT Device Client.
Receive messages using AWS IoT Device Client
Continue to receive messages according to the page.
Since the AWS IoT Device Client is already running, send a message to test/dc/subtopic on the MQTT test client page of the managed console.
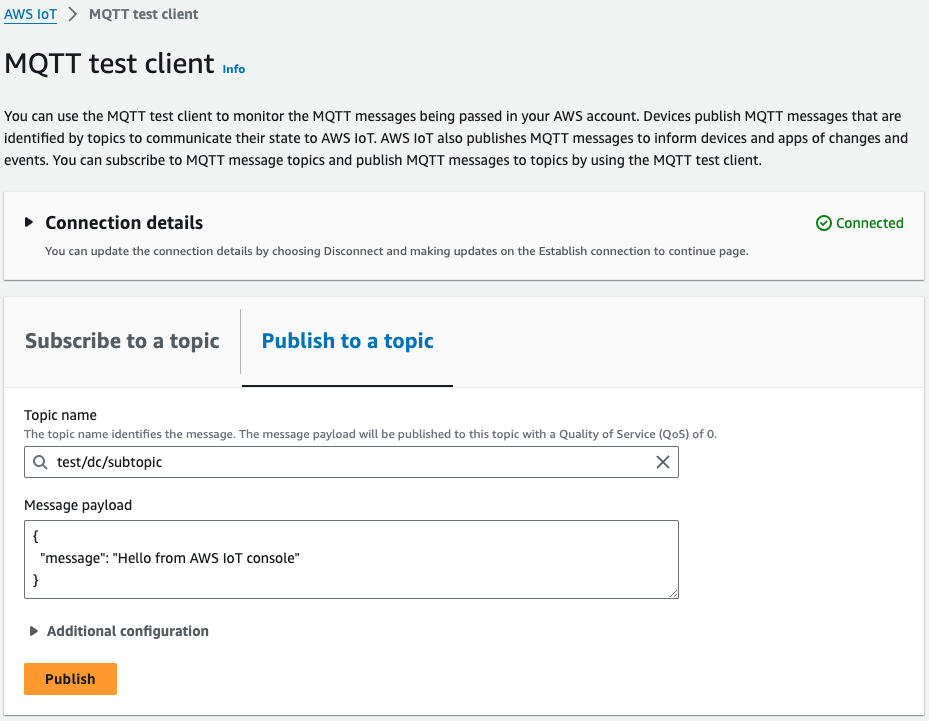
The Raspberry Pi running the AWS IoT Device Client will then notify you of the receipt of the message.
2024-03-30T10:40:51.339Z [DEBUG] {samples/PubSubFeature.cpp}: Message received on subscribe topic, size: 45 bytes
Code language: Bash (bash)
Stop AWS IoT Device Client and check the log file.
$ cat ~/.aws-iot-device-client/log/pubsub_rx_msgs.log
{
  "message": "Hello from AWS IoT console"
}
Code language: Bash (bash)
It is indeed the message sent on the MQTT test client page.
Thus, it is possible to receive messages using the AWS IoT Device Client.
Summary
We have identified how to send and receive messages on the Raspberry Pi using the AWS IoT Device Client.