Connect your Raspberry Pi to AWS IoT Core using the AWS IoT Device SDK
The following page shows a demonstration of connecting to AWS IoT Core using the AWSIoT Device SDK.
We will be using a Raspberry Pi 5 to experience this demonstration in action.
Environment
The basic structure is the same as the following page.

The change is to the SSM document that executes against the Raspberry Pi.
Specifically, modify it to perform the following two processes
- AWS IoT Device SDK installation
- Prepare a demonstration program for the SDK
In this case, the Python version of the SDK will be used.
CloudFormation template files
The above configuration is built with CloudFormation.
The CloudFormation template is placed at the following URL

Explanation of key points of template files
Since this structure is generally the same as the aforementioned pages, we will focus on the changes.
IoT Policy
Resources:
  Policy:
    Type: AWS::IoT::Policy
    Properties:
      PolicyDocument:
        Version: 2012-10-17
        Statement:
          - Effect: Allow
            Action:
              - iot:Publish
              - iot:Receive
              - iot:Subscribe
              - iot:Connect
            Resource: "*"
      PolicyName: !Sub "${Prefix}-policy"
Code language: YAML (yaml)
Set as specified in the following pages.
SSM Document
Resources:
  RunShellScriptAssociation:
    Type: AWS::SSM::Association
    Properties:
      AssociationName: !Sub "${Prefix}-shellscript-association"
      Name: AWS-RunShellScript
      OutputLocation:
        S3Location:
          OutputS3BucketName: !Ref BucketName
          OutputS3KeyPrefix: shellscript-association-log
      Parameters:
        commands:
          - "sudo apt-get -y install cmake libssl-dev"

          - !Sub 'su - ${UserName} -c "git clone https://github.com/aws/aws-cli.git"'
          - !Sub 'su - ${UserName} -c "cd aws-cli && git checkout v2 && sudo pip3 install --break-system-packages -r requirements.txt"'
          - !Sub 'su - ${UserName} -c "cd aws-cli && git checkout v2 && sudo pip3 install --break-system-packages ."'

          - !Sub 'su - ${UserName} -c "cd ~ && python3 -m pip install awsiotsdk --break-system-packages"'
          - !Sub 'su - ${UserName} -c "git clone https://github.com/aws/aws-iot-device-sdk-python-v2.git"'

          - !Sub 'su - ${UserName} -c "mkdir ~/certs"'
          - !Sub 'su - ${UserName} -c "curl -o ~/certs/AmazonRootCA1.pem https://www.amazontrust.com/repository/AmazonRootCA1.pem"'
          - !Sub 'su - ${UserName} -c "sudo aws s3 cp s3://${BucketName}/${Thing}/${CertificateName} ~/certs/"'
          - !Sub 'su - ${UserName} -c "sudo aws s3 cp s3://${BucketName}/${Thing}/${PrivateKeyName} ~/certs/"'
          - !Sub 'su - ${UserName} -c "sudo aws s3 cp s3://${BucketName}/${Thing}/${PublicKeyName} ~/certs/"'

          - !Sub "row=`sed -n '/print(\"Received message/=' /home/${UserName}/aws-iot-device-sdk-python-v2/samples/pubsub.py`"
          - !Sub |
            cat << EOF | sed ''$row'r /dev/stdin' /home/${UserName}/aws-iot-device-sdk-python-v2/samples/pubsub.py > /home/${UserName}/aws-iot-device-sdk-python-v2/samples/pubsub2.py
                # insert start
                topic_parsed = False
                if "/" in topic:
                    parsed_topic = topic.split("/")
                    if len(parsed_topic) == 3:
                        # this topic has the correct format
                        if (parsed_topic[0] == 'device') and (parsed_topic[2] == 'details'):
                            # this is a topic we care about, so check the 2nd element
                            if (parsed_topic[1] == 'temp'):
                                print("Received temperature request: {}".format(payload))
                                topic_parsed = True
                            if (parsed_topic[1] == 'light'):
                                print("Received light request: {}".format(payload))
                                topic_parsed = True
                if not topic_parsed:
                    print("Unrecognized message topic.")
                # insert end
            EOF
          - !Sub 'su - ${UserName} -c "sudo chown ${UserName}:${UserName} ~/aws-iot-device-sdk-python-v2/samples/pubsub2.py"'

          - !Sub 'su - ${UserName} -c "cp ~/aws-iot-device-sdk-python-v2/samples/pubsub.py ~/aws-iot-device-sdk-python-v2/samples/pubsub3.py"'
          - !Sub |
            su - ${UserName} -c "sed -i 's/message = \"{} \[{}\]\".format(message_string, publish_count)/message = \"{}\".format(message_string)/' ~/aws-iot-device-sdk-python-v2/samples/pubsub3.py"
          - !Sub |
            su - ${UserName} -c "sed -i 's/message_json = json.dumps(message)/message_json = json.dumps(json.loads(message))/' ~/aws-iot-device-sdk-python-v2/samples/pubsub3.py"
      Targets:
        - Key: InstanceIds
          Values:
            - !Ref InstanceId
      WaitForSuccessTimeoutSeconds: !Ref WaitForSuccessTimeoutSeconds
Code language: YAML (yaml)
Run the SSM document AWS-RunShellScript to execute the command on the Raspberry Pi.
The following two points are important
The first point is to install the AWS IoT Device SDK.
We referred to the following page for the installation procedure.
Python and Git are installed by default on the Raspberry Pi.
The second point is to prepare a demonstration program for the SDK.
After installing the SDK, a sample program called pubsub.py is available.
In the course of the demonstration, we will copy this file and use partially modified files (pubsub2.py, pubsub3.py).
Originally, this process is supposed to be done manually, but we will configure the SSM documentation to automatically perform the same process.
The following page was used as a reference in implementing this process.

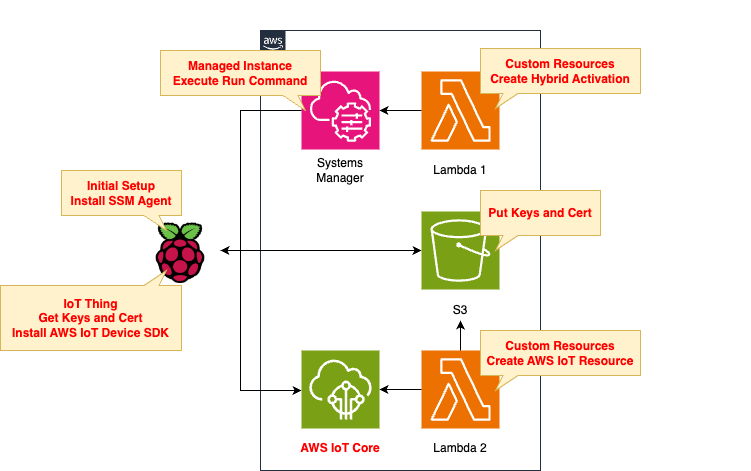
Architecting
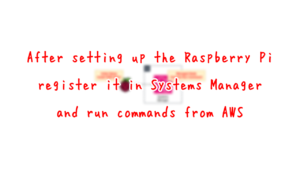
Registering the Raspberry Pi with SSM
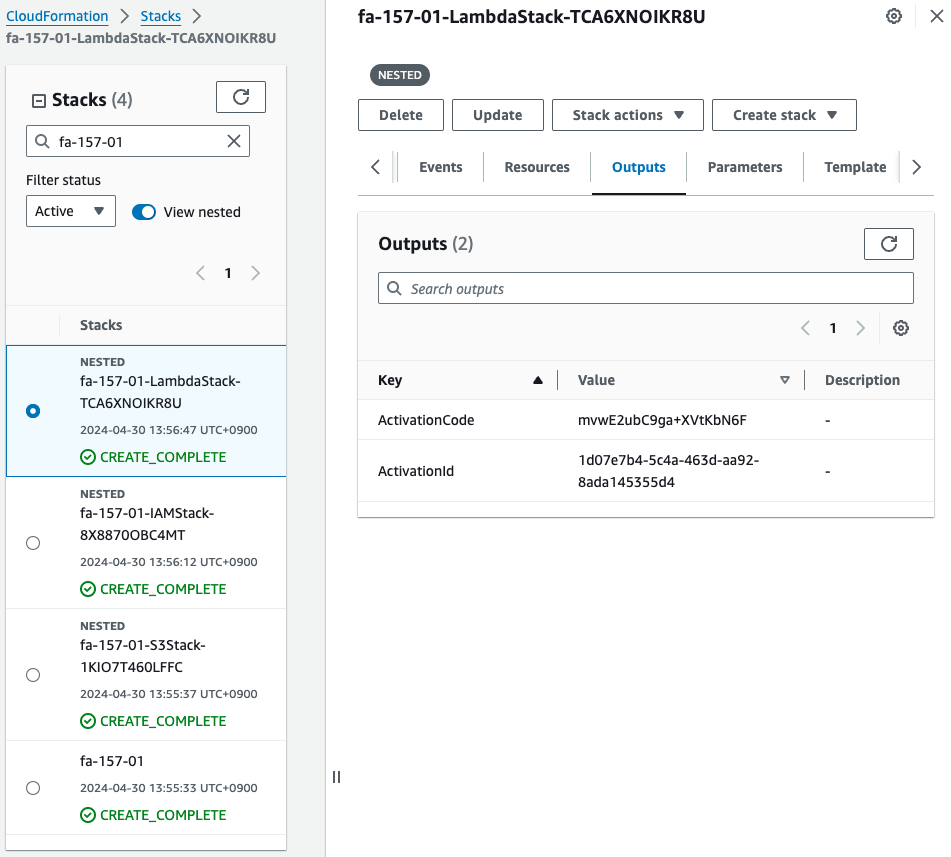
Create the first CloudFormation stack.
Create a CloudFormation stack using the AWS CLI.
After placing the above template file in any S3 bucket, execute the following command
$ aws cloudformation create-stack \
--stack-name fa-157-01 \
--template-url https://[bucket-name].s3.[region].amazonaws.com/fa-157/fa-157-01.yaml \
--capabilities CAPABILITY_IAM
Code language: Bash (bash)
For more information on creating stacks, please see the following page.

This stack primarily creates the following resources
- S3 bucket to place client certificates and keys
- SSM Hybrid Activation
- IAM role for activation
Once the stack has been created, you will receive a hybrid activation code and ID as shown below.
Install SSM Agent on Raspberry Pi
Run the following command on the Raspberry Pi to install SSM Agent.
sudo apt-get -y update
sudo apt-get -y upgrade
sudo apt-get -y install libc6:armhf
mkdir /tmp/ssm
curl https://amazon-ssm-ap-northeast-1.s3.ap-northeast-1.amazonaws.com/latest/debian_arm/ssm-setup-cli -o /tmp/ssm/ssm-setup-cli
sudo chmod +x /tmp/ssm/ssm-setup-cli
sudo /tmp/ssm/ssm-setup-cli -register -activation-code "[activation-code]" -activation-id "[activation-id]" -region "ap-northeast-1"
Code language: Bash (bash)
Embed the activation ID and code you identified earlier in the last command.
Please refer to the following page for details on the procedure.
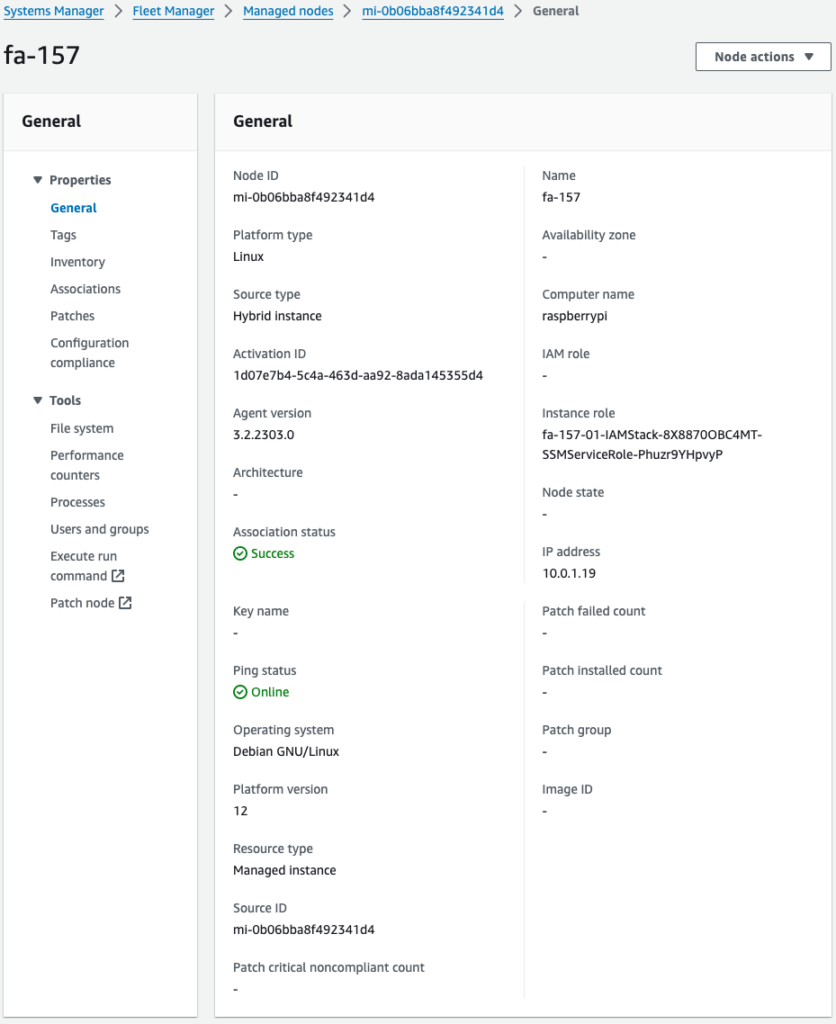
Checking SSM Fleet Manager, we see that the SSM agent is indeed installed and managed on the Raspberry Pi.
Set up the AWS IoT Device SDK after registering the Raspberry Pi with AWS IoT using SSM documentation
Create a second CloudFormation stack.
As before, create a stack using the AWS CLI.
$ aws cloudformation create-stack \
--stack-name fa-157-02 \
--template-url https://[bucket-name].s3.[region].amazonaws.com/fa-157/fa-157-02.yaml \
--capabilities CAPABILITY_IAM
Code language: Bash (bash)
This stack primarily creates the following resources
- IoT Thing
- IoT Policy
- Client Certificates and Keys
- Attach client certificates to mono and IoT policies
In addition, the SSM document will download the client certificate and key to the Raspberry Pi, allowing it to be treated as a thing.
The necessary steps to use the AWS IoT Device SDK are then performed.
Check the resources related to AWS IoT from the Management Console.
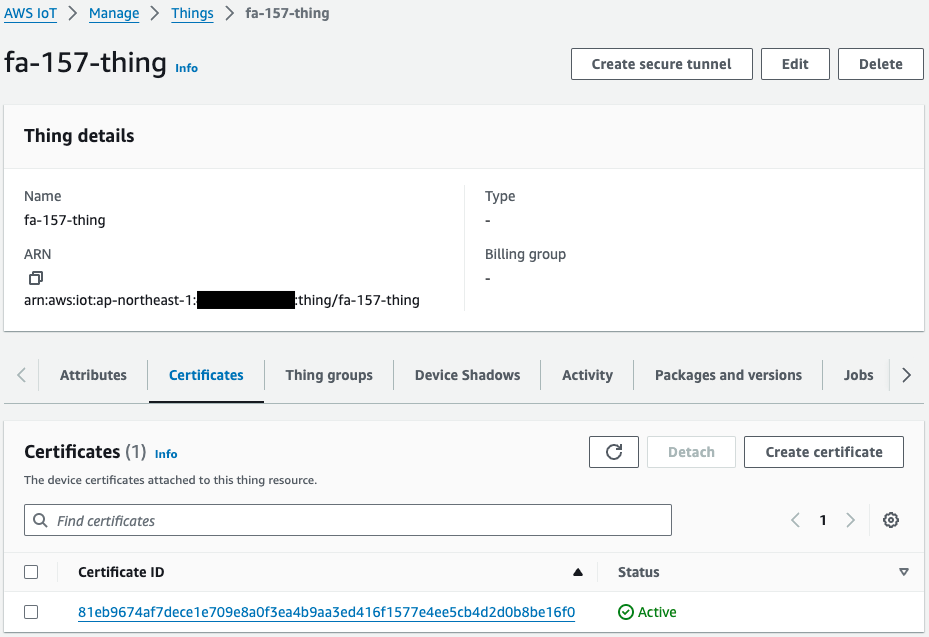
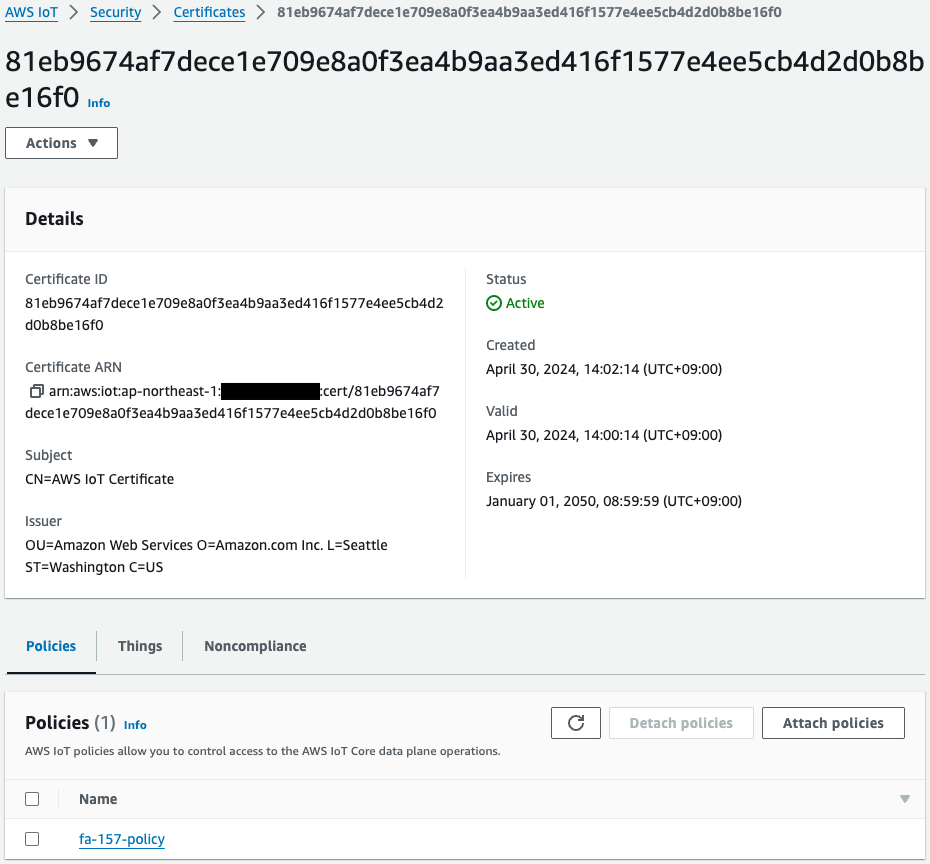
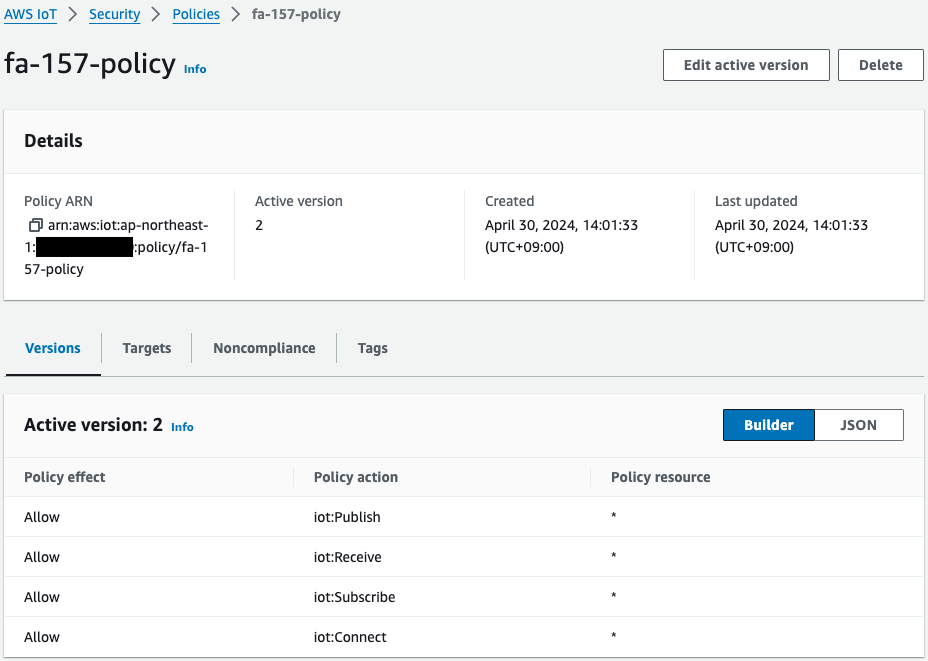
The thing, certificate, and policy have been successfully created.
In particular, we can see that the policies are as per the CloudFormation template we checked earlier.
Operation Check
Check the installation status of AWS IoT Device SDK
Now that you are ready, access the Raspberry Pi.
Access is done via SSH from the local machine.
First, check the availability of the certificate and key.
awstut@raspberrypi:~ $ ls -l ~/certs
total 16
-rw-r--r-- 1 awstut awstut 1188 Apr 30 14:09 AmazonRootCA1.pem
-rw-r--r-- 1 root   root    root   1220 Apr 30 14:02 device.pem.crt
-rw-r--r-- 1 root   root    root   1679 Apr 30 14:02 private.pem.key
-rw-r--r-- 1 root    root    451 Apr 30 14:02 public.pem.key
Code language: Bash (bash)
In addition to the root certificate, the certificate and key are downloaded from the S3 bucket.
This means that this Raspberry Pi can act as an AWS IoT device.
Check the installation status of the AWS IoT Device SDK.
awstut@raspberrypi:~ $ ls -ld ~/aws*
drwxr-xr-x 18 awstut awstut 4096 Apr 30 14:04 /home/awstut/aws-cli
drwxr-xr-x 14 awstut awstut 4096 Apr 30 14:09 /home/awstut/aws-iot-device-sdk-python-v2
Code language: Bash (bash)
In addition to the AWS CLI, the AWS IoT Device SDK is installed.
Check the status of the sample program.
awstut@raspberrypi:~ $ ls -l ~/aws-iot-device-sdk-python-v2/samples/pubsub*
-rw-r--r-- 1 awstut awstut 7244 Apr 30 14:10 /home/awstut/aws-iot-device-sdk-python-v2/samples/pubsub2.py
-rw-r--r-- 1 awstut awstut 6479 Apr 30 14:10 /home/awstut/aws-iot-device-sdk-python-v2/samples/pubsub3.py
-rw-r--r-- 1 awstut awstut 3204 Apr 30 14:09 /home/awstut/aws-iot-device-sdk-python-v2/samples/pubsub.md
-rw-r--r-- 1 awstut awstut 6487 Apr 30 14:09 /home/awstut/aws-iot-device-sdk-python-v2/samples/pubsub.py
Code language: Bash (bash)
From the base pubsub.py, pubsub2.py and pubsub3.py are created.
The creation of these files is defined in the SSM documentation.
AWS IoT Device SDK Demo
Demonstrate according to the following page.
Demo 1: Subscribing with a Wildcard Topic Filter
The purpose of this demonstration is to subscribe to a message using a wildcard topic filter.
First, run pubsub.py on the Raspberry Pi side.
awstut@raspberrypi:~ $ python3 ~/aws-iot-device-sdk-python-v2/samples/pubsub.py \
--message "" \
--count 2 \
--topic device/+/details \
--ca_file ~/certs/AmazonRootCA1.pem \
--cert ~/certs/device.pem.crt \
--key ~/certs/private.pem.key \
--endpoint [endpoint-name]
Connecting to a2oxckhng7gmur-ats.iot.ap-northeast-1.amazonaws.com with client ID 'test-cd3f51c3-7a0a-43ad-b5af-98f62ee53dfa'...
Connection Successful with return code: 0 session present: False
Connected!
Subscribing to topic 'device/+/details'...
Subscribed with 1
Waiting for all messages to be received...
Code language: Bash (bash)
The value passed to the endpoint argument is unique for each AWS account.
Please name the endpoint appropriately.
The program has been executed and is now in standby mode.
Then, on the MQTT test client page of the Managed Console, register by specifying “device/+/details” as the topic filter.
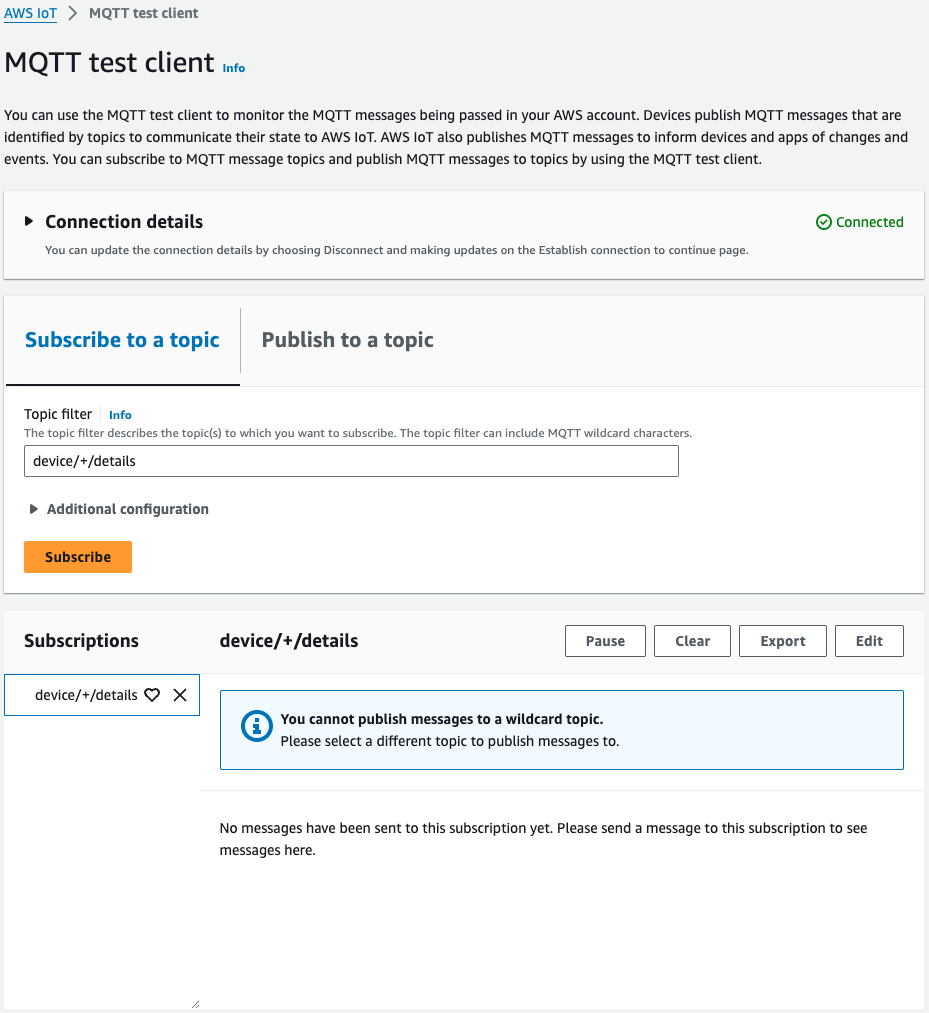
Messages are then issued for the two topics.
The message was successfully issued.
Check the Raspberry Pi again.
Waiting for all messages to be received...
Received message from topic 'device/temp/details': b'{ "desiredTemp": 20, "currentTemp": 15 }'
Received message from topic 'device/light/details': b'{ "desiredLight": 100, "currentLight": 50 }'
2 message(s) received.
Disconnecting...
Connection closed
Disconnected!
Code language: Bash (bash)
We did indeed receive two messages.
Thus, the AWS IoT Device SDK can be used to receive messages.
Demo 2: Customizing Callback Functions
The purpose of this demonstration is to customize the callback function that is executed when a message is received and to separate the process to be executed depending on the topic.
The following is a customized callback function.
# Callback when the subscribed topic receives a message
def on_message_received(topic, payload, dup, qos, retain, **kwargs):
    print("Received message from topic '{}': {}".format(topic, payload))
    # insert start
    topic_parsed = False
    if "/" in topic:
        parsed_topic = topic.split("/")
        if len(parsed_topic) == 3:
            # this topic has the correct format
            if (parsed_topic[0] == 'device') and (parsed_topic[2] == 'details'):
                # this is a topic we care about, so check the 2nd element
                if (parsed_topic[1] == 'temp'):
                    print("Received temperature request: {}".format(payload))
                    topic_parsed = True
                if (parsed_topic[1] == 'light'):
                    print("Received light request: {}".format(payload))
                    topic_parsed = True
    if not topic_parsed:
        print("Unrecognized message topic.")
    # insert end
    global received_count
    received_count += 1
    if received_count == cmdData.input_count:
        received_all_event.set()
Code language: Python (python)
Split the topic name with a slash and vary the action to be performed according to the string in the middle.
So far, we have been returning strings in a uniform manner, but we will change some of the strings that are returned.
First, run pubsub2.py on the Raspberry Pi side.
awstut@raspberrypi:~ $ python3 ~/aws-iot-device-sdk-python-v2/samples/pubsub2.py \
--message "" \
--count 2 \
--topic device/+/details \
--ca_file ~/certs/AmazonRootCA1.pem \
--cert ~/certs/device.pem.crt \
--key ~/certs/private.pem.key \
--endpoint [endpoint-name]
Connecting to a2oxckhng7gmur-ats.iot.ap-northeast-1.amazonaws.com with client ID 'test-21b600e1-018d-42eb-81c8-d156e55dd729'...
Connection Successful with return code: 0 session present: False
Connected!
Subscribing to topic 'device/+/details'...
Subscribed with 1
Waiting for all messages to be received...
Code language: Bash (bash)
The program has been executed and is now in standby mode.
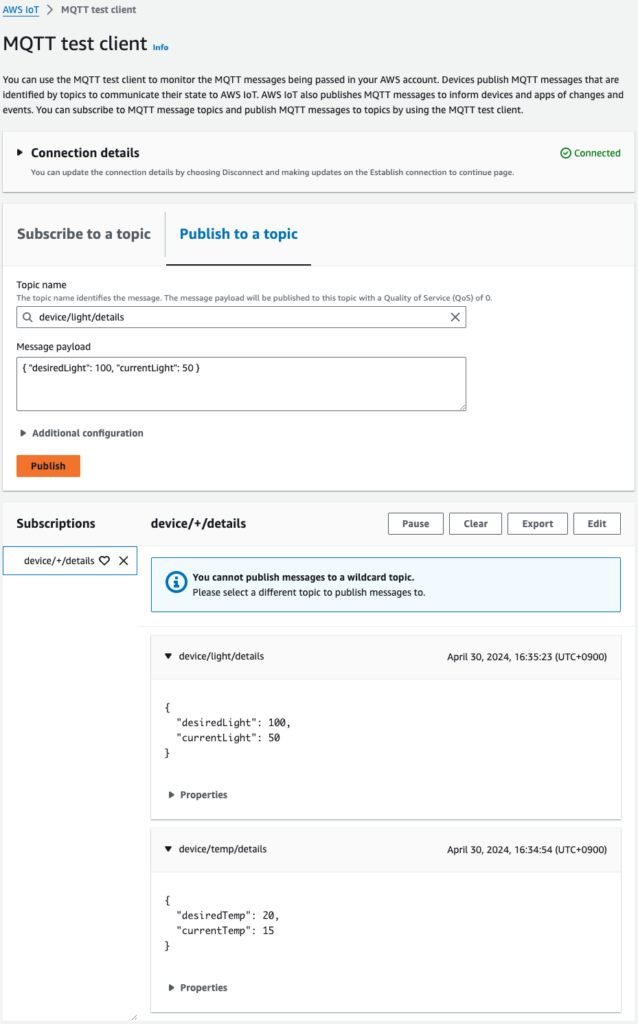
Then, on the MQTT test client page of the Managed Console, issue two messages.
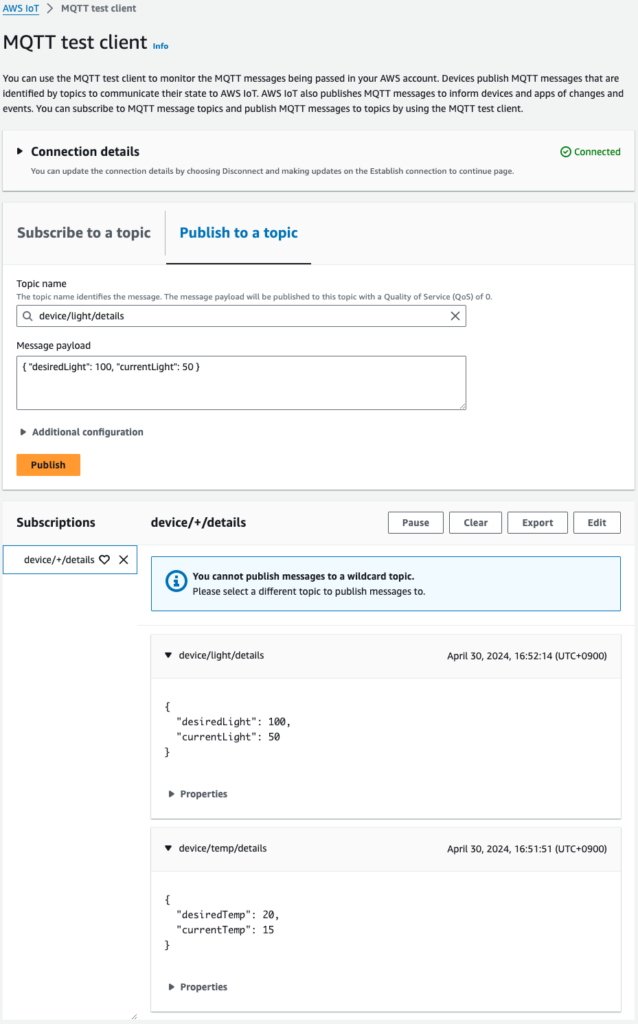
The message was successfully issued.
Check the Raspberry Pi again.
Waiting for all messages to be received...
Received message from topic 'device/temp/details': b'{ "desiredTemp": 20, "currentTemp": 15 }'
Received temperature request: b'{ "desiredTemp": 20, "currentTemp": 15 }'
Received message from topic 'device/light/details': b'{ "desiredLight": 100, "currentLight": 50 }'
Received light request: b'{ "desiredLight": 100, "currentLight": 50 }'
2 message(s) received.
Disconnecting...
Connection closed
Disconnected!
Code language: Bash (bash)
As before, we received two messages.
If you look at the messages as they are received, you will see that the output string changes depending on the topic name.
Thus, AWS IoT Device SDK allows you to define actions for each subscription by customizing callback variables.
Demo 3: Message Issuance
The purpose of this demo is to use the AWS IoT Device SDK to issue messages.
Before the demonstration, check out pubsub3.py that we have prepared for this demo.
The differences from pubsub.py are as follows
awstut@raspberrypi:~ $ diff -c ~/aws-iot-device-sdk-python-v2/samples/pubsub.py ~/aws-iot-device-sdk-python-v2/samples/pubsub3.py
*** /home/awstut/aws-iot-device-sdk-python-v2/samples/pubsub.py	2024-04-30 14:09:43.040952447 +0900
--- /home/awstut/aws-iot-device-sdk-python-v2/samples/pubsub3.py	2024-04-30 14:10:05.797367406 +0900
***************
*** 132,140 ****

          publish_count = 1
          while (publish_count <= message_count) or (message_count == 0):
!              message = "{} [{}]".format(message_string, publish_count)
              print("Publishing message to topic '{}': {}".format(message_topic, message))
!              message_json = json.dumps(message)
              mqtt_connection.publish(
                  topic=message_topic,
                  payload=message_json,
--- 132,140 ----

          publish_count = 1
          while (publish_count <= message_count) or (message_count == 0):
!              message = "{}".format(message_string)
              print("Publishing message to topic '{}': {}".format(message_topic, message))
!              message_json = json.dumps(json.loads(message))
              mqtt_connection.publish(
                  topic=message_topic,
                  payload=message_json,
Code language: Bash (bash)
As you can see, two areas have been corrected.
The first is a correction regarding the number of messages.
By default, the number of messages issued was written along with the message, but this will be removed.
The second location is to change the format of the message.
By default, json.dumps was executed as a string, but before that, the json.loads function is executed.
We are ready to go.
First, go to the MQTT test client page of the Managed Console and configure your subscription settings.
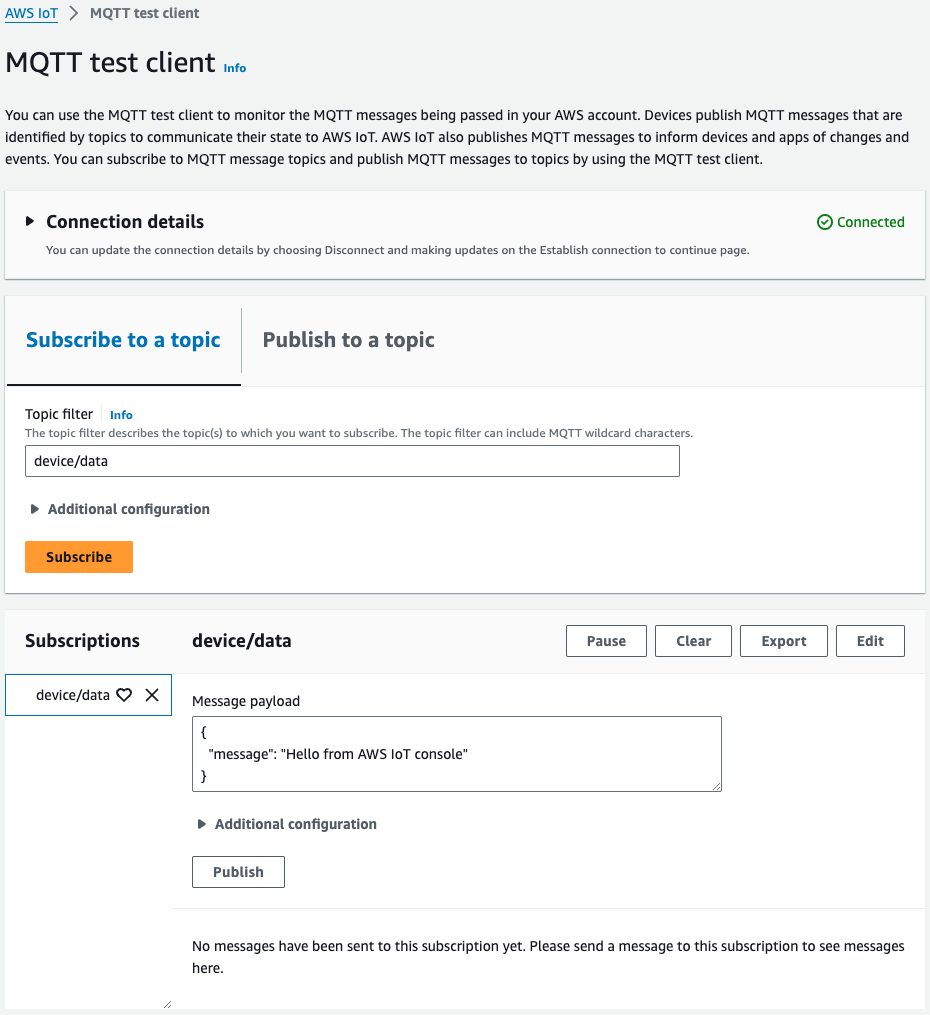
Subscribe to “device/data”.
Then execute pubsub3.py on the Raspberry Pi side.
awstut@raspberrypi:~ $ python3 ~/aws-iot-device-sdk-python-v2/samples/pubsub3.py \
--message '{"timestamp":1601048303,"sensorId":28,"sensorData":[{"sensorName":"Wind speed","sensorValue":34.2211224}]}' \
--count 2 \
--topic device/data \
--ca_file ~/certs/AmazonRootCA1.pem \
--cert ~/certs/device.pem.crt \
--key ~/certs/private.pem.key \
--endpoint [endpoint-name]
Connecting to a2oxckhng7gmur-ats.iot.ap-northeast-1.amazonaws.com with client ID 'test-4522c1a4-f306-4910-9331-e87728ccd222'...
Connection Successful with return code: 0 session present: False
Connected!
Subscribing to topic 'device/data'...
Subscribed with 1
Sending 2 message(s)
Publishing message to topic 'device/data': {"timestamp":1601048303,"sensorId":28,"sensorData":[{"sensorName":"Wind speed","sensorValue":34.2211224}]}
Received message from topic 'device/data': b'{"timestamp": 1601048303, "sensorId": 28, "sensorData": [{"sensorName": "Wind speed", "sensorValue": 34.2211224}]}'
2 message(s) received.
Disconnecting...
Connection closed
Disconnected!
Code language: Bash (bash)
After issuing two messages, the program was terminated.
Finally, check the MQTT test client page again.
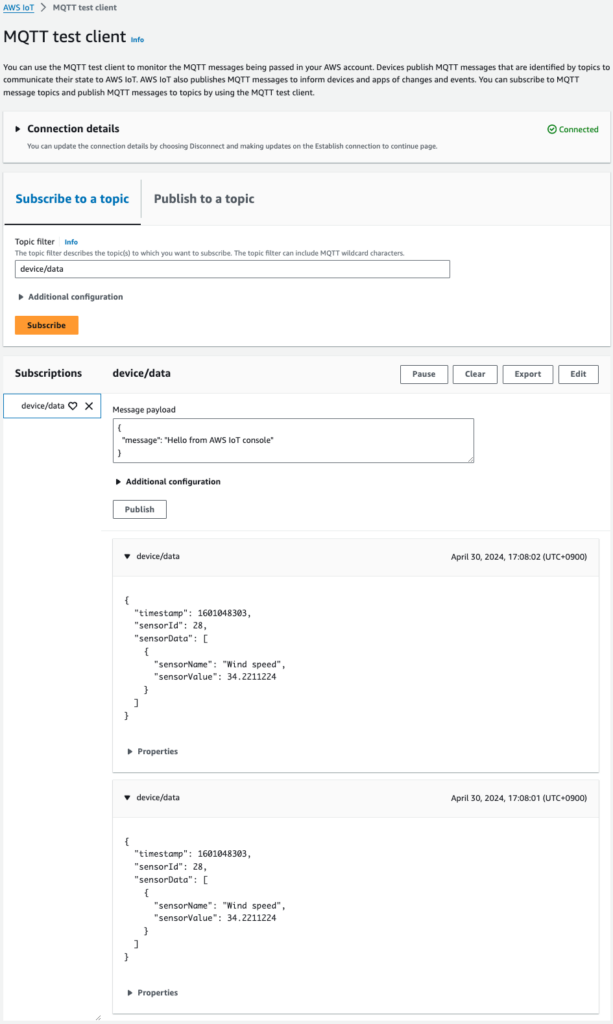
Indeed, the issued message was displayed.
It is also noteworthy that the message payload is in JSON format.
Issue a message in pubsub.py for comparison.
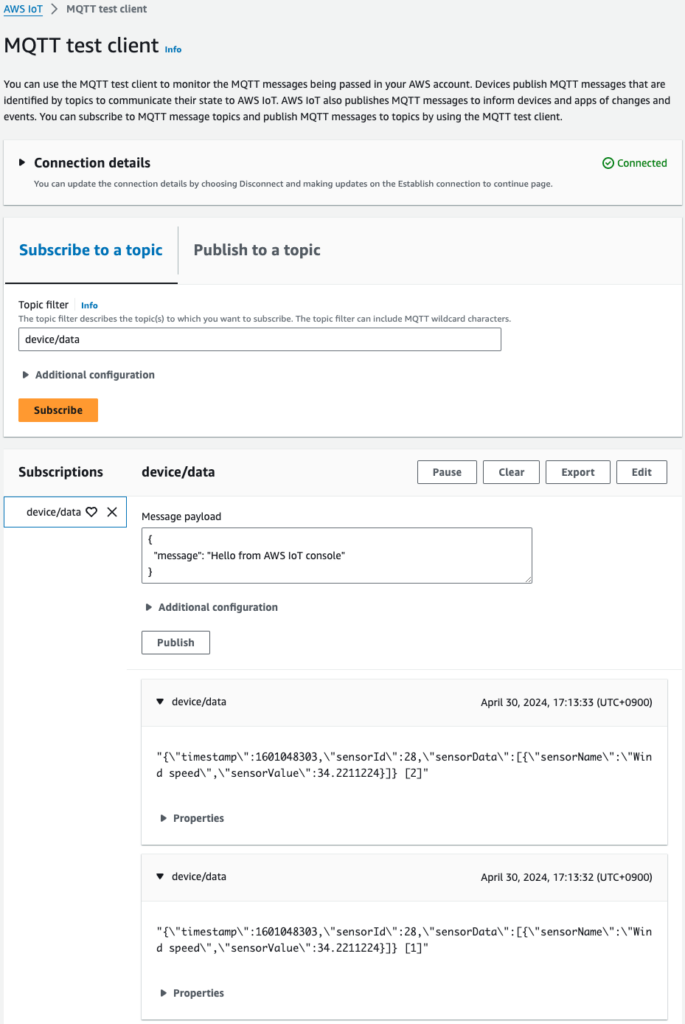
The message was sent as a string, not in JSON format.
In this way, the AWS IoT Device SDK can be used to issue messages.
Also, by properly implementing the message issuing logic, messages can be issued in JSON format.
Summary
Demonstration of AWS IoT Device SDK was experienced using Raspberry Pi 5.