Using CloudFormation to create RDS with Multi-AZ deployment
One of the features provided by RDS is multi-AZ deployment.
In an Amazon RDS Multi-AZ deployment, Amazon RDS automatically creates a primary database (DB) instance and synchronously replicates the data to an instance in a different AZ. When it detects a failure, Amazon RDS automatically fails over to a standby instance without manual intervention.
Amazon RDS Multi-AZ
In this page, we will use CloudFormation to create an RDS with multi-AZ deployment enabled.
構築する環境
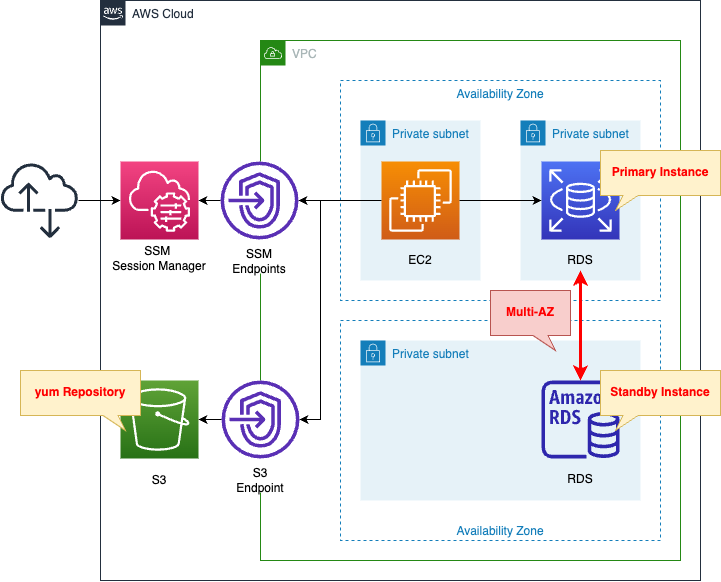
Create an RDS DB instance.
Create a MySQL type DB instance.
And enable multi-AZ deployment.
Create an EC2 instance as well.
Use it as a client to connect to the DB instance.
The instance is the latest version of Amazon Linux 2.
Create two types of VPC endpoints.
The first is for SSM.
SSM Session Manager to connect to an EC2 instance in a private subnet.
The second is for S3.
This is for accessing yum repositories built on S3 buckets.
CloudFormation template files
Build the above configuration with CloudFormation.
The CloudFormation templates are placed at the following URL
https://github.com/awstut-an-r/awstut-fa/tree/main/110
Explanation of points of template filess
RDS
Resources:
  DBInstance:
    Type: AWS::RDS::DBInstance
    DeletionPolicy: Delete
    Properties:
      AllocatedStorage: !Ref DBAllocatedStorage
      #AvailabilityZone:
      DBInstanceClass: !Ref DBInstanceClass
      DBInstanceIdentifier: dbinstance
      DBSubnetGroupName: !Ref DBSubnetGroup
      Engine: !Ref DBEngine
      EngineVersion: !Ref DBEngineVersion
      MasterUsername: !Ref DBMasterUsername
      MasterUserPassword: !Ref DBMasterUserPassword
      MultiAZ: true
      VPCSecurityGroups:
        - !Ref DBSecurityGroup
Code language: YAML (yaml)
To enable multi-AZ deployment of DB instances, configure the MultiAZ property.
Setting this property to “true” enables multi-AZ placement.
Note that there are some precautions to take when enabling multi-AZ deployment.
You can’t set the AvailabilityZone parameter if the MultiAZ parameter is set to true.
AWS::RDS::DBInstance
Follow the above and do not set the AvailabilityZone property.
(Reference) EC2 instance
Resources:
  Instance:
    Type: AWS::EC2::Instance
    Properties:
      IamInstanceProfile: !Ref InstanceProfile
      ImageId: !Ref ImageId
      InstanceType: !Ref InstanceType
      NetworkInterfaces:
        - DeviceIndex: 0
          SubnetId: !Ref InstanceSubnet
          GroupSet:
            - !Ref InstanceSecurityGroup
      UserData: !Base64 |
        #!/bin/bash -xe
        yum update -y
        yum install -y mariadb
Code language: YAML (yaml)
To access a DB instance from an EC2 instance, you need to prepare a client package.
This time, we will use user data to install the package.
For more information about user data, see the following page
For information on client packages for connecting to various RDS from Amazon Linux 2, please see the following pages.
Architecting
Use CloudFormation to build this environment and check the actual behavior.
Create CloudFormation stacks and check resources in stacks
Create CloudFormation stacks.
For information on how to create stacks and check each stack, please refer to the following page

After reviewing the resources in each stack, the following is the information on the main resources created in this time.
- EC2 Instance:i-06419d1a3dc94757c
- ID of RDS DB Instance:dbinstance
- DNS Name of RDS DB Instance:dbinstance.cl50iikpthxs.ap-northeast-1.rds.amazonaws.com
Check each resource from the AWS Management Console.
Check the RDS.
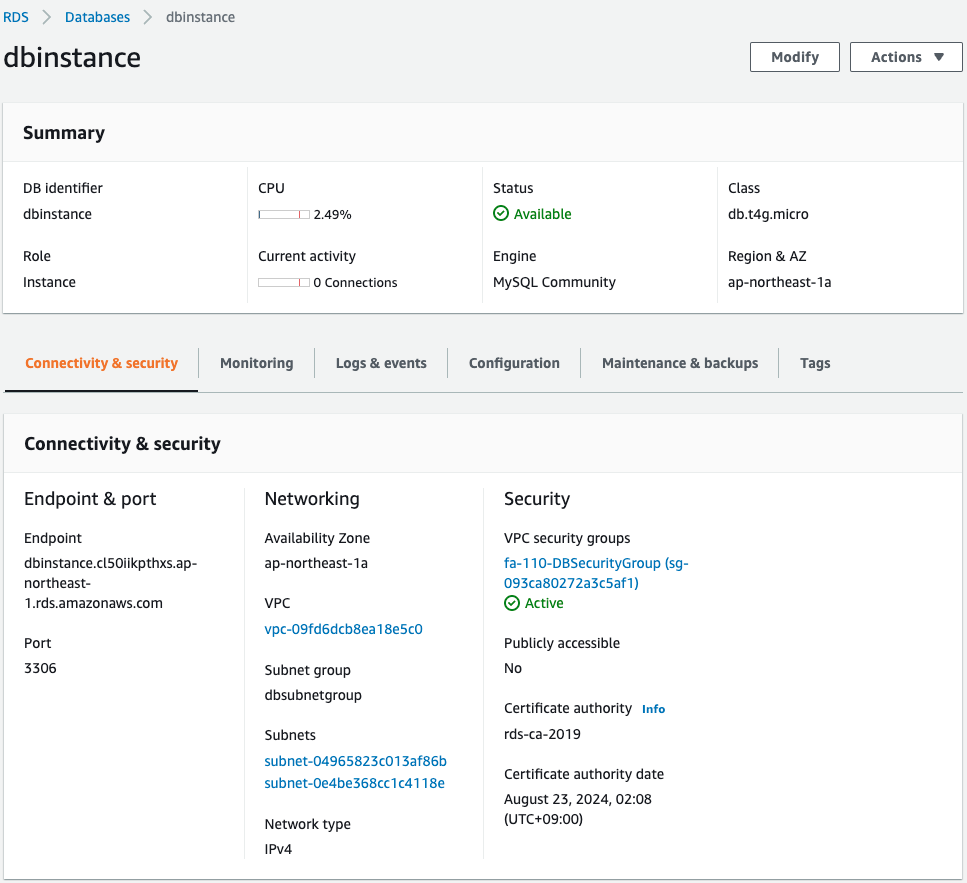
You can see that the DB instance is indeed created.
You can see that the primary instance is located in the subnet on the ap-northeast-1a side.
Check more detailed settings.
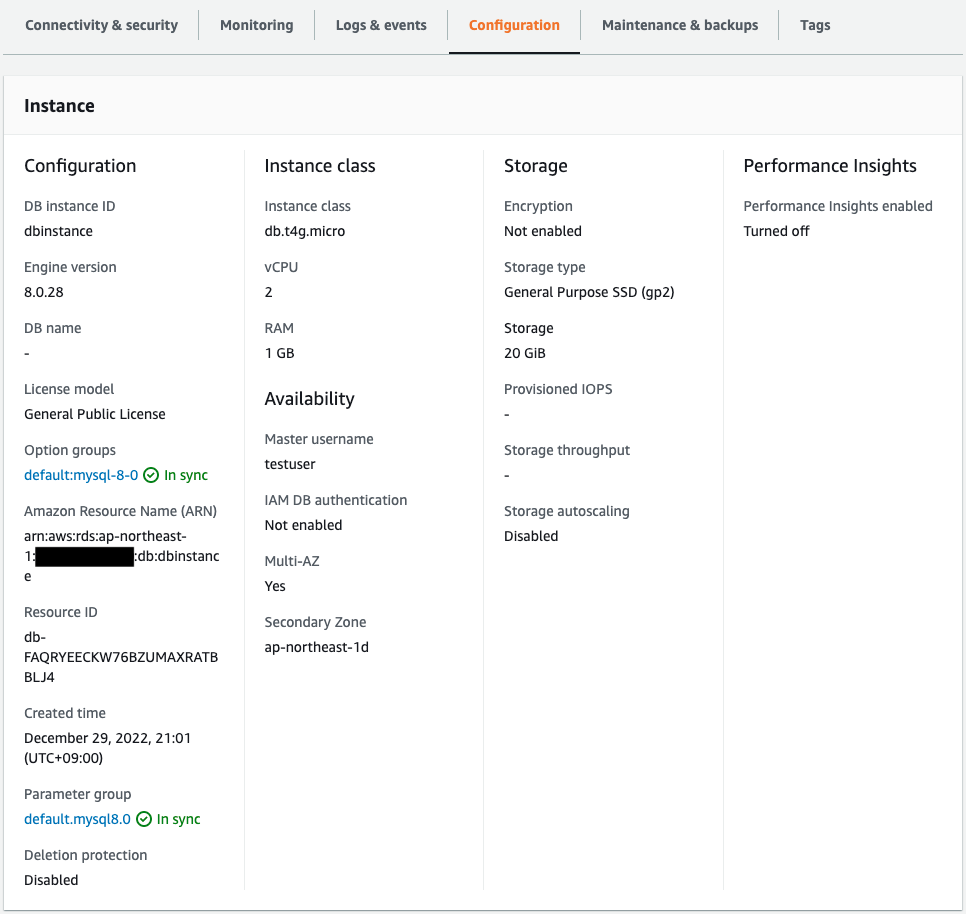
You can see that multi-AZ deployment is enabled.
You can also see that the standby instance is deployed on the ap-northeast-1d subnet.
Action Check
Accessing Primary Instance
Connect from the EC2 instance to the primary instance.
Use SSM Session Manager to access the EC2 instance.
% aws ssm start-session --target i-06419d1a3dc94757c
...
sh-4.2$
Code language: Bash (bash)
For more information about SSM Session Manager, please refer to the following page.
Check the execution status of the EC2 instance initialization process using user data.
sh-4.2$ sudo yum list installed | grep mariadb
mariadb.aarch64                       1:5.5.68-1.amzn2                 @amzn2-core
mariadb-libs.aarch64                  1:5.5.68-1.amzn2                 installed

sh-4.2$ mysql -V
mysql  Ver 15.1 Distrib 5.5.68-MariaDB, for Linux (aarch64) using readline 5.1
Code language: Bash (bash)
You will see that the MySQL client package has been successfully installed.
Use this client package to connect to the DB instance.
sh-4.2$ mysql -h dbinstance.cl50iikpthxs.ap-northeast-1.rds.amazonaws.com  -P 3306 -u testuser -p
Enter password:
Welcome to the MariaDB monitor.  Commands end with ; or \g.
Your MySQL connection id is 19
Server version: 8.0.28 Source distribution

Copyright (c) 2000, 2018, Oracle, MariaDB Corporation Ab and others.

Type 'help;' or '\h' for help. Type '\c' to clear the current input statement.

MySQL [(none)]>
Code language: Bash (bash)
I’ve got a connection.
Create a test database and tables to store test data.
MySQL [(none)]> CREATE database test;

MySQL [(none)]> use test;

MySQL [test]> CREATE TABLE planet (id INT UNSIGNED AUTO_INCREMENT, name VARCHAR(30), PRIMARY KEY(id));

MySQL [test]> INSERT INTO planet (name) VALUES ("Mercury");
MySQL [test]> INSERT INTO planet (name) VALUES ("Venus");
MySQL [test]> INSERT INTO planet (name) VALUES ("Earth");
MySQL [test]> INSERT INTO planet (name) VALUES ("Mars");
MySQL [test]> INSERT INTO planet (name) VALUES ("Jupiter");
MySQL [test]> INSERT INTO planet (name) VALUES ("Saturn");
MySQL [test]> INSERT INTO planet (name) VALUES ("Uranus");
MySQL [test]> INSERT INTO planet (name) VALUES ("Neptune");

MySQL [test]> select * from planet;
+----+---------+
| id | name    |
+----+---------+
|  1 | Mercury |
|  2 | Venus   |
|  3 | Earth   |
|  4 | Mars    |
|  5 | Jupiter |
|  6 | Saturn  |
|  7 | Uranus  |
|  8 | Neptune |
+----+---------+
Code language: Bash (bash)
It worked fine.
Elevating Standby Instance
Failover from the primary instance to the standby instance.
Specifically, change the instance class to “db.t4g.micro” or “db.t4g.small” and failover.
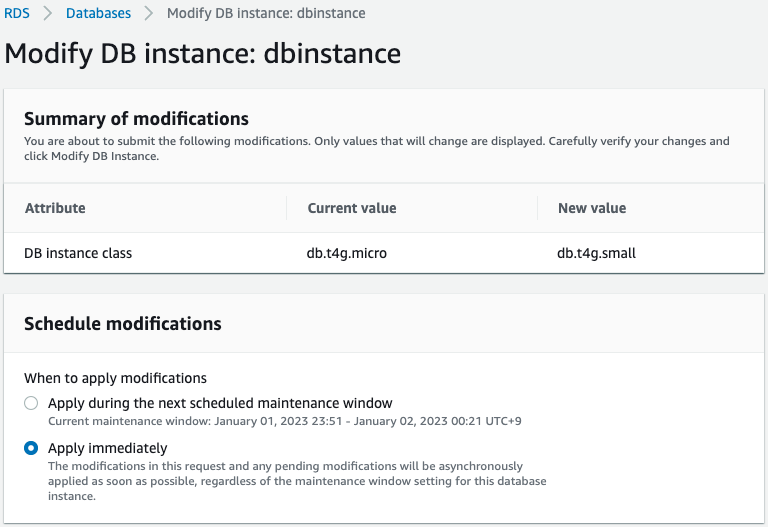
Check the log after the change of the instance class is completed.
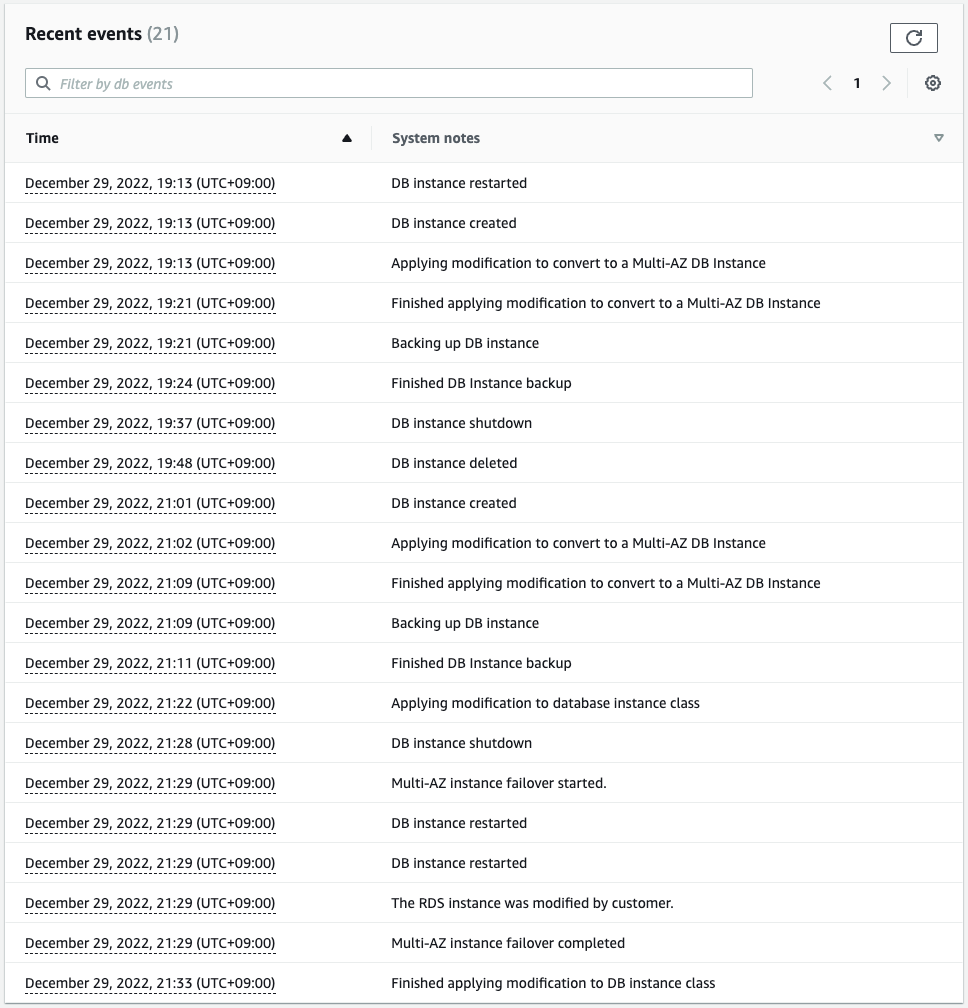
You can see that failover has occurred between instances in a multi-AZ deployment due to the change in instance class.
Check the instance details again.
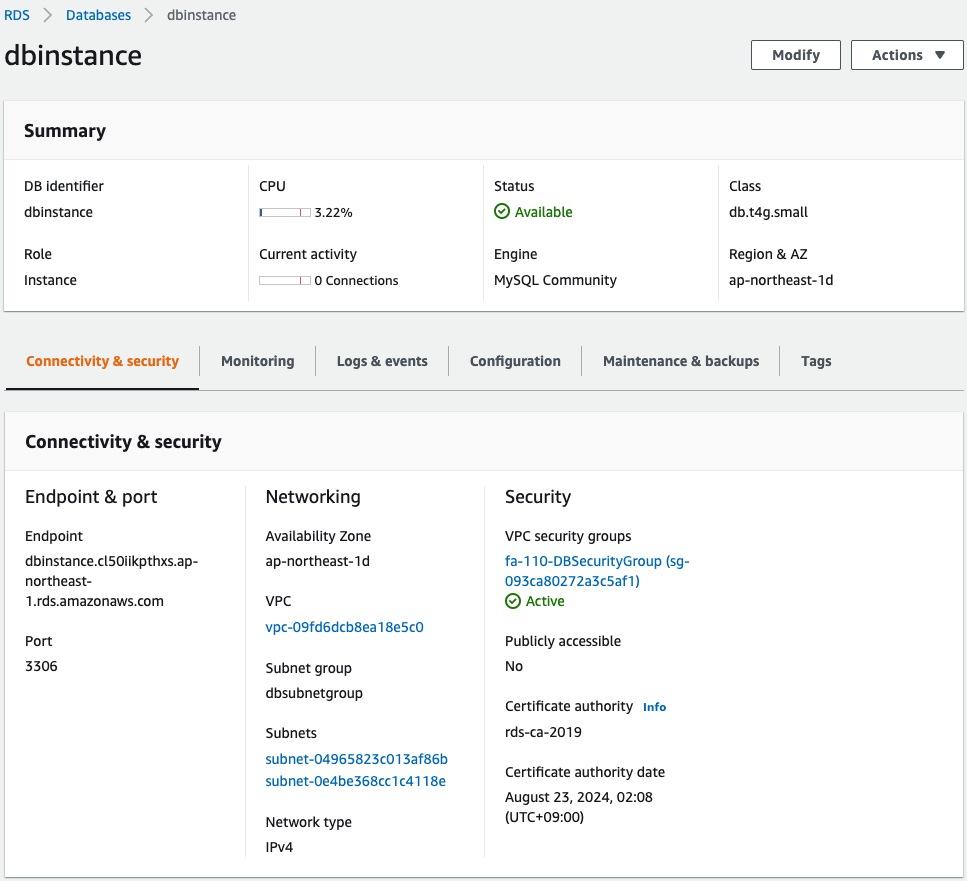
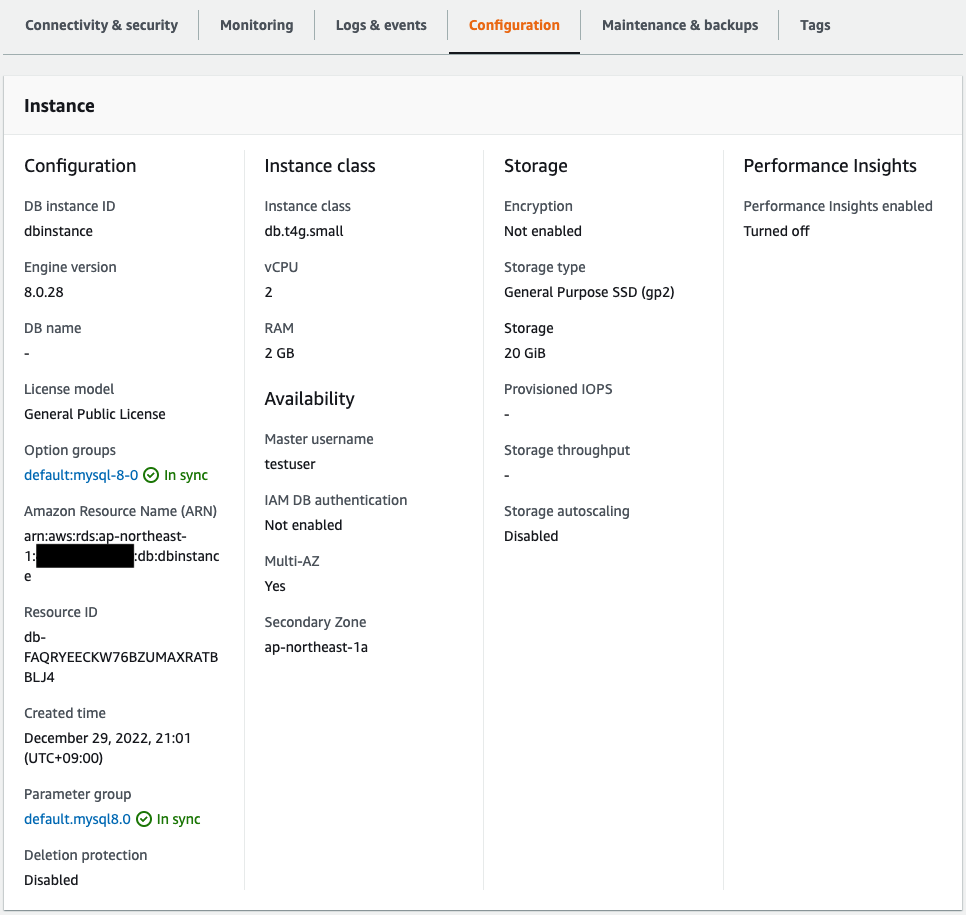
The DNS names, etc. of the endpoints have not been changed since before the failover.
The primary instance is deployed on the ap-northeast-1d subnet.
The multi-AZ deployment is still enabled, and the standby instance is deployed on the subnet of ap-northeast-1a.
In this way, if the primary instance fails, it will automatically failover to the standby instance.
Access New Primary Instance
Access the new primary instance again and check the stored data.
sh-4.2$ mysql -h dbinstance.cl50iikpthxs.ap-northeast-1.rds.amazonaws.com  -P 3306 -u testuser -p
Enter password:
...

MySQL [(none)]> show databases;
+--------------------+
| Database           |
+--------------------+
| information_schema |
| mysql              |
| performance_schema |
| sys                |
| test               |
+--------------------+


MySQL [(none)]> use test;

MySQL [test]> select * from planet;
+----+---------+
| id | name    |
+----+---------+
|  1 | Mercury |
|  2 | Venus   |
|  3 | Earth   |
|  4 | Mars    |
|  5 | Jupiter |
|  6 | Saturn  |
|  7 | Uranus  |
|  8 | Neptune |
+----+---------+
Code language: Bash (bash)
Indeed, the data stored before the failover was displayed.
This indicates that the data is replicated between the two instances in the multi-AZ deployment and will be carried over even after failover.
Summary
Using CloudFormation, we have created an RDS with multi-AZ deployment enabled.