Storage Gateway Tape Gateway Configuration
The content is related to reliability and business continuity, which is also part of the scope of AWS SOA.
There are four types of Storage Gateways, and we will introduce the Tape Gateway.
Tape gateways provide VTL (Virtual Tape Library) and tape archiving functions.
Tape Gateway enables you to replace using physical tapes on premises with virtual tapes in AWS without changing existing backup workflows…
Tape Gateway stores virtual tapes in Amazon S3, Amazon S3 Glacier Flexible Retrieval, and Amazon S3 Glacier Deep Archive, protected by 99.999999999% of durability.
Tape Gateway
You can also choose from the following five tape gateway platforms
- VMware ESXi
- Microsoft Hyper-V
- Linux KVM
- Amazon EC2
- Hardware Appliance
- Snowball Edge
This time, the EC2 instance will act as a tape gateway.
The goal of this project is to operate the VTL through the tape gateway.
Environment
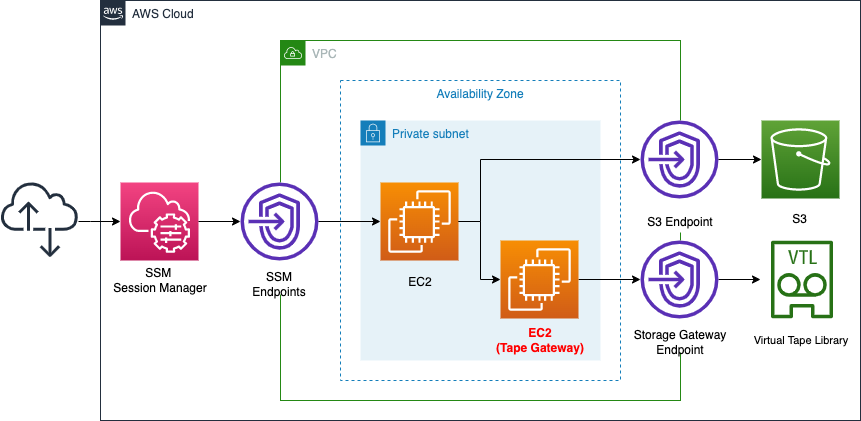
Create two EC2 instances in a private subnet.
The first will act as a tape gateway.
It will be created using the AMI for the tape gateway.
The second will act as a client to operate the VTL.
Through the aforementioned tape gateway, access to the VTL.
Create a Storage Gateway endpoint for the Tape Gateway instance.
This instance will be used to connect to the VTL outside the VPC.
Create SSM and S3 endpoints for the client instance.
The former is used to access this instance via SSM Session Manager.
The latter is used to install packages for tape device operation via yum repository built on the S3 bucket.
CloudFormation template files
The above configuration is built with CloudFormation.
The CloudFormation templates are located at the following URL
https://github.com/awstut-an-r/awstut-soa/tree/main/02/001
Explanation of key points of the template file
Tape Gateway Instance
Instance
Resources:
  StorageGatewayInstance:
    Type: AWS::EC2::Instance
    Properties:
      ImageId: !Ref ImageId
      InstanceType: !Ref InstanceType
      NetworkInterfaces:
        - DeviceIndex: 0
          SubnetId: !Ref PrivateSubnet
          GroupSet:
            - !Ref StorageGatewaySecurityGroup
Code language: YAML (yaml)
Specify the AMI with the ImageId property.
This time, specify the following value to obtain the latest AMI ID for the tape gateway stored in the SSM parameter store.
- /aws/service/storagegateway/ami/VTL/latest
Specify the instance class in the InstanceType property.
One of the requirements for an EC2 instance to act as a tape gateway is the instance class.
Storage Gateway is supported on instance types that meet certain minimum requirements. We recommend starting with the m4xlarge instance type, which meets the minimum requirements for your gateway to function properly.
Deploying a Volume or Tape Gateway on an Amazon EC2 Host
In this case, we will specify m5a.xlarge.
EBS
Resources:
  StorageGatewayInstanceEBS1:
    Type: AWS::EC2::Volume
    Properties:
      AvailabilityZone: !Ref AZ
      Size: !Ref EBSSize
      VolumeType: gp3

  EBSAttachment1:
    Type: AWS::EC2::VolumeAttachment
    Properties:
      Device: /dev/sdf
      InstanceId: !Ref StorageGatewayInstance
      VolumeId: !Ref StorageGatewayInstanceEBS1

  StorageGatewayInstanceEBS2:
    Type: AWS::EC2::Volume
    Properties:
      AvailabilityZone: !Ref AZ
      Size: !Ref EBSSize
      VolumeType: gp3

  EBSAttachment2:
    Type: AWS::EC2::VolumeAttachment
    Properties:
      Device: /dev/sdg
      InstanceId: !Ref StorageGatewayInstance
      VolumeId: !Ref StorageGatewayInstanceEBS2
Code language: YAML (yaml)
One of the requirements for an EC2 instance to act as a tape gateway is the specification of an additional disk.
The official website states that two disks must be provided as follows
Cache (Minimum): 150GiB
Upload Buffer (Minimum): 150GiB
Deploying a file gateway on an Amazon EC2 host
Create an EBS for each and attach it to the tape gateway instance.
However, this time, since this is an action verification, we specify the size of the EBS to be 8GB.
Although it does not meet the minimum requirement, it will act as a tape gateway.
Security Group
Resources:
  StorageGatewaySecurityGroup:
    Type: AWS::EC2::SecurityGroup
    Properties:
      GroupName: !Sub "${Prefix}-StorageGatewaySecurityGroup"
      GroupDescription: Allow Storage Gateway Traffic.
      VpcId: !Ref VPC
      SecurityGroupIngress:
        - IpProtocol: tcp
          FromPort: !Ref HTTPPort
          ToPort: !Ref HTTPPort
          SourceSecurityGroupId: !Ref InstanceSecurityGroup
        - IpProtocol: tcp
          FromPort: !Ref iSCSIPort
          ToPort: !Ref iSCSIPort
          SourceSecurityGroupId: !Ref InstanceSecurityGroup
Code language: YAML (yaml)
According to AWS officials, there are two inbound communications that should be allowed in the security group when an EC2 instance is acting as a tape gateway.
- iSCSI (3260/tcp): Used by the instance to operate the VTL.
- HTTP (80/tcp): used to activate the EC2 instance as a tape gateway.
Specify the security group for the client instance, described below, as the source of the two communications.
Client Instance
Instance
Resources:
  Instance:
    Type: AWS::EC2::Instance
    Properties:
      IamInstanceProfile: !Ref InstanceProfile
      ImageId: !Ref ImageId
      InstanceType: !Ref InstanceType
      NetworkInterfaces:
        - DeviceIndex: 0
          SubnetId: !Ref PrivateSubnet
          GroupSet:
            - !Ref InstanceSecurityGroup
      UserData: !Base64 |
        #!/bin/bash -xe
        yum update -y
        yum install -y iscsi-initiator-utils
        yum install -y mt-st
        yum install -y mtxCode language: PHP (php)
The key point is the UserData property.
This function, called UserData, allows you to specify the process to be executed when an instance is created.
For more information on user data, please refer to the following page

This time, we will define a command to be executed as an initialization process in this property.
The content to be executed is the process of installing the packages required to operate the tape device.
Install the following packages
- iscsi-initiator-utils
- mt-st
- mtx
Install these packages from the yum repository built on the S3 bucket.
For more information, please refer to the following page

Security Group
Resources:
  InstanceSecurityGroup:
    Type: AWS::EC2::SecurityGroup
    Properties:
      GroupName: !Sub "${Prefix}-InstanceSecurityGroup"
      GroupDescription: Deny All.
      VpcId: !Ref VPC
Code language: YAML (yaml)
Nothing in particular is set.
In this requirement, there will be no inbound communication to this instance.
Only outbound communication from this instance to the tape gateway.
VPC Endpoints for Storage Gateway
VPC Endpoint
Resources:
  StorageGatewayEndpoint:
    Type: AWS::EC2::VPCEndpoint
    Properties:
      PrivateDnsEnabled: true
      SecurityGroupIds:
        - !Ref StorageGatewayEndpointSecurityGroup
      ServiceName: !Sub "com.amazonaws.${AWS::Region}.storagegateway"
      SubnetIds:
        - !Ref PrivateSubnet
      VpcEndpointType: Interface
      VpcId: !Ref VPC
Code language: YAML (yaml)
The VpcEndpointType property specifies “Interface”.
There are two types of VPC endpoint types: gateway type and interface type.
The former is used to communicate with S3 and DynamoDB.
The latter is used to communicate with other AWS services.
Therefore, since we will be communicating with Storage Gateway, it will be “Interface” which means interface type.
Security Group
Resources:
  StorageGatewayEndpointSecurityGroup:
    Type: AWS::EC2::SecurityGroup
    Properties:
      GroupName: !Sub ${Prefix}-StorageGatewayEndpointSecurityGroup
      GroupDescription: Allow Storage Gateway Traffic.
      VpcId: !Ref VPC
      SecurityGroupIngress:
        - IpProtocol: tcp
          FromPort: !Ref HTTPSPort
          ToPort: !Ref HTTPSPort
          SourceSecurityGroupId: !Ref StorageGatewaySecurityGroup
        - IpProtocol: tcp
          FromPort: !Ref StorageGatewayPort1
          ToPort: !Ref StorageGatewayPort1
          SourceSecurityGroupId: !Ref StorageGatewaySecurityGroup
        - IpProtocol: tcp
          FromPort: !Ref StorageGatewayPort2
          ToPort: !Ref StorageGatewayPort2
          SourceSecurityGroupId: !Ref StorageGatewaySecurityGroup
        - IpProtocol: tcp
          FromPort: !Ref StorageGatewayPort3
          ToPort: !Ref StorageGatewayPort3
          SourceSecurityGroupId: !Ref StorageGatewaySecurityGroup
        - IpProtocol: tcp
          FromPort: !Ref StorageGatewayPort4
          ToPort: !Ref StorageGatewayPort4
          SourceSecurityGroupId: !Ref StorageGatewaySecurityGroup
        - IpProtocol: tcp
          FromPort: !Ref StorageGatewayPort5
          ToPort: !Ref StorageGatewayPort5
          SourceSecurityGroupId: !Ref StorageGatewaySecurityGroup
Code language: YAML (yaml)
Allow inbound communication for a total of 6 ports according to the following AWS official site.
Verify that all of the following TCP ports are allowed in your security group:
TCP 443
Activating a gateway in a virtual private cloud
TCP 1026
TCP 1027
TCP 1028
TCP 1031
TCP 2222
Specify the security group for the gateway instance described earlier as the source of the communication to be allowed.
Architecting
We will use CloudFormation to build this environment and check its actual behavior.
Create CloudFormation stack and check resources in stacks
Create CloudFormation stacks.
For information on how to create stacks and check each stack, please refer to the following page

After checking the resources of each stack, the following is the information on the main resources created in this case.
- ID of client instance: i-0205370d5c210e708
- ID of the tape gateway instance: i-0f2d46c571fdd8b22
- Private DNS name of the tape gateway instance: ip-10-0-2-143.ap-northeast-1.compute.internal
- VPC endpoint for Storage Gateway: vpce-02536f2b50d39f32a-inqvg1ig.storagegateway.ap-northeast-1.vpce.amazonaws.com
You can also check the resource from the AWS Management Console.
Tape gateway instance.
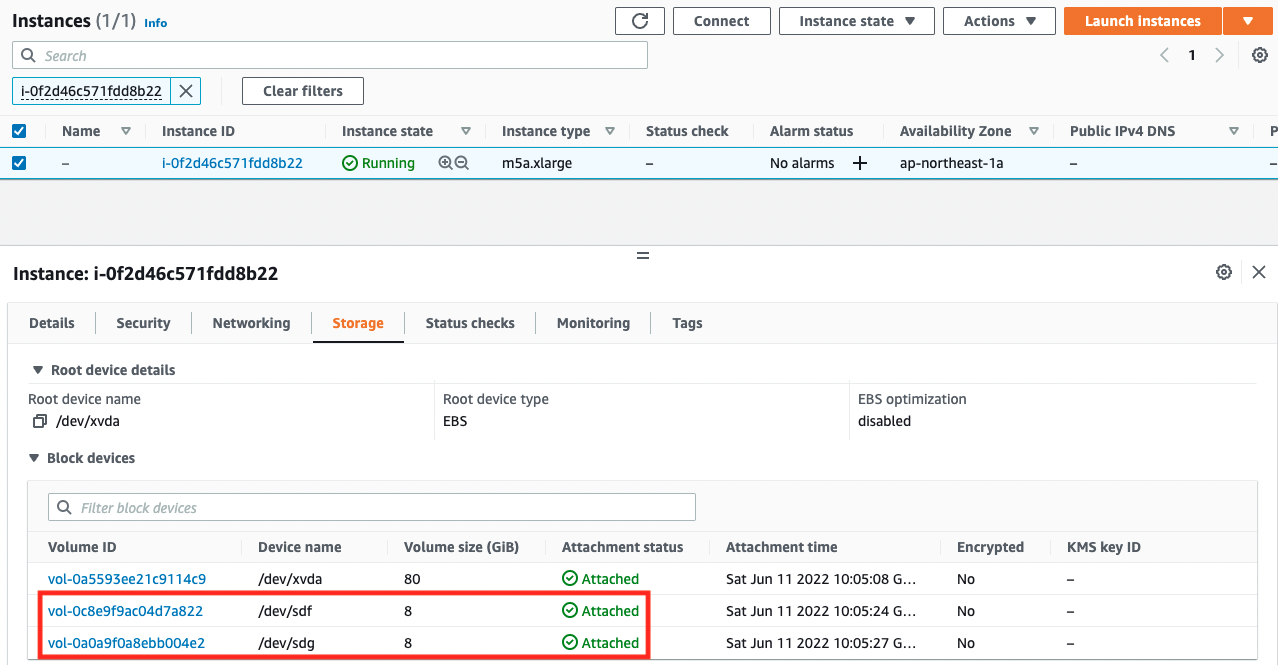
You can see that there are indeed two EBSs attached.
Obtaining Activation Key from Tape Gateway
CloudFormation has completed the creation of the EC2 instance that will serve as the tape gateway itself.
However, the instance is not currently acting as a tape gateway.
According to the official AWS website, you need to obtain an activation key in order for the instance to act as a gateway.
To connect to your gateway, first get the IP address or activation key of your gateway VM. You use the IP address or activation key to activate your gateway…
For gateways deployed and activated on an Amazon EC2 instance, you can get the IP address or activation key from the Amazon EC2 console.
Connecting to Your Gateway
The activation key can be obtained by making an HTTP request to a specific URL of the target instance.
To get an activation key for your gateway, you make a web request to the gateway VM and it returns a redirect that contains the activation key.
Getting an Activation Key for Your Gateway
Now that the points for obtaining an activation key have been organized, we will actually obtain one.
Follow the steps below to obtain an activation key. 1.
- Access the client instance.
- Make an HTTP request from the client instance to the tape gateway instance to obtain the activation key.
Access to the client instance is through SSM Session Manager.
For details on SSM Session Manager, please refer to the following page.
% aws ssm start-session --target i-0205370d5c210e708

Starting session with SessionId: root-0b4a067cd35e64034
sh-4.2$
Code language: Bash (bash)
The client instance is now accessible.
Referring to the official AWS page, send an HTTP request from the client instance to the tape gateway instance.
sh-4.2$ curl 'http://ip-10-0-2-143.ap-northeast-1.compute.internal/?gatewayType=VTL&activationRegion=ap-northeast-1&vpcEndpoint=vpce-02536f2b50d39f32a-inqvg1ig.storagegateway.ap-northeast-1.vpce.amazonaws.com&no_redirect'
Q229E-KD8FM-FFHRR-6IU8I-K0VPU
Code language: Bash (bash)
Response.
‘Q229E-KD8FM-FFHRR-6IU8I-K0VPU’ is the activation key.
Activating Tape Gateway
Now that you have obtained the activation key in the previous section, activate the instance for the tape gateway.
Activation is performed on a local machine that has been granted permissions related to the Storage Gateway.
$ aws storagegateway activate-gateway \
--activation-key Q229E-KD8FM-FFHRR-6IU8I-K0VPU \
--gateway-name soa-02-001 \
--gateway-timezone "GMT+9:00" \
--gateway-region ap-northeast-1 \
--gateway-type VTL \
--tape-drive-type IBM-ULT3580-TD5 \
--medium-changer-type AWS-Gateway-VTL
Code language: Bash (bash)
We will cover the important parameters.
For activation-key, specify the activation key obtained earlier.
For gateway-type, specify “VTL,” meaning tape gateway.
For tape-drive-type and medium-changer-type, specify the default values “IBM-ULT3580-TD5” and “AWS-Gateway-VTL”.
Check the creation status of the tape gateway in the AWS Management Console.

The gateway instance has been activated and the tape gateway has been created.
Cache/Upload buffer settings
Configure disk settings for the activated tape gateway instance.
There are two disks that need to be configured to act as a tape gateway: one for the cache and one for the upload buffer.
The target storage itself is an EBS created with CloudFormation and already attached to the instance.
Configure the cache and buffer settings from the AWS Management Console.
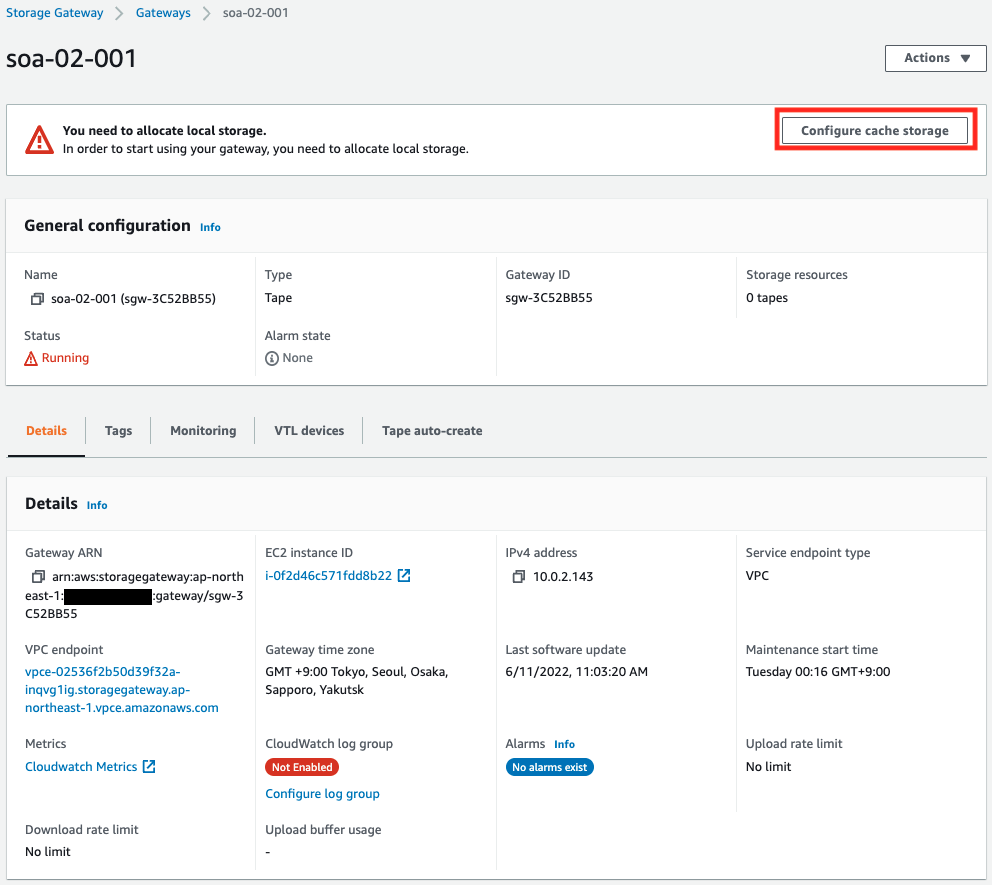
Click “Configure cache storage”.
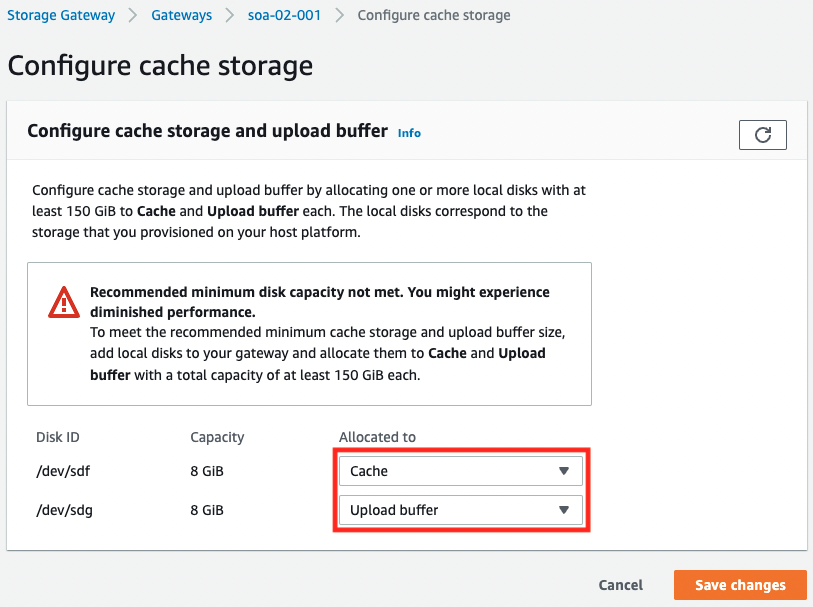
Specify “Cache” and “Upload buffer” for the two disks respectively.
After specifying, click “Save changes”.
Create Tape
Finally, define a virtual tape to store the data.
In this case, we will create a 100 GiB (107374182400 bytes) tape, which is the minimum configuration, for the purpose of action verification.
Create a tape from the AWS Management Console.
Access the Tapes page.

Click “Create tapes”.
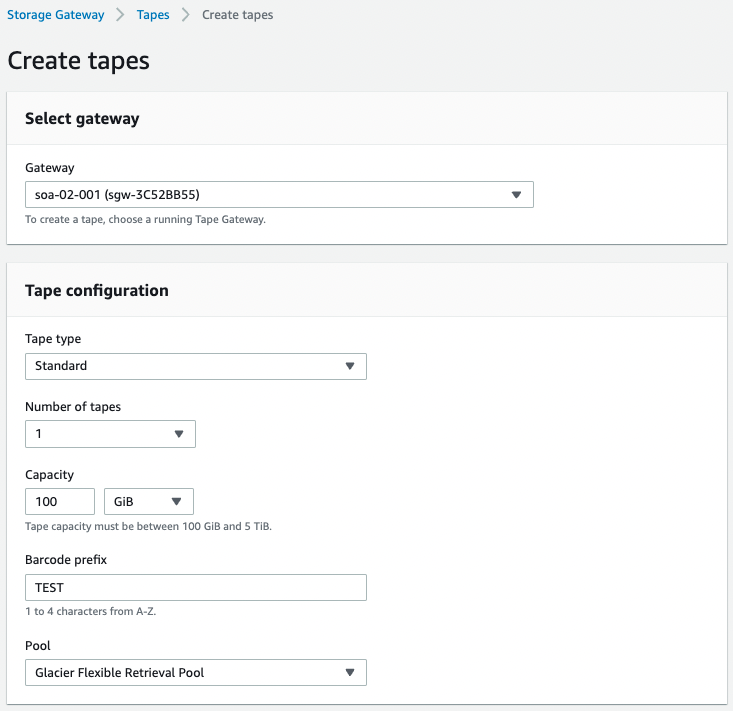
Select the tape gateway you just created for “Gateway” and set it so that one tape will be created.
For “Pool,” select “Clacier Flexible Retrieval Pool” so that the tapes will be stored in Glacier as usual.

Sure enough, one tape has been created.
Operating Virtual Tape
Now that we are ready, we can access the client instance again.
Check the installation status of the packages required to operate the virtual tape.
sh-4.2$ yum list installed | grep mtx
mtx.aarch64                           1.3.12-14.amzn2.0.2            @amzn2-core

sh-4.2$ yum list installed | grep mt-st
mt-st.aarch64                         1.1-14.amzn2.0.2               @amzn2-core

sh-4.2$ yum list installed | grep iscsi
iscsi-initiator-utils.aarch64         6.2.0.874-7.amzn2              @amzn2-core
iscsi-initiator-utils-iscsiuio.aarch64
Code language: Bash (bash)
It has been successfully installed.
Continue to access the VTL through the tape gateway.
The following steps are to be performed according to the instructions presented in the official AWS
First, start iscsid.
sh-4.2$ sudo systemctl start iscsid

sh-4.2$ sudo systemctl status iscsid
● iscsid.service - Open-iSCSI
   Loaded: loaded (/usr/lib/systemd/system/iscsid.service; disabled; vendor preset: disabled)
   Active: active (running) since Sat 2022-06-11 02:14:22 UTC; 3s ago
     Docs: man:iscsid(8)
           man:iscsiadm(8)
  Process: 972 ExecStart=/usr/sbin/iscsid (code=exited, status=0/SUCCESS)
 Main PID: 974 (iscsid)
   CGroup: /system.slice/iscsid.service
           ├─973 /usr/sbin/iscsid
           └─974 /usr/sbin/iscsid

Jun 11 02:14:22 ip-10-0-2-11.ap-northeast-1.compute.internal systemd[1]: Starting Open-iSCSI...
Jun 11 02:14:22 ip-10-0-2-11.ap-northeast-1.compute.internal iscsid[972]: iSCSI logger with pid=973 started!
Jun 11 02:14:22 ip-10-0-2-11.ap-northeast-1.compute.internal systemd[1]: Failed to parse PID from file /var/run/iscsid.pid: Invalid argument
Jun 11 02:14:22 ip-10-0-2-11.ap-northeast-1.compute.internal systemd[1]: Started Open-iSCSI.
Jun 11 02:14:23 ip-10-0-2-11.ap-northeast-1.compute.internal iscsid[973]: iSCSI daemon with pid=974 started!
Code language: Bash (bash)
It says “active (running)”, so it started successfully.
Next, search for the VTL device target.
sh-4.2$ sudo /sbin/iscsiadm \
--mode discovery \
--type sendtargets \
--portal ip-10-0-2-143.ap-northeast-1.compute.internal:3260
10.0.2.143:3260,1 iqn.1997-05.com.amazon:sgw-3c52bb55-tapedrive-09
10.0.2.143:3260,1 iqn.1997-05.com.amazon:sgw-3c52bb55-mediachanger
10.0.2.143:3260,1 iqn.1997-05.com.amazon:sgw-3c52bb55-tapedrive-08
10.0.2.143:3260,1 iqn.1997-05.com.amazon:sgw-3c52bb55-tapedrive-05
10.0.2.143:3260,1 iqn.1997-05.com.amazon:sgw-3c52bb55-tapedrive-04
10.0.2.143:3260,1 iqn.1997-05.com.amazon:sgw-3c52bb55-tapedrive-07
10.0.2.143:3260,1 iqn.1997-05.com.amazon:sgw-3c52bb55-tapedrive-06
10.0.2.143:3260,1 iqn.1997-05.com.amazon:sgw-3c52bb55-tapedrive-01
10.0.2.143:3260,1 iqn.1997-05.com.amazon:sgw-3c52bb55-tapedrive-03
10.0.2.143:3260,1 iqn.1997-05.com.amazon:sgw-3c52bb55-tapedrive-02
10.0.2.143:3260,1 iqn.1997-05.com.amazon:sgw-3c52bb55-tapedrive-10
Media changer and tape drive detected successfully.
Continue to connect to the media changer and one of the tape drives (tapedrive-01).
sh-4.2$ sudo /sbin/iscsiadm \
--mode node \
--targetname iqn.1997-05.com.amazon:sgw-3c52bb55-mediachanger \
--portal 10.0.2.143:3260,1 \
--login
Logging in to [iface: default, target: iqn.1997-05.com.amazon:sgw-3c52bb55-mediachanger, portal: 10.0.2.143,3260] (multiple)
Login to [iface: default, target: iqn.1997-05.com.amazon:sgw-3c52bb55-mediachanger, portal: 10.0.2.143,3260] successful.

sh-4.2$ sudo /sbin/iscsiadm \
--mode node \
--targetname iqn.1997-05.com.amazon:sgw-3c52bb55-tapedrive-01 \
--portal 10.0.2.143:3260,1 \
--login
Logging in to [iface: default, target: iqn.1997-05.com.amazon:sgw-3c52bb55-tapedrive-01, portal: 10.0.2.143,3260] (multiple)
Login to [iface: default, target: iqn.1997-05.com.amazon:sgw-3c52bb55-tapedrive-01, portal: 10.0.2.143,3260] successful.Code language: JavaScript (javascript)
Check the attachment status of the two devices.
sh-4.2$ ls -l /dev/tape/by-path
total 0
lrwxrwxrwx 1 root root  9 Jun 11 02:18 ip-10.0.2.143:3260-iscsi-iqn.1997-05.com.amazon:sgw-3c52bb55-mediachanger-lun-0-changer -> ../../sg0
lrwxrwxrwx 1 root root  9 Jun 11 02:19 ip-10.0.2.143:3260-iscsi-iqn.1997-05.com.amazon:sgw-3c52bb55-tapedrive-01-lun-0 -> ../../st0
lrwxrwxrwx 1 root root 10 Jun 11 02:19 ip-10.0.2.143:3260-iscsi-iqn.1997-05.com.amazon:sgw-3c52bb55-tapedrive-01-lun-0-nst -> ../../nst0
Code language: Bash (bash)
You can see that it is successfully attached.
You can see that it is symbolic to /dev/sg0, /dev/st0, etc.
You can check the device ID with the following command.
sh-4.2$ ls -l /dev/tape/by-id
total 0
lrwxrwxrwx 1 root root  9 Jun 11 02:19 scsi-2334335324242353530310000 -> ../../st0
lrwxrwxrwx 1 root root 10 Jun 11 02:19 scsi-2334335324242353530310000-nst -> ../../nst0
lrwxrwxrwx 1 root root  9 Jun 11 02:18 scsi-2414d5a4e5f5347572d334335 -> ../../sg0
Code language: Bash (bash)
From now on, we will operate the media changer.
The media changer is operated with the mtx command.
First, check the status of the media changer itself.
sh-4.2$ sudo mtx -f /dev/tape/by-id/scsi-2414d5a4e5f5347572d334335 inquiry
Product Type: Medium Changer
Vendor ID: 'AWS     '
Product ID: 'Gateway-VTL     '
Revision: '0100'
Attached Changer API: No
Code language: Bash (bash)
We can see that it is indeed accessible as if it were a physical device.
Next, check the status of the tape drive.
sh-4.2$ sudo mtx -f /dev/tape/by-id/scsi-2414d5a4e5f5347572d334335 status | grep 'Data Transfer Element'
Data Transfer Element 0:Empty
Data Transfer Element 1:Empty
Data Transfer Element 2:Empty
Data Transfer Element 3:Empty
Data Transfer Element 4:Empty
Data Transfer Element 5:Empty
Data Transfer Element 6:Empty
Data Transfer Element 7:Empty
Data Transfer Element 8:Empty
Data Transfer Element 9:Empty
Code language: Bash (bash)
You can see that all drives are empty.
Check for unused tapes.
sh-4.2$ sudo mtx -f /dev/tape/by-id/scsi-2414d5a4e5f5347572d334335 status | grep -v Empty
  Storage Changer /dev/tape/by-id/scsi-2414d5a4e5f5347572d334335:10 Drives, 3200 Slots ( 1600 Import/Export )
      Storage Element 1601 IMPORT/EXPORT:Full :VolumeTag=TESTD67E76
Code language: Bash (bash)
You can see that the 1601st tape is unused.
The VolumeTag is “TEST67E76″, which also indicates that this is a tape that was created.
Insert the unused tape into the 0th (tapedrive-01) drive.
sh-4.2$ sudo mtx -f /dev/tape/by-id/scsi-2414d5a4e5f5347572d334335 load 1601 0
Loading media from Storage Element 1601 into drive 0...done
Code language: Bash (bash)
Check the status of the entire drive again.
sh-4.2$ sudo mtx -f /dev/tape/by-id/scsi-2414d5a4e5f5347572d334335 status | grep -v Empty
  Storage Changer /dev/tape/by-id/scsi-2414d5a4e5f5347572d334335:10 Drives, 3200 Slots ( 1600 Import/Export )
Data Transfer Element 0:Full (Storage Element 1 Loaded):VolumeTag = TESTD67E76
Code language: Bash (bash)
We can see that the 0th drive is indeed “Full” and that the tape we just inserted has been inserted.
Now that the tape has been inserted, the next step is to manipulate the tape.
Access to the tape is done with the mt command.
First, check the current status of the tape. To access the tape, specify the device name of the path that you have just confirmed.
This time, we will access the 0th tape drive (tapedrive-01), so “/dev/st0”.
sh-4.2$ sudo mt -f /dev/st0 status
SCSI 2 tape drive:
File number=0, block number=0, partition=0.
Tape block size 65536 bytes. Density code 0x0 (default).
Soft error count since last status=0
General status bits on (41010000):
 BOT ONLINE IM_REP_ENCode language: JavaScript (javascript)
Since it is not used, of course nothing is written to it.
Prepare a file for writing.
sh-4.2$ echo 'hogehoge' > /home/ssm-user/test.txt
sh-4.2$ cat /home/ssm-user/test.txt
hogehoge
Code language: Bash (bash)
Writing/reading data to/from the tape is done with the tar command.
Write the prepared file to the tape.
sh-4.2$ sudo tar -cv --record-size=65536 -f /dev/st0 /home/ssm-user/test.txt
tar: Removing leading `/' from member names
/home/ssm-user/test.txt
Code language: Bash (bash)
The key to writing is the record-size option. If this is not specified, an error will occur.
The value to be specified is “Tape block size 65536 bytes.
Next, check the files written to the tape.
sh-4.2$ sudo tar -tv --record-size=65536 -f /dev/st0
-rw-r--r-- ssm-user/ssm-user 9 2022-06-11 02:25 home/ssm-user/test.txt
Code language: Bash (bash)
You can see the information of the written file.
Finally, read the data from the tape.
sh-4.2$ sudo tar xvf /dev/nst0
home/ssm-user/test.txt

sh-4.2$ cat home/ssm-user/test.txt
hogehoge
Code language: Bash (bash)
The data was successfully retrieved.
The virtual tape could be accessed in the same way as operations on physical tapes.
Summary
We have created a tape gateway, which is a type of Storage Gateway.
We have confirmed that you can access the VTL from an EC2 instance through the gateway, and read from and write to the virtual tape in the same way as you do with a physical tape.