Configuration of data linkage between Fargate containers using SQS
This is related to high elasticity, which is one of the questions in the AWS SAA, and using SQS allows Fargate containers to work together while keeping the coupling between them sparse.
In this article, we will use SQS to link containers running on two Fargate-type services. We will also see how to scale out the number of Fargate tasks according to the length of the SQS queue.
Environment
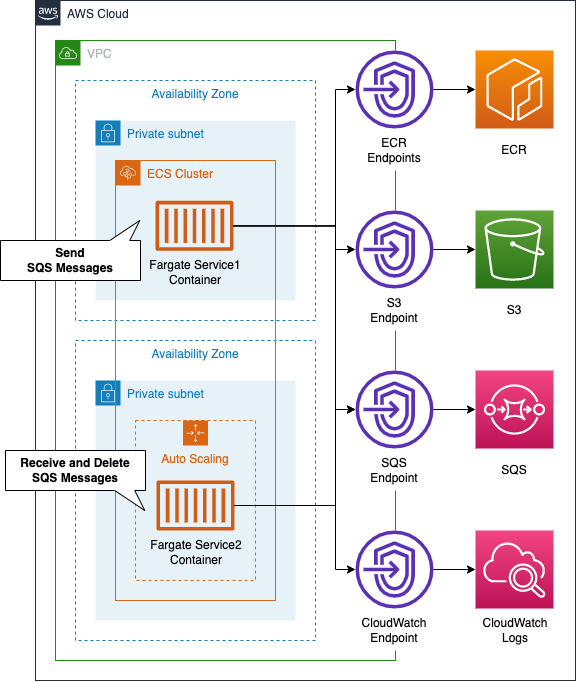
On the ECS cluster, we will build two Fargate-type ECS services and tasks: the container running on the first service will send messages to SQS, and the container running on the second service will receive messages from SQS, process them, and then delete them. The second service will receive messages from SQS, process them, and then delete them. Service 2 will also be configured for scaling, so that it will increase or decrease the number of tasks depending on the length of the SQS queue.
The following is a summary of the function of each container we will build.
- Container running in service 1 (①): sends the current UNIX time to SQS at random (every 10-60 seconds).
- Container running in Service 2 (②): Poll SQS periodically to get data, then take 60 seconds to determine whether the UNIX time is even or odd, and write the result to CloudWatch Logs.
The point is that the processing pace of (2) (60 seconds) is slower than the data transmission pace of (1) (10~60 seconds). Therefore, unprocessed messages will gradually accumulate in the SQS queue. We can scale the number of tasks in (2) by targeting the length of the SQS queue. We will use 3 as the threshold. We will assume that one container will be running by default, and we will scale out the number of tasks in (2) to a maximum of three. The above logic will be implemented in Python.
CloudFormation Template Files
We will build the above configuration using CloudFormation. The CloudFormation templates is located at the following URL.
https://github.com/awstut-an-r/awstut-saa/tree/main/01/002
Explanation of points in template files
For more information on the basics of Fargate, check out the following pages.

For information on how to create a Fargate on a private subnet, please see the following page
For information on how to distribute Fargate container logs to CloudWatch Logs, please see the following page

For more information on the basics of scaling ECS tasks, please refer to the following page.
For more information about SQS basics, please refer to the following page.
This page will only cover points that are not included or different from the above pages.
Passing environment variables to container with Environment property
Let’s create a task definition.
Resources:
  TaskDefinition1:
    Type: AWS::ECS::TaskDefinition
    Properties:
      RequiresCompatibilities:
        - FARGATE
      Cpu: !Ref ServiceCpu
      Memory: !Ref ServiceMemory
      NetworkMode: awsvpc
      ExecutionRoleArn: !Ref FargateTaskExecutionRole
      TaskRoleArn: !Ref TaskRole1
      ContainerDefinitions:
        - Name: !Sub "${ServiceName}-container"
          Image: !Sub "${AWS::AccountId}.dkr.ecr.${AWS::Region}.amazonaws.com/${Repository}:latest"
          LogConfiguration:
            LogDriver: awslogs
            Options:
              awslogs-group: !Ref LogGroup
              awslogs-region: !Ref AWS::Region
              awslogs-stream-prefix: !Ref ServiceName
          Environment:
            - Name: QueueName
              Value: !Ref QueueName
            - Name: RegionName
              Value: !Ref AWS::Region
            - Name: SQSEndpointUrl
              Value: !Ref SQSEndpointUrl
Code language: YAML (yaml)
The key point is to set up environment variables. in the Environment property, you can set up environment variables to be passed to the container running on the task. In this case, we will set the name of the SQS queue, the region name, and the URL of the SQS endpoint as variables.
The container image to run on Task 1 was created with the following Dockerfile.
ROM python:3

RUN pip install boto3

COPY main.py ./

CMD ["python3", "main.py"]
Code language: Dockerfile (dockerfile)
Using the official Python 3 image as a base, we will install boto3, copy the script to be executed, and run the script. The following is the content of main.py.
import boto3
import datetime
import logging
import os
import random
import time

logging.basicConfig(level=logging.INFO)

queue_name = os.environ['QueueName']
region_name = os.environ['RegionName']
sqs_endpoint_url = os.environ['SQSEndpointUrl']

sqs = boto3.resource('sqs',
    region_name=region_name,
    endpoint_url=sqs_endpoint_url)
queue = sqs.get_queue_by_name(QueueName=queue_name)

def main():
    while True:
        now = datetime.datetime.now()
        now_str = now.strftime('%Y%m%d%H%M%S%f')
        epoch_time = int(time.mktime(now.timetuple()))

        logging.info(now_str)
        logging.info(epoch_time)

        messages = [{
            'Id': str(now_str),
            'MessageBody': str(epoch_time)
        }]
        response = queue.send_messages(Entries=messages)

        time.sleep(random.randint(10, 60))


if __name__ == '__main__':
    main()
Code language: Python (python)
Refer to the os.environ object to get the environment variables specified in the task definition earlier.
The key point is the argument when creating the boto3.resource object: you need to specify the endpoint_url. In our configuration, we will access SQS via VPC endpoint, so we will pass the endpoint URL for SQS (https://sqs.ap-northeast-1.amazonaws.com).
After getting the current date and time, use time.mktime to get the UNIX time. After outputting the UNIX time to the log, use the send_messages method to send messages. After sending the data, use time.sleep to randomly wait 10 to 60 seconds, and then return to the initial processing.
Scaling number of ECS tasks by length of SQS queue
The key to scaling an ECS task is the scaling policy.
Resources:
  Service2ScalingPolicy:
    Type: AWS::ApplicationAutoScaling::ScalingPolicy
    DependsOn:
      - Service2
      - Service2ScalableTarget
    Properties:
      PolicyName: Service2ScalingPolicy
      PolicyType: TargetTrackingScaling
      ScalingTargetId: !Ref Service2ScalableTarget
      TargetTrackingScalingPolicyConfiguration:
        TargetValue: 3
        CustomizedMetricSpecification:
          Dimensions:
            - Name: QueueName
              Value: !Ref QueueName
          MetricName: ApproximateNumberOfMessagesVisible
          Namespace: AWS/SQS
          Statistic: Average
          Unit: Count
        DisableScaleIn: false
        ScaleInCooldown: 0
        ScaleOutCooldown: 0
Code language: YAML (yaml)
Since the length of the queue is a condition for scaling, specify “TargetTrackingScaling” in the PolicyType property, which means target tracking scaling policy.
In the TargetTrackingScalingPolicyConfiguration property, define the target and the metrics to be tracked. Specify “AWS/SQS” for the Namespace property, “NumberOfMessagesVisible” for the MetricName property, and a predefined queue for the Dimensions property to target the number of unprocessed data in the SQS queue. By setting the Statistic property to “Average”, the Unit property to “Count”, and the TargetValue property to “3”, we can get the average number of unprocessed data measured over a specific period of time, and scale out/in based on 3.
The Dockerfile for building the container to run in Service 2 is the same as the one described earlier. The following is the content of the script (main.py) to be executed by the Service 2 task.
import boto3
import logging
import os
import time


logging.basicConfig(level=logging.INFO)

interval = int(os.environ['Interval'])
queue_name = os.environ['QueueName']
region_name = os.environ['RegionName']
sqs_endpoint_url = os.environ['SQSEndpointUrl']

sqs = boto3.resource('sqs',
    region_name=region_name,
    endpoint_url=sqs_endpoint_url)
queue = sqs.get_queue_by_name(QueueName=queue_name)

def is_even(num):
    if num % 2 == 0:
        return True
    return False

def main():
    while True:
        messages = queue.receive_messages(MaxNumberOfMessages=1)

        for msg in messages:
            logging.info(msg.body)
            num = int(msg.body)

            if is_even(num):
                logging.info('{num} is even.'.format(num=num))
            else:
                logging.info('{num} is odd.'.format(num=num))

            time.sleep(interval)

            msg.delete()


if __name__ == '__main__':
    main()
Code language: Python (python)
Use the receive_messages method to retrieve data from the queue. Change the output log according to the result of the home-made function (is_even) that determines whether the number is even or not. Finally, after waiting for 60 seconds with the time.sleep function, it deletes the data from the queue and returns to the initial process.
Architecting
Using CloudFormation, we will build this environment and check the actual behavior. We will create the CloudFormation stack in two parts.
Creating ECR Repository
First, we will create an ECR repository. Please refer to another page for details.
Create rest of CloudFormation stack
Create the CloudFormation stacks. For more information on creating stacks and how to check each stack, please refer to the following page

After checking the resources of each stack, here is the information of the main resources created this time
- SQS queue: saa-01-002-queue
- ECS cluster: saa-01-002-cluster
- ECS service 1: saa-01-002-service1
- ECS service 2: saa-01-002-service2
- CloudWatch Logs log group name for ECS task 1: saa-01-002-LogGroup1
- CloudWatch Logs log group name for ECS task 2: saa-01-002-LogGroup2
Check the created resources from the AWS Management Console. First, check the SQS queue.
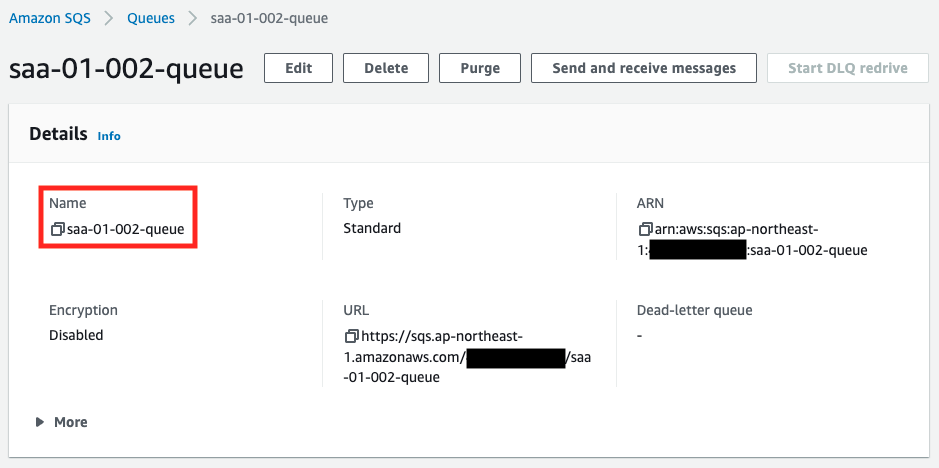
You can see that the queue has been created successfully. Next is the ECS cluster.
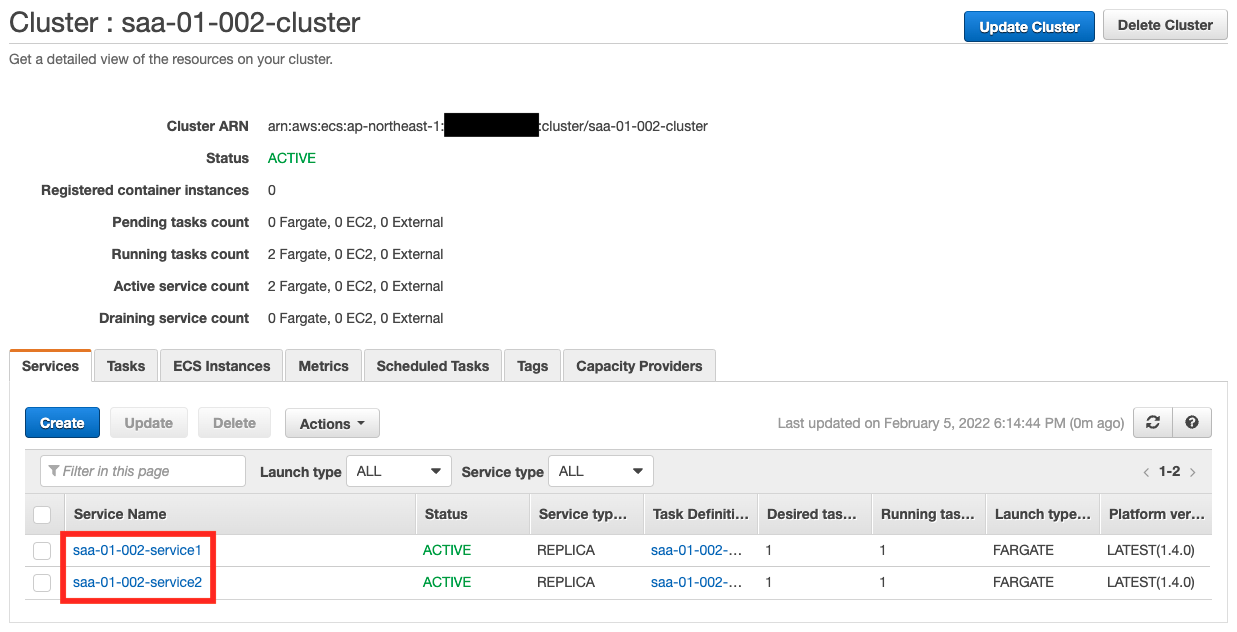
You can see that two ECS services have been created on the cluster.
Operation check: Service 1
Now that everything is ready, let’s check the actual behavior. Let’s start with Service 1.

You can see that a single task is running. Next, let’s check the operation status from CloudWatch Logs.
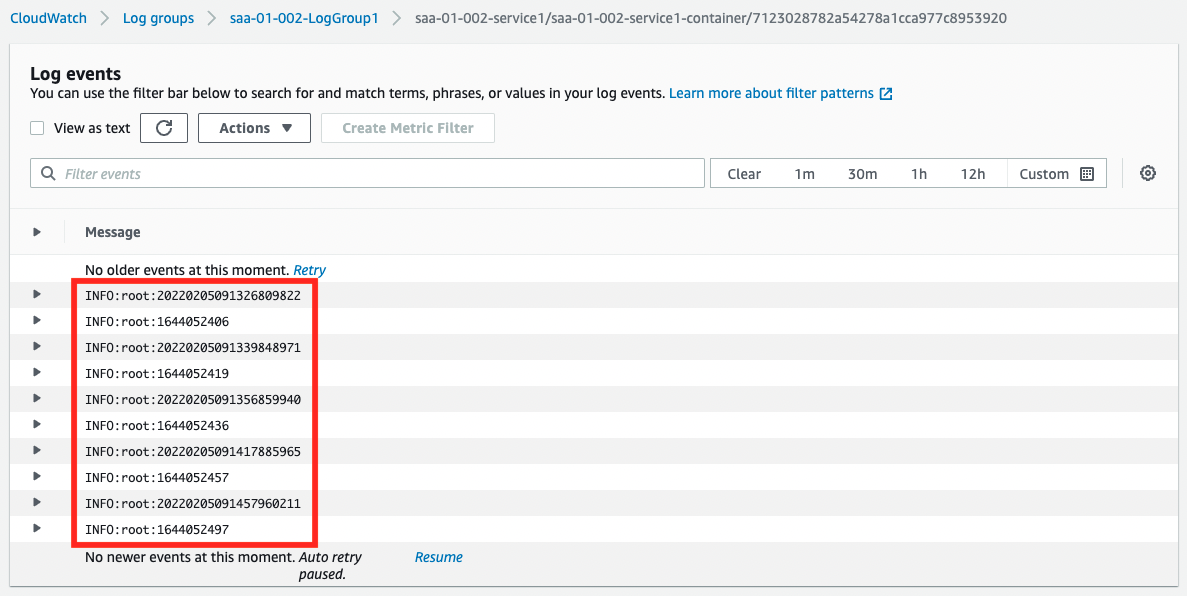
The current date and time and UNIX time are output alternately. From this, we can say that the container on Service 1 is running normally.
Operation check: Service 2
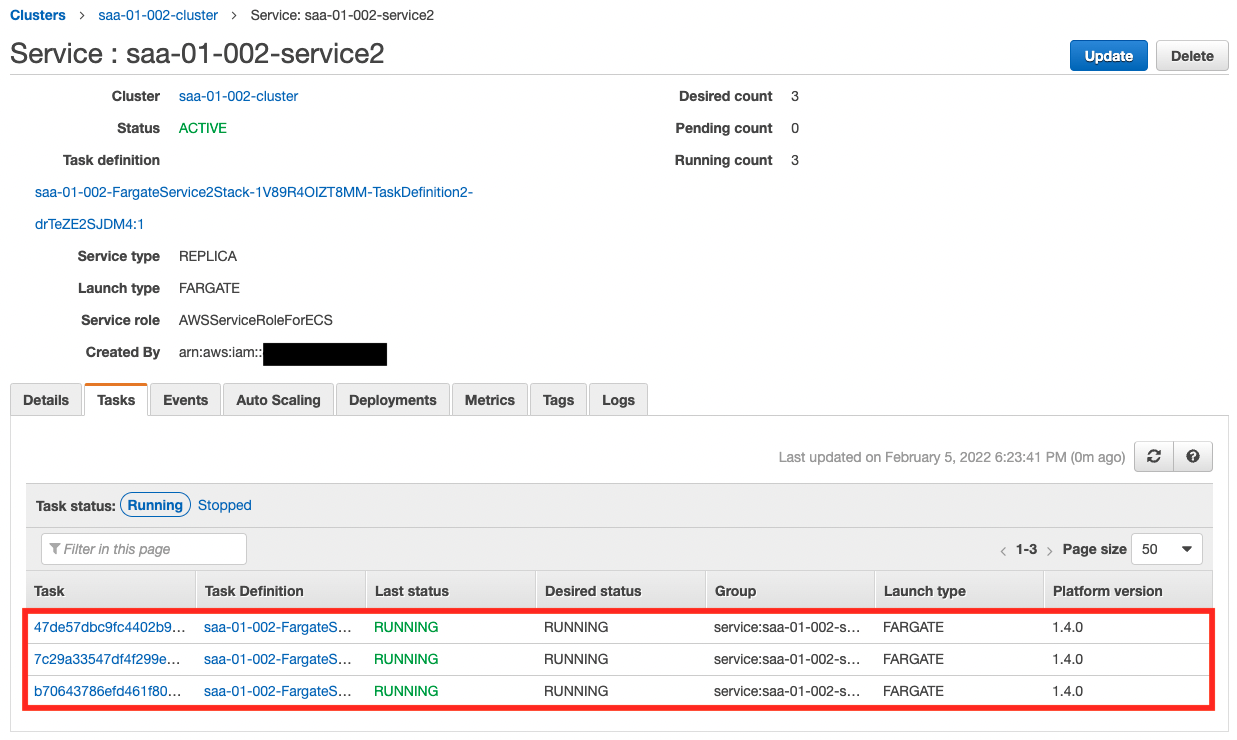
Next, let’s check the status of Service 2.

We can see that a task is running here as well. Next, let’s check the operation status from CloudWatch Logs.
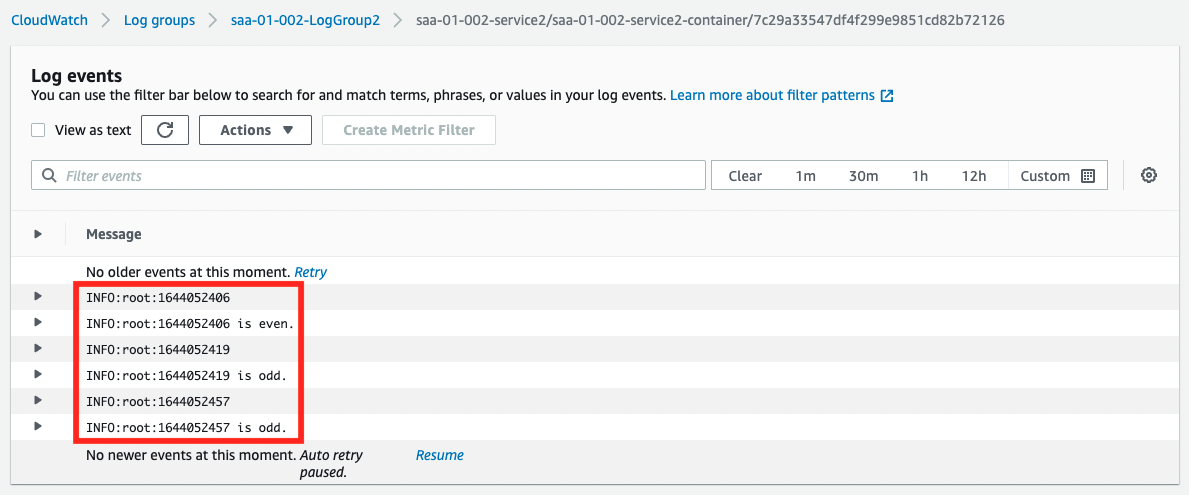
The results of the UNIX time even/odd judgment generated by the Service 1 side are output. This indicates that the containers on the two ECS services are able to link data via SQS.
Operation check: SQS queue – number of messages increased
After waiting for a while, check the details of SQS.
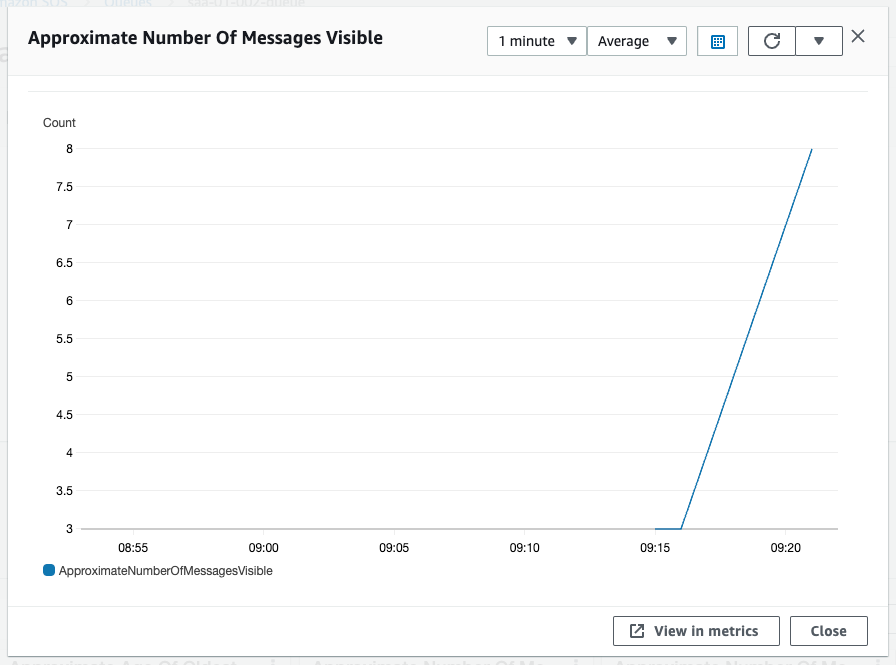
The value of the scaling tracking target, Approximate Number Of Messages Visible, is now above the threshold of 3. This is because Service 1 is sending messages at a faster rate than Service 2 can process them.
Operation check: Service 2 – Scale-out
As we have just confirmed, the scale-out condition has been met and the scale-out will start.
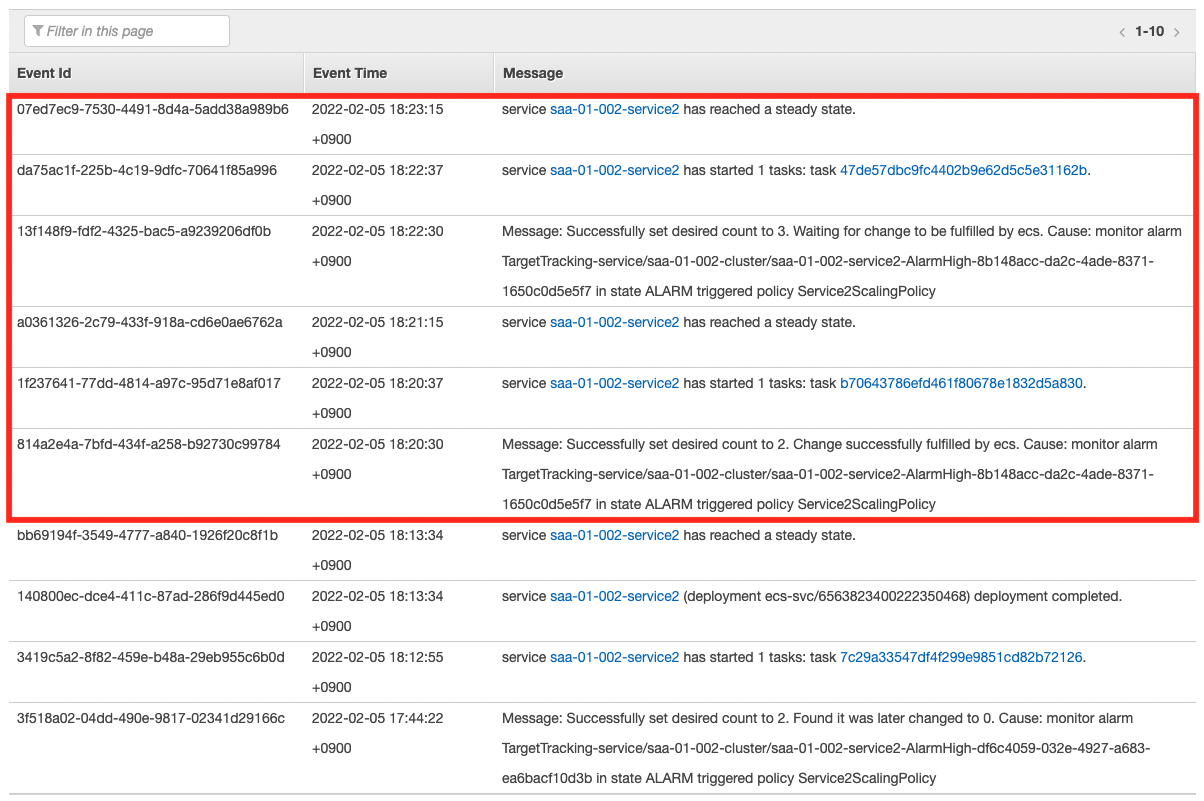
As the scaling log shows, the number of tasks has increased step by step, up to the upper limit of three. Now we can stably process the messages in the queue.
Operation check: SQS queue – number of messages decrease
Now that the number of tasks has increased to three, Service 2 is processing at a faster pace than Service 1 is sending messages. This gradually reduces the length of the SQS queue.
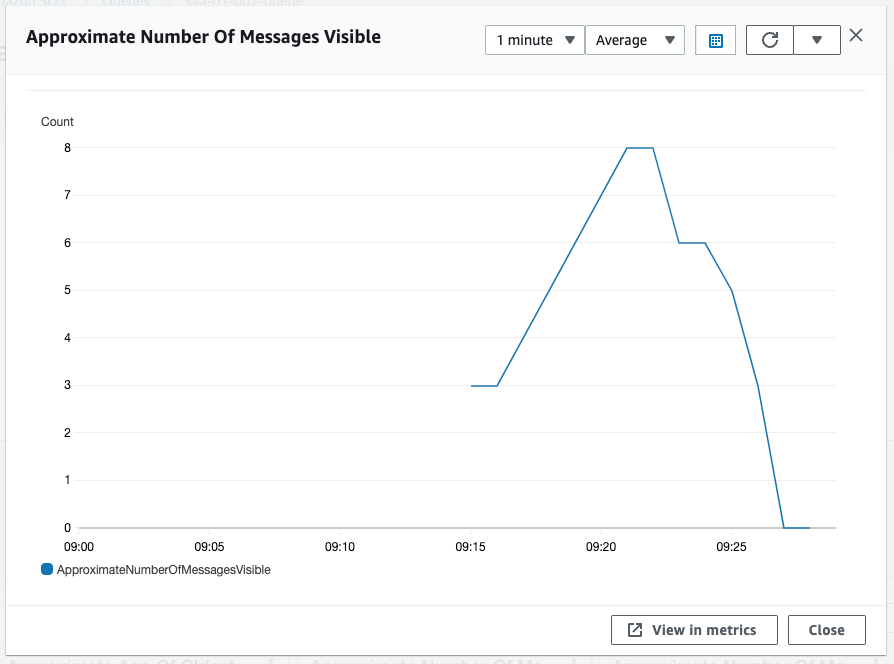
The value of Approximate Number Of Messages Visible is now below the threshold of 3.
Operation check: Service 2 – Scale-in
As we saw earlier, the scale-in condition has been met, so scale-in will start.
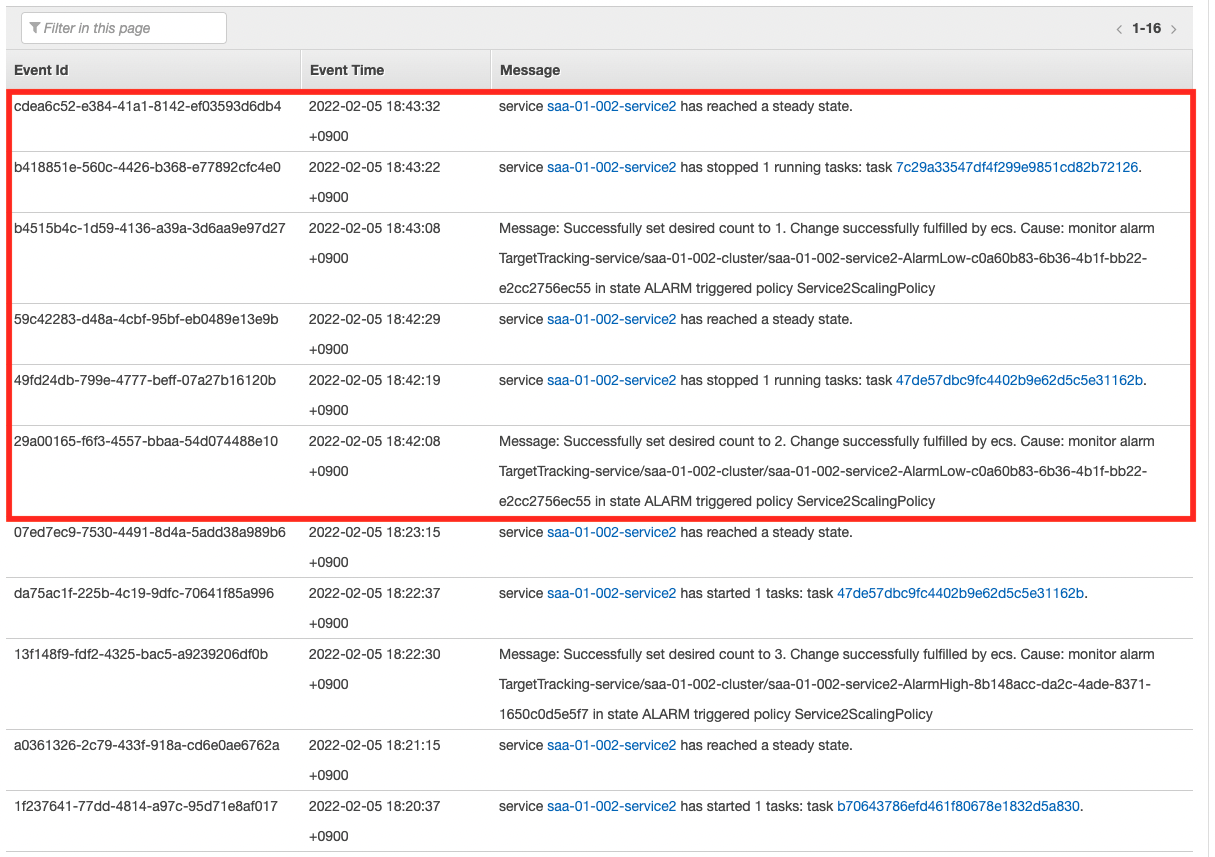

As the scaling log shows, the number of tasks has decreased step by step and returned to the lower limit of one.
In this way, we can automatically increase or decrease the number of tasks depending on the length of the SQS queue.
Summary
We have used SQS to link data between Fargate containers.
By scaling the number of ECS tasks according to the length of the SQS queue, we can achieve cost-effective and elastic data federation.