Configuring instances in private subnet to run AWS-ApplyAnsiblePlaybooks document
In the following page, we have introduced four ways to initialize process on an EC2 instance (Amazon Linux 2).
In this article, we will delve into one of those methods, using Ansible. In the previous page, the configuration was that the instance was installed in a public subnet. In this article, we will cover how to run the AWS-ApplyAnsiblePlaybooks document in a configuration where the instance is located in a private subnet. I will introduce the following two patterns.
- The pattern using a NAT gateway
- Pattern using VPC endpoints
Environment
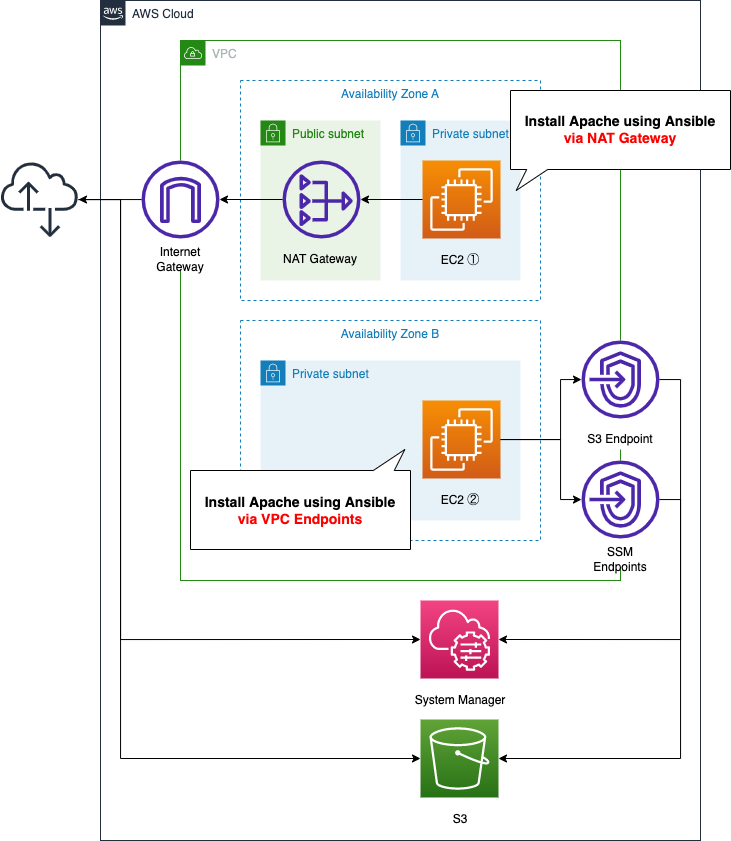
EC2 instance 1 is the pattern for running Ansible via a NAT gateway, and EC2 instance 2 is the pattern for running Ansible via VPC endpoints.
The content of the playbook will be the same for both instances, and will be placed in an S3 bucket.
CloudFormation template files
We will build the above configuration using CloudFormation. We have placed the CloudFormation template at the following URL
https://github.com/awstut-an-r/awstut-fa/tree/main/025
Explanation of key points of template files
This page only describes the resources related to AWS-ApplyAnsiblePlaybooks document. For more information about the basics of running AWS-ApplyAnsiblePlaybooks documentation, configuration for NAT gateways, and how to run yum in a private subnet, see the following page
AWS-ApplyAnsiblePlaybooks Document Execution (1) (via NAT gateway)
First, let’s check the configuration for running AWS-ApplyAnsiblePlaybooks document via NAT gateway. Define the SSM related resources in fa-025-ssm.yaml.
<meta charset="utf-8">Resources:
  ApplyAnsiblePlaybooksAssociation1:
    Type: AWS::SSM::Association
    DependsOn:
      - RunShellScriptAssociation
    Properties:
      AssociationName: !Sub ${Prefix}-apply-ansible-playbook-association1
      Name: AWS-ApplyAnsiblePlaybooks
      OutputLocation:
        S3Location:
          OutputS3BucketName: !Ref PlaybookBucket
          OutputS3KeyPrefix: !Sub "${Prefix}/playbook-association-log"
      Parameters:
        Check:
          - "False"
        ExtraVariables:
          - SSM=True
        InstallDependencies:
          - "True"
        PlaybookFile:
          - !Ref PlaybookFileName
        SourceInfo:
          - !Sub '{"path": "https://${PlaybookBucket}.s3.${AWS::Region}.amazonaws.com/${Prefix}/${PlaybookPackageName}"}'
        SourceType:
          - S3
        Verbose:
          - -v
      Targets:
        - Key: InstanceIds
          Values:
            - !Ref Instance1
      WaitForSuccessTimeoutSeconds: !Ref WaitForSuccessTimeoutSeconds
Code language: YAML (yaml)
The settings are the same as those described above when the instance is installed in a public subnet. In this case, the instance is installed in a private subnet, but since it can access the Internet via a NAT gateway, the same settings as for a public subnet will work.
In this configuration, the setting of particular interest is the InstallDependencies property. This option is used to install packages that are dependencies on running the AWS-ApplyAnsiblePlaybooks document. To begin with, Ansible is not installed on Amazon Linux 2 by default. So enable this option and let Ansible be installed at document runtime.
AWS-ApplyAnsiblePlaybooks Document Execution (2) (via VPC endpoints)
Next, let’s check the configuration for running AWS-ApplyAnsiblePlaybooks document via VPC endpoints.
This time, we will create the following two resources.
- AWS-RunShellScript: to be run to install Ansible.
- AWS-ApplyAnsiblePlaybooks: To run the contents of the Ansible Playbook.
The reason for defining the process in two separate documents is that the instance is located on a private subnet, so Ansible cannot be successfully installed using the options described above. This is due to the fact that the instance is on a private subnet and thus cannot communicate freely to the Internet.
The workaround for this is to install Ansible with the AWS-RunShellScript document first and then run the AWS-ApplyAnsiblePlaybooks document.
AWS-RunShellScript
Resources:
  RunShellScriptAssociation:
    Type: AWS::SSM::Association
    Properties:
      AssociationName: !Sub ${Prefix}-run-shellscript-association
      Name: AWS-RunShellScript
      OutputLocation:
        S3Location:
          OutputS3BucketName: !Ref PlaybookBucket
          OutputS3KeyPrefix: !Sub "${Prefix}/shellscript-association-log"
      Parameters:
        commands:
          - "sudo amazon-linux-extras install -y ansible2"
      Targets:
        - Key: InstanceIds
          Values:
            - !Ref Instance2
      WaitForSuccessTimeoutSeconds: !Ref WaitForSuccessTimeoutSeconds
Code language: YAML (yaml)
Execute the commands for the Ansible installation in the commands property. In this case, we will use Amazon Linux Extras for the installation.
Extras is a mechanism in Amazon Linux 2 to enable the consumption of new versions of application software on a stable operating system that is supported until June 30, 2023.
Examples of extras include Ansible 2.4.2, memcached 1.5, nginx 1.12, Postgresql 9.6, MariaDB 10.2, Go 1.9, Redis 4.0, R 3.4, Rust 1.22.1.
Amazon Linux Extras
AWS-ApplyAnsiblePlaybooks
Resources:
  ApplyAnsiblePlaybooksAssociation2:
    Type: AWS::SSM::Association
    DependsOn:
      - RunShellScriptAssociation
    Properties:
      AssociationName: !Sub ${Prefix}-apply-ansible-playbook-association2
      Name: AWS-ApplyAnsiblePlaybooks
      OutputLocation:
        S3Location:
          OutputS3BucketName: !Ref PlaybookBucket
          OutputS3KeyPrefix: !Sub "${Prefix}/playbook-association-log"
      Parameters:
        Check:
          - "False"
        ExtraVariables:
          - SSM=True
        InstallDependencies:
          #- "True"
          - "False"
        PlaybookFile:
          - !Ref PlaybookFileName
        SourceInfo:
          - !Sub '{"path": "https://${PlaybookBucket}.s3.${AWS::Region}.amazonaws.com/${Prefix}/${PlaybookPackageName}"}'
        SourceType:
          - S3
        Verbose:
          - -v
      Targets:
        - Key: InstanceIds
          Values:
            - !Ref Instance2
      WaitForSuccessTimeoutSeconds: !Ref WaitForSuccessTimeoutSeconds
Code language: YAML (yaml)
Notice the InstallDependencies property. Specify “False”. This is because we have already installed Ansible by running the AWS-RunShellScript document, so there is no need to resolve any dependencies.
(Reference) Ansible Playbook
For your reference, here is the content of the Playbook that we will run.
- hosts: all
  gather_facts: no
  become: yes

  tasks:
    - name: update yum
      yum: name=*
    - name: install the latest version of Apache
      yum: name=httpd state=latest
    - name: start and enable Apache
      service: name=httpd state=started enabled=yes
    - name: make index.html
      shell: ec2-metadata -i > /var/www/html/index.html
Code language: YAML (yaml)
This is the content of writing the instance ID to index.html after installing Apache. This time, we will access and run this one Playbook via a NAT gateway and via VPC endpoints.
Architecting
We will use CloudFormation to build this environment and check the actual behavior.
Preparing Ansible Playbook
Before creating the CloudFormation stack, we will prepare Ansible. Specifically, we will zip up the Playbook and place it in an S3 bucket. For specific commands, please refer to the aforementioned page.
Create CloudFormation stack and check resources in stacks
Create a CloudFormation stack.
Please refer to the following page for information on how to create a stack and check each stack.

After checking the resources in each stack, the information for the main resources created this time is as follows
- Instance1: i-0a2d78121ee6dfd1f
- Instance2: i-057dde56603eebcf4
We will also check the resource creation status from the AWS Management Console. First, we will check the EC2 instances.

You can see that two instances have been created. Next, check the execution status of the SSM document in the SSM State Manager.
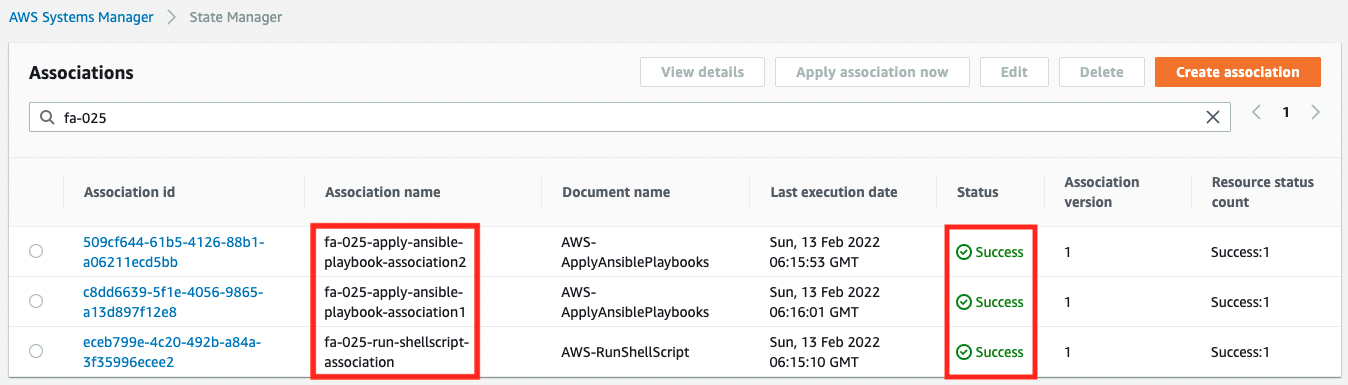
You can see that a total of three associations have been created for the two instances, and the Status is “Success”, which indicates that they were executed successfully.
Operation check (1)
Now that everything is ready, let’s access the instances. First, let’s look at instance 1. We will use the SSM Session Manager to access the instance. For details, please refer to the following page.
% aws ssm start-session --target i-0a2d78121ee6dfd1f

Starting session with SessionId: root-0f62c0c5edc7d8e07

sh-4.2$
Code language: Bash (bash)
Access yourself with curl.
sh-4.2$ curl http://localhost
instance-id: i-0a2d78121ee6dfd1f
Code language: Bash (bash)
You can see that the contents of the Ansible Playbook have been successfully executed.
For reference, here is an excerpt from the log of the Playbook execution
Amazon Linux release 2 (Karoo)

...

Installed:
  epel-release.noarch 0:7-14

...

Installed:
  ansible.noarch 0:2.9.27-1.el7

...

PLAY [all] *********************************************************************

TASK [update yum] **************************************************************
...

TASK [install the latest version of Apache] ************************************
...

TASK [start and enable Apache] *************************************************
...

TASK [make index.html] *********************************************************
...

PLAY RECAP *********************************************************************
localhost                  : ok=4    changed=3    unreachable=0    failed=0    skipped=0    rescued=0    ignored=0
Code language: plaintext (plaintext)
You can see that we have installed Ansible to resolve the dependencies before executing the contents of the Playbook.
Operation check (2)
Next is instance 2.
% aws ssm start-session --target i-057dde56603eebcf4

Starting session with SessionId: root-083a1d2a50de3e64a

sh-4.2$

sh-4.2$ curl http://localhost
instance-id: i-057dde56603eebcf4
Code language: Bash (bash)
This also returned its own ID, so you can see that the contents of the Ansible Playbook were executed successfully.
Let’s check the runtime logs for this one as well, starting with the AWS-RunShellScript log.
Loaded plugins: extras_suggestions, langpacks, priorities, update-motd

...

Installed:
  ansible.noarch 0:2.9.23-1.amzn2

...

Complete!
Code language: plaintext (plaintext)
Next is the AWS-ApplyAnsiblePlaybooks log, which shows the installation of Ansible as specified in the template file.
PLAY [all] *********************************************************************

TASK [update yum] **************************************************************
...

TASK [install the latest version of Apache] ************************************
...

TASK [start and enable Apache] *************************************************
...

TASK [make index.html] *********************************************************
...

PLAY RECAP *********************************************************************
localhost                  : ok=4    changed=3    unreachable=0    failed=0    skipped=0    rescued=0    ignored=0
Code language: plaintext (plaintext)
This one does not install Ansible, but runs the Playbook from the beginning.
Summary
We have now seen how to run the AWS-ApplyAnsiblePlaybooks document in a private subnet.
Specifically, we used either a NAT gateway or VPC endpoints.