Configuring SSL not only between Client and ALB, but also between ALB and EC2
In the following page, we introduced a configuration that uses an ACM certificate to SSL the communication from the Internet to the ALB.
However, in the above configuration, the communication up to the ALB is HTTPS, but the communication from the ALB to the EC2 instance is HTTP. Therefore, in this article, we will create a self-certificate, and aim to convert all communication between the client and the instance to SSL.
Environment
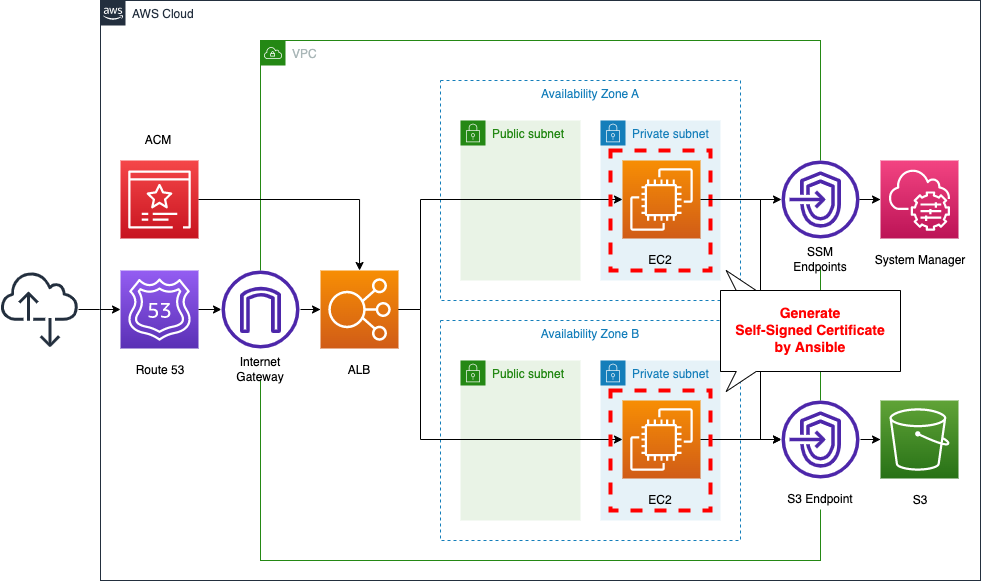
The basic configuration is the same as that described in the previous page. This time, we will execute the SSM document (AWS-ApplyAnsiblePlaybooks) and create a self-certificate on the EC2 instance.
CloudFormation Template Files
We will build the above configuration using CloudFormation. We have placed the CloudFormation template at the following URL.
https://github.com/awstut-an-r/awstut-fa/tree/main/024
Explanation of points in template files
This page explains how to support HTTPS communication in ALB and how to create a self-certificate for an EC2 instance. For information on how to attach EC2 instances in a private subnet to the ALB, how to configure Route 53, and ACM certificates, see the following pages.

In ALB target group, set communication to instance to HTTPS
Define ALB-related resources in fa-024-alb.yaml. The point is the ALB target group.
Resources:
  ALBTargetGroup:
    Type: AWS::ElasticLoadBalancingV2::TargetGroup
    Properties:
      VpcId: !Ref VPC
      Name: !Sub ${Prefix}-ALBTargetGroup
      Protocol: HTTPS
      Port: !Ref HTTPSPort
      HealthCheckProtocol: HTTPS
      HealthCheckPath: /
      HealthCheckPort: traffic-port
      HealthyThresholdCount: !Ref HealthyThresholdCount
      UnhealthyThresholdCount: !Ref UnhealthyThresholdCount
      HealthCheckTimeoutSeconds: !Ref HealthCheckTimeoutSeconds
      HealthCheckIntervalSeconds: !Ref HealthCheckIntervalSeconds
      Matcher:
        HttpCode: !Ref HttpCode
      Targets:
        - Id: !Ref Instance1
        - Id: !Ref Instance2
Code language: YAML (yaml)
Notice the three parameters: the first is the Protocol property. The first is the Protocol property, which sets the protocol to communicate with the target instance. The second is the Port property. The second is the Port property, which sets the port number that the target is listening for. The third is the HealthCheckProtocol property. The third property is the HealthCheckProtocol property, which sets the protocol used by ALB to access the instance as a health check. Specify “HTTPS” here as well.
Allow HTTPS in instance security group
Next, check the security group to be applied to the instance, which is defined in fa-024-vpc.yaml.
Resources:
  InstanceSecurityGroup:
    Type: AWS::EC2::SecurityGroup
    Properties:
      GroupName: !Sub "${Prefix}-InstanceSecurityGroup"
      GroupDescription: Allow HTTPS from ALBSecurityGroup.
      VpcId: !Ref VPC
      SecurityGroupIngress:
        - IpProtocol: tcp
          FromPort: !Ref HTTPSPort
          ToPort: !Ref HTTPSPort
          SourceSecurityGroupId: !Ref ALBSecurityGroup
Code language: YAML (yaml)
Specify the port number to be allowed in the FromPort and ToPort properties. By setting “443” for both properties, only HTTPS communication will be allowed.
Creating a self-certification by Ansible
SSM Association
Finally, we will check the SSM-related resources defined in fa-024-ssm.yaml.
We will use Ansible to perform the steps to create a unified self-certificate for the two instances. In this case, we will use the SSM document AWS-ApplyAnsiblePlaybooks. One thing to note is that the instance is located in a private subnet. Therefore, we will run the said document by accessing SSM/S3 via the VPC endpoint. For more details, please refer to the following page

Ansible Playbook
Check the contents of the Playbook to be executed by Ansible.
- hosts: all
  gather_facts: no
  become: yes

  tasks:
    - name: update yum
      yum: name=*
    - name: install the latest version of Apache
      yum: name=httpd state=latest
    - name: install the latest version of openssl
      yum: name=openssl state=latest
    - name: install the latest version of mod_ssl
      yum: name=mod_ssl state=latest
    - name: copy openssl.cnf
      copy:
        src: ./openssl.cnf
        dest: /etc/pki/tls/openssl.cnf
        owner: root
        group: root
        mode: '0644'
    - name: copy ssl.conf
      copy:
        src: ./ssl.conf
        dest: /etc/httpd/conf.d/ssl.conf
        owner: root
        group: root
        mode: '0644'
    - name: generate private key
      shell: openssl genrsa > server.key
    - name: generate public key
      shell: openssl req -new -batch -key server.key > server.csr
    - name: generate crt
      shell: openssl x509 -req -signkey server.key < server.csr > server.crt
    - name: copy private key
      shell: cp -a ./server.key /etc/pki/tls/private/
    - name: copy crt
      shell: cp -a ./server.crt /etc/pki/tls/certs/
    - name: start and enable Apache
      service: name=httpd state=started enabled=yes
    - name: make index.html
      shell: ec2-metadata -i > /var/www/html/index.html
Code language: YAML (yaml)
After installing Apache and the necessary packages for SSL (openssl, mod_ssl), replace the two configuration files (openssl.cnf, ssl.conf) with the files you have prepared. The following steps are for using self-certificates. Specifically, after creating the private key, public key, and certificate, place the private key and certificate in their designated locations. Finally, after starting Apache, write your instance ID in index.html. I used this page as a reference to set up the commands.
(Reference) openssl.cnf
This page explains the changes to openssl.cnf. In order to run the command in batch mode in creating a public key, the default values for each parameter have been changed as follows
- countryName_default = JP
- stateOrProvinceName_default = Tokyo
- localityName_default = Hogehoge
- 0.organizationName_default = HugaHuga
- organizationalUnitName_default = Piyopiyo
- commonName_default = spamspam
- emailAddress_default = mail.example.com
(Reference) ssl.conf
This section explains the changes to ssl.conf.
The location of the certificate and private key has been changed as follows
- SSLCertificateFile /etc/pki/tls/certs/server.crt
- SSLCertificateKeyFile /etc/pki/tls/private/server.key
I also used this page as a reference for setting this up.
Architecting
We will use CloudFormation to build this environment and check the actual behavior.
Preparing Ansible Playbook
Before creating the CloudFormation stack, we will prepare Ansible. Specifically, we will zip up the playbook and place it in an S3 bucket.
$ zip -r playbook.zip *
  adding: openssl.cnf (deflated 67%)
  adding: playbook.yml (deflated 67%)
  adding: ssl.conf (deflated 59%)

$ aws s3 cp playbook.zip s3://[bucket-name]/
upload: ./playbook.zip to s3://[bucket-name]/playbook.zip
Code language: Bash (bash)
Create CloudFormation stacks and check resources in stacks
We will create a CloudFormation stack.
For information on how to create a stack and check each stack, please refer to the following page

After checking the resources in each stack, the information for the main resources created this time is as follows
- Instance1: i-06b5fa80e358558a2
- Instance2: i-0b0b10fbc49e33809
- ALB: fa-024-ALB
- Route 53 record: awstut.net
We will also check the resource creation status from the AWS Management Console. First, we will check the ALB target group.
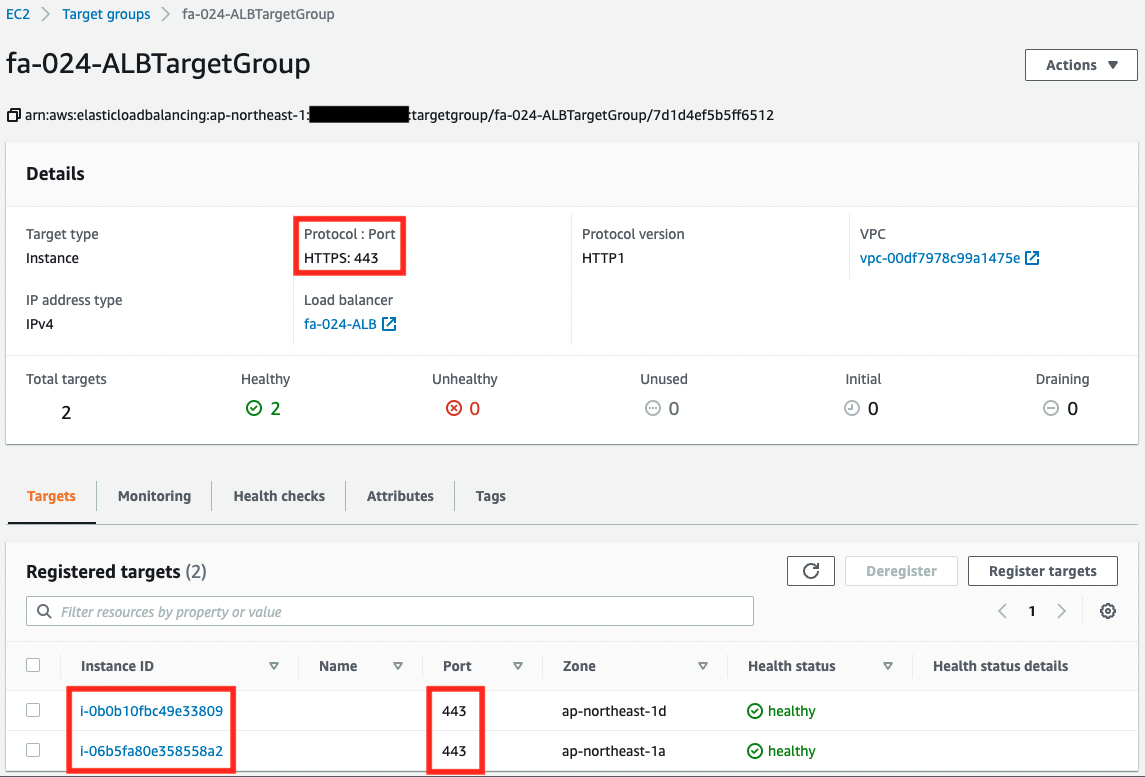
You can see that there are two instances registered in the target group. We can also see that the instances are configured to communicate via HTTPS to port 443.
Next, let’s check the execution status of the SSM State Manager.
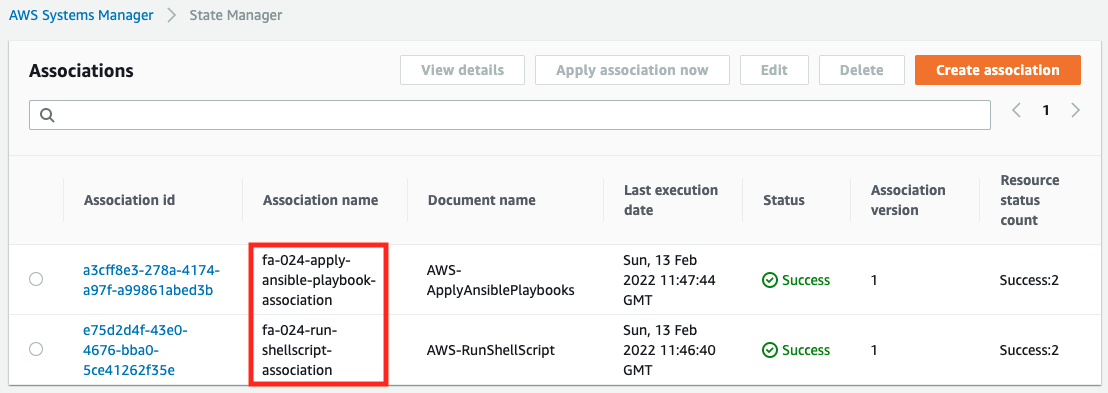
We can see that the creation of the two SSM associations is successful. This indicates that Ansible has been executed successfully.
Accessing ALB
Now that everything is ready, access your own domain via HTTPS from your browser.


You can now access the ALB. As you can see above, we were able to use SSL not only between the client and the ALB, but also between the ALB and the instance.
(Reference) Ansible execution log
For your reference, here is an excerpt of the Ansible execution log for Instance1.
Running Ansible in /var/lib/amazon/ssm/i-06b5fa80e358558a2/document/orchestration/a3e0b63e-23f6-4e80-bfe3-4c73c83f6ab6/downloads
Archive:  ./playbook.zip
  inflating: openssl.cnf
  inflating: playbook.yml
  inflating: ssl.conf
Using /etc/ansible/ansible.cfg as config file

PLAY [all] *********************************************************************

TASK [update yum] **************************************************************
ok: ...

TASK [install the latest version of Apache] ************************************
changed: ...

TASK [install the latest version of openssl] ***********************************
ok: ...

TASK [install the latest version of mod_ssl] ***********************************
changed: ...

TASK [copy openssl.cnf] ********************************************************
changed: [localhost] => {"changed": true, "checksum": "870dcd50252d8aa8e1aa6392ce29a987480b337c", "dest": "/etc/pki/tls/openssl.cnf", "gid": 0, "group": "root", "md5sum": "3aa020ec74b4fb8be0aaf8746a489215", "mode": "0644", "owner": "root", "size": 11173, "src": "/root/.ansible/tmp/ansible-tmp-1644752856.2-2777-102212935013649/source", "state": "file", "uid": 0}

TASK [copy ssl.conf] ***********************************************************
changed: [localhost] => {"changed": true, "checksum": "10d92760527eaa77206766f62f47cb1346121434", "dest": "/etc/httpd/conf.d/ssl.conf", "gid": 0, "group": "root", "md5sum": "1747532281ea14600da458ef529f37da", "mode": "0644", "owner": "root", "size": 9544, "src": "/root/.ansible/tmp/ansible-tmp-1644752857.31-2820-240351648915287/source", "state": "file", "uid": 0}

TASK [generate private key] ****************************************************
changed: [localhost] => {"changed": true, "cmd": "openssl genrsa > server.key", "delta": "0:00:00.117549", "end": "2022-02-13 11:47:38.683733", "rc": 0, "start": "2022-02-13 11:47:38.566184", "stderr": "Generating RSA private key, 2048 bit long,  ...

TASK [generate public key] *****************************************************
changed: [localhost] => {"changed": true, "cmd": "openssl req -new -batch -key server.key > server.csr", "delta": "0:00:00.026476", "end": "2022-02-13 11:47:39.110980", "rc": 0, "start": "2022-02-13 11:47:39.084504", "stderr": "", "stderr_lines": [], "stdout": "", "stdout_lines": []}

TASK [generate crt] ************************************************************
changed: [localhost] => {"changed": true, "cmd": "openssl x509 -req -signkey server.key < server.csr > server.crt", "delta": "0:00:00.038384", "end": "2022-02-13 11:47:39.541607", "rc": 0, "start": "2022-02-13 11:47:39.503223", ...

TASK [copy private key] ********************************************************
changed: [localhost] => {"changed": true, "cmd": "cp -a ./server.key /etc/pki/tls/private/", "delta": "0:00:00.018995", "end": "2022-02-13 11:47:39.959631", "rc": 0, "start": "2022-02-13 11:47:39.940636", "stderr": "", "stderr_lines": [], "stdout": "", "stdout_lines": []}

TASK [copy crt] ****************************************************************
changed: [localhost] => {"changed": true, "cmd": "cp -a ./server.crt /etc/pki/tls/certs/", "delta": "0:00:00.018371", "end": "2022-02-13 11:47:40.383606", "rc": 0, "start": "2022-02-13 11:47:40.365235", "stderr": "", "stderr_lines": [], "stdout": "", "stdout_lines": []}

TASK [start and enable Apache] *************************************************
changed: ...

TASK [make index.html] *********************************************************
changed: ...

PLAY RECAP *********************************************************************
localhost                  : ok=13   changed=11   unreachable=0    failed=0    skipped=0    rescued=0    ignored=0
Code language: plaintext (plaintext)
Summary
We have confirmed how to create a self-certificate and make the communication between ALB and the instance SSL as well.
By making the procedure for creating the certificate an Ansible Playbook, we were able to run it in a unified manner for the two instances.