Introduction to EFS with CloudFormation
This page is about designing a high-performance architecture, which is one of the topics of AWS SAA.
EFS is a type of storage service offered by AWS.
Amazon Elastic File System (Amazon EFS) is a simple, serverless, set-and-forget elastic file system that lets you share file data without provisioning or managing storage. It can be used with AWS services and on-premises resources, and it’s built to scale to petabytes on demand without disrupting applications.
Amazon EFS features
As this is an introductory tutorial, our goal is to build EFS with CloudFormation and access it from two EC2 instances.
Environment
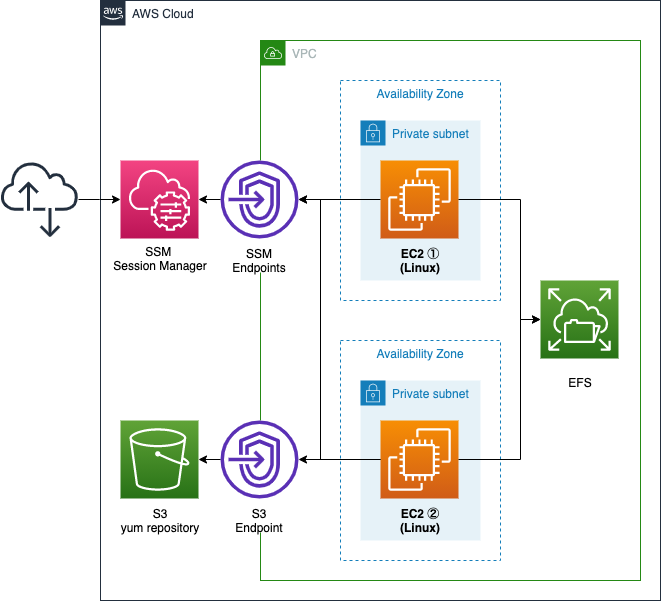
We will create two subnets within a VPC.
Both subnets will be private subnets that are inaccessible to the Internet.
Create an EFS and associate it with each subnet.
Also, place one EC2 instance in each subnet.
Use it to access the EFS.
The instance should be the latest version of Amazon Linux 2.
Create an SSM endpoint.
This endpoint will be used for two purposes.
The first is to remotely access the EC2 instance using SSM Session Manager.
The second is to use SSM Document to perform the instance initialization process.
An S3 endpoint is also created.
This is used to access the yum repository that will be built on the S3 bucket.
CloudFormation template files
Build the above configuration with CloudFormation.
The CloudFormation templates are located at the following URL
https://github.com/awstut-an-r/awstut-saa/tree/main/02/007
Explanation of key points of the template files
Security group for EFS
Resources:
  InstanceSecurityGroup:
    Type: AWS::EC2::SecurityGroup
    Properties:
      GroupName: !Sub "${Prefix}-InstanceSecurityGroup"
      GroupDescription: Deny All.
      VpcId: !Ref VPC

  EFSSecurityGroup:
    Type: AWS::EC2::SecurityGroup
    Properties:
      GroupName: !Sub "${Prefix}-EFSSecurityGroup"
      GroupDescription: Allow NFS from InstanceSecurityGroup.
      VpcId: !Ref VPC
      SecurityGroupIngress:
        - IpProtocol: tcp
          FromPort: !Ref NFSPort
          ToPort: !Ref NFSPort
          SourceSecurityGroupId: !Ref InstanceSecurityGroup
Code language: YAML (yaml)
Communication between the instance and EFS is done via NFS.
You can mount an Amazon EFS file system in your virtual private cloud (VPC), through the Network File System versions 4.0 and 4.1 (NFSv4) protocol.
Amazon EFS: How it works
In order for an instance to communicate with EFS via NFS, a security group must be associated with the EFS mount target (described below) that meets the following criteria
The security groups you associate with a mount target must allow inbound access for the TCP protocol on the NFS port from all EC2 instances on which you want to mount the file system.
Creating security groups
Following the above, create a security group to allow NFS communication (2049/tcp) from the instances.
Two parameters of EFS
Check the configuration of the EFS itself.
Resources:
  EFS:
    Type: AWS::EFS::FileSystem
    Properties:
      Encrypted: true
      PerformanceMode: generalPurpose
      ThroughputMode: bursting
Code language: YAML (yaml)
EFS requires two parameters to be set.
The first is the performance mode.
You can choose between general-purpose mode and maximum I/O mode, but the former is the default mode and can be used for many applications.
We recommend using General Purpose performance mode for the vast majority of applications. If you are not sure which performance mode to use, choose the General Purpose performance mode.
Amazon EFS performance
The second is throughput mode.
You can choose between burst throughput and provisioned throughput.
In this case, we will select the former.
Burst throughput is a mode that allows bursting based on credits, like a general-purpose SSD in EBS.
Bursting Throughput mode is the default Amazon EFS throughput mode. It is a good fit for traditional applications that have a bursty throughput pattern. When throughput is low, Bursting Throughput mode uses burst buckets to save burst credits. When throughput is higher, it uses burst credits.
Amazon EFS performance
Following the above, specify “generalPurpose” for the PerformanceMode property and “bursting” for the ThroughputMode property.
EFS can be deployed across AZs
Define EFS mount points so that instances can access EFS.
Resources:
  MountTarget1:
    Type: AWS::EFS::MountTarget
    Properties:
      FileSystemId: !Ref EFS
      SubnetId: !Ref PrivateSubnet1
      SecurityGroups:
        - !Ref EFSSecurityGroup

  MountTarget2:
    Type: AWS::EFS::MountTarget
    Properties:
      FileSystemId: !Ref EFS
      SubnetId: !Ref PrivateSubnet2
      SecurityGroups:
        - !Ref EFSSecurityGroup
Code language: YAML (yaml)
Mount targets must be created on a per-subnet basis.
In this case, instances will be deployed on two subnets, so a mount target must be created for each subnet.
Also, associate a security group with the mount point.
Specify the security group for the mount point as described above.
Set up instance using SSM Document
Define the initialization process to access EFS from the instance.
Resources:
  RunShellScriptAssociation:
    Type: AWS::SSM::Association
    Properties:
      AssociationName: !Sub ${Prefix}-shellscript-association
      Name: AWS-RunShellScript
      OutputLocation:
        S3Location:
          OutputS3BucketName: !Ref LogBucketName
          OutputS3KeyPrefix: !Sub "${Prefix}/shellscript-association-log"
      Parameters:
        commands:
          - "sudo yum update -y"
          - "sudo yum install -y amazon-efs-utils"
          - "sudo mkdir /mnt/efs"
          - "sleep 90"
          - !Sub "sudo mount -t efs ${FileSystemId}:/ /mnt/efs"
      Targets:
        - Key: InstanceIds
          Values:
            - !Ref Instance1
            - !Ref Instance2
      WaitForSuccessTimeoutSeconds: 300
Code language: YAML (yaml)
In order for instances to access EFS, it is best practice to use the Amazon EFS client provided by AWS.
The Amazon EFS client (amazon-efs-utils) is an open-source collection of Amazon EFS tools.
The Amazon EFS client includes a mount helper and tooling that makes it easier to perform encryption of data in transit for Amazon EFS file systems.
Overview
The client is installed as part of the instance initialization process.
There are several ways to set up an instance automatically, but in this case we will use the SSM document AWS-RunShellScript to perform the setup by executing a shell script.
For more information, please see the following page

Setup details are as follows
- update installed packages with yum
- install Amazon EFS client
- create a mount point for EFS
- wait 90 seconds
- mount EFS
The reason for the wait in the process is to avoid mount errors that can occur immediately after the mount target.
It can take up to 90 seconds after creating a mount target for the Domain Name Service (DNS) records to propagate fully in an AWS Region. If you’re programmatically creating and mounting file systems, for example with an AWS CloudFormation template, we recommend that you implement a wait condition.
File System Mount Fails Immediately After File System Creation
Set up the above to run on two instances.
Executing yum in Private Subnet
The aforementioned setup process included content related to update/installation by yum.
However, since the 2 instances are located in a private subnet, they do not have access to the Internet, and as such, yum will fail.
Therefore, this time, we will create a VPC endpoint for S3 and execute yum from within the private subnet by accessing the repository for Amazon Linux built on S3.
For more details, please refer to the following page
Architecting
Use CloudFormation to build this environment and check the actual behavior.
Create CloudFormation stacks and check resources in stacks
Create CloudFormation stacks.
For information on how to create stacks and check each stack, please refer to the following page

After checking the resources in each stack, information on the main resources created this time is as follows
- Instance1: i-091b12e8726df75c1
- Instance2: ii-0664bcef7e9712b79
- EFS: fs-07e706669a91cd761
The resource creation status is also checked from the AWS Management Console.
First, check the EFS.
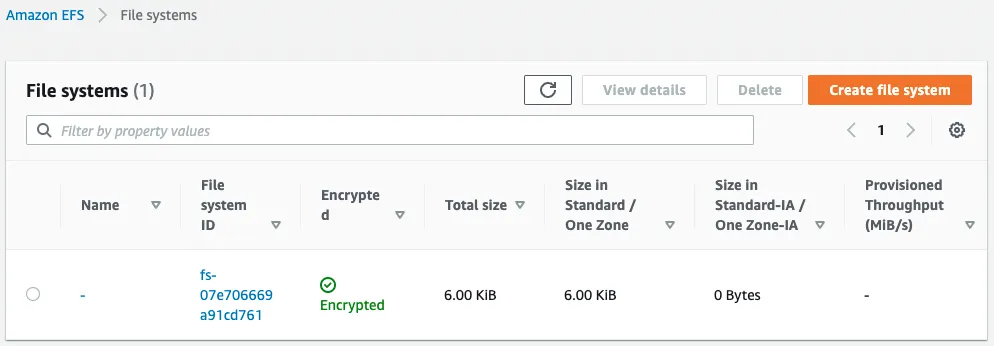
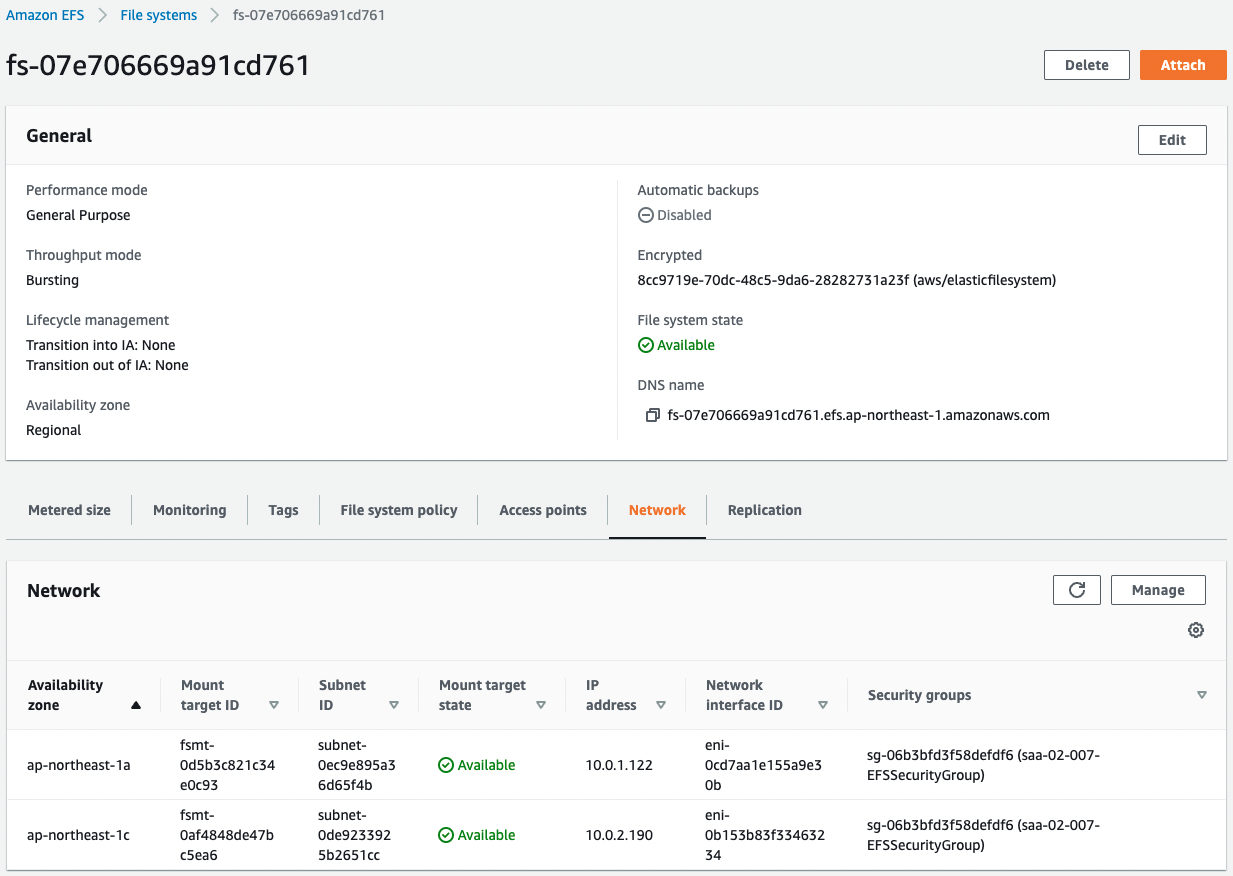
We can see that the EFS has been created successfully.
We can also see that the EFS is associated with the subnets created on the two AZs.
This indicates that mount targets have been created on both subnets.
Next we check the results of running the SSM Document.
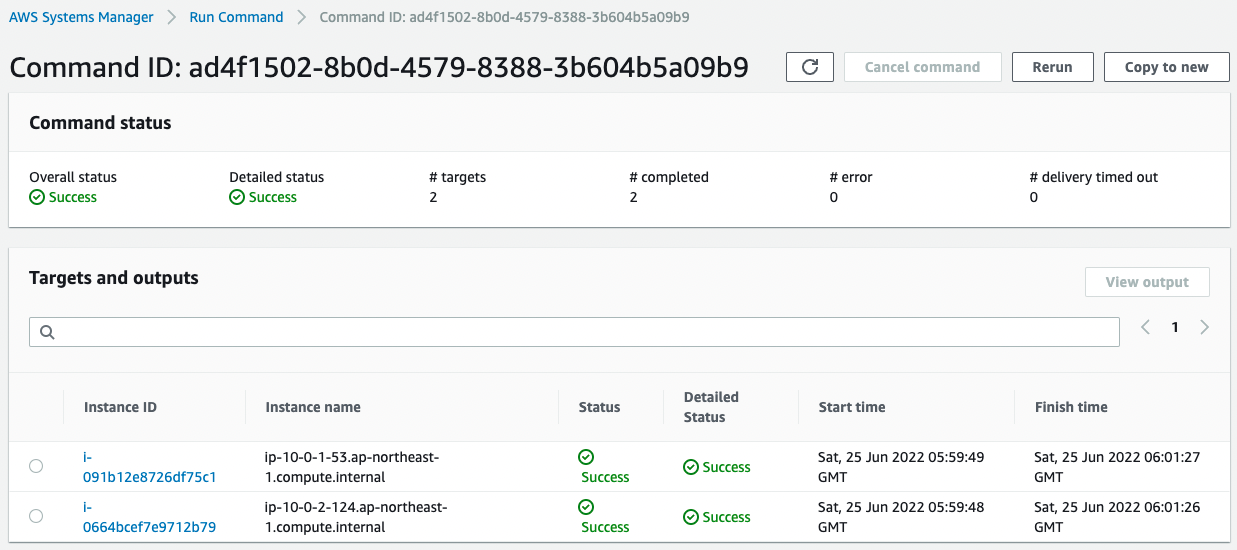
We can see that it was successfully executed on both instances.
We have configured the execution logs to be stored in the S3 bucket.
The saved log is as follows
Loaded plugins: extras_suggestions, langpacks, priorities, update-motd
No packages marked for update
Loaded plugins: extras_suggestions, langpacks, priorities, update-motd
Resolving Dependencies
--> Running transaction check
---> Package amazon-efs-utils.noarch 0:1.33.1-1.amzn2 will be installed
--> Processing Dependency: stunnel >= 4.56 for package: amazon-efs-utils-1.33.1-1.amzn2.noarch
--> Running transaction check
---> Package stunnel.aarch64 0:4.56-6.amzn2.0.3 will be installed
--> Finished Dependency Resolution

Dependencies Resolved

================================================================================
 Package               Arch         Version               Repository       Size
================================================================================
Installing:
 amazon-efs-utils      noarch       1.33.1-1.amzn2        amzn2-core       51 k
Installing for dependencies:
 stunnel               aarch64      4.56-6.amzn2.0.3      amzn2-core      148 k

Transaction Summary
================================================================================
Install  1 Package (+1 Dependent package)

Total download size: 199 k
Installed size: 626 k
Downloading packages:
--------------------------------------------------------------------------------
Total                                              1.6 MB/s | 199 kB  00:00
Running transaction check
Running transaction test
Transaction test succeeded
Running transaction
  Installing : stunnel-4.56-6.amzn2.0.3.aarch64                             1/2
  Installing : amazon-efs-utils-1.33.1-1.amzn2.noarch                       2/2
  Verifying  : amazon-efs-utils-1.33.1-1.amzn2.noarch                       1/2
  Verifying  : stunnel-4.56-6.amzn2.0.3.aarch64                             2/2

Installed:
  amazon-efs-utils.noarch 0:1.33.1-1.amzn2

Dependency Installed:
  stunnel.aarch64 0:4.56-6.amzn2.0.3

Complete!
Code language: plaintext (plaintext)
You can see that amazon-efs-utils and its dependencies have been installed.
Checking Action
Now that we are ready, let’s access the EC2 instances.
Instance1
First, access Instance1 via SSM Session Manager.
% aws ssm start-session --target i-091b12e8726df75c1

Starting session with SessionId: root-0a204dce1675cd00c

sh-4.2$
Code language: Bash (bash)
For more information on SSM Session Manager, please refer to the following page

Next, make sure the AWS EFS client is installed.
sh-4.2$ yum list installed | grep efs
amazon-efs-utils.noarch               1.33.1-1.amzn2                   @amzn2-core
Code language: Bash (bash)
You can see that it was successfully installed.
Now let’s check the disk status with the df command.
sh-4.2$ df -hT
Filesystem                                              Type      Size  Used Avail Use% Mounted on
devtmpfs                                                devtmpfs  178M     0  178M   0% /dev
tmpfs                                                   tmpfs     215M     0  215M   0% /dev/shm
tmpfs                                                   tmpfs     215M  412K  214M   1% /run
tmpfs                                                   tmpfs     215M     0  215M   0% /sys/fs/cgroup
/dev/nvme0n1p1                                          xfs       8.0G  1.5G  6.5G  19% /
/dev/nvme0n1p128                                        vfat       10M  3.8M  6.3M  38% /boot/efi
tmpfs                                                   tmpfs      43M     0   43M   0% /run/user/0
fs-07e706669a91cd761.efs.ap-northeast-1.amazonaws.com:/ nfs4      8.0E     0  8.0E   0% /mnt/efs
Code language: Bash (bash)
The bottom line is EFS.
You can see that it is mounted on /mnt/efs, as specified in the setup process.
The Size item is “8.0E”, which means that 8 exabytes have already been allocated before scaling.
Next, write to EFS and check the file sharing.
sh-4.2$ cd /mnt/efs

sh-4.2$ sudo touch test.txt

sh-4.2$ ls
test.txt
Code language: Bash (bash)
We were able to write to EFS successfully.
Instance2
Next, access Instance2.
% aws ssm start-session --target i-0664bcef7e9712b79

Starting session with SessionId: root-0ede646d6dca48f56

sh-4.2$
Code language: Bash (bash)
Similarly, check the disk status.
sh-4.2$ df -hT
Filesystem                                              Type      Size  Used Avail Use% Mounted on
devtmpfs                                                devtmpfs  178M     0  178M   0% /dev
tmpfs                                                   tmpfs     215M     0  215M   0% /dev/shm
tmpfs                                                   tmpfs     215M  412K  214M   1% /run
tmpfs                                                   tmpfs     215M     0  215M   0% /sys/fs/cgroup
/dev/nvme0n1p1                                          xfs       8.0G  1.5G  6.5G  19% /
/dev/nvme0n1p128                                        vfat       10M  3.8M  6.3M  38% /boot/efi
tmpfs                                                   tmpfs      43M     0   43M   0% /run/user/0
fs-07e706669a91cd761.efs.ap-northeast-1.amazonaws.com:/ nfs4      8.0E     0  8.0E   0% /mnt/efs
Code language: Bash (bash)
Here again we can see that EFS is mounted with /mnt/efs as the mount point.
Finally, check the same directory.
sh-4.2$ ls /mnt/efs
test.txt
Code language: Bash (bash)
The file installed in Instance1 can now be confirmed from Instance2.
Summary
As an introduction to EFS, we created EFS with CloudFormation.
We have confirmed that EFS can be used to share data between EC2 instances.