Install amazon-efs-utils using SSM Distributor AmazoneFsutils
This is one of the AWS SOA topics related to deployment, provisioning, and automation.
The following page provides a basic configuration of EFS.

In the page we presented, we used the SSM Document AWS-RunShellScript to execute the commands to install the EFS client.
This is officially listed by AWS as a manual installation of the EFS client.
https://docs.aws.amazon.com/efs/latest/ug/installing-amazon-efs-utils.html
This time we will see how to install the EFS client according to best practices.
https://docs.aws.amazon.com/efs/latest/ug/manage-efs-utils-with-aws-sys-manager.html
Specifically, this method uses SSM Distributor AmazoneFsutils.
By using AmazoneFsutils, you can install new or periodically update the EFS client.
Environment

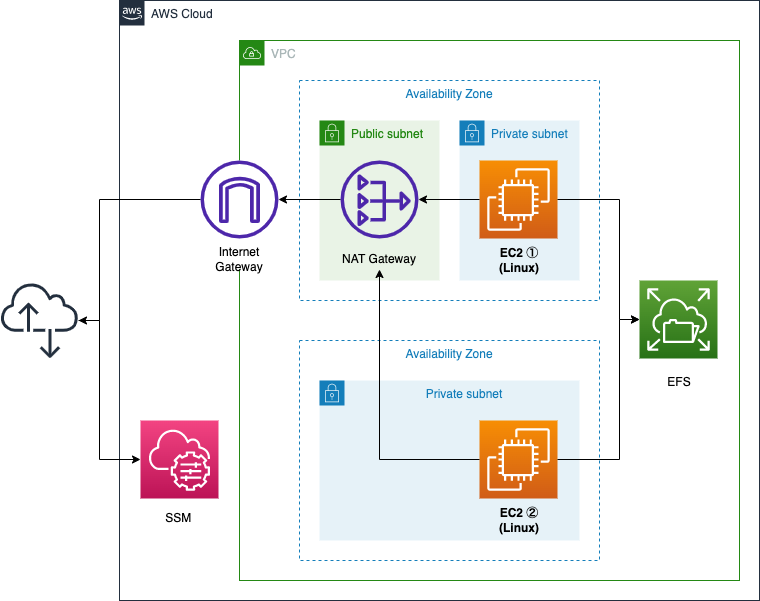
Basically, the configuration is the same as in the previous page.
The difference is the network configuration.
The EC2 instances in the private subnet will use a NAT Gateway instead of a VPC endpoint to access resources outside the VPC.
This is because the sequence of actions performed by AmazoneFsutils includes accessing third-party resources on the Internet using pip and yum, and VPC endpoints cannot meet the action requirements.
CloudFormation template files
The above configuration is built with CloudFormation.
The CloudFormation templates are located at the following URL
https://github.com/awstut-an-r/awstut-soa/tree/main/03/002
Explanation of key points of the template files
This page focuses on how to install amazon-efs-utils using AmazoneFsutils.
For basic EFS matters, please refer to the page introduced at the beginning of this document.
IAM Roles for EC2 Instances
Resources:
  InstanceRole:
    Type: AWS::IAM::Role
    Properties:
      AssumeRolePolicyDocument:
        Version: 2012-10-17
        Statement:
          - Effect: Allow
            Action: sts:AssumeRole
            Principal:
              Service:
                - ec2.amazonaws.com
      Policies:
        - PolicyName: SSMStateManagerPolicy
          PolicyDocument:
            Version: 2012-10-17
            Statement:
              - Effect: Allow
                Action:
                  - s3:GetObject
                  - s3:PutObject
                  - s3:PutObjectAcl
                  - s3:ListBucket
                Resource:
                  - !Sub "arn:aws:s3:::${LogBucketName}"
                  - !Sub "arn:aws:s3:::${LogBucketName}/*"
      ManagedPolicyArns:
        - arn:aws:iam::aws:policy/AmazonElasticFileSystemsUtils
Code language: YAML (yaml)
The key point is the setting regarding AWS management policy (ManagedPolicyArns property).
Use the AmazonElasticFileSystemsUtils AWS managed permission policy to assign the appropriate permissions to roles.
Using AWS Systems Manager to automatically install or update Amazon EFS clients
Add the AmazonElasticFileSystemsUtils policy to the IAM role for the instance according to the above.
In addition, an inline policy is defined that allows access to the S3 bucket.
This permission is necessary to distribute the SSM Document execution logs as described below.
Running SSM Distributor
Resources:
  ConfigureAWSPackageAssociation:
    Type: AWS::SSM::Association
    Properties:
      AssociationName: !Sub "${Prefix}-configure-awspackage-association"
      Name: AWS-ConfigureAWSPackage
      OutputLocation:
        S3Location:
          OutputS3BucketName: !Ref LogBucketName
          OutputS3KeyPrefix: !Sub "${Prefix}/configure-awspackage-association-log"
      Parameters:
        action:
          - Install
        installationType:
          - In-place update
        name:
          - AmazonEFSUtils
      ScheduleExpression: rate(30 days)
      Targets:
        - Key: InstanceIds
          Values:
            - !Ref Instance1
            - !Ref Instance2
      WaitForSuccessTimeoutSeconds: !Ref WaitForSuccessTimeoutSeconds
Code language: YAML (yaml)
To run the SSM Distributor, the SSM Document AWS-ConfigureAWSPackage must be executed.
This means creating an association between AWS-ConfigureAWSPackage and the instance.
Specify the parameters for executing AWS-ConfigureAWSPackage in the Parameters property.
Specify “Install” for action and “In-place update” for installationType.
These values are as specified in the AWS official documentation.
For Parameters choose Action > Install and Installation Type > In-place update.
Using AWS Systems Manager to automatically install or update Amazon EFS clients
Specify “AmazonEFSUtils” for Name.
Specify “rate(30 days)” for ScheduleExpression.
This will cause an update of amazon-efs-utils to be attempted every 30 days.
This update frequency is the official AWS recommended value.
For Specify schedule the recommended setting for AmazonEFSUtils is every 30 days.
Using AWS Systems Manager to automatically install or update Amazon EFS clients
Note that what is performed by AmazonEFSUtils is only the installation of amazon-efs-utils.
For mounting EFS, you will need to additionally perform the following
Resources:
  RunShellScriptAssociation:
    Type: AWS::SSM::Association
    DependsOn:
      - ConfigureAWSPackageAssociation
    Properties:
      AssociationName: !Sub "${Prefix}-shellscript-association"
      Name: AWS-RunShellScript
      OutputLocation:
        S3Location:
          OutputS3BucketName: !Ref LogBucketName
          OutputS3KeyPrefix: !Sub "${Prefix}/shellscript-association-log"
      Parameters:
        commands:
          - sudo mkdir /mnt/efs
          - sleep 90
          - !Sub "sudo mount -t efs ${FileSystemId}:/ /mnt/efs"
      Targets:
        - Key: InstanceIds
          Values:
            - !Ref Instance1
            - !Ref Instance2
      WaitForSuccessTimeoutSeconds: !Ref WaitForSuccessTimeoutSeconds
Code language: YAML (yaml)
Architecting
Use CloudFormation to build this environment and check the actual behavior.
Create CloudFormation stacks and check resources in stacks
Create CloudFormation stacks.
For information on how to create stacks and check each stack, please refer to the following page

After checking the resources in each stack, information on the main resources created this time is as follows
- Instance1: -i-0c59ea8cc2aeb73c2
- Instance2: ii-0dd528e705bdd4c14
- EFS: fs-04f30fea390abb082
The SSM status is also checked from the AWS Management Console.
First we check the status of the creation of associations.

We can see that indeed two SSM documents have been executed.
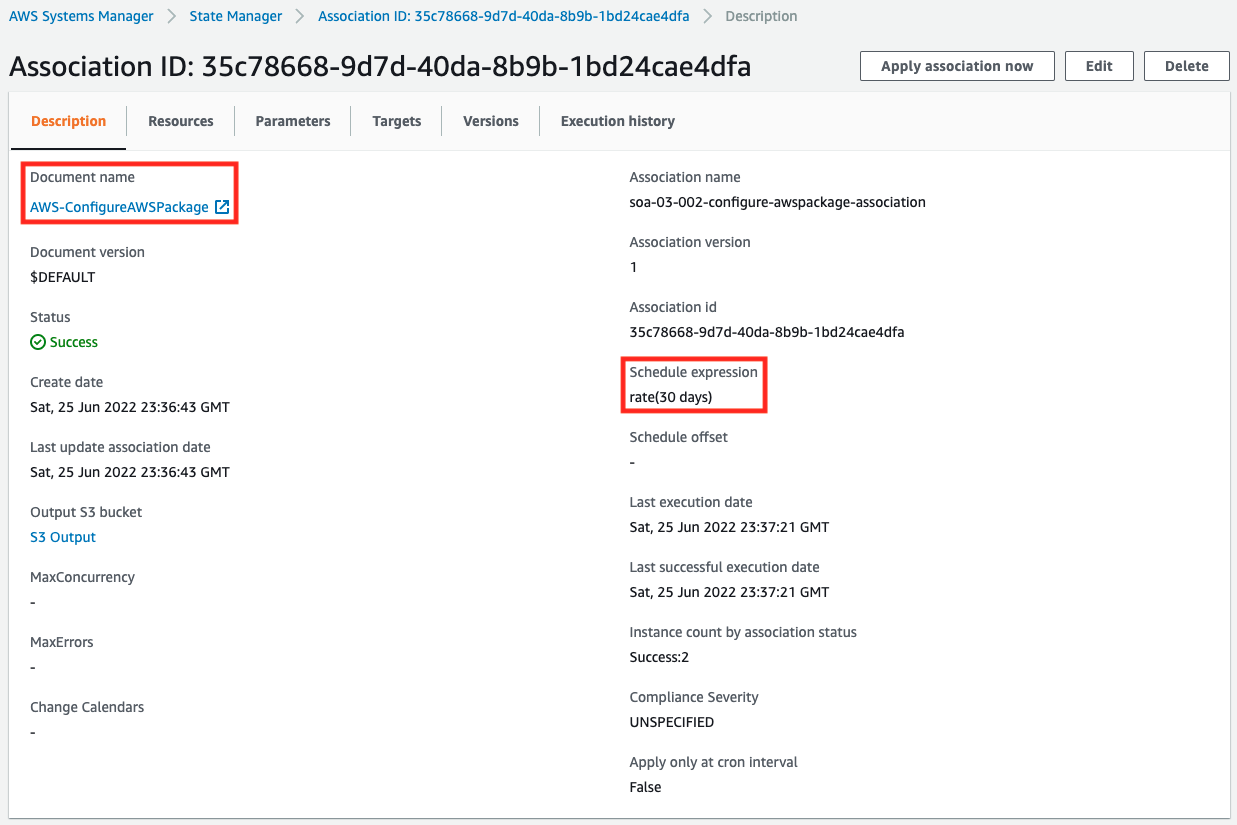
Next we check the details of the AWS-ConfigureAWSPackage association.


We see that the schedule is set to run every 30 days.
Looking at the parameters, we see that AmazonEFSUtils is set to install with in-place updates.
We have configured the execution logs to be stored in an S3 bucket.
The logs stored are as follows
Initiating AmazonEFSUtils 1.33.2-1 install
Plugin aws:runShellScript ResultStatus Success
install output: Running sh install.sh
Loaded plugins: extras_suggestions, langpacks, priorities, update-motd
Examining ./amazon-efs-utils-1.33.2-1.amzn2.noarch.rpm: amazon-efs-utils-1.33.2-1.amzn2.noarch
Marking ./amazon-efs-utils-1.33.2-1.amzn2.noarch.rpm to be installed
Resolving Dependencies
--> Running transaction check
---> Package amazon-efs-utils.noarch 0:1.33.2-1.amzn2 will be installed
--> Processing Dependency: stunnel >= 4.56 for package: amazon-efs-utils-1.33.2-1.amzn2.noarch
--> Running transaction check
---> Package stunnel.aarch64 0:4.56-6.amzn2.0.3 will be installed
--> Finished Dependency Resolution

Dependencies Resolved

================================================================================
 Package Arch    Version          Repository                               Size
================================================================================
Installing:
 amazon-efs-utils
         noarch  1.33.2-1.amzn2   /amazon-efs-utils-1.33.2-1.amzn2.noarch 198 k
Installing for dependencies:
 stunnel aarch64 4.56-6.amzn2.0.3 amzn2-core                              148 k

Transaction Summary
================================================================================
Install  1 Package (+1 Dependent package)

Total size: 346 k
Total download size: 148 k
Installed size: 627 k
Downloading packages:
Running transaction check
Running transaction test
Transaction test succeeded
Running transaction
  Installing : stunnel-4.56-6.amzn2.0.3.aarch64                             1/2
  Installing : amazon-efs-utils-1.33.2-1.amzn2.noarch                       2/2
  Verifying  : stunnel-4.56-6.amzn2.0.3.aarch64                             1/2
  Verifying  : amazon-efs-utils-1.33.2-1.amzn2.noarch                       2/2

Installed:
  amazon-efs-utils.noarch 0:1.33.2-1.amzn2

Dependency Installed:
  stunnel.aarch64 0:4.56-6.amzn2.0.3

Complete!
Loaded plugins: extras_suggestions, langpacks, priorities, update-motd
Package wget-1.14-18.amzn2.1.aarch64 already installed and latest version
Nothing to do
Collecting pip
  Downloading pip-22.1.2-py3-none-any.whl (2.1 MB)
     ━━━━━━━━━━━━━━━━━━━━━━━━━━━━━━━━━━━━━━━━ 2.1/2.1 MB 45.1 MB/s eta 0:00:00
Collecting wheel
  Downloading wheel-0.37.1-py2.py3-none-any.whl (35 kB)
Installing collected packages: wheel, pip
  Attempting uninstall: pip
    Found existing installation: pip 20.2.2
    Uninstalling pip-20.2.2:
      Successfully uninstalled pip-20.2.2
Successfully installed pip-22.1.2 wheel-0.37.1
Collecting botocore
  Downloading botocore-1.27.17-py3-none-any.whl (8.9 MB)
     ━━━━━━━━━━━━━━━━━━━━━━━━━━━━━━━━━━━━━━━━ 8.9/8.9 MB 81.8 MB/s eta 0:00:00
Collecting urllib3<1.27,>=1.25.4
  Downloading urllib3-1.26.9-py2.py3-none-any.whl (138 kB)
     ━━━━━━━━━━━━━━━━━━━━━━━━━━━━━━━━━━━━━━ 139.0/139.0 kB 20.3 MB/s eta 0:00:00
Collecting jmespath<2.0.0,>=0.7.1
  Downloading jmespath-1.0.1-py3-none-any.whl (20 kB)
Collecting python-dateutil<3.0.0,>=2.1
  Downloading python_dateutil-2.8.2-py2.py3-none-any.whl (247 kB)
     ━━━━━━━━━━━━━━━━━━━━━━━━━━━━━━━━━━━━━━ 247.7/247.7 kB 45.5 MB/s eta 0:00:00
Collecting six>=1.5
  Downloading six-1.16.0-py2.py3-none-any.whl (11 kB)
Installing collected packages: urllib3, six, jmespath, python-dateutil, botocore
Successfully installed botocore-1.27.17 jmespath-1.0.1 python-dateutil-2.8.2 six-1.16.0 urllib3-1.26.9

Successfully installed AmazonEFSUtils 1.33.2-1
Code language: plaintext (plaintext)
You can see that amazon-efs-utils and its dependencies have been installed.
Checking Action
Now that everything is ready, access an EC2 instance and confirm that amazon-efs-utils has been installed.
This time, we will access Instance1 to check.
Use SSM Session Manager to access the instance.
% aws ssm start-session --target i-0c59ea8cc2aeb73c2

Starting session with SessionId: root-02323560c270157c7
sh-4.2$
Code language: Bash (bash)
For more information on SSM Session Manager, please see the following page

Make sure amazon-efs-utils is installed.
sh-4.2$ sudo yum list installed | grep efs
amazon-efs-utils.noarch               1.33.2-1.amzn2                   installed
Code language: Bash (bash)
You can see that it has been successfully installed.
Thus we see that we can install amazon-efs-utils using SSM Distributor AmazonEFSUtils.
Checking the Operation of amazon-efs-utils installed by AmazonEFSUtils.
Check the disk status with the df command.
$ sudo yum list installed | grep efs
amazon-efs-utils.noarch               1.33.2-1.amzn2                   installed
sh-4.2$
sh-4.2$
sh-4.2$ df -hT
Filesystem                                              Type      Size  Used Avail Use% Mounted on
devtmpfs                                                devtmpfs  178M     0  178M   0% /dev
tmpfs                                                   tmpfs     215M     0  215M   0% /dev/shm
tmpfs                                                   tmpfs     215M  356K  215M   1% /run
tmpfs                                                   tmpfs     215M     0  215M   0% /sys/fs/cgroup
/dev/nvme0n1p1                                          xfs       8.0G  1.6G  6.4G  20% /
/dev/nvme0n1p128                                        vfat       10M  3.8M  6.3M  38% /boot/efi
fs-04f30fea390abb082.efs.ap-northeast-1.amazonaws.com:/ nfs4      8.0E     0  8.0E   0% /mnt/efs
Code language: Bash (bash)
EFS is mounted.
You can see that amazon-efs-utils is successfully in action.
Finally, we will perform a file write to EFS.
sh-4.2$ cd /mnt/efs

sh-4.2$ sudo touch test.txt

sh-4.2$ ls
test.txt
Code language: Bash (bash)
We were able to write successfully.
The amazon-efs-utils installed with AmazonEFSUtils worked fine.
Summary
We have shown you how to install the EFS client according to best practices.
We have verified that amazon-efs-utils can be newly installed or periodically updated by using SSM Distributor AmazoneFsutils.