Aurora Serverless v1 with CFN
Aurora Serverless is a managed database service provided by AWS.
Amazon Aurora Serverless is an on-demand, autoscaling configuration for Amazon Aurora. It automatically starts up, shuts down, and scales capacity up or down based on your application’s needs. You can run your database on AWS without managing database capacity.
Amazon Aurora Serverless
Our goal is to build Aurora Serverless v1 with CloudFormation and access it from an EC2 instance.
There are two versions of Aurora Serverless, but we will focus on v1.
For more information on Aurora Serverless v2, please see the following page.
Environment
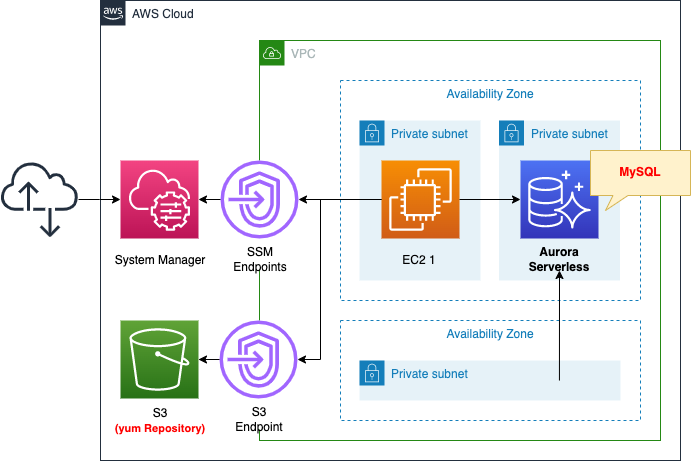
Create three subnets in the VPC.
All of them are private subnets with no access to the Internet.
Create Aurora Serverless and associate it with two subnets with different AZs.
Specify the latest version of the MySQL type.
Create an EC2 instance.
Use it as a client to connect to Aurora Serverless.
Specify the latest version of Amazon Linux 2 as the OS.
Create an SSM endpoint.
This is for remote access to the EC2 instance using SSM Session Manager.
Also create an S3 endpoint.
This is used to access the yum repository that will be built on the S3 bucket.
CloudFormation template files
Build the above configuration with CloudFormation.
The CloudFormation templates are located at the following URL
https://github.com/awstut-an-r/awstut-fa/tree/main/058
Explanation of key points of the template files
Security Group
Check the security groups for the EC2 instance and Aurora Serverless.
Resources:
  InstanceSecurityGroup:
    Type: AWS::EC2::SecurityGroup
    Properties:
      GroupName: !Sub "${Prefix}-InstanceSecurityGroup"
      GroupDescription: Deny All.
      VpcId: !Ref VPC

  DBSecurityGroup:
    Type: AWS::EC2::SecurityGroup
    Properties:
      GroupName: !Sub "${Prefix}-DBSecurityGroup"
      GroupDescription: DBSecurityGroup.
      VpcId: !Ref VPC
      SecurityGroupIngress:
        - IpProtocol: tcp
          FromPort: !Ref MySQLPort
          ToPort: !Ref MySQLPort
          SourceSecurityGroupId: !Ref InstanceSecurityGroup
Code language: YAML (yaml)
The former is for instances.
It does not specify the inbound communication to be allowed.
In this configuration, there is no inbound communication to the instance.
The latter is for Aurora Serverless.
This time, since Aurora Serverless of the MySQL type is created, the port for MySQL communication (tcp/3306) is permitted.
For the source, set the aforementioned security group for the instance.
Aurora Serverless
Resources:
  DBSubnetGroup:
    Type: AWS::RDS::DBSubnetGroup
    Properties:
      DBSubnetGroupName: dbsubnetgroup
      DBSubnetGroupDescription: test subnet group
      SubnetIds:
        - !Ref PrivateSubnet2
        - !Ref PrivateSubnet3

  DBCluster:
    Type: AWS::RDS::DBCluster
    Properties:
      DatabaseName: !Ref DBName
      DBClusterIdentifier: !Ref DBClusterIdentifier
      DBSubnetGroupName: !Ref DBSubnetGroup
      Engine: !Ref DBEngine
      EngineMode: serverless
      EngineVersion: !Ref DBEngineVersion
      MasterUsername: !Ref DBMasterUsername
      MasterUserPassword: !Ref DBMasterUserPassword
      StorageEncrypted: true
      VpcSecurityGroupIds:
        - !Ref DBSecurityGroup

  #DBInstance:
  #  Type: AWS::RDS::DBInstance
  #  Properties:
  #    ...
Code language: YAML (yaml)
To create Aurora Serverless, at least two resources must be defined.
The first is the DB subnet group.
There are requirements for the subnets to be associated with RDS.
Create subnets in different Availability Zones for the DB subnet group that you use for your Aurora Serverless v1 DB cluster.
Configuration requirements for Aurora Serverless v1
Specify the subnets created for each of the two AZs to meet the above requirements.
The second is a DB cluster.
The key point is the EngineMode property.
Specify “serverless” to create Aurora Serverless.
Specify the engine and version of the DB to be created in the Engine and EngineVersion properties.
In this case, we will specify the most recent MySQL version as of July 2022, so specify “aurora-mysql” for the former and “5.7.mysql_aurora.2.07.1” for the latter.
Please note that “aurora” must be specified in the Engine property when selecting MySQL 5.6 series.
Please refer to the following page for the engine versions supported by Aurora Serverless v1.
When creating Aurora Serverless, it is sufficient to define a DB cluster.
Since Aurora Serverless is a managed service, you do not need to define any internally generated DB instances.
EC2 Instance
Resources:
  Instance:
    Type: AWS::EC2::Instance
    Properties:
      IamInstanceProfile: !Ref InstanceProfile
      ImageId: !Ref ImageId
      InstanceType: !Ref InstanceType
      NetworkInterfaces:
        - DeviceIndex: 0
          SubnetId: !Ref PrivateSubnet
          GroupSet:
            - !Ref InstanceSecurityGroup
      UserData: !Base64 |
        #!/bin/bash -xe
        yum update -y
        yum install -y mariadb
Code language: YAML (yaml)
2 instance is used to verify the connection to Aurora Serverless.
Therefore, in the UserData property, as part of the initialization process of the instance, we specify package installation by yum.
This time, since we are creating a MySQL type Aurora Serverless, we will install the client for MySQL (mysql) by installing the mariadb package.
For more information on the initialization process, please refer to the following page
For more information on how to connect to RDS from Amazon Linux 2, please refer to the following page
For information on how to run yum in a private subnet, please refer to the following page
Architecting
Use CloudFormation to build this environment and check the actual behavior.
Create CloudFormation stacks and check resources in stacks
Create CloudFormation stacks.
For information on how to create stacks and check each stack, please refer to the following page

After checking the resources in each stack, information on the main resources created this time is as follows
- EC2 instance: i-096b962150f8473aa
- DB cluster for Aurora Serverless: fa-058-dbcluster
- Aurora Serverless endpoint: fa-058-dbcluster.cluster-cl50iikpthxs.ap-northeast-1.rds.amazonaws.com
- Master user name for Aurora Serverless: testuser
- Password for the master user of Aurora Serverless: Passw0rd
- Database name to be created in Aurora Serverless: testdb
We also check the creation status of Aurora Serverless from the AWS Management Console.
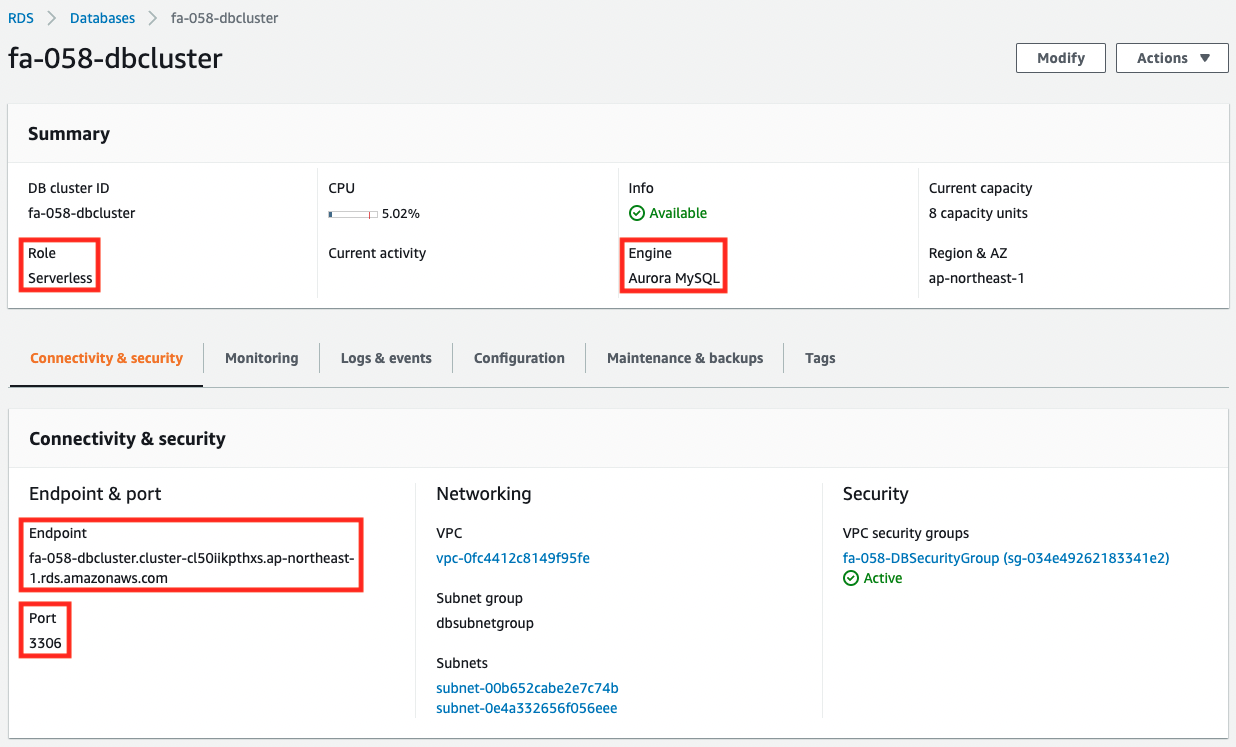
We can see that the DB cluster is indeed in Aurora Serverless mode and the engine type is the MySQL type.
We can also see that the endpoint mentioned above has been created and the communication port is 3306.
Check Action
Now that everything is ready, let’s access the EC2 instance.
Use SSM Session Manager to access the instance.
% aws ssm start-session --target i-096b962150f8473aa

Starting session with SessionId: root-08ee1c5f1155eb7dd
sh-4.2$
Code language: Bash (bash)
For more information on SSM Session Manager, please see the following page
Check the installation status of mariadb.
sh-4.2$ yum list installed | grep mariadb
mariadb.x86_64                        1:5.5.68-1.amzn2                 @amzn2-core
mariadb-libs.x86_64                   1:5.5.68-1.amzn2                 installed
Code language: Bash (bash)
Installed successfully.
Next, check mysql client.
sh-4.2$ mysql -V
mysql  Ver 15.1 Distrib 5.5.68-MariaDB, for Linux (x86_64) using readline 5.1
Code language: Bash (bash)
The client is now installed.
Now that the client installation has been confirmed, connect to Aurora Serverless.
Specify the Aurora Serverless endpoint and pass the port number, user name, and password as arguments.
$ mysql -h fa-058-dbcluster.cluster-cl50iikpthxs.ap-northeast-1.rds.amazonaws.com -P 3306 -u testuser -p testdb
Enter password:
Welcome to the MariaDB monitor.  Commands end with ; or \g.
Your MySQL connection id is 6
Server version: 5.7.12 MySQL Community Server (GPL)

Copyright (c) 2000, 2018, Oracle, MariaDB Corporation Ab and others.

Type 'help;' or '\h' for help. Type '\c' to clear the current input statement.

MySQL [testdb]>
Code language: Bash (bash)
You have successfully connected.
You can see that Aurora Serverless has been successfully created.
Summary
We have confirmed how to create Aurora Serverless with CloudFormation.