Delete resource (NAT gateway) used only for initial build with CFN custom resource
For example, when creating an ECS, you need to be able to access the Internet if you want to pull images from Dockerhub.
If the ECS cluster is set up on a private subnet, a NAT gateway is placed on the public subnet to provide a route to the Internet.
However, in a verification environment, for example, once the image pull is complete, the NAT gateway may no longer be used and unnecessary resources may continue to act.
Therefore, this page aims to remove the used resources (e.g. NAT gateway) by using CloudFormation custom resource.
Environment
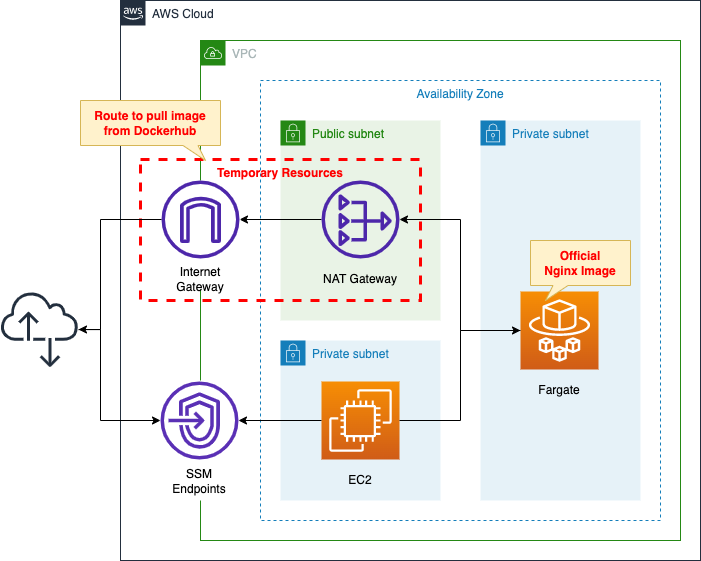
Create a Fargate type ECS and place it on a private subnet.
Create a container from the latest Nginx image obtained from Dockerhub.
Place a NAT gateway on the public subnet to retrieve the official Nginx image from DockerHub.
After the ECS build is complete, the NAT gateway and Internet gateway are no longer needed.
Create a Lambda function to remove them and associate this with a CloudFormation custom resource.
Set this function to run when the CloudFormation stack is created.
Create an EC2 instance.
Use it as a client to access the container.
CloudFormation template files
Build the above configuration with CloudFormation.
The CloudFormation templates are located at the following URL
https://github.com/awstut-an-r/awstut-fa/tree/main/071
Explanation of key points of the template files
The purpose of this project is to remove unnecessary resources using CloudFormation custom resource.
Specifically, we will remove the following four resources
- NAT gateway
- Internet Gateway
- Route table associated with the subnet for ECS (private subnet)
- Route tables associated with subnets for NAT gateways (public subnets)
Custom Resource
Resources:
  CustomResource:
    Type: Custom::CustomResource
    Properties:
      ServiceToken: !GetAtt CustomResourceLambdaFunction.Arn
Code language: YAML (yaml)
No special configuration is required.
Set the ARN of the Lambda function described below to the ServiceToken property and associate the function with the custom resource.
For basic information on CloudFormation custom resource, please refer to the following page
Lambda Function
Resources:
  CustomResourceLambdaFunction:
    Type: AWS::Lambda::Function
    Properties:
      Architectures:
        - !Ref Architecture
      Environment:
        Variables:
          CONTAINER_ROUTE_TABLE: !Ref ContainerRouteTable
          EIP_ALLOCATION_ID: !Ref EIPAllocationId
          INTERNET_GATEWAY: !Ref IGW
          NAT_GATEWAY: !Ref NATGateway
          PUBLIC_ROUTE_TABLE: !Ref PublicRouteTable
          REGION: !Ref AWS::Region
          VPC: !Ref VPC
      Code:
        ZipFile: |
          ...
      FunctionName: !Sub "${Prefix}-custom-resource-lambda-function"
      Handler: !Ref Handler
      Runtime: !Ref Runtime
      Role: !GetAtt CustomResourceLambdaFunctionRole.Arn
      Timeout: !Ref Timeout
Code language: YAML (yaml)
Define the code to be executed by the Lambda function in inline notation.
For more information, please refer to the following page

The Environment property allows you to define environment variables that can be passed to the function.
Specifically, these are the IDs of the NAT gateway, the Internet gateway, and the two route tables to be deleted.
Here is the code to run
import boto3
import cfnresponse
import os
import time

container_route_table = os.environ['CONTAINER_ROUTE_TABLE']
eip_allocation_id = os.environ['EIP_ALLOCATION_ID']
internet_gateway = os.environ['INTERNET_GATEWAY']
nat_gateway = os.environ['NAT_GATEWAY']
public_route_table = os.environ['PUBLIC_ROUTE_TABLE']
region = os.environ['REGION']
vpc = os.environ['VPC']

client = boto3.client('ec2', region_name=region)

CREATE = 'Create'
response_data = {}

def lambda_handler(event, context):
  try:
    if event['RequestType'] == CREATE:
      response1 = client.delete_route(
        DestinationCidrBlock='0.0.0.0/0',
        RouteTableId=container_route_table)
      print(response1)

      response2 = client.delete_route(
        DestinationCidrBlock='0.0.0.0/0',
        RouteTableId=public_route_table)
      print(response2)

      response3 = client.delete_nat_gateway(
        NatGatewayId=nat_gateway)
      print(response3)

      time.sleep(60)

      response4 = client.release_address(
        AllocationId=eip_allocation_id)
      print(response4)

      response5 = client.detach_internet_gateway(
        InternetGatewayId=internet_gateway,
        VpcId=vpc)
      print(response5)

      response6 = client.delete_internet_gateway(
        InternetGatewayId=internet_gateway)
      print(response6)

    cfnresponse.send(event, context, cfnresponse.SUCCESS, response_data)

  except Exception as e:
    print(e)
    cfnresponse.send(event, context, cfnresponse.FAILED, response_data)
Code language: YAML (yaml)
The cfnresponse module is used to implement the function as a Lambda-backed custom resource.
The code can be summarized as follows:
- retrieve the environment variables defined in the CloudFormation template by accessing os.environ.
- create a client object for EC2 with Boto3.
- Delete the default route for the NAT gateway from the route table for the private subnet using the delete_route method.
- Delete the default route for the Internet Gateway from the route table for the public subnet using the delete_route method.
- Delete a NAT gateway using the delete_nat_gateway method.
- After deleting the NAT gateway and waiting 60 seconds, release the Elastic IP address attached to the NAT gateway using the release_address method.
- detach_internet_gateway method to detach the Internet gateway from the VPC.
- delete_internet_gateway method to delete the Internet Gateway.
The reason for the 60-second wait in item 6 is to wait for the deletion of the NAT gateway to complete.
Please note that if you do not wait long enough for the deletion, the following error will occur
An error occurred (AuthFailure) when calling the ReleaseAddress operation: You do not have permission to access the specified resource.
The reason for releasing the Elastic IP address is to completely break the association with the VPC.
You can’t detach an internet gateway if the VPC has resources with associated public IP addresses or Elastic IP addresses.
Connect to the internet using an internet gateway
IAM role for Lambda function
Resources:
  CustomResourceLambdaFunctionRole:
    Type: AWS::IAM::Role
    Properties:
      AssumeRolePolicyDocument:
        Version: 2012-10-17
        Statement:
          - Effect: Allow
            Action: sts:AssumeRole
            Principal:
              Service:
                - lambda.amazonaws.com
      ManagedPolicyArns:
        - arn:aws:iam::aws:policy/service-role/AWSLambdaBasicExecutionRole
      Policies:
        - PolicyName: DeleteTemporaryResourcePolicy
          PolicyDocument:
            Version: 2012-10-17
            Statement:
              - Effect: Allow
                Action:
                  - ec2:DeleteInternetGateway
                  - ec2:DetachInternetGateway
                Resource:
                  - !Sub "arn:aws:ec2:${AWS::Region}:${AWS::AccountId}:internet-gateway/${IGW}"
                  - !Sub "arn:aws:ec2:${AWS::Region}:${AWS::AccountId}:vpc/${VPC}"
              - Effect: Allow
                Action:
                  - ec2:DeleteRoute
                Resource:
                  - !Sub "arn:aws:ec2:${AWS::Region}:${AWS::AccountId}:route-table/${PublicRouteTable}"
                  - !Sub "arn:aws:ec2:${AWS::Region}:${AWS::AccountId}:route-table/${ContainerRouteTable}"
              - Effect: Allow
                Action:
                  - ec2:DeleteNatGateway
                Resource:
                  - !Sub "arn:aws:ec2:${AWS::Region}:${AWS::AccountId}:natgateway/${NATGateway}"
              - Effect: Allow
                Action:
                  - ec2:ReleaseAddress
                Resource: "*"
                #Resource: !Sub "arn:aws:ec2:${AWS::Region}:${AWS::AccountId}:eip/${EIPAllocationId}"
Code language: YAML (yaml)
In addition to AWSLambdaVPCAccessExecutionRole, grant permissions to delete and detach four resources.
Please note the authorization settings for releasing Elastic IP addresses.
The value specified for the Resource property is “*”.
Note that even if you specify the ARN of the Elastic IP address for this property, an authorization error will occur.
(Reference) Task Definition
Resources:
  TaskDefinition:
    Type: AWS::ECS::TaskDefinition
    Properties:
      ContainerDefinitions:
        - Name: !Sub "${Prefix}-container"
          Image: nginx:latest
      Cpu: !Ref TaskCpu
      ExecutionRoleArn: !Ref FargateTaskExecutionRole
      Memory: !Ref TaskMemory
      NetworkMode: awsvpc
      RequiresCompatibilities:
        - FARGATE
      TaskRoleArn: !Ref TaskRole
Code language: YAML (yaml)
Set the Image property to “nginx:latest” to create a container from the latest version of the Nginx image from Dockerhub.
This will access the Internet via the NAT gateway and cause the action to pull the image from Dockerhub.
Architecting
Using CloudFormation, we will build this environment and verify the actual behavior.
Create CloudFormation stacks and check resources in stacks
Create a CloudFormation stacks.
Please refer to the following pages for information on how to create stacks and check each stack.

After checking the resources for each stack, information on the main resources created this time is as follows
- ECS cluster: fa-071-cluster
- ECS service: fa-071-service
- EC2 instance: i-090a6eb7047448e04
- NAT gateway: nat-0cbbcb99b52367f68
- Internet Gateway: igw-079babd830354ac3a
- Elastic IP address: 54.248.104.49
- Route table associated with private subnet: rtb-06e6f97bd2f575051
- Route table associated with public subnet: rtb-039ff9202847ec4a5
Check the created resource from the AWS Management Console.
First check the CloudFormation stack.
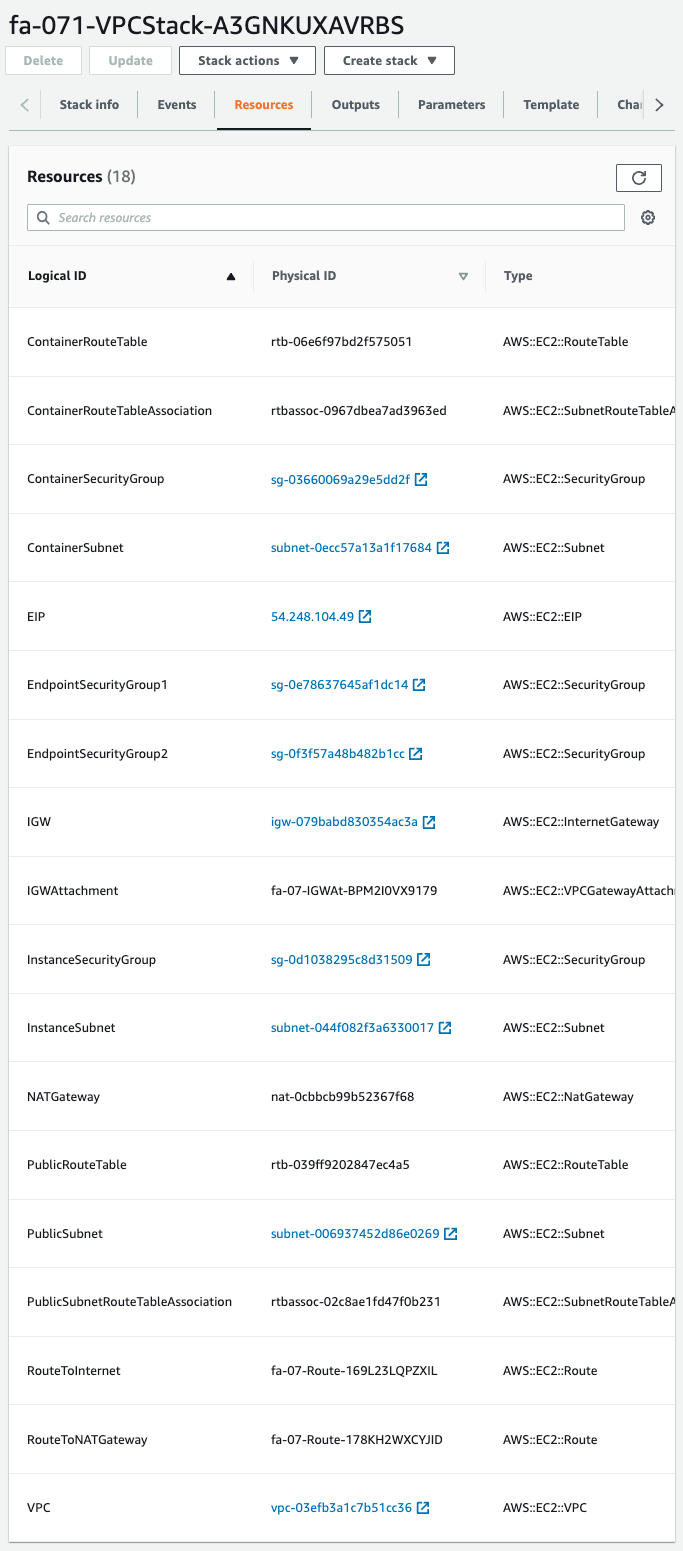
We can see that the resource to be deleted has indeed been created.
Next, check the CloudFormation custom resource creation status.
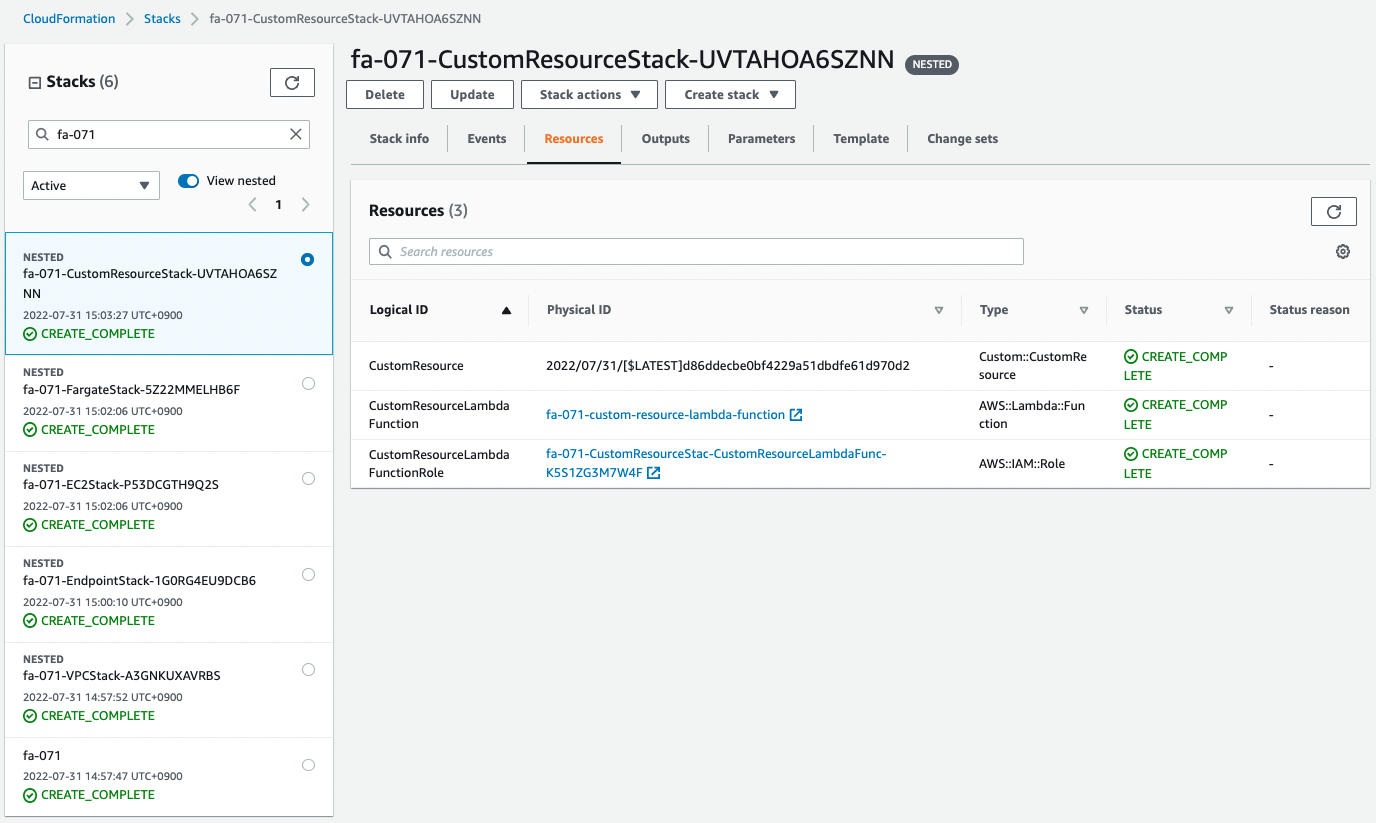
This also shows that the resource has been created.
This means that the NAT gateway, etc., once created, was deleted by this custom resource.
Check the ECS task.
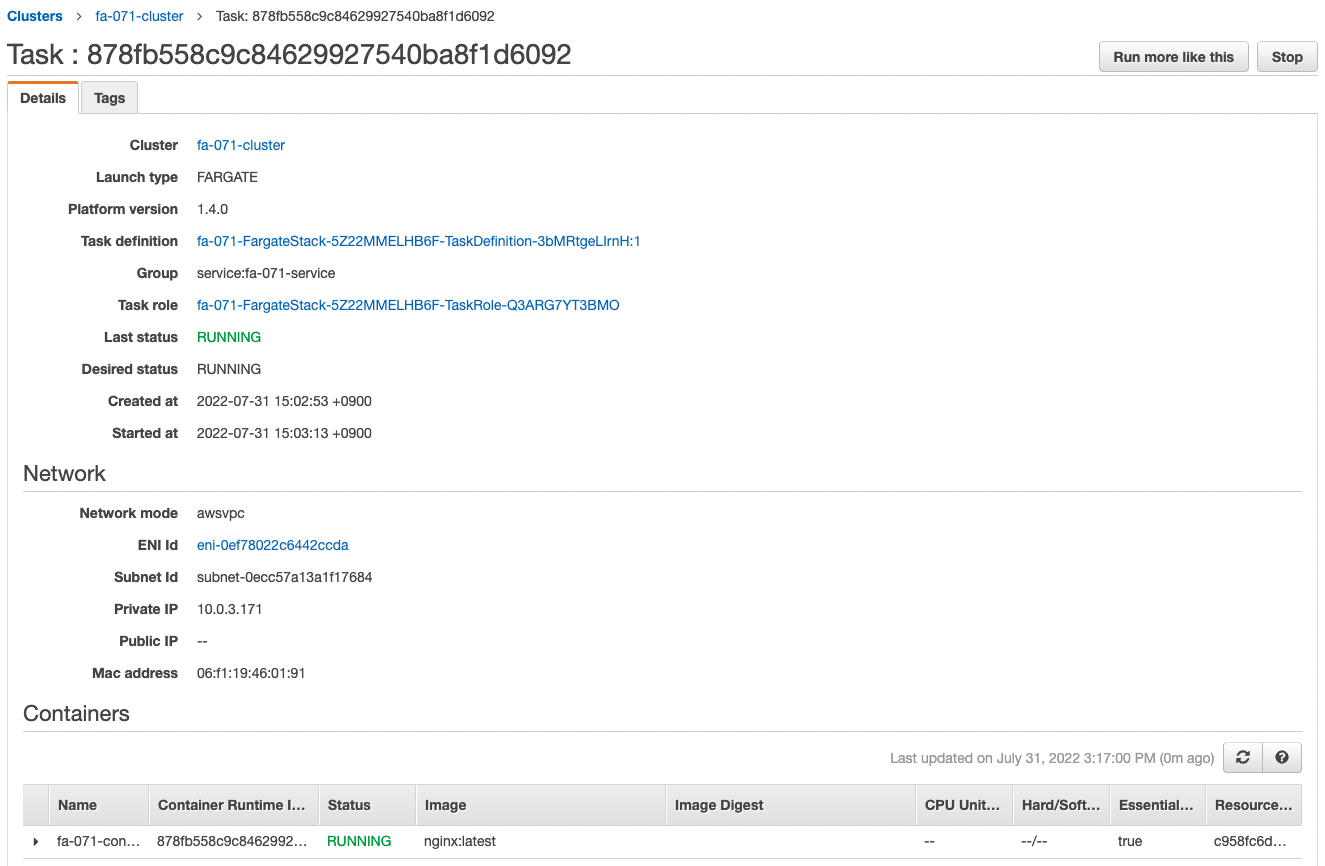
You can see that the private address assigned to the created task is “10.0.3.171”.
Checking Action
Now that everything is ready, let’s check the status.
Checking Resource Status
First, check the execution log of the Lambda function associated with the CloudFormation custom resource.
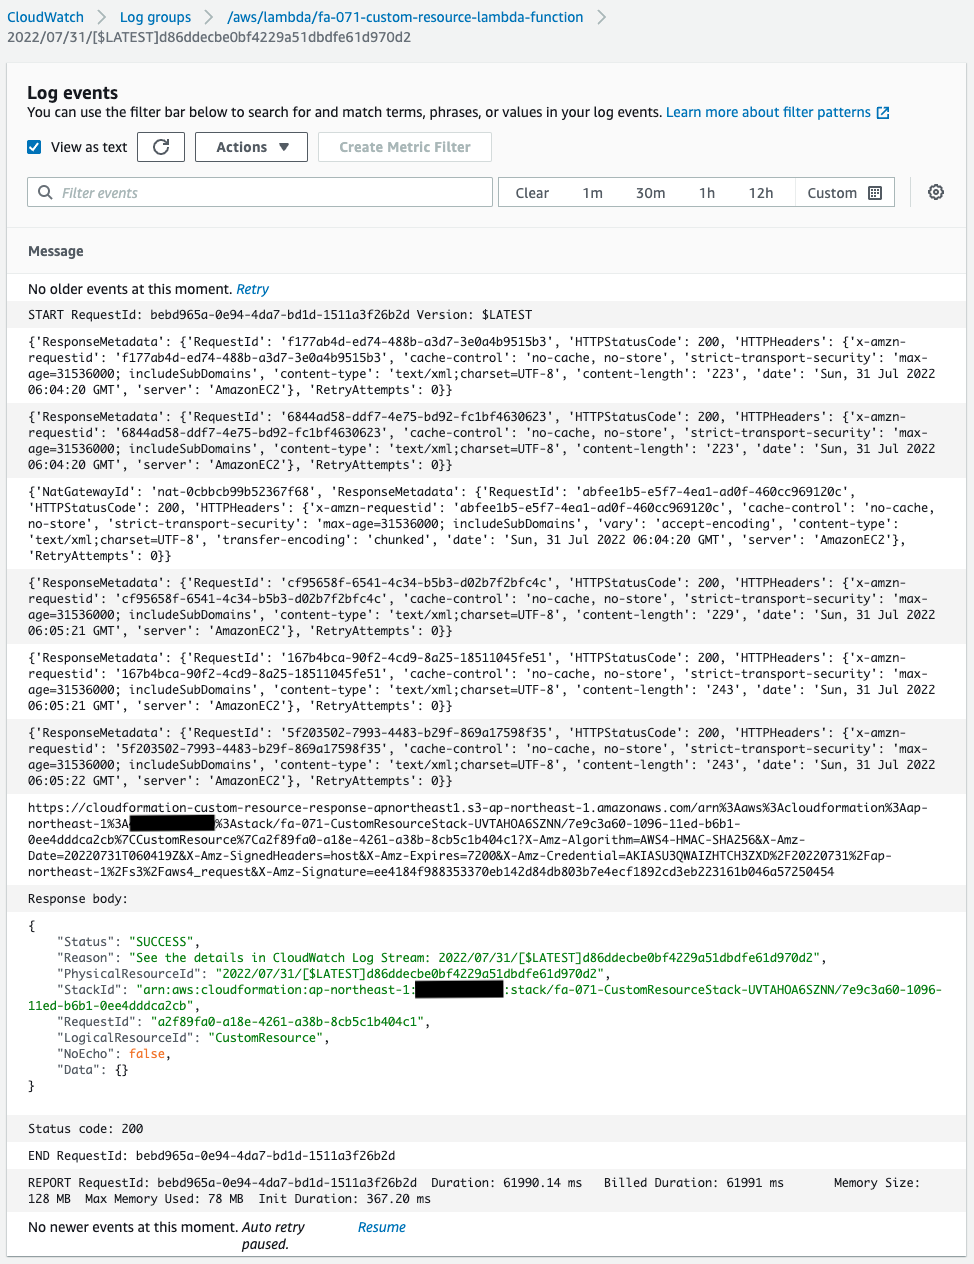
We can see that the various resource deletions were indeed successfully executed.
Next, check the routing information in the two route tables.
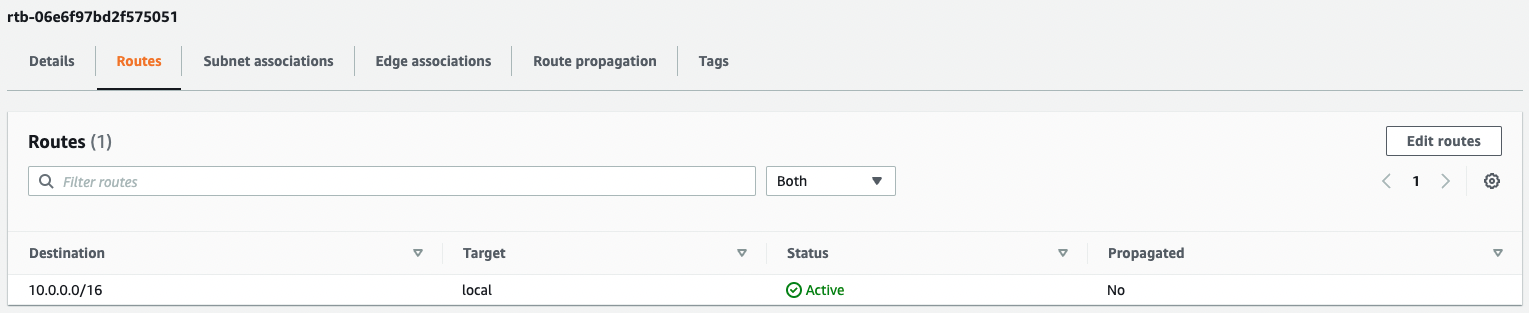

We can see that the default route has indeed been removed from the two route tables.
Next, we check the status of the NAT gateway.
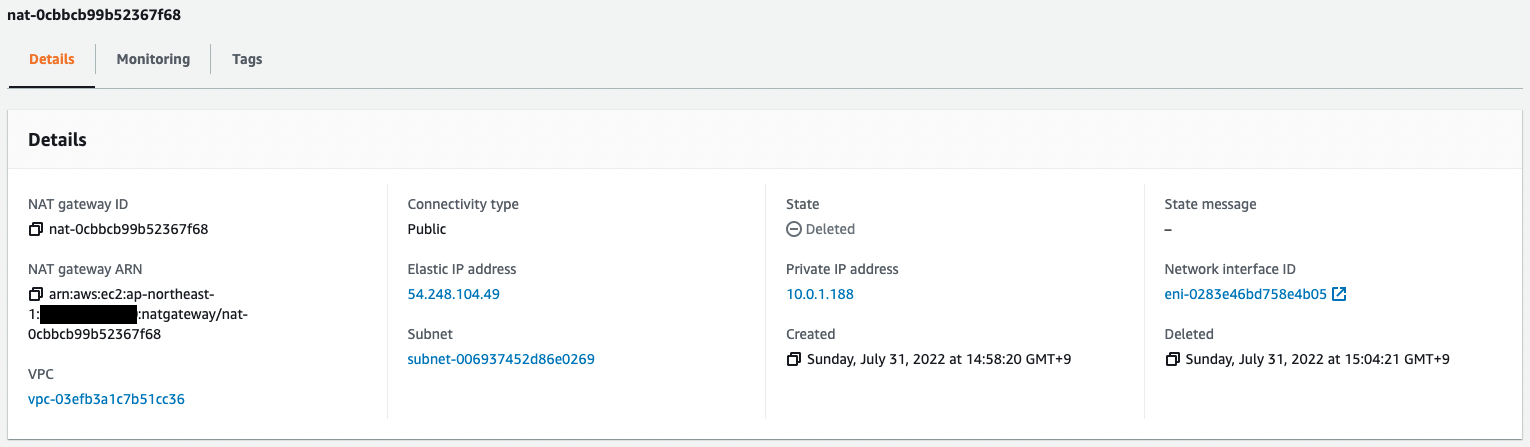
The Status is “Deleted”.
We can see that the NAT gateway has indeed been deleted.
Check the Elastic IP address attached to the NAT gateway.

We can confirm that it has been released as well.
Finally, we check the status of the Internet gateway.

We can see that it has already been removed.
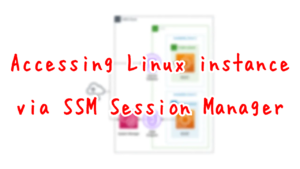
Accessing Container
Checking the Operation of the Container by accessing the EC2 instance.
Use SSM Session Manager to access the EC2 instance.
% aws ssm start-session --target i-090a6eb7047448e04

Starting session with SessionId: root-03345556116251505
sh-4.2$Code language: JavaScript (javascript)
For more information on SSM Session Manager, please see the following page
Access the container in the task using the curl command.
sh-4.2$ curl http://10.0.3.171
<!DOCTYPE html>
<html>
<head>
<title>Welcome to nginx!</title>
<style>
html { color-scheme: light dark; }
body { width: 35em; margin: 0 auto;
font-family: Tahoma, Verdana, Arial, sans-serif; }
</style>
</head>
<body>
<h1>Welcome to nginx!</h1>
<p>If you see this page, the nginx web server is successfully installed and
working. Further configuration is required.</p>

<p>For online documentation and support please refer to
<a href="http://nginx.org/">nginx.org</a>.<br/>
Commercial support is available at
<a href="http://nginx.com/">nginx.com</a>.</p>

<p><em>Thank you for using nginx.</em></p>
</body>
</html>
Code language: Bash (bash)
I was able to access the site successfully.
The Nginx container is indeed in action.
This means that during the initial build of the ECS, the Nginx image was obtained from Dockerhub by accessing the Internet through the NAT gateway.
Then, after the build was completed, the NAT gateway and other resources were removed by CloudFormation custom resource.
Summary
We have seen how to remove used resources (e.g. NAT gateways) by using CloudFormation custom resource.