EC2 Auto Scaling – step scaling based on CPU utilization
The following pages cover the basics of EC2 Auto Scaling.

This page will review the behavior of dynamic scaling.
There are three types of dynamic scaling in EC2 Auto Scaling
- Simple scaling
- Step scaling
- Target Tracking Scaling
In this page, we will check the behavior of step scaling.
It scales the number of instances based on CPU utilization.
For more information on simple scaling, please refer to the following page.

For more information on target tracking scaling, please refer to the following page

Environment
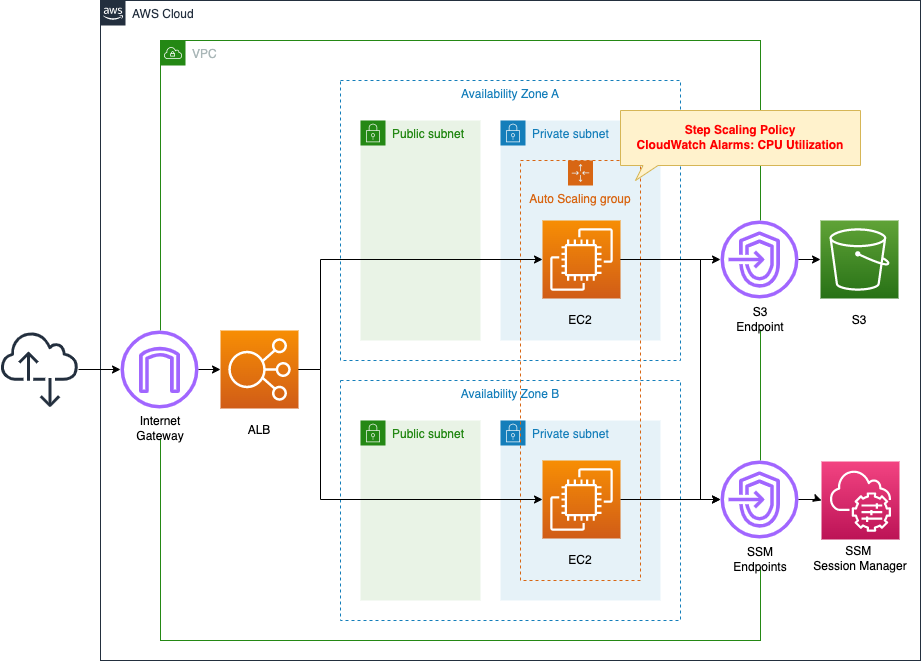
Create an ALB and attach an EC2 Auto Scaling instance in private subnets.
Set the number of Auto Scaling instances as follows
- Minimum number: 1
- Maximum number: 4
- Desired number: 1
Set the scaling to run based on CPU usage.
If CPU utilization is 50~70%, scale out for 1 unit; if CPU utilization exceeds 70%, scale out for 2 units.
If CPU utilization is less than 50%, scale in for 1 unit.
The EC2 instance to be started in the Auto Scaling group is the latest version of Amazon Linux 2.
Install Apache from the yum repository on S3 and configure it to act as a web server.
Use SSM Session Manager to access the launched instance.
CloudFormation template files
Build the above configuration with CloudFormation.
The CloudFormation templates are located at the following URL
https://github.com/awstut-an-r/awstut-fa/tree/main/088
Explanation of key points of the template files
This page focuses on how to configure step scaling in EC2 Auto Scaling.
For information on how to attach resources in a private subnet to an ALB, please refer to the following page
For information on how to execute yum on instances in a private subnet, please refer to the following page
(Reference) Launch Template
Resources:
  LaunchTemplate:
    Type: AWS::EC2::LaunchTemplate
    Properties:
      LaunchTemplateData:
        IamInstanceProfile:
          Arn: !GetAtt InstanceProfile.Arn
        ImageId: !Ref ImageId
        InstanceType: !Ref InstanceType
        SecurityGroupIds:
          - !Ref InstanceSecurityGroup
        UserData: !Base64 |
          #!/bin/bash -xe
          yum update -y
          yum install -y httpd
          systemctl start httpd
          systemctl enable httpd
          ec2-metadata -i > /var/www/html/index.html
      LaunchTemplateName: !Sub "${Prefix}-LaunchTemplate"
Code language: YAML (yaml)
A Launch template is a resource for configuration information for EC2 instances to be launched within an Auto Scaling group.
You must create a Launch template or Launch configuration to configure EC2 Auto Scaling.
However, it is currently deprecated to configure Auto Scaling using Launch configuration.
We strongly recommend that you do not use launch configurations. They do not provide full functionality for Amazon EC2 Auto Scaling or Amazon EC2. We provide information about launch configurations for customers who have not yet migrated from launch configurations to launch templates.
Launch configurations
These are basically the same configuration items as for EC2 instances.
For example, specify the AMI and instance type of the instance to be launched with the ImageId and InstanceType properties.
User data can be set with the UserData property.
This time we will install and activate Apache, write the instance ID in an HTML file, and set it in the Apache root page.
Auto Scaling Group
Resources:
  AutoScalingGroup:
    Type: AWS::AutoScaling::AutoScalingGroup
    Properties:
      AutoScalingGroupName: !Sub "${Prefix}-AutoScalingGroup"
      DesiredCapacity: !Ref DesiredCapacity
      LaunchTemplate:
        LaunchTemplateId: !Ref LaunchTemplate
        Version: !GetAtt LaunchTemplate.LatestVersionNumber
      MaxSize: !Ref MaxSize
      MinSize: !Ref MinSize
      VPCZoneIdentifier:
        - !Ref PrivateSubnet1
        - !Ref PrivateSubnet2
      TargetGroupARNs:
        - !Ref ALBTargetGroup
Code language: YAML (yaml)
No special settings are required for the Auto Scaling group in configuring step scaling.
Set the number of instances to be created in the group as follows
Set the desired number to 1 in the DesiredCapacity property.
Set the maximum number to 4 in the MaxSize property.
Set the minimum number to 1 in the MinSize property.
Scaling Policy
Resources:
  ScalingPolicy1:
    Type: AWS::AutoScaling::ScalingPolicy
    Properties:
      AdjustmentType: ChangeInCapacity
      AutoScalingGroupName: !Ref AutoScalingGroup
      MetricAggregationType: Average
      PolicyType: StepScaling
      StepAdjustments:
        - MetricIntervalLowerBound: !Ref MetricIntervalLowerBound1
          MetricIntervalUpperBound: !Ref MetricIntervalUpperBound1
          ScalingAdjustment: !Ref ScalingAdjustment1
        - MetricIntervalLowerBound: !Ref MetricIntervalLowerBound2
          ScalingAdjustment: !Ref ScalingAdjustment2

  ScalingPolicy2:
    Type: AWS::AutoScaling::ScalingPolicy
    Properties:
      AdjustmentType: ChangeInCapacity
      AutoScalingGroupName: !Ref AutoScalingGroup
      MetricAggregationType: Average
      PolicyType: StepScaling
      StepAdjustments:
        - MetricIntervalUpperBound: !Ref MetricIntervalUpperBound2
          ScalingAdjustment: !Ref ScalingAdjustment3
Code language: YAML (yaml)
To configure step scaling, two scaling policies are created.
The first policy is for scaling out and the second is for scaling in.
Set the type of scaling policy in the PolicyType property.
In this case, we specify “StepScaling” since this is step scaling.
The MetricAggregationType property allows you to set the aggregation type of CloudWatch metrics.
In this case, we specify “Average,” which means average value.
The StepAdjustments property allows you to set the step scaling settings.
Step scaling settings take the form of defining step adjustments.
The step adjustment is explained in detail on the official AWS page and consists of three elements.
- Lower bound of the metric value with respect to the threshold value: MetricIntervalLowerBound property
- Upper bound of the metric value based on the threshold value: MetricIntervalUpperBound property
- Number of instances to increase or decrease: ScalingAdjustment property
As explained in the CloudWatch alarm section, we will use 50% as the threshold value.
In this case, we will set the following.
| Scaling Policy | Step Adjustment | MetricIntervalLowerBound | MetricIntervalUpperBound | ScalingAdjustment |
| ScalingPolicy1 | 1 | 0.0 | 20.0 | 1 |
| ScalingPolicy1 | 2 | 20.0 | – | 2 |
| ScalingPolicy2 | 1 | – | 0.0 | -1 |
The policy for scale-out defines two steps.
The first is to add one instance when CPU utilization is 50~70%.
The second is to add two instances when CPU utilization is 70% or higher.
The policy for scale-in defines one step.
The second is for removing one instance for one unit when CPU utilization is below 50%.
Set the scaling adjustment type with the AdjustmentType property.
In this case, “ChangeInCapacity” is specified.
The description of this type is quoted below.
ChangeInCapacity — Increment or decrement the current capacity of the group by the specified value. A positive value increases the capacity and a negative adjustment value decreases the capacity. For example: If the current capacity of the group is 3 and the adjustment is 5, then when this policy is performed, we add 5 capacity units to the capacity for a total of 8 capacity units.
Scaling adjustment types
CloudWatch Alarms
Resources:
  Alarm1:
    Type: AWS::CloudWatch::Alarm
    Properties:
      AlarmActions:
        - !Ref ScalingPolicy1
      AlarmName: !Sub "${Prefix}-Alarm1"
      ComparisonOperator: GreaterThanOrEqualToThreshold
      Dimensions:
        - Name: AutoScalingGroupName
          Value: !Ref AutoScalingGroup
      EvaluationPeriods: !Ref AlarmEvaluationPeriod
      MetricName: CPUUtilization
      Namespace: AWS/EC2
      Period: !Ref AlarmPeriod
      Statistic: Average
      Threshold: !Ref AlarmThreshold

  Alarm2:
    Type: AWS::CloudWatch::Alarm
    Properties:
      AlarmActions:
        - !Ref ScalingPolicy2
      AlarmName: !Sub "${Prefix}-Alarm2"
      ComparisonOperator: LessThanOrEqualToThreshold
      Dimensions:
        - Name: AutoScalingGroupName
          Value: !Ref AutoScalingGroup
      EvaluationPeriods: !Ref AlarmEvaluationPeriod
      MetricName: CPUUtilization
      Namespace: AWS/EC2
      Period: !Ref AlarmPeriod
      Statistic: Average
      Threshold: !Ref AlarmThreshold
Code language: YAML (yaml)
CloudWatch alarms act as triggers for scaling policy action.
Alarms are created for each scaling policy.
The first alarm is for the scale-out policy and the second alarm is for the scale-in policy.
This is specified in the AlarmActions property.
Set the target for metric measurement in the Dimensions property.
This time, to measure the CPU utilization of the Auto Scaling group, specify “AutoScalingGroupName” for Name and the ID of the group for Value.
This time, set the scaling to be started according to the CPU utilization.
By specifying “CPUUtilization” for the MetricName property, “AWS/EC2” for the Namespace property, and “Average” for the Statistic property, the average CPU utilization for the entire Auto Scaling group is measured.
The measurement period of CPU utilization is set with the Period property.
In this case, “60” is specified to measure every minute.
Threshold values are set with the ComparisonOperator, Threshold, and EvaluationPeriods properties.
For Alarm 1, specify “GreaterThanOrEqualToThreshold,” “50.0,” and “2,” respectively, to trigger when CPU usage reaches 50% or more for two consecutive times.
Alarm 2 specifies “LessThanOrEqualToThreshold”, “50.0”, and “2”, respectively, and is triggered when CPU utilization falls below 50% for two consecutive times.
Architecting
Use CloudFormation to build this environment and check the actual behavior.
Create CloudFormation stacks and check resources in stacks
Create a CloudFormation stacks.
For information on how to create stacks and check each stack, please refer to the following page

After checking the resources in each stack, information on the main resources created this time is as follows
- ALB: fa-088-ALB
- DNS name of ALB: fa-088-alb-1899073536.ap-northeast-1.elb.amazonaws.com
- ALB target group: fa-088-ALBTargetGroup
- Launch template: fa-088-LaunchTemplate
- EC2 Auto Scaling group: fa-088-AutoScalingGroup
- CloudWatch alarm1: fa-088-Alarm1
- CloudWatch Alarm 2: fa-088-Alarm2
Confirm the created resource from the AWS Management Console.
Confirm the ALB.
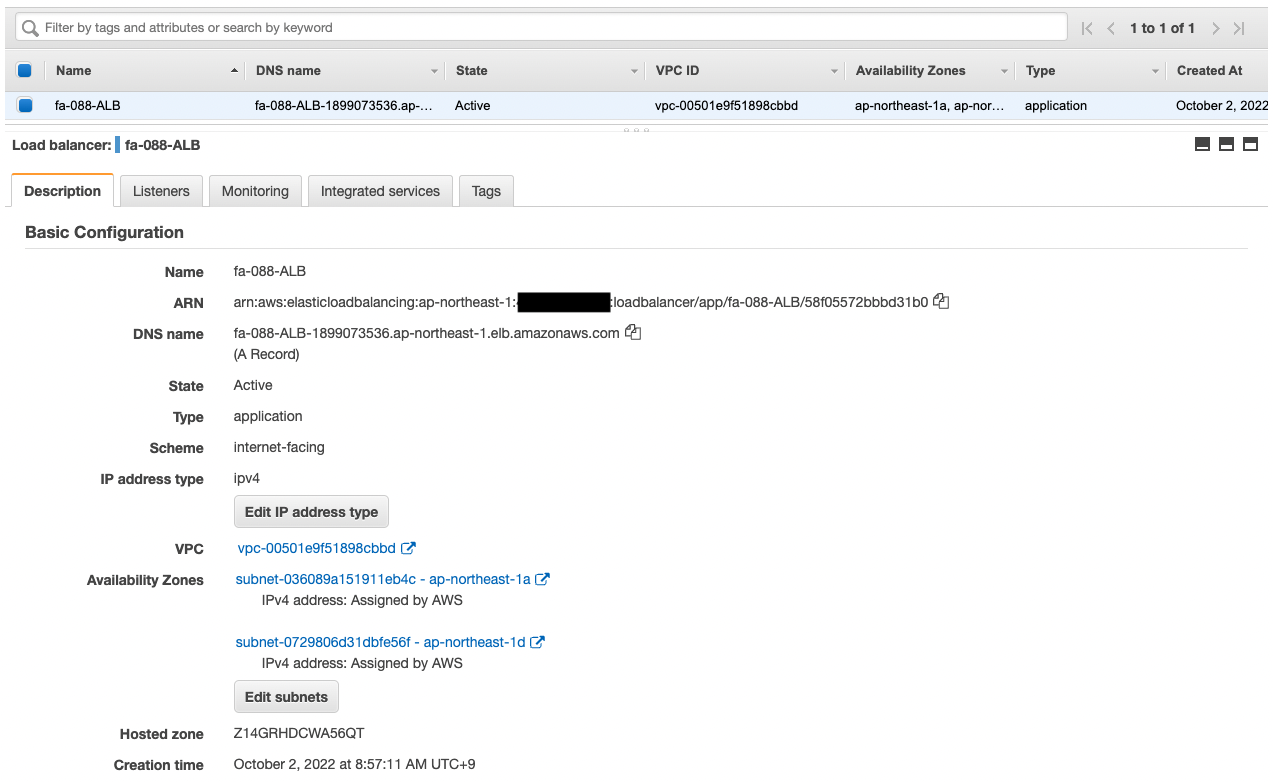
Confirm the DNS name, etc. of the ALB.
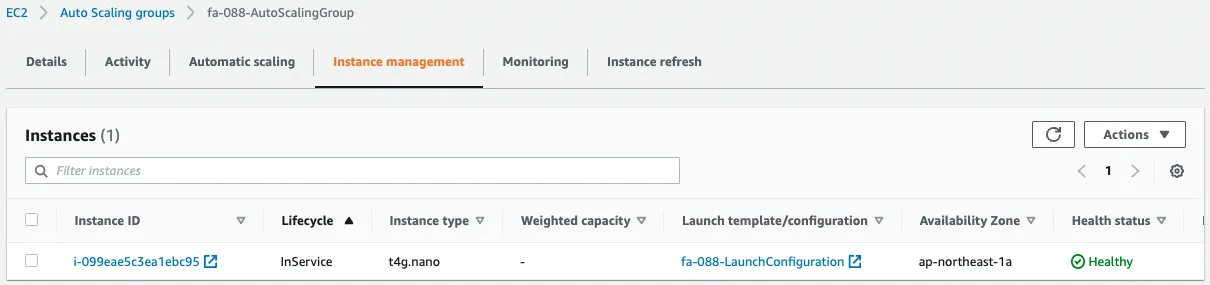
Confirm the Auto Scaling group.
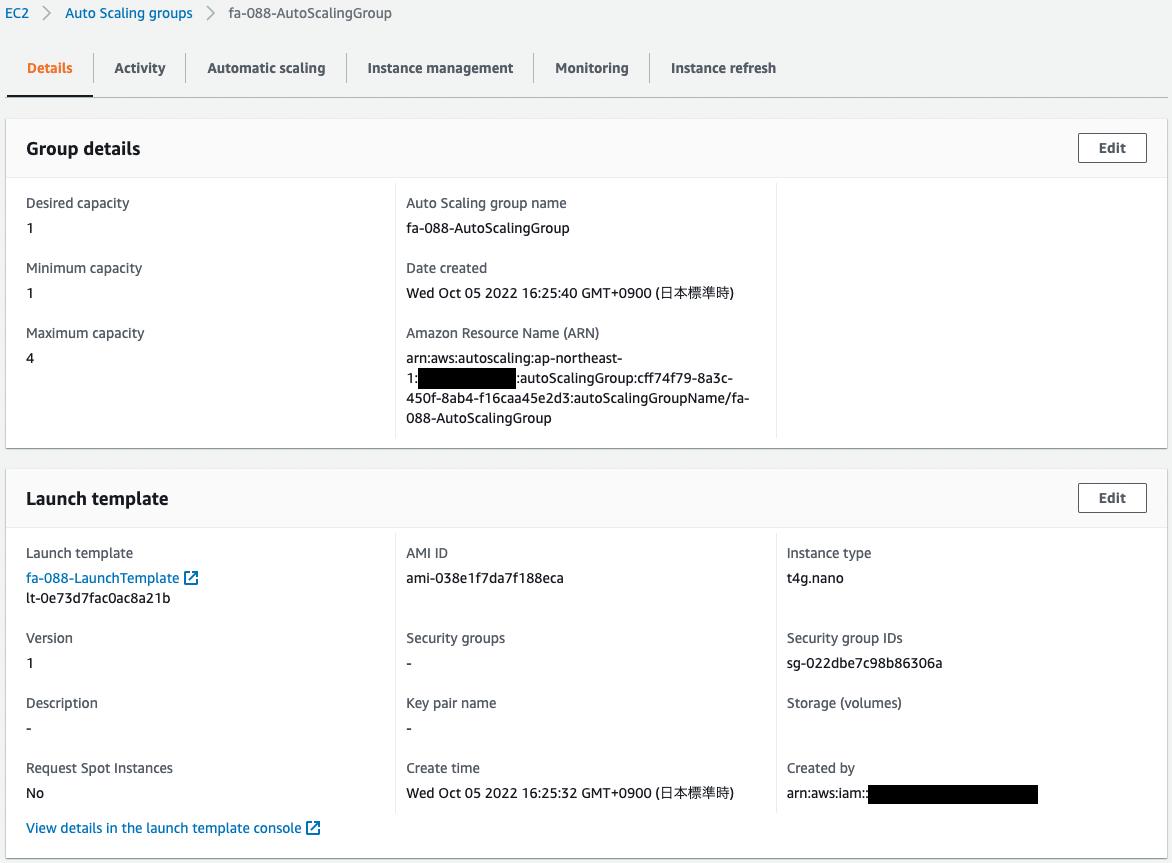
The desired/minimum number is 1 and the maximum number is 4. In other words, within the Auto Scaling group, one instance will be launched during normal operation, and up to four instances during scale-out.
Check the scaling policies.
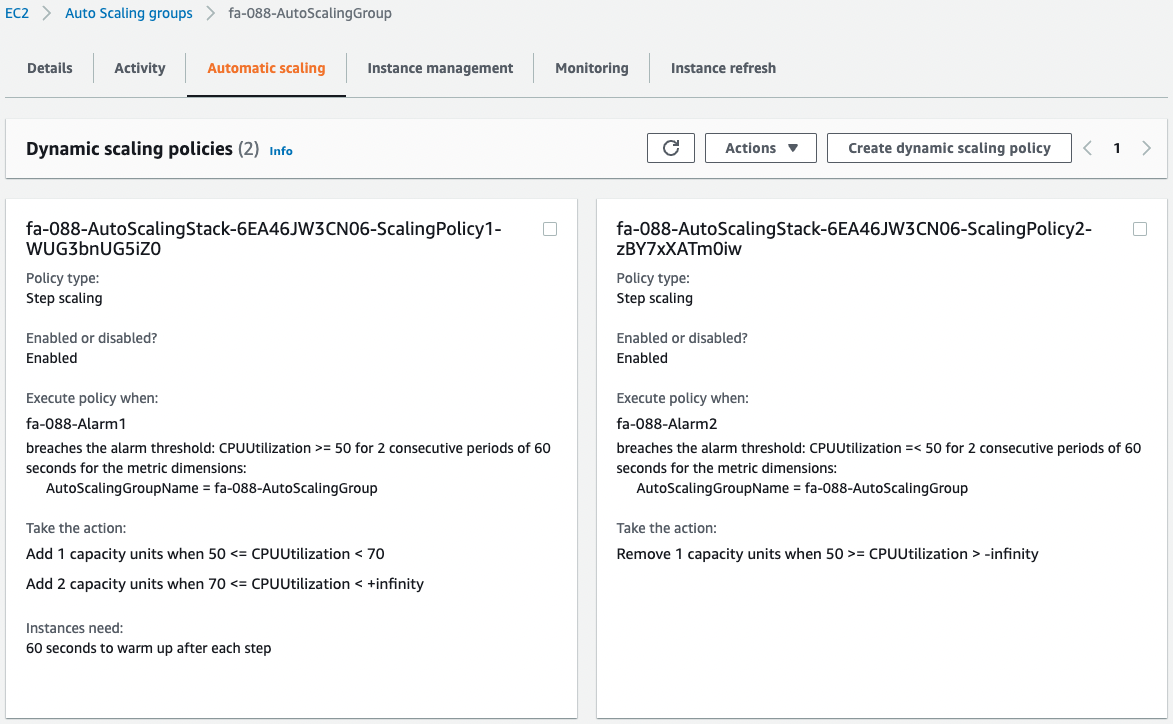
You can see that two scaling policies have been created.
These policies are for scale-out/in.
You can also check the conditions that trigger the CloudWatch alarm, which is the trigger for the action of the two policies.
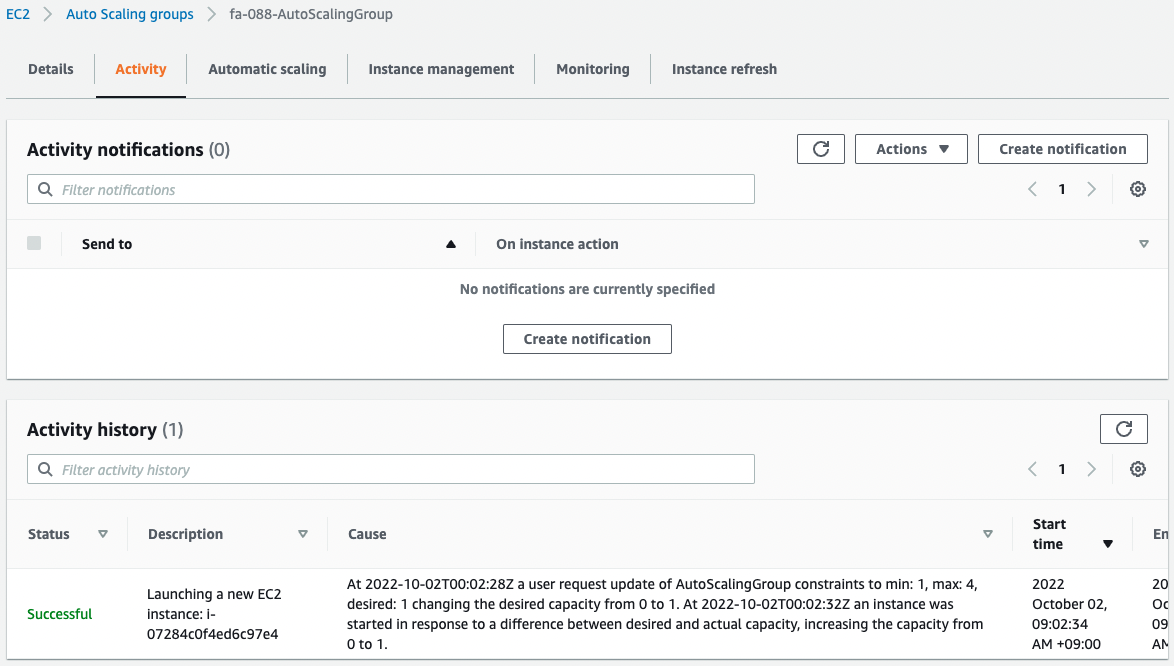
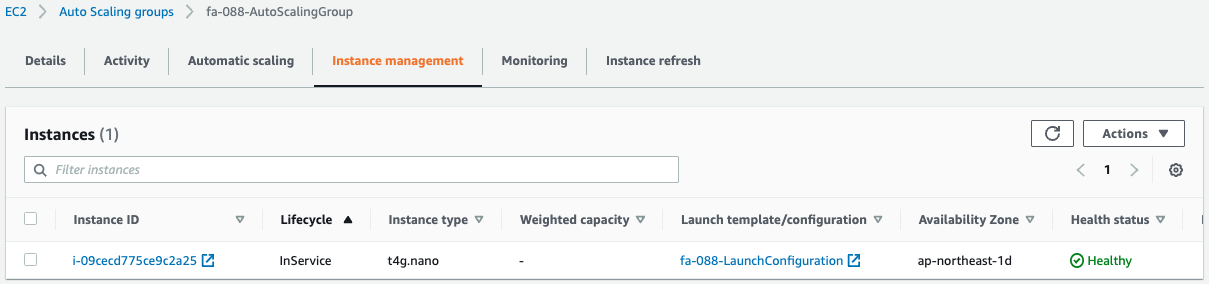
Looking at the activity history of the Auto Scaling group, we can see that one instance was created in the group that was empty.
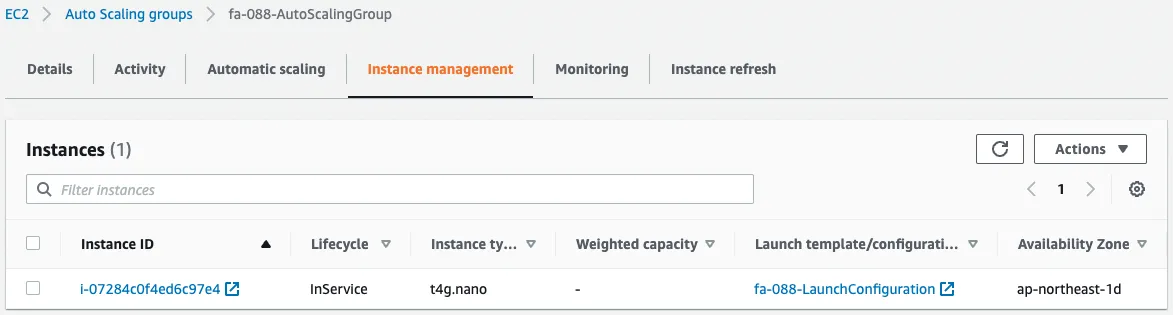
Checking the instances in the group shows that one instance has indeed been started.
Check Operation
Normal
Now that everything is ready, we can access the ALB.

We were able to access the instance.
You can see that the Auto Scaling group is indeed attached to the ALB.
Scale-out 1
Check the behavior during scale-out.
Use SSM Session Manager to access the instances in the Auto Scaling group.
% aws ssm start-session --target i-07284c0f4ed6c97e4

Starting session with SessionId: root-0d5c2cb28ca211e00
sh-4.2$
Code language: Bash (bash)
For more information on SSM Session Manager, please refer to the following page
Use the yes command to increase the CPU utilization of the instance.
sh-4.2$ yes > /dev/null &
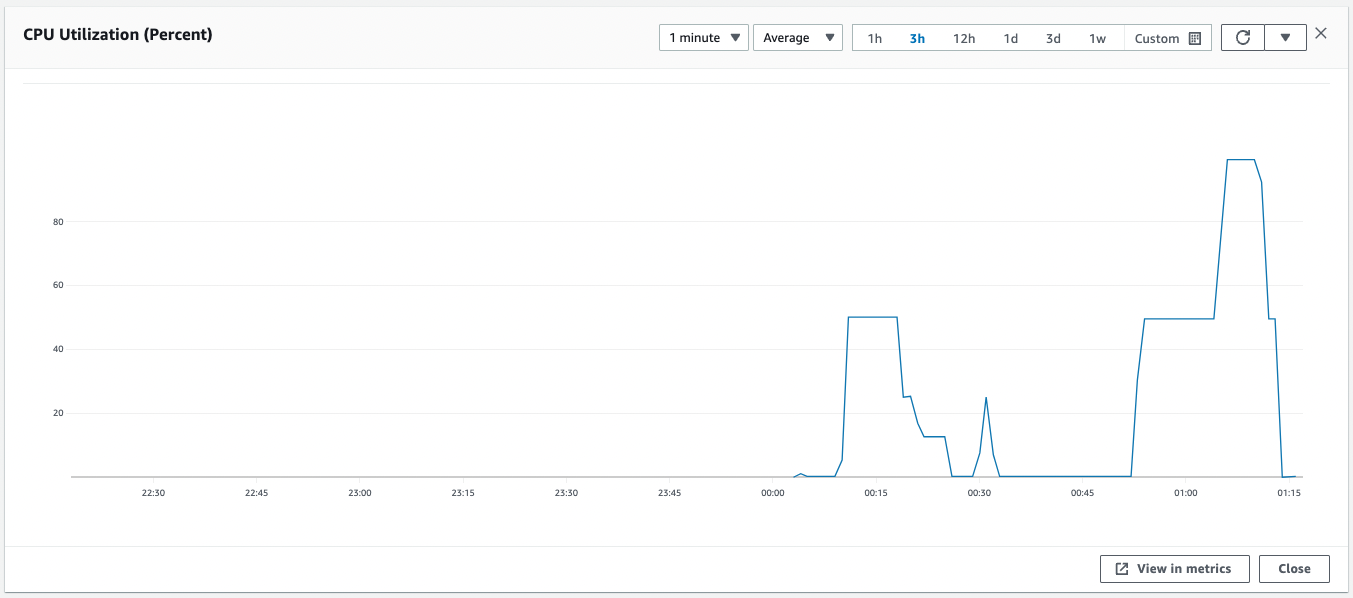
Code language: Bash (bash)Check the CPU utilization.
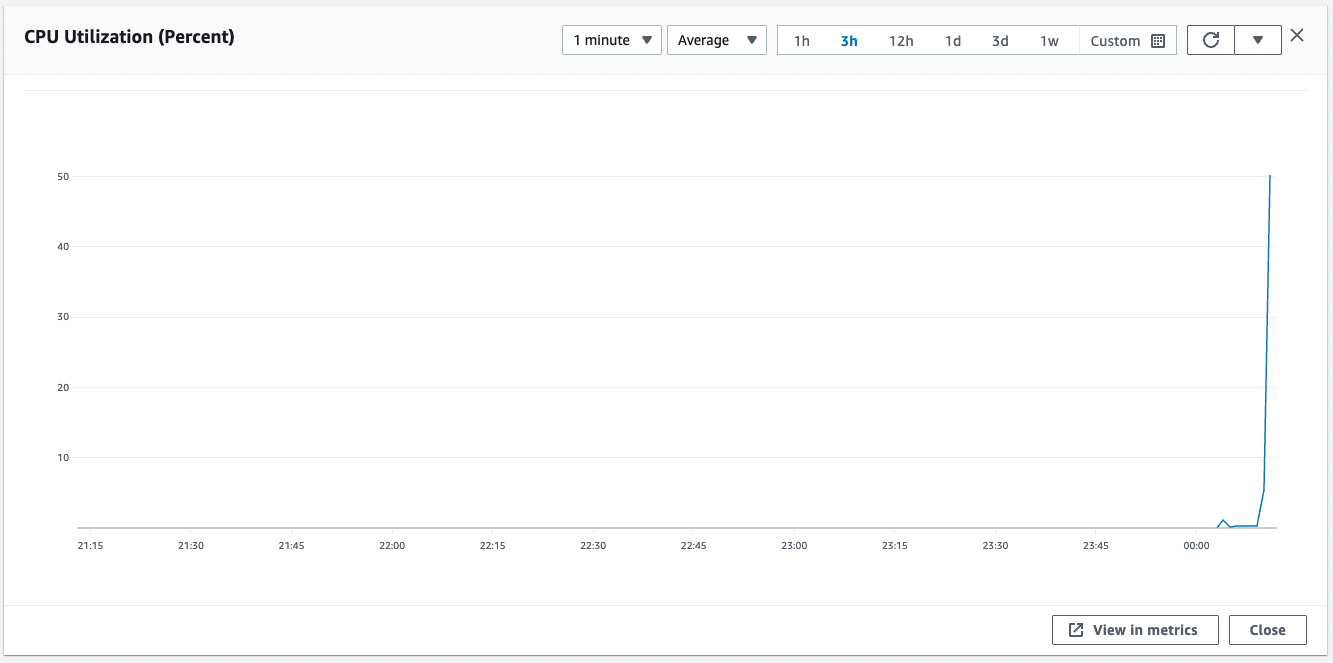
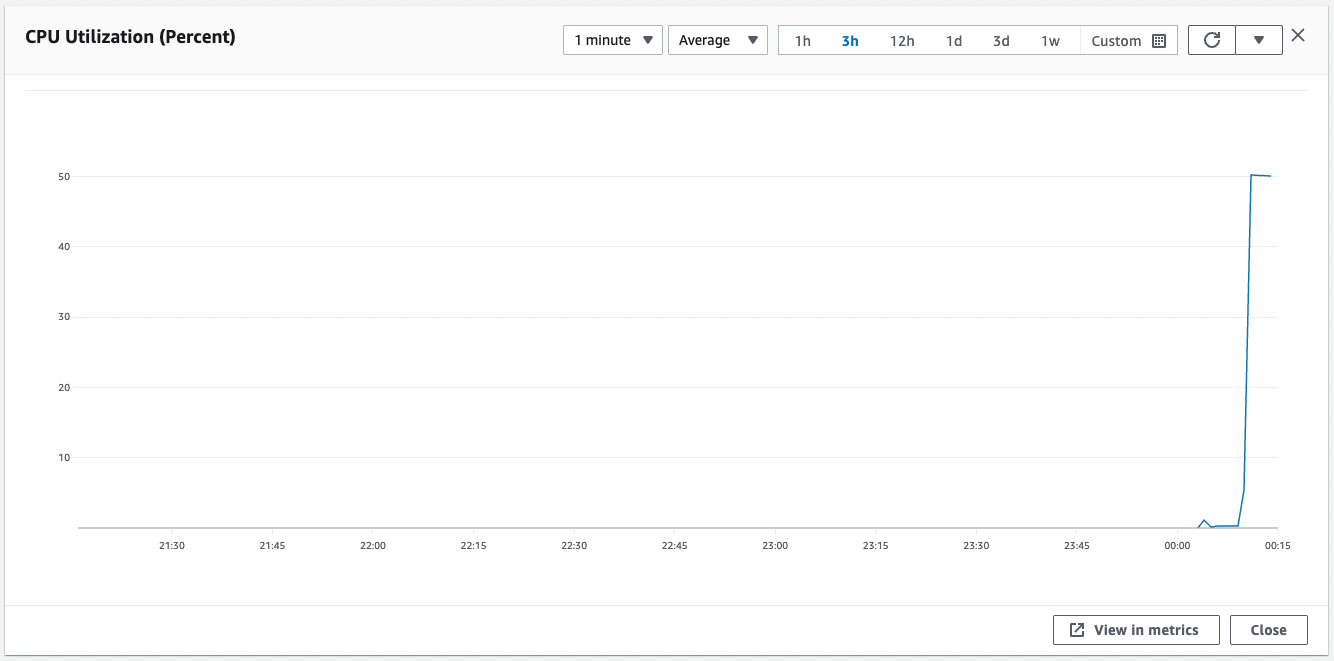
CPU utilization has exceeded 50%.
You have now met the conditions for scale-out to begin.
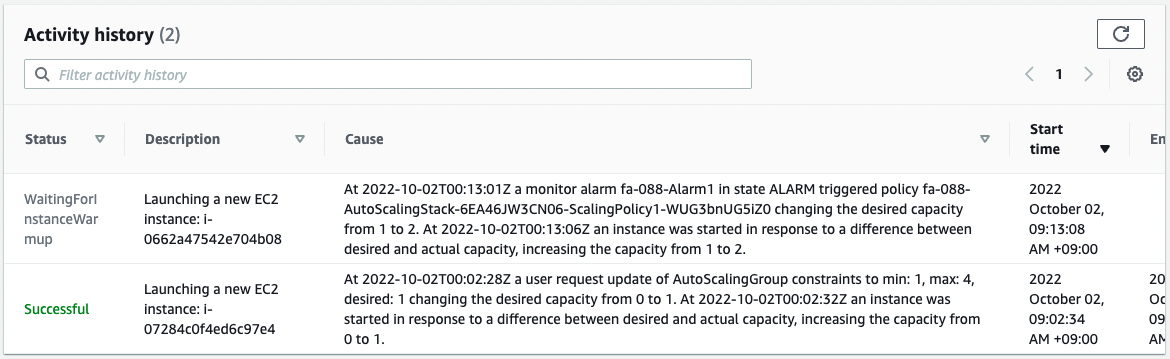
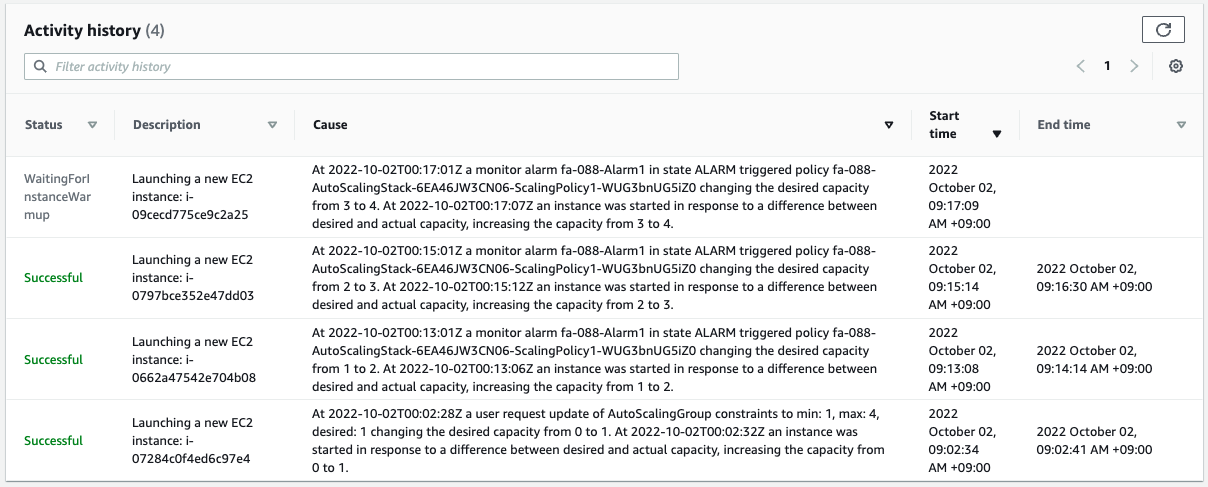
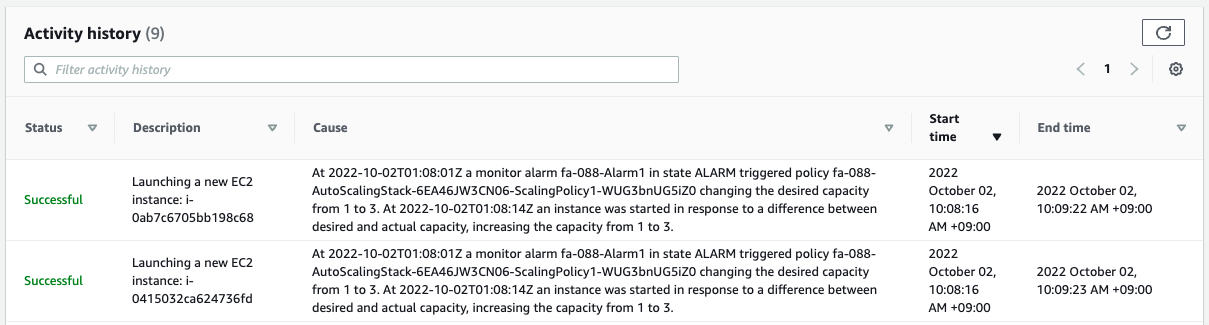
The activity history of the Auto Scaling group shows that a new instance has been started.
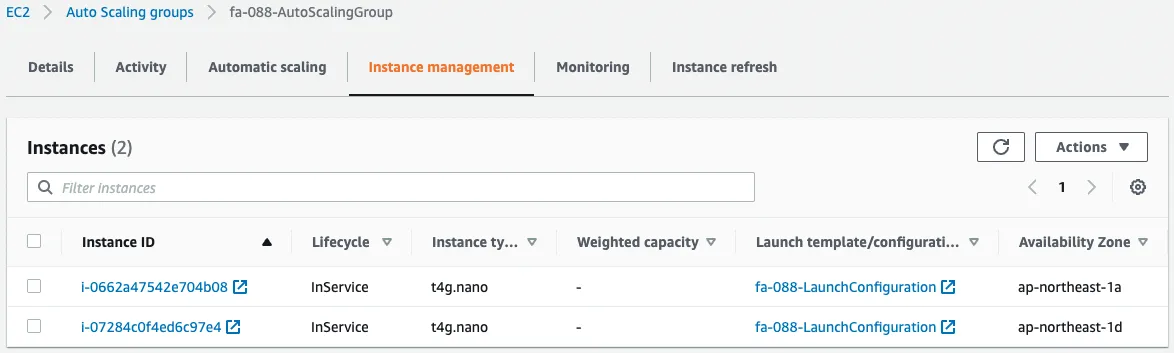
Checking the instances in the group, we see that one instance has indeed been added.
The CPU utilization is 50~70%, which means that step 1, or one instance, has been added.
Continue with the yes command to maintain the CPU utilization at 50~70%.
Wait for a while and scale-out will continue to execute.
Scale-out continued to be executed.
You can see that the instances are increasing one by one.

Finally, the scale-out was executed up to 4 instances, the maximum number in the Auto Scaling group.
Scale-in 1
With the number of instances increased, the average CPU utilization for the entire Auto Scaling group drops below 50%.
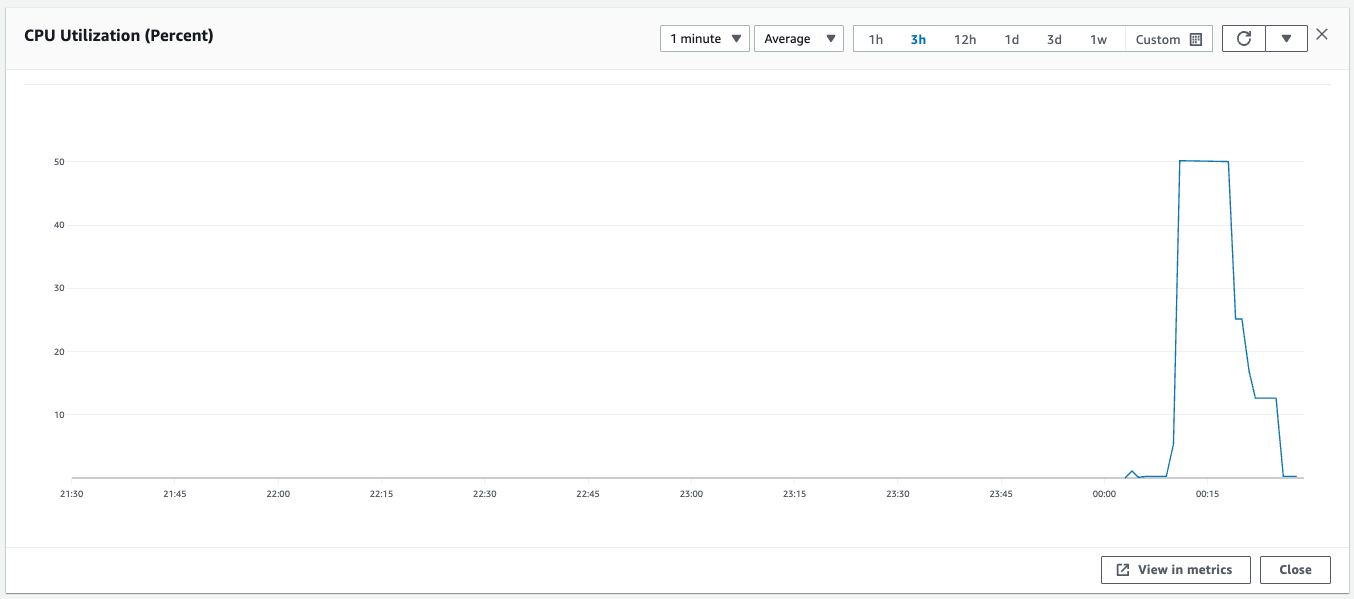
Since the CPU utilization is now below 50, the condition for scale-out to be initiated has been met.
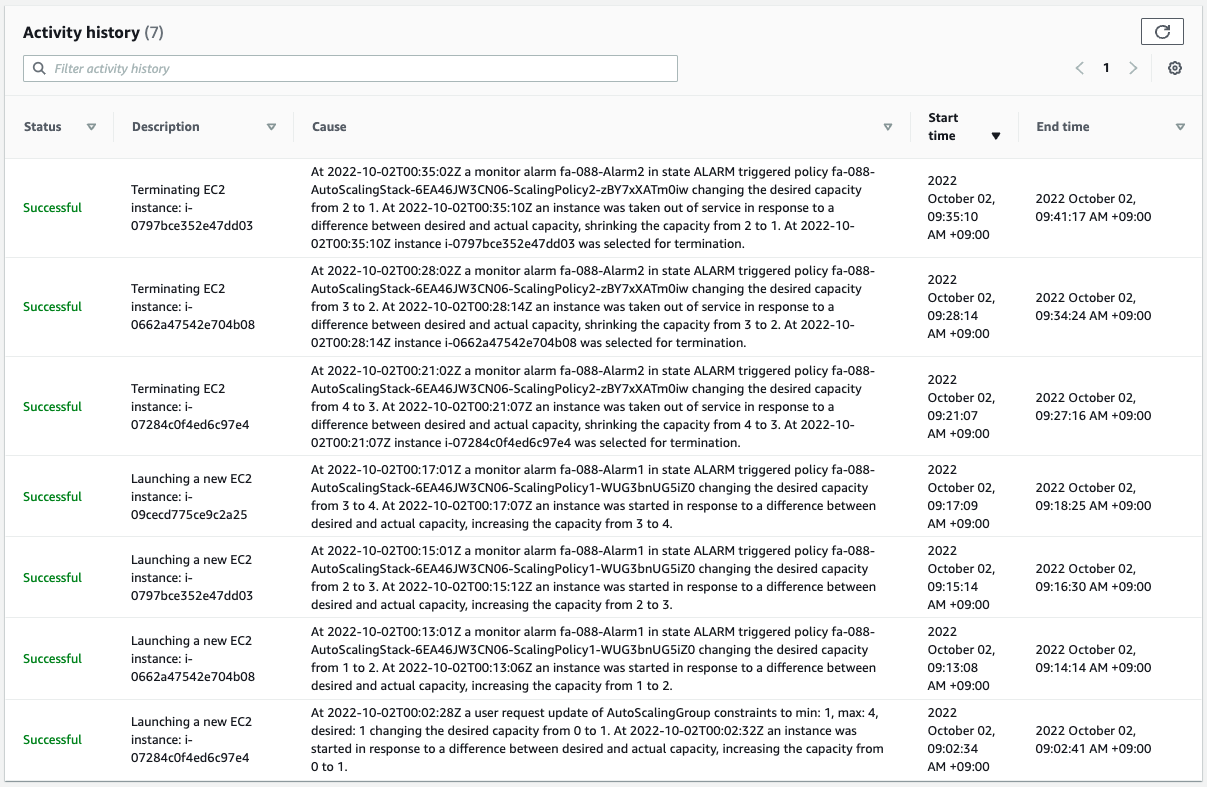
We can see that instances are being removed one by one according to the scale-in policy.
Finally, only one unit remains, the minimum number for the Auto Scaling group.
Scale-out 2
Now we will check the scale-out behavior in step 2.
As before, we will run the yes command several times in the background to get the CPU utilization to exceed 70%.

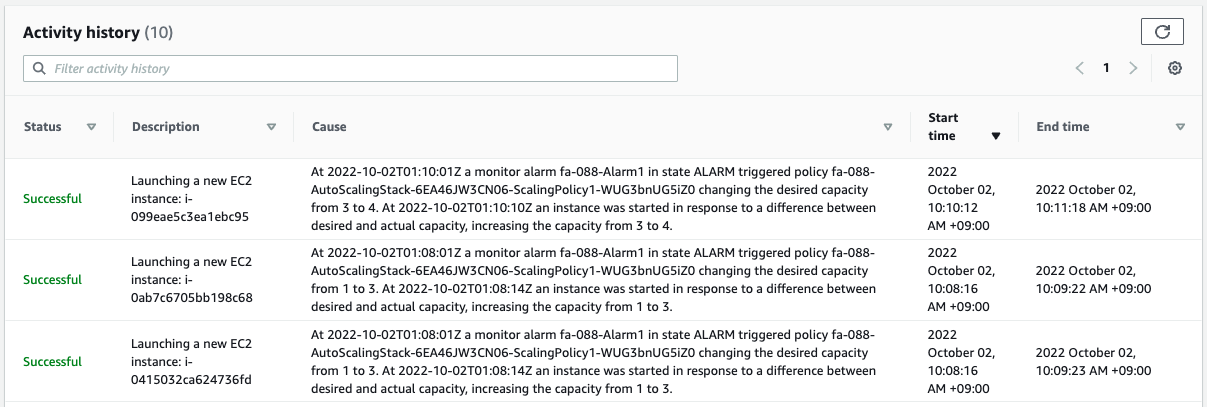
We have now met the conditions for scale-out to be initiated in Step 2.
Indeed, we can see that two instances have been added in one scale-out.
Further scale-outs will add up to four instances, which is the maximum number of instances in an Auto Scaling group.
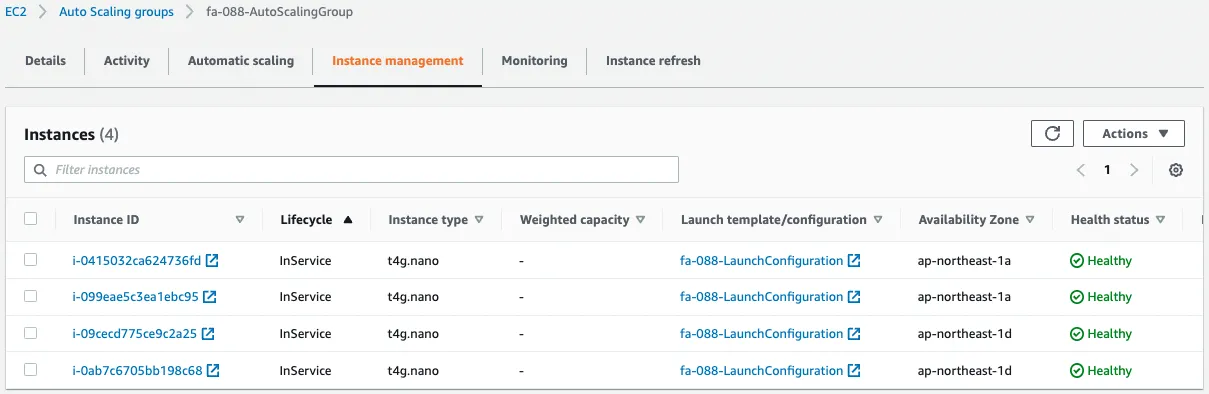
Indeed, we can see that four instances have been created in the Auto Scaling group.
Scale-in 2
With the number of instances increased again, the average CPU utilization in the entire Auto Scaling group drops below 50%.
Since the CPU utilization is now below 50, the conditions for scale-out to begin have been met.

We can see that instances are being removed one by one according to the scale-in policy.
Finally, only one unit remains, the minimum number for the Auto Scaling group.
Summary
We have confirmed the behavior of step scaling, a type of dynamic scaling of EC2 Auto Scaling.