Separate Web and App Servers Using Internal NLB
Create a web service in Apache and Python.
Separate the web servers from the application servers and place an internal NLB between the two servers to see how they can work together.
Environment
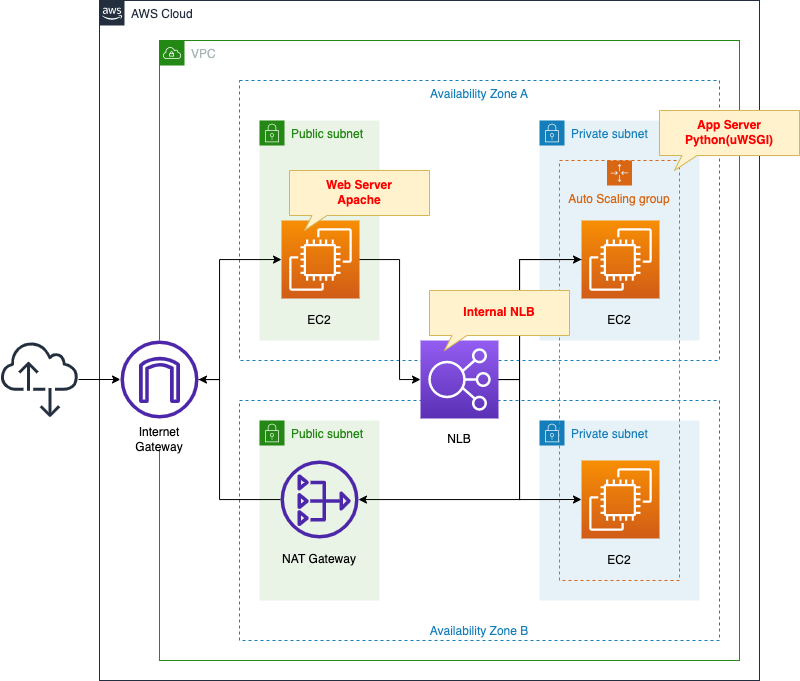
Place an EC2 instance on a public subnet.
The instance will be created based on the latest version of Amazon Linux 2.
This instance will act as a web server by installing Apache.
Place an EC2 Auto Scaling group on the private subnet.
This instance will also be Amazon Linux 2.
The work of these instances is to be an app server running by Python (uWSGI).
Place a NAT gateway in the public subnet.
This is used to install various packages during the initialization process of the instances located in the private subnet mentioned above.
NLB is placed between the web server and the application servers.
The NLB is created for internal use.
Organize communication between the client and various servers.
- Client -> Web server: HTTP (80/tcp)
- Web server -> NLB -> App server: UNIX Domain Socket (9090/tcp)
CloudFormation template files
The above configuration is built using CloudFormation.
The CloudFormation templates are located at the following URL
https://github.com/awstut-an-r/awstut-fa/tree/main/092
Explanation of key points of template files
This page focuses on how to separate the web servers from the app servers using an internal NLB.
For information on how to attach resources in a private subnet to the ELB (ALB), please refer to the following page
For Auto Scaling without scaling policy, please check the following page

NLB
Resources:
  NLB:
    Type: AWS::ElasticLoadBalancingV2::LoadBalancer
    Properties:
      Name: !Sub "${Prefix}-NLB"
      Scheme: internal
      Subnets:
        - !Ref PrivateSubnet1
        - !Ref PrivateSubnet2
      Type: network

  NLBTargetGroup:
    Type: AWS::ElasticLoadBalancingV2::TargetGroup
    Properties:
      Name: !Sub "${Prefix}-NLBTargetGroup"
      Protocol: TCP
      Port: !Ref UWSGIPort
      TargetGroupAttributes:
        - Key: preserve_client_ip.enabled
          Value: false
      VpcId: !Ref VPC
      HealthCheckProtocol: TCP
      HealthyThresholdCount: !Ref HealthyThresholdCount
      UnhealthyThresholdCount: !Ref UnhealthyThresholdCount
      HealthCheckIntervalSeconds: !Ref HealthCheckIntervalSeconds

  NLBListener:
    Type: AWS::ElasticLoadBalancingV2::Listener
    Properties:
      DefaultActions:
        - TargetGroupArn: !Ref NLBTargetGroup
          Type: forward
      LoadBalancerArn: !Ref NLB
      Port: !Ref UWSGIPort
      Protocol: TCP
Code language: YAML (yaml)
The key to creating an internal NLB is the Schema property.
Specify “internal” for this property.
Communication between the web servers and the application servers are performed using 9090/tcp.
Therefore, configure the target group and listeners to listen for this communication and route it to the target EC2 instance.
Another point of NLB is that it disables the client IP retention feature.
This setting is performed with the TargetGroupAttributes property.
The purpose of disabling it is to make the source address of packets routed from the NLB be the private address of the NLB.
The aim of this setting is related to the security group for the EC2 instance that is the app server.
This means that in the security group rules, the source of allowed communication can be set to a private address of the NLB.
For more information, please refer to the following page
Web Server
EC2 instance
Resources:
  EIP1:
    Type: AWS::EC2::EIP
    Properties:
      Domain: vpc

  EIPAssociation1:
    Type: AWS::EC2::EIPAssociation
    Properties:
      AllocationId: !GetAtt EIP1.AllocationId
      InstanceId: !Ref Instance1

  Instance1:
    Type: AWS::EC2::Instance
    Properties:
      IamInstanceProfile: !Ref InstanceProfile
      ImageId: !Ref ImageId
      InstanceType: !Ref InstanceType
      NetworkInterfaces:
        - DeviceIndex: 0
          SubnetId: !Ref PublicSubnet1
          GroupSet:
            - !Ref WebServerSecurityGroup
      Tags:
        - Key: !Ref InstanceTagKey
          Value: !Ref InstanceTagValueWeb1
Code language: YAML (yaml)
No special configuration is required for action as a web server.
Just prepare an Elastic IP address and fix the global address by associating it with the instance.
Set the tag as follows
- Key: Server
- Value: ApacheWeb
This is because the SSM document is used during the instance initialization process described below, and the tag information is used to distinguish the target instance.
Security Group
Resources:
  WebServerSecurityGroup:
    Type: AWS::EC2::SecurityGroup
    Properties:
      GroupName: !Sub "${Prefix}-WebServerSecurityGroup"
      GroupDescription: Allow HTTP.
      VpcId: !Ref VPC
      SecurityGroupIngress:
        - IpProtocol: tcp
          FromPort: !Ref HTTPPort
          ToPort: !Ref HTTPPort
          CidrIp: 0.0.0.0/0
Code language: YAML (yaml)
Communication from the client to the web server is done over HTTP (80/tcp) from an unspecified global address.
Therefore, the rule is defined to allow this.
SSM Associations
Resources:
  RunShellScriptAssociation:
    Type: AWS::SSM::Association
    Properties:
      AssociationName: !Sub "${Prefix}-run-shellscript-association"
      Name: AWS-RunShellScript
      OutputLocation:
        S3Location:
          OutputS3BucketName: !Ref PlaybookBucket
          OutputS3KeyPrefix: !Sub "${Prefix}/shellscript-association-log"
      Parameters:
        commands:
          - yum update -y
          - yum install -y httpd
          - !Sub "echo 'ProxyPass / uwsgi://${NLBDNSName}:${UWSGIPort}/' >> /etc/httpd/conf/httpd.conf"
          - !Sub "echo 'ProxyPassReverse / uwsgi://${NLBDNSName}:${UWSGIPort}/' >> /etc/httpd/conf/httpd.conf"
          - systemctl start httpd
          - systemctl enable httpd
      Targets:
        - Key: !Sub "tag:${InstanceTagKey}"
          Values:
            - !Ref InstanceTagValueWeb1
      WaitForSuccessTimeoutSeconds: !Ref WaitForSuccessTimeoutSeconds
Code language: YAML (yaml)
Define the initialization process to action the instance as a web server.
In this case, SSM document AWS-RunShellScript is used.
Please refer to the following page for the initialization process of the instance using SSM document.
The contents to be executed are as follows
- Install Apache.
- Add proxy settings for NLB to the configuration file (httpd.conf).
- Start and enable Apache.
Specify the target to perform this initialization process in the Targets property.
Apply this SSM association to instances that have been given the aforementioned tags.
App Server
Auto Scaling Group
Resources:
  LaunchTemplate:
    Type: AWS::EC2::LaunchTemplate
    Properties:
      LaunchTemplateData:
        IamInstanceProfile:
          Arn: !Ref InstanceProfileArn
        ImageId: !Ref ImageId
        InstanceType: !Ref InstanceType
        SecurityGroupIds:
          - !Ref AppServerSecurityGroup
        TagSpecifications:
          - ResourceType: instance
            Tags:
              - Key: !Ref InstanceTagKey
                Value: !Ref InstanceTagValueApp
      LaunchTemplateName: !Sub "${Prefix}-LaunchTemplate"

  AutoScalingGroup:
    Type: AWS::AutoScaling::AutoScalingGroup
    Properties:
      AutoScalingGroupName: !Sub "${Prefix}-AutoScalingGroup"
      DesiredCapacity: !Ref DesiredCapacity
      LaunchTemplate:
        LaunchTemplateId: !Ref LaunchTemplate
        Version: !GetAtt LaunchTemplate.LatestVersionNumber
      MaxSize: !Ref MaxSize
      MinSize: !Ref MinSize
      VPCZoneIdentifier:
        - !Ref PrivateSubnet1
        - !Ref PrivateSubnet2
      TargetGroupARNs:
        - !Ref NLBTargetGroup
Code language: YAML (yaml)
Build an Auto Scaling group as an app server.
No special configuration is required.
Set the tags as follows
- Key: Server
- Value: App
The SSM document is also used in the instance initialization process, and this tag information is used in that process.
Security Group
Resources:
  AppServerSecurityGroup:
    Type: AWS::EC2::SecurityGroup
    Properties:
      GroupName: !Sub "${Prefix}-AppServerSecurityGroup2"
      GroupDescription: Allow uWSGI from Web Server.
      VpcId: !Ref VPC
      SecurityGroupIngress:
        - IpProtocol: tcp
          FromPort: !Ref UWSGIPort
          ToPort: !Ref UWSGIPort
          CidrIp: !Sub "${NLBPrivateAddress1}/32"
        - IpProtocol: tcp
          FromPort: !Ref UWSGIPort
          ToPort: !Ref UWSGIPort
          CidrIp: !Sub "${NLBPrivateAddress2}/32"
Code language: YAML (yaml)
Communication from the web server to the app server is done via NLB and the UNIX Domain Socket (9090/tcp).
Therefore, we define a rule to allow this.
In this case, we define two rules.
This is because there are two private addresses assigned to NLB.
The number of private addresses an NLB has is determined by the number of subnets associated with the NLB.
In this configuration, the NLB is associated with two subnets, so it has two addresses.
As you can see in the NLB section, the client IP preservation feature is disabled in this configuration.
Therefore, after going through the NLB, the source address of the packet will be replaced by the private address of the NLB.
In summary, the source addresses that should be allowed by the security group rule are the two private addresses of the NLB.
SSM Association
Resources:
  ApplyAnsiblePlaybooksAssociation:
    Type: AWS::SSM::Association
    Properties:
      AssociationName: !Sub "${Prefix}-apply-ansible-playbook-association"
      Name: AWS-ApplyAnsiblePlaybooks
      OutputLocation:
        S3Location:
          OutputS3BucketName: !Ref PlaybookBucket
          OutputS3KeyPrefix: !Sub "${Prefix}/playbook-association-log"
      Parameters:
        Check:
          - "False"
        ExtraVariables:
          - SSM=True
        InstallDependencies:
          - "True"
        PlaybookFile:
          - !Ref PlaybookFileName
        SourceInfo:
          - !Sub '{"path": "https://${PlaybookBucket}.s3.${AWS::Region}.amazonaws.com/${Prefix}/${PlaybookPackageName}"}'
        SourceType:
          - S3
        Verbose:
          - -v
      Targets:
        - Key: !Sub "tag:${InstanceTagKey}"
          Values:
            - !Ref InstanceTagValueApp
      WaitForSuccessTimeoutSeconds: !Ref WaitForSuccessTimeoutSeconds
Code language: YAML (yaml)
Define the initialization process to make the instance act as a app server.
In this case, we will use the SSM document AWS-ApplyAnsiblePlaybooks.
By executing the Ansible Playbook, we will perform the initialization.
playbook.yml
- hosts: all
  gather_facts: no
  become: yes

  tasks:
    - name: update yum.
      yum: name=*

    - name: install packages by yum.
      yum:
        name:
          - python3-devel
          - gcc

    - name: install packages by pip3.
      pip:
        name:
          - uwsgi
          - flask
        executable: pip3

    - name: create app directory.
      file:
        path: /home/ec2-user/myapp
        state: directory

    - name: copy flask script.
      copy:
        src: ./run.py
        dest: /home/ec2-user/myapp/run.py

    - name: copy uWSGI ini.
      copy:
        src: ./uwsgi.ini
        dest: /home/ec2-user/myapp/uwsgi.ini

    - name: copy uWSGI Service.
      copy:
        src: ./uwsgi.service
        dest: /etc/systemd/system/uwsgi.service

    - name: reload daemon.
      systemd:
        daemon_reload: yes

    - name: start and enable uWSGI.
      systemd:
        name: uwsgi
        state: started
        enabled: yes
Code language: YAML (yaml)
The following is to be performed
- Install packages with yum and pip.
- Deploy the Python scripts.
- Deploy the uWSGI files.
- Deploy the files for uWSGI service.
- Start and activate the uWSGI service.
Specify the target to perform this initialization process in the Targets property.
This SSM association is applied to instances to which the aforementioned tags are assigned.
Python Script
import urllib.request
from flask import Flask

app = Flask(__name__)
url = 'http://169.254.169.254/latest/meta-data/instance-id'

@app.route('/')
def main():
  request = urllib.request.Request(url)
  with urllib.request.urlopen(request) as response:
    data = response.read().decode('utf-8')
    return data

if __name__ == '__main__':
  app.run()
Code language: Python (python)
Create a simple application with the web framework Flask.
When the root URL is accessed, it returns an instance ID.
uwsgi.ini
[uwsgi]
chdir = /home/ec2-user/myapp
socket = 0.0.0.0:9090
file = /home/ec2-user/myapp/run.py
callable = app
master = True
uid = ec2-user
gid = ec2-userCode language: plaintext (plaintext)
This is the content of executing the Python script described above.
uwsgi.service
[Unit]
Description = uWSGI
After = syslog.target

[Service]
WorkingDirectory = /home/ec2-user/myapp/
ExecStart = /usr/local/bin/uwsgi --ini /home/ec2-user/myapp/uwsgi.ini

Restart = on-failure
RestartSec = 3
KillSignal = SIGQUIT
Type = notify
StandardError = syslog
NotifyAccess = all

[Install]
WantedBy = multi-user.target
Code language: plaintext (plaintext)
Architecting
Use CloudFormation to build this environment and check the actual behavior.
Preparing Ansible Playbook
Before creating the CloudFormation stacks, prepare Ansible.
Specifically, zip the Playbook and place it in an S3 bucket. See the following page for specific commands.

Create CloudFormation stacks and check resources in stacks
Create CloudFormation stacks.
For information on how to create stacks and check each stack, please refer to the following page

After checking the resources in each stack, information on the main resources created this time is as follows
- NLB: fa-092-NLB
- DNS name of NLB: ec2-18-176-243-76.ap-northeast-1.compute.amazonaws.com
- NLB target group: fa-092-NLBTargetGroup
- Web server instance: i-036a057a2caa32486
Confirm the created resource from the AWS Management Console.
Confirm the NLB.
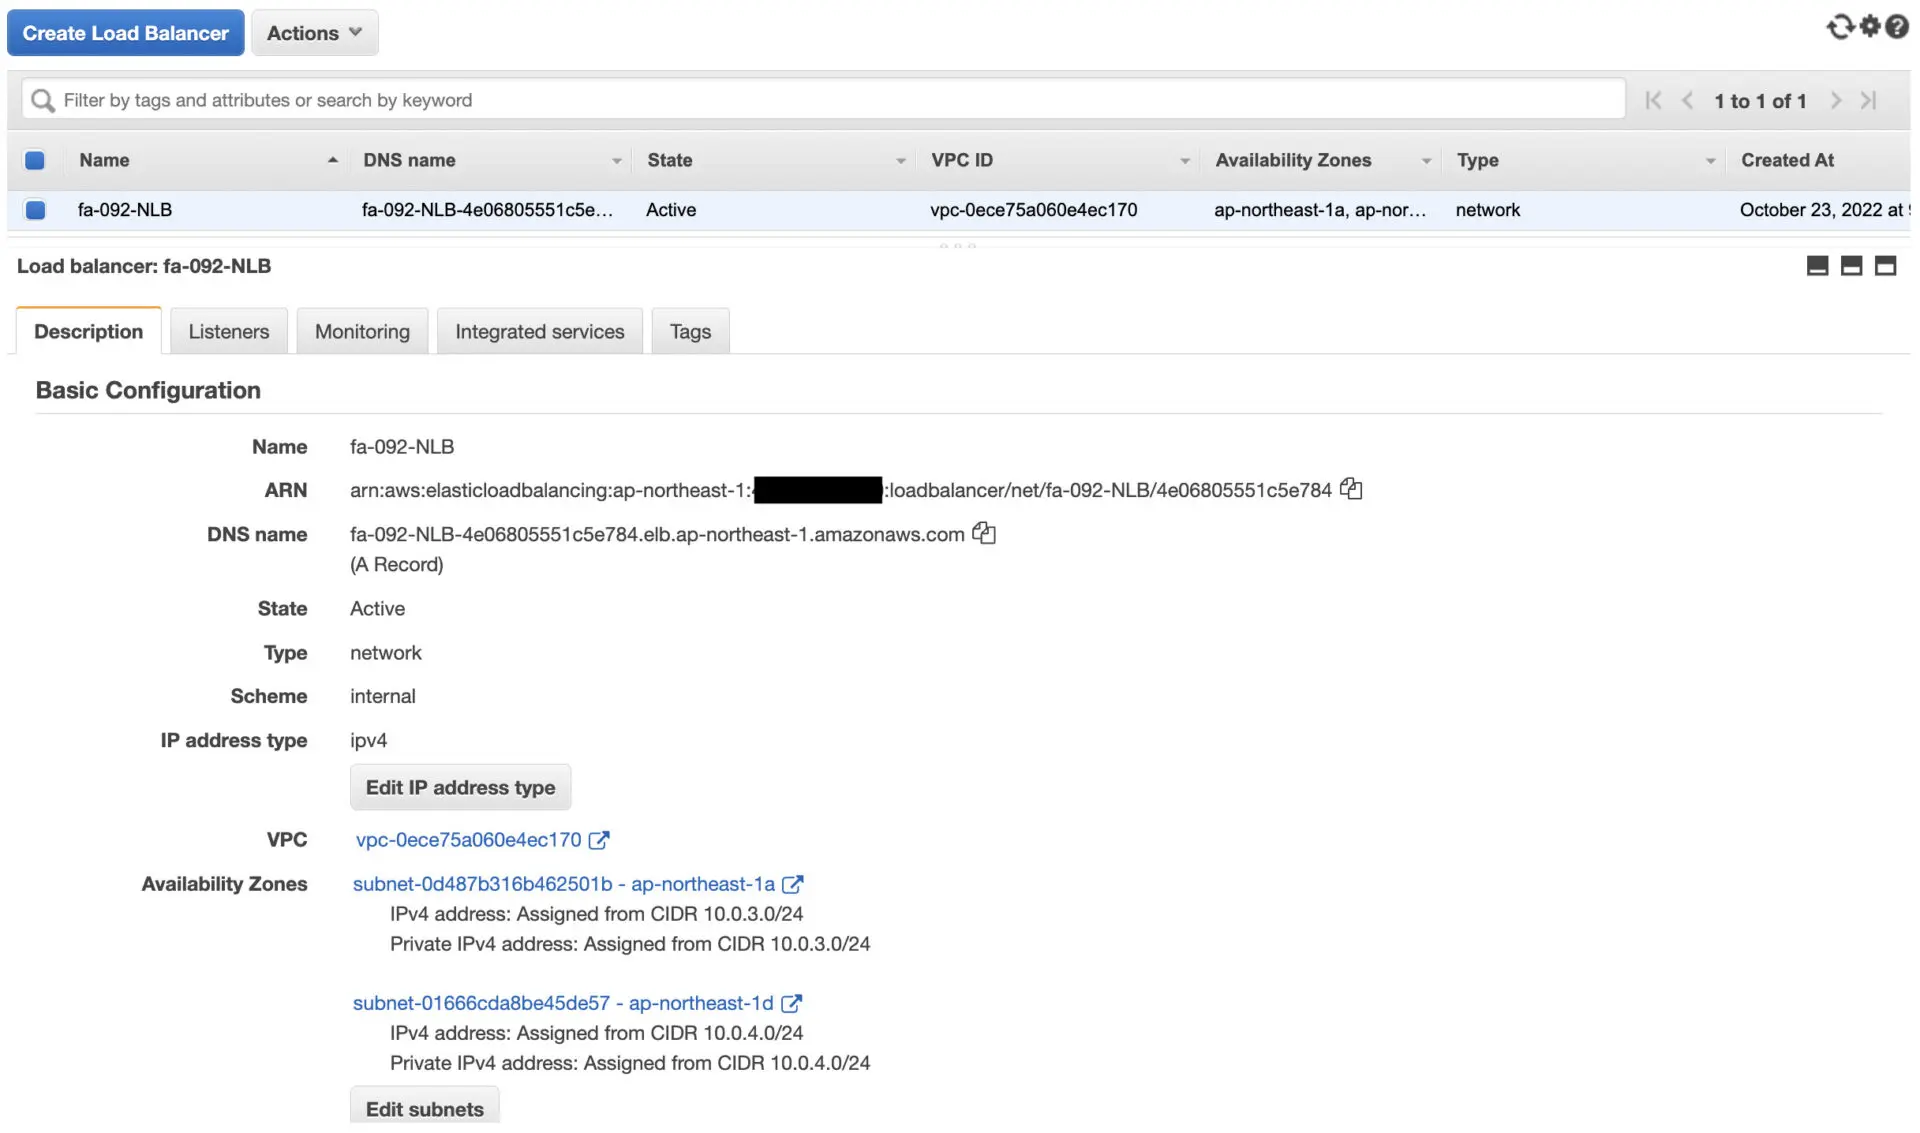
You can confirm the DNS name, etc. of the NLB.
Confirm the target group.
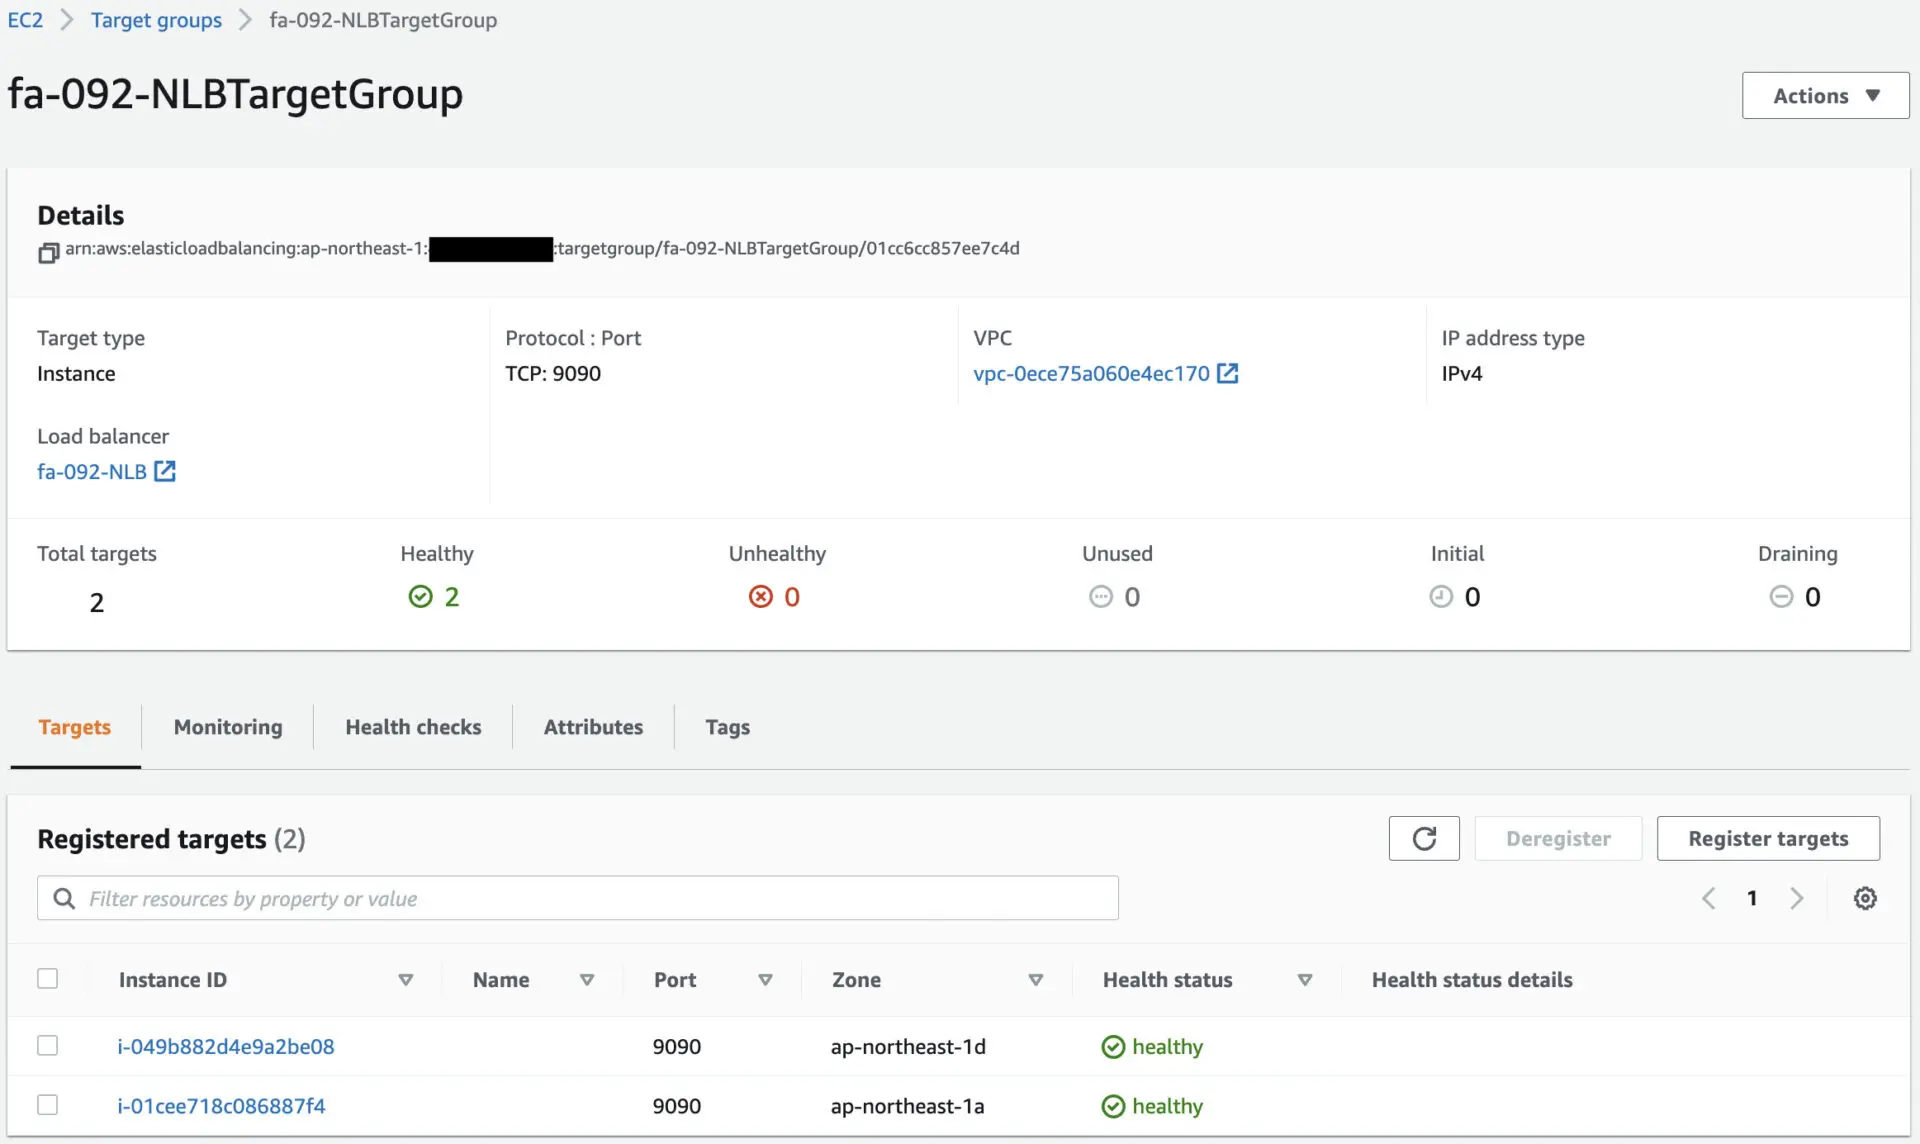
Looking at the Target tab, you can see that two EC2 instances have been registered.
These EC2 instances will act as application servers.
Check the details of the EC2 instance that is the web server.
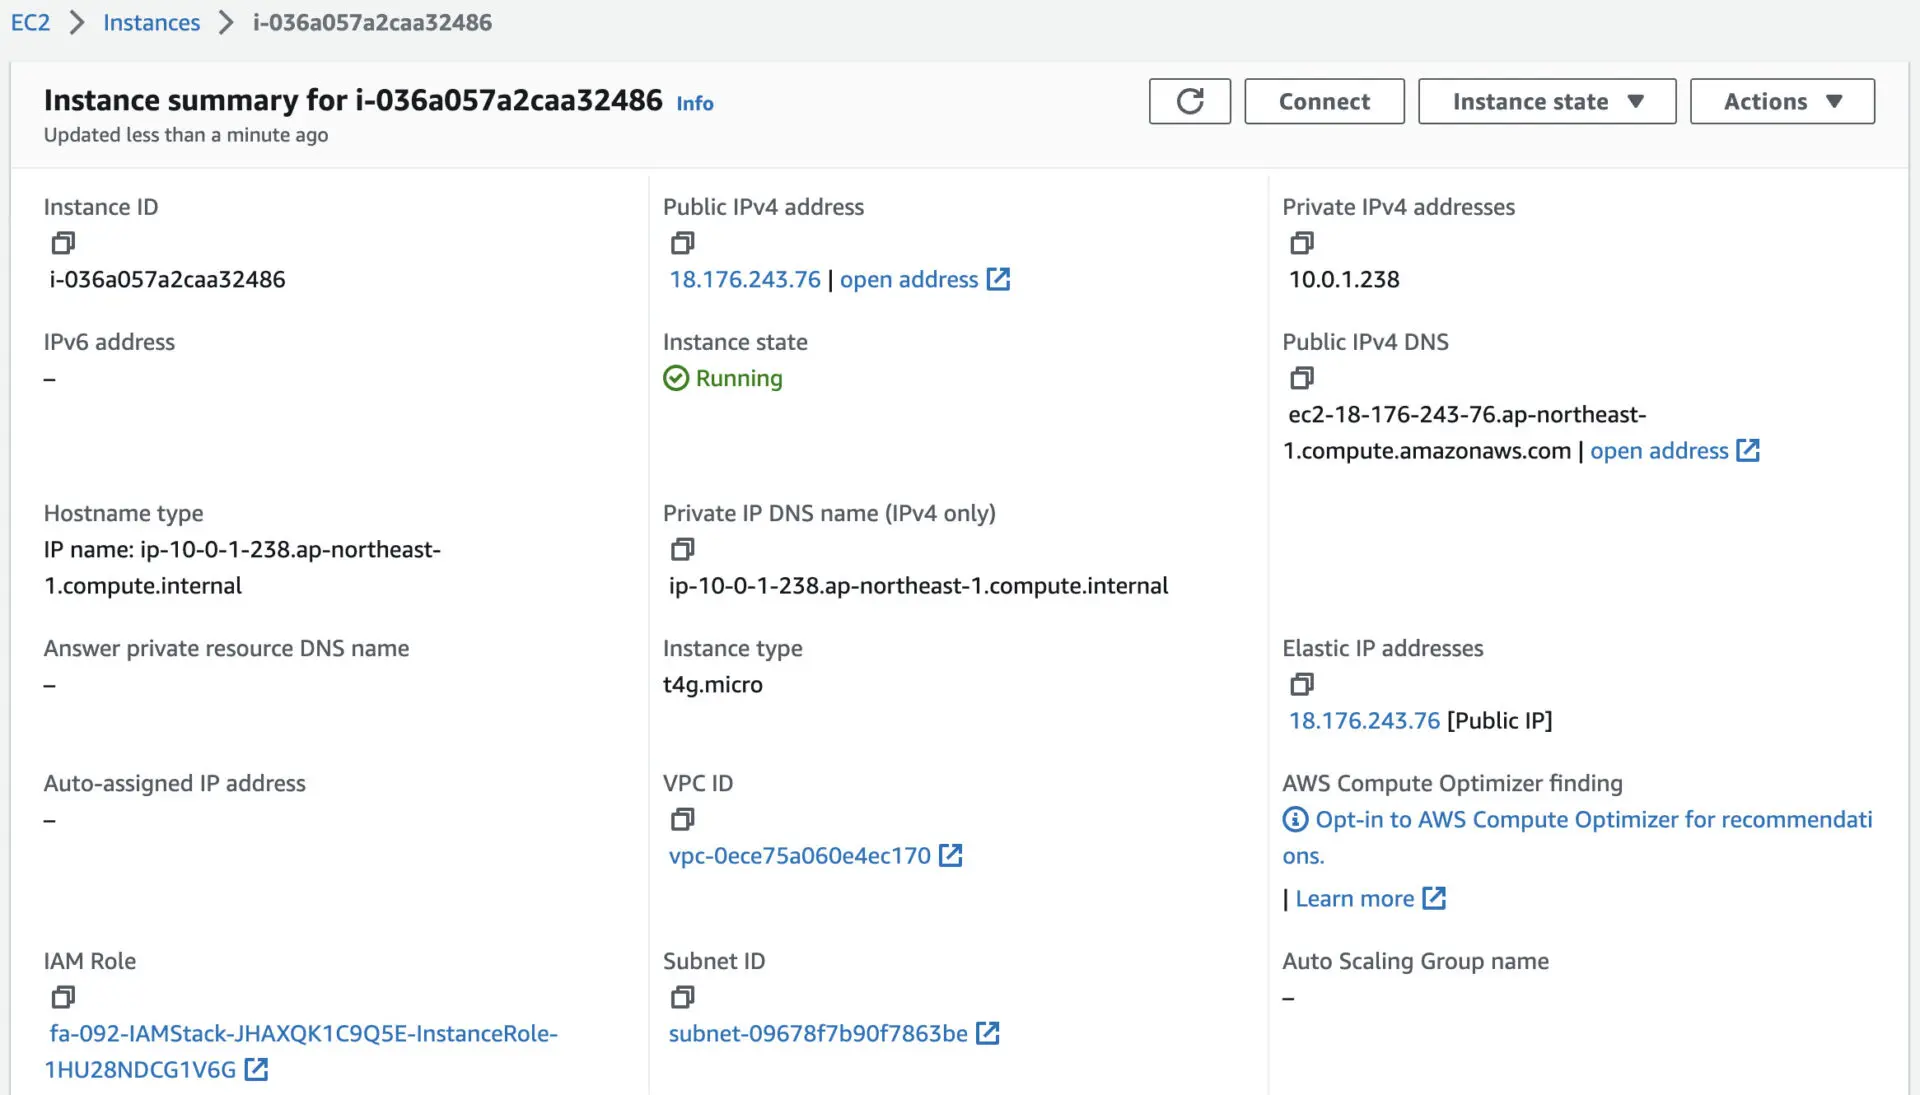
You can see that the NLB DNS name is ec2-18-176-243-76.ap-northeast-1.compute.amazonaws.com.
Check the execution status of the SSM documents.
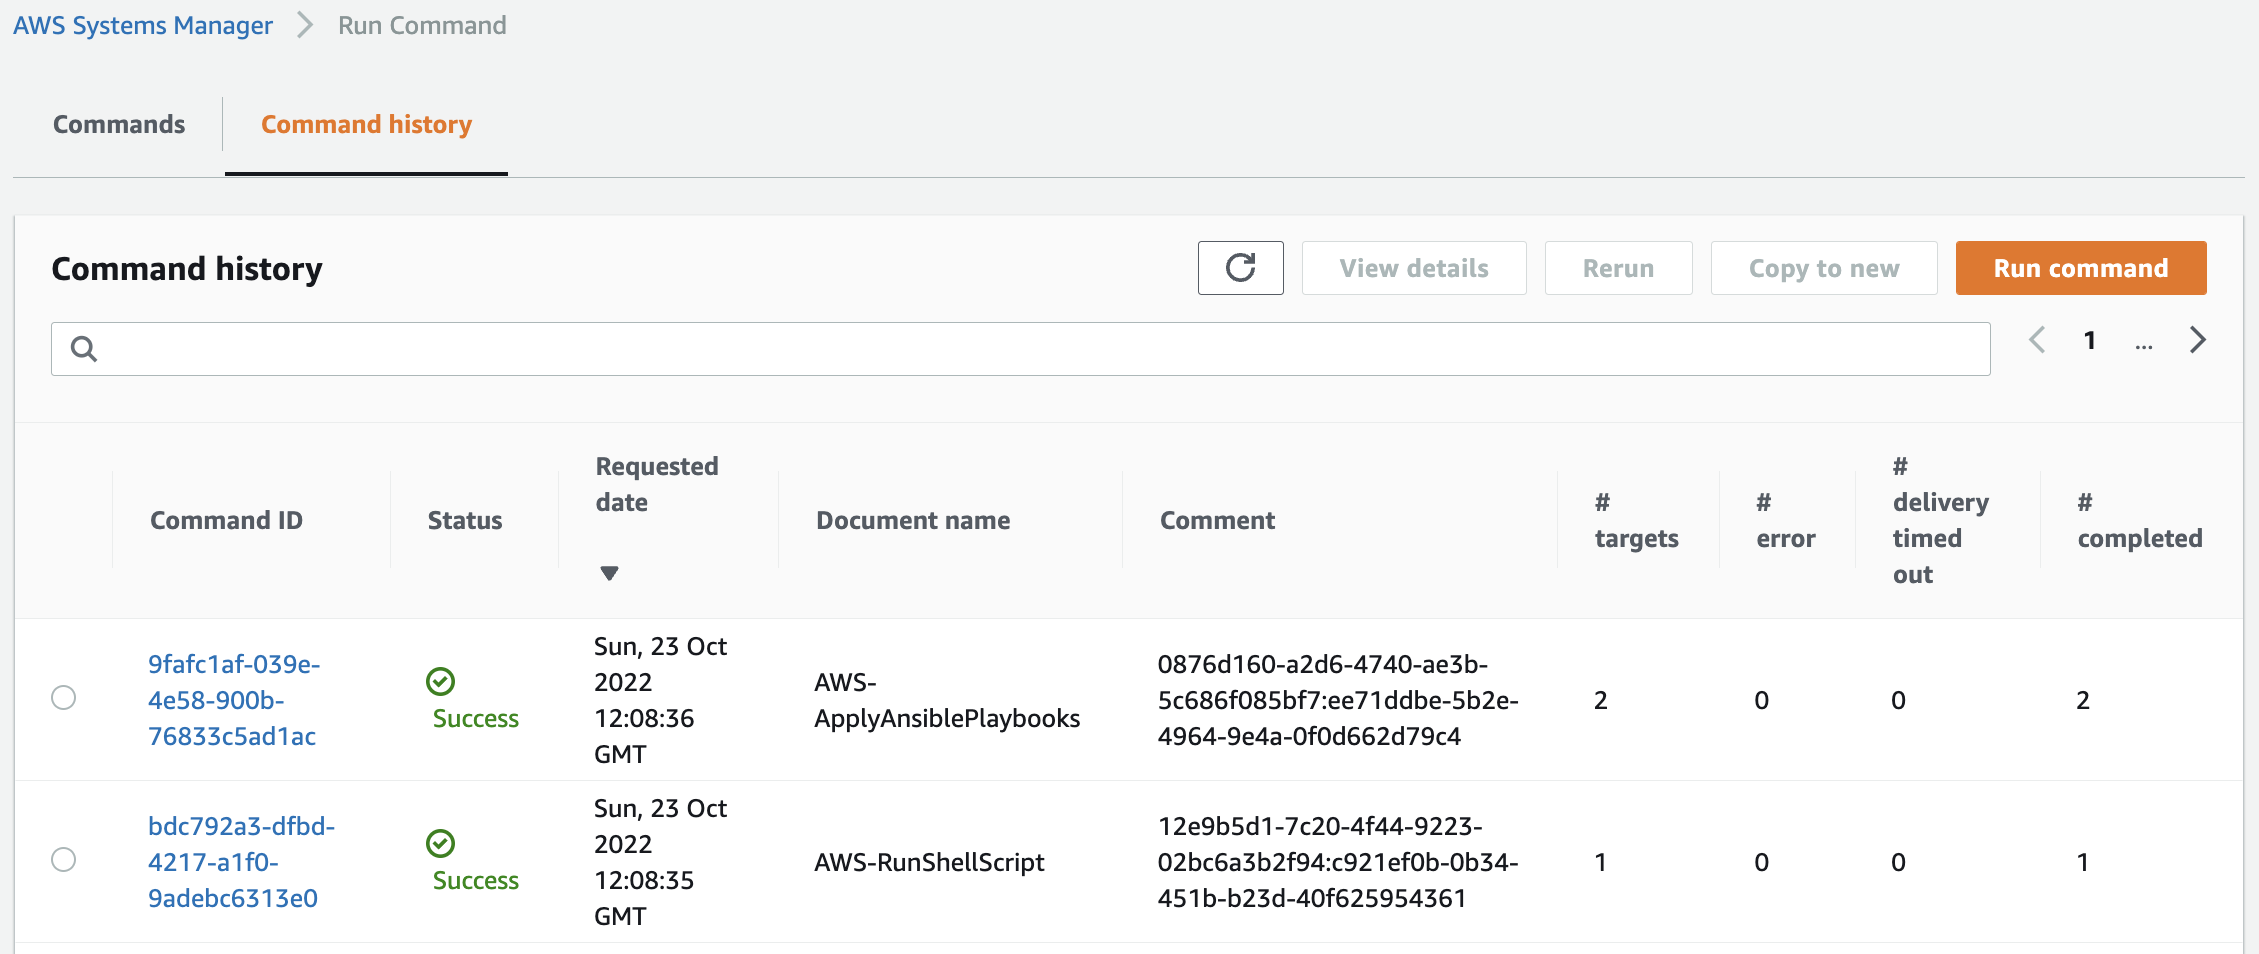
We can see that indeed two documents are running.
First, run AWS-RunShellScript and check the execution log during initialization for the web server.
Loaded plugins: extras_suggestions, langpacks, priorities, update-motd
...

================================================================================
 Package                Arch       Version                  Repository     Size
================================================================================
Installing:
 httpd                  aarch64    2.4.54-1.amzn2           amzn2-core    1.4 M

...

Installed:
  httpd.aarch64 0:2.4.54-1.amzn2

...

Complete!
Code language: plaintext (plaintext)
You can see that Apache is indeed installed.
Then run AWS-ApplyAnsiblePlaybooks and check the execution logs during initialization for the app server.
Amazon Linux release 2 (Karoo)

...

PLAY [all] *********************************************************************

TASK [update yum.] *************************************************************
ok: [localhost] => {"ansible_facts": {"discovered_interpreter_python": "/usr/bin/python"}, "changed": false, "msg": "", "rc": 0, "results": ["libjpeg-turbo-2.0.90-2.amzn2.0.1.aarch64 providing * is already installed"]}

TASK [install packages by yum.] ************************************************
changed: [localhost] => {"ansible_facts": {"pkg_mgr": "yum"}, "changed": true, "changes": {"installed": ["python3-devel", "gcc"]}, "msg": "", "rc": 0, ...}

TASK [install packages by pip3.] ***********************************************
changed: [localhost] => {"changed": true, "cmd": ["/usr/bin/pip3", "install", "uwsgi", "flask"], "name": ["uwsgi", "flask"], ...}

TASK [create app directory.] ***************************************************
changed: [localhost] => {"changed": true, "gid": 0, "group": "root", "mode": "0755", "owner": "root", "path": "/home/ec2-user/myapp", "size": 6, "state": "directory", "uid": 0}

TASK [copy flask script.] ******************************************************
changed: [localhost] => {"changed": true, "checksum": "392c86110eaf72f4ba78c5462ebfe5ea4bddc962", "dest": "/home/ec2-user/myapp/run.py", "gid": 0, "group": "root", "md5sum": "c7db1fa4405b84afe32795fbad73abc6", "mode": "0644", "owner": "root", "size": 352, "src": "/root/.ansible/tmp/ansible-tmp-1666527040.07-114179067830016/source", "state": "file", "uid": 0}

TASK [copy uWSGI ini.] *********************************************************
changed: [localhost] => {"changed": true, "checksum": "dc25dc7fbba4d1dc3f78f765cf65cf5e6af9672b", "dest": "/home/ec2-user/myapp/uwsgi.ini", "gid": 0, "group": "root", "md5sum": "e20220d2bcd7012cc2136339322f54b4", "mode": "0644", "owner": "root", "size": 171, "src": "/root/.ansible/tmp/ansible-tmp-1666527040.66-271438457070822/source", "state": "file", "uid": 0}

TASK [copy uWSGI Service.] *****************************************************
changed: [localhost] => {"changed": true, "checksum": "5f1a6f6e4469de744b10fe8de37af7847e33c644", "dest": "/etc/systemd/system/uwsgi.service", "gid": 0, "group": "root", "md5sum": "c520ed8cb1af45762b3d2d51c08eae8f", "mode": "0644", "owner": "root", "size": 406, "src": "/root/.ansible/tmp/ansible-tmp-1666527040.9-17771148645236/source", "state": "file", "uid": 0}

TASK [reload daemon.] **********************************************************
ok: [localhost] => {"changed": false, "name": null, "status": {}}

TASK [start and enable uWSGI.] *************************************************
changed: [localhost] => {"changed": true, "enabled": true, "name": "uwsgi", "state": "started", ...}}

PLAY RECAP *********************************************************************
localhost                  : ok=9    changed=7    unreachable=0    failed=0    skipped=0    rescued=0    ignored=0
Code language: plaintext (plaintext)
You can see that the various packages are indeed installed and uWSGI is in action.
Check Action
Now that everything is ready, access the EC2 instance that is the web server.


By accessing the web server, we were able to access the two EC2 instances in the Auto Scaling group via the NLB.
From the above, we were able to separate the web server from the application server by deploying an internal NLB.
Summary
We have confirmed how to separate the web servers from the app servers, deploy an internal NLB between the two servers, and link them together.