3-Tier Architecture with Apache/Python(uWSGI)/RDS(Aurora)
Consider building a simple web application.
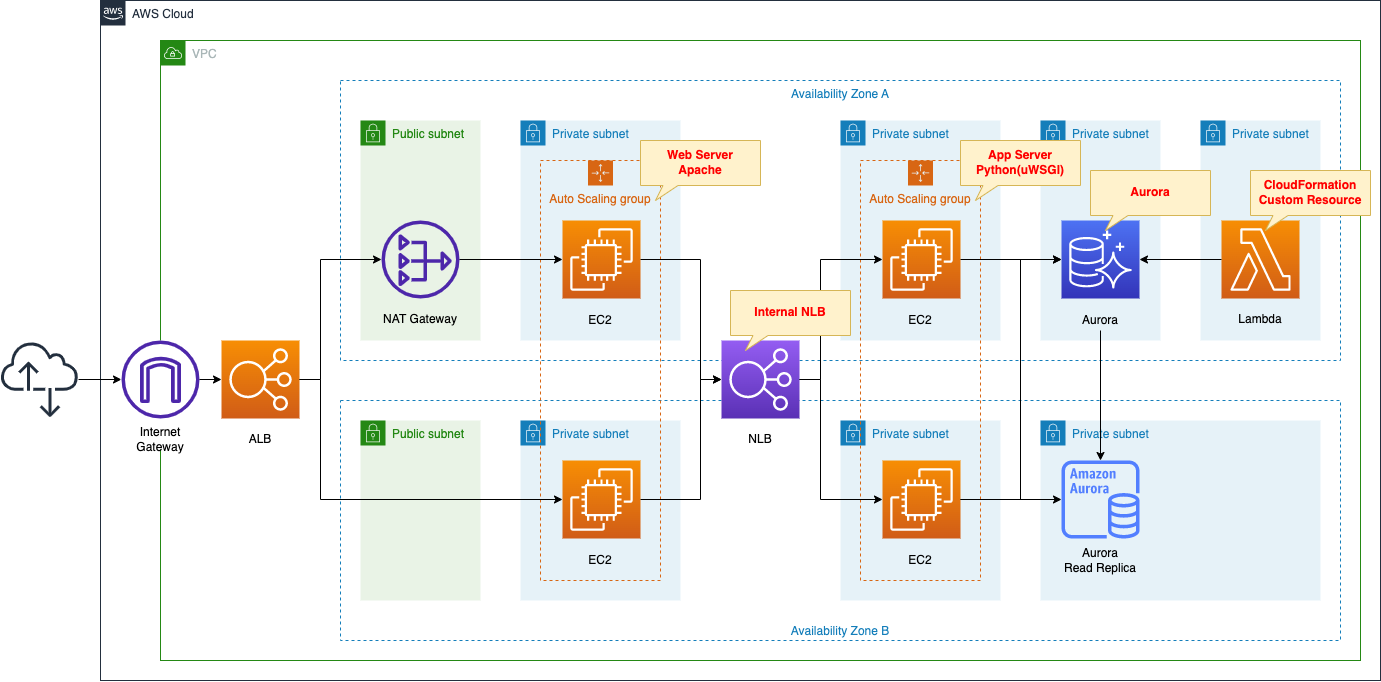
The application will have the following 3-tier structure
- Web tier: ALB and Web server (Auto Scaling)
- Application tier: NLB and application server (Auto Scaling)
- DB tier: RDS (Aurora)
The application to be created is an application that stores and displays date and time information.
We will create a page that stores the date and time accessed by the client and a page that returns a list of stored dates and times.
Environment
Create Auto Scaling for the web server in private subnets.
The EC2 instance created in the Auto Scaling group will be the latest version of Amazon Linux 2.
The instance in the group will act as a web server by installing Apache.
Attach ALB to the Auto Scaling group.
Create Auto Scaling for the app server in private subnets.
The instance created in this group will also be the latest version of Amazon Linux 2.
The instance will be run as an app server with Python (uWSGI).
Attach NLB to the Auto Scaling group.
Create an RDS (Aurora) on private subnets.
Aurora will act as DB server.
Aurora is assumed to be of type MySQL.
Initialize Aurora with CloudFormation custom resources.
Specifically, we will associate a Lambda function with the custom resource to perform table creation in the DB.
Deploy a NAT gateway on a public subnet.
Used to access the Internet and download packages needed for setup when building various servers.
Organize communication between clients and various servers.
- Client -> ALB -> Web server: HTTP (80/tcp)
- Web server -> NLB -> App server: UNIX Domain Socket (9090/tcp)
- App server -> DB server: MySQL(3306/tcp)
CloudFormation template files
The above configuration is built using CloudFormation.
The CloudFormation templates are located at the following URL
https://github.com/awstut-an-r/awstut-fa/tree/main/094
Explanation of key points of the template files
ALB
In this configuration, ALB is attached to the Auto Scaling group in private subnets.
Please refer to the following page for details here.
Security Group
Resources:
  ALBSecurityGroup:
    Type: AWS::EC2::SecurityGroup
    Properties:
      GroupName: !Sub "${Prefix}-ALBSecurityGroup"
      GroupDescription: Allow HTTP Only.
      VpcId: !Ref VPC
      SecurityGroupIngress:
        - IpProtocol: tcp
          FromPort: !Ref HTTPPort
          ToPort: !Ref HTTPPort
          CidrIp: 0.0.0.0/0
Code language: YAML (yaml)
Communication from the client to the web server is done over HTTP (80/tcp) from an unspecified global address.
Therefore, the rule is defined to allow this.
Web Server
Auto Scaling Group
Resources:
  LaunchTemplate:
    Type: AWS::EC2::LaunchTemplate
    Properties:
      LaunchTemplateData:
        IamInstanceProfile:
          Arn: !Ref InstanceProfileArn
        ImageId: !Ref InstanceImageId
        InstanceType: !Ref InstanceType
        SecurityGroupIds:
          - !Ref WebSecurityGroup
        TagSpecifications:
          - ResourceType: instance
            Tags:
              - Key: !Ref InstanceTagKey
                Value: !Ref InstanceTagValueWeb
      LaunchTemplateName: !Sub "${Prefix}-LaunchTemplate-Web"
Code language: YAML (yaml)
Place the web server in an Auto Scaling group.
we will configure an Auto Scaling group without a scaling policy.
For more information on this, please see the following page

This is the Launch template for the Auto Scaling group, but the key point is the tag settings.
Set the tags as follows
- Key: Server
- Value: ApacheWeb
This is because the SSM document is used during the instance initialization process described below, and the tag information is used to distinguish the target instance.
Security Group
Resources:
  WebSecurityGroup:
    Type: AWS::EC2::SecurityGroup
    Properties:
      GroupName: !Sub "${Prefix}-WebSecurityGroup"
      GroupDescription: Allow HTTP from ALBSecurityGroup.
      VpcId: !Ref VPC
      SecurityGroupIngress:
        - IpProtocol: tcp
          FromPort: !Ref HTTPPort
          ToPort: !Ref HTTPPort
          SourceSecurityGroupId: !Ref ALBSecurityGroup
Code language: YAML (yaml)
HTTP traffic directed from the client to the ALB is routed to the web server.
Since the traffic originates from the ALB, the security group of the ALB is specified.
SSM association
Resources:
  WebServerAssociation:
    Type: AWS::SSM::Association
    Properties:
      AssociationName: !Sub "${Prefix}-run-shellscript-association"
      Name: AWS-RunShellScript
      OutputLocation:
        S3Location:
          OutputS3BucketName: !Ref PlaybookBucket
          OutputS3KeyPrefix: !Sub "${Prefix}/shellscript-association-log"
      Parameters:
        commands:
          - yum update -y
          - yum install -y httpd
          - !Sub "echo 'ProxyPass / uwsgi://${NLBDNSName}:${UWSGIPort}/' >> /etc/httpd/conf/httpd.conf"
          - !Sub "echo 'ProxyPassReverse / uwsgi://${NLBDNSName}:${UWSGIPort}/' >> /etc/httpd/conf/httpd.conf"
          - systemctl start httpd
          - systemctl enable httpd
      Targets:
        - Key: !Sub "tag:${InstanceTagKey}"
          Values:
            - !Ref InstanceTagValueWeb
      WaitForSuccessTimeoutSeconds: !Ref WaitForSuccessTimeoutSeconds
Code language: YAML (yaml)
Define the initialization process to action the instance as a web server.
In this case, SSM document AWS-RunShellScript is used.
Please refer to the following page for the initialization process of the instance using SSM document.
The contents to be executed are as follows
- Install Apache.
- Add proxy settings for NLB to the configuration file (httpd.conf).
- Start and enable Apache.
Specify the targets to perform this initialization process in the Targets property.
Apply this SSM association to instances that have been given the aforementioned tags.
NLB
In this configuration, the web server and application server are separated, and an internal NLB is placed between the two servers.
For more information on this configuration, please refer to the following page
App Server
Auto Scaling group
Resources:
  LaunchTemplate:
    Type: AWS::EC2::LaunchTemplate
    Properties:
      LaunchTemplateData:
        IamInstanceProfile:
          Arn: !Ref InstanceProfileArn
        ImageId: !Ref InstanceImageId
        InstanceType: !Ref InstanceType
        SecurityGroupIds:
          - !Ref AppSecurityGroup
        TagSpecifications:
          - ResourceType: instance
            Tags:
              - Key: !Ref InstanceTagKey
                Value: !Ref InstanceTagValueApp
      LaunchTemplateName: !Sub "${Prefix}-LaunchTemplate-App"
Code language: YAML (yaml)
Place the web server in the Auto Scaling group.
As mentioned earlier, the key point is the tag settings.
Set the tags as follows
- Key: Server
- Value: ApacheWeb
Security Group
Resources:
  AppSecurityGroup:
    Type: AWS::EC2::SecurityGroup
    Properties:
      GroupName: !Sub "${Prefix}-AppSecurityGroup"
      GroupDescription: Allow uWSGI from NLB.
      VpcId: !Ref VPC
Code language: YAML (yaml)
The security group for the app server, but on the CloudFormation template, we do not specify the communication to be allowed.
The source of traffic for the app server is the NLB, but this time the NLB has disabled the preservation of client IPs, so the source of traffic will be the private address of the NLB.
This address is dynamically assigned after the NLB is created and cannot be specified in the template.
To deal with the above, use CloudFormation custom resources.
Please refer to the following page for details
This time, change the Lambda function in the above page as follows
Resources:
  AppSecurityGroupFunction:
    Type: AWS::Lambda::Function
    Properties:
      Code:
        ZipFile: |
          import boto3
          import cfnresponse
          import os

          nlb_loadbalancer_name = os.environ['NLB_LOADBALANCER_NAME']
          security_group_id = os.environ['SECURITY_GROUP']
          uwsgi_port = int(os.environ['UWSGI_PORT'])

          filter_value = '*{nlb}*'.format(nlb=nlb_loadbalancer_name)

          client = boto3.client('ec2')

          CREATE = 'Create'
          response_data = {}

          def lambda_handler(event, context):
            try:
              if event['RequestType'] == CREATE:
                describe_network_interfaces_response = client.describe_network_interfaces(
                  Filters=[
                    {
                      'Name':'description',
                      'Values':[
                        filter_value
                      ]
                    }
                  ]
                )

                for interface in describe_network_interfaces_response['NetworkInterfaces']:
                  private_address = interface['PrivateIpAddress']
                  authorize_security_group_ingress_response = client.authorize_security_group_ingress(
                    GroupId=security_group_id,
                    IpPermissions=[
                      {
                        'FromPort': uwsgi_port,
                        'IpProtocol': 'tcp',
                        'IpRanges': [
                          {
                            'CidrIp': '{address}/32'.format(address=private_address)
                          }
                        ],
                        'ToPort': uwsgi_port
                      }
                    ]
                  )
                  print(authorize_security_group_ingress_response)
              cfnresponse.send(event, context, cfnresponse.SUCCESS, response_data)

            except Exception as e:
              print(e)
              cfnresponse.send(event, context, cfnresponse.FAILED, response_data)
      Environment:
        Variables:
          NLB_LOADBALANCER_NAME: !Ref NLBLoadBalancerName
          SECURITY_GROUP: !Ref AppSecurityGroup
          UWSGI_PORT: !Ref UWSGIPort
      FunctionName: !Sub "${Prefix}-AppSecurityGroupFunction"
      Handler: !Ref FunctionHandler
      Runtime: !Ref FunctionRuntime
      Role: !GetAtt AppSecurityGroupFunctionRole.Arn
Code language: YAML (yaml)
After obtaining the private addresses of the NLB, use it to add rules for the security group for the app server.
SSM association
Resources:
  AppServerAssociation:
    Type: AWS::SSM::Association
    Properties:
      AssociationName: !Sub "${Prefix}-apply-ansible-playbook-association"
      Name: AWS-ApplyAnsiblePlaybooks
      OutputLocation:
        S3Location:
          OutputS3BucketName: !Ref PlaybookBucket
          OutputS3KeyPrefix: !Sub "${Prefix}/playbook-association-log"
      Parameters:
        Check:
          - "False"
        ExtraVariables:
          - !Sub >-
              SSM=True
              DB_NAME=${DBName}
              DB_PASSWORD=${DBPassword}
              DB_READ_ENDPOINT_ADDRESS=${DBReadEndpointAddress}
              DB_TABLENAME=${DBTableName}
              DB_USER=${DBUser}
              DB_WRITE_ENDPOINT_ADDRESS=${DBWriteEndpointAddress}
              MYSQL_PORT=${MySQLPort}
        InstallDependencies:
          - "True"
        PlaybookFile:
          - !Ref PlaybookFileName
        SourceInfo:
          - !Sub '{"path": "https://${PlaybookBucket}.s3.${AWS::Region}.amazonaws.com/${Prefix}/${PlaybookPackageName}"}'
        SourceType:
          - S3
        Verbose:
          - -v
      Targets:
        - Key: !Sub "tag:${InstanceTagKey}"
          Values:
            - !Ref InstanceTagValueApp
      WaitForSuccessTimeoutSeconds: !Ref WaitForSuccessTimeoutSeconds
Code language: YAML (yaml)
Define the initialization process to make the instance act as a web server.
In this case, we will use the SSM document AWS-ApplyAnsiblePlaybooks.
By executing the Ansible Playbook described below, we will perform the initialization.
The key point is the ExtraVariables property.
Variables can be defined with this property, and these variables can be used in the Ansible runtime environment.
In this case, we will use this property to pass DB user name, password, and other information to the Ansible environment.
The notation is as follows
[variable name1]=[value1] [variable name2]=[value2] …
This time, the variables are separated into multiple lines to improve readability of the code.
By using “>-“, newlines on each line are converted to spaces and combined, while newlines on the last line are shaved off.
playbook.yml, uwsgi.service, run.py
Basically, this is the same as what is described in the following pages.
playbook.yml
Since there are changes in playbook.yml, we will cover this.
- hosts: all
  gather_facts: no
  become: yes

  tasks:
    - name: update yum.
      yum: name=*

    - name: install packages by yum.
      yum:
        name:
          - python3-devel
          - gcc

    - name: install packages by pip3.
      pip:
        name:
          - uwsgi
          - flask
          - mysql-connector-python
        executable: pip3

    - name: create app directory.
      file:
        path: /home/ec2-user/myapp
        state: directory

    - name: copy flask script.
      copy:
        src: ./run.py
        dest: /home/ec2-user/myapp/run.py

    - name: copy uWSGI ini.
      copy:
        src: ./uwsgi.ini
        dest: /home/ec2-user/myapp/uwsgi.ini

    - name: copy uWSGI Service.
      copy:
        src: ./uwsgi.service
        dest: /etc/systemd/system/uwsgi.service

    - name: create uWSGI environment variables file.
      copy:
        dest: "/etc/sysconfig/uwsgi"
        content: |
          DB_NAME={{DB_NAME}}
          DB_PASSWORD={{DB_PASSWORD}}
          DB_READ_ENDPOINT_ADDRESS={{DB_READ_ENDPOINT_ADDRESS}}
          DB_TABLENAME={{DB_TABLENAME}}
          DB_USER={{DB_USER}}
          DB_WRITE_ENDPOINT_ADDRESS={{DB_WRITE_ENDPOINT_ADDRESS}}
          MYSQL_PORT={{MYSQL_PORT}}

    - name: reload daemon.
      systemd:
        daemon_reload: yes

    - name: start and enable uWSGI.
      systemd:
        name: uwsgi
        state: started
        enabled: yes
Code language: YAML (yaml)
Add a task to define variables for systemd.
Create a file in /etc/sysconfig/uwsgi and write environment variables in it.
The variables to be created are DB user name, password, and other information.
These are defined in ExtraVariables in the SSM association and the values passed to Ansible.
uwsgi.service
Set uwsgi.service to read /etc/sysconfig/uwsgi.
[Unit]
Description = uWSGI
After = syslog.target

[Service]
WorkingDirectory = /home/ec2-user/myapp/
EnvironmentFile=/etc/sysconfig/uwsgi
ExecStart = /usr/local/bin/uwsgi --ini /home/ec2-user/myapp/uwsgi.ini

Restart = on-failure
RestartSec = 3
KillSignal = SIGQUIT
Type = notify
StandardError = syslog
NotifyAccess = all

[Install]
WantedBy = multi-user.target
Code language: plaintext (plaintext)
run.py
import datetime
import json
import mysql.connector
import os
from flask import Flask

db_name = os.environ['DB_NAME']
db_password = os.environ['DB_PASSWORD']
db_read_endpoint_address = os.environ['DB_READ_ENDPOINT_ADDRESS']
db_tablename = os.environ['DB_TABLENAME']
db_user = os.environ['DB_USER']
db_write_endpoint_address = os.environ['DB_WRITE_ENDPOINT_ADDRESS']
mysql_port = int(os.environ['MYSQL_PORT'])

str_format = '%Y-%m-%d %H:%M:%S'

app = Flask(__name__)

@app.route('/')
@app.route('/read')
def read():
  conn = mysql.connector.connect(
    host=db_read_endpoint_address,
    port=mysql_port,
    user=db_user,
    password=db_password,
    database=db_name
    )
  cur = conn.cursor()

  read_sql = 'select * from {table};'.format(table=db_tablename)
  cur.execute(read_sql)
  result = json.dumps(
    [record[0].strftime(str_format) for record in cur],
    indent=2
    )

  cur.close()
  conn.close()

  return result


@app.route('/write')
def write():
  conn = mysql.connector.connect(
    host=db_write_endpoint_address,
    port=mysql_port,
    user=db_user,
    password=db_password,
    database=db_name
    )
  cur = conn.cursor()

  now = datetime.datetime.now()
  now_str = now.strftime(str_format)
  write_sql = 'insert into {table} values ("{now}");'.format(
    table=db_tablename,
    now=now_str
    )
  cur.execute(write_sql)

  cur.close()
  conn.commit()
  conn.close()

  return 'Saved: {now}'.format(now=now_str)


if __name__ == '__main__':
  app.run()
Code language: Python (python)
Using Flask, define the following two pages
- read page, top page: Connects to Aurora, retrieves all stored date/time information, and returns it to the client.
- write page: Connects to Aurora, stores the current date and time information, and returns it to the client.
Each page connects to Aurora, but the endpoints used for the connection are different.
In the case of the read page, only the read process occurs, so the read endpoint for the read replica is used.
For write pages, write processing also occurs, so the write endpoint for the primary server is used.
DB Server
Aurora
Create a primary server and a read replica server in the Aurora cluster.
The basic configuration is the same as in the following page.
Use CloudFormation custom resources to initialize Aurora’s DB.
Specifically, the Lambda function associated with the custom resource will connect to Aurora and execute the initialization process.
For more information, please refer to the following page
In this case, we will execute the following SQL statement stored in the SSM parameter store to initialize the DB.
Resources:
  SQLParameter:
    Type: AWS::SSM::Parameter
    Properties:
      Name: !Sub "${Prefix}-SQLParameter"
      Type: String
      Value: !Sub |
        USE ${DBName};
        CREATE TABLE ${DBTableName} (dt datetime);
Code language: YAML (yaml)
Specifically, after selecting the DB to operate, the contents of the table to store date/time information is created.
Security Group
Resources:
  DBSecurityGroup:
    Type: AWS::EC2::SecurityGroup
    Properties:
      GroupName: !Sub "${Prefix}-DBSecurityGroup"
      GroupDescription: Allow MySQL from AppSecurityGroup and FunctionSecurityGroup.
      VpcId: !Ref VPC
      SecurityGroupIngress:
        - IpProtocol: tcp
          FromPort: !Ref MySQLPort
          ToPort: !Ref MySQLPort
          SourceSecurityGroupId: !Ref AppSecurityGroup
        - IpProtocol: tcp
          FromPort: !Ref MySQLPort
          ToPort: !Ref MySQLPort
          SourceSecurityGroupId: !Ref FunctionSecurityGroup
Code language: YAML (yaml)
Connections to Aurora are generated from the app server and Lambda functions, so the contents allow these communications.
Architecting
Using CloudFormation, we will build this environment and check the actual behavior.
Prepare Ansible Playbook
Before creating the CloudFormation stacks, prepare Ansible.
Specifically, zip the Playbook and other files and place them in an S3 bucket. Please refer to the following page for specific commands.
Create CloudFormation stacks and check resources in stacks
Create CloudFormation stacks.
For information on how to create stacks and check each stack, please refer to the following page

After checking the resources in each stack, information on the main resources created this time is as follows
- ALB: fa-094-ALB
- DNS name of ALB: fa-094-alb-1763061004.ap-northeast-1.elb.amazonaws.com
- NLB: fa-094-NLB
- Auto Scaling for Web server: fa-094-ALBAutoScalingGroup
- Auto Scaling for app servers: fa-094-NLBAutoScalingGroup
- Aurora cluster: fa-094-dbcluster
ALB
Confirm the created resources from the AWS Management Console.
Check the ALB.
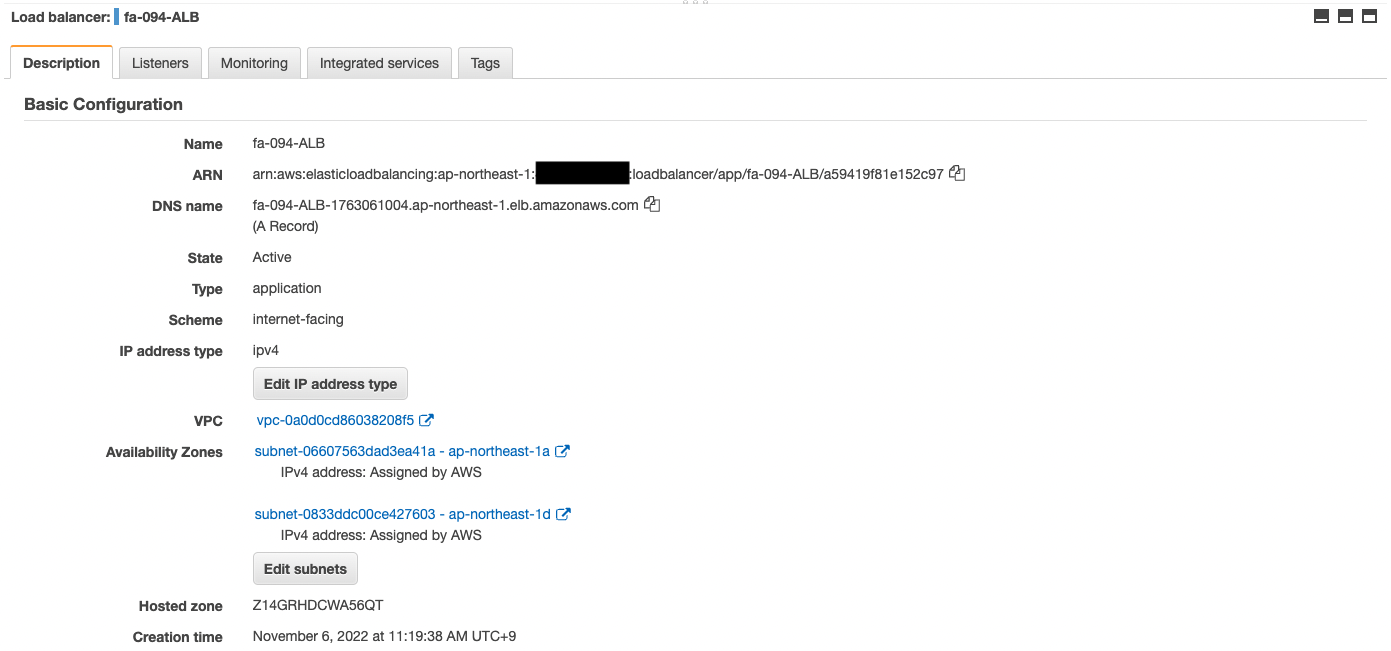
You can see that the ALB has been successfully created.
You can also see the DNS name of the ALB.
Check the ALB target group.
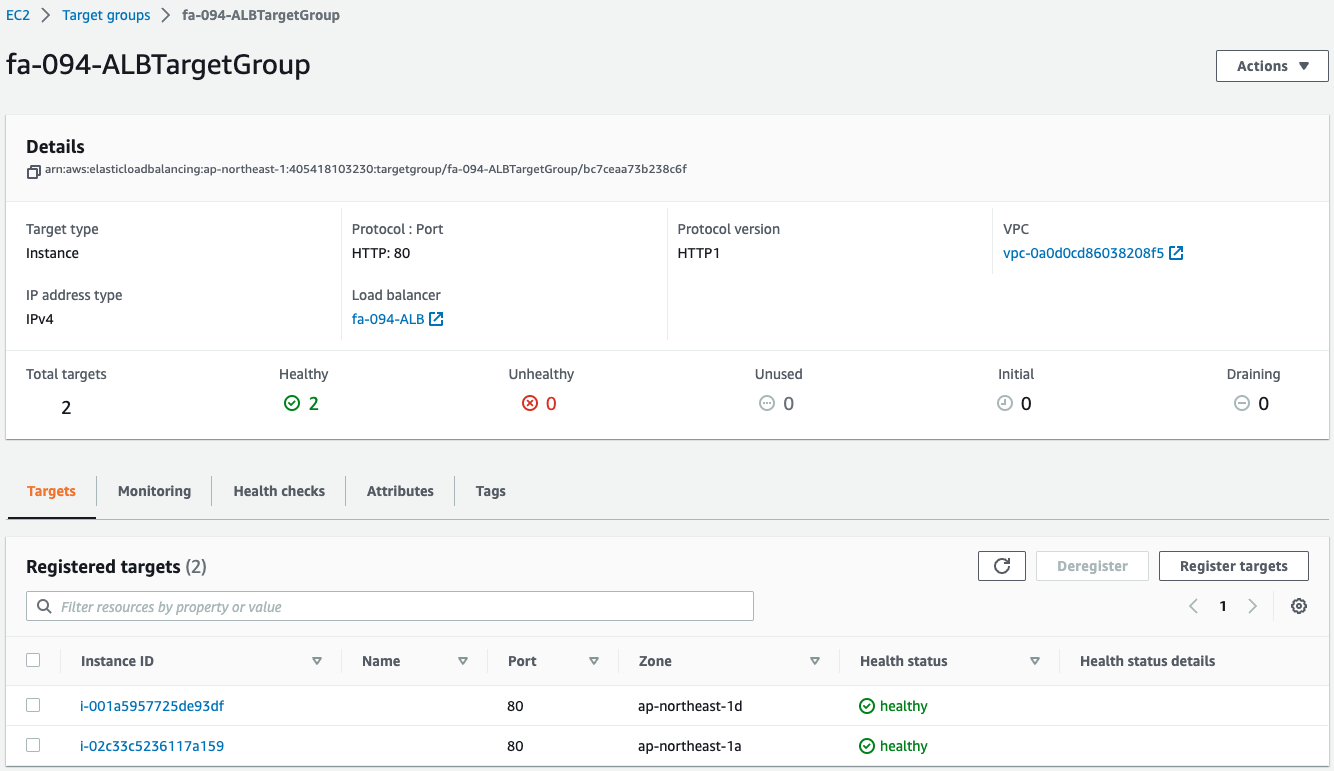
You can see that two instances have been created in the group.
This means that two web server instances were automatically launched by the Auto Scaling group for the web associated with the ALB.
NLB
Check the NLB.
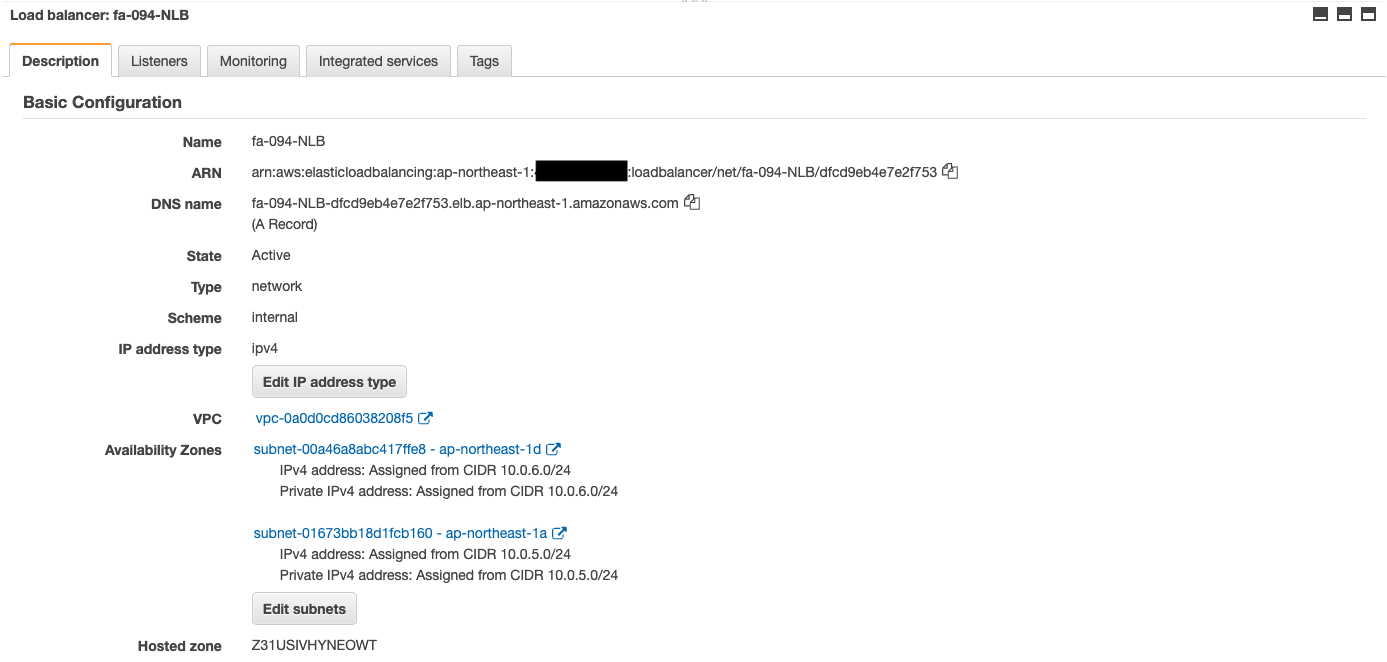
We can see that the NLB has been successfully created.
Also check the NLB target group.
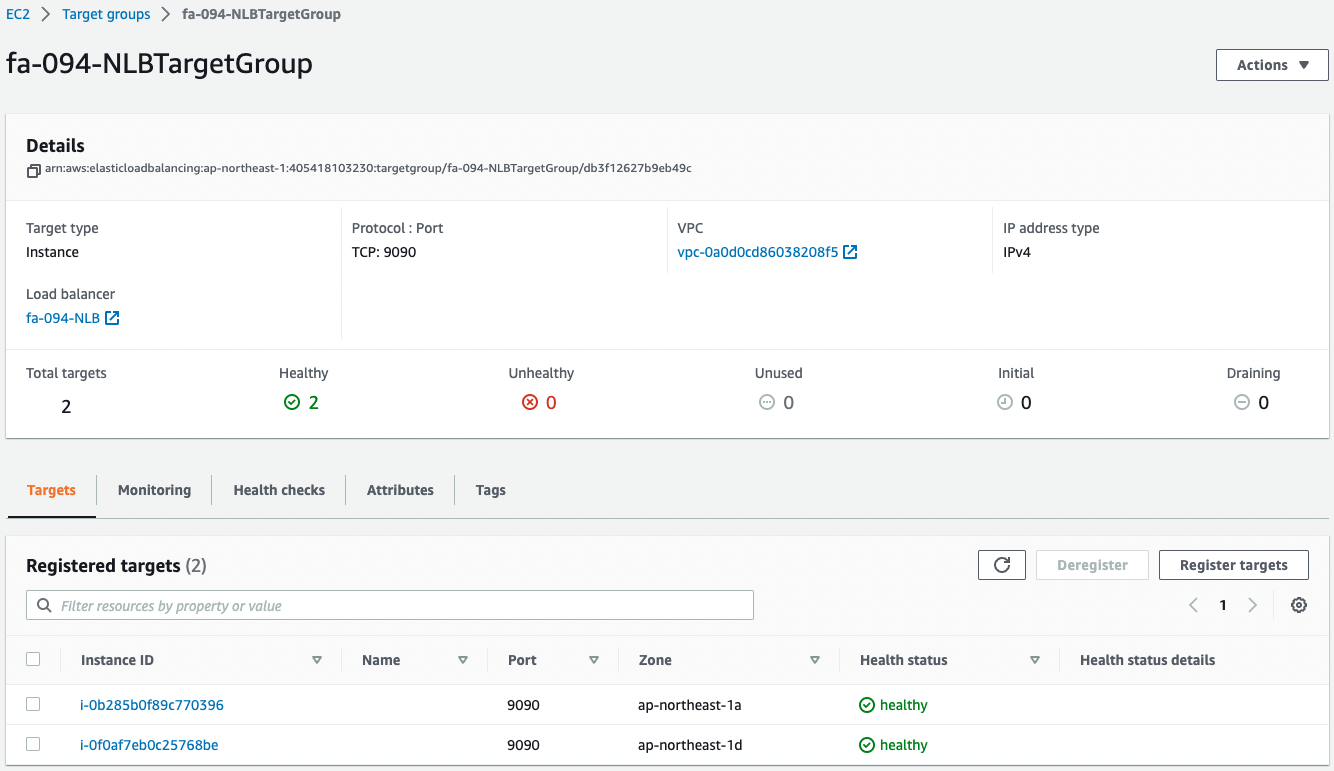
You can see that two instances were created in the group.
This means that two app server instances were automatically launched by the Auto Scaling group for apps associated with the NLB.
Aurora
Check the Aurora cluster.
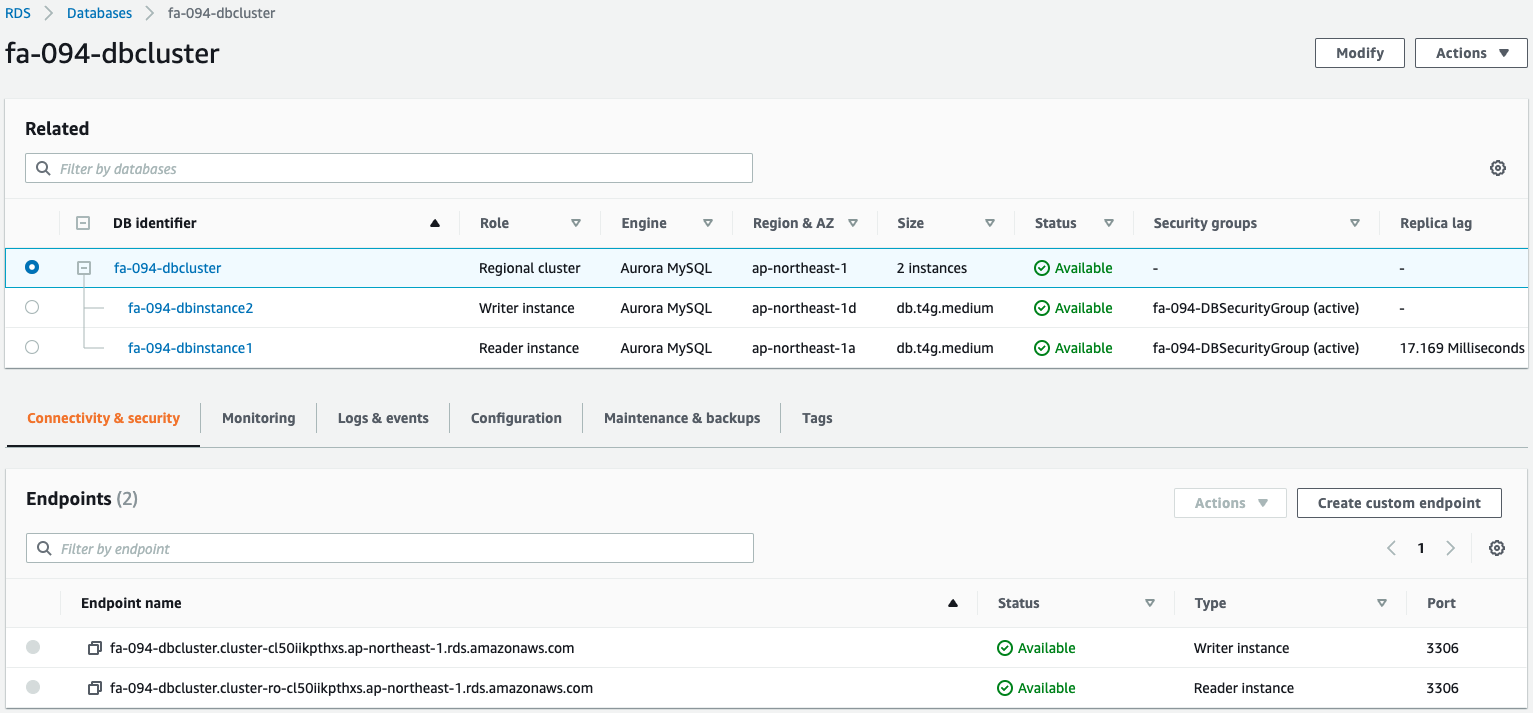
You can see that the Aurora cluster has been successfully created.
You can see that write and read endpoints have indeed been created.
Check Action
Now that everything is ready, access the ALB top page.

An empty list is returned as a response.
This is because the date and time information has not yet been saved.
Access the write page several times to save the data in the DB.


The date/time data has been successfully saved.
Access the read page again.

The saved data is returned.
You can see that this 3-tier application is working properly.
(Reference) Server log
Check the server logs of the web and application layer for reference.
First, we will take a look at some of the logs of two web servers.
10.0.2.56 - - [06/Nov/2022:03:01:52 +0000] "GET /write HTTP/1.1" 200 26 "-" "Mozilla/5.0 (Macintosh; Intel Mac OS X 10_15_7) AppleWebKit/537.36 (KHTML, like Gecko) Chrome/107.0.0.0 Safari/537.36"
10.0.2.56 - - [06/Nov/2022:03:02:03 +0000] "GET / HTTP/1.1" 200 77 "-" "Mozilla/5.0 (Macintosh; Intel Mac OS X 10_15_7) AppleWebKit/537.36 (KHTML, like Gecko) Chrome/107.0.0.0 Safari/537.36"
Code language: plaintext (plaintext)
10.0.2.56 - - [06/Nov/2022:03:01:35 +0000] "GET / HTTP/1.1" 200 2 "-" "Mozilla/5.0 (Macintosh; Intel Mac OS X 10_15_7) AppleWebKit/537.36 (KHTML, like Gecko) Chrome/107.0.0.0 Safari/537.36"
10.0.2.56 - - [06/Nov/2022:03:01:47 +0000] "GET /write HTTP/1.1" 200 26 "-" "Mozilla/5.0 (Macintosh; Intel Mac OS X 10_15_7) AppleWebKit/537.36 (KHTML, like Gecko) Chrome/107.0.0.0 Safari/537.36"
10.0.2.56 - - [06/Nov/2022:03:01:57 +0000] "GET /write HTTP/1.1" 200 26 "-" "Mozilla/5.0 (Macintosh; Intel Mac OS X 10_15_7) AppleWebKit/537.36 (KHTML, like Gecko) Chrome/107.0.0.0 Safari/537.36"
10.0.2.56 - - [06/Nov/2022:03:02:14 +0000] "GET /read HTTP/1.1" 200 77 "-" "Mozilla/5.0 (Macintosh; Intel Mac OS X 10_15_7) AppleWebKit/537.36 (KHTML, like Gecko) Chrome/107.0.0.0 Safari/537.36"
Code language: plaintext (plaintext)We can see that the traffic is being divided between the two web servers by ALB.
Next, we will take a look at some of the logs from the app server.
[pid: 2178|app: 0|req: 70/70] 10.0.2.56 () {64 vars in 1335 bytes} [Sun Nov  6 03:01:47 2022] GET /write => generated 26 bytes in 48 msecs (HTTP/1.1 200) 2 headers in 79 bytes (1 switches on core 0)
[pid: 2178|app: 0|req: 71/71] 10.0.1.106 () {52 vars in 765 bytes} [Sun Nov  6 03:01:47 2022] GET / => generated 27 bytes in 26 msecs (HTTP/1.1 200) 2 headers in 79 bytes (1 switches on core 0)
[pid: 2178|app: 0|req: 73/73] 10.0.2.56 () {64 vars in 1332 bytes} [Sun Nov  6 03:02:14 2022] GET /read => generated 77 bytes in 30 msecs (HTTP/1.1 200) 2 headers in 79 bytes (1 switches on core 0)
Code language: plaintext (plaintext)
[pid: 2189|app: 0|req: 67/67] 10.0.1.106 () {52 vars in 762 bytes} [Sun Nov 6 03:01:47 2022] GET / => generated 27 bytes in 44 msecs (HTTP/1.1 200) 2 headers in 79 bytes (1 switches on core 0)
[pid: 2189|app: 0|req: 68/68] 10.0.2.56 () {66 vars in 1365 bytes} [Sun Nov 6 03:01:52 2022] GET /write => generated 26 bytes in 34 msecs (HTTP/1.1 200) 2 headers in 79 bytes (1 switches on core 0)
[pid: 2189|app: 0|req: 69/69] 10.0.2.56 () {66 vars in 1366 bytes} [Sun Nov 6 03:01:57 2022] GET /write => generated 26 bytes in 37 msecs (HTTP/1.1 200) 2 headers in 79 bytes (1 switches on core 0)
Code language: plaintext (plaintext)Here, too, we can see that the NLB is distributing traffic to the two app servers.
Summary
We created a 3-tier architecture with Apache/Python (uWSGI)/RDS (Aurora).