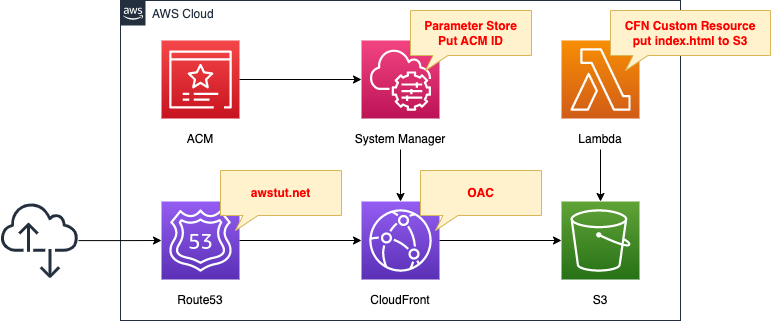
Register CloudFront + S3 configuration with Route53 and access with your own domain
The following pages cover how to use OAC to deliver S3 content via CloudFront.
This page is a continuation of this page, so we will register this configuration with Route53 and make it accessible under our own domain.
Environment
Basically, it is the same as the aforementioned page.
There are two changes.
The first point is Route53.
Register CloudFront with Route53 and make it accessible with your own domain.
In this case, we will use “awstut.net” obtained from Route53.
The second point is ACM.
SSL is used for communication when accessing with your own domain.
CloudFormation template files
The above configuration is built with CloudFormation.
The CloudFormation templates are placed at the following URL
https://github.com/awstut-an-r/awstut-fa/tree/main/134
Explanation of key points of template files
This configuration is built using CloudFormation StackSets.
For more information on StackSets, please visit
Route53
Resources:
  DnsRecord:
    Type: AWS::Route53::RecordSet
    Properties:
      HostedZoneId: !Ref HostedZoneId
      Name: !Ref DomainName
      Type: A
      AliasTarget:
        DNSName: !Ref DistributionDomainName
        HostedZoneId: !Ref DistributionHostedZoneId
Code language: YAML (yaml)
Set records for your own domain and CloudFront in Route53.
For details, please refer to the following page.
The key point is the HostedZoneId of CloudFront.
The following page shows that the HostedZoneId for CloudFront is “Z2FDTNDATAQYW2”.
https://docs.aws.amazon.com/general/latest/gr/cf_region.html
ACM
Resources:
  Certificate:
    Type: AWS::CertificateManager::Certificate
    Properties:
      DomainName: !Ref DomainName
      DomainValidationOptions:
        - DomainName: !Ref DomainName
          HostedZoneId: !Ref HostedZoneId
      ValidationMethod: DNS
Code language: YAML (yaml)
Use ACM to create a certificate for your own domain.
For details, please refer to the following page.
The point is the region where the ACM is created.
To use an ACM certificate with Amazon CloudFront, you must request or import the certificate in the US East (N. Virginia) region. ACM certificates in this region that are associated with a CloudFront distribution are distributed to all the geographic locations configured for that distribution.
Supported Regions
Create ACM in the us-east-1 region according to the above.
Save the ACM ID to the SSM Parameter Store.
Resources:
  CustomResource:
    Type: Custom::CustomResource
    Properties:
      ServiceToken: !GetAtt Function.Arn

  Function:
    Type: AWS::Lambda::Function
    Properties:
      Code:
        ZipFile: |
          import boto3
          import cfnresponse
          import os

          certificate = os.environ['CERTIFICATE']
          parameter_name = os.environ['PARAMETER_NAME']
          region = os.environ['REGION']

          ssm_client = boto3.client('ssm', region_name=region)

          CREATE = 'Create'
          DELETE = 'Delete'
          response_data = {}

          def lambda_handler(event, context):
            try:
              if event['RequestType'] == CREATE:
                response = ssm_client.put_parameter(
                  Name=parameter_name,
                  Value=certificate,
                  Type='String'
                )
                print(response)

              elif event['RequestType'] == DELETE:
                response = ssm_client.delete_parameter(
                  Name=parameter_name
                )
                print(response)

              cfnresponse.send(event, context, cfnresponse.SUCCESS, response_data)

            except Exception as e:
              print(e)
              cfnresponse.send(event, context, cfnresponse.FAILED, response_data)
      Environment:
        Variables:
          CERTIFICATE: !Ref Certificate
          PARAMETER_NAME: !Ref ACMParameterStoreName
          REGION: !Ref AppRegion
      FunctionName: !Sub "${Prefix}-function"
      Handler: !Ref Handler
      Runtime: !Ref Runtime
      Role: !GetAtt FunctionRole.Arn
Code language: YAML (yaml)
CloudFormation custom resource.
Store parameters by executing the Lambda function associated with the custom resource.
For more information on CloudFormation custom resources, please see the following pages
This configuration will be built in the ap-northeast-1 region.
So we will register it in the SSM Parameter Store in the ap-northeast-1 region so that we can reference the ID of the ACM in the us-east-1 region.
CloudFront
Resources:
  Distribution:
    Type: AWS::CloudFront::Distribution
    Properties:
      DistributionConfig:
        Aliases:
          - !Ref DomainName
        DefaultCacheBehavior:
          AllowedMethods:
            - GET
            - HEAD
          CachedMethods:
            - GET
            - HEAD
          Compress: true
          ForwardedValues:
            Cookies:
              Forward: none
            QueryString: false
          TargetOriginId: !Ref BucketName
          ViewerProtocolPolicy: redirect-to-https
        DefaultRootObject: index.html
        Enabled: true
        Origins:
          - DomainName: !Ref BucketRegionalDomainName
            Id: !Ref BucketName
            OriginAccessControlId: !GetAtt OAC.Id
            S3OriginConfig:
              OriginAccessIdentity: ""
        PriceClass: PriceClass_All
        ViewerCertificate:
          SslSupportMethod: sni-only
          AcmCertificateArn: !Sub "{{resolve:ssm:${ACMParameterStoreName}}}"
Code language: YAML (yaml)
There are two key points in applying ACM to CloudFront distributions.
The first point is the Aliases property.
Register the domain name to be used here.
The second point is the ViewerCertificate property.
Specify the ACM ID here.
Refer to the aforementioned Parameter Store value and set it to this property.
Architecting
Use CloudFormation to build this environment and check its actual behavior.
Create CloudFormation stacks and check the resources in the stacks
Create CloudFormation stacks.
For information on how to create stacks and check each stack, please see the following page.

After reviewing the resources in each stack, information on the main resources created in this case is as follows
- CloudFront Distribution: E1HDHS15XEQA22
- CloudFront distribution domain: d1u8d8wqcfy55l.cloudfront.net
The AWS Management Console also checks the status of resource creation.
Check the ACM.
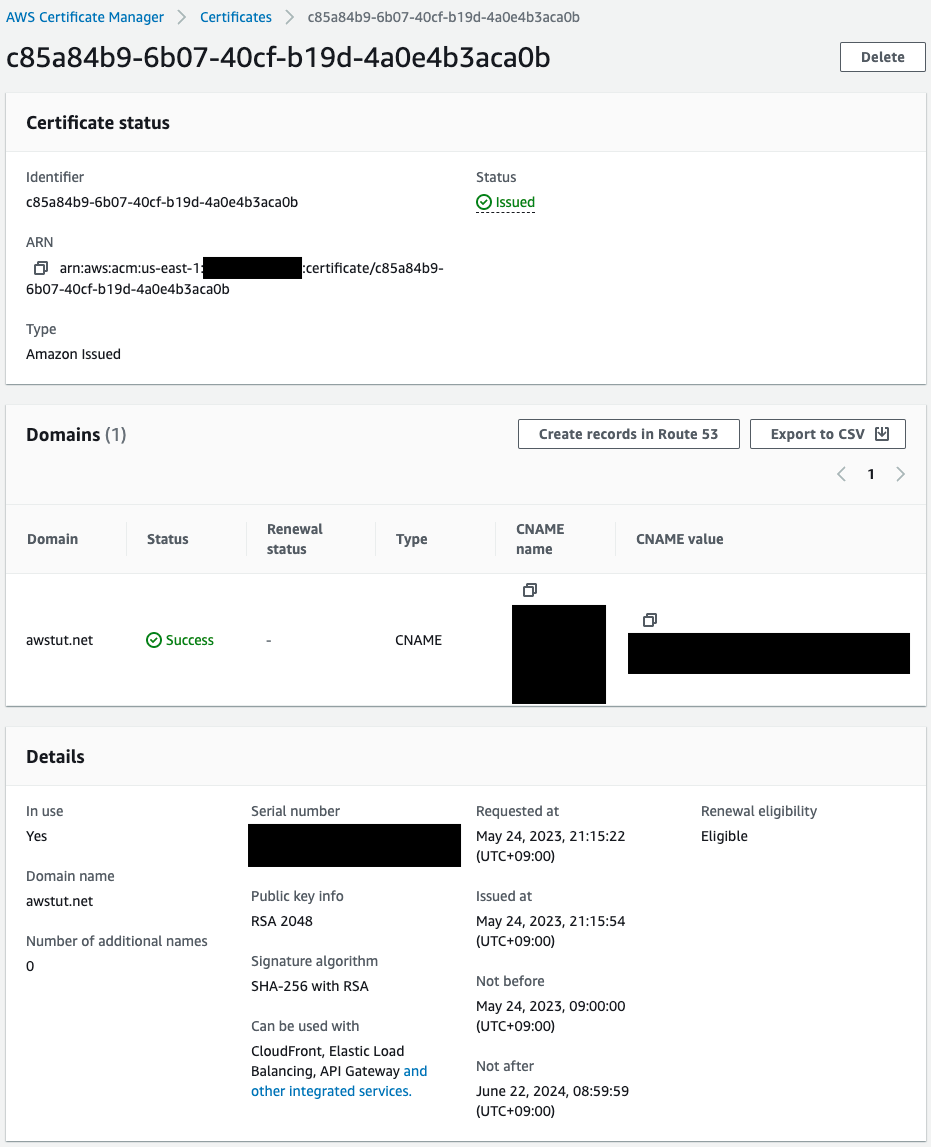
Indeed, an ACM certificate for “awstut.net” has been created.
Check the status of CloudFront creation.
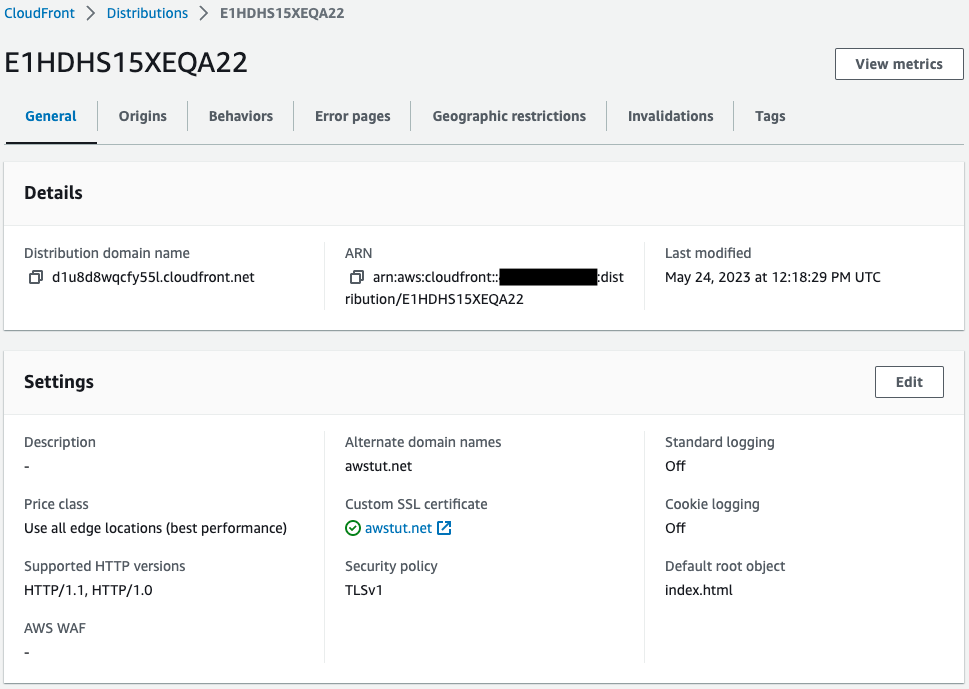
The CloudFront distribution has been successfully created.
We can also see that the aforementioned ACM certificate is associated with the distribution.
Check the origin of the distribution.
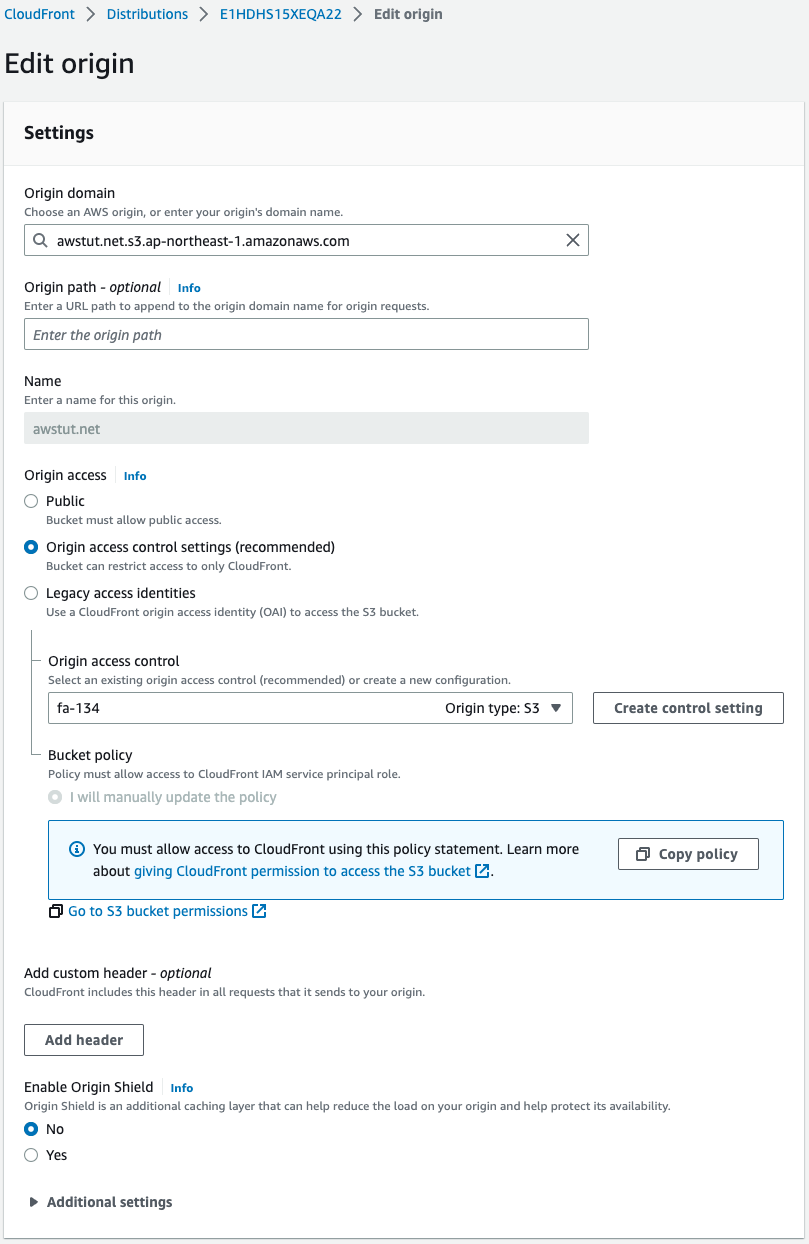
Indeed, an S3 bucket is associated.
We also see that access to the S3 bucket is configured to use OAC.
Check Route53.
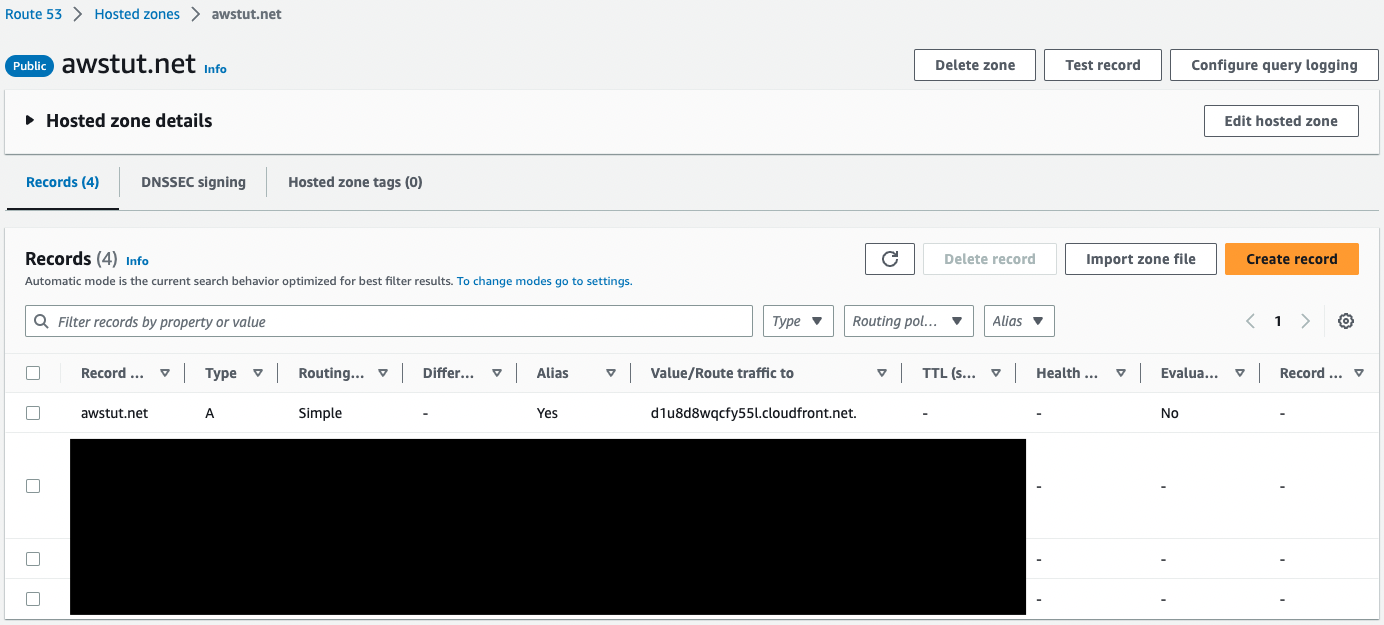
Indeed, an A record is created for CloudFront.
Operation Check
Now that you are ready, access your own domain.
$ curl https://awstut.net/
<html>
  <head></head>
  <body>
    <h1>index.html</h1>
    <p>awstut.net</p>
  </body>
</html>
Code language: HTML, XML (xml)
Successfully responded.
You were able to communicate with your own domain and HTTPS.
Summary
CloudFront + S3 configurations are now registered with Route53 and can be accessed with your own domain.