Using CloudFormation to configure security groups for NLB
On 2023/08/10, it was announced that NLB will support security groups.
This time, we will use CloudFormation to create a configuration with security groups applied to NLB.
Environment
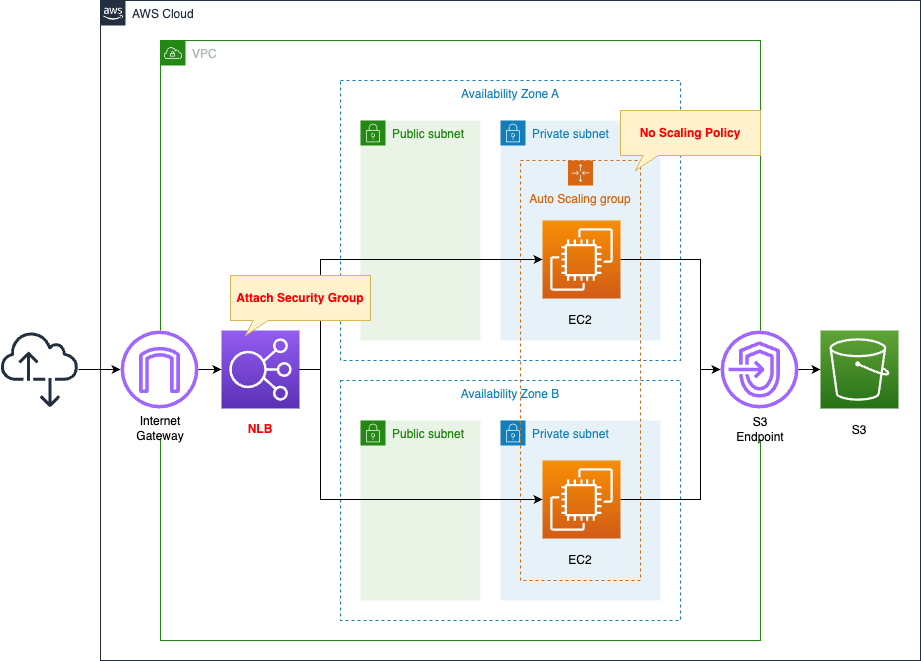
Basically, the structure is the same as the following pages.
The change from the configuration on the above page is the use of NLB instead of ALB.
Apply a security group to this NLB.
CloudFormation template files
The above configuration is built with CloudFormation.
The CloudFormation templates are placed at the following URL
https://github.com/awstut-an-r/awstut-saa/tree/main/01/006
Explanation of key points of template files
This page focuses on how to apply security groups to NLB.
For information on how to build an Auto Scaling group on a private subnet and associate it with ELB, etc., please refer to the following page.

security group
Resources:
  NLBSecurityGroup:
    Type: AWS::EC2::SecurityGroup
    Properties:
      GroupName: !Sub "${Prefix}-NLBSecurityGroup"
      GroupDescription: Allow HTTP Only.
      VpcId: !Ref VPC
      SecurityGroupIngress:
        - IpProtocol: tcp
          FromPort: !Ref HTTPPort
          ToPort: !Ref HTTPPort
          CidrIp: 0.0.0.0/0

  InstanceSecurityGroup:
    Type: AWS::EC2::SecurityGroup
    Properties:
      GroupName: !Sub "${Prefix}-InstanceSecurityGroup"
      GroupDescription: Allow HTTP from NLBSecurityGroup.
      VpcId: !Ref VPC
      SecurityGroupIngress:
        - IpProtocol: tcp
          FromPort: !Ref HTTPPort
          ToPort: !Ref HTTPPort
          SourceSecurityGroupId: !Ref NLBSecurityGroup
Code language: YAML (yaml)
Create two security groups.
The first is for NLB.
Allow HTTP communication (80/TCP) from all IP addresses.
The second is for EC2 instances.
Specifying a security group for NLB as the source allows inbound traffic through this resource.
NLB
Resources:
  NLB:
    Type: AWS::ElasticLoadBalancingV2::LoadBalancer
    Properties:
      Name: !Sub "${Prefix}-ALB"
      Scheme: internet-facing
      SecurityGroups:
        - !Ref NLBSecurityGroup
      Subnets:
        - !Ref PublicSubnet1
        - !Ref PublicSubnet2
      Type: network

  NLBTargetGroup:
    Type: AWS::ElasticLoadBalancingV2::TargetGroup
    Properties:
      VpcId: !Ref VPC
      Name: !Sub "${Prefix}-NLBTargetGroup"
      Protocol: TCP
      Port: !Ref HTTPPort
      HealthCheckProtocol: TCP
      HealthyThresholdCount: !Ref HealthyThresholdCount
      HealthCheckIntervalSeconds: !Ref HealthCheckIntervalSeconds
      UnhealthyThresholdCount: !Ref UnhealthyThresholdCount

  NLBListener:
    Type: AWS::ElasticLoadBalancingV2::Listener
    Properties:
      DefaultActions:
        - TargetGroupArn: !Ref NLBTargetGroup
          Type: forward
      LoadBalancerArn: !Ref NLB
      Port: !Ref HTTPPort
      Protocol: TCP
Code language: YAML (yaml)
To build an NLB, three resources (NLB body, target group, and resources) are created.
This time, a particularly key setting is the SecurityGroups property of the NLB itself.
Specify the security groups for NLB as explained earlier.
(Reference) Launch Template
Resources:
  LaunchTemplate:
    Type: AWS::EC2::LaunchTemplate
    Properties:
      LaunchTemplateData:
        IamInstanceProfile:
          Arn: !GetAtt InstanceProfile.Arn
        ImageId: !Ref ImageId
        InstanceType: !Ref InstanceType
        SecurityGroupIds:
          - !Ref InstanceSecurityGroup
        UserData: !Base64 |
          #!/bin/bash -xe
          yum update -y
          yum install -y httpd
          systemctl start httpd
          systemctl enable httpd
          ec2-metadata -i > /var/www/html/index.html
      LaunchTemplateName: !Sub "${Prefix}-LaunchTemplate"
Code language: YAML (yaml)
Launch template for Auto Scaling group.
In the SecurityGroupIds property, specify the aforementioned security group for EC2.
Define the initialization process for the instance using user data.
This time, after installing and starting Apache, place the HTML (index.html) with the instance ID written in the root directory.
For more information on user data, please see the following page.
The NLB’s support for security groups has one major benefit.
That is, traffic control for instances under NLB is now easier.
Prior to NLB’s support of security groups, a laborious process was required to achieve the same behavior as in this case.
That is, disabling client IP storage in NLB and then specifying a private address assigned to NLB.
For more information on this page, please see the following page.
Architecting
Use CloudFormation to build this environment and check its actual behavior.
Create CloudFormation stacks and check the resources in the stacks
Create CloudFormation stacks.
For information on how to create stacks and check each stack, please see the following page.

After reviewing the resources in each stack, information on the main resources created in this case is as follows
- NLB: saa-01-006-ALB
- DNS name of NLB: saa-01-006-alb-e1094ac0c1da946d.elb.ap-northeast-1.amazonaws.com
- NLB target group: saa-01-006-AutoScalingGroup
- Security group for NLB: sg-03d85dadbf8cc1ad7
- Security group for EC2 instance: sg-0a0aca4eda6a6291
Check each resource created from the AWS Management Console.
Check the security groups.
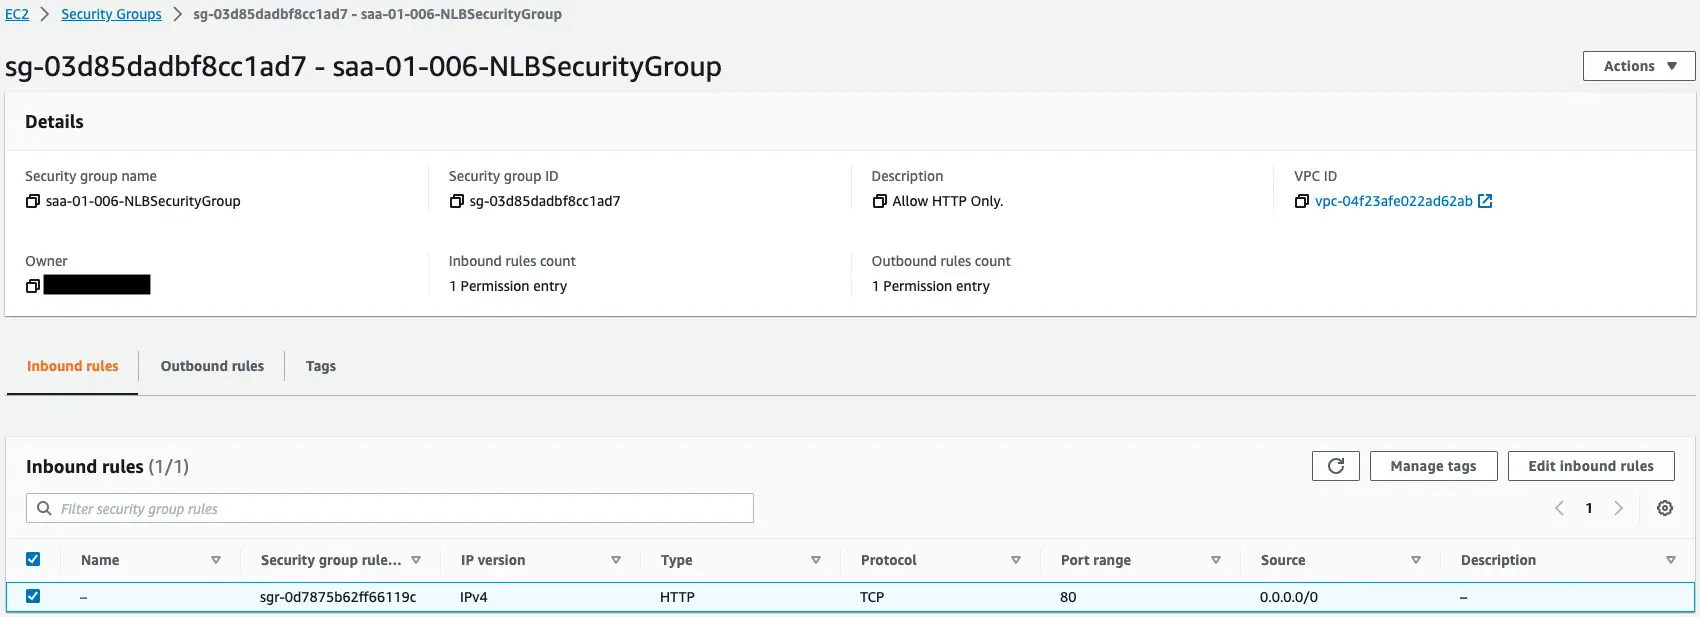
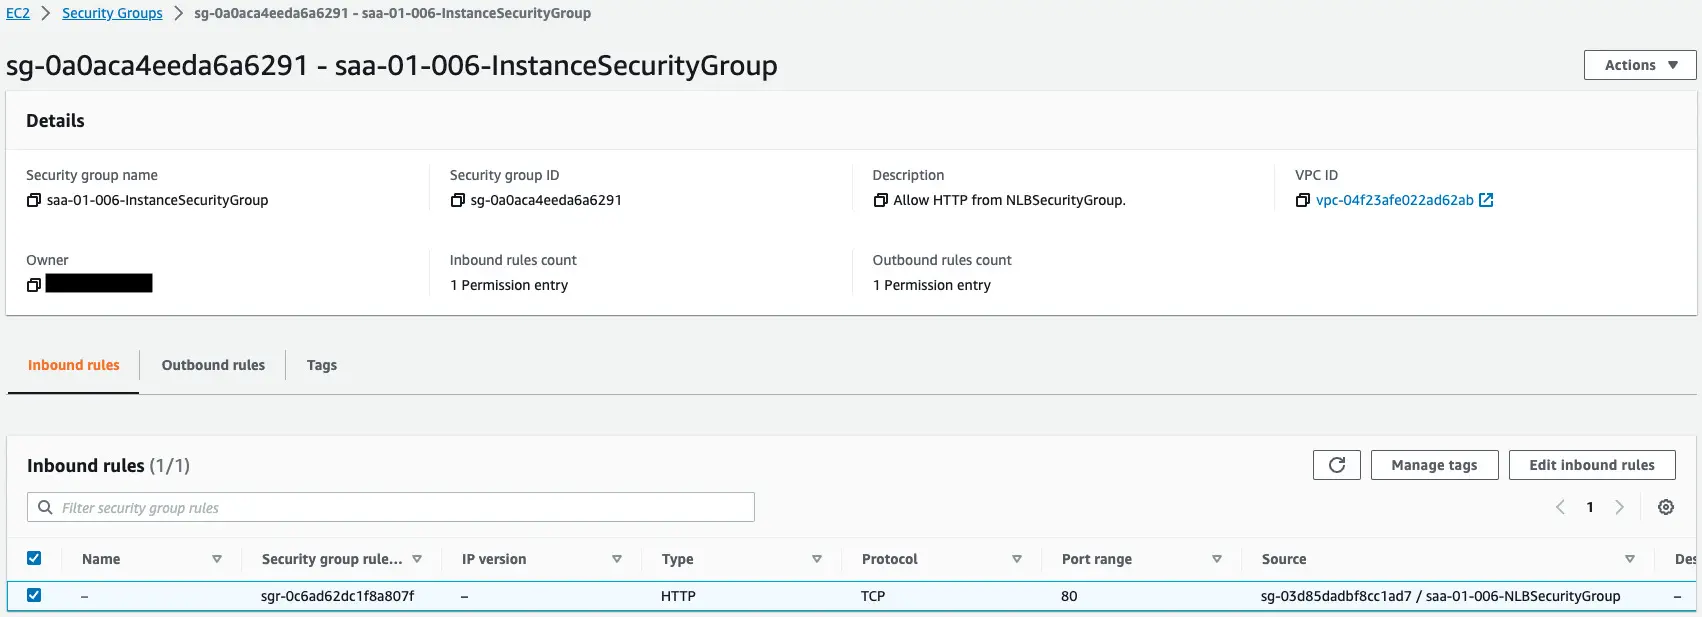
The former is for NLB.
This content allows HTTP communication (80/tcp) from all addresses.
The latter is for EC2 instances.
This content allows HTTP communication (80/tcp) from the security group for NLB.
Check the NLB.
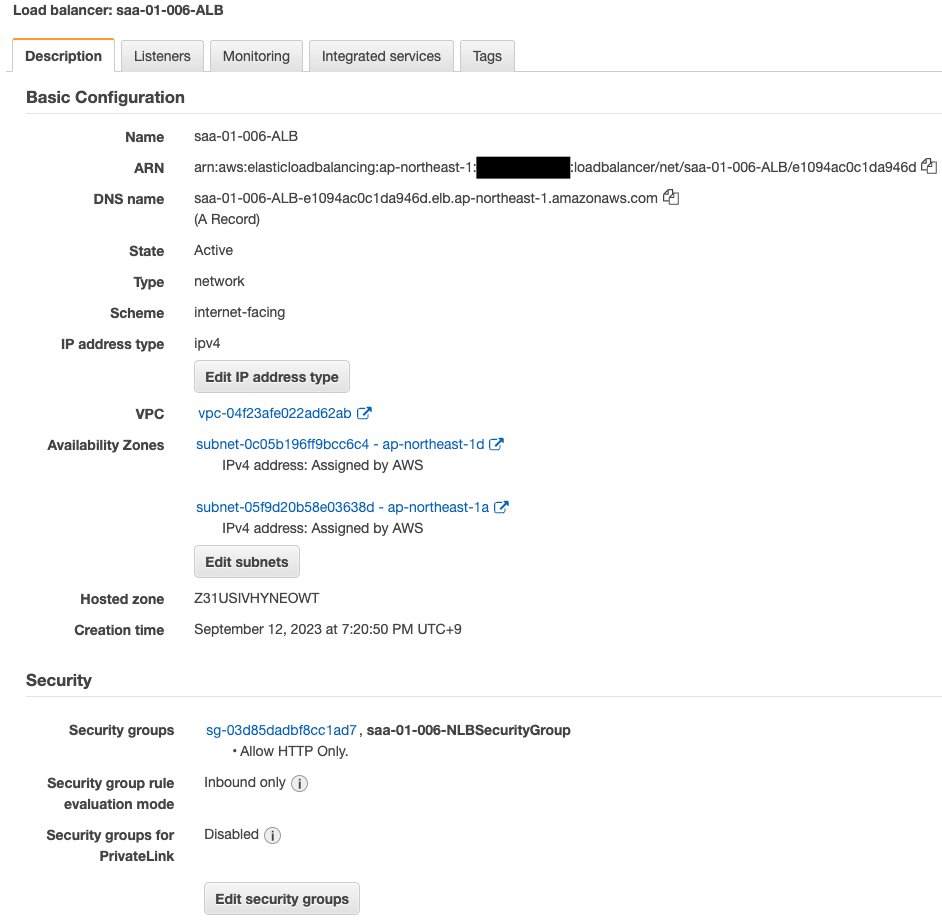
The NLB has been successfully created.
You have indeed attached a security group to the NLB.
Check the Auto Scaling group.
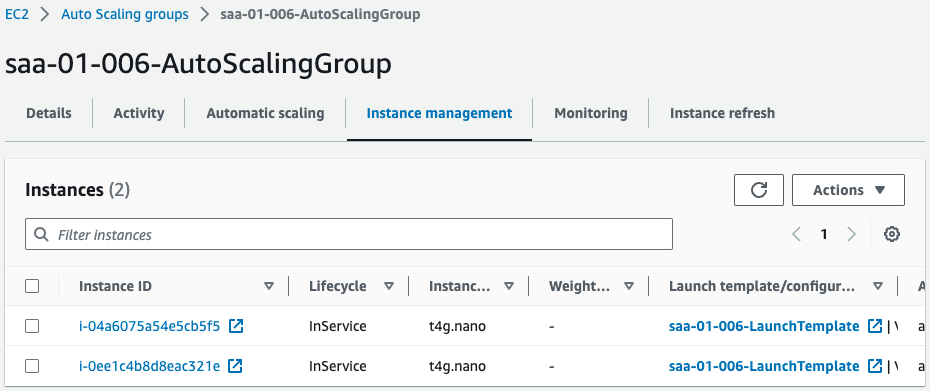
You can see that two instances are placed in the group.
Operation Check
Now that you are ready, access the NLB.
$ curl http://saa-01-006-ALB-e1094ac0c1da946d.elb.ap-northeast-1.amazonaws.com
instance-id: i-0ee1c4b8d8eac321e

$ curl http://saa-01-006-ALB-e1094ac0c1da946d.elb.ap-northeast-1.amazonaws.com
instance-id: i-04a6075a54e5cb5f5
Code language: Bash (bash)
We were able to access the two EC2 instances through NLB.
This means that the security groups for NLB and for EC2 instances worked correctly.
Summary
A configuration was created with security groups applied to NLB.