Create AWS IoT client certificate using CloudFormation custom resource
As an introduction to AWS IoT Core, the following page reviews how to use an EC2 instance as an IoT device and send MQTT messages to AWS IoT Core.

In the above page, we followed the official AWS tutorial for the setup in general.
This time, the purpose is the same, but the following changes are made
- Instead of creating client certificates and public/private keys on the IoT device (EC2 instance), create them using a Lambda function and place them in an S3 bucket.
- Use a Lambda function instead of performing MQTT message endpoint acquisition on the IoT device.
- The process of attaching a certificate to an object is not performed on the IoT device, but is handled by creating the corresponding resource using CloudFormation.
- The process of attaching certificates to IoT policies is not performed on IoT devices, but is handled by creating the relevant resources using CloudFormation.
Environment
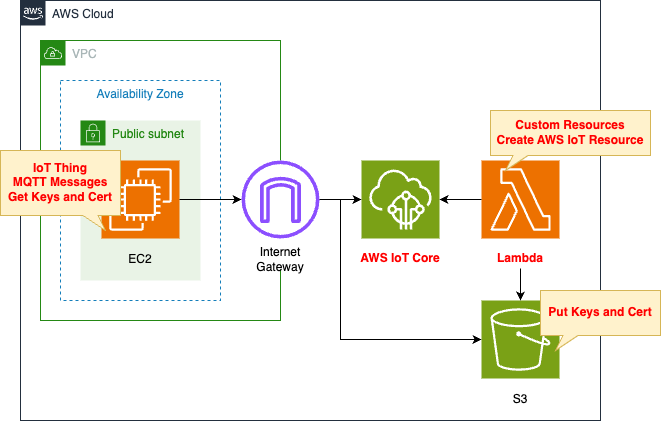
The basic structure is the same as in the page above.
Prepare a Lambda function and S3 bucket for the changes introduced at the beginning.
The runtime environment for Lambda functions is Python 3.11.
CloudFormation template files
The above configuration is built with CloudFormation.
The CloudFormation template is placed at the following URL
https://github.com/awstut-an-r/awstut-fa/tree/main/154
Explanation of key points of template files
We will focus on the changes introduced at the beginning of this section.
(Reference) S3 bucket
Resources:
  Bucket:
    Type: AWS::S3::Bucket
    Properties:
      BucketName: !Ref Prefix
      AccessControl: Private
Code language: YAML (yaml)
This bucket is used to place client certificates and keys.
The Lambda function described below uploads objects to this bucket, and the EC2 instance acting as the IoT device downloads the objects.
Lambda Function
Resources:
  CustomResource:
    Type: Custom::CustomResource
    Properties:
      ServiceToken: !GetAtt Function.Arn

  Function:
    Type: AWS::Lambda::Function
    Properties:
      Architectures:
        - !Ref Architecture
      Environment:
        Variables:
          BUCKET_NAME: !Ref BucketName
          CERTIFICATE_NAME: !Ref CertificateName
          PRIVATE_KEY_NAME: !Ref PrivateKeyName
          PUBLIC_KEY_NAME: !Ref PublicKeyName
          REGION: !Ref AWS::Region
          THING: !Ref Thing
      Code:
        ZipFile: |
          import boto3
          import cfnresponse
          import os

          bucket_name = os.environ['BUCKET_NAME']
          certificate_name = os.environ['CERTIFICATE_NAME']
          private_key_name = os.environ['PRIVATE_KEY_NAME']
          public_key_name = os.environ['PUBLIC_KEY_NAME']
          region = os.environ['REGION']
          thing = os.environ['THING']

          s3_key = '{folder}/{object}'

          CREATE = 'Create'
          response_data = {}

          iot_client = boto3.client('iot', region_name=region)
          s3_client = boto3.client('s3', region_name=region)

          def lambda_handler(event, context):
            try:
              if event['RequestType'] == 'Create':
                iot_response = iot_client.create_keys_and_certificate(
                  setAsActive=True
                )

                # certificate
                s3_client.put_object(
                  Body=iot_response['certificatePem'],
                  Bucket=bucket_name,
                  Key=s3_key.format(
                    folder=thing,
                    object=certificate_name
                  )
                )

                # public key
                s3_client.put_object(
                  Body=iot_response['keyPair']['PublicKey'],
                  Bucket=bucket_name,
                  Key=s3_key.format(
                    folder=thing,
                    object=public_key_name
                  )
                )

                # private key
                s3_client.put_object(
                  Body=iot_response['keyPair']['PrivateKey'],
                  Bucket=bucket_name,
                  Key=s3_key.format(
                    folder=thing,
                    object=private_key_name
                  )
                )

                response_data['CertificateArn'] = iot_response['certificateArn']
                certificate_id = iot_response['certificateId']

                iot_endpoint_response = iot_client.describe_endpoint(
                  endpointType='iot:Data-ATS'
                )
                response_data['IoTEndpoint'] = iot_endpoint_response['endpointAddress']

              elif event['RequestType'] == 'Delete':
                certificate_id = event['PhysicalResourceId']

                # delete objects in s3 bucket
                list_response = s3_client.list_objects_v2(
                  Bucket=bucket_name
                )

                if 'Contents' in list_response and len(list_response['Contents']):
                  for obj in list_response['Contents']:
                    delete_response = s3_client.delete_object(
                      Bucket=bucket_name,
                      Key=obj['Key']
                    )
                    print(delete_response)

                # inactive and delete iot cert
                iot_client.update_certificate(
                  certificateId=certificate_id,
                  newStatus='INACTIVE'
                )
                iot_client.delete_certificate(
                  certificateId=certificate_id,
                  forceDelete=True
                )

              cfnresponse.send(
                event=event,
                context=context,
                responseStatus=cfnresponse.SUCCESS,
                responseData=response_data,
                physicalResourceId=certificate_id
                )
            except Exception as e:
              print(e)

              certificate_id = event['PhysicalResourceId']

              cfnresponse.send(
                event=event,
                context=context,
                responseStatus=cfnresponse.FAILED,
                responseData=response_data,
                physicalResourceId=certificate_id
                )
      FunctionName: !Sub "${Prefix}-function"
      Handler: !Ref Handler
      Runtime: !Ref Runtime
      Role: !GetAtt FunctionRole.Arn

Outputs:
  CertificateArn:
    Value: !GetAtt CustomResource.CertificateArn

  IoTEndpoint:
    Value: !GetAtt CustomResource.IoTEndpoint
Code language: YAML (yaml)
Define the code to be executed by the Lambda function in inline notation.
For more information, please see the following page.
Use the cfnresponse module to implement the function as a Lambda-backed custom resource.
For more information, please see the following page.
The content of the code to be executed is different when creating and deleting CloudFormation stacks.
When creating a stack, the following processes are mainly performed
- Execute the create_keys_and_certificate method of the client object for IoT to create the client certificate and private and public keys.
- Execute the put_object method of the client object for S3 to upload the certificate and key to the S3 bucket.
- Execute the describe_endpoint method of the client object for IoT to obtain the endpoint for MQTT messages.
It also passes the ARN of the client certificate created and the endpoint obtained to the custom resource.
This is accomplished by passing these values as arguments when executing the cfnresponse.send function.
By passing those values to your custom resource, you can reference them in your CloudFormation stack.
If you look at the Outputs section, you can see that we are indeed able to reference these values.
When deleting stacks, the following processes are mainly performed
- Execute the list_objects_v2 and delete_object methods of the client object for S3 to delete all objects in the S3 bucket.
- Delete the client certificate after invalidating it.
In addition, there is a twist to the handling of certificate IDs.
Specify the ID of the certificate in physicalResourceId when creating the stack.
Specifying the ID in this parameter allows this parameter to be referenced when deleting the stack.
The following is the IAM role for this function.
Resources:
  FunctionRole:
    Type: AWS::IAM::Role
    DeletionPolicy: Delete
    Properties:
      AssumeRolePolicyDocument:
        Version: 2012-10-17
        Statement:
          - Effect: Allow
            Action: sts:AssumeRole
            Principal:
              Service:
                - lambda.amazonaws.com
      ManagedPolicyArns:
        - arn:aws:iam::aws:policy/service-role/AWSLambdaBasicExecutionRole
      Policies:
        - PolicyName: FunctionPolicy
          PolicyDocument:
            Version: 2012-10-17
            Statement:
              - Effect: Allow
                Action:
                  - iot:CreateKeysAndCertificate
                  - iot:DeleteCertificate
                  - iot:DescribeEndpoint
                  - iot:UpdateCertificate
                Resource:
                  - "*"
              - Effect: Allow
                Action:
                  - s3:PutObject
                Resource:
                  - !Sub "arn:aws:s3:::${BucketName}/${Thing}/*"
              - Effect: Allow
                Action:
                  - s3:DeleteObject
                  - s3:GetObject
                  - s3:ListBucket
                Resource:
                  - !Sub "arn:aws:s3:::${BucketName}"
                  - !Sub "arn:aws:s3:::${BucketName}/*"
Code language: YAML (yaml)
Configure IoT and S3 related actions to be performed.
Attaching certificates and IoT resources
Resources:
  PolicyPrincipalAttachment:
    Type: AWS::IoT::PolicyPrincipalAttachment
    Properties:
      PolicyName: !Ref Policy
      Principal: !Ref CertificateArn

  ThingPrincipalAttachment:
    Type: AWS::IoT::ThingPrincipalAttachment
    Properties:
      Principal: !Ref CertificateArn
      ThingName: !Ref Thing
Code language: YAML (yaml)
Create two resources and attach certificates to policies and things.
In the page introduced at the beginning of this article, we used the AWS CLI to perform these attachments on an EC2 instance, an IoT device.
This time, we will attach the certificates in the form of CloudFormation resources.
EC2 Instance
Resources:
  Instance:
    Type: AWS::EC2::Instance
    Properties:
      IamInstanceProfile: !Ref InstanceProfile
      ImageId: !Ref ImageId
      InstanceType: !Ref InstanceType
      NetworkInterfaces:
        - AssociatePublicIpAddress: true
          DeviceIndex: 0
          GroupSet:
            - !Ref InstanceSecurityGroup
          SubnetId: !Ref PublicSubnet1
      UserData: !Base64
        Fn::Sub: |
          #!/bin/bash -xe
          dnf update -y
          dnf install python3.11-pip -y
          dnf install -y git

          mkdir ~/${CertificateDir}

          root_cert="Amazon-root-CA-1.pem"
          curl -o ~/${CertificateDir}/$root_cert \
            https://www.amazontrust.com/repository/AmazonRootCA1.pem

          aws s3 cp s3://${BucketName}/${Thing}/${CertificateName} ~/${CertificateDir}/
          aws s3 cp s3://${BucketName}/${Thing}/${PrivateKeyName} ~/${CertificateDir}/
          aws s3 cp s3://${BucketName}/${Thing}/${PublicKeyName} ~/${CertificateDir}/

          python3.11 -m pip install awsiotsdk
          cd ~ && git clone https://github.com/aws/aws-iot-device-sdk-python-v2.git

          cd ~/aws-iot-device-sdk-python-v2/samples && python3.11 pubsub.py \
            --endpoint "${IoTEndpoint}" \
            --ca_file ~/${CertificateDir}/$root_cert \
            --cert ~/${CertificateDir}/${CertificateName} \
            --key ~/${CertificateDir}/${PrivateKeyName} \
            --client_id "${Thing}" \
            --topic "${TopicName}" \
            --count 5
Code language: YAML (yaml)
User data is used to make this instance operate as an IoT device.
The overall flow of what is to be performed is the same as on the opening page.
The change is in the handling of certificates and keys.
Previously, certificate and key creation, certificate attachment, etc. were performed in the instance.
In contrast, this time these processes are performed by Lambda functions and CloudFormation resources.
So in this user data, we download the certificate and key from the S3 bucket.
The following are IAM roles for EC2 instances.
Resources:
  InstanceRole:
    Type: AWS::IAM::Role
    DeletionPolicy: Delete
    Properties:
      AssumeRolePolicyDocument:
        Version: 2012-10-17
        Statement:
          - Effect: Allow
            Action: sts:AssumeRole
            Principal:
              Service:
                - ec2.amazonaws.com
      ManagedPolicyArns:
        - arn:aws:iam::aws:policy/AmazonSSMManagedInstanceCore
      Policies:
        - PolicyName: InstancePolicy
          PolicyDocument:
            Version: 2012-10-17
            Statement:
              - Effect: Allow
                Action:
                  - s3:GetObject
                Resource:
                  - !Sub "arn:aws:s3:::${BucketName}/${Thing}/*"
Code language: YAML (yaml)
Grant permissions to retrieve objects from the S3 bucket.
Previously, we gave permissions to create certificates and keys, attach certificates, and retrieve endpoints, but these are no longer needed.
Architecting
Use CloudFormation to build this environment and check its actual behavior.
Create CloudFormation stacks and check the resources in the stacks
Create CloudFormation stacks.
For information on how to create stacks and check each stack, please see the following page.

Check each resource from the AWS Management Console.
Check the S3 bucket.
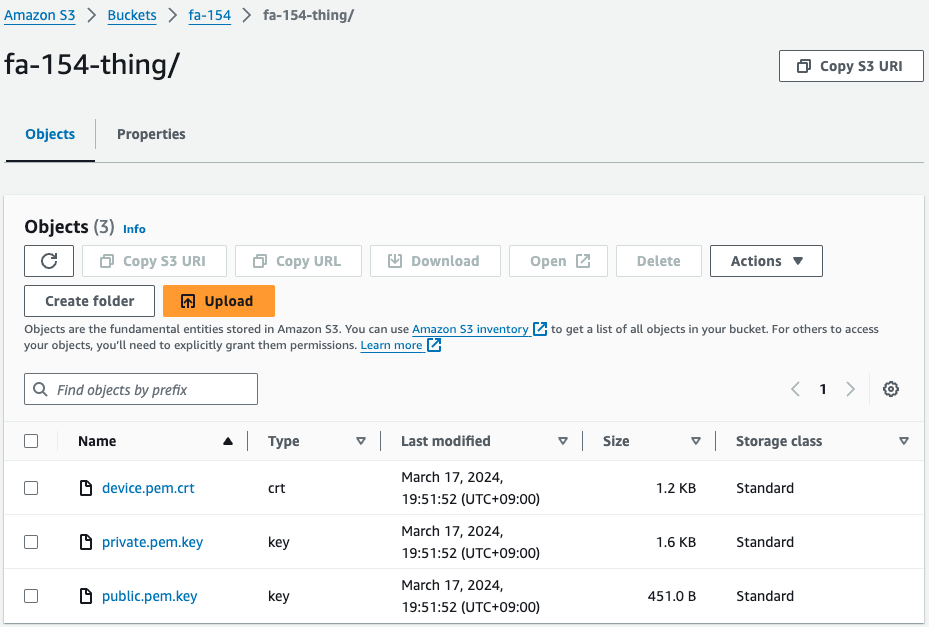
Three files are located.
The client certificate and the public and private keys.
This means that when the CloudFormation stack was created, the Lambda function associated with the CloudFormation custom resource was successfully executed and these files were generated and uploaded to this bucket. This means that these files were generated and uploaded to this bucket.
Check the client certificate.
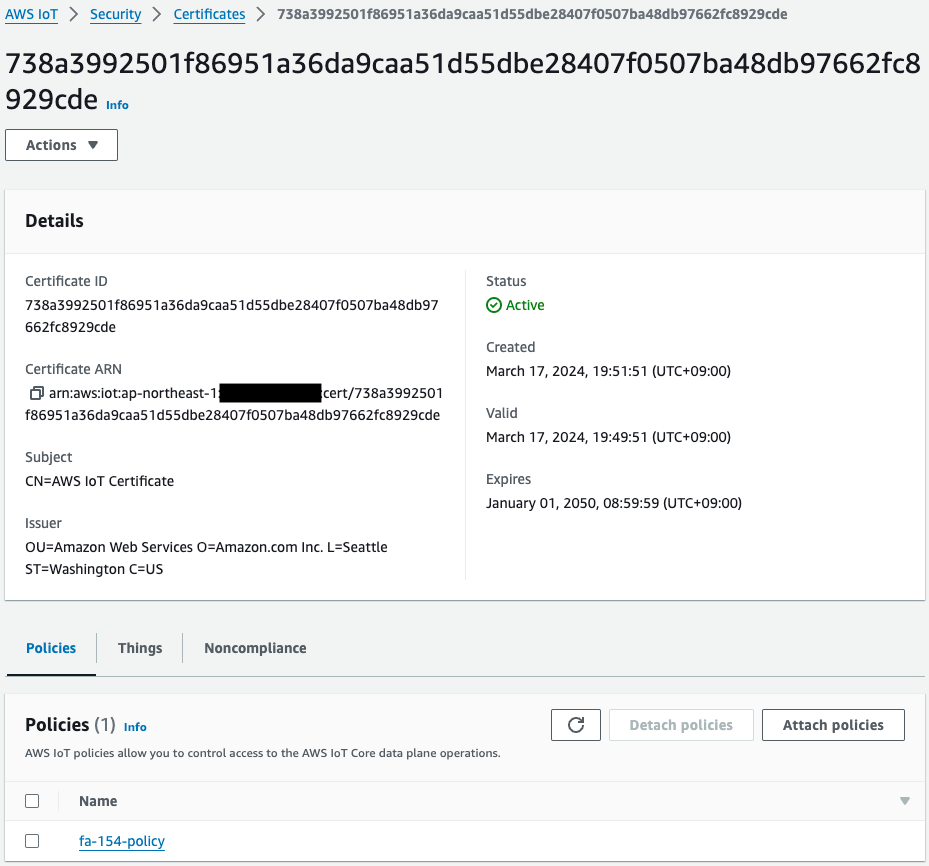
Indeed, a certificate has been created.
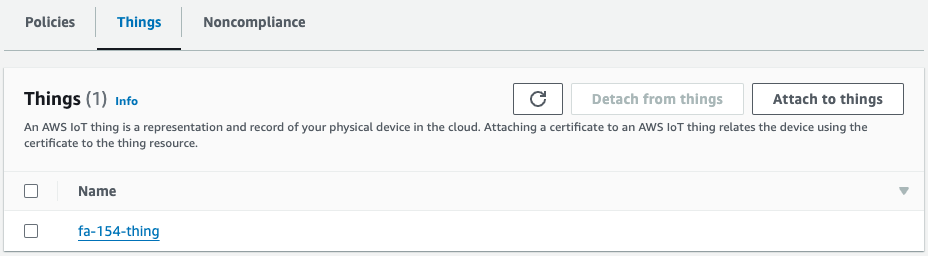
If we look at what is attached to this certificate, we see that there are policies and things.
This means that the CloudFormation resources (PolicyPrincipalAttachment and ThingPrincipalAttachment) have successfully performed the attachment with the certificate.
Operation Check
Now that you are ready, access the EC2 instance (i-00c214deb833338595) that is the IoT device.
SSM Session Manager is used to access the instance.
% aws ssm start-session --target i-00c214deb83338595
...
sh-5.2$
Code language: Bash (bash)
For more information on SSM Session Manager, please refer to the following page.

Check the contents of the /root/certs directory.
sh-5.2$ sudo ls /root/certs
Amazon-root-CA-1.pem  device.pem.crt  private.pem.key  public.pem.key
Code language: Bash (bash)
Indeed, the three files that were placed in the S3 bucket have been saved.
This means that these files were successfully downloaded as part of the instance initialization process with EC2 user data.
This can also be confirmed by looking at the logs.
sh-5.2$ sudo journalctl --no-pager
...
Mar 17 10:56:34 ip-10-0-1-14.ap-northeast-1.compute.internal cloud-init[1671]: + aws s3 cp s3://fa-154/fa-154-thing/device.pem.crt /root/certs/
Mar 17 10:56:36 ip-10-0-1-14.ap-northeast-1.compute.internal cloud-init[1671]: [142B blob data]
Mar 17 10:56:36 ip-10-0-1-14.ap-northeast-1.compute.internal cloud-init[1671]: + aws s3 cp s3://fa-154/fa-154-thing/private.pem.key /root/certs/
Mar 17 10:56:37 ip-10-0-1-14.ap-northeast-1.compute.internal cloud-init[1671]: [144B blob data]
Mar 17 10:56:37 ip-10-0-1-14.ap-northeast-1.compute.internal cloud-init[1671]: + aws s3 cp s3://fa-154/fa-154-thing/public.pem.key /root/certs/
Mar 17 10:56:37 ip-10-0-1-14.ap-northeast-1.compute.internal cloud-init[1671]: [145B blob data]
Code language: Bash (bash)
Indeed, you can see that the AWS CLI is used to download 3 files from the S3 bucket.
Finally, check the status of MQTT messages sent to AWS IoT Core.
Check the log again.
Mar 17 10:56:47 ip-10-0-1-14.ap-northeast-1.compute.internal cloud-init[1671]: Connecting to a2oxckhng7gmur-ats.iot.ap-northeast-1.amazonaws.com with client ID 'fa-154-thing'...
Mar 17 10:56:47 ip-10-0-1-14.ap-northeast-1.compute.internal cloud-init[1671]: Connected!
Mar 17 10:56:47 ip-10-0-1-14.ap-northeast-1.compute.internal cloud-init[1671]: Subscribing to topic 'test/topic'...
Mar 17 10:56:47 ip-10-0-1-14.ap-northeast-1.compute.internal cloud-init[1671]: Connection Successful with return code: 0 session present: False
Mar 17 10:56:47 ip-10-0-1-14.ap-northeast-1.compute.internal cloud-init[1671]: Subscribed with 1
Mar 17 10:56:47 ip-10-0-1-14.ap-northeast-1.compute.internal cloud-init[1671]: Sending 5 message(s)
Mar 17 10:56:47 ip-10-0-1-14.ap-northeast-1.compute.internal cloud-init[1671]: Publishing message to topic 'test/topic': Hello World!  [1]
Mar 17 10:56:47 ip-10-0-1-14.ap-northeast-1.compute.internal cloud-init[1671]: Received message from topic 'test/topic': b'"Hello World!  [1]"'
Mar 17 10:56:47 ip-10-0-1-14.ap-northeast-1.compute.internal cloud-init[1671]: Publishing message to topic 'test/topic': Hello World!  [2]
Mar 17 10:56:47 ip-10-0-1-14.ap-northeast-1.compute.internal cloud-init[1671]: Received message from topic 'test/topic': b'"Hello World!  [2]"'
Mar 17 10:56:47 ip-10-0-1-14.ap-northeast-1.compute.internal cloud-init[1671]: Publishing message to topic 'test/topic': Hello World!  [3]
Mar 17 10:56:47 ip-10-0-1-14.ap-northeast-1.compute.internal cloud-init[1671]: Received message from topic 'test/topic': b'"Hello World!  [3]"'
Mar 17 10:56:47 ip-10-0-1-14.ap-northeast-1.compute.internal cloud-init[1671]: Publishing message to topic 'test/topic': Hello World!  [4]
Mar 17 10:56:47 ip-10-0-1-14.ap-northeast-1.compute.internal cloud-init[1671]: Received message from topic 'test/topic': b'"Hello World!  [4]"'
Mar 17 10:56:47 ip-10-0-1-14.ap-northeast-1.compute.internal cloud-init[1671]: Publishing message to topic 'test/topic': Hello World!  [5]
Mar 17 10:56:47 ip-10-0-1-14.ap-northeast-1.compute.internal cloud-init[1671]: Received message from topic 'test/topic': b'"Hello World!  [5]"'
Mar 17 10:56:47 ip-10-0-1-14.ap-northeast-1.compute.internal cloud-init[1671]: 5 message(s) received.
Mar 17 10:56:47 ip-10-0-1-14.ap-northeast-1.compute.internal cloud-init[1671]: Disconnecting...
Mar 17 10:56:47 ip-10-0-1-14.ap-northeast-1.compute.internal cloud-init[1671]: Connection closed
Mar 17 10:56:47 ip-10-0-1-14.ap-northeast-1.compute.internal cloud-init[1671]: Disconnected!
Code language: Bash (bash)
It is indeed sending MQTT messages to the endpoint.
Check the management console again.
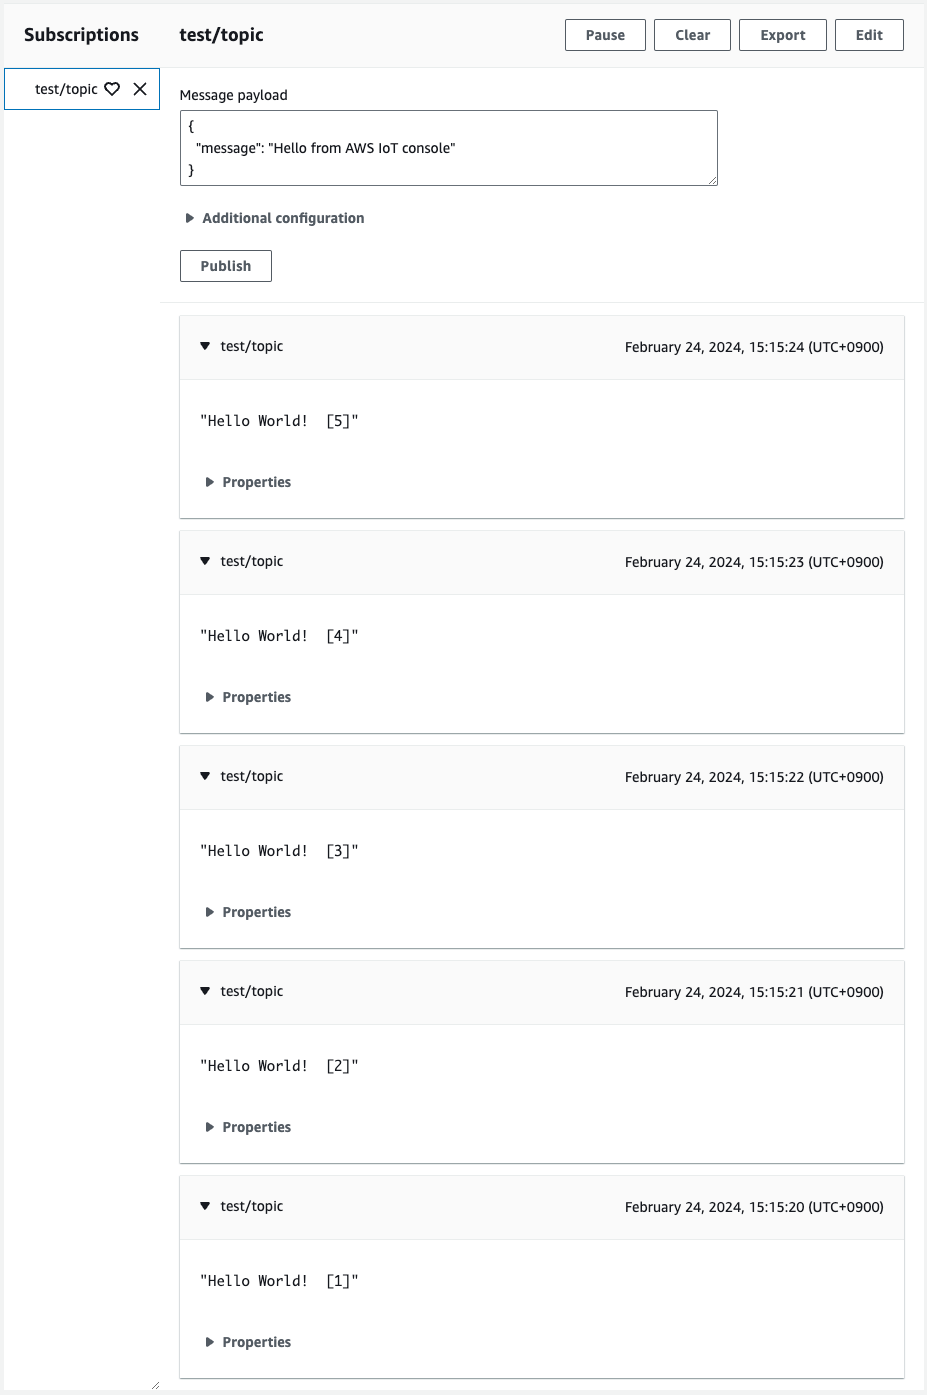
The message was indeed sent from the instance.
Thus, we were able to send MQTT messages to AWS IoT Core using the client certificate created by the CloudFormation custom resource.
Summary
By using a CloudFormation custom resource, we were able to create a client certificate.