Route53 latency-based routing for ALB
One of the routing policies provided by Route 53 is latency-based routing.
If your application is hosted in multiple AWS Regions, you can improve performance for your users by serving their requests from the AWS Region that provides the lowest latency.
Latency-based routing
This page presents a configuration using latency-based routing for multiple ALBs.
Environment
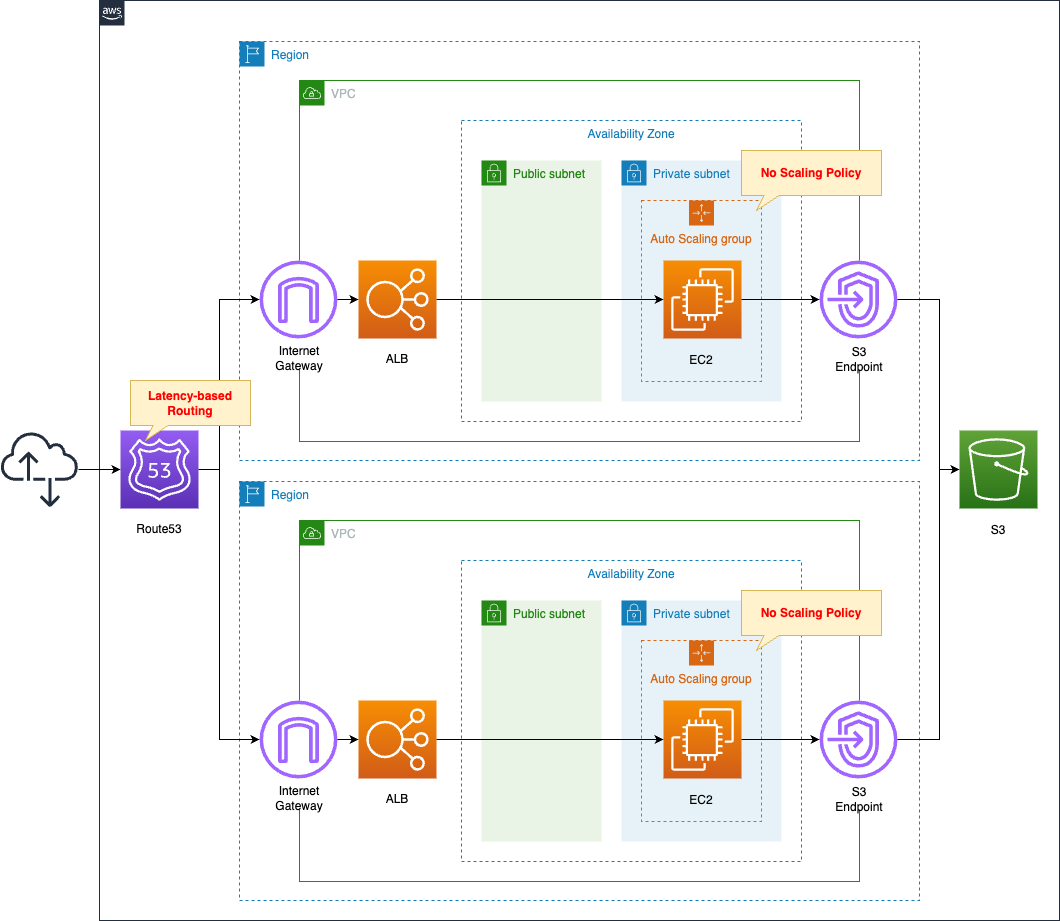
Prepare identical configurations in the two regions. Specifically, associate an Auto Scaling group with the ALB and create an EC2 instance in that group.
Register the DNS names of the two ALBs with Route 53. These should be records for latency based routing.
The domain used in this configuration is the one obtained from Route 53 (awstut.net). So we will not configure the HostedZone of the domain.
In this configuration, the ALB will be located in the following two regions.
- ap-northeast-1
- us-east-1
CloudFormation template files
The above configuration is built with CloudFormation. The CloudFormation templates are placed at the following URL
https://github.com/awstut-an-r/awstut-soa/tree/main/05/004
Explanation of key points of template files
Route 53
Resources:
  HealthCheck1:
    Type: AWS::Route53::HealthCheck
    Properties:
      HealthCheckConfig:
        FailureThreshold: !Ref FailureThreshold
        FullyQualifiedDomainName: !Sub "{{resolve:ssm:${SSMParameterALBDNSName1}}}"
        MeasureLatency: true
        Port: !Ref HTTPPort
        RequestInterval: !Ref RequestInterval
        ResourcePath: /
        Type: HTTP

  HealthCheck2:
    Type: AWS::Route53::HealthCheck
    Properties:
      HealthCheckConfig:
        FailureThreshold: !Ref FailureThreshold
        FullyQualifiedDomainName: !Sub "{{resolve:ssm:${SSMParameterALBDNSName2}}}"
        MeasureLatency: true
        Port: !Ref HTTPPort
        RequestInterval: !Ref RequestInterval
        ResourcePath: /
        Type: HTTP

  RecordSetGroup:
    Type: AWS::Route53::RecordSetGroup
    Properties:
      HostedZoneName: !Sub "${DomainName}."
      RecordSets:
        - AliasTarget:
            DNSName: !Sub "{{resolve:ssm:${SSMParameterALBDNSName1}}}"
            EvaluateTargetHealth: true
            HostedZoneId: !Ref ALBHostedZoneId1
          HealthCheckId: !Ref HealthCheck1
          Name: !Ref DomainName
          Region: !Ref Region1
          SetIdentifier: !Ref Region1
          Type: A
        - AliasTarget:
            DNSName: !Sub "{{resolve:ssm:${SSMParameterALBDNSName2}}}"
            EvaluateTargetHealth: true
            HostedZoneId: !Ref ALBHostedZoneId2
          HealthCheckId: !Ref HealthCheck2
          Name: !Ref DomainName
          Region: !Ref Region2
          SetIdentifier: !Ref Region2
          Type: A
Code language: YAML (yaml)
Add two records to one domain. Therefore, set the RecordSetGroup for two records.
For latency-based routing for alias records, such as ALB, the official AWS page describes how to set it up.
Particularly key settings will be covered.
The first point is the Name property. This is the parameter that corresponds to the record name, and is described as follows
Enter the name of the domain or subdomain that you want to route traffic for.
Record name
Specify “awstut.net” for this property for both records according to the above.
The second point is the Type property. This is the parameter corresponding to the record type, described as follows
ELB load balancer
Select A — IPv4 address or AAAA — IPv6 address
Record type
Specify “A” for this property for both records according to the above.
The third point is the AliasTarget property. Specify the DNS name and host zone ID of the ALB as described below. In addition, health checks are enabled. Note that the DNS name uses SSM dynamic reference.
The fourth point is the Region property. This specifies the name of the region where each ALB is located. Specifying this property makes the record for latency-based routing.
The point of the health check is to enable MeasureLatency. This is essentially an unnecessary setting, but is necessary for drawing Latency Graphs, described below.
(Reference) Stacksets
CloudFormation Stacksets can be used to create VPCs, ALBs, etc. in two regions in a unified manner.
For basic information about Stacksets, please see the following pages.

This page covers the key points in building this configuration.
SSM Parameter Store
Resources:
  Parameter1:
    Type: AWS::SSM::Parameter
    Properties:
      Name: !Sub "${Prefix}-alb-dns-name-${Region1}"
      Type: String
      Value: " "

  Parameter2:
    Type: AWS::SSM::Parameter
    Properties:
      Name: !Sub "${Prefix}-alb-dns-name-${Region2}"
      Type: String
      Value: " "
Code language: YAML (yaml)
One consideration when using Stacksets is how to reference resources created within Stacksets from outside of Stacksets. In this case, we will use the SSM Paramater Store. In other words, the data to be accessed from outside Stacksets is stored in the Parameter Store.
In this configuration, the DNS names of the ALBs to be created in each region will be stored in the Parameter Store. This is to register both DNS names in Route 53. This is why we used SSM dynamic references to specify DNS names in the RecordSetGroup earlier.
Only one region will be used for the SSM Parameter Store. In this configuration, it is ap-northeast-1. This is because when using SSM dynamic references, it is more convenient to use the Parameter Store of the region where the CloudFormation stack is created.
The value of both parameters can be anything. In this case, we used a space. This is because the parameter cannot be created without specifying some string. This value will be updated when the DNS name is determined after the ALB is created using CloudFormation custom resources.
Stacksets
Resources:
  StackSet:
    Type: AWS::CloudFormation::StackSet
    Properties:
      AdministrationRoleARN: !Ref AdministrationRoleArn
      Capabilities:
        - CAPABILITY_IAM
      Parameters:
        - ParameterKey: ImageId
          ParameterValue: !Ref ImageId
        - ParameterKey: InstanceCapacity
          ParameterValue: !Ref InstanceCapacity
        - ParameterKey: InstanceType
          ParameterValue: !Ref InstanceType
        - ParameterKey: HTTPPort
          ParameterValue: !Ref HTTPPort
        - ParameterKey: LambdaHandler
          ParameterValue: !Ref LambdaHandler
        - ParameterKey: LambdaRuntime
          ParameterValue: !Ref LambdaRuntime
        - ParameterKey: Prefix
          ParameterValue: !Ref Prefix
        - ParameterKey: SSMParameter
          ParameterValue: ""
        - ParameterKey: SSMParameterRegion
          ParameterValue: !Ref Region1
        - ParameterKey: TemplateDir
          ParameterValue: !Ref TemplateDir
      PermissionModel: SELF_MANAGED
      StackInstancesGroup:
        - DeploymentTargets:
            Accounts:
              - !Ref AWS::AccountId
          ParameterOverrides:
            - ParameterKey: SSMParameter
              ParameterValue: !Ref Parameter1
          Regions:
            - !Ref Region1
        - DeploymentTargets:
            Accounts:
              - !Ref AWS::AccountId
          ParameterOverrides:
            - ParameterKey: SSMParameter
              ParameterValue: !Ref Parameter2
          Regions:
            - !Ref Region2
      StackSetName: !Sub "${Prefix}-stacksets"
      TemplateURL: !Sub "${TemplateDir}/${Prefix}-stacksets-template.yaml"
Code language: YAML (yaml)
A key point in creating Stacksets is the parameters that are passed to each stack. There are some that are common to each stack and some that are specific. The former uses the Parameters property and the latter the ParameterOverrides property. For example, the instance types created in an Auto Scaling group are common, so they are specified with the former. Parameter Store, on the other hand, has different parameters for storing DNS names for each region, so the latter is used.
(Reference) ALB and Auto Scaling Group
In this configuration, we will associate an Auto Scaling group with the ALB. The Auto Scaling group has no scaling policy set.
For more information on this configuration, please see the following page.
ALB
Resources:
  ALB:
    Type: AWS::ElasticLoadBalancingV2::LoadBalancer
    Properties:
      Name: !Sub "${Prefix}-ALB"
      Scheme: internet-facing
      SecurityGroups:
        - !Ref ALBSecurityGroup
      Subnets:
        - !Ref PublicSubnet1
        - !Ref PublicSubnet2
      Type: application

  ALBTargetGroup:
    Type: AWS::ElasticLoadBalancingV2::TargetGroup
    Properties:
      VpcId: !Ref VPC
      Name: !Sub "${Prefix}-ALBTargetGroup"
      Protocol: HTTP
      Port: !Ref HTTPPort
      HealthCheckProtocol: HTTP
      HealthCheckPath: /
      HealthCheckPort: traffic-port
      HealthyThresholdCount: !Ref HealthyThresholdCount
      UnhealthyThresholdCount: !Ref UnhealthyThresholdCount
      HealthCheckTimeoutSeconds: !Ref HealthCheckTimeoutSeconds
      HealthCheckIntervalSeconds: !Ref HealthCheckIntervalSeconds
      Matcher:
        HttpCode: !Ref HttpCode

  ALBListener:
    Type: AWS::ElasticLoadBalancingV2::Listener
    Properties:
      DefaultActions:
        - TargetGroupArn: !Ref ALBTargetGroup
          Type: forward
      LoadBalancerArn: !Ref ALB
      Port: !Ref HTTPPort
      Protocol: HTTP
Code language: YAML (yaml)
ALBs are configured in a manner that spans two AZs.
Auto Scaling Group
Resources:
  LaunchTemplate:
    Type: AWS::EC2::LaunchTemplate
    Properties:
      LaunchTemplateData:
        IamInstanceProfile:
          Arn: !GetAtt InstanceProfile.Arn
        ImageId: !Ref ImageId
        InstanceType: !Ref InstanceType
        SecurityGroupIds:
          - !Ref InstanceSecurityGroup
        UserData: !Base64 |
          #!/bin/bash -xe
          yum update -y
          yum install -y httpd
          systemctl start httpd
          systemctl enable httpd
          ec2-metadata -i > /var/www/html/index.html
      LaunchTemplateName: !Sub "${Prefix}-LaunchTemplate"

  AutoScalingGroup:
    Type: AWS::AutoScaling::AutoScalingGroup
    Properties:
      AutoScalingGroupName: !Sub "${Prefix}-AutoScalingGroup"
      DesiredCapacity: !Ref DesiredCapacity
      LaunchTemplate:
        LaunchTemplateId: !Ref LaunchTemplate
        Version: !GetAtt LaunchTemplate.LatestVersionNumber
      MaxSize: !Ref MaxSize
      MinSize: !Ref MinSize
      VPCZoneIdentifier:
        - !Ref PrivateSubnet1
        - !Ref PrivateSubnet2
      TargetGroupARNs:
        - !Ref ALBTargetGroup
Code language: YAML (yaml)
Associate the Auto Scaling group with the ALB target group mentioned earlier.
The key to the startup template is the user data. Install Apache and place the HTML file with the instance ID written in.
For more information on the instance initialization process, please also see the following page.
CloudFormation Custom Resources
Resources:
  CustomResource:
    Type: Custom::CustomResource
    Properties:
      ServiceToken: !GetAtt Function.Arn

  Function:
    Type: AWS::Lambda::Function
    Properties:
      Code:
        ZipFile: |
          import boto3
          import cfnresponse
          import os

          parameter_name = os.environ['PARAMETER_NAME']
          parameter_value = os.environ['PARAMETER_VALUE']
          region = os.environ['REGION']

          ssm_client = boto3.client('ssm', region_name=region)

          CREATE = 'Create'
          response_data = {}

          def lambda_handler(event, context):
            try:
              if event['RequestType'] == CREATE:
                response = ssm_client.put_parameter(
                  Name=parameter_name,
                  Value=parameter_value,
                  Type='String',
                  Overwrite=True
                )
                print(response)

              cfnresponse.send(event, context, cfnresponse.SUCCESS, response_data)

            except Exception as e:
              print(e)
              cfnresponse.send(event, context, cfnresponse.FAILED, response_data)
      Environment:
        Variables:
          PARAMETER_NAME: !Ref SSMParameter
          PARAMETER_VALUE: !Ref ALBDNSName
          REGION: !Ref SSMParameterRegion
      FunctionName: !Sub "${Prefix}-function-01"
      Handler: !Ref Handler
      Runtime: !Ref Runtime
      Role: !GetAtt FunctionRole.Arn

  FunctionRole:
    Type: AWS::IAM::Role
    DeletionPolicy: Delete
    Properties:
      AssumeRolePolicyDocument:
        Version: 2012-10-17
        Statement:
          - Effect: Allow
            Action: sts:AssumeRole
            Principal:
              Service:
                - lambda.amazonaws.com
      ManagedPolicyArns:
        - arn:aws:iam::aws:policy/service-role/AWSLambdaBasicExecutionRole
      Policies:
        - PolicyName: CreateSSMParameterStorePolicy
          PolicyDocument:
            Version: 2012-10-17
            Statement:
              - Effect: Allow
                Action:
                  - ssm:PutParameter
                Resource: "*"
Code language: YAML (yaml)
Use CloudFormation custom resources to automatically execute Lambda functions when creating CloudFormation stacks. For more information on custom resources, please see the following page
The function to be performed is to store the DNS name of the ALB in the SSM Parameter Store. This will update the Parameter Store that we just checked.
The parameter names are different for each region, but the region specified in the client object for SSM is unified (ap-northeast-1).
Architecting
Use CloudFormation to build this environment and check its actual behavior.
Create CloudFormation stacks and check the resources in the stacks
Create CloudFormation stacks. For information on how to create stacks and check each stack, please see the following page.

Note that in this configuration, we will create an IAM role with a name. So we will create a stack with the following command.
$ aws cloudformation create-stack \
--stack-name [stack-name] \
--template-url https://[template-path]/soa-05-004.yaml \
--capabilities CAPABILITY_NAMED_IAM
Code language: Bash (bash)
After reviewing the resources in each stack, information on the main resources created in this case is as follows
- DNS name of ALB1: soa-05-004-alb-2078359657.ap-northeast-1.elb.amazonaws.com
- DNS name 2 for ALB: soa-05-004-alb-1191006444.us-east-1.elb.amazonaws.com
- SSM Parameter Store parameter 1: soa-05-004-alb-dns-name-ap-northeast-1
- SSM Parameter Store parameter 2: soa-05-004-alb-dns-name-us-east-1
Check the created resource from the AWS Management Console.
Check the two ALBs.
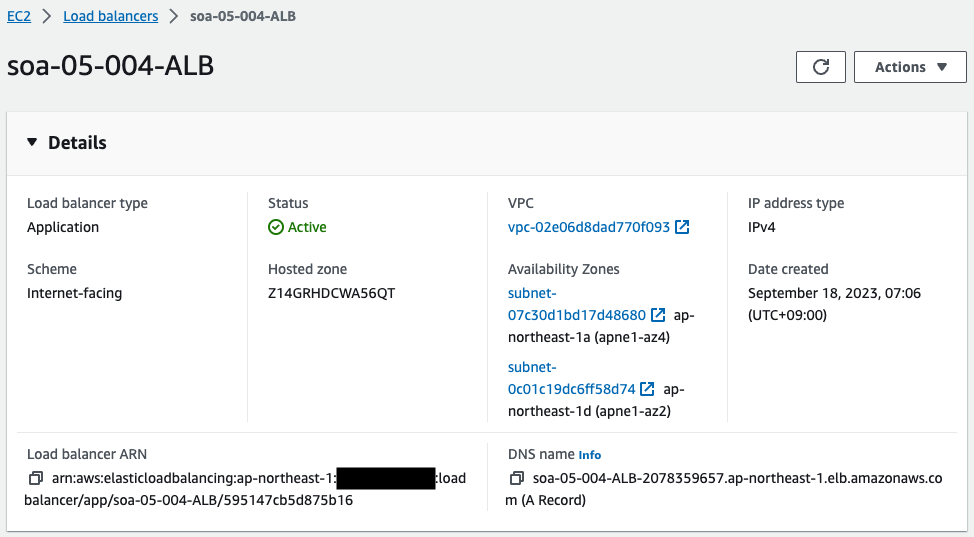
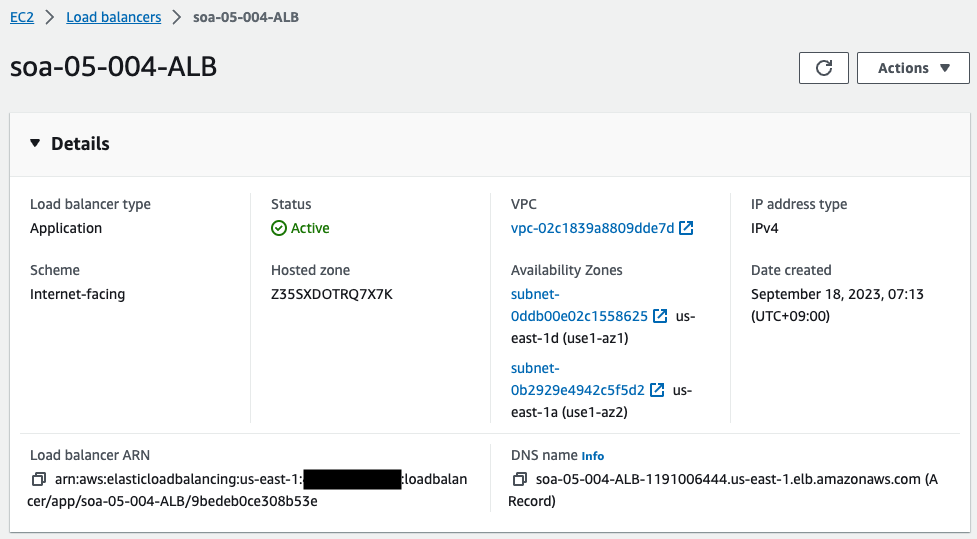
One ALB has been created in each of the two regions. This means that CloudFormation StackSets has created a uniform and identical configuration in the two regions.
Check SSM Parameter Store.
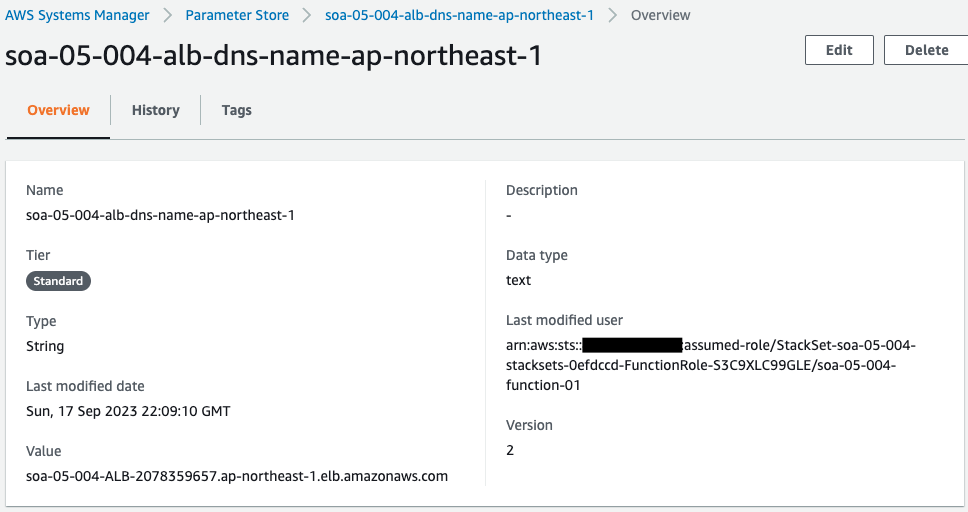
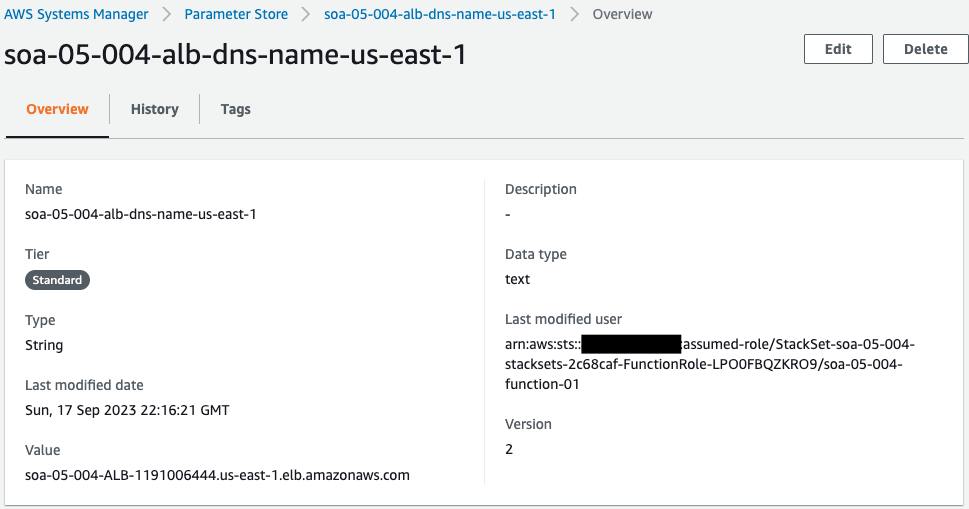
The DNS name of the ALB is stored in the two parameter stores. If we look at the updated user, it is a Lambda function. This means that these parameters were updated by the Lambda function associated with the CloudFormation custom resource.
Check Route 53.
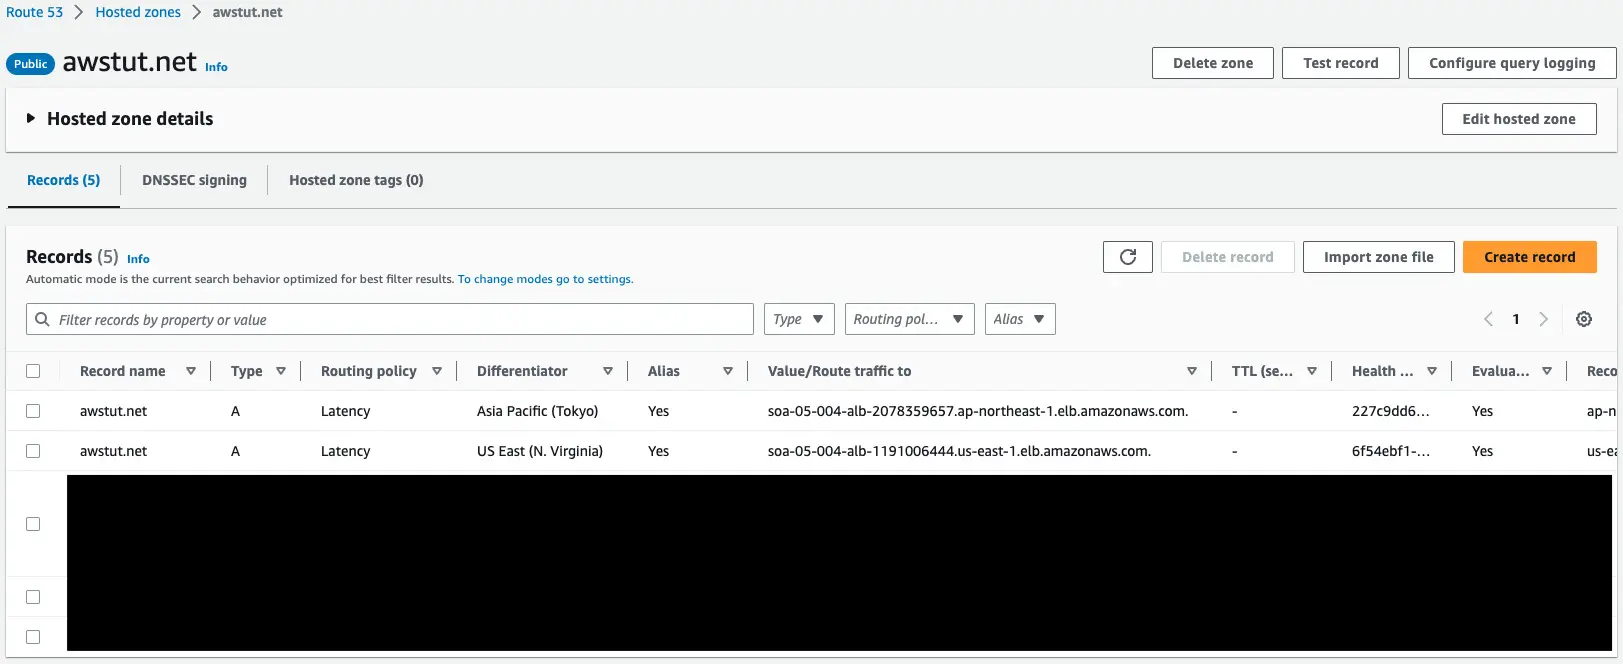
There are several records set up for the domain “awstut.net”. If we look at the Routing Policy column, we see two lines for “Latency”. If we look at where the traffic is routed to, we see that it is the DNS name of the ALB.
Check the Latency Graph of the Health Check.


Here is the latency status of each health check for the two regions. As you can see, health checks from the region where the ALB is located are almost always responded to within 1 ms. In contrast, health checks from other regions take about 150ms.
Operation Check
Now that we are ready, we can actually check the behavior.
First, try to access the DNS name of each ALB.
$ curl http://soa-05-004-ALB-2078359657.ap-northeast-1.elb.amazonaws.com
instance-id: i-014e7a7755f6aa5ca

$ curl http://soa-05-004-ALB-1191006444.us-east-1.elb.amazonaws.com
instance-id: i-08c5f073c2534990d
Code language: Bash (bash)
The IDs of the EC2 instances under each ALB are returned. Both ALBs are working properly.
Next, access from CloudShell in the ap-northeast-1 region by domain name.

You can see that the ALB on the ap-northeast-1 side is being accessed. Judging from the latency, it means that it was routed to the ap-northeast-1 side, not us-east-1.
Finally, access it by domain name from CloudShell in the us-east-1 region.

You can see that the ALB on the us-east-1 side is being accessed. Judging from the latency, it means that it was routed to the us-east-1 side, not ap-northeast-1.
Using latency-based routing in this way allows access to services in the regions with the lowest latency.
Summary
We introduced a configuration using latency-based routing for multiple ALBs.